Advanced ActionScript 3: Design Patterns, Second Edition (2015)
Chapter 1. Object-Oriented Programming
Object-oriented programming (OOP) is the practice of creating a software architecture that enables flexibility through modular design. A programmer who is object-oriented isn’t necessarily one who is a more advanced coder, but one who chooses to be a more strategic coder, and who adheres to the principles of OOP. OOP isn’t a language; it’s the practice of architecting and the thought process behind it that leads to applications and languages being object-oriented, such as ActionScript 3 (AS3).
AS3 was built as an object-oriented language to mirror the mental model of a programmer who knows the benefits of breaking code into a series of objects that can message one another. But many who choose to develop with AS3 don’t use OOP. This is due to the somewhat daunting nature of OOP, as well as the time required to learn it. AS3 is meant to support the development of flexible architecture, and using OOP can help prevent unmanageable code. Flexible architecture is easier to modify because the objects that make up the application possess distinct boundaries, which simplifies substituting among the objects you’re working with. Therefore, it’s beneficial to code with an object-oriented thought process. However, that isn’t saying you can’t use AS3 with a procedural programming mindset and be successful.
Procedural programming, which is a linear method of developing, often culminates in lines of code that have no separation of behaviors or train of thought. The language becomes nothing more than a series of routines and subroutines. Procedural programming can work well if you’re the sole developer on a project, because you’re familiar with your code. However, when more programmers are involved, it can be cumbersome for them to become familiar with one another’s code and sift through the lines to see where a change needs to be made. With OOP, each behavior in the application is contained in a unique class, providing a more elegant way to view object collaborations. Because each unique class possesses a name, it’s easy to track down; and because it should possess a single behavior, the class has only one reason to ever change.
The image in Figure 1-1 is the result of the procedural code provided in Listing 1-1. The code uses an image of my cat (Buttercup), and analyzes the pixel information to generate a halftone image.
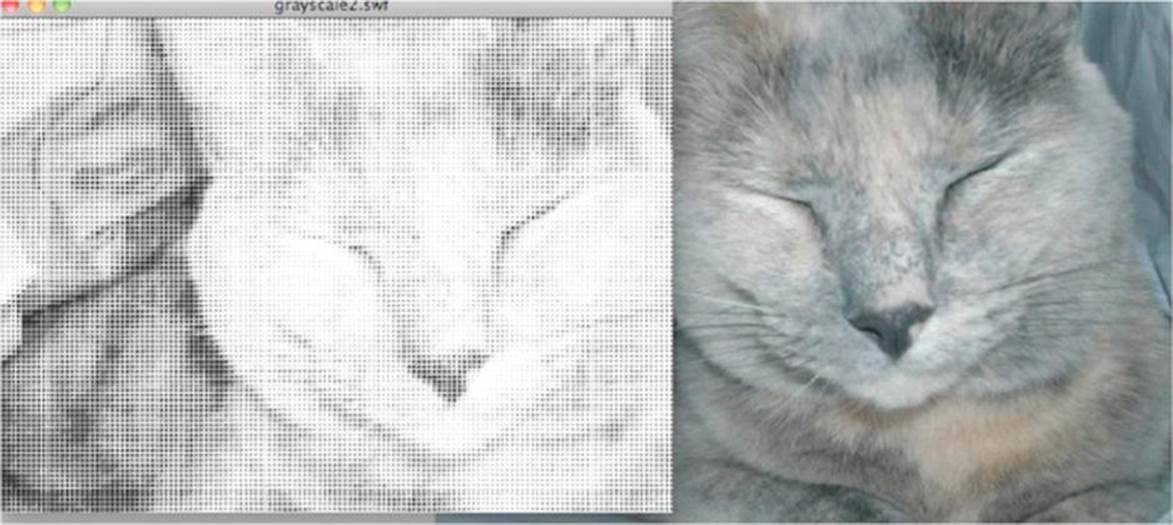
Figure 1-1. A color image of my cat Buttercup being converted to that of a halftone image
Listing 1-1. The following code converts an image into that of a halftone
import flash.display.BitmapData;
import flash.display.Shape;
import flash.display.Sprite;
import flash.display.StageAlign;
import flash.geom.ColorTransform;
import flash.geom.Rectangle;
var img : BitmapData = new Buttercup( 1 , 1 );
var sampleSize : int = 4;
var brushSize : int = 4;
var pixelsTall : uint = img.height;
var pixelsWide : uint = img.width;
var rect : Rectangle = new Rectangle( 0 , 0 , sampleSize , sampleSize );
var totalBytesToScan : uint = pixelsWide * pixelsTall;
var position : uint = 0;
var offset : Number = sampleSize * 0.5;
var averageColor : uint;
var pixels : Vector.<uint>;
var darks : Number;
var halftone : Shape = new Shape();
var scale : Number;
while ( position <= totalBytesToScan )
{
pixels = img.getVector( rect );
averageColor = grayScaleAverage( pixels );
darks = brightness( averageColor );
if ( darks > 0 )
{
halftone.graphics.beginFill( averageColor , 1 );
scale = (255 - darks) / 255;
halftone.graphics.drawCircle( rect.x + offset , rect.y + offset ,![]()
scale * brushSize );
}
if (rect.x >=pixelsWide)
{
rect.x = 0;
rect.y += sampleSize;
}
else
{
rect.x += sampleSize;
}
position += sampleSize * sampleSize;
}
addChild( halftone );
function brightness( color : uint ) : int
{
var R : uint = color >>16 & 0xff;
var G : uint = color >>8 & 0xff;
var B : uint = color & 0xff;
return int( 0.2126 * R + 0.7152 * G + 0.0722 * B );
}
function rgbAverage( pixels : Vector.<uint> ) : uint
{
var color : uint;
var pixelLength : int = pixels.length;
var averageR : uint = 0;
var averageG : uint = 0;
var averageB : uint = 0;
while ( --pixelLength >=0 )
{
color = pixels[pixelLength];
averageR += color >>16 & 0xFF;
averageG += color >>8 & 0xFF;
averageB += color & 0xFF;
}
averageR /=pixels.length;
averageG /=pixels.length;
averageB /=pixels.length;
color = averageR << 16 | averageG << 8 | averageB;
return color;
}
function grayScaleAverage( pixels : Vector.<uint> ) : uint
{
var color : uint;
var pixelLength : int = pixels.length;
var averageR : uint;
var averageG : uint;
var averageB : uint;
while ( --pixelLength >=0 )
{
color = pixels[pixelLength];
averageR += color >>16 & 0xFF;
averageG += color >>8 & 0xFF;
averageB += color & 0xFF;
}
averageR /=pixels.length;
averageG /=pixels.length;
averageB /=pixels.length;
var luma : int = averageR * 0.3 + averageG * 0.59 + averageB * 0.11;
color = luma << 16 | luma << 8 | luma;
return color;
}
This can be considered, and very well may be, a perfectly working system with only 85 lines of code. However, the code could easily begin to grow unmanageable. I even added a bit of extra code, in case I want to make a change to the system: the rgbAverage method lets me generate colored halftones if I wish.
Briefly glancing at Listing 1-1 shows it to be cumbersome and gives you little understanding about the application and how the code functions. You would probably need to analyze the code line by line to gain true insight into how the application works. But the code can be made much more organized and flexible if it’s built with the four principles of OOP in mind, encapsulation, polymorphism, inheritance, and data hiding.
Encapsulation
If you have to ask, “What am I looking at?” there is a good chance that what you’re viewing is far from the norm. For example, you know there is an engine under the hood of a car, yet you ignore such mechanics and focus on what you’re required to interact with while driving the vehicle—or so it appears. In reality, you’re concerned with what it takes to get you comfortably from point A to point B. This is known as a problem domain: what requires the focus in this case is how to remain comfortable or navigate directions.
If you’re attempting to understand engines but they don’t relate to your occupation or a hobby, you’ve probably changed your focus to a new problem domain: your broken-down engine and how you can fix it.
What you need to know per problem domain must be properly separated from what you don’t need to know, so you aren’t overloaded with extraneous information. This way, you can maintain your focus.
With this in mind, let’s apply this understanding to the halftone application. The goal of the application is to take an image and digitally alter its tone, revealing a halftone effect. If, much like the car example, you separate the engine from everything else to reveal what physically allows the application to move, then you focus on the code in Listing 1-2.
Listing 1-2. The “engine” of the application
import flash.display.BitmapData;
import flash.display.Shape;
import flash.display.Sprite;
import flash.display.StageAlign;
import flash.geom.ColorTransform;
import flash.geom.Rectangle;
var img : BitmapData = new Buttercup( 1 , 1 );
var sampleSize : int = 4;
var brushSize : int = 4;
var pixelsTall : uint = img.height;
var pixelsWide : uint = img.width;
var rect : Rectangle = new Rectangle( 0 , 0 , sampleSize , sampleSize );
var totalBytesToScan : uint = pixelsWide * pixelsTall;
var position : uint = 0;
var offset : Number = sampleSize * 0.5;
var averageColor : uint;
var pixels : Vector.<uint>;
var darks : Number;
var halftone : Shape = new Shape();
var scale : Number;
while ( position <= totalBytesToScan )
{
pixels = img.getVector( rect );
averageColor = grayScaleAverage( pixels );
darks = brightness( averageColor );
if ( darks > 0 )
{
halftone.graphics.beginFill( averageColor , 1 );
scale = (255 - darks) / 255;
halftone.graphics.drawCircle( rect.x + offset , rect.y + offset ,![]()
scale * brushSize );
}
if (rect.x >=pixelsWide)
{
rect.x = 0;
rect.y += sampleSize;
}
else
{
rect.x += sampleSize;
}
position += sampleSize * sampleSize;
}
addChild( halftone );
Remarkably, you’ve reduced 85 lines of code into 40 lines that define your system; this code is what you expect to find as the engine under the hood. The removed lines of code perform behaviors to be used by the engine and should be separated from the code in Listing 1-2 so you can begin to create distinguishable roles.
Polymorphism
Defining boundaries among your system’s roles allows for interchangeability among other behaviors with similar method parameters, method name, and return type. These three components of a method are the contracts that proper messaging requires and together are referred to as a signature. As long as the signatures between varied implementations remain the same, the behaviors can be swapped to achieve various results without having to modify much code, if any.
Let’s consider two behaviors extracted from Listing 1-2: grayscaleAverage and rgbAverage. These behaviors are responsible for determining the average brightness of the parameterized vector of pixels and returning the calculated value. Whether the value returned possesses three color channels or one is determined by the method used to perform the calculations.
Because these two behaviors possess individual method names, the invoker of the behavior must be aware of what behavior is being called, which lessens the flexibility between the messenger and receiver.
To allow the two behaviors to be interchanged indistinguishably, you must ensure that both methods expose a common interface. Because the signatures and return types of both methods are exact, you must devise a common name by which you can invoke the method. Both methods average the brightness of a given pixel sample, so you can state that average is the common link between your algorithms (see Figure 1-2).

Figure 1-2. Both methods must reflect a consistent interface
But a common interface isn’t enough to enable code substitution with procedural programming. While both methods make use of the same name, they can’t be added into the application and be compiled without throwing an error. What we need is a way to distinguish both implementations, while still making use of the common method name. Enter inheritance.
Inheritance
The concept of inheritance is modeled in object-oriented languages, enabling developers to write code in the form of hierarchical relationships. As facilitators of OOP, programmers can encapsulate a collection of behaviors and attributes into an isolated body known as an object. Such an object can then be used when you create additional objects, which you can do by deriving them from the original object. Much like children who benefit from the possessions of their mother and father, so can objects benefit through inheritance. Compartmentalized attributes and behaviors are used by child objects, creating a hierarchy between the two. A child object in a hierarchy of objects is referred to as a subclass, and its parent is referred to as its superclass.
Just as humans can be classified as mammals, any subclass in an object-oriented language can be generalized as a particular collection of attributes and behaviors of any of its ancestors. The referral to all encapsulated behaviors and attributes as objects indicates that the hierarch of all relationships is an encapsulation known as Object. Such generalization among varied implementations is required to fulfill polymorphic behavior.
To use polymorphic behaviors, your references must be typed to a generalization, thus ensuring that any and all objects to which the reference is assigned possess similar interfaces. This is so the substitution among objects doesn’t break the messaging between client and receiver.
To create a generic type that ensures both grayscale and color halftone behaviors expose the average interface, you must create a hierarchical relationship. In this case, the two behaviors are siblings that inherit the average interface from a common superclass. Not only does inheritance establish a hierarchy to allow this application to use polymorphism, but it also enables code reuse, which can minimize duplicate and repetitive code.
As Table 1-1 shows, the two implementations appear nearly identical in a side-by-side sibling comparison. The only difference between the two is the declaration of the luma variable and its calculation in the grayscale implementation.
Table 1-1. Side-by-side comparison of both halftone algorithms
|
//color halftone behavior |
//grayscale halftone behavior |
Referring back to the concept of encapsulation, you can maintain a localized area of focus and minimize additional lines of code by appropriately situating all common code in the originator of the behavior to which the code applies. You begin by extracting variables that are common to both methods and inserting them as attributes of their superclass, as shown in Table 1-2.
Table 1-2. Common variables are extracted from both siblings and inserted as attributes of their generic superclass
|
//generic attributes |
|
//color halftone behavior |
//grayscale halftone behavior |
|
|
while ( --pixelLength >=0 ) |
while ( --pixelLength >=0 ) |
|
|
averageR /=pixels.length; |
averageR /=pixels.length; |
|
|
return color; |
return color; |
Without the excess variables, you can immediately see that minus two lines of code, both implementations are exactly the same. We can also move the averaging of all channels from both halftone algorithms into your superclass as the default implementation of the average interface; then both algorithms can use it.
Table 1-3 uses implementation inheritance, where the default implementation of the interface average in the superclass is available to both subclasses. In addition, both subclasses can redefine such inherited implementations, as shown in the table.
Table 1-3. The channel averaging among a sampled region of pixels has been localized to the superclass
|
//ChannelAveraging algorithm |
|
//color halftone algorithm |
//grayscale halftone algorithm |
|
|
super.average(pixels); |
super.average(pixels); |
|
|
return color; |
color = luma << 16 | luma << 8 | luma; |
Both subclasses inherit the average implementation to which they immediately refer via the keyword super, which refers to the superclass’s implementation of the defined method name—in this case, average. From there, the superclass determines the averaged channels, which are used by the remaining implementation of both algorithms.
The end result is the reduction of duplicate code, the localization of logic specific to each behavior, and the increased cohesion of all three objects. We’ve also devised a generalized type where your reference can be strongly typed, enabling polymorphism between the two behaviors.
Data Hiding
Data hiding is the act of concealing information from a possible client of the application and a possible problem domain. In object-oriented languages, data hiding helps maintain proper encapsulation and is enforced by the use of namespaces such as the following:
· Attributes and behaviors that use the private declaration can be targeted/referenced only in the scope to which they’re declared.
· Protected is a slightly less restrictive use of private. Behaviors and attributes declared as protected can only be used within the class that defined them, or by that classes subclasses.
· If a class’s attribute or behavior is declared as internal, it can be viewed by any class in the same package. By default, behaviors and attributes are always internal unless declared otherwise.
· Any attribute or behavior declared as public can be viewed by any class of any package.
To illustrate why data hiding is so important in OOP, refer back to Table 1-3, which shows distinct behaviors encapsulated in three unique objects. The first object calculates the average color per color channel of a sampled range of pixels. The second object calculates those channels into a hexadecimal color, which is returned to the messaging object. The third object calculates the calculated channels of the first object into a grayscale tone value, which is returned to the messaging client.
Each object has an obvious role in the application, and when a change is required or a bug occurs, the object you must modify is apparent. The code is so clear because each object maintains control over the manipulation of its own attributes—for now, at least. But when another object erroneously references a variable that doesn’t pertain to it, tracking down an error may become puzzling and delay immediate repair. Data hiding can help prevent such errors from taking place by ensuring proper visibility among messaging objects.
As shown in Table 1-4, the average interface is declared public. The attributes declared by the superclass of the halftone algorithms are another story: they’re marked as both private and protected, thus ensuring that only appropriate objects can view/manipulate such data.
Table 1-4. Addition of namespace modifiers to enforce an object’s ability to maintain its proper states
|
//ChannelAveraging algorithm |
|
//color halftone algorithm |
//grayscale halftone algorithm |
You can further ensure that the attributes of the superclass are read-only to each subclassed behavior by adding public getter methods as additional interfaces of the superclass. Doing so lets each subclass retrieve attribute values without being able to reassign a value to the reference. To enforce that each subclass uses the getter methods versus reading the properties to which they currently have access, you continue to mark all protected attributes of the superclass as private.
This example illustrates the potential power of an object-oriented language. Remaining object-oriented as you write code, which makes the code easier to maintain and more flexible. Now that we’ve covered the principles of OOP, let’s focus on their implementation into an object-oriented language.
Note: It’s always easier to say how to properly engineer a better structure after all is said and done. Don’t be discouraged if you understood the previous example but can’t yet create OOP code on your own. The goal is to understand how the building blocks add modularity and flexibility while reducing the possibility of disaster, by following the four principles of OOP.
ActionScript as an Object-Oriented Language
Working with an object-oriented mentality opens the door to a new manner of programming. ActionScript lets you flexibly develop rich Internet applications (RIAs) when you program according to the four OOP principles:
· Encapsulation: ActionScript allows for the compartmentalization of behaviors and data into a class.
· Polymorphism: Objects within a hierarchy can respond to the operations defined by their hierarch, when indistinguishably messaged by the client.
· Inheritance: Like every class in the API, a custom class is an extension of the most generalized class in the language. This most basic class is appropriately called Object. The Object class makes it possible to add custom classes to a system, as long as those classes use the proper language structure and syntax.
· Data hiding: A class ensures its own behavioral and data security by using namespaces. In the ActionScript language, five namespace modifiers provide varying levels of security.
· public: Add the keyword public in lowercase before the declaration of variables or methods. This namespace modifier provides no security. Behaviors and variables can be seen and manipulated by all classes and objects.
· internal: The default namespace. This is the first tier of security in that the class is public, but only to other classes in the same package.
· private: The opposite of public, allowing no access except by the class that made the private declaration.
· protected: Similar to private, but visibility among properties and behaviors are available to classes which subclass the class which defines any protected attribute or behavior.
· final: Ensures that either class or method cannot be extended, and thus protects all declared behaviors or classes form being modified via inheritance.
· Custom namespace: Declaring a custom namespace for either a behavior or an attribute treats any such modified elements as being private, although it’s only private to classes which have not opened the custom namespace (we’ll learn more about this later in the chapter).
Defining an External Definition
Up to now, you’ve explored the principles of OOP and seen how the four principles of OOP work harmoniously to improve your code architecture. All that remains is to learn how to physically construct these objects in the AS3 language.
Part of the burden of defining a custom object is that such an object isn’t natively understood by the compiler. You must tell the compiler what the object does and also where to find it. Essentially, the compiler must be made aware of an external definition.
Any spoken language can have multiple definitions for a particular word, which may create confusion during a conversation. Similarly, computers require a way to tell which definition should be used; otherwise, unexpected errors may arise.
Because it’s impossible to have two files with exactly the same name and extension in the same system folder, a definition can be differentiated by its location along with its file name. Therefore, each definition can be viewed as being unique to the compiler.
The location of a definition, noted by its folder structure, becomes the pointer to the appropriate definition. This is known as a Unified Resource Identifier (URI); it enables the compiler to differentiate among definitions of similar names.
The first step in creating an external definition is writing the wrapper that surrounds the body of the definition. This is demonstrated in Table 1-5.
Table 1-5. The skeletal structure of an external definition
|
1 |
package [folder[, folder... ]]{ |
As you can see, to begin a definition, you identify its location using the package directive. This represents the folder structure where the definition resides. The arrangement of folders for the project is entirely up to you, but it’s beneficial to group your objects in a manner that represents the relationships between definitions. This grouping may be apparent in the physical naming of the folders as well as in their hierarchy. It not only keeps your classes organized, but also gives other developers a clear idea which definitions are being used and what other objects may be used with them.
As denoted by line 1 in Table 1-5 the package directive is followed by the full path to where the definition resides, denoted with dot notation. If the class doesn’t reside in a folder structure, then the folder arguments following the package directive may be left blank.
An example you’re sure to have seen is the import code for the MovieClip class (see Figure 1-3).
import flash.display.MovieClip;

Figure 1-3. The MovieClip import reflects the MovieClip package
As you can see, MovieClip is a class in a series of nested folders that reveals the nature of the class—you don’t even need to see the code that MovieClip contains. The import refers to where the location of the definition used.
If you open the MovieClip.as file, the first line looks like: package flash.display{
Now that you’ve specified the location of your definition, ActionScript expects the type of definition and the name of the definition. The name must also be that of the saved .as file. Although the package and filename specify a particular definition, the actual definition, which varies depending on the type of definition being created, is placed in the body as shown on line 5 of Table 1-5.
ActionScript uses three types of definitions: class, namespace, and interface. The next section, describes the parts of each definition.
Parts of a Class
Even the most introductory ActionScript books cover the creation of custom classes (see Table 1-5). Often, this is to demonstrate the use of the language. It would be beyond the scope of those books to ensure that you have the proper object-oriented mindset as you construct your classes. With this in mind, don’t be too anxious to skip ahead if you feel you may already be familiar with constructing classes.
On line 4 in Figure 1-4, you used the keyword class to signify that the following definition relates to a class. The class directive can include four additional modifiers, not including its visibility. By default, you don’t see any of the keywords other than class in your editor, because everything in brackets in Figure 1-4 is optional; these elements let you make custom modifications to the class.
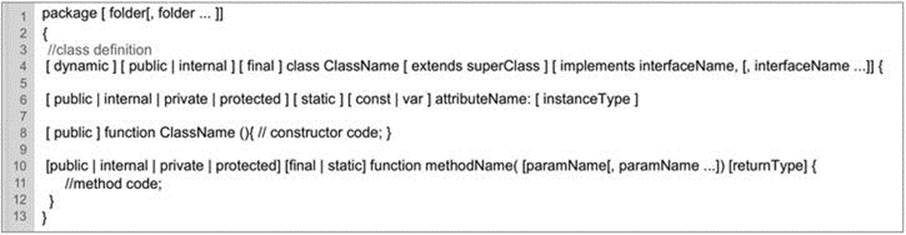
Figure 1-4. The expected syntax and structure to properly define a custom class
The first optional modifier is the keyword dynamic. Specifying that your class is dynamic lets you add properties to your class definition at runtime. Without this modifier, the class is locked: you can’t add new properties or behaviors later. Dynamic can only be used to modify the definition of the class, not the properties or methods. Subclasses of a dynamic class can’t inherit dynamic behavior, because it’s specific to the current definition.
The next modifier specifies the visibility of the class’s definition and defaults to internal, but can be specified as public to allow any classes outside the declared package view its definition. Although there are five namespaces that modify visibility, only internal and public can be used to modify the visibility of a definition.
The last optional attribute, final, specifies that the class can’t be subclassed. Because inheritance is a significant part of OOP, the use of this final keyword may be confusing, but it enforces data hiding. Declaring a definition as final prohibits any classes from subclassing the definition. This ensures that the class can’t be modified, short of physically changing the code in the original file.
Following the class directive, you add a name to identify the definition. To distinguish this from methods and variables that use camelCase, class names use a capital letter at the start of each word. Class names should be specific to the behavior they define. An appropriately named class can allude to the behaviors that a developer expects to find within the definition.
The remaining keywords (extends and implements), again optional, let you add your class to an existing hierarchy. By default, all classes extend the top-level Object unless specified otherwise. This is why it’s said that to initialize a class is to instantiate an object. At the core of every class is an Object.
Through the principle of inheritance, your class gains all public and protected, properties and behaviors of each class in the hierarchy of the chosen superclass.
Suppose we were devising a class named Foo, and Foo requires the abilities possessed by MovieClip. Choosing to subclass MovieClip looks like the following:
package
{
public class Foo extends MovieClip
{
public function Foo()
{
// constructor code
}
}
}
Because ActionScript doesn’t support inheriting from multiple classes, the keyword implements allows you to add into your class the interface utilized by a specific type. By implementing an interface, in addition to adding existing public methods to your definition, you are also adding the interfaces type to the hierarchical chain of your definition as well.
Currently, our Foo class that extends MovieClip can be typed as Object, EventDispatcher, InteractiveObject, DisplayObjectContainer, Sprite, and finally MovieClip. This is because MovieClip is the subclass of another subclass, of another subclass, all the way up to the most generic class of all, Object:
MovieClip ![]() Sprite
Sprite ![]() DisplayObjectContainer
DisplayObjectContainer ![]() InteractiveObject
InteractiveObject ![]() DisplayObject
DisplayObject ![]() EventDispatcher
EventDispatcher ![]() Object
Object
Before you go any further, let’s see what it means to extend from EventDispatcher. As you can see in Table 1-6, EventDispatcher is a subclass of Object and implements an interface named IEventDispatcher.
Table 1-6. The composition of EventDispatcher
|
Implements |
IEventDispatcher |
IEventDispatcher is referred to as an interface, which, as the word implies, declares the public methods, and only public methods, with which you can “interface” or interact. If these methods were defined as anything other than public, then technically you couldn’t use them orinterface with them—hence the term. Therefore, they must be public. An interface isn’t a class, but it requires a name to which a collection of defined methods can be referred; it too can be used to add another type to your class.
The inclusion of IEventDispatcher demonstrates that the interface is what allows MovieClips and Sprites to exhibit the public methods listed in Figure 1-5.
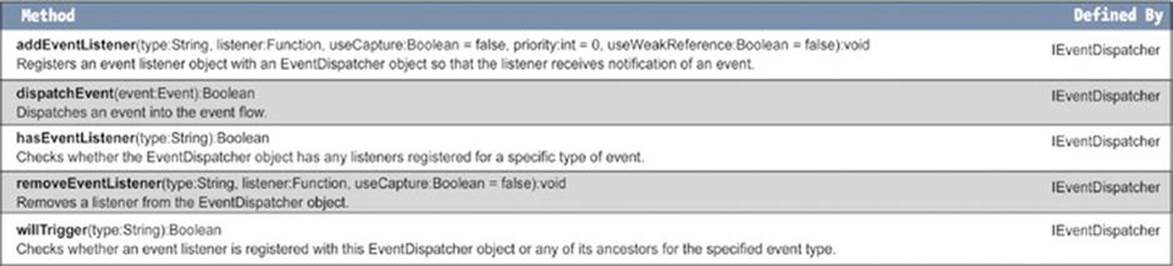
Figure 1-5. The IEventDispatcher interface inherited by MovieClip and Sprite
Now that you have your class’s definition, you can add the attributes and behaviors to the definition’s body. You can specify their visibility as private, public, protected, internal, or using custom namespaces, and you can also declare them as being static.
Static isn’t a visibility modifier, but it establishes whether the attribute or behavior is a member of the class or the instantiation itself. The difference is that if a behavior or attribute is an instance member, any assignment is localized to the individual object; but a class member signified via the keyword static is referenced by every instance (see Listing 1-3).
Listing 1-3. Demonstrates how class members are referenced by every instance
package
{
public class StaticExample
{
public static var classString:String = ' I am a variable![]()
of the Class itself ';
public var instanceString:String = ' I am a variable of the![]()
instance ';
public function changeClassMember(str:String):void
{
classString = str;
}
public function changeInstanceMember(str:String):void
{
instanceString = str;
}
public function traceClassString():void
{
trace(classString);
}
public function traceinstanceString():void
{
trace(instanceString);
}
}
}
Listing 1-3 defines two variables one belonging to the Class and the other to the instance. The four methods, will offer the means to trace our either of the variables, or to adjust them. Listing 1-4, will demonstrate how class members are referenced by any and all instances, while the object members are not.
Listing 1-4. The DocumentClass devises the behaviors of StaticExample
package
{
import flash.display.Sprite
public class DocumentClass extends Sprite
{
private var _staticExampleInstanceA:StaticExample;
private var _staticExampleInstanceB:StaticExample;
public function DocumentClass()
{
_staticExampleInstanceA = new StaticExample();
_staticExampleInstanceB = new StaticExample();
_staticExampleInstanceA.changeInstanceMember( 'an instance![]()
member is independent' );
_staticExampleInstanceB.changeClassMember( 'a class member is not' );
_staticExampleInstanceA.traceClassString(); //a class member is not
_staticExampleInstanceB.traceInstanceString(); //I am a![]()
variable of the instance
_staticExampleInstanceA.traceClassString(); //a class member is not
}
}
}
As demonstrated in Listing 1-4, a class member is referenced by an instance rather than copied into the instantiation itself.
The keyword variable, or var, as it’s written in ActionScript, shouldn’t be new to you, but the keyword const may be. Much like var, const is used to hold properties or values; but whereas values declared with var can change, values declared as const can’t. The keywordconst is short for constant, and as the name implies, it doesn’t allow the value to change. You use const when there is a reference that isn’t expected to change after a value has been decided. Some examples are values in physics, like gravity, or the days in a year. Using a constant is insurance that the value will never be modified by any oversight, unless you change it at compile-time.
Constants can prevent the need to track down literals in your code as well. This is the preferred manner of adding literals. It’s also a convenient way to refer to the same literal on multiple lines, because if the value must change, it’s only changed in one place. The identifier must be assigned at the moment of its declaration.
The Constructor
The constructor is your point of origin for using a class and is the only way to instantiate an object of this class into your program. To ensure that all definitions of all superclasses are linked, the constructor method initiates and invokes the constructor of its superclass, and so forth, until theObject class’s constructor is initialized. This is called an inheritance chain, and it reflects the manner in which you create your classes onto your reference. Along with any inheritance initiations, you can use the constructors to initialize chosen variables or constants with specific assignments.
Custom Namespaces
Namespaces are nothing new to the world of OOP and determine the visibility of definitions, attributes, and methods. The predefined namespaces public, protected, private, and internal are well known, but custom namespaces are rarely used. Thus a custom namespace is the epitome of data hiding, because it’s the road less traveled. The lack of familiarity makes it a great way to hide data; and the fact that you can name the definition makes it all the more unlikely that the namespace will be used without being opened specifically.
Using a custom namespace is the equivalent of hiring a bouncer to secure the door of a back-room poker game where only invited guests know the password. The only way an uninvited guest can get through the door is if the password leaks out.
Creating and using a custom namespace is as easy as this:
1. Declare the namespace identifier.
2. Prefix your definition with the custom namespace identifier.
3. Open the custom namespace to the reference that’s attempting to target your customized definition.
The following sections explain these steps.
Declaring the Namespace Identifier
Because you need to define your namespace, you must define an external definition by which the namespace can be referred to and located. The type of definition is indicated via the namespace directive, along with the name by which the definition can be identified. Remember, the definition name must reflect the saved .as filename. Finally, it’s optional to redefine a URI string that ensures that the namespace isn’t duplicated. If you choose not to supply a URI, the package structure is inserted to prevent name conflicts when compiled:
package
{
[ visible ] namespace custom_name_space = "http://namespaces/customnamespace"
{
}
}
As with all definitions, if you wish to modify the visibility of this namespace, you can. Although, public and internal are your only available options. If you fail to modify the visibility, remember that it defaults to internal at compile time. Because no body is expected or even allowed, it’s common to see namespaces without the extra brackets surrounding the body, as shown here:
package
{
public namespace custom_name_space = 'http://namespaces/customnamespace'
}
Applying a Custom Namespace
Once a custom namespace has been defined, you can use it by importing its definition into the class and then declaring the custom namespace as the modifier of the definition you wish to customize. Use it as the prefix for your chosen attribute or behavior definition:
package
{
import custom_name_space
public class Foo extends MovieClip
{
custom_name_space function aRandomFunction():void
{
}
}
}
Opening a Namespace within a Class
Finally, because Flash isn’t expecting to use your custom definition, you must make sure your compiler (bouncer) knows that you have the secret password by referring to it.
AS3 allows for not just definitions but also statements in a body. If a statement appears in the body but not in a defined operation, it’s executed once at the moment the class definition is encountered. Thus, in the class that you wish to open your custom namespace, you can apply the following statement immediately after you create your definition:
package
{
import Foo;
import custom_name_space;
public class DocumentClass extends Sprite
{
use namespace custom_name_space;
public function DocumentClass()
{
var foo:Foo= new Foo();
foo.aRandomFunction();
}
}
}
Using the directive use namespace can open an individual namespace or a set of namespaces within the class. This lets you access all declared attributes and behaviors marked with the custom namespace of our referenced class Foo.
Constructing an Interface
The final type of external definition that you can define is an Interface. You do so using the interface keyword directive. Table 1-7 shows an example.
Table 1-7. The structure of an interface definition
|
package [folder[, folder... ]] |
In this example, the definition’s name, InterfaceName appears to begin with two Is. The first I is to indicate that the name refers to an interface. Like a class definition, an interface definition can specify a superclass, but it must be that of an interface. Interfaces, however, will allow you to inherit multiple interfaces via extends. Just as the name implies, and as you saw earlier when analyzing the IEventDispatcher Interface, all methods declared must be public.
Change
Sometimes change can be good. However, nine out of ten times, change in the world of programming is a bad thing. Simple changes on paper can turn into hours of work, depending on how the code is written. Rather than fear change, embrace it. Roll out the red carpet and let change take its place in the spotlight. Change is a diva and needs to be treated as such.
When you decide to give change center stage, you’re better prepared to deal with maintenance, rather than making adjustments on demand. Rather than leave a ticking time bomb in your code, isolate it and allow it to be used in your system like any other object.
I believe that many developers have learned to rely too much on the use of subversioning systems. Subversioning is a very useful technique in which code can be saved to backups with detailed notes about what changes have been made. At the time of subversion, a version number is assigned to the file, allowing for code rollbacks to a previous version. Although I promote the use of versioning, changes to code and rollbacks should be the role of inheritance and polymorphism.
General Terms and Definitions
This list doesn’t include all words that are discussed in the book, but it defines for you terms that are used frequently when dealing with OOP:
· Class: The classification of defined properties, states, and behaviors that can be shared/modified among instances.
· object: An instantiated type referred to by its inherited traits.
· Object: The top-level class.
· Unified Modeling Language (UML): The standard representation used to build models for large and small computer applications.
· Encapsulation: The principle of separating and localizing behavior into an object.
· Abstraction: Being absent of details (a generalization).
· Composition: The manner in which arrangements of objects collaborate to fulfill the behaviors that make up a distinct object.
· Delegation: The process of using behaviors of another object to achieve a result communicated by the original object.
· Inheritance: The means by which subclasses inherit attributes and behaviors of a superclass.
· Interface: The exposed methods on an object, which another object can message.
· Implementation: The code used in the body of a declared method.
· Private: This modifier limits the visibility of any attributes/behaviors to the scope that declared them.
· Subclass: A class belonging to the hierarchy of a superclass.
· Superclass: The parent class of a subclass.
· Properties: The attributes that make up the states of an object.
· Behavior: The expected response of an object.
· Message: The communication between objects; a request.
· Namespace: A directive, which enables the visibility of a class’s properties and methods.
· Public: This modifier extends the visibility of a defined property or method to all scopes.
· Protected: This modifier specifies the visibility of property or method as being visible to class, which declared them as well as that classes subclasses.
· Concrete: A class’s or object’s inability to be generalized due to its implemented specifics.
· Type: The category of a class, which is based on its exposed Interface.
· Polymorphism: Latin meaning many faces; a process that allows interchangeability among objects with the same interface.
· Spaghetti code: Unorganized code with no clear structure, intertwined with no clear beginning or ending.
· Hashtable: A data structure used to store data in key/value pairs.
· Procedural code: Code that separates data from associated behaviors.
· Loose coupling: The generalized collaboration among objects.
· Tight coupling: The act of collaboration among objects with reference to concrete objects.
· Object-oriented programming: The practice of architecting a system that adheres to four principles (encapsulation, polymorphism, inheritance, and data hiding), thereby promoting flexibility.
· Design pattern: A core solution to solving a particular and reoccurring problem.
Summary
OOP is a structural device, rather than the act of making objects. Having a better structure lets you compartmentalize your code by using distinctions that allow for more efficient assembling, interchangeability, and readable language. On the other hand, OOP can add complexity to a system, and it generally takes patience, forethought, and—most important—time to perfect. All in all, using classes properly and putting thought into each class reflects the flexibility you aim for, but you must understand the importance of encapsulation, polymorphism, inheritance, and data hiding.
The largest misconception about OOP is the belief that to be object-oriented, you must be working with objects. Working with objects merely for the sake of appearing object-oriented increases the likelihood of failure and negates the benefits of programming in an object-oriented manner. It’s imperative that you understand the four principles to which objects are formed. A plethora of objects doesn’t enhance code flexibility but instead becomes an obstacle in the way of maintenance, upkeep, and change.
This chapter has provided a lot of information and has more than likely left your brain hurting—which means your brain is working. OOP isn’t something that happens immediately; it takes practice, a lot of it, to realize why it’s a beneficial practice to follow.
Don’t resort to mimicry or memorization. Understanding is the only key to being object-oriented. Spend some time considering how you could take already-developed code and transform it into a properly structured system, using the four OOP principles. Being able to point out behaviors that can be encapsulated, and interchanged, will help you understand the chapters to come. Knowledge is half the battle. Go code!
Key Points
· Code can be made much more efficient if it’s built with the four principles of OOP in mind: encapsulation, polymorphism, inheritance, and data hiding.
· Generalizing common behavior allows for interchangeability.
· The goal of OOP is to build an architecture that allows flexibility and easier maintenance.
· Class names should be specific to the behavior they define and should always begin with an uppercase letter.
· The keyword implements lets you add into your class the methods required by other defined types.
· The point of creating a class isn’t only to use it to build objects, but also to separate behaviors and/or data. Instantiating an object means you expect the behaviors and/or state to change.
· Don’t resort to mimicry or memorization when practicing OOP.
· OOP is a structural device and is not the same as the act of making objects.
· OOP can add complexity to a system.
· Changes to code and rollbacks should be the role of inheritance.
· Change is a constant.
All materials on the site are licensed Creative Commons Attribution-Sharealike 3.0 Unported CC BY-SA 3.0 & GNU Free Documentation License (GFDL)
If you are the copyright holder of any material contained on our site and intend to remove it, please contact our site administrator for approval.
© 2016-2026 All site design rights belong to S.Y.A.