Agile Data Science (2014)
Part II. Climbing the Pyramid
If you can see your path laid out in front of you step by step, you know it’s not your path. Your own path you make with every step you take. That’s why it’s your path.
—Joseph Campbell
Part II introduces the schema for the rest of the book: the data-value pyramid. Throughout the rest of our lessons, we will use the data-value pyramid to iteratively build value from very simple records up to interactive predictions. We begin with theory, then dive into practice using the framework I previously introduced.
Building Agile Big Data products means staging an environment where reproducible insights occur, are reinforced, and are extended up the value stack. It starts simply with displaying records. It ends with driving actions that create value and capture some of it. Along the way is a voyage of discovery.
The structure of this voyage, shown in Figure 44, is called the data-value pyramid.
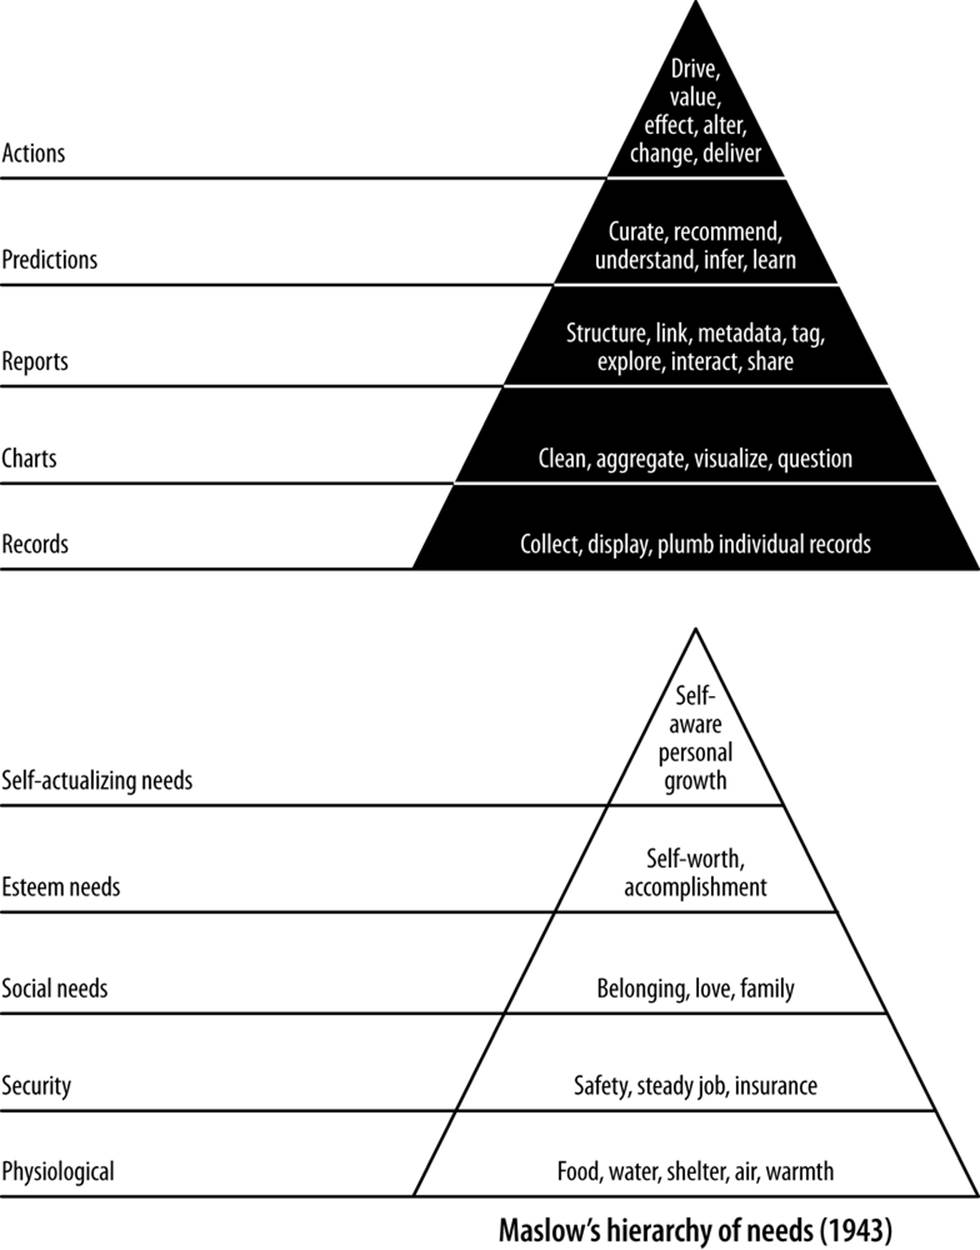
Figure 44. The Jurney-Warden data-value pyramid of 2011
Climbing the Stack
The data-value stack mirrors Maslow’s hierarchy of needs in the sense that lower levels must precede higher levels. The higher levels (like predictions) depend on the lower levels (like reports), so we can’t skip steps. If we do so, we will lack sufficient structure and understanding of our data to easily build features and value at the higher levels.
The data-value stack begins with the simple display of records, where the focus is on connecting or “plumbing” our data pipeline all the way through from the raw data to the user’s screen. We then move on to charts, where we extract enough structure from our data to display its properties in aggregate and start to familiarize ourselves with those properties. Next comes identifying relationships and exploring data through interactive reports. This enables statistical inference to generate predictions. Finally, we use these predictions to create value by driving user behavior and creating and capturing value.
To summarize, here are the components of the data-value stack:
Records
The processing and display of atomic records through our entire stack
Charts
Extracting properties from records in aggregate to produce charts
Reports
Extracting relationships and trends to enable exploration and interactive charts
Predictions
Using structure to make inferences, predictions, and recommendations
Actions
Driving user behavior to create value and capture some of it
As we climb the stack, we extract increasing amounts of derived structure from our data to produce increasingly sophisticated features. Light is the best cleaner of data, and data that is not exposed in features seldom cleans itself. Structure and features are byproducts of each other. Therefore we cannot skip steps in the pyramid. Doing so undermines our ability to proceed further.
Nor can we specify features in later steps before working through those that precede them. Doing so results in lackluster products specified in the blind and uninformed by reality. We must respect that the data has its own opinion.
We’ll be using this structure throughout the rest of the book to build our application around your email inbox.
Conclusion
The data-value pyramid enables agility by providing a structure for agile development cycles, helping to ensure that our development is broken up into short sprints. It serves as a conceptual framework to enable the kind of lightweight collaboration that characterizes agile efficiency.
Chapter 5. Collecting and Displaying Records
In this chapter, our first agile sprint, we climb level 1 of the data-value pyramid (Figure 5-1). We will connect, or plumb, the parts of our data pipeline all the way through from raw data to a web application on a user’s screen. This will enable a single developer to publish raw data records on the Web. In doing so, we will activate our stack against our real data, thereby connecting our application to the reality of our data and our users.
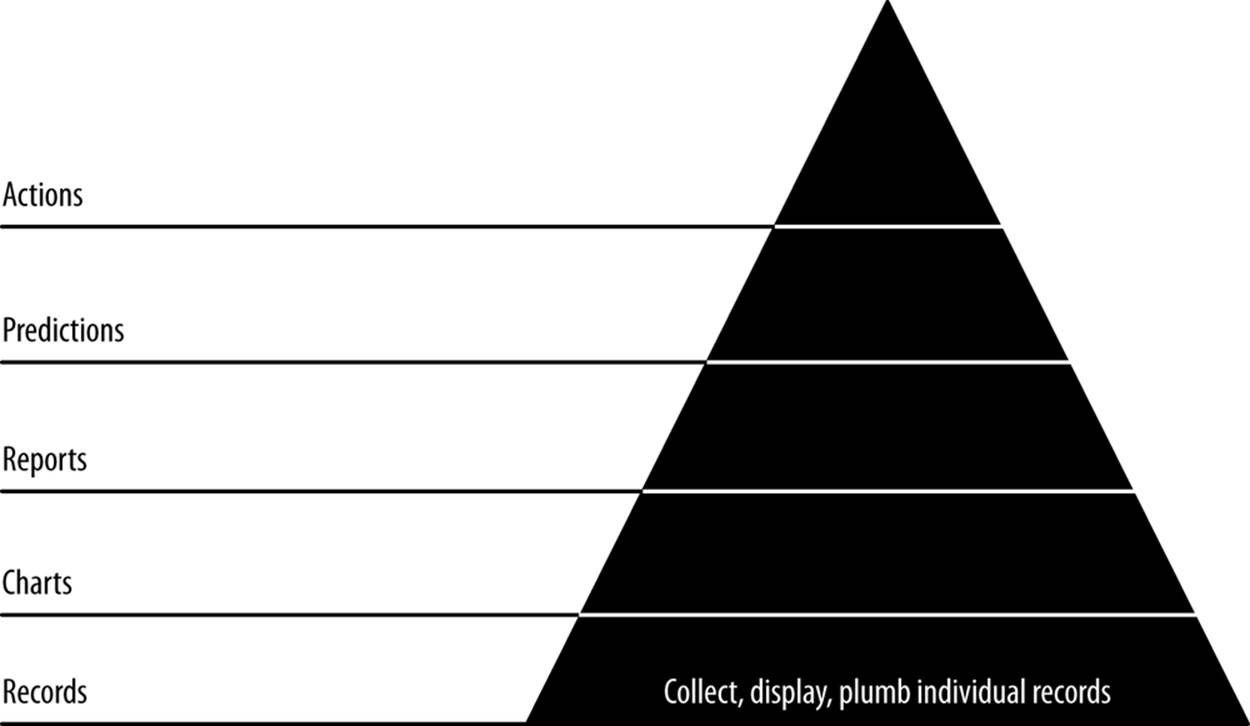
Figure 5-1. Level 1: Displaying base records
If you already have a popular application, this step may seem confusing in that you already have the individual (or atomic) records displaying in your application. The point of this step, then, is to pipe these records through your analytical pipeline to bulk storage and then on to a browser. Bulk storage provides access for further processing via ETL (extract, transform, load) or some other means.
This setup and these records set the stage for further advances up the data-value pyramid as our complexity and value snowball.
NOTE
If your atomic records are petabytes, you may not want to publish them all to a document store. Moreover, security constraints may make this impossible. In that case, a sample will do. Prepare a sample and publish it, and then constrain the rest of your application as you create it.
Code examples for this chapter are available at https://github.com/rjurney/Agile_Data_Code/tree/master/ch05. Clone the repository and follow along!
git clone https://github.com/rjurney/Agile_Data_Code.git
Putting It All Together
Setting up our stack was a bit of work. The good news is, with this stack, we don’t have to repeat this work as soon as we start to see load from users on our system increase and our stack needs to scale. Instead, we’ll be free to continue to iterate and improve our product from now on.
Now, let’s work with some atomic records—our emails—to see how the stack works for us.
NOTE
An atomic record is a base record, the most granular of the events you will be analyzing. We might aggregate, count, slice, and dice atomic records, but they are indivisible. As such, they represent ground truth to us, and working with atomic records is essential to plugging into the reality of our data and our application.
Collect and Serialize Our Inbox
You can see the process of serializing events in Figure 5-2.

Figure 5-2. Serializing events
If you haven’t already, download your Gmail inbox to Avro format. This can take a while to download, so you may need to let it run overnight.
NOTE
Store your emails to a location other than /tmp to persist the data between reboots.
Download your inbox using gmail.py, as shown in Example 5-1.
Example 5-1. Collecting data: scrape our email inbox
Usage: gmail.py -m <mode: interactive|automatic> -u <username@gmail.com>
-p <password> -s <schema_path> -f <imap_folder> -o <output_path>
Our IMAP script is writing avros like this:
def process_email(self, raw_email, thread_id):
avro_parts = dict({
'message_id': self.strip_brackets(msg['Message-ID']),
'thread_id': thread_id,
'in_reply_to': self.strip_brackets(msg['In-Reply-To']),
'subject': subject,
'date': self.parse_date(msg['Date']),
'body': body,
'from': from_value,
'tos': self.parse_addrs(msg['To']),
'ccs': self.parse_addrs(msg['Cc']),
'bccs': self.parse_addrs(msg['Bcc']),
'reply_tos': self.parse_addrs(msg['Reply-To'])
})
return avro_parts, charset
...
status, email_hash = fetch_email(imap, str(id))
if(status == 'OK'):
avro_writer.append(email_hash)
Here’s an example command that will get the Gmail All Mail box:
./gmail.py -m automatic -u my.name@gmail.com -p '********' -s ./email.avro.schema
-f '[Gmail]/All Mail' -o /tmp/my_emails
Process and Publish Our Emails
Having collected our inbox data, let’s process it (Figure 5-3). In the interest of plumbing our stack all the way through with real data to give us a base state to build from, let’s publish the emails right away to MongoDB, so we can access them from Mongo and Flask.

Figure 5-3. Processing and publishing data
Pig’s MongoDB integration makes this easy. Look at ch05/pig/avro_to_mongo.pig (Example 5-2).
Example 5-2. Publishing emails to MongoDB
/* Set Home Directory - where we install software */
%default HOME `echo \$HOME/Software/`
/* Load Avro jars and define shortcut */
REGISTER $HOME/pig/build/ivy/lib/Pig/avro-1.5.3.jar
REGISTER $HOME/pig/build/ivy/lib/Pig/json-simple-1.1.jar
REGISTER $HOME/pig/contrib/piggybank/java/piggybank.jar
define AvroStorage org.apache.pig.piggybank.storage.avro.AvroStorage();
/* MongoDB libraries and configuration */
REGISTER $HOME/mongo-hadoop/mongo-2.10.1.jar
REGISTER $HOME/mongo-hadoop/core/target/mongo-hadoop-core-1.1.0-SNAPSHOT.jar
REGISTER $HOME/mongo-hadoop/pig/target/mongo-hadoop-pig-1.1.0-SNAPSHOT.jar
set mapred.map.tasks.speculative.execution false
set mapred.reduce.tasks.speculative.execution false
/* Set speculative execution off so we don't have the chance of duplicate
records in Mongo */
set mapred.map.tasks.speculative.execution false
set mapred.reduce.tasks.speculative.execution false
define MongoStorage com.mongodb.hadoop.pig.MongoStorage(); /* Shortcut */
avros = load '$avros' using AvroStorage(); /* For example, 'enron.avro' */
store avros into '$mongourl' using MongoStorage(); /* For example,
'mongodb://localhost/enron.emails' */
If something goes wrong, you can always drop the store and try again. The beauty of our infrastructure is that everything is reproducible from the original data.
[bash]$ mongo agile_data
MongoDB shell version: 2.0.2
connecting to: agile_data
> db.emails.drop()
true
Finally, verify that our emails are in MongoDB:
> db.emails.findOne()
{
"_id" : ObjectId("4fcd4748414efd682a861443"),
"message_id" : "CANSvDjoPNg5E-hdBSDm5SCgn-AByKALr-Mi-szXRdmqu3g@mail.gmail.com",
"thread_id" : "1403882181130881909",
"in_reply_to" : null,
"subject" : "Holla",
"body" : "\r\n\r\n-- \r\nRussell Jurney twitter.com/rjurney
russell.jurney@gmail.com datasyndrome.com\r\n",
"date" : "2012-06-04T14:46:19",
"froms" : [
{
"real_name" : "Russell Jurney",
"address" : "russell.jurney@gmail.com"
}
],
"tos" : [
{
"real_name" : "Paul Stamatiou",
"address" : "p@pstam.com"
}
],
"ccs" : null,
"bccs" : null,
"reply_tos" : null
}
Presenting Emails in a Browser
Now that we’ve published our emails to a document store, we’re ready to present our data in a browser via a simple web application (Figure 5-4).
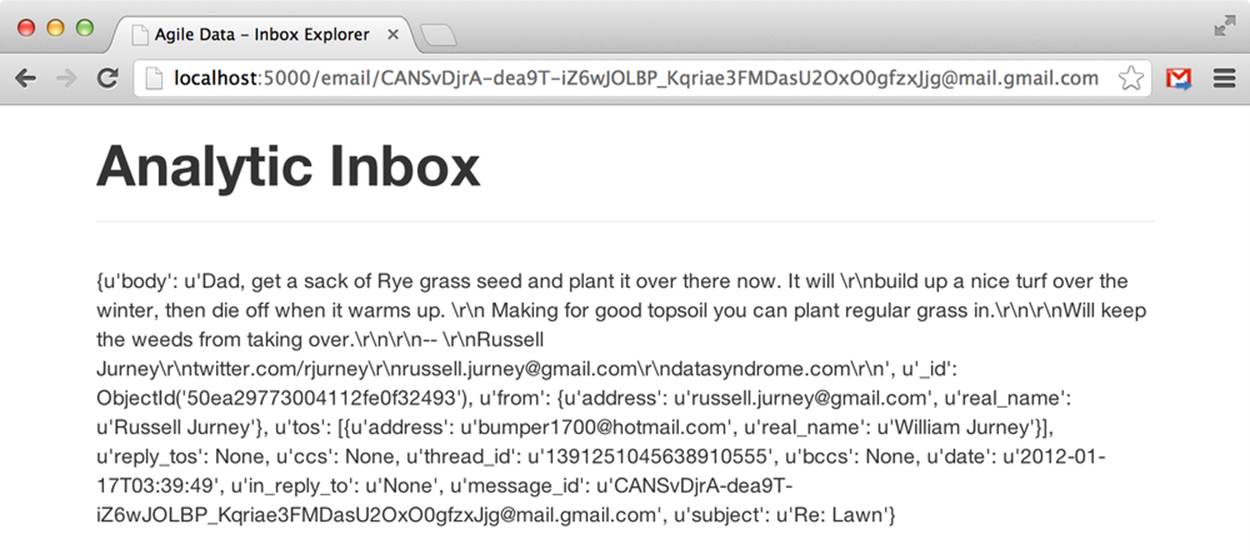
Figure 5-4. Displaying a Raw Email
Serving Emails with Flask and pymongo
Flask and pymongo make querying and returning emails easy. Jinja2 makes it easy to transform emails to web pages. Check out ch05/web/index.py.
from flask import Flask, render_template, request
import pymongo
import json, pyelasticsearch
import re
import config
# Set up Flask
app = Flask(__name__)
# Set up Mongo
conn = pymongo.Connection() # defaults to localhost
db = conn.agile_data
emails = db['emails']
# Set up ElasticSearch
elastic = pyelasticsearch.ElasticSearch(config.ELASTIC_URL)
# Controller: Fetch an email and display it
@app.route("/email/<message_id>")
def sent_counts(message_id):
email = emails.find_one({'message_id': message_id})
return render_template('partials/email.html', email=email)
Rendering HTML5 with Jinja2
Note that render_template in our example points at the file ch05/web/templates/partials/email.html. This is a partial template that fills in the dynamic content area of our layout page. The layout page that it subclasses, ch05/web/templates/layout.html, imports Bootstrap and handles the global design for each page, such as the header, overall styling, and footer. This saves us from repeating ourselves each page to create a consistent layout for the application.
The layout template contains an empty content block, {% block content %}{% endblock %}, into which our partial template containing our application data is rendered.
<!-- Part 1: Wrap all page content here -->
<div id="wrap">
<!-- Begin page content -->
<div class="container">
{% block content %}{% endblock %}
</div>
<div id="push"></div>
</div>
<div id="footer">
Our email-specific partial template works by subclassing the layout template. The rest of the template is composed of macros. Jinja2 syntax and macros are simple enough.
Jinja2 templates perform control flow in {% %} tags to loop through tuples and arrays and apply conditionals. We display variables by putting bound data or arbitrary Python code inside the {{ }} tags. For example, our email template looks like this:
<!-- Extend our site layout -->
{% extends "layout.html" %}
<!-- Include our common macro set -->
{% import "macros.jnj" as common %}
<!-- Link to another message ID -->
{% macro display_in_reply_to(key, name) %}
{% if email[key] != 'None' -%}
<div class="row">
{{ common.display_label(name)|safe }}
{{ common.display_link(email[key], '/email', email[key])|safe }}
</div>
{% endif -%}
{% endmacro -%}
<!-- Convert the carriage returns in the body to HTML endlines -->
{% macro convert_body(body) -%}
{{ body.replace('\r\n', '<br />')|safe }}
{% endmacro -%}
<!-- Display the email body -->
{% macro display_email_body(record) -%}
{% if(record['body']) -%}
<div class="row">
<div class="span" style="display: inline-block; margin-top: 17px;
background-color: #F7F7F7; padding: 10px;">
{{ convert_body(record['body']) }}
</div>
</div>
{% endif -%}
{% endmacro -%}
<!-- Block in which content appears in superclass - layout.html -->
{% block content -%}
<div class="page-header">
<h1>Analytic Inbox</h1>
</div>
<p class="lead">Email ID: {{email['message_id']}}</p>
<div>
{{ common.display_email_addresses('From', email['from'])|safe }}
{{ common.display_email_addresses('To', email['tos'])|safe }}
{{ common.display_email_addresses('Cc', email['ccs'])|safe }}
{{ common.display_email_addresses('Bcc', email['bccs'])|safe }}
{{ common.display_email_addresses('Reply-To',
email['reply_tos'])|safe }}
{{ display_in_reply_to('in_reply_to', 'In-Reply-To') }}
{{ common.display_field(email['date'], 'Date')|safe }}
{{ common.display_field(email['subject'], 'Subject')|safe }}
{{ display_email_body(email) }}
</div>
{% endblock -%}
Our content block is our main code that calls on macros to render HTML for our data. To avoid repeating ourselves, each parametized HTML block is written by a macro. We start with a raw template, plug in values from our data (via the email variable we bound to the template), and get the page displaying some data. Then we remove repetition via macros until we duplicate as little logic as possible. This enables us to reuse macros later, and to make global changes that affect the entire page or application.
We can see the email in our web page with a message_id. To test things out, grab a message_id directly from MongoDB.
[bash]$ mongo agile_data
>db.emails.findOne()
{
"_id" : ObjectId("50ea29793004112fe0f33f4f"),
"message_id" : "4484555894252760987@unknownmsgid",
"thread_id" : "1386763841092409007",
"in_reply_to" : "None",
"subject" : "Re:",
"body" : "Dad, get a sack of Rye grass seed and
plant it over there now. It\r\nwill build up a
nice turf over the winter, then die off when it
warms\r\nup. Making for good topsoil you can
plant regular grass in.
\r\n\r\nWill keep the weeds from taking over.
\r\n\r\nRussell Jurney\r\ntwitter.com/rjurney\r\
nrussell.jurney@gmail.com\r\ndatasyndrome.com
\r\n\r\nOn Nov 28, 2011, at 2:19 PM, William Jurney
<*******@hotmail.com> wrote:\r\n\r\n> <mime-attachment>
\r\n> <photo.JPG>\r\n",
"date" : "2011-11-28T14:57:38",
"from" : {
"real_name" : "Russell Jurney",
"address" : "russell.jurney@gmail.com"
},
"tos" : [
{
"real_name" : "William Jurney",
"address" : "*******@hotmail.com"
}
],
"ccs" : null,
"bccs" : null,
"reply_tos" : null
}
We can now fetch a single email via http://localhost:5000/email/[my_message_id], as shown in Figure 5-5.
Our Flask console shows the resources being accessed.
* Running on http://127.0.0.1:5000/
* Restarting with reloader
127.0.0.1 - - [12:40:08] "GET /email/%3my_message_id%3E HTTP/1.1" 200 -
127.0.0.1 - - [12:40:08] "GET /static/bootstrap/docs/assets/css/bootstrap.css
HTTP/1.1" 304 -
127.0.0.1 - - [12:40:08] "GET /email/images/favicon.ico HTTP/1.1" 404 -
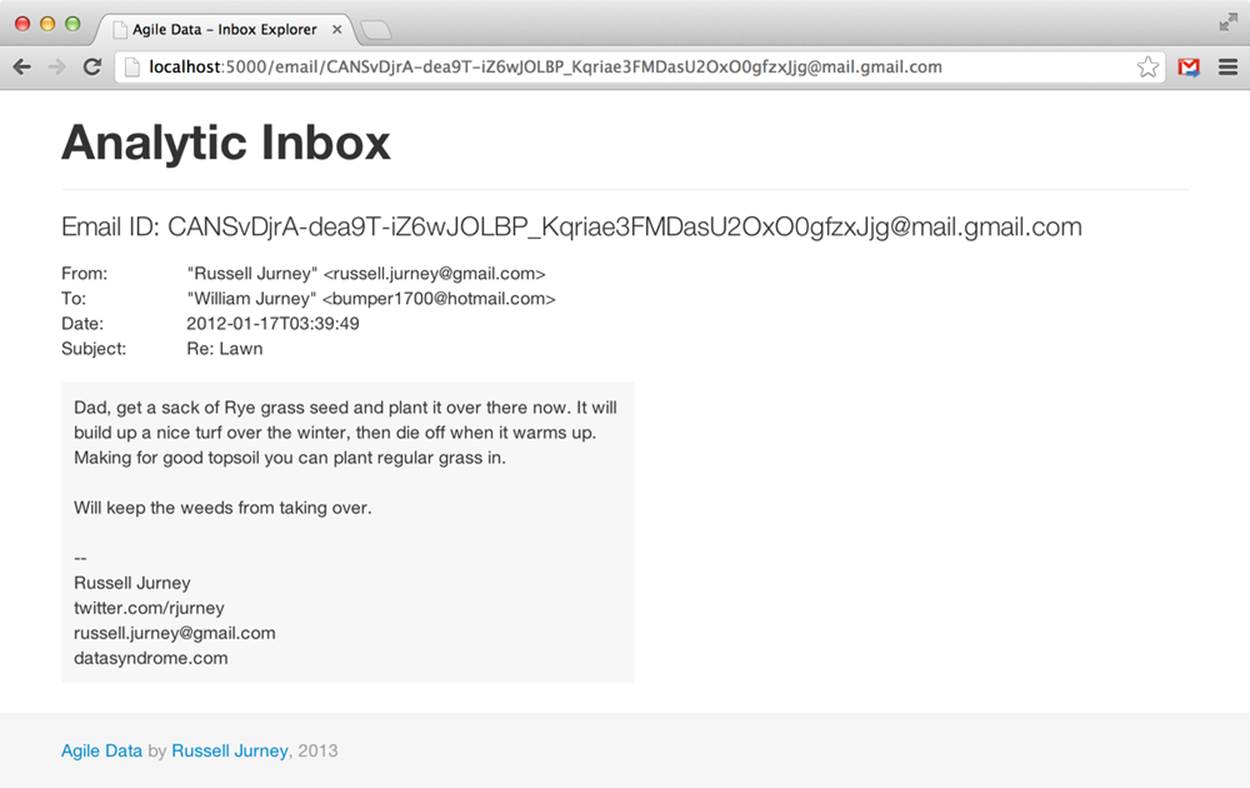
Figure 5-5. Presenting a single email
Great! But what have we achieved?
We’ve completed the base of the pyramid, level 1—displaying atomic records—in our standard data pipeline. This is a foundation. Whatever advanced analytics we offer, in the end, the user will often want to see the signal itself—that is, the raw data backing our inferences. There is no skipping steps here: if we can’t correctly “visualize” a single atomic record, then our platform and strategy have no base. They are weak.
Agile Checkpoint
Since we now have working software, it is time to let users in to start getting their feedback. “Wait, really? This thing is embarrassing!” Get over yourself.
We all want to be Steve Jobs; we all want to have a devastating product launch, and to make a huge splash with a top-secret invention. But with analytics applications, when you hesitate to ship, you let your fragile ego undermine your ability to become Steve Jobs by worrying about not looking like him in your first draft. If you don’t ship crap as step one, you’re unlikely to get to a brilliant step 26.
You will notice immediately when you ship this (maybe to close friends or insiders who clone the source from GitHub at this point) that users can’t find which email message_ids to click on. To get real utility from this, we need list and search.
You may well have anticipated this. Why ship something obviously broken? Because although step two is obvious, step 13 is not. We must involve users at this step because their participation is a fundamental part of completing step one of the data-value pyramid. Users provide validation of our underlying assumptions, which at this stage might be stated as: does anyone care about email? Without validation, we haven’t learned anything. Without learning, we are building in the dark. Success that way is unlikely, just as a pyramid without a strong foundation will soon crumble.
The other reason to ship something now is that the act of publishing, presenting, and sharing your work will highlight a number of problems in your platform setup that would otherwise go undiscovered until the moment you launch your product. In Agile Big Data, you always ship after a sprint. As a team member, you don’t control whether to ship or not. You control what to ship and how broad an audience to release it to. This release might be appropriate for five friends and family members, and you might have to hound them to get it running. In doing so, you will optimize your packaging and resolve dependencies. You’ll have to make it presentable. Without such work, without a clear deliverable to guide your efforts, technical issues you are blinded to by familiarity will be transparent to you.
Now, let’s add listing emails and search so we can start generating real clicks from real users.
Listing Emails
An email inbox is typically presented as a time-sorted list, with the most recent emails first. A list helps bridge individual emails to other emails, and to link emails to a point in time represented by our place in the inbox. Lists are the next step after displaying individual records.
Listing Emails with MongoDB
Before we search our emails, we need the capacity to list them in order to display our search results. We can use MongoDB’s query capabilities to return a list, sorted by timestamp. Check out ch05/listmails.mongo.js.
mongo agile_data
> db.emails.find().sort({date:1})
error: {
"$err" : "too much data for sort() with no index. add an index or specify a
smaller limit",
"code" : 10128
}
Whoops! No index. We must create one to sort by date.
> db.emails.getIndexes()
[
{
"v" : 1,
"key" : {
"_id" : 1
},
"ns" : "agile_data.emails",
"name" : "_id_"
}
]
> db.emails.ensureIndex({date: 1})
> db.emails.getIndexes()
[
{
"v" : 1,
"key" : {
"_id" : 1
},
"ns" : "agile_data.emails",
"name" : "_id_"
},
{
"v" : 1,
"key" : {
"date" : 1
},
"ns" : "agile_data.emails",
"name" : "date_1"
}
]
While we’re at it, let’s add an index for message_id.
> db.emails.ensureIndex({message_id: 1})
Now that our index on dates is in place, we can get the last 10 emails sent to us in pretty JSON format.
> db.emails.find().sort({date:0}).limit(10).pretty()
{
{
"_id" : ObjectId("4f7a5da2414e4dd0645d1176"),
"message_id":"<CA+bvURyn-rLcH_JRNq+YJ_Hkvhnrpk8zfYshL-wA@mail.gmail.com>",
"from" : [
...
Our Flask stub has two default routes that display the most recent 20 emails, unless specified by arguments. Otherwise, it works the same as before—except this time it passes an array of emails instead of one email. Check out ch05/web/index.py (Figure 5-6).
@app.route('/')
@app.route('/emails/')
@app.route("/emails/<int:offset1>/<int:offset2>")
def listmails(offset1 = 0, offset2 = 20):
offset1 = int(offset1)
offset2 = int(offset2)
emails = emaildb.find()[offset1:offset2] # Uses a MongoDB cursor
return render_template('partials/emails.html', emails=emails)
Our templates are pretty simple too, owing to Bootstrap’s snazzy presentation of tables. Tables are often scoffed at, but this is tabular data, so their use is appropriate.
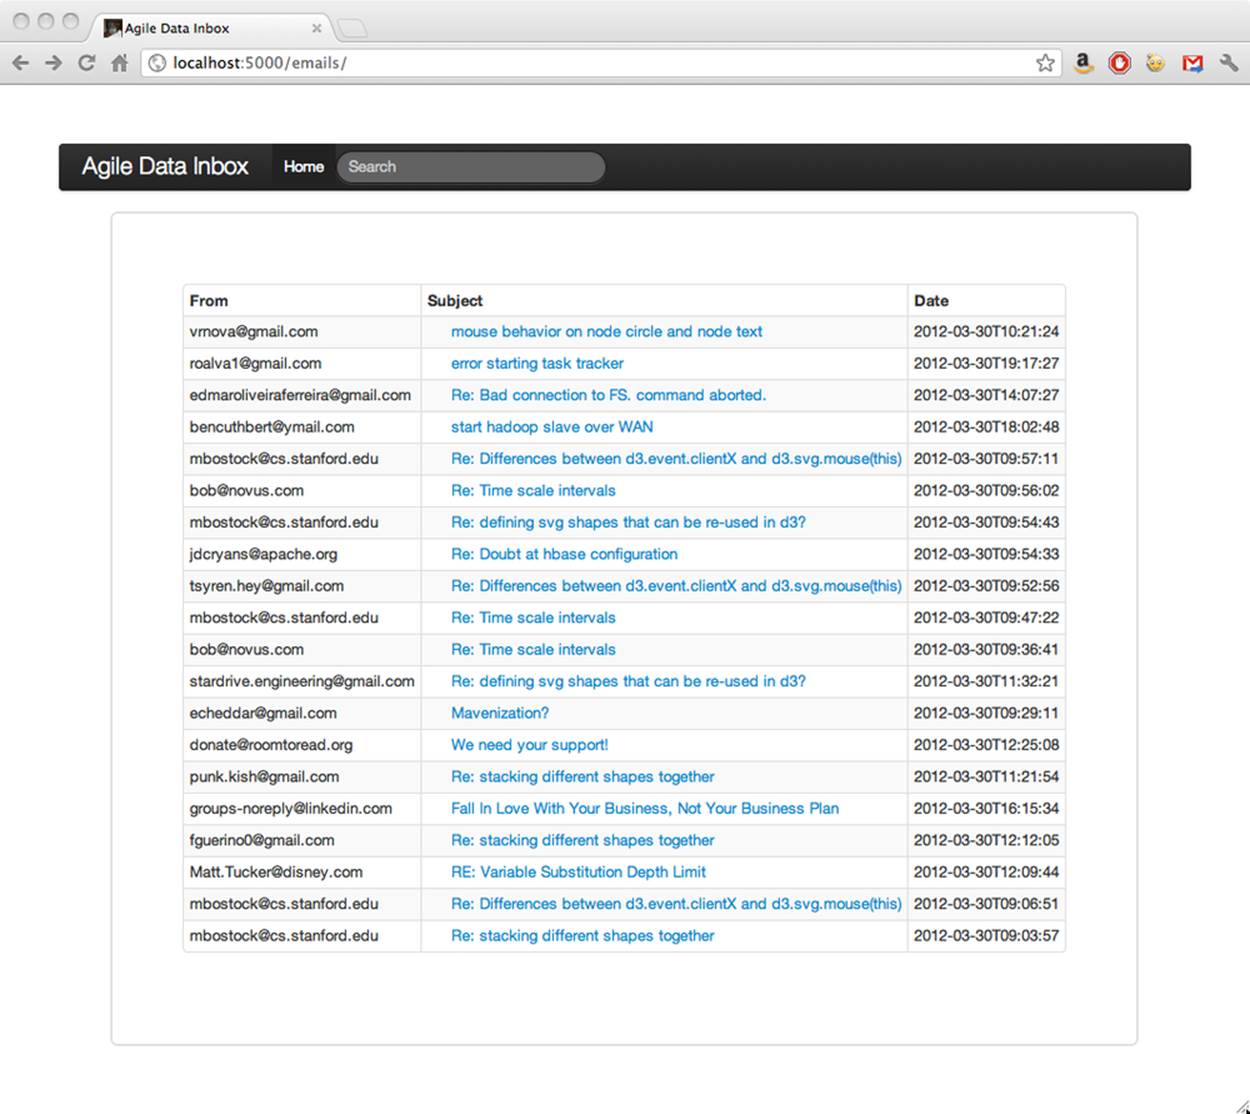
Figure 5-6. Presenting a list of emails
Anatomy of a Presentation
Now that we can list the most recent emails, our users say, “What if I want to see more than the last 20?” Shouldn’t there be a previous/next button to scroll forward and back in time? Yes. That is what we add next.
So far we’ve glossed over how we’re creating these templates, subtemplates, and macros. Now we’re going to dive in by creating a macro and a subtemplate for pagination.
Reinventing the wheel?
Why are we building our own pagination? Isn’t that a solved problem?
The first answer is that it makes a good example to connect the browser with the data directly. In Agile Big Data, we try to process the data into the very state it takes on a user’s screen with minimal manipulation between the backend and an image in a browser. Why? We do this because it decreases complexity in our systems, because it unites data scientist and designer around the same vision, and because this philosophy embraces the nature of distributed systems in that it doesn’t rely on joins or other tricks that work best on “big iron”—or legacy systems.
Keeping the model consistent with the view is critical when the model is complex, as in a predictive system. We can best create value when the interaction design around a feature is cognizant of and consistent with the underlying data model. Data scientists must bring understanding of the data to the rest of the team, or the team can’t build to a common vision. The principle of building view to the model ensures this from the beginning.
In practice, we cannot predict at which layer a feature will arise. It may first appear as a burst of creativity from a web developer, designer, data scientist, or platform engineer. To validate it, we must ship it in an experiment as quickly as possible, and so the implementation layer of a feature may in fact begin at any level of our stack. When this happens, we must take note and ticket the feature as containing technical debt. As the feature stabilizes, if it is to remain in the system, we move it further back in the stack as time permits.
A full-blown application framework like Rails or Django would likely build in this functionality. However, when we are building an application around derived data, the mechanics of interactions often vary in both subtle and dramatic ways. Frameworks offer less value in these situations, where their behavior must likely be customized. Also note that while MongoDB happens to include the ability to select and return a range of sorted records, the NoSQL store you use may or may not provide this functionality, or it may not be possible to use this feature because publishing your data in a timely manner requires a custom service. You may have to precompute the data periodically and serve the list yourself. NoSQL gives us options, and web frameworks are optimized for relational databases. We must often take matters into our own hands.
Prototyping back from HTML
Being familiar with email, we know scrolling forward and back is a solved problem (Figure 5-7).
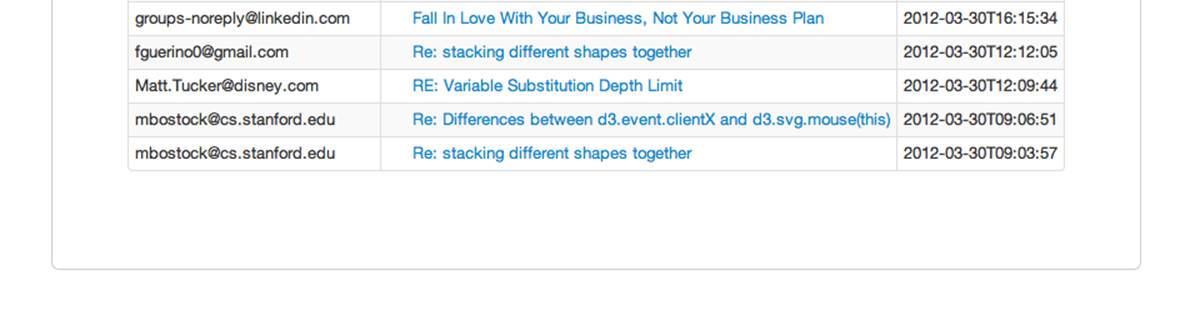
Figure 5-7. Missing next/previous links
We need a previous/next button at the bottom of the page that links us to the previous/next N emails, if that range exists. Recall that we defined the email list API as follows (see ch05/web/index.py):
@app.route('/')
@app.route('/emails/')
@app.route("/emails/<int:offset1>/<int:offset2>")
def listmails(offset1 = 0, offset2 = config.EMAILS_PER_PAGE):
email_list = emails.find()[offset1:offset2]
nav_offsets = get_navigation_offsets(offset1, offset2, config.EMAILS_PER_PAGE)
return render_template('partials/emails.html', emails=email_list, nav_offsets=
nav_offsets, nav_path='/emails/', query=query)
This means that all we need is a link to an incremented/decremented offset range for the path /emails/offset1/offset2. Let’s prototype the feature based on these requirements by appending static forward and back links against our email list API.
For example, we want to dynamically render this HTML, corresponding to the URL /emails/20/40, as shown in Figure 5-8:
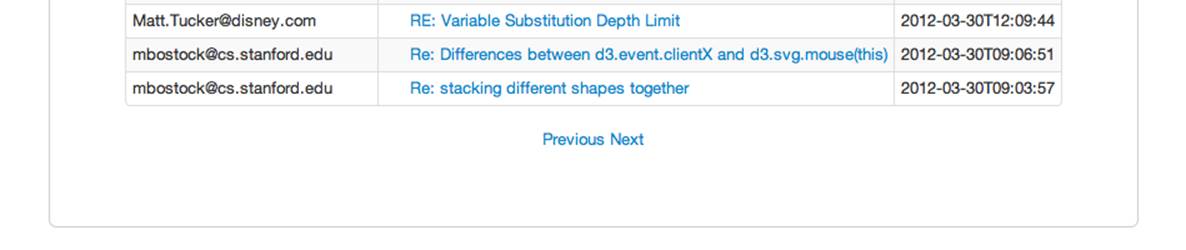
Figure 5-8. Simple next/previous links
templates/partials/emails.html
...
</table>
<div style="text-align: center">
<a href="/emails/0/20">Previous</a>
<a href="/emails/40/60">Next</a>
</div>
{% endblock -%}
Pasting and navigating to the links, such as http://localhost:5000/emails/40/60, demonstrates that the feature works with our data.
Now let’s generalize it. Macros are convenient, but we don’t want to make our template too complicated, so we compute the increments in a Python helper (we might consider a model class) and make a macro to render the offsets.
For starters, let’s use this opportunity to set up a simple config file to set variables like the number of emails to display per page. Embedding these in code will cause headaches later.
config.py
# config.py, a configuration file for index.py
EMAIL_PER_PAGE = 20
Let’s also create a simple helper to calculate email offsets. In time this will become a full-blown class model, but for now, we’ll just create a helpers section in index.py.
The controller now binds the navigation variables to the template, because we are now passing both the list of emails and the calculated offsets for the navigation links.
index.py
# Simple configuration
import config
# Calculate email offsets for fetchig lists of emails from MongoDB
def get_navigation_offsets(offset1, offset2, increment):
offsets = {}
offsets['Next'] = {'top_offset': offset2 + increment, 'bottom_offset':
offset1 + increment}
offsets['Previous'] = {'top_offset': max(offset2 - increment, 0),
'bottom_offset': max(offset1 - increment, 0)} # Don't go < 0
return offsets
...
# Enable /emails and /emails/ to serve the last 20 emails in our inbox unless
otherwise specified
default_offsets={'offset1': 0, 'offset2': 20}
@app.route('/emails', defaults=default_offsets)
@app.route('/emails/', defaults=default_offsets)
@app.route("/emails/<int:offset1>/<int:offset2>")
def listmaildb(offset1=0, offset2=config.EMAILS_PER_PAGE):
emails = emaildb.find()[offset1:offset2] # Uses a MongoDB cursor
nav_offsets = get_offsets(offset1, offset2, config.EMAIL_RANGE)
return render_template('partials/emails.html', emails=emails, nav_offsets=
nav_offsets, nav_path='/emails/')
Our email list template calls a macro to render our data. Note the use of |safe to ensure our HTML isn’t escaped:
templates/partials/emails.html
...
<div>
<table class="table table-striped table-condensed">
<thead>
<th>From</th>
<th>Subject</th>
<th>Date</th>
</thead>
<tbody>
{% for email in emails %}
<tr style="white-space:nowrap;">
<td>{{ common.display_email_address(email['from'])|safe }}</td>
<td>{{ common.display_link(email['message_id'], '/email', email
['subject'])|safe }}</td>
<td style="white-space:nowrap;">{{ email['date'] }}</td>
</tr>
{% endfor %}
</tbody>
</table>
{% if nav_offsets and nav_path -%}
{{ common.display_nav(nav_offsets, nav_path, query)|safe }}
{% endif -%}
</div>
which we place in our Jinja2 macros file, further breaking up the task as the drawing of two links inside a div.
templates/macros.jnj
<!-- Display two navigation links for previous/next page in the email list -->
{% macro display_nav(offsets, path, query) -%}
<div style="text-align: center;">
{% for key, values in offsets.items() -%}
{% if values['bottom_offset'] >= 0 -%}
<a style="margin-left: 20px; margin-right: 20px;" href="{{ path }}{{ values
['bottom_offset'] }}/{{ values['top_offset'] }}{%- if query -%}?search=
{{query}}{%- endif -%}">{{ key }}</a>
{% else -%}
{{ key }}
{% endif -%}
{% endfor -%}
</div>
{% endmacro -%}
And we’re done. We can now paginate through our list of emails as we would in any other inbox. We’re one step closer to providing the kind of user experience that will enable real user sessions, and we’ve extended a graph connecting emails over the top of our individual records. This additional structure will enable even more structure later on, as we climb the stack.
Searching Our Email
Browsing through a list of emails certainly beats manually looking up message_ids, but it’s hardly as efficient as search for finding emails of interest to a particular topic. Let’s use our data platform to add search.
Indexing Our Email with Pig, ElasticSearch, and Wonderdog
Remember from Chapter 3 that we can index our emails for search easily with Pig and Wonderdog, as shown in Example 5-3.
NOTE
Check out Infochimps, which developed Wonderdog as part of its big data platform: http://www.infochimps.com/platform.
Example 5-3. Process and searchify email data
/* Avro uses json-simple, and is in piggybank until Pig 0.12, where AvroStorage and
TrevniStorage are builtins */
REGISTER $HOME/pig/build/ivy/lib/Pig/avro-1.5.3.jar
REGISTER $HOME/pig/build/ivy/lib/Pig/json-simple-1.1.jar
REGISTER $HOME/pig/contrib/piggybank/java/piggybank.jar
DEFINE AvroStorage org.apache.pig.piggybank.storage.avro.AvroStorage();
/* Elasticsearch's own jars */
REGISTER $HOME/elasticsearch-0.20.2/lib/*.jar
/* Register wonderdog - elasticsearch integration */
REGISTER $HOME/wonderdog/target/wonderdog-1.0-SNAPSHOT.jar
/* Remove the old email json */
rmf /tmp/inbox_json
/* Nuke the elasticsearch emails index, as we are about to replace it. */
sh curl -XDELETE 'http://localhost:9200/inbox/emails'
/* Load Avros, and store as JSON */
emails = LOAD '/me/Data/test_mbox' USING AvroStorage();
STORE emails INTO '/tmp/inbox_json' USING JsonStorage();
/* Now load the JSON as a single chararray field, and index it into ElasticSearch
with Wonderdog from InfoChimps */
email_json = LOAD '/tmp/inbox_json' AS (email:chararray);
STORE email_json INTO 'es://inbox/emails?json=true&size=1000' USING com.infochimps
.elasticsearch.pig.ElasticSearchStorage(
'$HOME/elasticsearch-0.20.2/config/elasticsearch.yml',
'$HOME/elasticsearch-0.20.2/plugins');
/* Search for Hadoop to make sure we get a hit in our email index */
sh curl -XGET 'http://localhost:9200/inbox/emails/_search?q=hadoop&
pretty=true&size=1'
Test things out with a search query:
[bash]$ curl -XGET 'http://localhost:9200/email/email/_search?q=hadoop&pretty=
true&size=1'
If you want to reload your data after changing it, you can get rid of an index easily:
[bash]$ curl -XDELETE 'http://localhost:9200/email/'
Searching Our Email on the Web
Next, let’s connect our search engine to the Web.
First, configure pyelastic to point at our ElasticSearch server.
config.py
ELASTIC_URL = 'http://localhost:9200/inbox'
Then import, set up, and query ElasticSearch via the /emails/search path.
index.py
# ElasticSearch
import json, pyelasticsearch
...
# Set up ElasticSearch onnection
elastic = pyelasticsearch.ElasticSearch(config.ELASTIC_URL)
...
# Process elasticsearch hits and return email records
def process_search(results):
emails = []
if results['hits'] and results['hits']['hits']:
hits = results['hits']['hits']
for hit in hits:
email = hit['_source']
emails.append(email)
return emails
# Controller: Fetch a list of emails and display them
@app.route('/')
@app.route('/emails/')
@app.route("/emails/<int:offset1>/<int:offset2>")
def listmails(offset1 = 0, offset2 = config.EMAILS_PER_PAGE, query=None):
query = request.args.get('search')
if query==None:
email_list = emails.find()[offset1:offset2]
else:
results = elastic.search({'query': {'match': { '_all': query}},
'sort': {'date': {'order': 'desc'}}, 'from': offset1, 'size':
config.EMAILS_PER_PAGE}, index="emails")
print results
email_list = process_search(results)
nav_offsets = get_navigation_offsets(offset1, offset2, config.EMAILS_PER_PAGE)
return render_template('partials/emails.html', emails=email_list,
nav_offsets=nav_offsets, nav_path='/emails/', query=query)
Generalizing the navigation links, we are able to use the same template for both listing emails in order and searching them. Our search box is part of our layout template (ch05/web/templates/layout.html), and we need only set its action to point at our search API (see Figure 5-9).
layout.html
<form class="navbar-search pull-right">
<input name="search" type="text" class="search-query" placeholder="Search"
value="{% if query -%}{{query}} {% endif -%}">
</form>
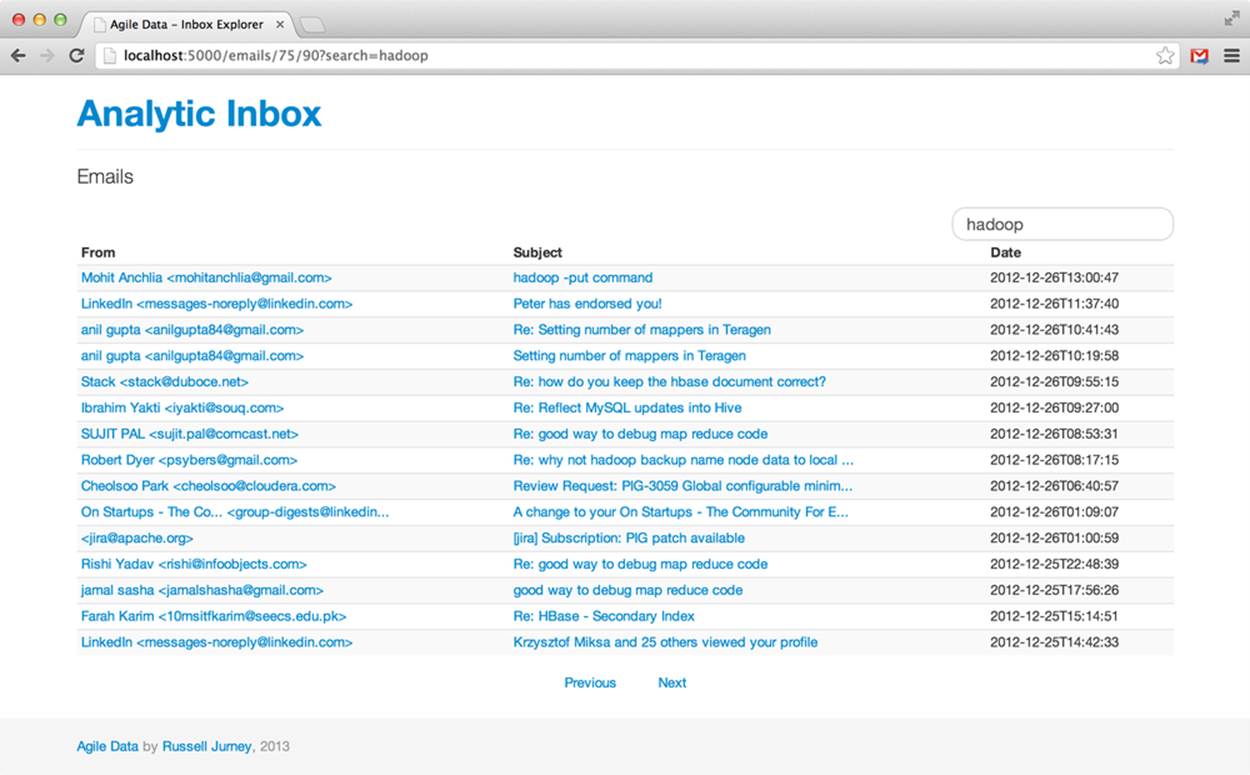
Figure 5-9. Searching for emails
Conclusion
We have now collected, published, indexed, displayed, listed, and searched our emails. They are no longer abstract. We can search for keywords, click on individual emails, and explore our inbox as we might in an email client. More important, we have piped our raw data through our platform and transformed it into an interactive application.
This application forms the base of our value stack. We will use it as the way to develop, present, and iterate on more advanced features throughout the book as we build value walking up the data-value pyramid. With this base of the data-value pyramid in place, we move on to building charts.
All materials on the site are licensed Creative Commons Attribution-Sharealike 3.0 Unported CC BY-SA 3.0 & GNU Free Documentation License (GFDL)
If you are the copyright holder of any material contained on our site and intend to remove it, please contact our site administrator for approval.
© 2016-2026 All site design rights belong to S.Y.A.