Beginning Arduino Programming (Technology in Action) (2011)
Chapter 3. Working with Variables
In our last project, there is nothing in the sketch except for our comments that helps us to identify which color LED is connected to which pin on the Arduino board, or, for that matter, what color we are turning on or off at any given time in the code. We would just have to remember that the number 9 in the line digitalWrite(9, HIGH); refers to the Arduino pin 9 that the red LED is connected to. Rather than trying to remember these things, because honestly we will forget or the next person we share our code with will have no clue, there is a better way to write our code using something called variables.
In this chapter, we will revisit the last project, pulling from our magic hat to create seven colors out of our three-color LED as a way to talk about the many uses for variables and how we can put them to work for us. We will also look at a few ways to manipulate variables using several different kinds of operators and how they work. For this new project, we will use the same hardware from the last chapter, but it might be a good idea to briefly mention them here again.
What's needed for this chapter:
• Arduino Uno
• 5mm RGB LED with common cathode
• 1x 330 ohm and 2x 220 ohm У watt resistors or similar
• Hookup wires
• Solderless breadboard
Project 2: 7-Color Blink
If you'll remember the RGB color wheel in Figure 2-1 of the last chapter, we can mix red, green, and blue light to create millions of different colors. For our next project, we will take the simple three-color sketch from the last chapter and improve upon it by introducing simple color mixing to get seven colors, while pausing for a little longer on white for effect. This will give us an opportunity to introduce working with variables and demonstrate some basic operations, as well.
Hooking It Up
This project uses the very same hardware from the last chapter, as shown in Figures 3-1 and 3-2, which only make a repeat appearance here for convenience sake.
1234
1- RED
2- GROUND
3- BLUE
4- GREEN
p|N 11
LED2 GND
Figure 3-1. 7-Color Blink schematic
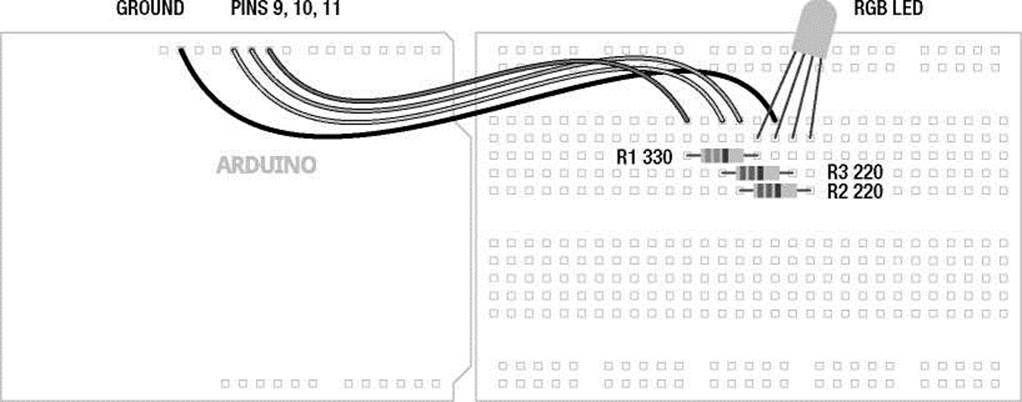
Figure 3-2. 7-Color Blink illustration
Uploading the Source Code
The source code for this project in Listing 3-1 should look vaguely similar to our first project's code. It is a little longer now to create a sequence that will result in seven individual colors. We've also replaced the numbers 9, 10, and 11 with the variable names red, green, and blue, and added variables for the timing of the sketch. This will help us to read the code better and understand what exactly is going on.
Listing 3-1. 7-Color Blink
const int red = 9; const int green = 10; const int blue = 11;
int time = 1000; int multiple = 2;
void setup() {
pinMode(red, OUTPUT); pinMode(green, OUTPUT); pinMode(blue, OUTPUT);
}
// red // yellow // green // cyan // blue // magenta // white // reset
void loop() { digitalWrite(red, HIGH); delay(time);
digitalWrite(green, HIGH); delay(time); digitalWrite(red, LOW); delay(time);
digitalWrite(blue, HIGH); delay(time);
digitalWrite(green, LOW); delay(time);
digitalWrite(red, HIGH); delay(time);
digitalWrite(green, HIGH); delay(time*=multiple); digitalWrite(blue, lOW); digitalWrite(green, LOW); time/=multiple;
}
Source Code Summary
To kick things off, we start our sketch with a block of code that defines each of the variables that will be used in our code. In this way we will know, for example, that the red LED is connected to pin 9 and the time delay between colors is 1000 milliseconds, or 1 second. If we wanted to change any of these values, to set different pin numbers for the RGB LED or to increase or decrease the delay time, we would only have to change the value in one single location, speeding up changes to the sketch and making it that much easier to understand. This will become more important later on when our sketches begin to do more interesting things with our variables, but for now let's look at the following first line of code in more detail:
const int red = 9;
This line declares that the first variable is named red; identifies the variable's data type as an integer, or int; and then tells the compiler that this variable should stay constant using the const modifier. Finally, this one line of code will also assign the numerical value 9 to the variable named red. In this way, the keywords red, green, blue are all variable names that we made up to identify the pin that each color of the RGB LED is connected to, while time is a variable to store the time period that each color stays on for, and multiple will be used to delay for a longer period on white just to give it a little emphasis.
Later in the sketch, we substitute the numbers that might be found inside the various statements with the variable names that we set up earlier so that every time that name is called, the compiler knows to look up the appropriate value. By using variables in our code, the following two lines will be functionally equivalent:
pinMode(red, OUTPUT); pinMode(9, OUTPUT);
The rest of the code is just a slightly longer version of our last project sketch. In addition to red, green, and blue, you should now see yellow, cyan, magenta, and even white. Pretty nifty, huh? In addition to turning on and off each color of LED, we turn on two colors at the same time to make the intermediary colors, and all three colors to make white. Inside the loop() function, we begin with red, then add green to make yellow, turn off red to make green, add blue to make cyan, turn off green to make blue, turn on red to make magenta, and then turn on green to make white. At this point, we perform a compound operation to multiply the time delay with another variable called multiple to create a longer delay on the white color. We then reset our colors by turning off blue and green, leaving only red, perform another operation on the time delay to return it back to its original value, and then we start the loop all over again.
Now that we have seen variables in action, let's look at them in much greater depth to find out how we can put them to work for us.
What’s a Variable?
The variables that we use in writing code are the very same variables that we learned about in school. Take the following equation for example:
a2 + b2 = c2
I'm sure you've seen this before; it's the Pythagorean theorem and it's pretty useful for finding the length of one side of a right-angle triangle if we know any of the other two sides. The letters a, b, and c are the names for numerical data, in this case the letter c is used for the hypotenuse while a and b are the other two sides of the triangle. We can also call these letters variables. Variables are quite simply containers for information. In programming, variables have a name that tells us what data the variable might contain and they have a type that determines what kind of information the variable can hold, and finally they have a value whether we know what it is or not.
We can use variables to assign human-readable names for things like pin numbers or useful values. They can also be used to store numbers that constantly change while our code is actively running. This can be useful for setting up counters, performing calculations, or for passing new values to and from functions. To properly use a variable, we need to start with declaring the variable. After that, we should also talk about good variable names, the various types of variables, and a few other things related to working with variables.
Declaring Variables
When setting up a new variable, we need to at the very least determine two pieces of information: the variables data type and its name. This process is called declaring a variable where we will hold a place open in the Arduino's memory to store our information. Declaring a variable is as simple as indicating the data type followed by a unique name for the variable. The following are some examples of simple variable declarations:
int x;
int myVariable; int time;
The sort of data that can be stored in a variable, and what can be done with it, is determined by the variable's data type. The data type that is chosen is very important later on when it affects what we can and cannot do with it. In the previous examples, we are declaring integer data types, signified by the int keyword, a useful data type for numerical data. After establishing the data type, we need a clear variable name that tells us in plain English what the variable does. As a general rule of thumb, it should be descriptive, but not overly cumbersome. Take the following examples:
int r; int red;
int redLEDConnectedToPin9;
Each of these three variable names is technically correct, but naming our variable red instead of the letter r is generally easier to understand. Single-letter variable names, with a few exceptions, are often harder to read and make sense of; for example, a lowercase l (L) looks an awful lot like the uppercase I (I), or even the number 1 (1). The extreme case, redLEDConnectedToPin9, is generally too verbose and makes reading, as well as writing, the code somewhat tedious.
Where these previous examples simply declare the variable data type and variable name, it is also possible to assign a value to a variable when we declare it in a single statement. In our example sketch, we did this in the following line:
int red = 9;
Here we are declaring the variable named red as an integer data type and assigning the value 9 to that variable name using the assignment operator to be discussed shortly. While the Arduino compiler will still hold a place open in its memory for a variable even if we do not assign it a value, it is generally a good idea to assign a value in the variable declaration even if that value is 0.
Variable Names
We can name a variable pretty much anything we want, but there are a few rules we need to follow. First of all, function and variable names can only contain letters, underscores, numbers, or the dollar sign. Spaces or odd characters like the @ or & are not allowed and the first character cannot be a number. White space is not allowed inside a variable name, as generally when white space is allowed, you could have one space or hundreds and it wouldn't matter. This white space includes new lines from hitting the Return or Enter keys, or indents from the space bar or Tab key. Considering this, the variable names myVariable, mYvAlUe, DELAY_TIME, and valuel are all valid names. Conversely, the variable names lstValue, delay time, and time&money are not valid names for a variable.
Now some of these names may not be the most readable, which is why many Arduino programmers have adopted certain naming guidelines or conventions. Naming conventions are generally controversial in programming circles, and they are not specifically required when defining your own unique names, but they can make code easier to read in the big scheme of things.
For example, we can have a variable name with multiple words but, because we cannot use spaces inside our variable name, we might want a way to separate each word to make the name easier to read. One possibility is to use an underscore between each word, as in red_led_connected_to_pin_9, a method usually favored by UNIX programmers. Instead, we will use the convention known as camelback notation, as in redLEDConnectedToPin9. Under this convention, the first letter of the first word will be lowercase while the first letter of each subsequent word will be capitalized with no space between each word. Take the following examples:
variable
myVariable
valuel
tiltSwitchValue
It's really your choice how you name your variables and you will often see both types in other people's sketches, but we feel that camelback notation makes the code easier to read and matches the format the Arduino developers have decided upon for all of the built-in functions in the Arduino library. Likewise, it is the general convention that constants are sometimes written in all caps with underscores in between multiple words, as in the following examples, although we will not adhere strictly to this in naming our own constant variables.
HIGH
INPUT
BLUE_LED ■ Note Remember that the Arduino language is case-sensitive, so whatever style you adopt, you need to use it consistently throughout your sketch. This also means that any predefined variables or function names that are already a part of Arduino C must be used with exact capitalization.
One thing to keep in mind is that while there is no maximum or minimum length for variable names, extremely long names start to become rather tedious to type over and over. On the other hand, one-character names are often too cryptic. A few exceptions to this would be the lower case letter i, which is a commonly used variable to indicate an index along with the variable names j and k. Likewise, a, b, c or x, y, z are other sometimes used as short names, often when adding a longer name would not necessarily provide any more information.
Data Types
While there are many data types available to the Arduino, for the moment we will start with the numerical types that use either whole numbers or floating-point numbers. Numeric data types are available in two varieties: signed and unsigned. Unsigned variables will always contain positive values, whereas signed variables can express numbers with a negative value. Usually most data types default to signed data types, but can be changed using the unsigned variable qualifier described later.
The integer data type is Arduino's primary variable data type for storing numbers; it can be used to store numerical values between -32,768 and 32,767. These values need to be whole numbers such as 42, 28,000, or -32, and can not include values with decimal points. Integer-type variables consume 16 bits or 2 bytes of our available 32 kilobytes of program memory—why this is important will become clearer when we discuss memory in Chapter 8. Integer variables can be declared with the int keyword, as follows:
int myVariable;
If you look at enough examples of Arduino code, you'll start to see that integers are a commonly used data type. For the most part, we will stick with this convention except where it makes more sense to choose another data type. Part of the reason for carefully choosing the proper data type for the job is that all numerical data types, including integers, will roll over in one direction or another when they exceed the minimum or maximum capacity. So given the following example:
x = 32767; x = x + 1;
The variable x will now contain the value -32,768, as the integer exceeded its maximum capacity and rolled over to its minimum capacity and started again there. Remember that this also works both ways—so if x = -32768; and the following line is x = x - 1; then x will be equal to 32,767.
As far as integers are concerned, there is only one value between 3 and 5, which is of course 4 because integers work in whole numbers. In contrast, floating-point numbers, expressed as the float data type, are capable of expressing fractions of a number using a decimal point and can be used to represent a multitude of values between 3 and 5, such as 3.14159, 4.25, or 5.0. Floats use 32 bits of memory and, like integers, can express values that are positive, negative, or zero. To declare a floatingpoint variable, we use the float keyword; and if assigning a value, we will also need to include a decimal point—even if the digit after the decimal point is 0. The following are two examples of float declarations:
float pi = 3.14159; float circle = 360.0;
Because the Arduino lacks any dedicated hardware to manage floating-point math, floats are slow to process and may not yield the most accurate results. With only about 6 or 7 digits of precision, the expression z = 12.0 / 5.0 will yield 2.4000000953 instead of 2.4. While extremely helpful in certain situations, it is best to avoid floats where possible, especially in timing critical applications.
In addition to integers and floats, there are numerous other data types available on the Arduino. Byte, an 8-bit data type, can store values between 0 and 255. Unlike integers and floats, bytes are unsigned so that when a byte exceeds 255, it rolls over to 0. Bytes can be useful if we need to save some memory or are pretty sure we won't have a problem with data roll over.
byte dataPin = 11;
Other data types include the 32-bit long, which is the big brother of the integer, and the 1-bit boolean data type that only stores two values—either true or false. In Table 3-1 there are some of the various data types available to the Arduino platform, some of which we will cover in more depth later in the book.
Table 3-1. Arduino Data Types
|
Name |
Size |
Range |
|
boolean |
1 bit |
true or false |
|
byte |
8 bit |
0 to 255 |
|
char |
8 bit |
-128 to 127 |
|
int |
16 bit |
-32,768 to 32,767 |
|
long |
32 bit |
-2,147,483,648 to 2,147,483,647 |
|
float |
32 bit |
-3.4028235E+38 to 3.4028235E+38 |
Variable Qualifiers
As discussed earlier, variables will behave in certain ways based on the properties of their data type. By using variable qualifiers, it is possible to modify the behavior of certain variables in ways that will fundamentally change how we work with them. For example, the const or constant variable qualifier makes the value of a variable a read-only constant that cannot be changed once the value has been assigned. This could be useful in our sketch, so instead of the variable declaration reading as follows:
int red = 9;
We could write the line like this: const int red = 9;
We use the const keyword at the beginning of a variable declaration to define a variable as a constant value to prevent us from inadvertently changing the variable's value later in the code. This is useful if we know that, as in the example, the pin number of the red LED will never change. If we attempt to assign a new value to the constant variable red, we will be reminded with a friendly compiler error.
The constant qualifier is also useful for reducing the amount of memory that is needed by the code while it's running. Don't worry too much about that now; we will talk more about memory usage later in Chapter 8.
You might find examples of code that use the #define preprocessor directive instead of const, as in the line #define red 9. The constant qualifier is generally the preferred method of the Arduino development team over the #define preprocessor directive for defining constant variables. This is because the constant qualifier can be checked for errors and will follow all of the rules of variables, including variable scope defined momentarily, while not creating any potential conflicts with the Arduino library.
As briefly mentioned before, certain data types are either signed or unsigned. To modify the range of a few of the data types we could use the unsigned qualifier and the unsigned keyword, making them store positive-only values. This qualifier is beneficial for increasing the positive range of variables or for indicating to the reader of the code that the value expected will never be negative. For example:
unsigned int maxThreshold = 1024;
By placing the unsigned keyword in front of the integer variable declaration, the variable maxThreshold may now only store positive values in the range of 0 to 65,535. Table 3-2 provides a list of unsigned variable data types and their modified ranges.
Table 3-2. Unsigned Data Types
|
Name |
Size |
Range |
|
unsigned char |
8 bit |
0 to 255 |
|
unsigned int |
16 bit |
0 to 65,535 |
|
unsigned long |
32 bit |
0 to 4,294,967,295 |
You will notice that an unsigned char has the same value range as the byte although, for this range of values, byte is the preferred data type. Also keep in mind that unsigned data types will roll over just like their signed brethren when they exceed their minimum or maximum values.
In addition to unsigned and const, there are other variable qualifiers that we will revisit in later chapters, as they are needed.
Predefined Constants
In addition to user defined constant variables, the Arduino development environment uses its own predefined constants. The first of these constants defines the Boolean logic states based on logical truth tables using two states: true and false. The false condition is easily defined as being 0 or sometimes off. On the other hand, true is, in many ways, anything other than false. In this sense, true could be 1, or ‘on,' but it could also be 5, -42, or even 64,000. Unlike our other constants, true and false always appear in lowercase.
Our other pairs of constants, which you have already seen some of, are generally used as part of the Arduino's digital I/O capabilities and will be discussed in more depth in later. These constants define the operation of the digital pins as either INPUT or OUTPUT using the pinMode() function, or define the pin levels as being HIGH or LOW, roughly equivalent to pin states of +5 volts and 0 volts, or on and off respectively.
Variable Scope
While we have so far been discussing how variables are declared, where we declare variables is as important as how we declare them. The location of a variable declaration in the larger sketch determines where that variable can be used, or what is known as variable scope.
const int red = 9;
This variable from our previous example is declared outside the setup() and loop() functions at the beginning of the source code. This is known as a global variable and can be used by all functions in the sketch regardless of location. If, however, this variable was declared inside the setup() function, it would become a local variable and would be unavailable to loop() or any other functions. Local variables can also be used inside for loops, commonly as counters, where only that statement can use it and not the rest of the function. In fact, it is entirely possible for one variable name to be used in two different
manners depending on where those variables are declared and used. However, if we attempt to access a variable outside of its scope, we will receive another one of those friendly reminders in the form of a compiler error letting us know where we went wrong.
Because writing code for Arduino C is a little different from normal C source code, specifically in our use of the setup() function to perform one time only tasks, we will often use global variables to define pin numbers, set up thresholds, or define constants, so that all functions in a sketch can use the same values. This would not generally be the case with code written for other platforms, but it works for us.
Using Operators
Now that we have thoroughly explored what the variables are, what can we do with them? To answer this question we need to examine various operators, which are special characters used to perform specific operations. For now, we will stick with simple assignment, arithmetic, and compound operators, and get into some others in the next chapter.
When we talked about declaring variables, we used the assignment operator, =, which looks just like the equals sign but isn't exactly the equals sign we know and love from algebra class. Take a look at the following example:
myValue = 255;
Here, the assignment operator is telling the compiler to take the value or expression on the right side of the operator and assign that value to the variable on the left side of the = character. In this case, we are taking the value of 255 and putting it into a variable we are calling myValue. Considering the following hypothetical code fragment:
int myValue, newValue; myValue = 255; newValue = myValue;
The first line declares two integer type variables on the same line. (Yes, I know this is ninja sneaky, but as long as we separate the variable names with commas, we can declare multiple variables with the same data type.) The second line then assigns the numerical value 255 to the variable myValue. Then in the third line, remembering that assignments work somewhat counter intuitively right to left, we assign the value of myValue to the variable newValue. In this case newValue will now also hold the value of 255. That should be crystal clear, right?
■ Note Because we can only declare a variable in the same scope once, we do not use the data type when assigning a value to a variable after the first declaration. If in the previous example we wrote int myValue = 255; instead of myValue = 255; we would have another compiler error.
Arithmetic Operators: +, -, *, /
With that out of the way, let's look at the simple arithmetic operators to add, subtract, multiply, and divide. To start with, let's say we wanted to add two numbers together and assign it to a variable; it would look something like the following: myValue = 4 + 38;
Beginning on the right side, the Arduino will add 4 and 38 and assign the sum to the variable myValue, which now will equal the numerical value of 42. Likewise, since variables act just like the numbers that they store, they can be included in the equation as well.
myValue = 255; newValue = myValue - 128;
After assigning the value 255 to myValue, the next line subtracts 128 from myValue and assigns the result to newValue that now contains the number 127. We can even do this using the same variable as in the following example:
myValue = 255; myValue = myValue - 1;
Beginning with 255, 1 is subtracted from myValue and this new result, 254, is reassigned to the variable myValue. If we performed this second line 255 times in a row, we would decrement, or lower the value of myValue until it reached 0.
The values that we are performing these operations on are called operands. The data type of the operands determines the data type used by the operators with the largest type being used if they are of different types. Consider the following code fragment, which should be somewhat familiar from high school geometry:
float pi = 3.14159; int diameter = 5; float C;
C = pi * diameter;
In this case, the operator used to determine C ignores the fact that the variable diameter is an integer data type and, in the last line, we multiply the float variable pi (3.14159) to the integer variable diameter (5) and we end up with the floating-point value of 15.7079505920 assigned to the variable C. This shows that when one of the operands is of the float data type, floating point math is used for the entire calculation and, as a result, suffers from the usual drawbacks of large memory size and slow operation.
In this most recent example, the variable C was of the float data type and as a result could store the fractional value. If, however, both of the operands are of the same data type, the operation will be performed using that type regardless of the actual outcome, as follows, for example:
int myValue; myValue = 9 / 5;
This statement divides 9 by 5; however, since myValue is an integer type variable, the resulting value assigns the lobbed off result of 1 to myValue rather than the actual value of 1.8 because integers can only contain whole numbers. Notice that this isn't rounding up or down but rather disregarding any fractional numbers after the decimal point.
Be careful about accidently dividing a number by zero, as in x = 9 / 0;. Rather than giving you a compiler error for something you should not be able to do, the Arduino compiler will instead spit out some rather odd and unexpected numbers.
Compound Operators: ++, +=, -=, *=, /=
In the previous examples, we needed two values for the operators to work their magic, as in the following statement:
myValue = 0; myValue = myValue +1;
Instead, we could use compound operators that combine an arithmetic operation with an assignment operation, thereby only needing one variable statement to do what they do. These can be used to either increment, raise the value, or decrement, lower the value, using just one operator. The following is an example that increments myValue by 1 using the ++ character symbol:
myValue = 0; myValue++;
This statement, functionally identical to the very last code example, increments the variable by 1 and reassigns the new value to the current variable name. In this case, the variable myValue now contains the numerical value 1. Likewise, we can decrement the value using the -- character symbol, as follows:
myValue--;
Here, myValue now contains 0 again. In these two examples, the compound operators ++ or -- only increment or decrement by a value of 1. If we wanted to increment or decrement a variable by a value greater than 1 we could use one of these compound operators: +=, -=, *=, or /=. For example if we wanted to increment myValue by 10 we could use the following statement:
myValue += 10;
This statement, again identical to the statement myValue = myValue +10; adds 10 to whatever value is assigned to myValue. Assuming that myValue contains the number 10, we can multiply it by a factor and reassign the new value using the following example:
myValue *= 1.5;
The variable myValue has now been increased to 15. Remember though, if we assume myValue is an integer, a further *= 1.5 would result in 22 rather than 22.5 because integers lob off anything after the decimal point.
We used compound operators in our recent project code to multiply two variables together to create a longer delay time for white, as in the following example:
delay(time*=multiple);
In this line of code, we multiply the value of the variable multiple by the current value of time, assign this new value back to the variable time, and then we delay for that amount. In this way we can change either of the initial values for these two variables at the beginning of the code without needing to hunt down each line in the sketch. Compound operators are also useful for counters and indices and especially help compact the code into a more readable form when we get to the for loop control structures later.
Order of Operations
When the math gets a little more complicated, it's good to know about the order of operations, or the order in which operators are processed in any given expression. For example, depending on the way an expression is evaluated, 3 * 5 + 10 could yield either 25 or 45 depending on whether we multiply 3 by 5
then add 10 or add 5 to 10 and multiply the result by 3. When we consult the order of operations, however, we find that multiplication always takes precedence over addition regardless of the order they appear in the expression; so the correct answer would be 25.
Alternatively, if we wanted 45 we could add parentheses to the expression making it now 3 * (5 + 10) to modify the order in which the expression is evaluated. In this case, parenthesis take precedence over every other operator, so 5 is added to 10 and that sum is then multiplied by 3 for the modified result of 45. Parenthesis may also be added to an expression not necessarily to modify the order of operations, but rather just to make things easier to understand. Take the following examples:
In the first line, the order of operations is followed to result in a final value of 30, which happens to be the same value for the second line because the parenthesis are only their aesthetically. The final line modifies the normal order of operations by bracketing 5 + 5 with parenthesis so that that part of the expression will take precedence. Here, the sum of 5 and 5 is then multiplied by 5 for a total value of 50.
Table 3-3 shows the normal order of operations ranked by highest precedence at the top and lowest at the bottom. We have covered some of these operators in this chapter, while others will be discussed later.
Table 3-3. Order of Operations
|
Symbol |
Description |
Examples |
|
( ) |
Parenthesis |
(x+y)*z |
|
++ -- |
Increment, decrement |
x++, y-- |
|
* / % |
Multiplication, division, modulus |
x * 1.5 |
|
+ - |
Addition, subtraction |
y + 10 |
|
< > <= >= |
Less than, greater than comparisons |
if (x < 255) |
|
== != |
Is, is not equal to |
if (x == HIGH) |
|
&& |
Logical AND |
if (x == HIGH && x > y) |
|
|| |
Logical OR |
if (x == HIGH || x > y) |
|
II II * II II + II |
Assignment and compound assignments |
x = y |
Consulting the chart, you can see that division will always happen before addition and subtraction will happen before assignment. There's also some other things thrown in there, but we will get to these before too long.
Summary
In this chapter we introduced some concepts that we will continue to build on in the rest of the book, focusing on the use of variables, including operations and assignments. It is important to remember that variables are only declared once in a particular location, or scope, and that when performing operations or making assignments, whatever value is on the right of the equals (=) sign will be attributed to the variable on the left. Also remember that the operators we discussed in this chapter can be used to increment, decrement, or perform other arithmetic and compound operations, which are performed in a specific order of operations. In the next chapter, we will take this information and use it to alter our program's flow and learn how the Arduino can make decisions using various control structures, such as the if statement and for loop.