Programming Arduino Getting Started with Sketches (2012)
3
C Language Basics
The programming language used to program Arduinos is a language called C. In this chapter, you get to understand the basics of the C language. You will use what you learn here in every sketch you develop as an Arduino programmer. To get the most out of Arduino, you need to understand these fundamentals.
Programming
It is not uncommon for people to speak more than one language. In fact, the more you learn, the easier it seems to learn spoken languages as you start to find common patterns of grammar and vocabulary. The same is true of programming languages. So, if you have used any other programming language, you will quickly pick up C.
The good news is that the vocabulary of a programming language is far smaller than that of a spoken language, and because you write it rather than say it, the dictionary can always be at hand whenever you need to look things up. Also, the grammar and syntax of a programming language are extremely regular, and once you come to grips with a few simple concepts, learning more quickly becomes second nature.
It is best to think of a program—or a sketch, as programs are called in Arduino—as a list of instructions to be carried out in the order that they are written down. For example, suppose you were to write the following:
![]()
These three lines would each do something. The first line would set the output of pin 13 to HIGH. This is the pin with an LED built in to the Arduino board, so at this point the LED would light. The second line would simply wait for 500 milliseconds (half a second) and then the third line would turn the LED back off again. So these three lines would achieve the goal of making the LED blink once.
You have already seen a bewildering array of punctuation used in strange ways and words that don’t have spaces between them. A frustration of many new programmers is, “I know what I want to do, I just don’t know what I need to write!” Fear not, all will be explained.
First of all, let’s deal with the punctuation and the way the words are formed. These are both part of what is termed the syntax of the language. Most languages require you to be extremely precise about syntax, and one of the main rules is that names for things have to be a single word. That is, they cannot include spaces. So, digitalWrite is the name for something. It’s the name of a built-in function (you’ll learn more about functions later) that will do the job of setting an output pin on the Arduino board. Not only do you have to avoid spaces in names, but also names are case sensitive. So you must write digitalWrite, not DigitalWrite or Digitalwrite.
The function digitalWrite needs to know which pin to set and whether to set that pin HIGH or LOW. These two pieces of information are called arguments, which are said to be passed to a function when it is called. The parameters for a function must be enclosed in parentheses and separated by commas.
The convention is to place the opening parenthesis immediately after the last letter of the function’s name and to put a space after the comma before the next parameter. However, you can sprinkle space characters within the parentheses if you want.
If the function only has one argument, then there is no need for a comma.
Notice how each line ends with a semicolon. It would be more logical if they were periods, because the semicolon marks the end of one command, a bit like the end of a sentence.
In the next section, you will find out a bit more about what happens when you press the Upload button on the Arduino integrated development environment (IDE). Then you will be able to start trying out a few examples.
What Is a Programming Language?
It is perhaps a little surprising that we can get to Chapter 3 in a book about programming without defining exactly what a programming language is. We can recognize an Arduino sketch and probably have a rough idea of what it is trying to do, but we need to look a bit deeper into how some programming language code goes from being words on a page to something that does something real, like turn an LED on and off.
Figure 3-1 summarizes the process involved from typing code into the Arduino IDE to running the sketch on the board.
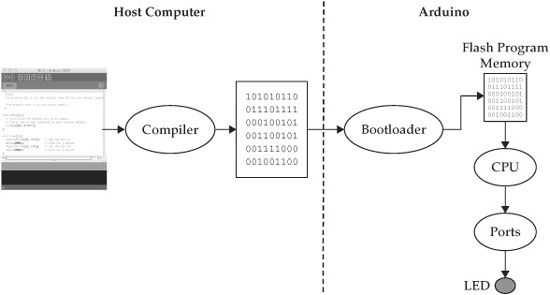
Figure 3-1 From code to board
When you press the Upload button on your Arduino IDE, it launches a chain of events that results in your sketch being installed on the Arduino and being run. This is not as straightforward as simply taking the text that you typed into the editor and moving it to the Arduino board.
The first step is to do something called compilation. This takes the code you have written and translates it into machine code—the binary language that the Arduino understands. If you click the triangular Verify button on the Arduino IDE, this actually attempts to compile the C that you have written without trying to send the code to the Arduino IDE. A side-effect of compiling the code is that it is checked to make sure that it conforms to the rules of the C language.
If you type Ciao Bella into your Arduino IDE and click on the Play button, the results will be as shown in Figure 3-2.
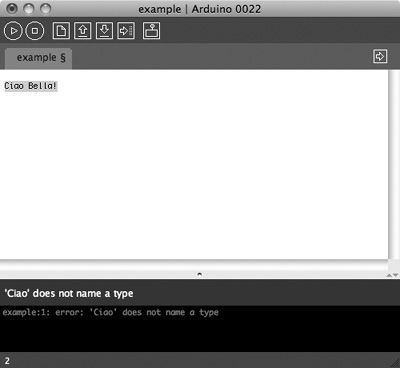
Figure 3-2 Arduinos don’t speak Italian
The Arduino has tried to compile the words “Ciao Bella,” and despite its Italian heritage, it has no idea what you are talking about. This text is not C. So, the result is that at the bottom of the screen we have that cryptic message “error: Ciao does not name a type.” What this actually means is that there is a lot wrong with what you have written.
Let’s try another example. This time we will try compiling a sketch with no code at all in it (see Figure 3-3).
This time, the compiler is telling you that your sketch does not have setup or loop functions. As you know from the Blink example that you ran in Chapter 2, you have to have some “boilerplate” code, as it is called, before you can add your own code into a sketch. In Arduino programming the “boilerplate” code takes the form of the “setup” and “loop” functions that must always be present in a sketch.
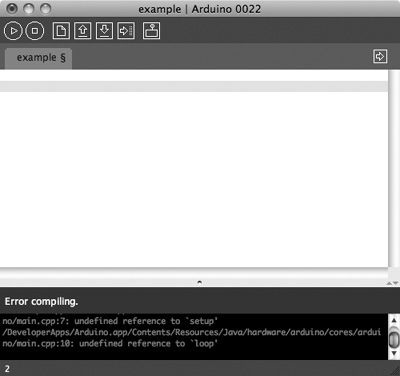
Figure 3-3 No setup or loop
You will learn much more about functions later in the book, but for now, let’s accept that you need this boilerplate code and just adapt your sketch so it will compile (see Figure 3-4).
The Arduino IDE has looked at your efforts at writing code and found them to be acceptable. It tells you this by saying “Done Compiling” and reporting the size of the sketch to you: 450 bytes. The IDE is also telling you that the maximum size is 32,256 bytes, so you still have lots of room to make your sketch bigger.
Let’s examine this boilerplate code that will form the starting point for every sketch that you ever write. There are some new things here. For example, there is the word void and some curly braces. Let’s deal with void first.
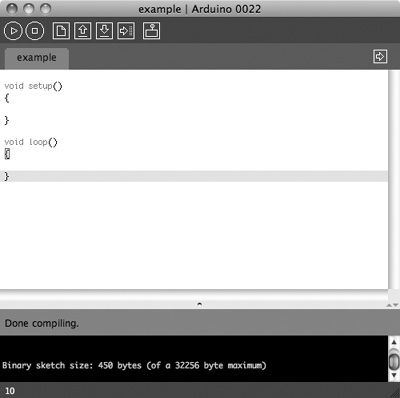
Figure 3-4 A sketch that will compile
The line void setup() means that you are defining a function called setup. In Arduino, some functions are already defined for you, such as digitalWrite and delay, whereas you must or can define others for yourself. setup and loop are two functions that you must define for yourself in every sketch that you write.
The important thing to understand is that here you are not calling setup or loop like you would call digitalWrite, but you are actually creating these functions so that the Arduino system itself can call them. This is a difficult concept to grasp, but one way to think of it is as being similar to a definition in a legal document.
Most legal documents have a “definitions” section that might say, for example, something like the following:

By defining a term in this way—for example, simply using the word “author” as shorthand for “The person or persons responsible for creating the book”—lawyers can make their documents shorter and more readable. Functions work much like such definitions. You define a function that you or the system itself can then use elsewhere in your sketches.
Going back to void, these two functions (setup and loop) do not return a value as some functions do, so you have to say that they are void, using the void keyword. If you imagine a function called sin that performed the trigonometric function of that name, then this function would return a value. The value returned to use from the call would be the sin of the angle passed as its argument.
Rather like a legal definition uses words to define a term, we write functions in C that can then be called from C.
After the special keyword void comes the name of the function and then parentheses to contain any arguments. In this case, there are no arguments, but we still have to include the parentheses there. There is no semicolon after the closing parenthesis because we are defining a function rather than calling it, so we need to say what will happen when something does call the function.
Those things that are to happen when the function is called must be placed between curly braces. Curly braces and the code in between them are known as a block of code, and this is a concept that you will meet again later.
Note that although you do have to define both the functions setup and loop, you do not actually have to put any lines of code in them. However, failing to add code will make your sketch a little dull.
Blink—Again!
The reason that Arduino has the two functions setup and loop is to separate the things that only need to be done once, when the Arduino starts running its sketch, from the things that have to keep happening continuously.
The function setup will just be run once when the sketch starts. Let’s add some code to it that will blink the LED built onto the board. Add the lines to your sketch so that it appears as follows and then upload them to your board:
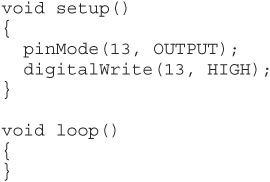
The setup function itself calls two built-in functions, pinMode and digitalWrite. You already know about digitalWrite, but pinMode is new. The function pinMode sets a particular pin to be either an input or an output. So, turning the LED on is actually a two-stage process. First, you have to set pin 13 to be an output, and second, you need to set that output to be high (5V).
When you run this sketch, on your board you will see that the LED comes on and stays on. This is not very exciting, so let’s at least try to make it flash by turning it on and off in the loop function rather than in the setup function.
You can leave the pinMode call in the setup function because you only need to call it once. The project would still work if you moved it into the loop, but there is no need and it is a good programming habit to do things only once if you only need to do them once. So modify your sketch so that it looks like this:
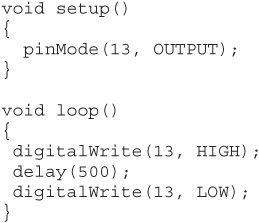
Run this sketch and see what happens. It may not be quite what you were expecting. The LED is basically on all the time. Hmm, why should this be?
Try stepping through the sketch a line at a time in your head:
1. Run setup and set pin 13 to be an output.
2. Run loop and set pin 13 to high (LED on).
3. Delay for half a second.
4. Set pin 13 to low (LED off).
5. Run loop again, going back to step 2, and set pin 13 to high (LED on).
The problem lies between steps 4 and 5. What is happening is that the LED is being turned off, but the very next thing that happens is that it gets turned on again. This happens so quickly that it appears that the LED is on all the time.
The microcontroller chip on the Arduino can perform 16 million instructions per second. That’s not 16 million C language commands, but it is still very fast. So, our LED will only be off for a few millionths of a second.
To fix the problem, you need to add another delay after you turn the LED off. Your code should now look like this:
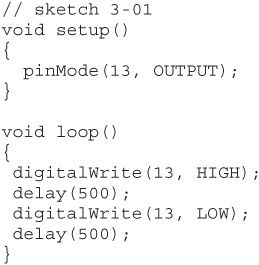
Try again and your LED should blink away merrily once per second.
You may have noticed the comment at the top of the listing saying “sketch 3-01.” To save you some typing, we have uploaded to the book’s website all the sketches with such a comment at the top. You can download them from http://www.arduinobook.com.
Variables
In this Blink example, you use pin 13 and have to refer to it in three places. If you decided to use a different pin, then you would have to change the code in three places. Similarly, if you wanted to change the rate of blinking, controlled by the argument to delay, you would have to change 500 to some other number in more than one place.
Variables can be thought of as giving a name to a number. Actually, they can be a lot more powerful than this, but for now, you will use them for this purpose.
When defining a variable in C, you have to specify the type of the variable. We want our variables to be whole numbers, which in C are called ints. So to define a variable called ledPin with a value of 13, you need to write the following:
![]()
Notice that because ledPin is a name, the same rules apply as those of function names. So, there cannot be any spaces. The convention is to start variables with a lowercase letter and begin each new word with an uppercase letter. Programmers will often call this “bumpy case” or “camel case.”
Let’s fit this into your Blink sketch as follows:
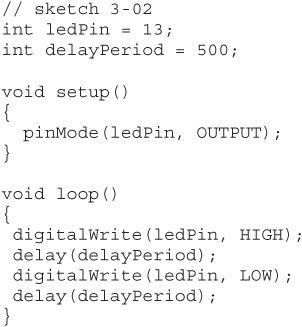
We have also sneaked in another variable called delayPeriod.
Everywhere in the sketch where you used to refer to 13, you now refer to ledPin, and everywhere you used to refer to 500, you now refer to delayPeriod.
If you want to make the sketch blink faster, you can just change the value of delayPeriod in one place. Try changing it to 100 and running the sketch on your Arduino board.
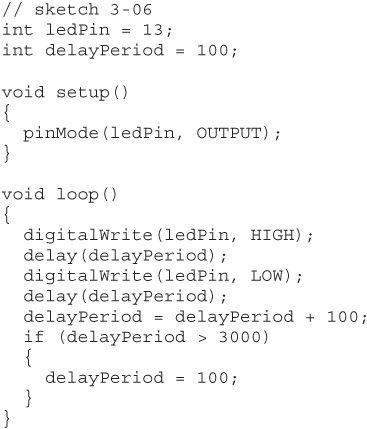
There are other cunning things that you can do with variables. Let’s modify your sketch so that the blinking starts really fast and gradually gets slower and slower, as if the Arduino is getting tired. To do this, all you need to do is to add something to the delayPeriod variable each time that you do a blink.
Modify the sketch by adding the single line at the end of the loop function so that it appears, as in the following listing, and then run the sketch on the Arduino board. Press the Reset button and see it start from a fast rate of flashing again.
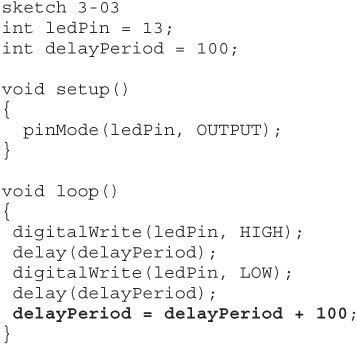
Your Arduino is doing arithmetic now. Every time that loop is called, it will do the normal flash of the LED, but then it will add 100 to the variable delayPeriod. We will come back to arithmetic shortly, but first you need a better way than a flashing LED to see what the Arduino is up to.
Experiments in C
You need a way to test your experiments in C. One way is to put the C that you want to test out into the setup function, evaluate them on the Arduino, and then have the Arduino display any output back to something called the Serial Monitor, as shown in Figures 3-5 and 3-6.
The Serial Monitor is part of the Arduino IDE. You access it by clicking on the rightmost icon in the toolbar. Its purpose is to act as a communication channel between your computer and the Arduino. You can type a message in the text entry area at the top of the Serial Monitor and when you press Return or click Send, it will send that message to the Arduino. Also if the Arduino has anything to say, this message will appear in the Serial Monitor. In both cases, the information is sent through the USB link.
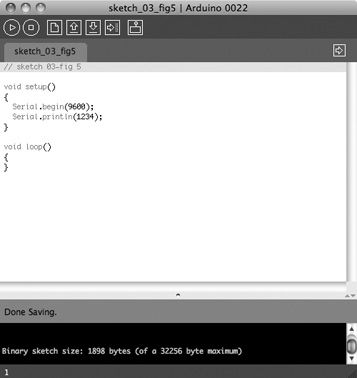
Figure 3-5 Writing C in setup
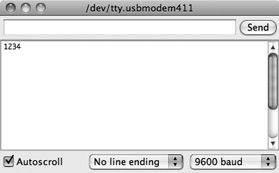
Figure 3-6 The Serial Monitor
As you would expect, there is a built-in function that you can use in your sketches to send a message back to the Serial Monitor. It is called Serial.println and it expects a single argument, which consists of the information that you want to send. This information is usually a variable.
You will use this mechanism to test out a few things that you can do with variables and arithmetic in C; frankly, it’s the only way you can see the results of your experiments in C.
Numeric Variables and Arithmetic
The last thing you did was add the following line to your blinking sketch to increase the blinking period steadily:
![]()
Looking closely at this line, it consists of a variable name, then an equals sign, then what is called an expression (delayPeriod + 100). The equals sign does something called assignment. That is, it assigns a new value to a variable, and the value it is given is determined by what comes after the equals sign and before the semicolon. In this case, the new value to be given to the delayPeriod variable is the old value of delayPeriod plus 100.
Let’s test out this new mechanism to see what the Arduino is up to by entering the following sketch, running it, and opening the Serial Monitor:
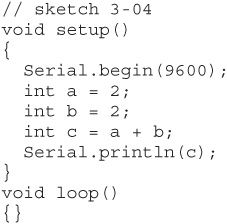
Figure 3-7 shows what you should see in the Serial Monitor after this code runs.
To take a slightly more complex example, the formula for converting a temperature in degrees Centigrade into degrees Fahrenheit is to multiply it by 5, divide by 9, and then add 32. So you could write that in a sketch like this:
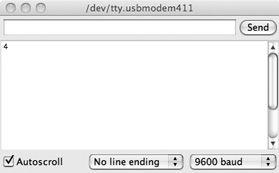
Figure 3-7 Simple arithmetic
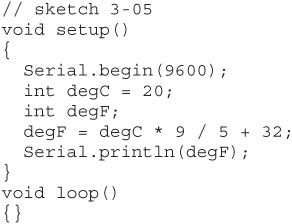
There are a few things to notice here. First, note the following line:
![]()
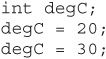
When we write such a line, we are actually doing two things: We are declaring an int variable called degC, and we are saying that its initial value will be 20. Alternatively, you could separate these two things and write the following:
![]()
You must declare any variable just once, essentially telling the compiler what type of variable it is—in this case, int. However, you can assign the variable a value as many times as you want:
So, in the Centigrade to Fahrenheit example, you are defining the variable degC and giving it an initial value of 20, but when you define degF, it does not get an initial value. Its value gets assigned on the next line, according to the conversion formula, before being sent to the Serial Monitor for you to see.
Looking at the expression, you can see that you use the asterisk (*) for multiplication and the slash (/) for division. The arithmetic operators +, −, *, and / have an order of precedence—that is, multiplications are done first, then divisions, then additions and subtractions. This is in accordance with the usual use of arithmetic. However, sometimes it makes it clearer to use parentheses in the expressions. So, for example, you could write the following:
![]()
The expressions that you write can be as long and complex as you need them to be, and in addition to the usual arithmetic operators, there are other less commonly used operators and a big collection of various mathematical functions that are available to you. You will learn about these later.
Commands
The C language has a number of built-in commands. In this section, we explore some of these and see how they can be of use in your sketches.
if
In our sketches so far, we have assumed that your lines of programming will be executed in order one after the other, with no exceptions. But what if you don’t want to do that? What if you only want to execute part of a sketch if some condition is true?
Let’s return to our gradually slowing-down Blinking LED example. At the moment, it will gradually get slower and slower until each blink is lasting hours. Let’s look at how we can change it so that once it has slowed down to a certain point, it goes back to its fast starting speed.
To do this, you must use an if command; the modified sketch is as follows. Try it out.
The if command looks a little like a function definition, but this resemblance is only superficial. The word in the parenthesis is not an argument; it is what is called a condition. So in this case, the condition is that the variable delayPeriod has a value that is greater than 3,000. If this is true, then the commands inside the curly braces will be executed. In this case, the code sets the value of delayPeriod back to 100.
If the condition is not true, then the Arduino will just continue on with the next thing. In this case, there is nothing after the “if”, so the Arduino will run the loop function again.
Running through the sequence of events in your head will help you understand what is going on. So, here is what happens:
1. Arduino runs setup and initializes the LED pin to be an output.
2. Arduino starts running loop.
3. The LED turns on.
4. A delay occurs.
5. The LED turns off.
6. A delay occurs.
7. Add 100 to the delayPeriod.
8. If the delay period is greater than 3,000 set it back to 100.
9. Go back to step 2.
We used the symbol <, which means less than. It is one example of what are called comparison operators. These operators are summarized in the following table:
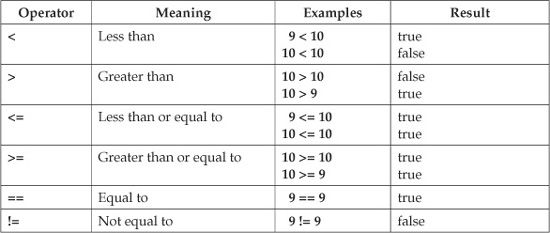
To compare two numbers, you use the == command. This double equals sign is easily confused with the character =, which is used to assign values to variables.
There is another form of if that allows you to do one thing if the condition is true and another if it is false. We will use this in some practical examples later in the book.
for
In addition to executing different commands under different circumstances, you also often will want to run a series of commands a number of times in a program. You already know one way of doing this, using the loop function. As soon as all the commands in the loop function have been run, it will start again automatically. However, sometimes you need more control than that.
So, for example, let’s say that you want to write a sketch that blinks 20 times, then paused for 3 seconds, and then started again. You could do that by just repeating the same code over and over again in your loop function, like this:

But this requires a lot of typing and there are several much better ways to do this. Let’s start by looking at how you can use a for loop and then look at another way of doing it using a counter and an if statement.
The sketch to accomplish this with a for loop is, as you can see, a lot shorter and easier to maintain than the previous example:

The for loop looks a bit like a function that takes three arguments, although here those arguments are separated by semicolons rather than the usual commas. This is just a quirk of the C language. The compiler will soon tell you when you get it wrong.
The first thing in the parentheses after for is a variable declaration. This specifies a variable to be used as a counter variable and gives it an initial value—in this case, 0.
The second part is a condition that must be true for you to stay in the loop. In this case, you will stay in the loop as long as i is less than 20, but as soon as i is 20 or more, the program will stop doing the things inside the loop.
The final part is what to do every time you have done all the things in the loop. In this case, that is to increment i by 1 so that it can, after 20 trips around the loop, cease to be less than 100 and cause the program to exit the loop.
Try entering this code and running it. The only way to get familiar with the syntax and all that pesky punctuation is to type it in and have the compiler tell you when you have done something wrong. Eventually it will all start to make sense.
One potential downside of this approach is that the loop function is going to take a long time. This is not a problem for this sketch, because all it is doing is flashing an LED. But often, the loop function in a sketch will also be checking that keys have been pressed or that serial communications have been received. If the processor is busy inside a for loop, it will not be able to do this. Generally, it is a good idea to make the loop function run as fast as possible so that it can be run as frequently as possible.
The following sketch shows how to achieve this:

You may have noticed the following line:
![]()
This is just C shorthand for the following:
![]()
So now each time that loop is run, it will take just a bit more than 200 milliseconds, unless it’s the 20th time round the loop, in which case it will take the same plus the three seconds delay between each batch of 20 flashes. In fact, for some applications, even this is too slow, and purists would say that you should not use delay at all. The best solution depends on the application.
while
Another way of looping in C is to use the while command in place of the for command. You can accomplish the same thing as the preceding for example using a while command as follows:
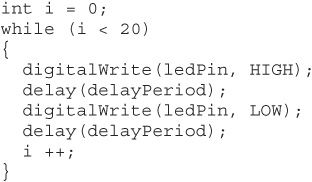
The expression in parentheses after while must be true to stay in the loop. When it is no longer true, then the sketch continues running the commands after the final curly brace.
The #define Directive
For constant values like pin assignments that do not change during the running of a sketch, there is an alternative to using a variable. You can use a command called #define that allows you to associate a value with a name. Everywhere that this name appears in your sketch, the value will be substituted before the sketch is compiled.
As an example, you could define a pin assignment for a LED like this:
![]()
Note that the #define directive does not use an “=” between the name and the value. It does not even need a “;” on the end. This is because it is not actually part of the C language itself; but is called a pre-compiler directive that is run before compilation.
This approach, in the author’s opinion, is less easy to read than using a variable, but it does have the advantage that you do not use any memory to store it. It is something to consider if memory is at a premium.
Conclusion
This chapter has got you started with C. You can make LEDs blink in various exciting ways and get the Arduino to send results back to you over the USB by using the Serial.println function. You also worked out how to use if and for commands to control the order in which your commands are executed, and learned a little about making an Arduino do some arithmetic.
In the next chapter, you will look more closely at functions. The chapter will also introduce the variable types other than the int type that you used in this chapter.
All materials on the site are licensed Creative Commons Attribution-Sharealike 3.0 Unported CC BY-SA 3.0 & GNU Free Documentation License (GFDL)
If you are the copyright holder of any material contained on our site and intend to remove it, please contact our site administrator for approval.
© 2016-2026 All site design rights belong to S.Y.A.