LEARN TO PROGRAM WITH SMALL BASIC: An Introduction to Programming with Games, Art, Science, and Math (2016)
11. EVENT-DRIVEN PROGRAMMING
So far, the programs you’ve written have been mostly sequential because they have followed the lines of code in order, from top to bottom. Some statements might have made a comparison or called a subroutine to take a detour, but overall the order of statements has been mostly linear.
In some ways, this is comparable to how you go about your daily routine: you wake up, make your bed, take a shower, eat your breakfast, watch TV, comb your hair, and so on. But what if the phone rings during your routine? If you’re expecting a call from a friend to confirm that night’s party, you’d better take it! Even though you’re doing something at that moment, you’re also listening for the phone. The minute you hear the ring (the event), you drop everything and take the call (let’s just hope it isn’t your aunt calling to see if you finished reading Little House on the Freeway).
Similarly, many computer programs (especially games) use event-driven programming, which means they listen and respond to events raised by the operating system (see Figure 11-1). Think of an event as a signal that’s raised in response to an action, like moving or clicking the mouse, clicking a button, typing on the keyboard, having a timer expire, and so on. Some objects in the Small Basic library can see these events and tell you when they happen. Programmers say that an object raised an event. You can write some exciting applications and games by handling these events (like a super fun explosion farming game). These games typically wait patiently for the player to move the mouse or press some keys, and then they take action.
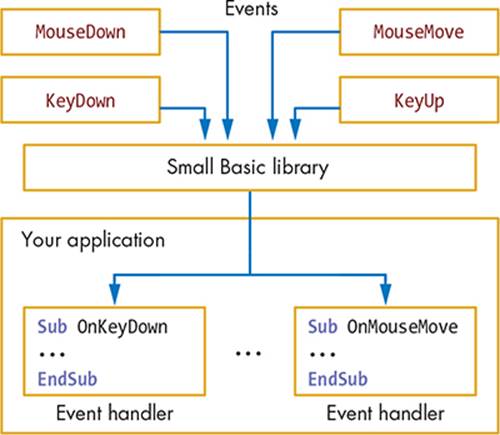
Figure 11-1: The event-driven programming model
In Figure 11-1, the events are at the top. When a user triggers an action (like pressing a key), the Small Basic library knows about it. If you want to know when an event happens, you can ask Small Basic to inform you when an event occurs so you can write programs that react to certain events.
The Small Basic library has three objects that handle events (see Figure 11-2): GraphicsWindow, Timer, and Controls. You’ll study the events of GraphicsWindow and Timer objects in this chapter, and you’ll tackle the events of the Controls object in the next chapter.
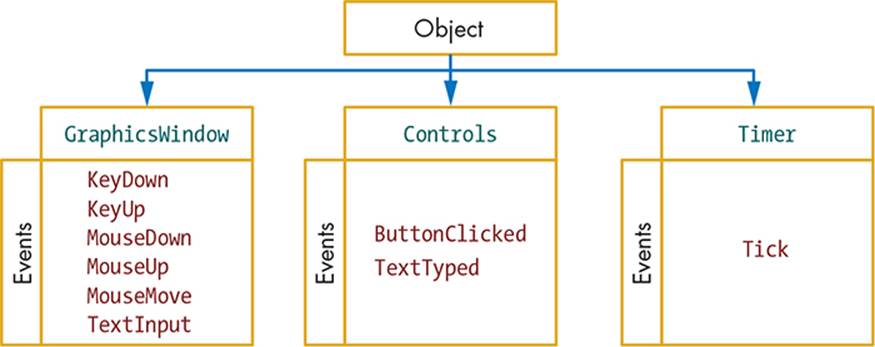
Figure 11-2: The available events in Small Basic
GraphicsWindow Events
Let’s start by exploring the events in GraphicsWindow. When a user interacts with your application, GraphicsWindow knows when keys are pressed, which keys are pressed, and if the user clicks or moves the mouse. Although GraphicsWindow knows about these events, it doesn’t automatically do anything when the events happen. You need to instruct GraphicsWindow to tell you when these events happen so you can use them. Next, you’ll learn how to use the information Small Basic knows about the user to create interesting, interactive applications.
Create Patterns with the MouseDown Event
Let’s make a simple application that draws a randomly colored circle every time the user clicks the graphics window. Enter the code in Listing 11-1.
1 ' Circles.sb
2 GraphicsWindow.MouseDown = OnMouseDown
3
4 Sub OnMouseDown
5 GraphicsWindow.PenColor = GraphicsWindow.GetRandomColor()
6 X0 = GraphicsWindow.MouseX - 10
7 Y0 = GraphicsWindow.MouseY - 10
8 GraphicsWindow.DrawEllipse(X0, Y0, 20, 20)
9 EndSub
Listing 11-1: Drawing circles with a click of the mouse
Run the program. A sample output is shown in Figure 11-3. When you click inside the graphics window, you draw a circle with a random color. Make a fun pattern, show it to someone else, and try to convince them that Pablo Picasso painted it!
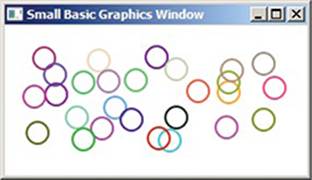
Figure 11-3: Sample output of Circles.sb
Let’s look at the code in Listing 11-1 to see how Small Basic handles event-driven programming. Figure 11-4 shows an important line in this program: line 2.
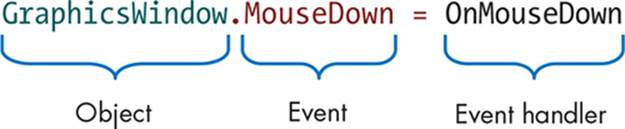
Figure 11-4: The event-handler registration statement
The statement in line 2 tells the GraphicsWindow object that when the MouseDown event happens, it should run the OnMouseDown() subroutine. This subroutine is also known as an event handler, because its purpose is to handle, or process, an event. Although you can name this subroutine anything you want, it’s common to use the format OnEventName, which is why we named the handler OnMouseDown. The statement on line 2 is known as registering an event handler. In this example, Small Basic calls the OnMouseDown() subroutine every time the user clicks inside the graphics window.
When the user clicks inside the graphics window, the x and y mouse positions (relative to the window’s upper-left corner) are saved in the MouseX and MouseY properties of GraphicsWindow. Because the program draws a circle with a diameter of 20 centered around the mouse click, it subtracts 10 from MouseX and MouseY (to mark the circle’s upper-left position) and saves the result in the X0 and Y0 variables (lines 6–7). The subroutine then draws a circle with a diameter of 20 that’s centered at the mouse-click position (line 8).
TRY IT OUT 11-1
Change the code in Listing 11-1 to draw triangles and squares instead of a circle. If you need help, refer back to Chapter 3 to review GraphicsWindow’s drawing methods.
Fire Missiles with the KeyDown Event
Many computer games are played using the keyboard. For example, the player might use the arrow keys to move the main character, the spacebar to shoot a missile, F1 to get help, P to pick the character’s nose, and ESC to exit the game. If you want to make a game that uses the keyboard for input, you need to add the KeyDown event to your program to let you know which key the user presses and when.
To understand the KeyDown event, let’s write a simple application that displays the name of each key a user presses. Enter the program in Listing 11-2.
1 ' KeyDown.sb
2 yPos = 10
3 GraphicsWindow.KeyDown = OnKeyDown
4
5 Sub OnKeyDown
6 GraphicsWindow.DrawText(10, yPos, GraphicsWindow.LastKey)
7 yPos = yPos + 15
8 EndSub
Listing 11-2: Displaying each key a user presses
A sample run, with some comments, is shown in Figure 11-5.
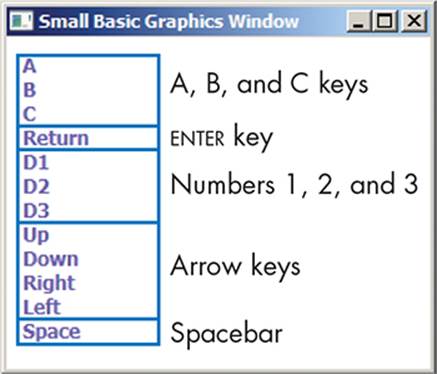
Figure 11-5: A sample run of KeyDown.sb
The yPos variable sets the vertical position where you’ll display the name of the key the user presses. It starts at 10 and increases by 15 after it shows the name of the last pressed key (line 7).
You register the KeyDown event handler on line 3. Whenever a user presses a key, the program runs the OnKeyDown() subroutine. The subroutine displays the name of the pressed key (line 6) and increases yPos by 15 (line 7) to get ready to display the name of the next key on the next line. The GraphicsWindow.LastKey property on line 6 provides the name of the pressed key (as a string). This read-only property tells you the last key a user pressed.
The importance of this example is that it shows you the names that Small Basic assigns to the different keyboard keys. If you want to create an application that responds to these keys, you need to know what Small Basic calls them. Here are some other details you should know:
1. The names of the letter keys (A–Z) are always uppercase. For example, if you type the letter "a", LastKey will register it as an uppercase "A" regardless of whether caps lock is on or if you’re holding down the SHIFT key.
2. The name of a number key (0–9) uses the form "Ddigit". For example, the name of the 5 key is "D5".
3. The four arrow keys are named "Up", "Down", "Right", and "Left".
4. The ENTER (or RETURN) key is named "Return", and the spacebar is named "Space".
5. The KeyDown event is raised continuously (about every 35 milliseconds) as long as a key is pressed. This is different from the MouseDown event, which is raised only once (when the left mouse button is clicked).
Knowing the names of the keys is important if you want to test for certain keypresses in your programs.
TRY IT OUT 11-2
Enter and run the following code. Press some keys on the keyboard and watch for their names in the text window. Press and hold a key for a while to see what happens. (Make sure the graphics window is the active window when you type.)
TextWindow.Show()
GraphicsWindow.Show()
GraphicsWindow.KeyDown = OnKeyDown
Sub OnKeyDown
TextWindow.WriteLine(GraphicsWindow.LastKey)
EndSub
What did you notice when you tried this example?
Make a Typewriter Using the TextInput Event
The TextInput event is very similar to the KeyDown event, but it’s raised only when the user presses a text-related key on the keyboard. This includes letters (A–Z), digits (0–9), special characters (such as !@#$%^&), and other keys, like ENTER, the spacebar, TAB, and BACKSPACE. When theTextInput event is raised, the last character pressed on the keyboard is saved in the GraphicsWindow.LastText property.
Let’s see how this event works. Enter the code in Listing 11-3 to simulate a typewriter. We know that typewriters are old school, but hey, it could be worse; we could be simulating an abacus!
1 ' Typewriter.sb
2 x = 0 ' x position for displaying the last character
3 y = 0 ' y position for displaying the last character
4 GraphicsWindow.Title = "Typewriter"
5 GraphicsWindow.FontName = "Courier New"
6 GraphicsWindow.TextInput = OnTextInput
7
8 Sub OnTextInput
9 Sound.PlayClick() ' Plays a typewriter sound effect
10 If (GraphicsWindow.LastKey = "Return") Then
11 x = 0 ' Moves to next line
12 y = y + 15
13 Else
14 GraphicsWindow.DrawText(x, y, GraphicsWindow.LastText)
15 x = x + 8 ' Advances x position for the next character
16 If (x > GraphicsWindow.Width) Then ' If more than right margin
17 x = 0 ' Moves to the next line
18 y = y + 15
19 EndIf
20 EndIf
21 EndSub
Listing 11-3: Making a typewriter sound with each keypress
Look at the sample output in Figure 11-6.

Figure 11-6: Sample output of Typewriter.sb
Lines 2 and 3 set the cursor at the corner of the graphics window. Line 4 gives the window a title, line 5 sets the font style, and line 6 registers the event handler. Line 9 plays the click sound, and lines 10–12 advance the line if the user presses ENTER. Line 14 writes the character entered by the user, line 15 moves the cursor to the next spot, and lines 16–18 move the cursor to the next line when the cursor gets to the right edge.
NOTE
When you experiment with this application, you’ll notice that the TextInput event looks at the states of the different keyboard keys before setting the value of the LastText property. For example, if you press the A key while holding down SHIFT, the LastText property reports an uppercase"A"; if you don’t hold down SHIFT, it reports a lowercase "a".
TRY IT OUT 11-3
Update Listing 11-3 to display each character in a random color. See Listing 11-1 for ideas on how to randomly change the color.
Draw Pictures with the MouseMove Event
To understand how to use the MouseMove event, you’ll write an application that lets a user draw with the mouse. The user clicks the left mouse button in the graphics window and then drags the mouse to draw. The complete program is shown in Listing 11-4.
1 ' Scribble.sb
2 GraphicsWindow.MouseMove = OnMouseMove
3
4 Sub OnMouseMove
5 x = GraphicsWindow.MouseX ' Current x position of mouse
6 y = GraphicsWindow.MouseY ' Current y position of mouse
7
8 If (Mouse.IsLeftButtonDown) Then
9 GraphicsWindow.DrawLine(prevX, prevY, x, y)
10 EndIf
11
12 prevX = x ' Updates the last (previous) position
13 prevY = y
14 EndSub
Listing 11-4: Drawing a line as the user moves the mouse
A sample output of Scribble.sb is in Figure 11-7.
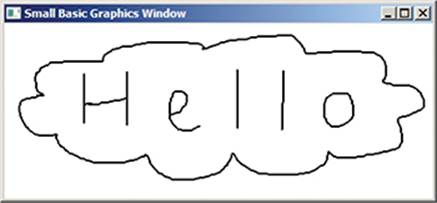
Figure 11-7: Sample output of Scribble.sb
The OnMouseMove() subroutine draws a line from the last mouse position, which you save in the variables prevX and prevY in lines 12 and 13, to the new mouse position, which you get from GraphicsWindow’s MouseX and MouseY properties. Because you want the user to draw only when the left mouse button is down, the OnMouseMove() subroutine checks the state of the left mouse button using the Mouse.IsLeftButtonDown property (line 8). This property indicates whether the left mouse button is being held down. If this value is true, the subroutine draws a line segment (line 9); if the value isn’t true, it doesn’t draw the line.
TRY IT OUT 11-4
Change Listing 11-4 to use the TextInput event to set the pen’s color (R for red, G for green, B for black, and so on).
Useful Tips
Before moving on, we’ll give you some tips for dealing with events and event handlers. You can handle multiple events using the same subroutine. For example, look at these statements:
GraphicsWindow.MouseDown = OnMouseEvent
GraphicsWindow.MouseMove = OnMouseEvent
These statements cause the MouseDown and MouseMove events to call the OnMouseEvent() subroutine. This feature can come in handy for complex games that use many events, so keep this feature in mind.
You can change the event-handler subroutine after you register it. For example, let’s say you registered the OnMouseDown() subroutine to handle the MouseDown event using this statement:
GraphicsWindow.MouseDown = OnMouseDown
If you later decide to stop responding to the MouseDown event (for example, because the game is over), you can write this statement:
GraphicsWindow.MouseDown = DoNothing
Now DoNothing is the new handler for the MouseDown event. If you don’t write any statements in your DoNothing() subroutine, your programs won’t do anything in response to the MouseDown event.
A MouseDown event is usually followed by a MouseUp event, but don’t always count on that MouseUp event happening. If you click the left mouse button in the graphics window and then move the cursor outside the graphics window before you release the button, your application receives only a MouseDown event notification. This is important to remember if you write an application that needs to pair the two events (such as if you click to grab a ball and release to throw it).
In the next section, you’ll put into practice what you’ve learned so far by creating a complete game. You’ll also learn about the Timer object and its Tick event. Get ready for an exciting adventure in computer gaming!
Create a Gold Rush Game
Let’s create a simple game in which a player uses the arrow keys to move a turtle to collect as many bags of gold as possible (see Figure 11-8). The bag of gold appears at random locations on the grid. If the player doesn’t grab the bag in 2 seconds, it moves elsewhere. Let’s see how fast you can get the turtle to move!
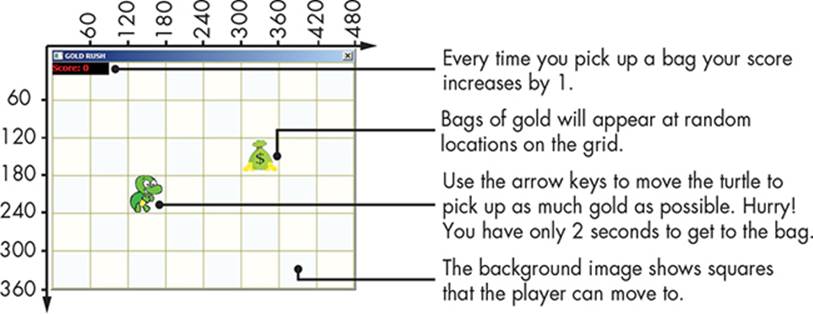
Figure 11-8: Help the turtle grab as many bags of gold as possible.
NOTE
The grid is part of the background image, but we added the x- and y-coordinates in Figure 11-8 to help you understand the numbers used in the code. Refer to this figure to picture how the turtle and the bag of gold move.
Step 1: Open the Startup File
Open the file GoldRush_Incomplete.sb from this chapter’s folder. The folder also has the three images you’ll need for this game. Follow the next four steps to walk through the application’s code. The startup file contains the program’s main code, as shown in Listing 11-5. It prepares the game’s user interface, registers the event handlers, and initializes the game’s variables. The file also contains empty placeholders (not shown in Listing 11-5) for all the subroutines you’ll add.
1 ' GoldRush_Incomplete.sb
2 GraphicsWindow.Title = "GOLD RUSH"
3 GraphicsWindow.CanResize = "False"
4 GraphicsWindow.Width = 480
5 GraphicsWindow.Height = 360
6
7 path = Program.Directory
8 grid = Shapes.AddImage(path + "\Grid.png")
9 player = Shapes.AddImage(path + "\Turtle.png")
10 gold = Shapes.AddImage(path + "\Gold.png")
11
12 ' Places the player (turtle) near the middle
13 XP = 4 ' x position (from 0 to 7)
14 YP = 3 ' y position (from 0 to 5)
15 Shapes.Move(player, XP * 60, YP * 60)
16
17 ' Creates the score text shape (over a black rectangle)
18 GraphicsWindow.BrushColor = "Black"
19 Shapes.AddRectangle(90, 20)
20 GraphicsWindow.FontSize = 14
21 GraphicsWindow.BrushColor = "Red"
22 scoreID = Shapes.AddText("Score: 0") ' For now
23
24 ' Registers two event handlers
25 GraphicsWindow.KeyDown = OnKeyDown
26 Timer.Tick = OnTick
27
28 ' Initializes variables
29 Timer.Interval = 2000 ' Ticks every 2 sec
30 score = 0 ' Keeps track of player's score
31 bagCount = 0 ' Counts how many bags so far
Listing 11-5: Setting up the Gold Rush game
Lines 3–5 set the size of the graphics window to match the size of the background image (grid.png). Lines 8–10 use the Shapes object to load the three images (the background grid, the turtle, and the bag of gold) and save the returned identifiers. You’ll need the identifiers to move the turtle and the bag of gold later. Lines 13–15 place the turtle near the middle of the grid. Note that each square on the grid is 60×60 pixels.
Lines 18–22 create the text shape you’ll use to display the player’s score. The score is displayed in red on a black background in the upper-left corner of the screen (see Figure 11-8). Lines 25–26 register two event handlers. The OnKeyDown handler checks the arrow keys and then moves the turtle as the player controls it. The OnTick handler handles the Timer object’s Tick event to limit the player’s time to reach each bag. Line 29 sets the timer interval to 2 seconds (2,000 milliseconds), telling the Timer object to raise a Tick event every 2 seconds. Then the code initializes the two variables score and bagCount to 0: score keeps track of the player’s score (line 30), and bagCount keeps track of how many bags have appeared so far (line 31).
Run the code; you should see the turtle in the middle of the grid, the bag of gold in the upper-left square of the grid, and the score text showing 0.
Step 2: Move the Turtle
To move the turtle when the player presses the arrow keys, add the code in Listing 11-6 to the bottom of your file.
1 Sub OnKeyDown
2 key = GraphicsWindow.LastKey
3 If ((key = "Up") And (YP > 0)) Then
4 YP = YP - 1
5 ElseIf ((key = "Down") And (YP < 5)) Then
6 YP = YP + 1
7 ElseIf ((key = "Left") And (XP > 0)) Then
8 XP = XP - 1
9 ElseIf ((key = "Right") And (XP < 7)) Then
10 XP = XP + 1
11 EndIf
12 Shapes.Move(player, XP * 60, YP * 60)
13 CheckTouch() ' Checks if the player touched the bag
14 EndSub
Listing 11-6: Moving the turtle as the player presses the arrow keys
The grid has eight horizontal and six vertical squares. Squares in the horizontal direction are numbered 0 to 7, and squares in the vertical direction are numbered 0 to 5. That means the XP variable (the player’s x position) takes any value between 0 and 7, and the YP variable (the player’s y position) takes any value between 0 and 5. The OnKeyDown() subroutine uses an If/ElseIf ladder to check whether the pressed key is one of the four arrow keys. If one of the arrow keys is pressed while the turtle is in the graphics window, the subroutine adjusts XP or YP according to the pressed arrow key.
For example, lines 3 and 4 check if the player pressed the up arrow, and if the turtle hasn’t reached the top edge yet, the turtle moves up one square. You can find the exact location on the grid (in pixels) by multiplying the square’s number by 60 (because each square is 60 pixels), which is what line 12 does. The code then calls the CheckTouch() subroutine to check if the player touched the bag of gold.
Run the application again to check the code you just added. You should be able to move the turtle over the square grid using the arrow keys on the keyboard. It’s alive!
Step 3: Move the Bag of Gold
Now you’ll add the OnTick handler to create a time limit and the code for moving the bag of gold to a new spot. Add the subroutine in Listing 11-7 to the bottom of your program.
1 Sub OnTick ' Timer expires
2 NewRound()
3 EndSub
Listing 11-7: The OnTick() subroutine
As mentioned earlier, the bag of gold appears at a random location and gives the player 2 seconds to grab it. If the timer expires, the player loses because they didn’t grab the bag in time. In this case, the OnTick handler calls the NewRound() subroutine (line 2) to start another round of the game.
The NewRound() subroutine is shown in Listing 11-8. Add it to the bottom of your program.
1 Sub NewRound
2 bagCount = bagCount + 1
3 If (bagCount <= 20) Then
4 XG = Math.GetRandomNumber(8) - 1 ' From 0 to 7
5 YG = Math.GetRandomNumber(6) - 1 ' From 0 to 5
6 Shapes.Move(gold, XG * 60, YG * 60)
7 CheckTouch()
8 Else
9 Shapes.Remove(gold) ' Deletes the gold bag shape
10 GraphicsWindow.KeyDown = OnGameOver ' Do nothing
11 Timer.Tick = OnGameOver ' Do nothing
12 EndIf
13 EndSub
Listing 11-8: Starting a new round when the timer expires
The NewRound() subroutine starts by increasing bagCount by 1 (line 2); bagCount just counts how many bags have appeared so far. The plan is to show a total of 20 bags to the player. If 20 total bags have not been shown (line 3), the subroutine selects a random position for the bag (lines 4–5) and then moves the bag to that location in the graphics window (line 6). We use the variables XG and YG (for the x- and y-positions of the bag of gold) in the CheckTouch() subroutine. After moving the bag, the code calls CheckTouch() to see if the bag was placed right on top of the player (line 7)—how lucky!
If bagCount is more than 20 (line 8), we delete the gold bag shape (line 9) and register the OnGameOver handler, which is a subroutine with no statements, for both the KeyDown and the Tick events to end the game. Then when the player presses the arrow keys or when the timer expires after bag 20 has appeared, nothing happens. Of course, this might surprise the user. There are other ways to end the game, but we’ll leave this to your imagination if you want to change it later.
The next subroutine you need to add is the OnGameOver() subroutine shown in Listing 11-9.
1 Sub OnGameOver
2 EndSub
Listing 11-9: The OnGameOver() subroutine
If you run the game at this point, the bag of gold should move to random positions on the grid every 2 seconds. You can still move the turtle with the arrows. After 20 bags have appeared, the bag of gold disappears, and the arrow keys will no longer move the turtle.
As you test this game, you might decide to give the user more time to pick up the bags or to remove the lucky feature where a bag could appear right on top of the player. Play around with this code until you think your game is fun to play.
Step 4: Update the User’s Score
To complete the game, add the CheckTouch() subroutine in Listing 11-10 to check whether the player successfully picked up a bag of gold and, if so, increase their score.
1 Sub CheckTouch
2 If ((XP = XG) And (YP = YG)) Then
3 score = score + 1 ' Gives the player one point
4 Shapes.SetText(scoreID, "Score: " + score)
5 Sound.PlayClick() ' Adds sound effect
6 Timer.Pause() ' Resets the timer
7 Timer.Resume() ' Starts the timer
8 NewRound() ' Starts a new round
9 EndIf
10 EndSub
Listing 11-10: Checking whether the turtle gets to the money
If the player’s x- and y-positions are the same as the bag, the turtle grabs the bag (line 2). Happy turtle! If the lucky turtle gets the bag of gold, we increase the score (line 3), show it (line 4), and use the Sound object to play a short click (line 5) for a nice audio effect.
We also need to reset the timer to 2 seconds for the new round. We do this by pausing the timer (line 6) and then resuming it (line 7). Then we call NewRound() to set another bag in a random spot after this historic triumph. Can your turtle do it again?
This completes the game, and you should be able to enjoy your creation after all this hard work. What’s your top score? (Tip: hold down the arrow key to move across squares faster.) Share it with your friends (just click Publish in the Toolbar) to see if they can beat your score. Have fun!
TRY IT OUT 11-5
Think of some ways to enhance the game, and try out your ideas. Here are some ideas you could try:
• End the game with a bigger bang! Display a message or show some interesting graphics.
• Add a second bag of gold.
• Make the time limit shorter each time the user grabs the bag.
Head to http://tiny.cc/turtlegame/ to share your turtle game updates.
Programming Challenges
If you get stuck, check out http://nostarch.com/smallbasic/ for the solutions and for more resources and review questions for teachers and students.
1. He-Man is hanging out with his friends playing Twilight trivia and needs a buzzer for when his friends get a question wrong. Make a program that draws a big X in the graphics window and plays a sound when He-Man clicks the left mouse button. The next click should erase the X. Make sure He-Man can repeat this as often as he wants (it’s a long trivia game).
2. Make a program that stamps a turtle-face image where the mouse was clicked each time the user clicks the mouse. Get turtleface.jpg from this chapter’s folder. (Hint: start with the code in Listing 11-1, and use the GraphicsWindow.DrawImage() method to draw your image.)
3. Open the Maze_Incomplete.sb file from this chapter’s folder. The goal is to exit the maze in the shortest possible time, but this maze has no exit yet. Figure out how to add a maze exit condition. When the player exits the maze, display the time it took to solve the maze.
All materials on the site are licensed Creative Commons Attribution-Sharealike 3.0 Unported CC BY-SA 3.0 & GNU Free Documentation License (GFDL)
If you are the copyright holder of any material contained on our site and intend to remove it, please contact our site administrator for approval.
© 2016-2026 All site design rights belong to S.Y.A.