LEARN TO PROGRAM WITH SMALL BASIC: An Introduction to Programming with Games, Art, Science, and Math (2016)
17. EXPANDING TO HIGHER-DIMENSION ARRAYS
In the previous two chapters, you learned how to use one-dimensional arrays to store collections of items. In this chapter, we’ll expand this concept to two dimensions and higher. Working in more than one dimension is also called working in higher dimensions.
In a two-dimensional (2D) array, you can store values in a table or a grid. For example, think about the scoreboard at a baseball game (see Figure 17-1). The left column lists the team names, and the right columns list the innings and other statistics.
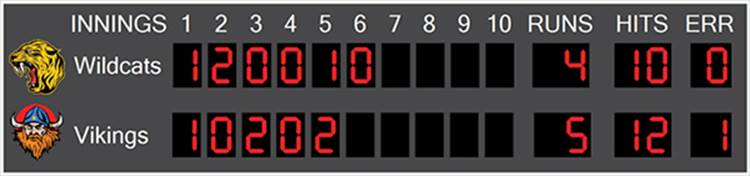
Figure 17-1: Baseball scoreboard
The arrays you’ll make in this chapter are similar to a scoreboard. They let you organize your data in rows and columns.
When you complete this chapter, you’ll understand 2D and other higher-dimensional arrays and you’ll be able to use them to build new types of applications, including a treasure-hunting game!
Two-Dimensional Arrays
A 2D array has two dimensions: rows and columns. You can think of a 2D array as a table. For example, Figure 17-2 shows a 2D array named score that stores a student’s test scores in three subjects.
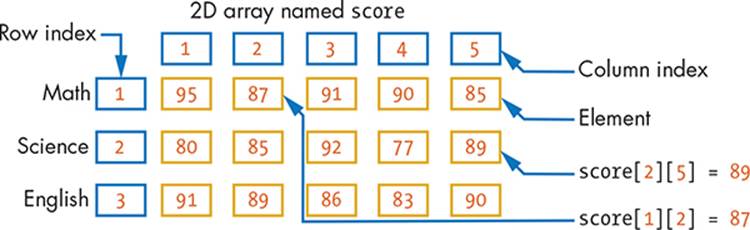
Figure 17-2: A pictorial view of a 2D array
The first row contains math test scores, the second row records the science test scores, and the next row stores English scores. This 2D arrangement of elements is also referred to as a matrix (the plural is matrices). But this matrix won’t teach you slow-motion kung fu!
To access the individual elements of a matrix, you need two indices: one for the rows and the other for the columns. Here are some examples:
score[1][1] = 95 ' Row 1, column 1
score[1][2] = 87 ' Row 1, column 2
score[2][1] = 80 ' Row 2, column 1
score[2][3] = 92 ' Row 2, column 3
The variable score is a double-scripted variable because it requires two indices to access its elements. The first index is the row number, and the second index is the column number.
As with one-dimensional arrays, the index of each dimension can be a number or a string. Also, the values stored in the matrix can be numbers, strings, or other identifiers returned by objects in the Small Basic library. Let’s look at some simple examples of 2D arrays next.
A Random Matrix
A client named MI6 wants your help to generate passwords for security locks. The program shown in Listing 17-1 creates a matrix named mat consisting of random numbers. The matrix contains three rows and four columns, which is a 3×4 (read 3 by 4) matrix, or a 3×4 array.
1 ' Random2DArray.sb
2 For r = 1 To 3 ' 3 rows
3 For c = 1 To 4 ' 4 columns
4 mat[r][c] = Math.GetRandomNumber(9)
5 EndFor
6 EndFor
7
8 ' Displays the matrix to see its contents
9 For r = 1 To 3 ' 3 rows
10 For c = 1 To 4 ' 4 columns
11 TextWindow.Write(mat[r][c] + " ")
12 EndFor
13 TextWindow.WriteLine("")
14 EndFor
Listing 17-1: Filling a 3×4 array with random numbers
The program uses a nested For loop to fill the matrix with random numbers (lines 2–6). Nested For loops are extremely helpful when you’re working with 2D arrays, because you can use one to loop through rows and the other to loop through columns. In this example, the outer loop uses a control variable r (for rows) and runs from 1 to 3 (line 2); the inner loop uses a control variable c (for columns) and runs from 1 to 4 (line 3).
The first pass of the outer loop (r = 1) causes four passes inside the inner loop (c = 1, 2, 3, and 4), which fills mat[1][1], mat[1][2], mat[1][3], and mat[1][4]. The second pass of the outer loop (r = 2) causes another four iterations of the inner loop (c = 1, 2, 3, and 4) and fills mat[2][1],mat[2][2], mat[2][3], and mat[2][4]. Likewise, the third pass of the outer loop (r = 3) fills the third row of the matrix. Figure 17-3 illustrates this process.
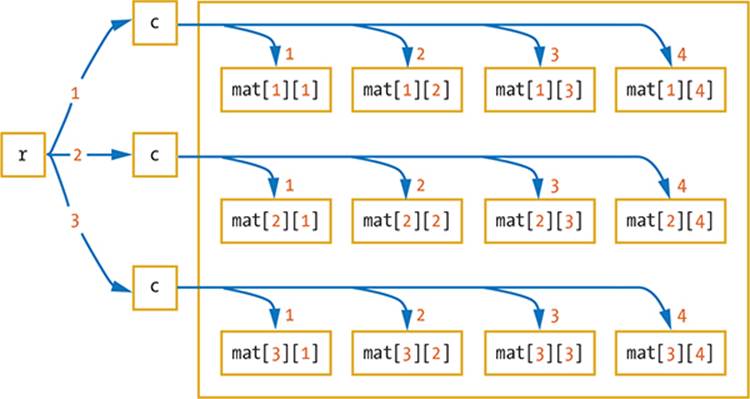
Figure 17-3: Using a nested For loop to access the elements of a matrix
Following along with this figure, when r = 1, the program takes the top c branch and fills in all four sets of the 2D array elements. When r = 2, it iterates through the middle branch four times. When r = 3, it iterates through the bottom branch.
After filling the matrix with random numbers, the program uses another nested loop to display its contents (lines 9–14) using a similar process. The outer loop runs from 1 to 3 to index the three rows (line 9), and the inner loop runs from 1 to 4 to index the four columns (line 10). Line 11 displays the element at index mat[r][c] (column c in row r), followed by a space. When the inner loop ends, it means an entire row has been displayed, and the cursor moves to the next line to prepare to display the next row (line 13).
It’s time to turn your program over to your MI6 client. Here’s a sample output of this program, but your output will most likely be different:
2 8 1 6
3 9 3 9
1 5 7 8
You can make matrices even more useful by programming them to accept user input. We’ll look at how to do that next.
TRY IT OUT 17-1
In Listing 17-1, the numbers in the matrix are stored by rows. First, row 1 is filled, then row 2, and finally row 3. The reason is that we made the r loop (which represents rows) the outer loop and the c loop (which represents columns) the inner loop. Change the program so it fills the matrix by columns first instead of rows.
A Matrix with User Input
Your MI6 client loves the program you built, but now they want to be able to enter certain numbers into the password matrix. You can easily change Listing 17-1 to take input from the user instead of using random numbers. Just replace line 4 with the following two lines:
TextWindow.Write("mat[" + r + "][" + c + "]: ")
mat[r][c] = TextWindow.ReadNumber()
The first statement prompts the user to enter an element in the matrix, and the second line reads and stores the user’s entry. Make this change, and try it out to see how it works.
But matrices aren’t only about numbers. You can use them to make some fun, colorful applications too. In the next example, you’ll create a colorful grid and animate it.
Animated Squares
Let’s write a program that creates a 4×8 grid of randomly colored squares and then animates these squares to fly to the upper-left corner of the graphics window, as shown in Figure 17-4.
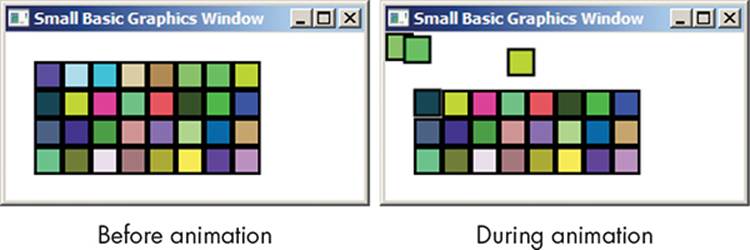
Figure 17-4: Illustrating the output of AnimatedSquares.sb
The complete application is shown in Listing 17-2.
1 ' AnimatedSquares.sb
2 ' Creates a 4x8 grid of randomly colored squares
3 For r = 1 To 4 ' 4 rows
4 For c = 1 To 8 ' 8 columns
5 clr = GraphicsWindow.GetRandomColor()
6 GraphicsWindow.BrushColor = clr
7 box[r][c] = Shapes.AddRectangle(20, 20) ' Adds a square
8 Shapes.Move(box[r][c], c * 20, r * 20) ' Positions it
9 EndFor
10 EndFor
11
12 ' Animates the squares to the upper-left corner of the window
13 For r = 1 To 4
14 For c = 1 To 8
15 Shapes.Animate(box[r][c], 0, 0, 1000)
16 Program.Delay(400) ' A small delay (in milliseconds)
17 EndFor
18 EndFor
Listing 17-2: Using a matrix to store shape IDs
The program uses a nested For loop to create the squares (lines 3–10). The outer loop (which creates the rows) runs four times, and the inner loop (which creates the columns) runs eight times (lines 3–4), for a total of 32 iterations (4×8). In each pass of the inner loop, the square’s color is set by changing the BrushColor property (lines 5–6), and a square is created by calling AddRectangle(). We save its identifier in box[r][c] (line 7) and then move the created square to its position on the square grid (see Figure 17-4). Let’s take a closer look at lines 7–8.
At line 7, the AddRectangle() method takes the width and the height of the desired rectangle and returns an identifier of the created shape. In this example, we pass 20 for both arguments to create a square, and we save the returned identifier in box[r][c].
To move the square, we call the Move() method of the Shapes object (line 8). This method takes three arguments: the identifier of the shape we want to move and the x- and y-coordinates of the position we’re moving it to. The squares in each row have their x positions (left edge) at 1 × 20 = 20, 2 × 20 = 40, 3 × 20 = 60, and so on. The squares in each column have their y positions (top edge) at 1 × 20 = 20, 2 × 20 = 40, 3 × 20 = 60, and so on. This is why we use c * 20 and r * 20 in the call to Move().
At the end of this For loop, the box matrix contains 32 unique identifiers for the 32 squares created by the Shapes object.
The program then animates the squares (lines 13–18), using a nested For loop to access the rows and the columns of box. During each iteration, we ask the Shapes object to animate one square (line 15) and then pause for a short time (line 16). The Animate() method takes four arguments: the identifier of the shape we want to animate, the x- and y-coordinates of the destination, and the animation duration in milliseconds. We ask the Shapes object to move each square to point (0, 0) in 1 second (1000 milliseconds).
TRY IT OUT 17-2
Change the program in Listing 17-2 to animate the squares by columns instead of by rows. If you’re feeling artistic, try moving the squares to create a pattern in the graphics window.
Using String Indices
The previous examples used integer indices to access the elements of a matrix. Our next example teaches you how use strings for indices. You’ll examine an application that keeps track of students’ scores in different subjects.
Welcome to Professor Xavier’s School for Gifted Youngsters! The class has only three students right now: Scott, Jean, and Logan (the others are on an important mission). The school teaches only three subjects: math, science, and combat. Let’s write a program that prompts the user to enter a student’s name and then displays the student’s average score. The complete program is shown in Listing 17-3.
1 ' StudentAvg.sb
2 score["Scott"]["Math"] = 92
3 score["Scott"]["Science"] = 90
4 score["Scott"]["Combat"] = 87
5 score["Jean"]["Math"] = 85
6 score["Jean"]["Science"] = 82
7 score["Jean"]["Combat"] = 92
8 score["Logan"]["Math"] = 85
9 score["Logan"]["Science"] = 95
10 score["Logan"]["Combat"] = 99
11
12 TextWindow.Write("Enter student name: ")
13 name = TextWindow.Read()
14 sum = score[name]["Math"]
15 sum = sum + score[name]["Science"]
16 sum = sum + score[name]["Combat"]
17 avg = Math.Round(sum / 3)
18 TextWindow.WriteLine(name + " average score = " + avg)
Listing 17-3: Using strings for indices
The program starts by initializing the score matrix with the scores of the three students (lines 2–10). Rows are indexed by the students’ names, and columns are indexed by the subjects. Figure 17-5 shows a visual representation of the score matrix.
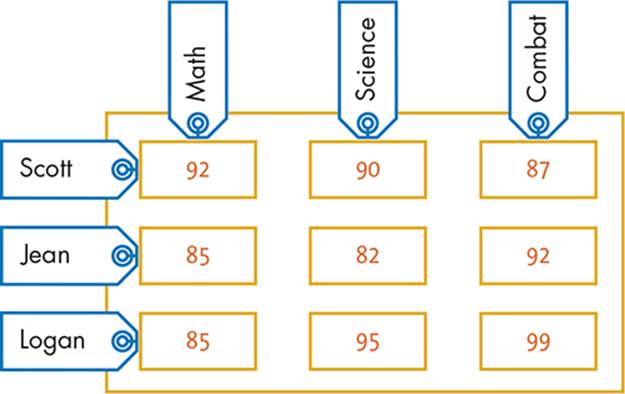
Figure 17-5: The score matrix in Listing 17-3
The program prompts the user to enter a student’s name (line 12) and assigns the input to the name variable (line 13). It then pulls that student’s math score into the sum variable (line 14), adds the student’s science score to sum (line 15), and adds the student’s combat score (line 16). Finally, the program computes the average score (line 17) and displays it (line 18).
Here’s the output from a sample run:
Enter student name: scott
scott average score = 90
The string index is case insensitive, which is why the program worked when we entered scott with a lowercase s. What do you think the output will be if you enter an invalid student name? Run the program to check your answer.
TRY IT OUT 17-3
Update the program in Listing 17-3 to display the score of a student in a given subject. Have the user enter the name of the student and the subject.
Going Interactive
Let’s explore how to get the students’ scores from the user rather than hardcoding them within the program like we did in Listing 17-3. We’ll use two loops to iterate over the students’ names and subjects, as shown in the following pseudocode (you’ll learn how to translate this pseudocode into real code in a moment):
For each student in the array: [Scott, Jean, Logan]
For each subject in the array: [Math, Science, Combat]
score[student][subject] = read score from user
EndFor
EndFor
You can save the names of the students in a one-dimensional array, save the names of the subjects in another one-dimensional array, and then use nested For loops with integer indices to access the individual elements of these two arrays. Then you can use the strings (student name and subject) as indices for a score matrix. Check out Listing 17-4 to see the code in action.
1 ' StudentAvg2.sb
2 nameList = "1=Scott;2=Jean;3=Logan;"
3 subjList = "1=Math;2=Science;3=Combat;"
4
5 For I = 1 To 3 ' Three students
6 name = nameList[I] ' Name of the Ith student
7 For J = 1 To 3 ' Three subjects
8 subj = subjList[J] ' Name of Jth subject
9 TextWindow.Write(name + "'s " + subj + " score: ")
10 score[name][subj] = TextWindow.ReadNumber()
11 EndFor
12 EndFor
13 TextWindow.Write("Enter student name: ")
14 name = TextWindow.Read()
15 sum = score[name]["Math"]
16 sum = sum + score[name]["Science"]
17 sum = sum + score[name]["Combat"]
18 avg = Math.Round(sum / 3)
19 TextWindow.WriteLine(name + " average score = " + avg)
Listing 17-4: Reading scores from the user
The program starts by creating the name and subject arrays (lines 2–3). Then a nested loop starts to fill the score matrix. The outer loop iterates over the students, and the inner loop iterates over the subjects.
The outer loop starts with I = 1. Here name gets assigned to nameList[1], which is "Scott" (line 6). Then the inner loop runs three times, the first time with J = 1, and subject gets assigned to subjList[1], which is "Math" (line 8). Line 9 displays Scott's Math score:, and line 10 waits for the user’s input. The number entered by the user is saved in score["Scott"]["Math"], and the inner loop repeats for J = 2. Now subject gets assigned to subjList[2], which is "Science". The program displays Scott's Science score:, waits for the user’s input, stores the entered number inscore["Scott"]["Science"], and repeats the inner loop with J = 3. Now subject gets assigned to subjList[3], which is "Combat". The program displays Scott's Combat score:, waits for the user’s input, and stores the entered number in score["Scott"]["Combat"]. This ends the inner loop.
The outer loop repeats with I = 2. This sets name to nameList[2], which is "Jean" and the inner loop works again to fill score["Jean"]["Math"], score["Jean"]["Science"], and score["Jean"]["Combat"].
The outer loop repeats with I = 3. This sets name to nameList[3], which is "Logan", and the inner loop works again to fill score["Logan"]["Math"], score["Logan"]["Science"], and score["Logan"]["Combat"].
Trace through this second version of the program to understand how it works. Thinking through what happens at each step is a great way to learn how matrices work!
TRY IT OUT 17-4
Replace the statements that find the sum (lines 15–17) in Listing 17-4 with a For loop, as shown in the following code snippet:
sum = 0
For J = 1 To 3
' Add each student's score in the Jth subject to sum
EndFor
Common Operations on Numerical 2D Arrays
In this section, we’ll develop a useful set of subroutines that can perform common operations on a 2D array made up of numbers. We’ll use the sales of a fake company, Duckberg Industries, whose December sales report is shown in Figure 17-6. The company has four stores (Beddy Buyz, UBroke I.T. Emporium, LAN Lord’s Cyber Store, and Mother Bored Electronics) and sells five types of products: Exploding Shoes (eShoes), the iShirt Computer (iShirt), Shampoop, Dehydrated Water (dWater), and the Invisible Hat (iHat). The numbers are the sales of each product in thousands.
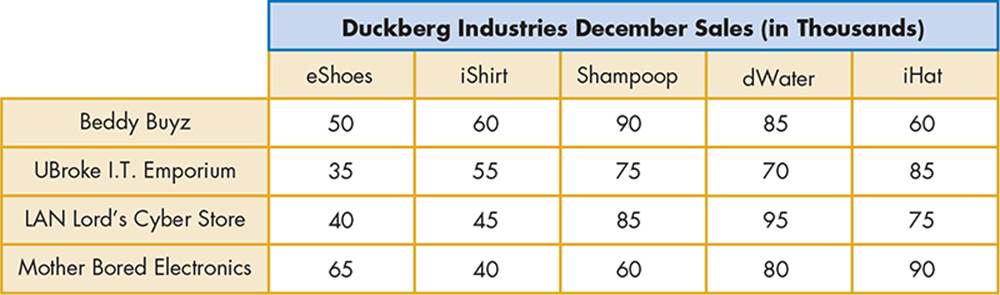
Figure 17-6: Duckberg Industries’ December sales report
Open the file Duckberg_Incomplete.sb from this chapter’s folder. The file contains the data in Figure 17-6 in a sequence of statements that looks like this:
sales[1][1] = 50 ' Beddy Buyz store; Exploding Shoes sales
sales[1][2] = 60 ' Beddy Buyz store; iShirt Computer sales
--snip--
sales[4][4] = 80 ' Mother Bored Electronics; Dehydrated Water sales
sales[4][5] = 90 ' Mother Bored Electronics; Invisible Hat sales
The program also defines the following variables:
ROWS = 4 ' Number of rows
COLS = 5 ' Number of columns
product = "1=eShoes;2=iShirt;3=Shampoop;4=dWater;5=iHat"
Follow the instructions in the next two sections to complete the program.
Step 1: Add All Elements
Donald, the company’s sales manager, wants to know the total sales of the company. You need to add all the numbers in the sales matrix. The TotalSales() subroutine in Listing 17-5 shows you how to do that.
1 Sub TotalSales
2 sum = 0 ' Initializes the running sum
3 For r = 1 To ROWS ' For all rows
4 For c = 1 To COLS ' For all columns
5 sum = sum + sales[r][c] ' Adds number at row r, column c
6 EndFor
7 EndFor
8 TextWindow.WriteLine("Total Sales: $" + sum + " K")
9 EndSub
Listing 17-5: Adding all numbers in a matrix
You start by initializing the sum variable (which holds the running sum) to 0 (line 2). You then use a nested loop to iterate over all the rows and columns (lines 3–4). For each iteration, you add the number stored in sales[r][c] to sum (line 5). When the outer loop ends, you display the result followed by K for thousands (line 8).
Add this subroutine to the program, and then add a statement to call it. Here’s what you should see when you call the TotalSales() subroutine:
Total Sales: $1340 K
Step 2: Find the Sum of Each Column
Donald also wants to see the total sales for each Duckberg Industries product. He needs to compare these numbers with those from his competitors to assess his company’s market share.
To give Donald this information, you’ll use the ColumnSum() subroutine in Listing 17-6 to compute the sum of each column in the sales matrix.
1 Sub ColumnSum
2 For c = 1 To COLS ' For each column
3 sum = 0 ' Initializes the sum for column c
4 For r = 1 To ROWS ' Iterates over the rows
5 sum = sum + sales[r][c] ' Adds number at row r, column c
6 EndFor
7 colName = product[c] + " Sales: $" ' Name to display
8 TextWindow.WriteLine(colName + sum + " K")
9 EndFor
10 EndSub
Listing 17-6: The ColumnSum() subroutine
You start the outer loop to iterate over the five columns (line 2). For each column (each value of c), you initialize the column’s sum to 0 (line 3) and then start a For loop to add the numbers from all the rows in that column to sum (lines 4–6). When the inner loop completes, you get the name of the current product (from product[c]), append "Sales: $" to it, and save the resulting string in colName (line 7). In line 8, you display that string followed by the sum you just computed. The outer loop then restarts to find and display the sum for the next column.
Add this subroutine to the program, and then add a statement to call it. Here’s what you should see when you call the ColumnSum() subroutine:
eShoes Sales: $190 K
iShirt Sales: $200 K
Shampoop Sales: $310 K
dWater Sales: $330 K
iHat Sales: $310 K
TRY IT OUT 17-5
Donald wants to review the performance of his four stores by comparing the total sales of each store. Write a subroutine, RowSum(), that calculates and displays the sum for each row of the sales matrix.
Arrays of Three or More Dimensions
You’ve learned that using 2D arrays is a convenient way to represent a table or a matrix. Small Basic also supports arrays with more than two dimensions. You can extend the syntax for creating 2D arrays to create arrays with even higher dimensions. Next we’ll explore how to create three-dimensional (3D) arrays in Small Basic.
Let’s work with a shelf that has five racks. Each rack has three rows and four columns, and each position on the shelf has a box that contains screws of a certain size. Look at Figure 17-7 and imagine boxes of different screw sizes in each column and row (that’s 12 boxes). Then imagine that same number of boxes on all five racks. That’s 60 boxes in total!
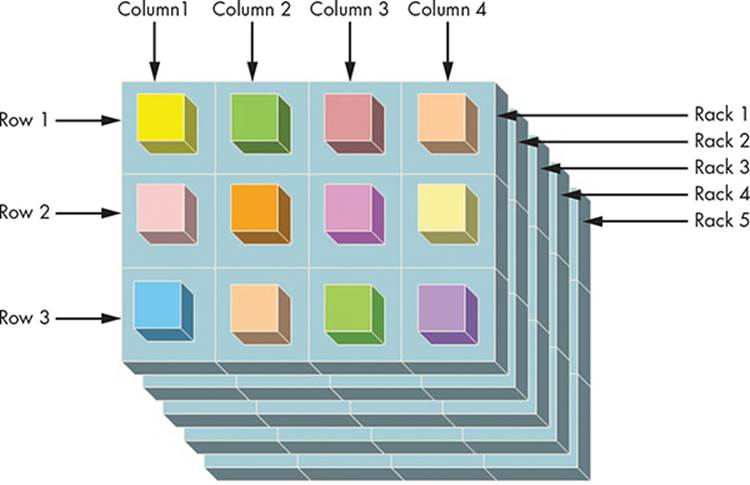
Figure 17-7: Visualizing a 3D array
We’ll examine a program that fills each box with a random number that indicates the size of the screws in that box. The program is shown in Listing 17-7.
1 ' 3DArrayDemo.sb
2 For rack = 1 To 5 ' For each rack
3 For row = 1 To 3 ' For each row
4 For col = 1 To 4 ' For each column
5 box[rack][row][col] = Math.GetRandomNumber(9)
6 EndFor
7 EndFor
8 EndFor
Listing 17-7: Demonstrating the syntax for 3D arrays
This program creates a 3D array named box. Its elements are indexed with three subscripts: rack runs from 1 to 5 (line 2), row runs from 1 to 3 (line 3), and col runs from 1 to 4 (line 4). This array has 60 elements (5×4×3), just like the shelf in the example. Line 5 uses the syntax box[rack] [row][col] to access the box in rack number rack, row number row, and column number col, and it puts a random number in that box.
Notice that another nested For loop is used, but in this example, we nested three For loops instead of just two (lines 2–4). Generally, you’ll need to use one For loop per dimension in your higher-dimension array; as a result, you’ll be able to access every element in your array!
In the next section, you’ll use what you’ve learned so far to create an exciting treasure game. Get ready for another adventure!
TRY IT OUT 17-6
Write a program that displays the output of the box array in Listing 17-7. Your output should have the following format:
Rack 1:
2 7 3 2
4 3 1 3
1 2 6 4
Rack 2:
8 8 2 1
7 4 2 7
1 5 2 7
--snip--
Create a Treasure Map Game
You woke up one morning and found you were alone on an island. A treasure map and an old compass were lying next to you. You could hardly hold back your excitement! You decided to look for the treasure. Figure 17-8 shows a sample map of the island.
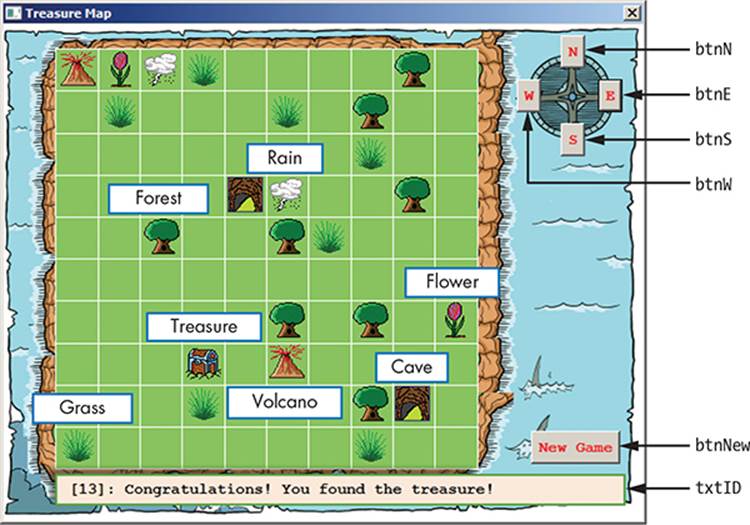
Figure 17-8: The user interface for the Treasure Map game
You can move north, east, south, or west, one block at a time. But because the compass is old, it might lead you in the wrong direction. For example, if you go north or south, there’s a 20 percent chance that you’ll also move one block to the left or to the right. And if you go east or west, there’s a 20 percent chance that you’ll also move one block up or down. Each time you move, you’ll receive information about your current location. The game ends if you find the treasure or if you fall in the water where the hungry sharks are waiting! Don’t think of Jaws while you’re playing this game! (Sorry, that probably didn’t help.)
Because you have the treasure map in your hands, you should be able to guess your location. For example, let’s say you’re in a forest, and when you click the S button to go south, the game tells you you’re now next to a volcano. Looking at the map, you can figure out that the treasure is just two blocks west.
The following sections will guide you step-by-step to show you how to put this game together. Adventure awaits!
Step 1: Open the Startup File
Open the TreasureMap_Incomplete.sb file from this chapter’s folder. This file contains some comments and placeholders for the required subroutines. You’ll add all the code one step at a time.
This folder also contains the eight images you’ll use. Background.png is a 580×450 image of the game’s background, and the seven 32×32 icons are the different objects on the treasure map.
NOTE
If you run into any problems, check out the finished program TreasureMap.sb, which is also included in this chapter’s folder.
Step 2: Create the GUI Elements
Add the code in Listing 17-8 to initialize the GraphicsWindow and create the controls (buttons and text shapes) for the game.
1 GraphicsWindow.Title = "Treasure Map"
2 GraphicsWindow.Width = 580
3 GraphicsWindow.Height = 450
4 GraphicsWindow.CanResize = "False"
5 GraphicsWindow.FontSize = 14
6 GraphicsWindow.FontName = "Courier New"
7
8 ' Creates a text shape for showing the player's location
9 GraphicsWindow.BrushColor = "Black"
10 txtID = Shapes.AddText("")
11 Shapes.Move(txtID, 60, 415)
12
13 ' Creates the 4 movement buttons and the new game button
14 GraphicsWindow.BrushColor = "Red"
15 btnN = Controls.AddButton("N", 507, 10)
16 btnS = Controls.AddButton("S", 507, 90)
17 btnW = Controls.AddButton("W", 467, 50)
18 btnE = Controls.AddButton("E", 541, 50)
19 btnNew = Controls.AddButton("New Game", 480, 370)
20
21 Controls.ButtonClicked = OnButtonClicked
22
23 NewGame()
Listing 17-8: Initializing GraphicsWindow
Lines 1–6 set the properties of GraphicsWindow. Lines 9–11 create and position the text that tells the player their current position on the island, and lines 14–19 create the five buttons (see Figure 17-8). Line 21 registers a handler to process the buttons, and line 23 calls NewGame() to start a new game.
Step 3: Start a New Game
Now you’ll add the NewGame() subroutine. This subroutine (shown in Listing 17-9) is called when the player clicks the New Game button.
1 Sub NewGame
2 gameOver = 0 ' Game isn't over yet
3 moveNumber = 0 ' How many moves the player makes
4 path = Program.Directory
5
6 GraphicsWindow.DrawImage(path + "\Background.png", 0, 0)
7 CreateNewMap() ' Creates and draws a new treasure map
8 ShowLocation() ' Gives feedback to the player
9 EndSub
Listing 17-9: The NewGame() subroutine
You set the gameOver flag to 0 because the game isn’t over yet (line 2). You also set moveNumber to 0 because the player hasn’t made any moves yet (line 3). You then find the program’s path and assign it to the path variable. You’ll use this variable when you draw the different icons on the treasure map. In line 6, you draw a new copy of the background image to erase the previous map. You then call CreateNewMap() to create and draw a new treasure map (line 7) and call ShowLocation() to give feedback to the player about their current location on the island (line 8).ShowLocation() updates the text message to describe the player’s new location after they move. You’ll add these subroutines next.
Step 4: Create a New Treasure Map
The CreateNewMap() subroutine builds a 10×10 array to represent the treasure map. Each element in the array stores a number between 0 and 7. The number 0 means clear, 1 means grass, 2 means forest, 3 means volcano, 4 means cave, 5 means rain, 6 means flowers, and 7 means treasure. TheCreateNewMap() subroutine is shown in Listing 17-10.
1 Sub CreateNewMap
2 For row = 1 To 10
3 For col = 1 To 10
4 map[row][col] = 0 ' Clears all cells
5 EndFor
6 EndFor
7
8 objId = "1=1;2=1;3=1;4=1;5=1;6=1;7=1;8=1;9=2;10=2;11=2;12=2;13=2;14=2;15=2;16=2;17=3;18=3;19=4;20=4;21=5;22=5;23=6;24=6;25=7;26=0"
9 count = 1 ' Points to first element in objId
10 While (count <= Array.GetItemCount(objId))
11 row = Math.GetRandomNumber(10)
12 col = Math.GetRandomNumber(10)
13 If (map[row][col] = 0) Then ' Cell is clear
14 map[row][col] = objId[count] ' Reserves the cell
15 DrawObject()
16 count = count + 1 ' Points to next element in objId
17 EndIf
18 EndWhile
19
20 rowP = row ' Player's current row
21 colP = col ' Player's current column
22 EndSub
Listing 17-10: The CreateNewMap() subroutine
First, you set all the elements of the map to 0 (lines 2–6). In line 8, you define an array, objId, that holds the identifiers of the objects you’ll add to the map. This array asks for eight grass fields, eight forests, two volcanoes, two caves, two rainy spots, two flower fields, and one treasure spot. The last element in the array is intentionally set to 0 so that the While loop on line 10 finds an empty starting place for the player. When you’re feeling more adventurous, you can change the objId array to make the treasure map contain more or fewer objects.
Next, you start a While loop to add the objects to the treasure map. First, you select a random cell on the map (lines 11–12). If that cell is clear (line 13), you mark it with a number that’s not zero to reserve it for the next object from objId (line 14), call DrawObject() to draw the added object on the treasure map (line 15), and increment the count variable to point to the next element in objId (line 16). When the loop finishes, you set the player’s current row, rowP, and column, colP, to the empty cell found by the While loop in its last iteration (lines 20–21). This ensures the player starts on a clear cell on the map.
Step 5: Draw Objects on the Map
Before you add the ShowLocation() subroutine, you need to add the DrawObject() subroutine in Listing 17-11. You call this subroutine to draw an object at map[row][col].
1 Sub DrawObject
2 imgName = "1=Grass.ico;2=Tree.ico;3=Volcano.ico;4=Cave.ico;5=Rain.ico;6=Flower.ico;7=Treasure.ico"
3
4 imgID = map[row][col]
5 If ((imgID >= 1) And (imgID <= 7)) Then
6 imgPath = path + "\" + imgName[imgID]
7
8 xPos = 52 + (col - 1) * 38
9 yPos = 25 + (row - 1) * 38
10 GraphicsWindow.DrawImage(imgPath, xPos, yPos)
11 EndIf
12 EndSub
Listing 17-11: The DrawObject() subroutine
You define the imgName array that holds the name of the image file for the seven objects in the game (line 2). In line 4, you get the number stored in the map at row number row and column number col, and then you assign this value to imgID. If this number is between 1 and 7 (line 5), you construct the full path for the image that corresponds to this number (line 6) and then draw that image at its position on the map (lines 8–10). The numbers you see in lines 8–9 (52, 38, and 25) come from the background image. These numbers ensure that the objects are drawn in the centers of the cells in Figure 17-8.
Step 6: Show the Player’s Location
Now you can add the ShowLocation() subroutine in Listing 17-12, which tells the player their current location on the island.
1 Sub ShowLocation
2 locID = map[rowP][colP]
3 If (locID = 1) Then
4 msg = "You're in a grass field."
5 ElseIf (locID = 2) Then
6 msg = "You're in a forest."
7 ElseIf (locID = 3) Then
8 msg = "You're next to a volcano."
9 ElseIf (locID = 4) Then
10 msg = "You're in a cave."
11 ElseIf (locID = 5) Then
12 msg = "You're in the rain."
13 ElseIf (locID = 6) Then
14 msg = "You're in a flower field."
15 ElseIf (locID = 7) Then
16 gameOver = 1
17 msg = "Congratulations! You found the treasure!"
18 Else
19 msg = "You're in the clear!"
20 EndIf
21
22 Shapes.SetText(txtID, "[" + moveNumber + "]: " + msg)
23 EndSub
Listing 17-12: The ShowLocation() subroutine
The subroutine uses an If/ElseIf ladder to create a message, msg, based on the player’s current location, which is identified by rowP and colP (lines 1–20). The subroutine then calls SetText() to show this message using the text shape identified by txtID. Note how the player’s move number, moveNumber, is included in the message so they know how many times they’ve moved.
Step 7: Handle Button Clicks
This is the final step to finish the game! You just need to process the button clicks. Add the OnButtonClicked() subroutine shown in Listing 17-13.
1 Sub OnButtonClicked
2 btnID = Controls.LastClickedButton
3
4 If (btnID = btnNew) Then
5 NewGame()
6 ElseIf (gameOver = 0) Then
7 moveNumber = moveNumber + 1
8
9 MovePlayer() ' Finds the player's new row and column
10
11 If ((rowP < 1) Or (rowP > 10) Or (colP < 1) Or (colP > 10)) Then
12 gameOver = 1
13 Shapes.SetText(txtID, "Sorry! You were eaten by the shark!")
14 Else
15 ShowLocation() ' Tells the player their new position
16 EndIf
17 EndIf
18 EndSub
Listing 17-13: The OnButtonClicked() subroutine
Because you’re using five buttons, you start by finding the identifier of the clicked button (line 2). If it’s the New Game button (line 4), you call NewGame() to start all over (line 5). Otherwise, the player has clicked one of the four movement buttons. You need to process the player’s request only if the game isn’t over yet. If the game is still in progress (line 6), you increment moveNumber (line 7), call MovePlayer() to set the player’s new location (line 9), and then check the status after this move (lines 11–16). If the player falls into the shark-infested water (line 11), you set gameOverto 1 (line 12) and inform the player of their bad luck (line 13). Otherwise, if the player is still on the island, you call ShowLocation() to give them information about their new location (line 15).
The last subroutine you need to add in this game is in Listing 17-14. The MovePlayer() subroutine sets the player’s next position based on which button (N, E, S, or W) they clicked.
1 Sub MovePlayer
2 shift = 0 ' How much to shift direction
3 randNum = Math.GetRandomNumber(10)
4 If (randNum = 1) Then
5 shift = 1
6 ElseIf (randNum = 2) Then
7 shift = -1
8 EndIf
9
10 If (btnID = btnN) Then ' North
11 rowP = rowP - 1
12 colP = colP + shift
13 ElseIf (btnID = btnS) Then ' South
14 rowP = rowP + 1
15 colP = colP + shift
16 ElseIf (btnID = btnE) Then ' East
17 colP = colP + 1
18 rowP = rowP + shift
19 ElseIf (btnID = btnW) Then ' West
20 colP = colP - 1
21 rowP = rowP + shift
22 EndIf
23 EndSub
Listing 17-14: The MovePlayer() subroutine
We mentioned that the old compass has a 20 percent chance of being wrong. To simulate this, you create the variable shift to alter the player’s direction. First, you get a random number between 1 and 10 (line 3). If this number is 1, you set shift to 1. If this number is 2, you set shift to –1 (lines 4–8). Otherwise, you keep shift at 0, which means that you won’t alter the player’s move in any way (line 2).
You start an If/ElseIf ladder to process the clicked button (lines 10–22). If the player clicked the north button N (line 10), you move them up one row (line 11) and change their current column by using the shift variable (line 12). If shift is 0, the player’s current column won’t change, and they’ll move north. The rest of the ladder works the same way.
Now that the game is complete, you can enjoy it. See how long it takes you to find the treasure without getting eaten by the sharks!
TRY IT OUT 17-7
The Treasure Map game has a lot of room for improvement. For example, you can give the player another chance if they fall victim to the sharks. You can also give the player more clues about their current location. Come up with some ideas to improve the game, and try to implement them. Make an adventure worthy of Captain Jack Sparrow!
Programming Challenges
If you get stuck, check out http://nostarch.com/smallbasic/ for the solutions and for more resources and review questions for teachers and students.
1. Okla is a fearless warrior known for his courage and wisdom. He’s now on a noble mission in a haunted castle looking for the four keys needed to free the puppies that are trapped inside! But there’s a problem: the haunted castle is guarded by evil monsters who throw bombs all over the castle. Each time one of these bombs hits Okla, he loses 10 units of energy. You need to help Okla navigate his way through the castle to find the four keys before he loses all his energy.

Open the file Okla.sb from this chapter’s folder, and run it to play the game. After you play the game and understand how it works, come up with some ideas to improve it, and try to implement them.
2. Open the file TicTacToe_Incomplete.sb from this chapter’s folder. This game lets you play tic-tac-toe against the computer. The game’s board is represented by a 3×3 matrix named board. When the player clicks a square, the game draws an X in the clicked cell and fills the number 1 in its board element. The computer then takes its turn and picks an empty cell at random (the computer isn’t that smart). The game draws an O in the cell the computer selected and fills in the number 5 in that board element. The following figure illustrates how the game works.
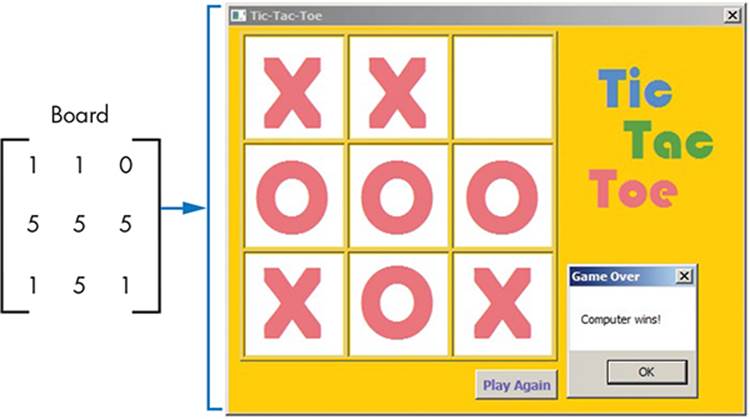
Your task is to complete the CheckWinner() subroutine, which is called after each move. You need to check the sum of each row, each column, and the two diagonals. A sum of 3 means the player won the game. A sum of 15 means the computer won the game. If there’s no winner and nine moves have been made (the board is filled completely with the Xs and Os), the game is a tie.
All materials on the site are licensed Creative Commons Attribution-Sharealike 3.0 Unported CC BY-SA 3.0 & GNU Free Documentation License (GFDL)
If you are the copyright holder of any material contained on our site and intend to remove it, please contact our site administrator for approval.
© 2016-2026 All site design rights belong to S.Y.A.