BDD in Action: Behavior-Driven Development for the whole software lifecycle (2015)
Part 4. Taking BDD Further
In part four, we’ll look at some more advanced aspects of BDD and see how they fit into the overall build and release cycle.
If you’ve gotten this far, you’ve seen all of the core aspects of BDD, with one important exception: living documentation. Communication and feedback are essential parts of the BDD process, and living documentation is an important part of the communication process. In chapter 11, you’ll see how to produce high-quality living documentation out of your automated acceptance criteria. We’ll introduce concepts such as Feature Readiness and Feature Coverage, which can be used to keep tabs on project progress and overall product quality. We’ll also see how well written BDD unit tests serve as effective technical documentation.
Finally, in chapter 12, we’ll look at how BDD fits into the overall build process and the role it plays in Continuous Integration and Continuous Delivery.
Chapter 11. Living Documentation: reporting and project management
This chapter covers
· What we mean by “living documentation”
· Keeping track of project progress using feature readiness and feature coverage
· Organizing your living documentation
· Technical living documentation
In this chapter, we’ll focus on an important part of BDD that you need to understand if you’re to get the most out of whatever BDD strategy you adopt. You’ve seen how BDD encourages teams to express requirements in terms of executable specifications that can be run in the form of automated tests. These executable specifications become the definitive reference (often referred to as the “source of truth”) for the current set of application requirements. The definitive form of these executable specifications is generally source code, so they fit neatly into the overall development process and drive the automated tests. The reports generated by the automated tests refer back to the original executable specifications. These reports, which combine the original specifications, acceptance criteria, and test results, are what we call living documentation.
11.1. Living documentation: a high-level view
BDD reports don’t simply provide a list of test outcomes, in terms of passing or failing tests. First and foremost, BDD reports document and describe what the application is expected to do, and they report whether or not the application actually performs these operations correctly. When you drill down into the details, a BDD report also illustrates how a particular feature or functionality is performed, from the user’s perspective.
Living documentation targets a broad audience (see figure 11.1). You’ve seen how BDD encourages teams to collaborate to define acceptance criteria in the form of concrete examples, scenarios, and executable specifications, and how these guide the development and delivery of the features being built. As features are delivered, the living documentation ties the features back to the original requirements, confirming that what was delivered corresponds to what the team originally discussed.
Figure 11.1. Living documentation provides feedback to the whole team, but in particular to business analysts, testers, and business stakeholders.
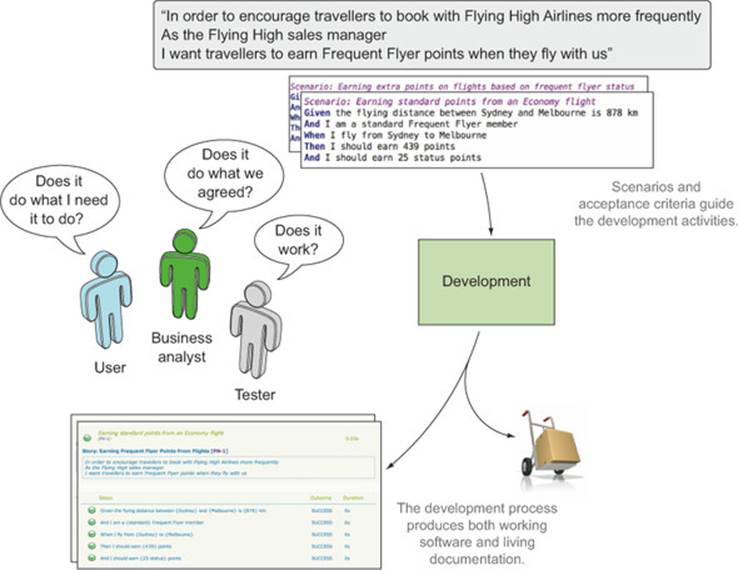
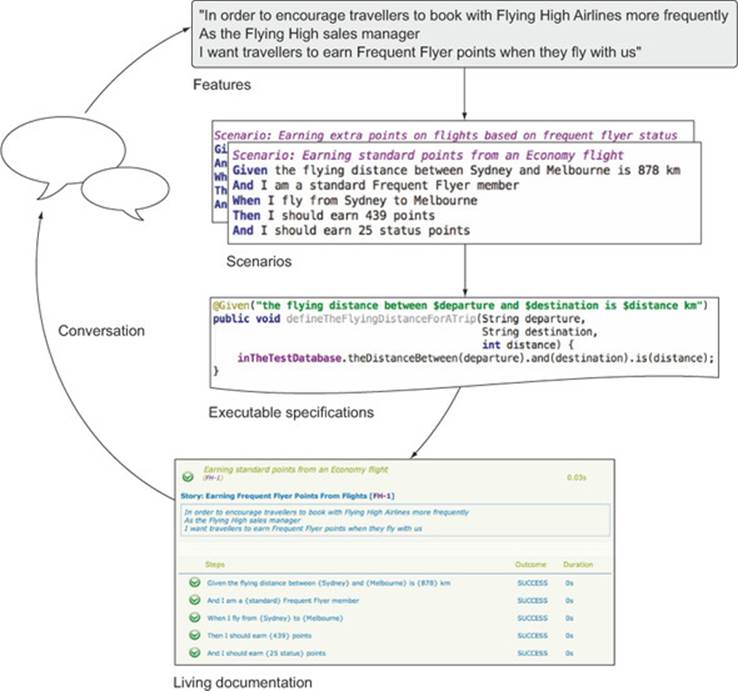
In this way, BDD reporting completes the circle that started with the initial conversations with business stakeholders. The stakeholders, business analysts, testers, and anyone else that participated in the conversations leading up to the scenarios and executable specifications see the conversations they had, and the examples they discussed appear as part of the generated reports. This feedback loop is a great way to get buy-in from business stakeholders, who are often much more keen to contribute actively when they see the results of their contributions verbatim in the living documentation. In addition, because the reports are generated automatically from the automated acceptance criteria, it’s a fast and efficient way of providing feedback once it’s set up (see figure 11.2).
Figure 11.2. Living documentation is generated automatically from the executable specifications, which simplifies reporting and accelerates the feedback cycle.
Testers also use the living documentation to complement their own testing activities, to understand how features have been implemented, and to get a better idea of the areas in which they should focus their exploratory testing.
The benefits of living documentation shouldn’t end when a project is delivered. When organized appropriately, living documentation is also a great way to bring new team members up to speed not only with what the application is supposed to do, but also how it does so. For organizations that hand over projects to a different team once they go into production, the benefits of this alone can be worth the time invested in setting up the living documentation reporting.
But living documentation goes beyond describing and illustrating the features that have been built. Many teams also integrate their BDD reports with agile project management or issue-tracking systems, making it possible to focus on the state of the features planned for a particular release. Teams that do this typically rely on the living documentation to produce their release reports, if they aren’t generated automatically from the BDD reports.
In the rest of this chapter, we’ll look at some of these different aspects of living documentation in more detail. I’ll illustrate many of the principles using Thucydides reports and a few other similar tools, but the principles aren’t specific to any particular toolset.
11.2. Are we there yet? Reporting on feature readiness and feature coverage
One of the core concepts in BDD is something we’ll call feature readiness. Features, in this sense, are just pieces of functionality that the stakeholders care about. Some teams use user stories in this role, and others prefer to distinguish user stories from higher-level features. The principle is the same in both cases: when the development team reports on progress, stakeholders are less interested in which individual tests pass or fail and are more interested in what functionality is ready to be deployed to production.
11.2.1. Feature readiness: what features are ready to deliver
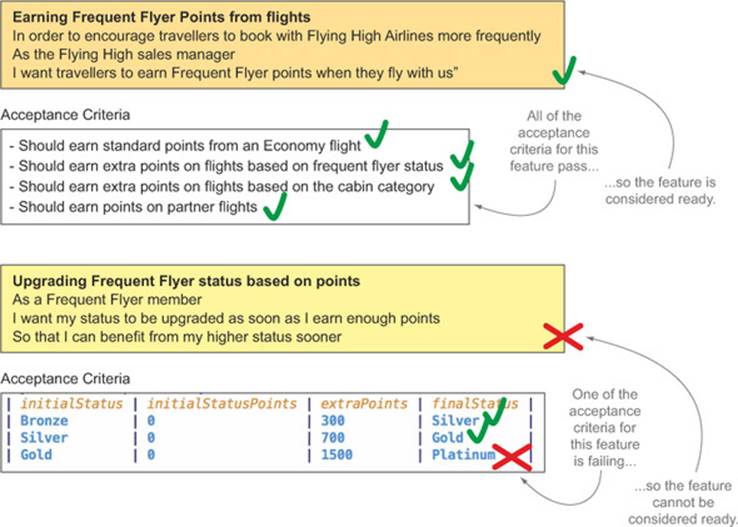
In BDD terms, a feature can be considered ready (or done) when all of its acceptance criteria pass (see figure 11.3). If you can automate all of these acceptance criteria, then the automated test reports can give you a simple, concise view of the state of the features you’re building. At this level, you’re more interested in the overall result of all of the scenarios associated with a feature than with whether individual scenarios pass or fail.
Figure 11.3. A feature can only be considered ready when all of its acceptance criteria pass.
Most BDD tools provide at least some level of reporting on feature readiness, where scenario results are aggregated at the feature level. For example, Thucydides provides feature-level reports, either directly with JBehave or with test results imported from other tools such as Cucumber, SpecFlow, and Behave. SpecFlow also provides comprehensive built-in reporting. Cucumber provides only basic feature reporting out of the box, but tools like Cucumber Reports (www.masterthought.net/section/cucumber-reporting) provide more presentable reports.
In figure 11.4, for example, you can see a feature report for a Cucumber project, generated using the Cucumber Reports library. Here the status of each feature is reported based on the overall result of the corresponding scenarios.
Figure 11.4. Feature readiness reports on the status of features or stories as a whole, rather than on individual tests.
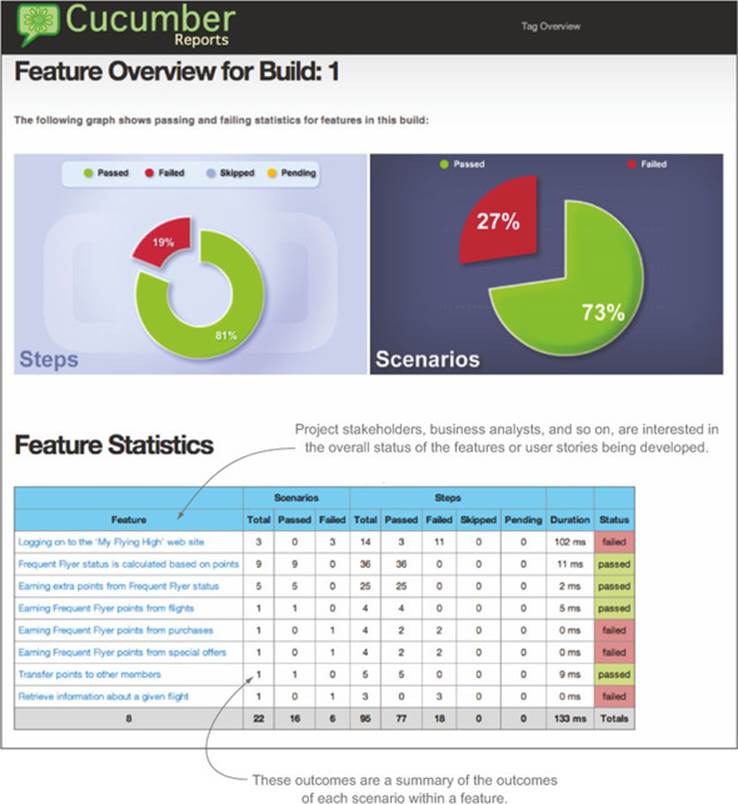
Succinct reports like the one in figure 11.4 are a good way to get an overview of the current state of the features under development, without drowning in the details of each individual scenario.
11.2.2. Feature coverage: what requirements have been built
Feature-readiness reporting can go beyond simply aggregating conventional automated test results. Ideally, feature readiness should also take into account requirements that haven’t yet been implemented and for which no automated tests exist. We’ll call this more comprehensive form of feature readiness feature coverage.
Feature coverage tells you how many acceptance criteria have been defined and automated for each requirement. It also tells you what requirements have no automated acceptance criteria. Figure 11.5 illustrates this idea. It shows reports from a Thucydides project configured to organize requirements in terms of epics and stories. The Spending Points epic hasn’t been started yet, so it has no automated scenarios and no test results. The Authentication epic has one implemented story, but two others exist only in the backlog. All of these still need to appear in the report so that the team can get a clearer overall view of the project status.
Figure 11.5. Feature-readiness reports can also report on higher-level concepts such as capabilities and epics.
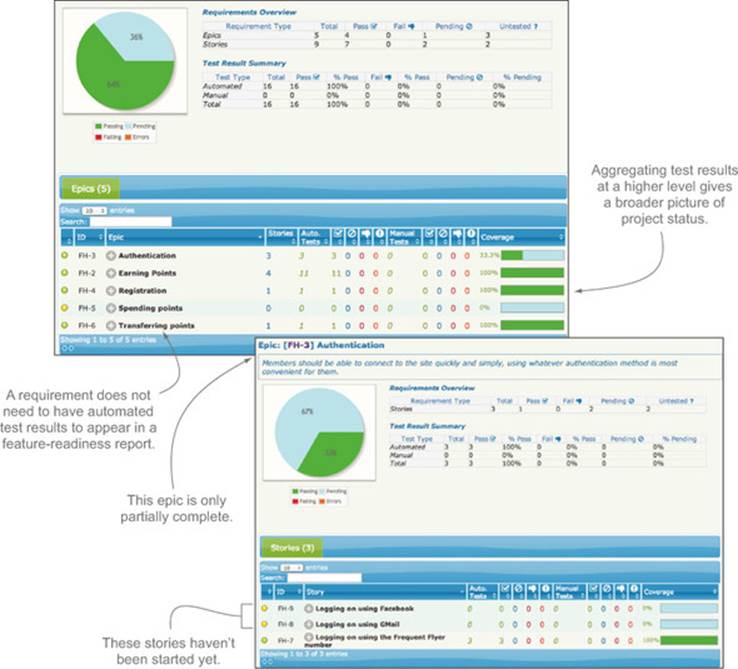
For example, in figure 11.5, all of the automated acceptance criteria associated with the Authentication epic pass. However, the coverage metric is only around 33% because only one of three user stories associated with this epic has been implemented. Although all of the tests are green, this epic is only around a third complete.
Feature coverage isn’t the same as code coverage. Traditional code coverage reports how many lines of code were exercised during the unit and integration tests. It can be a useful metric to tell developers what parts of the code base haven’t been well tested. It’s more limited when it comes to telling how well an application is tested at the unit-testing level, as it doesn’t, in itself, vouch for the quality of the tests.
The idea behind feature coverage is to give a fairer overall picture of project progress than you’d get by just reporting on test results. Feature coverage reports from the point of view of the requirements that have been defined, rather than the tests that have been executed. Of course, there’s a caveat: a feature-coverage report will only be as thorough as the number of overall requirements it knows about. As you’ve seen, BDD practitioners, and Agile projects in general, avoid defining more detailed requirements up front than absolutely necessary. Stories and scenarios will typically be available for the current iteration, but not for much more; beyond that, the product backlog will typically contain higher-level stories and epics. This is reflected in the feature-coverage reports. For example, in figure 11.5, Spending Points is an epic with no stories or scenarios associated with it.
To produce this sort of high-level report, the BDD reporting tool needs knowledge about the application requirements beyond what can be obtained from the test reports. Test results can tell you what features were tested, but they can’t tell you which features have no tests at all. One popular way to achieve this is to integrate the BDD reporting process with a digital product backlog.
11.3. Integrating a digital product backlog
In Agile projects, task boards are frequently used to keep track of project activity. A task board is a physical board or wall containing index cards that represent user stories, tasks, bug fixes, and other activities the team must undertake to complete the project. A simple example can be seen infigure 11.6.
Figure 11.6. A task board is a visual representation of the activities currently going on in a project.
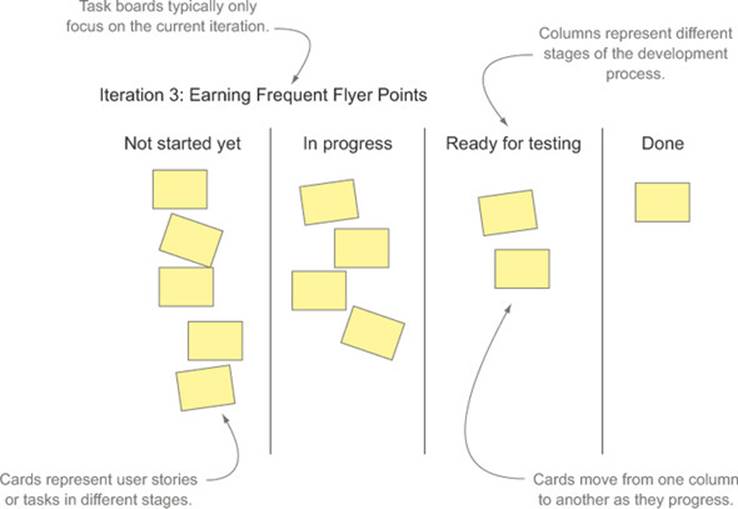
The exact layout of a task board is very flexible and is generally different for each team and project, but the general principle is always the same. During an initial planning session, work is broken down into the user stories, tasks, and so on that need to be delivered during the current iteration. Each task or user story goes in a column on the board, based on its status (not started, in progress, done, and so forth). Each day, team members get together in front of the task board to discuss the status of the task they’re working on, possibly moving the cards from one column to another. The main advantage of this format is to let the whole team see at a glance what everyone is working on, making it easier to coordinate work and troubleshoot blockages.
Physical boards are excellent communication facilitators, and they provide great visibility for the current work in progress. But they do have their limitations. For example, they aren’t optimal for teams that aren’t colocated, they can be time-consuming to maintain, and there are many useful metrics that can be more easily tracked and visualized if the tasks are recorded electronically.
Because of these constraints, some teams prefer to keep track of work in some sort of issue-tracking or agile project-management system, even if they still use a physical board for day-to-day organization and visibility. Some practitioners refer to this as a “digital product backlog.”[1] A digital product backlog can save you time and effort by calculating and reporting burn-down charts and other metrics automatically. It’s also easier to attach extra information to a card without cluttering up the board.
1 This is the term we’ll use going forward, because it’s a lot easier to say than “agile project-management software.”
In this situation, a team member (for example, the scrum master in a scrum team) will typically update the digital product backlog items based on the outcomes of the daily meeting around the physical board.
Storing user stories in an electronic system also has a number of advantages when it comes to integrating with BDD tools. In the simplest form, this integration may just include links to the corresponding card in the agile project-management software.
But a well-integrated system can do more. The BDD reporting tool can retrieve information from the digital product backlog and integrate this information into the reports. For example, the narrative description of a story need only be recorded in the digital product backlog and doesn’t need to be duplicated in the feature file. A good reporting tool will be able to, at a minimum, add links in the living documentation to the corresponding items in the digital product backlog.
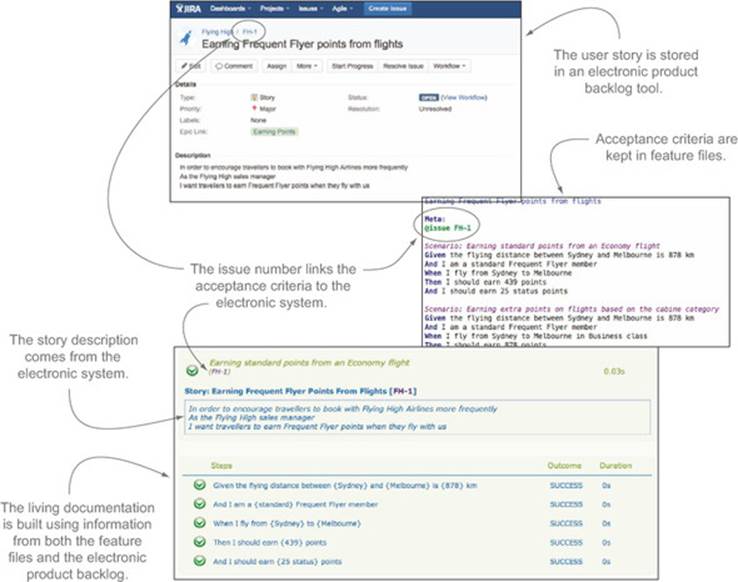
The simplest way to integrate scenarios with a digital product backlog is to use tags. Features and user stories are captured in the product backlog tool, where they have a unique number. The acceptance criteria are stored in the form of BDD feature files. Within these feature files, you use a specific tag to indicate the number of the corresponding item in the product backlog. For example, Thucydides uses the @issue tag for this purpose; if this tag is present, Thucydides will fetch the narrative text from the electronic product backlog and add a link to the corresponding item in the generated reports. This approach is illustrated in figure 11.7.
Figure 11.7. Reports are produced using information from both the executable specifications and from the electronic product backlog.
Reporting tools like Thucydides can also look up information about how the user stories are organized (in terms of epics, features, capabilities, and so forth). Some teams even update the status of the cards in the issue-tracking system based on the outcomes of the automated acceptance criteria, so if an acceptance criterion fails, the status of the corresponding card will be updated and the team notified.
11.4. Organizing the living documentation
If it’s to be useful to the team as a whole, living documentation needs to be presented in a way that’s easy to understand and navigate. For large projects, a flat list of features can quickly become unwieldy. Fortunately, there are many ways to structure living documentation so that it’s easier to navigate and, as a result, is more valuable. Here, we’ll look at two of the most common approaches:
· Organizing living documentation to reflect the requirements hierarchy of the project
· Organizing living documentation according to cross-functional concerns by using tags
Note that these choices are not exclusive. A good set of living documentation should be flexible, and it should be possible to easily display documentation in different ways, based on the needs of the project and of the reader. Let’s start with a look at how you can organize your living documentation in terms of the project requirements structure.
11.4.1. Organizing living documentation by high-level requirements
Grouping features by high-level requirements such as epics or capabilities is a good alternative to a flat list of features. You’ve seen an example of this approach in the Thucydides reports, where a high-level report summarizes the feature status by epic (see figure 11.8). This works well when the living documentation reporting is integrated with an electronic product backlog, because the structure of the living documentation will automatically reflect the structure used in the backlog tool.
Figure 11.8. One useful way to organize living documentation is in terms of high-level requirements, such as epics or capabilities.

Sometimes the structure that comes from this sort of hierarchical organization is a little too rigid. As you’ll see in the next section, tags can offer a more flexible option.
11.4.2. Organizing living documentation using tags
There are times when it’s useful to group features in a more free-form manner. For example, you might want to examine all of the features related to particular nonfunctional requirements, such as security or performance, or all of the features that need to integrate with a particular external system.
Tags are an easy way to identify nonfunctional requirements like this. For example, the following Thucydides/JBehave scenario has been tagged with the “security” nonfunctional requirement:
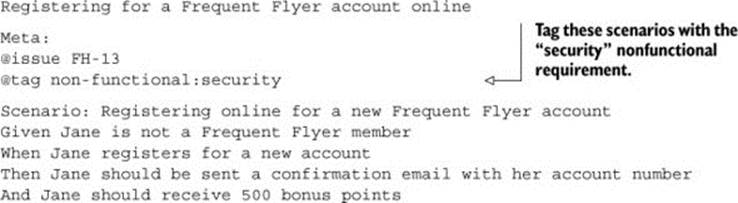
These features won’t necessarily be grouped in a single capability or epic; in fact, they’re typically scattered across the whole application. But it’s still often useful to report on all of the features that are impacted by this nonfunctional requirement.
One simple way to generate a tag-specific report is to run the scenarios using the tag as a filter. The only problem with this approach is that you have to run the tests again each time you need a report for a different tag.
Some more advanced BDD reporting tools let you view the features related to a given tag directly in the normal living documentation. In figure 11.9, for example, you can see a view in a Thucydides report summarizing the outcomes of only the scenarios related to the “security” nonfunctional requirement.
Figure 11.9. Reports are produced using information from both the executable specifications and data from the electronic product backlog.

11.4.3. Living documentation for release reporting
Living documentation is a great way to get a view of the overall project status from the point of view of the requirements. But for larger projects, the quantity of information can be a little overwhelming. It’s useful to be able to focus on the work being done in the current iteration and mask out work that’s already been completed, or work that’s scheduled for future releases.
There are many ways you can do this. One of the simplest is to use tags to associate features or individual scenarios with particular iterations. For example, you could assign a feature to iteration 1 in Cucumber or SpecFlow by giving it an appropriate tag:
@iteration-1
Feature: Logging on to the 'My Flying High' website
Frequent Flyer members can register on the 'My Flying High' website
using their Frequent Flyer number and a password that they provide
...
You could then run a separate batch of acceptance tests for the features containing the @iteration-1 tag, focusing only on the features scheduled for this iteration. This will produce a report containing only the scenarios and features that have been planned for this release, giving a clearer understanding of how ready the application is for release.
Many teams manage iterations and releases in an external software tool. For example, any electronic backlog software will let you assign stories, epics, and so forth to a particular release, and produce release notes based on this information. In this situation, a good strategy is to integrate the living documentation with the electronic backlog software. For example, figure 11.10 shows an example of a release report generated using details from the project release data stored in JIRA.
Figure 11.10. A release report focuses on requirements that have been scheduled for a particular release or iteration.

The advantage of this sort of integration is that releases need only be managed in one place. It also makes it easier for release managers to prepare release notes based on the current state of the automated acceptance criteria.
You don’t have to stick with a single approach for your living documentation. In practice, teams often use a mix of several strategies for different purposes or different audiences. For example, a requirements-based organization is more effective for documenting what the application does as a whole and how it does it, whereas release-focused reporting is more relevant when reporting on progress and preparing release notes.
11.5. Providing more free-form documentation
Living documentation should aim to be just that: documentation. It should be organized in a way that makes it easy to use and simple to find the information you’re looking for. It should also contain enough information to make it useful, albeit lightweight, documentation.
A user story is typically described as a “placeholder for a conversation,” with a deliberate minimum of information. But when the acceptance criteria are fleshed out, teams often find it useful to have a little more descriptive text around a feature and story than just the “in order to ... as a ... I want” text. This can include more background about the requirement, references to more detailed business rules, legislative requirements, and so forth.
There are several ways to provide this sort of additional information. In Cucumber and the other Gherkin-based tools, for example, the description section of a feature file is effectively free text, so teams often put quite detailed descriptive texts directly in the feature file.
Teams integrating with an electronic backlog system often store more detailed documentation in the backlog itself. This may even include links to external sources such as an enterprise wiki for additional details or documents. When using a reporting tool like Thucydides, the description text in the electronic backlog will appear in the living documentation, including any hyperlinks, so no information is lost in the reporting process.
Some automated acceptance-testing tools such as FitNesse and Concordion (http://concordion.org) give you even more flexibility in how you organize the living documentation. FitNesse (http://fitnesse.org/) uses wiki pages to let the team, including business analysts and even users, write their own acceptance criteria in a tabular format (see figure 11.11).
Figure 11.11. In FitNesse, you document requirements in a wiki.
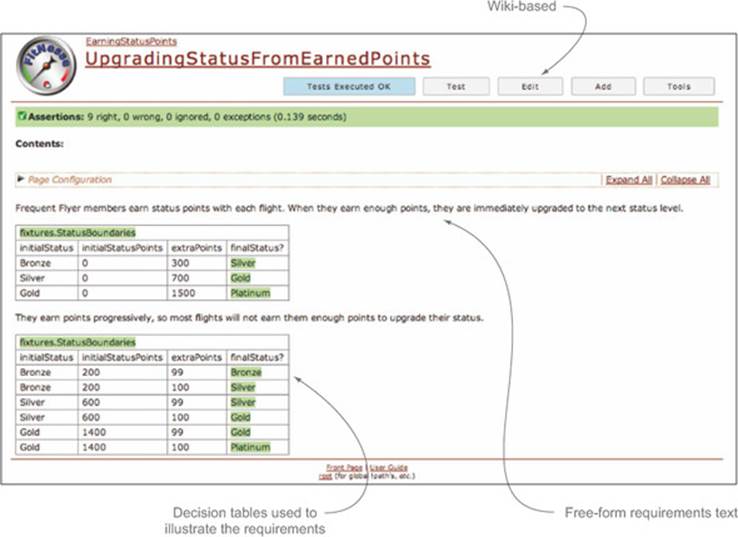
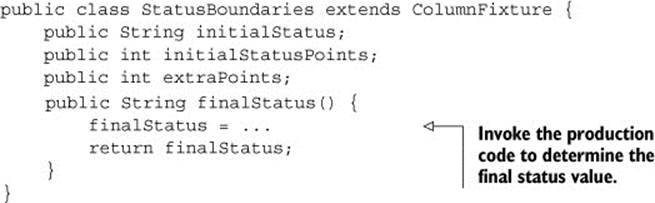
Developers then implement the corresponding acceptance tests using “fixture” classes, typically in Java. These classes interact with the wiki tables and call the actual production code to perform the tests. For example, a fixture class for the scenario in figure 11.11 might look like this:
Concordion uses a similar approach, except that the requirements are expressed in the form of simple HTML pages rather than on a wiki.
Both these approaches give you a great deal of flexibility in how you build your living documentation. But this flexibility does come at a cost—you need to organize and maintain the documentation pages, and the links between the pages, by hand, and it’s much harder to do the sort of high-level aggregation reporting you’ve seen in the previous sections.
11.6. Technical living documentation
Living documentation doesn’t stop with the high-level requirements. An important part of the low-level BDD practices you saw in chapter 10 involves writing unit and integration tests in the form of low-level executable specifications, which form a major part of the technical documentation in a BDD project.
You’ve seen how high-level acceptance tests describe and specify the behavior of the application as a whole. You’ve also seen how BDD unit tests describe and specify the behavior of an individual class, component, or API. In both cases the approach is similar; only the audience and the toolset change.
For technical living documentation, sophisticated reporting capabilities are less important than code readability and clarity. The primary audience of technical documentation is the developer who will need to maintain the code later on. Developers are used to reading code, so technical documentation in the form of well-organized, readable, annotated code samples is generally quite sufficient to help them understand the finer points of the code base. Many teams complement the low-level living documentation with light, higher-level architectural documentation, stored, for example, on a project wiki.
11.6.1. Unit tests as living documentation
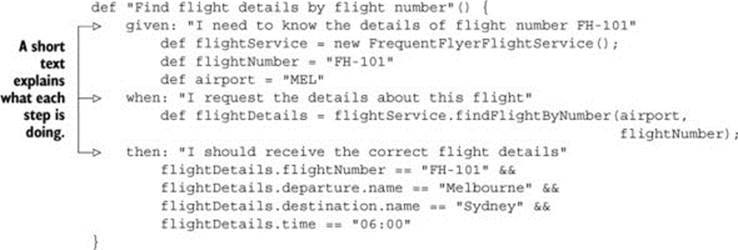
Some tools make it a little more natural to express unit tests as living documentation. Spock, for example, is a great way to write low-level BDD tests for Java or Groovy projects. As you saw in chapter 10 (section 10.4.3), a simple Spock specification might look like this:
But writing unit tests that make good technical documentation relies more on an attitude than on using a particular tool. The following NSpec specification, for example, also does a great job of explaining what feature it’s describing and illustrating how an API should be used:
public class WhenUpdatingStatusPoints : nspec
{
FrequentFlyer member;
void before_each()
{
member = new FrequentFlyer();
}
void earning_status_points()
{
context["When cumulating Frequent Flyer points"] = () =>
{
it["should earn points for each flight"] = () =>
{
member.earnStatusPoints(100);
member.earnStatusPoints(50);
member.getStatusPoints().should_be(150);
};
it["should upgrade status when enough points are earned"] = () =>
{
member.earnStatusPoints(300);
member.getStatus().should_be(Status.Silver);
};
};
};
};
You can use more conventional unit-testing tools like JUnit and NUnit to achieve a similar level of readability by using readable class and method names. The following NUnit test, for example, uses nested classes to organize low-level specifications in a more meaningful way.
[TestFixture]
public class WhenUpdatingStatusPoints
{
public class WhenTheFrequentFlyerAccountIsCreated
{
[Test]
public void it_should_have_zero_points() {...}
[Test]
public void it_should_have_Bronze_status() {...}
}
public class WhenCumulatingStatusPoints
{
[Test]
public void should_earn_points_for_each_flight() {...}
[Test]
public void upgrade_status_level_with_enough_points() {...}
}
}
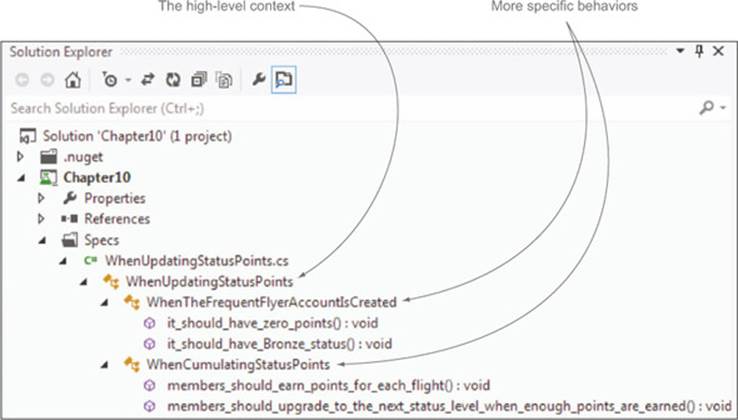
As illustrated in the Microsoft Visual Studio screenshot in figure 11.12, this makes the test classes read less like a list of test methods and more like a hierarchically organized specification document.
Figure 11.12. Structuring your unit tests well can make them read like living documentation within your IDE.
When a code base grows large, it can be hard to find the unit test that illustrates a particular feature. Many teams prefer to organize their unit tests in a package structure that mirrors the application structure. This approach has the advantage of making it easier to find the test class for a particular test, although this advantage is much less compelling with today’s development environments, where it’s very easy to find all the places in the code base where a particular class has been used.
This approach dates from the early days of unit testing. One of the original motivations was that Java classes in a given package could access protected fields of other classes in that package, so if the unit test class was in the same package as the class being tested, you could access protected fields as part of the unit tests.
From a BDD perspective, the argument for this approach is less compelling. A BDD-style unit test should provide a worked example of how to use a class and how the class is expected to behave. If you need to access protected variables, you may be binding your test code too tightly to the implementation, which runs the risk of making the unit tests more brittle.
This approach also assumes a very tight coupling between the classes under test and the features (or behavior) those classes are implementing. If you refactor a class, change its name, or break it apart into several smaller classes, for example, the requirement that these classes implement shouldn’t change.
Having a test class for each production class can also hamper refactoring. A modern IDE will tell you at a glance if a method or a class isn’t being used anywhere. Unless it’s part of an API for an external client, a method that’s never used anywhere can generally be deleted, which results in less code to maintain going forward.
For all these reasons, many organizations apply a looser association between test classes and production classes. For example, some teams find that test packages or directories organized in terms of functional slices are often easier to navigate, especially when you come back to a code base after a long period.
11.6.2. Living Documentation for legacy applications
Many organizations have large legacy applications that are still very much in use and still need regular maintenance, updates, and releases. Many of these applications have few unit or integration tests and low test coverage, and they’re often lacking technical or functional documentation.
The lack of automated tests for this sort of application makes it harder and riskier to deliver new features or bug fixes quickly. Releases are delayed by long testing cycles and regression issues. But for many organizations, rewriting the entire application isn’t a viable proposition.
BDD offers some possible approaches that can relieve these symptoms and help teams to deliver changes to their legacy applications more safely and efficiently. One popular strategy that many teams adopt is to retrofit the legacy application with high-level acceptance tests, typically web tests for a web application. These acceptance tests both describe and document the existing system and help reduce the risk of regressions when new features are introduced. The tests are written in the same style as the automated acceptance criteria you’ve seen elsewhere in this book, and often with the same BDD-focused tools (such as Cucumber, SpecFlow, and JBehave). The BDD reporting capabilities of these tools are a great way to document and communicate how people believe the application should behave.
Retrofitting unit testing is traditionally very difficult to do effectively, because unit tests written too long after the code was written tend to be quite superficial. BDD unit tests specify the behavior of classes and components within these applications and are often the only place that this behavior is documented. When these specifications don’t exist, it can be difficult to invent them after the fact, as it involves a deep understanding of how each class or component is expected to behave.
Despite these difficulties, BDD unit tests can provide excellent technical documentation, even for legacy applications. Some teams with mission-critical legacy applications that still require frequent and significant changes use BDD tests to document the most critical or high-risk parts of their application first, before expanding into less critical functionality. Unit tests are written in the spirit of documenting the current application behavior and giving code samples for how to use each class. This is a great way to provide technical documentation for the more critical parts of the application and to build up high-quality test coverage.
11.7. Summary
In this chapter you learned what living documentation means in a BDD project:
· Living documentation is a way of automatically reporting both what an application is intended to do and how it does it.
· Living documentation provides information about features and requirements in addition to individual test results.
· If you store your requirements in a digital product backlog tool, it’s useful to integrate the BDD reporting from the automated acceptance criteria with the requirements from the product backlog tool.
· Living documentation can be organized in many different ways, depending on what information needs to be retrieved.
· Living documentation can also be used to document the lower-level technical components of your system.
In the next and final chapter, you’ll see how BDD fits into the broader build process.