BDD in Action: Behavior-Driven Development for the whole software lifecycle (2015)
Part 2. What do I want? Defining requirements using BDD
Chapter 5. From examples to executable specifications
This chapter covers
· Turning concrete examples into executable scenarios
· Writing basic scenarios
· Using data tables to drive scenarios
· Writing more advanced scenarios using more JBehave/Gherkin keywords
· Organizing scenarios in feature files
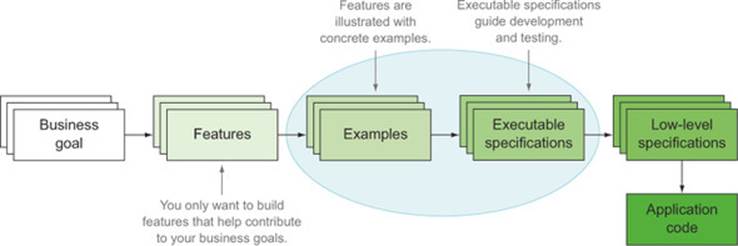
In the last chapter, you saw a number of techniques to identify and describe valuable features. You also saw how conversations with the stakeholders around concrete examples are a very effective way to build up a common understanding of a problem space. In this chapter, you’ll learn how to express these examples clearly and precisely, in a way that will allow you to transform them into executable specifications and living documentation (see figure 5.1).
Figure 5.1. In this chapter we’ll take examples we used to discuss and illustrate features in previous chapters and turn them into executable specifications.
The aim of this chapter is to help developers, business analysts, testers, and other interested team members get a solid shared understanding of how to read and write executable specifications in a way that makes it easy to automate them. BDD has a number of well-defined practices to achieve this shared understanding:
· BDD practitioners express concrete examples as executable scenarios, using a semi-structured “given ... when ... then” format that’s easy for both stakeholders and team members to read.
· This format can be automated using BDD tools such as JBehave, Cucumber, and SpecFlow.
· Tables can be used to combine several similar examples more concisely in a single scenario, or to express test data or expected results in a more succinct way.
· Experienced BDD practitioners take care to write their scenario steps well, providing enough detail for the scenario to be meaningful, but not so much that the essential business goals of the scenario are hard to find.
· Scenarios are organized in feature files and can be annotated with tags to indicate cross-functional concerns and to coordinate test execution.
It’s important for everyone to be comfortable with the notation and structures used for these scenarios; that way, team members can focus on discussing the requirements and not be distracted by the form that you use to express them. As in any language, there are common patterns and structures that recur (idioms, so to speak), and those can help you express your ideas more fluently.
In the next chapter, you’ll see how to automate these examples using popular BDD tools: JBehave (Java), Cucumber (Java and Ruby), SpecFlow (.NET), and Behave (Python). But if you want to experiment with the examples we discuss in this chapter, you can download the JBehave and Cucumber versions from GitHub (https://github.com/bdd-in-action/chapter-5) or the Manning website.
5.1. Turning concrete examples into executable scenarios
Imagine you’re working on the Flying High Frequent Flyer application we discussed in chapters 3 and 4. Your job is to implement a feature that will allow Frequent Flyer members to earn points when they fly. A traditional requirements specification document might include something like this:
Members will earn Frequent Flyer points from Flying High flights and from
partner flights.
This may capture the essence of what you need to build, but it’s a little vague. How many points should a member earn per flight? Will members earn the same number of points on Flying High flights as on partner flights? Do the flights on partner companies have to be booked through Flying High, or is any flight on a partner airline applicable? Will members earn more points if they fly in Premium Economy or Business? And so on.
If you leave these questions unaddressed now, the development team will have to make decisions and judgment calls about the most appropriate solutions. They may have to ask additional questions during development, which will slow down the project as they wait for answers. Or they may incorrectly assume that they’ve understood what’s needed, and implement a solution that doesn’t correspond to what the business really needs. In both cases, time and effort is wasted.
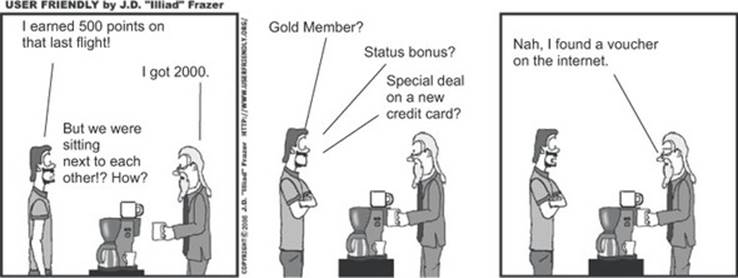
As we saw in the previous chapter, discussing concrete examples with the users and stakeholders is a great way to flush out and eliminate this sort of ambiguity, making sure everyone is on the same page. You use the language and vocabulary of your stakeholders to clarify aspects that you’re not clear about, and you’ll often discover things that the stakeholders hadn’t originally thought about, had assumed you knew, or had forgotten to mention. For example, Sarah, a business analyst, and Paul from the Flying High marketing team might have a conversation like this one to drill deeper into how Frequent Flyer points are earned:
Sarah: Can you give me an example? How many Frequent Flyer points would I earn if I flew from Sydney to Melbourne in Economy?
Paul: Well, the distance from Sydney to Melbourne is 878 km, and base points are calculated at half a point per kilometer, so if you fly with Flying High from Sydney to Melbourne in Economy, you’d earn 439 points.
Sarah: OK. Is there a way I might earn more or less points flying this trip?
Paul: Well, if you were a Silver Frequent Flyer, you’d get a 50% Status Bonus as well, so you’d earn 659 points.
Sarah: And what if I was a Gold Frequent Flyer?
Paul: In that case, you’d earn a 75% Status Bonus, but you’d also be entitled to the Guaranteed Minimum Point Earnings, which for Economy is 1000 points, so you’d earn 1000 points.
As with many real-world requirements, and as you can also see in figure 5.2, things get more complicated when you start to look into the details. We’ll come back to this example several times during this chapter. But already in this conversation you’ve learned about three business rules:
Figure 5.2. Business requirements are often not as simple as they appear.
· Frequent Flyer members normally earn half a point per kilometer flown.
· Silver and Gold Frequent Flyer members earn extra points.
· Gold Frequent Flyer members are guaranteed a minimum number of points per trip.
There are still some areas you need to investigate further. Do members earn more if they fly in Premium Economy or Business class? And what is the Guaranteed Minimum Point Earnings if you fly in Premium Economy or Business?
But let’s leave these questions for now and see how you can express the examples you have so far as executable requirements.
One of the core concepts behind BDD is the idea that you can express significant concrete examples in a form that’s both readable for stakeholders and executable as part of your automated test suite. You’ll write executable specifications in the native language of your users, and produce test results that report success or failure not in terms of classes and methods, but in terms of the features that the stakeholders requested. Stakeholders will be able to see their own words appear in the living documentation, which does wonders in increasing their confidence that you’ve understood their problems. This is what BDD tools like Cucumber, JBehave, and SpecFlow bring to the table.
When you automate your acceptance criteria using this sort of BDD tool, you express your examples in a slightly more structured form, often referred to as scenarios. Dan North defined a canonical form for these scenarios in the mid-2000s, built around a simple “Given ... When ... Then” structure, and this format has been widely adopted by BDD practitioners ever since.
You could write the first example we discussed earlier like this:
Scenario: Earning standard points from an Economy flight
Given the flying distance between Sydney and Melbourne is 878 km
And I am a standard Frequent Flyer member
When I fly from Sydney to Melbourne
Then I should earn 439 points
Although the example is a little more stylized than a free-text paragraph, you’re still speaking the language of the stakeholders. With a little practice, stakeholders quickly become comfortable enough with the format to be able to propose and discuss examples like this one.
This approach works equally well when the native language of the stakeholders is not English: you can write scenarios like this in any language. For example, here’s the equivalent of this scenario in French:[1]
1 This is the French version for JBehave; the Cucumber version is slightly different.
Scénario: Gagner des points standards sur un vol en Economy
Etant donné que la distance entre Sydney et Melbourne est de 878 km
Et que je suis un member Frequent Flyer standard
Quand je voyage de Sydney jusqu'à Melbourne
Alors je devrait gagner 439 points
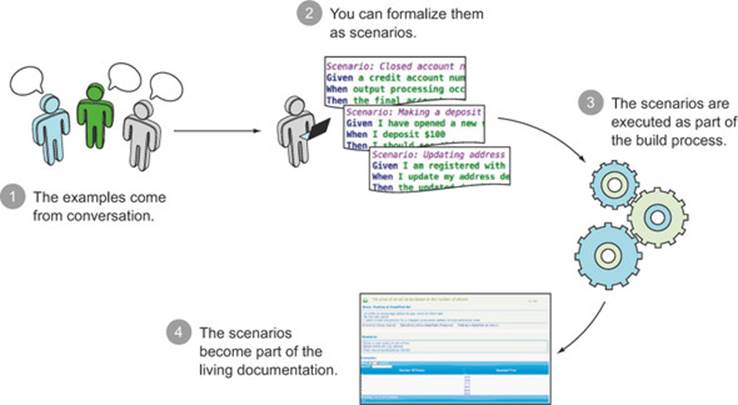
This sort of scenario is not only quite readable, it’s also executable: BDD tools like JBehave and Cucumber can read and execute these scenarios to verify your application’s behavior and generate meaningful test reports. These test reports are a central part of the living documentation that will help you understand and maintain the application (see figure 5.3).
Figure 5.3. When examples are expressed as scenarios, they can be automated and used to generate living documentation.
We’ll look at how you can take advantage of this sort of automation in chapter 6. But first, you need to learn how to write effective scenarios in this format using tools like Cucumber and JBehave.
5.2. Writing executable scenarios
Scenarios written in this format will make up the core of your executable specifications. But to make them truly executable, you need to integrate them into your projects.
In this section, you’ll see how to do this in both JBehave and Gherkin. Gherkin is the language used by Cucumber and the vast majority of Cucumber-based BDD tools, including SpecFlow (for .NET), Behave (for Python), and many others. JBehave uses a very similar format: there are slight variations between the tools, but I’ll point them out along the way.
Scenarios are stored in simple text files and grouped by feature. These files are called, logically enough, feature files.
5.2.1. A feature file has a title and a description
At the top of a feature file is a section where you can include the description of the corresponding feature. For example, in JBehave, you could write something like this:
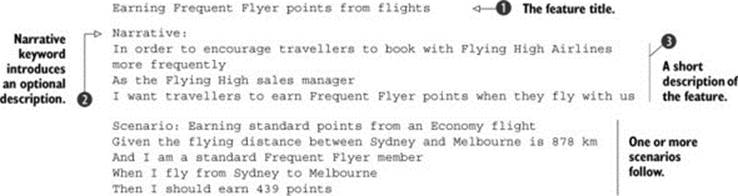
The first line ![]() is used as a title for the feature. Dan North suggests that the title should describe an activity that a user or stakeholder would like to perform.[2] This makes the work easier to contain and the scope easier to nail down. For example, “Earning Frequent Flyer points from flights” is a relatively well-defined user activity: when it’s implemented, Frequent Flyer members will be able to earn points when they fly. On the other hand, “Frequent Flyer Point Management” might also include rewarding Frequent Flyer members points when they make purchases with partner companies, letting members view their current point status, and so forth.
is used as a title for the feature. Dan North suggests that the title should describe an activity that a user or stakeholder would like to perform.[2] This makes the work easier to contain and the scope easier to nail down. For example, “Earning Frequent Flyer points from flights” is a relatively well-defined user activity: when it’s implemented, Frequent Flyer members will be able to earn points when they fly. On the other hand, “Frequent Flyer Point Management” might also include rewarding Frequent Flyer members points when they make purchases with partner companies, letting members view their current point status, and so forth.
2 See Dan North’s article, “What’s in a story,” for some interesting tips on writing well-pitched stories and scenarios: http://dannorth.net/whats-in-a-story/.
In addition to the title, it’s a good idea to include a short description of your feature so that readers can understand the underlying business objectives and background behind the scenarios that the file contains.
In JBehave, the Narrative keyword ![]() is used to mark the start of an optional, free-form description
is used to mark the start of an optional, free-form description ![]() . As illustrated here, it’s common to use the Feature Injection format you saw in chapters 3 and 4 (“In order to ... As a ... I want”) to describe a feature.
. As illustrated here, it’s common to use the Feature Injection format you saw in chapters 3 and 4 (“In order to ... As a ... I want”) to describe a feature.
The Gherkin version of this feature file would be very similar:
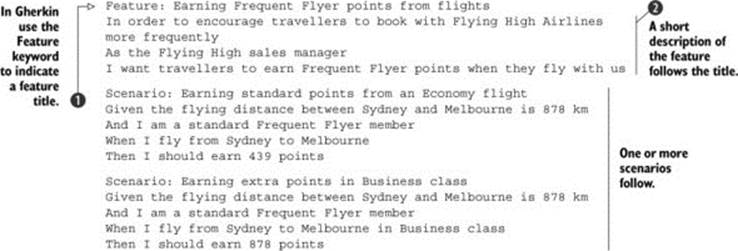
In Gherkin, you use the Feature ![]() keyword to mark the feature’s title. Any text between this title and the first scenario is treated as a feature description
keyword to mark the feature’s title. Any text between this title and the first scenario is treated as a feature description ![]() .
.
If you store feature descriptions electronically, using Agile software management tools or even an issue tracking system such as JIRA, you can configure reporting tools such as Thucydides to fetch this information from these systems and display it in the test reports (you’ll see how to do this in chapter 11).
5.2.2. Describing the scenarios
In both Gherkin and JBehave, a scenario starts with the Scenario keyword and a descriptive title:
Scenario: <a title>
The title is important. As with most things in BDD, good communication is essential. The scenario title should summarize what is special about this example in a short, declarative sentence, a bit like a subtitle for a book. It should emphasize how it differs from the other scenarios. For example you would say, “Earning standard points from an Economy flight” or “Earning extra points in Business class”, rather than “A frequent flyer member earns standard points when flying in Economy class”.
Scenario titles play a key role in reporting, making the living documentation reports easier to read and navigate. Having a succinct list of scenario titles makes it easier to understand what a particular feature is supposed to do, without having to study the details of the “Given ... When ... Then” text. It also makes it easier to isolate issues when tests break.
Figure 5.4 shows an example of a Cucumber report displaying features and scenario headings in this way.
Figure 5.4. A very basic Cucumber report, showing how scenario titles act as subheadings in the living documentation reports
Another good practice suggested by Matt Wynne[3] is to summarize the Given and When sections of the scenario in the title, and avoid including any expected outcomes. Because scenarios are based on real business examples, the context and events are usually relatively stable, but the expected outcomes may change as the organization changes and evolves the way it does business.
3 See Matt Wynne and Aslak Hellesøy, The Cucumber Book (Pragmatic Bookshelf, 2012).
Gherkin also lets you complement the scenario title with a description,[4] as shown in this example:
4 Thucydides also honors this convention in JBehave tests.

This is a great way to add extra details about business rules or calculations, as the additional text will appear as part of the living documentation.
5.2.3. The “Given ... When ... Then” structure
The meat of each scenario is made up of three parts: an initial state or context, an action or event, and an expected result. As you saw in chapters 1 and 2, these are expressed using the following structure:

This is a simple yet surprisingly versatile format. It helps you cleanly define the context of a test ![]() , what action is being tested
, what action is being tested ![]() , and what the expected outcome should be
, and what the expected outcome should be ![]() . It also helps you focus on what the requirement aims to achieve, rather than on how it will do so.
. It also helps you focus on what the requirement aims to achieve, rather than on how it will do so.
Let’s look at each of these steps in more detail.
Given sets the stage
The Given step describes the preconditions for your test. It sets up any test data your test needs and generally puts the application in the correct pretest state. Typically, this includes things such as creating any required test data, or, for a web application, logging on and navigating to the right page. Sometimes a Given step may be purely informative, to provide some context or background, even if no action is required in the test implementation.
You should be careful to only include the preconditions that are directly related to the scenario. Additional Givens make it harder for a reader to know precisely what’s required for the scenario to work. In the same way, preconditions that should be present in the Given steps, but that aren’t, are effectively assumptions that can lead to misunderstandings later on.
When contains the action under test
The When step describes the principal action or event that you want to test. This could be a user performing some action on a website, or some other non-UI event, such as processing a transaction or handling an event message. This action will generate some observed outcome, which you’ll verify in the Then step.
Then describes the expected outcomes
The Then step compares the observed outcome or state of the system with what you expect. The outcome should tie back to the business value you expect to get out of the story or feature this scenario belongs to.
5.2.4. Ands and buts
In both Gerkin and JBehave, any of the previous steps can be extended using and. Gherkin also allows you to use the synonym but. You’ve seen this before:

Technically, the BDD tools consider any step with And or But to be the same as the previous step that wasn’t And or But. The main goal is to make the scenarios read more easily.
It’s often a good habit to keep “Given ... When ... Then” clauses concise and focused. If you’re tempted to place two conditions in the same step, consider splitting them out into two separate steps. This will make the scenario easier to read and give developers more freedom to reuse steps between scenarios.
For example, suppose travellers can earn bonus points if they fly during special bonus-flyer periods. One way to express this might be the following:

Alternatively, you could split the Given and Then steps into smaller ones:

Although it’s slightly longer, this second version has several advantages. Each step is focused on a particular aspect of the problem—if something breaks, or the requirements change, it will be easier to see what needs to be changed. In addition, reuse is easier. Steps ![]() and
and ![]() are also used in some of the other scenarios you’ve seen, so you can simplify writing and maintaining the tests by reusing them.
are also used in some of the other scenarios you’ve seen, so you can simplify writing and maintaining the tests by reusing them.
5.2.5. Comments
You may also occasionally want to place comments in your feature files, such as to note some technical detail about how the scenario should be implemented.
In Gherkin, you can insert a comment, or comment out a line, by placing the hash character (#) at the start of a line:
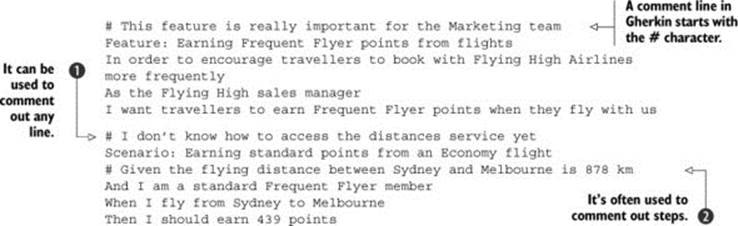
In Gherkin, comments can appear anywhere in the scenario, though they’re often used to leave a technical note for other developers ![]() or to temporarily comment out a step
or to temporarily comment out a step ![]() .
.
In JBehave, a comment line starts with !--. Unlike Gherkin, JBehave comments can only be used to comment out steps, as shown here:

Tip
Don’t forget the space between the !-- and the rest of the step; otherwise JBehave won’t treat it as a comment.
Unlike the narrative and descriptive texts you saw earlier, comments are not part of the living documentation.[5] They don’t appear in the reports and are therefore of limited communication value for the stakeholders. For this reason, other than for temporarily commenting out a step, comments should be used with moderation.
5 There’s one exception: commented-out JBehave steps will appear as “skipped” steps in the test reports.
Exercise 5.1
Sarah and her friends haven’t quite finished their job. They still need to come up with scenarios for each of the acceptance criteria outlined in section 4.2:
· The password should be at least 8 characters.
· The password should contain at least 1 digit.
· The password should contain at least 1 punctuation mark.
· You should get an error message telling you what you did wrong if you enter an insecure password.
Using the notation we’ve been discussing, write scenarios for these acceptance criteria.
5.3. Using tables in scenarios
Scenarios are like application code—you should write with the intention of making readability and maintenance easy. If you’re using your scenarios as living documentation, they’ll outlast the development project by quite a bit, and it’s important to make sure that they’re easy to understand and update in the future.
One way not to do this is to include a lot of duplicated text in your scenarios. In programming, duplication is one of the worst enemies of maintainable code, and the same applies to scenarios. But if you only use the “Given ... When ... Then” notation we’ve discussed so far, it’s sometimes hard to avoid overly wordy scenarios peppered with duplicated text.
In this section, we’ll look at how you can use tables in different ways to avoid duplication, improve readability, and make maintenance easier.
5.3.1. Using tables in individual steps
Suppose you’re working on a feature that allows Frequent Flyer members to transfer points to other members. For example, suppose Danielle and Martin are Frequent Flyer members. Both Danielle and Martin have accumulated a lot of points over the year. They want to go on holidays together using their points, but neither of them has enough points to buy the tickets outright. Martin needs to be able to transfer some of his points to Danielle so that she can purchase the flights for both of them with her points.
You could express this scenario as follows:

The problem is that there’s a lot of repetition and clutter in this scenario, and the meaning gets lost in all the words. A much better way to write this scenario would be to express the data in a more concise tabular format, like this:
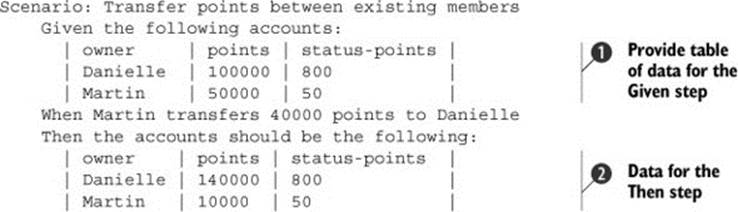
The tables start directly after the Given ![]() and Then
and Then ![]() steps, with the values being separated by pipes (|). The headers at the top of each column are useful in this case, but are optional. For example, in the following step, you could provide a list of values:
steps, with the values being separated by pipes (|). The headers at the top of each column are useful in this case, but are optional. For example, in the following step, you could provide a list of values:
Then I should be able to upgrade to one of the following cabin classes:
| Premium Economy |
| Business |
Embedding tabular data is a great way to express preconditions and expected outcomes in a clear and concise way. But there’s another equally useful way to use tabular data in your scenarios: tables of examples.
5.3.2. Using tables of examples
Suppose you need to implement the feature that calculates the bonus points that travellers earn based on their Frequent Flyer status—the feature that Sarah and Paul discussed in section 5.1. The basic business rules they discussed were the following:
· A standard Frequent Flyer member only earns the base point value of a trip.
· A Silver Frequent Flyer will earn a 50% status bonus.
· A Gold Frequent Flyer will earn a 75% status bonus.
· A Gold Frequent Flyer also benefits from a guaranteed minimum of 1,000 points per trip.
You could write examples illustrating these rules as separate scenarios, as shown in the following listing.
Listing 5.1. Scenarios for calculating bonus points based on Frequent Flyer status
Feature: Earning extra points from Frequent Flyer status
Scenario: A standard Frequent Flyer earns the base point value of a trip
Given I am a Standard Frequent Flyer member
When I fly on a flight that is worth 439 base points
Then I should earn a total of 439 points
Scenario: A Silver Frequent Flyer will earn a 50% status bonus
Given I am a Silver Frequent Flyer member
When I fly on a flight that is worth 439 base points
Then I should earn a status bonus of 220 points
And I should earn a total of 659 points
Scenario: A Gold Frequent Flyer will earn a 75% status bonus
Given I am a Gold Frequent Flyer member
When I fly on a flight that is worth 2040 base points
Then I should earn a status bonus of 1530 points
And I should earn a total of 3570 points
Scenario: A Gold Frequent Flyer benefits from a guaranteed minimum of 1000 points per trip
Given I am a Gold Frequent Flyer member
When I fly on a flight that is worth 439 base points
Then I should have a guaranteed minimum of 1000 earned points per trip
And I should earn a total of 1000 points
This is starting to get quite wordy. Having a lot of similar scenarios to describe a set of related business rules is a poor practice; the duplication makes the scenarios harder to maintain. In addition, after the first couple of almost-identical scenarios, readers are likely to just skim over the subsequent ones and miss important details, making them a poor communication tool.
When you’re writing scenarios in BDD, a good rule of thumb is “less is more.” You can often describe behavior more concisely and more effectively using a single scenario and a table of examples that summarizes the different cases. For example, you could express these examples more succinctly in JBehave like this:


This is effectively four scenarios wrapped into one—the scenario will be run four times, each time with the values from one row in the example table. Data from the table is passed into each step via the field names in angle brackets: <status>, <base>, and so forth. You’ve reduced four wordy scenarios into a single concise scenario and a table of examples!
Another advantage of a concise format like this is that it’s easier to spot missing examples that might need clarification and to add extra examples. In the examples we’ve discussed so far, you’ve included the guaranteed minimum points for Gold Frequent Flyers but not for Silver Frequent Flyers. Paul tells you that Silver Frequent Flyers are guaranteed to earn at least 500 points per trip. To make this clear, you can add another example to your table. You can also add a notes column, which isn’t used in the scenario but lets you annotate the examples with a little extra detail:
Scenario: Earning extra points on flights by Frequent Flyer status
Given I am a <status> Frequent Flyer member
When I fly on a flight that is worth <base> base points
Then I should earn a status bonus of <bonus>
And I should have guaranteed minimum earned points per trip of <minimum>
And I should earn <total> points in all
Examples:
| status | base | bonus | minimum | total | notes
| Standard | 439 | 0 | 0 | 439 |
| Silver | 148 | 74 | 500 | 500 | minimum points
| Silver | 439 | 220 | 500 | 659 | 50% bonus
| Gold | 439 | 329 | 1000 | 1000 | minimum points
| Gold | 2041 | 1531 | 1000 | 3572 | 75% bonus
In Gherkin, the format is similar, but you use the Scenario Outline keyword:

When you use a table of sample data like this, the scenario will be checked once for each row in the table, making this the equivalent of five separate scenarios. But presenting data in tabular form can make it easier to spot patterns and get a more holistic view of the problem. It also makes it easy to describe and explore boundary conditions and edge cases (which is what you’ve done in the preceding examples), and it produces excellent living documentation (see figure 5.5).
Figure 5.5. Tabular data also produces great living documentation.

Exercise 5.2
Frequent Flyer members also get a Cabin bonus if they fly in one of the premium cabins. The Cabin bonus rates are
· 25% for Premium Economy
· 50% for Business
· 100% for First
Based on the examples used in this section, come up with a concrete example of each rate, and write a table-driven scenario illustrating how the Cabin bonus works.
5.4. Expressive scenarios: patterns and anti-patterns
Now that you’ve seen the mechanics of writing scenarios in Gherkin and JBehave, it’s time to take things to the next level. In this section we’ll go beyond just seeing how scenarios are structured and written and look at what goes into a good scenario.
5.4.1. Writing expressive Given steps
Let’s start with the Given step. This step should aim at getting the application in the appropriate state as quickly as possible. In this regard, it’s fine to take a few shortcuts. For example, if you’re testing a web application, you should try to imitate the user experience and actions, and so do as much as possible via the web interface. But if you need to set up test data in the database, it’s fine to bypass the web interface and use a backend service to update the database.
The Given step, like the others, should reflect the business intent, or what, not the technical implementation, or how. For example, consider the following:

In line ![]() , too much detail is exposed about how the test is set up. This should be done silently, behind the scenes, both to avoid cluttering the scenario with unnecessary detail and to allow you to set it up as you see fit. All you’re interested in at this level is the business context, which in this case is that the user is logged in with the administrator role
, too much detail is exposed about how the test is set up. This should be done silently, behind the scenes, both to avoid cluttering the scenario with unnecessary detail and to allow you to set it up as you see fit. All you’re interested in at this level is the business context, which in this case is that the user is logged in with the administrator role ![]() . The following version focuses the attention on the precondition in business terms:
. The following version focuses the attention on the precondition in business terms:
Given I am logged in as an administrator
...
The Given step should also contain all the preconditions or steps that must have occurred before the action you’re testing: no more, no less. For example, the following scenario is a little unclear:
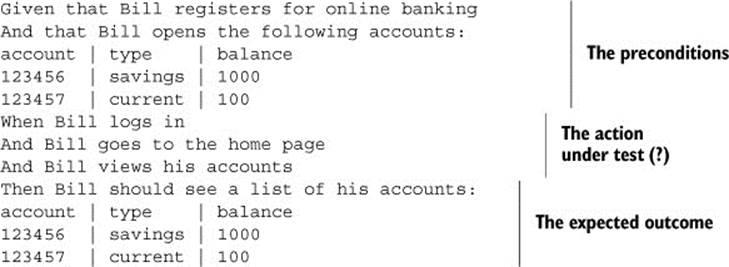
In this scenario, it’s not clear what you’re testing. Are you checking that Bill can log in successfully, or are you more interested in the accounts that he can view? In the latter case, you could rewrite this scenario as follows:
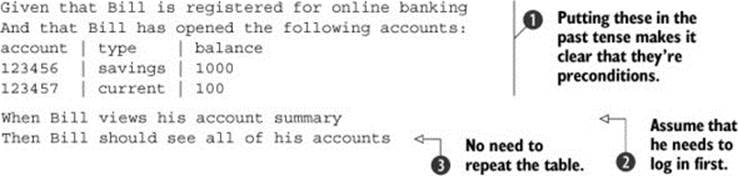
The preconditions here are that Bill is registered for online banking and that he has two accounts ![]() . If authentication has been specified elsewhere, you can probably safely assume that Bill needs to log in to see his accounts. The preconditions are also phrased in the past tense to make it more obvious that these actions are assumed to have already occurred. How Bill gets to the accounts summary page is also not the main focus of this test, so this is hidden inside step
. If authentication has been specified elsewhere, you can probably safely assume that Bill needs to log in to see his accounts. The preconditions are also phrased in the past tense to make it more obvious that these actions are assumed to have already occurred. How Bill gets to the accounts summary page is also not the main focus of this test, so this is hidden inside step ![]() . The action under test is now a one-liner that more accurately represents the business action you’re specifying.
. The action under test is now a one-liner that more accurately represents the business action you’re specifying.
The Then clause has also been simplified here ![]() by assuming that you can reuse the accounts list provided in the preconditions. This reduces clutter and focuses on the essence of the expected outcome.
by assuming that you can reuse the accounts list provided in the preconditions. This reduces clutter and focuses on the essence of the expected outcome.
5.4.2. Writing expressive When steps
The aim of the When step is to execute the event or action you’re testing. Like the Given step, the When step should describe the action in terms of what, not how.
The following scenario, for example, is too long and far too focused on the detailed steps involved in interacting with the user interface. This makes it tightly coupled to the implementation, which in turn makes it fragile and costly to maintain. The length of the scenario also makes it harder to read, which reduces its use as a communication medium:
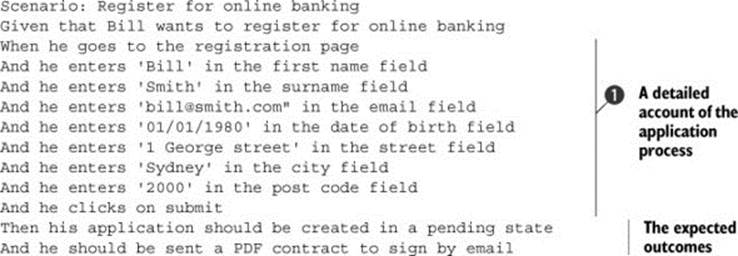
This is very dense, and it contains a lot of detail about what values should go in each field on the registration page ![]() . But do you really need this much detail? Although it’s using the user interface, this scenario is actually testing the online registration process, not the user interface. So you could hide these details in a single higher-level step, as shown here:
. But do you really need this much detail? Although it’s using the user interface, this scenario is actually testing the online registration process, not the user interface. So you could hide these details in a single higher-level step, as shown here:

This version doesn’t mention the user interface at all and focuses primarily on the submission process ![]() and the expected outcomes
and the expected outcomes ![]() . You summarize the fields you need to enter as a table
. You summarize the fields you need to enter as a table ![]() .
.
But this leads us to another question: do you really need this level of detail? For this scenario, the values entered have no importance, so you can skip them entirely and simplify the scenario even further:

This scenario does a much better job of focusing on the business actions that you’re describing. A scenario should only contain information that contributes to communicating the core business actions described by the scenario: anything else is waste.
5.4.3. Writing expressive Then steps
The Then step is where the testing takes place—this is where you describe what outcome you expect.
A common anti-pattern among new BDD practitioners is to mix the When and Then steps: a well-written scenario should only test a single action. Many teams new to BDD write scenarios that look like this:
Scenario: Updating my account address
Given I am logged in as a bank client
Then I should see the home page
When I select the 'accounts' menu
Then I should see the 'Accounts' page
And I should see a list of accounts
When I click on 'Edit'
Then I should see 'Account Details'
When I type '100 Main Street' into the street
And I type 'Armidale' into the city
And I type 'Update'
Then I should see the updated account details on the account summary page
This is more of a test script than a description of a behavior, which is very much a BDD anti-pattern. Scenarios written this way communicate poorly and are hard to maintain because they’re very tightly coupled to the implementation.
Tip
Good scenarios are declarative, not imperative. They describe the requirements in terms of what a feature should do, not how it should do it.
Once again, you can simplify this scenario by removing UI-specific implementation details and data that the business doesn’t really care about. Doing this, you could write a much cleaner version of the scenario along the following lines:
Given I am registered with online banking
When I update my address details
Then the updated details should be visible in the account summary
5.4.4. Providing background and context
Another common way that duplication slips into scenarios is when several scenarios start off with the same steps. For example, Frequent Flyer members can log on to the Frequent Flyer website to consult their points and status, book flights, and so forth. The following Gherkin scenarios relate to logging on to this site:
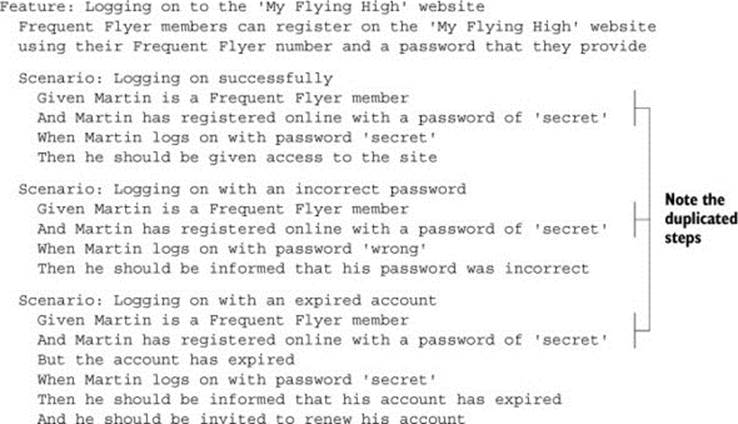
These scenarios contain a lot of repetition, which makes them harder to read and to maintain. In addition, if you ever need to change one of the duplicated steps, you’ll need to do so in several places.
In Gherkin, you can avoid having to repeat the first two steps by using the Background keyword, as shown here:
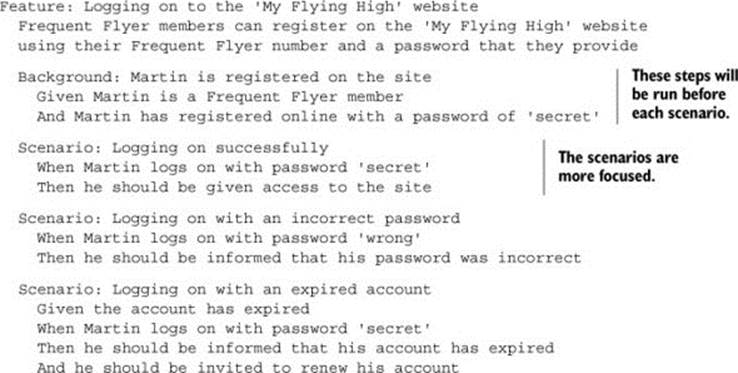
The Background keyword lets you specify steps that will be run before each scenario in the feature. You can use this to avoid duplicating steps in each scenario, which also helps focus attention on the important bits of each scenario.
In JBehave, you can do something similar with the GivenStories keyword, though it’s a bit more technical. This keyword lets you run the scenarios in arbitrary .story files either before each scenario or once before any of the scenarios are executed. For example, you could place the background steps in a file called Martin _has_registered.story:

Then you would modify your main .story file to refer to the preceding file using the GivenStories keyword, as follows.
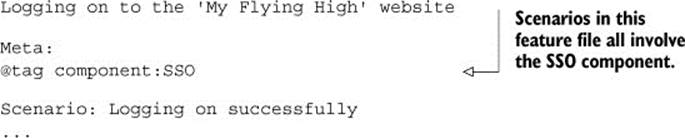
Listing 5.2. A JBehave story using the GivenStories keyword
Logging on to the 'My Flying High' website
Scenario: Logging on successfully
GivenStories: Martin_has_registered.story
When Martin logs on with password 'secret'
Then he should be given access to the site
Scenario: Logging on with an incorrect password
GivenStories: Martin_has_registered.story
When Martin logs on with password 'wrong'
Then he should be informed that his password was incorrect
Scenario: Logging on with an expired account
GivenStories: Martin_has_registered.story
Given the account has expired
When Martin logs on with password 'secret'
Then he should be informed that his account has expired
And he should be invited to renew his account
5.4.5. Avoid dependencies between scenarios
It’s important to remember that even if the scenarios live together in the same feature file, each scenario should be able to work in isolation. A scenario should not depend on a previous one running to set up data or to put the system into a particular state.
For example, suppose you’re writing scenarios for an e-commerce site. You might write something like this:
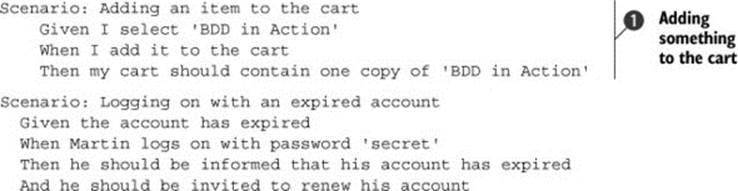
This is wrong on several levels. The second scenario ![]() will not work unless the first one
will not work unless the first one ![]() was run directly before it, and the system remained in the same state. But the testing framework will create a fresh environment for each scenario to run in, so the cart will be empty at the start of the second scenario.
was run directly before it, and the system remained in the same state. But the testing framework will create a fresh environment for each scenario to run in, so the cart will be empty at the start of the second scenario.
In addition, you can’t guarantee the order in which the scenarios will be run, or even which scenarios will be run (you may only run a subset of the scenarios for a particular test run).
On another level, these tests are a little too granular. They focus on small chunks of the business flow, at the risk of losing view of the overall objectives. In fact, a good way to make your tests more robust is to make them very high-level. A good acceptance criterion captures the business intent of a requirement, not the mechanics of how it gets done. For example, suppose your website prides itself on being environmentally friendly and is famed for its innovative delivery methods. Your real requirement might be more accurately captured in a high-level scenario like this one:
Scenario: Buying an item
Given I am looking for a good book to read
When I purchase a copy of 'BDD in Action'
Then I should be sent my copy by specially trained environmentally
friendly courier pigeon
High-level scenarios like this give a much better picture of why you need to implement a feature, and what sort of things you’ll value in it. Scenarios like this are highly maintainable, because the business scenario you’re describing is much less likely to change than, for example, the user interface you’d build to deliver this feature.
Another way to avoid dependencies between scenarios is to focus on specific business rules. Not all scenarios will be high-level, end-to-end scenarios like the preceding “Buying an Item” example. Others will capture more specific business requirements such as the Frequent Flyer point calculations that you saw earlier in this chapter. Once again, the scenarios should focus on the business requirements and expected outcomes, rather than on the implementation details of how this happens.
Of course, sometimes you’ll want to see the details. Don’t worry: in the following chapters you’ll see how to write high-level tests at this level that are both very maintainable and that still provide all the nitty-gritty low-level details for anyone who needs them.
5.5. Organizing your scenarios using feature files and tags
In real-world projects, scenarios can become quite numerous, and it’s important to keep them well organized. You may also need to be able to identify and group scenarios in different ways; for example, you might want to distinguish UI-related scenarios from batch-processing scenarios, or identify the scenarios related to cross-functional concerns. In this section, you’ll learn how to organize and group your scenarios to make them easier to understand and maintain.
5.5.1. The scenarios go in a feature file
The role of a scenario is to illustrate a feature, and you place all the scenarios that describe a particular feature in a single file, usually with a name that summarizes the feature (for example, earning_points_from_flights.feature). In JBehave, these files conventionally use the .story suffix (earning_points_from_flights.story), whereas the Gherkin-based tools use the .feature suffix. These files can be read and edited in a simple text editor, though plugins also exist for most modern IDEs. During the rest of the chapter, we’ll refer to these files as feature files, regardless of the file suffix used.
As you saw in chapter 2, these scenarios are part of the project’s source code, and they’ll be placed under version control. Many teams write the feature files during the “Three Amigos” sessions (see the “Different types of conversations” sidebar in section 4.5) and store them in the source code repository at the end of the meetings.
The exact file structure used to store the feature files varies from tool to tool. For example, figure 5.6 illustrates a typical Cucumber/Java project, whereas figure 5.7 shows the equivalent story files in a JBehave project.
Figure 5.6. Feature files are stored in plain text files as part of the project source code (this example is from a Cucumber project in Java).
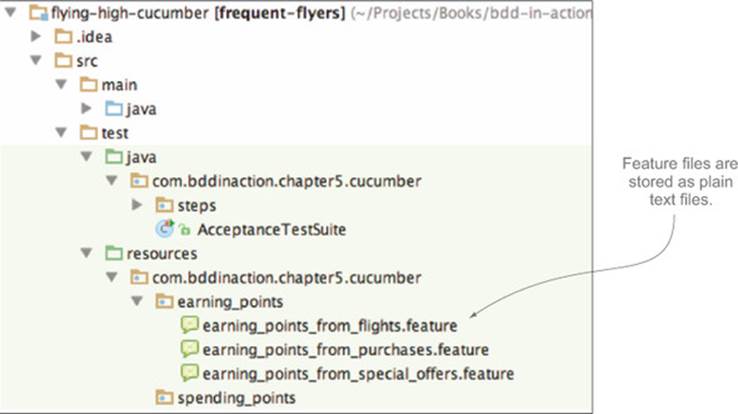
Figure 5.7. Organizing feature files into folders makes them easier to manage and navigate. In this JBehave project, the features are organized by high-level capability.

The .story suffix used by JBehave has historical origins and is a little misleading. It’s generally a bad idea to have a .story file for each user story.[6] Remember, stories are transitory planning artifacts that can be disregarded at the end of an iteration, but features are valuable units of functionality that stakeholders can understand and relate to. Organizing scenarios in terms of features rather than stories makes it easier to generate meaningful living documentation. It can be useful to associate scenarios with the corresponding stories for planning and reporting purposes during an iteration, but the primary association should be between a scenario and the feature it illustrates.
6 There’s nothing wrong with using tags or some other metadata to relate a scenario to a story for planning and reporting purposes. You’ll see how to use tags as an additional way to organize your requirements in section 5.5.4.
5.5.2. A feature file can contain one or more scenarios
As discussed in chapter 4, you use concrete examples to illustrate each feature. Any example you decide to automate will be represented by a single scenario in the corresponding feature file. As a result, the feature file will contain all of the examples that illustrate its expected behavior. These examples illustrate not only the simple cases but also alternative paths and edge cases that flesh out how the feature behaves in different situations.
5.5.3. Organizing the feature files
When you start to get a large number of feature files in your project, it’s important to keep them organized in a way that makes them easy to find and browse. A good way to do this is to place them into subdirectories, as illustrated in figure 5.7. Of course, you’ll need to decide what directory structure makes the most sense for your team. In my experience, if you’ve organized your features in terms of capabilities, as described in chapters 3 and 4, it’s very natural to create a directory for each capability.
As you’ll see later on, the Thucydides reporting tool (http://www.thucydides.info) can be configured to use this directory structure to group executable requirements by features, capabilities, tags, and so forth.
5.5.4. Annotating your scenarios with tags
You’ve seen (in section 5.5.1) how you can organize your feature files into subdirectories that mirror your requirements’ structure. But often it’s nice to have other ways to categorize your scenarios. Fortunately, this is quite easy to do. Both JBehave and Gherkin let you add tags to scenarios.
For example, many projects store details about features or user stories in issue-tracking software such as Atlassian’s JIRA. In this case, it’s useful to relate a feature or an individual scenario back to the corresponding issue, both for information and so that reporting tools can use this data to create a link back to the corresponding issue. In JBehave, you can do this using the Meta keyword:

Tip
When you’re defining tags with the Meta keyword in JBehave, it’s especially important not to leave out the title in the first line. If you forget to include this text, JBehave will treat the Meta statement as a title, which may result in errors in your living documentation.
In Gherkin, things are even simpler:

Tags are also a great way to categorize scenarios by other cross-functional concerns, to identify related parts of the system, and to help organize test execution. For example, you might want to flag all of the web tests, or mark certain tests as being slow, so that they can be grouped together during the automated build process:

This way, when executing the tests, you can configure a filter to only run the tests with a particular tag (or without a particular tag).[7]
7 You’ll see how to do this in chapter 6.
Some BDD tools (Cucumber, in particular) also let you write hooks—methods that will be executed before or after a scenario with a specific tag is executed. This is a great way to set up a test environment for certain types of tests, or to clean up afterwards. You’ll learn more about how to do this in chapter 6.
You can also use tags as a powerful reporting tool (see figure 5.8). For example, Thucydides lets you define tags that will appear in the test reports using @tag or @tags:
Figure 5.8. Using tags to organize the test reports
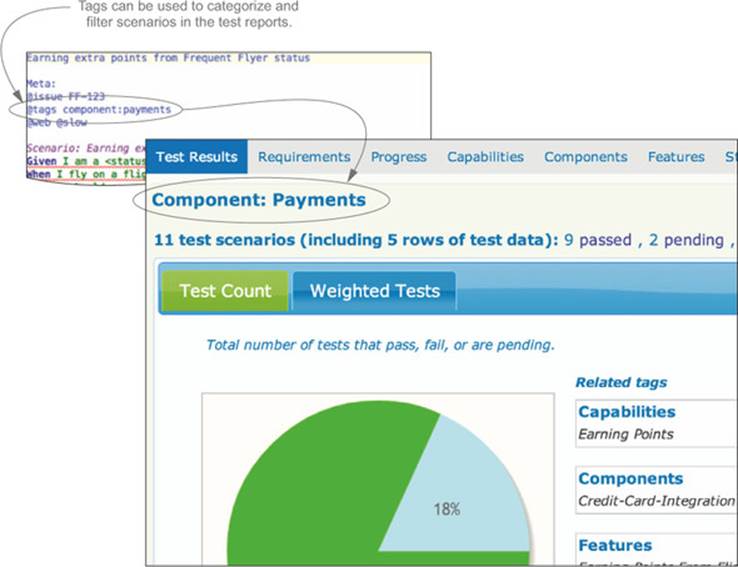
These tags can take any name/value combination and so can be used to report on whatever cross-functional aspects you need in the living documentation.
5.6. Summary
In this chapter you learned about creating executable scenarios:
· Examples can be turned into executable specifications by writing them as scenarios using variations on the “Given ... When ... Then” format.
· The executed scenarios are organized in feature files. The exact format varies slightly between JBehave and the Gherkin-based tools (Cucumber and others).
· Scenarios can be made more concise and more expressive by using embedded data tables and table-driven scenarios.
· Scenarios can be completed with background information and tags.
You’ve now hopefully learned enough to be able to write your own feature definitions, illustrated with concise, expressive scenarios. In the next chapter, you’ll see how to automate and implement this using several different languages and environments.
All materials on the site are licensed Creative Commons Attribution-Sharealike 3.0 Unported CC BY-SA 3.0 & GNU Free Documentation License (GFDL)
If you are the copyright holder of any material contained on our site and intend to remove it, please contact our site administrator for approval.
© 2016-2026 All site design rights belong to S.Y.A.