BDD in Action: Behavior-Driven Development for the whole software lifecycle (2015)
Part 2. What do I want? Defining requirements using BDD
Chapter 6. Automating the scenarios
This chapter covers
· The basic principles of automating your scenario steps
· The responsibilities of a step definition method
· Implementing step definitions in Java using JBehave and Cucumber-JVM
· Implementing step definitions in Python using Behave
· Implementing step definitions in .NET using SpecFlow
· Implementing step definitions in JavaScript using Cucumber-JS
So far, you’ve seen how you can describe and discuss your requirements very effectively using concrete examples. You also learned how you can express these examples in a loosely structured format built around the “Given ... When ... Then” structure.
A lot of the value in BDD comes from the conversations around these scenarios. This is why collaborating to write these scenarios is so important. Not all scenarios need to be automated; some may be too tricky to automate cost-effectively, and can be left to manual testing. Others may only be of marginal interest to the business, and might be better off implemented as unit or integration tests. Still others may be experimental, and might not be understood well enough to define clear scenarios; in this case, it could be worthwhile to do some initial prototyping to get a better feel for what’s really needed.[1]
1 Highly experimental startup applications might fall into this category. If the business needs to get market feedback to discover what features they really need, it will be hard to formalize scenarios with very much detail.
But when a scenario can be automated, when it makes sense to do so, and when it’s done well, automating the scenario brings its own set of undeniable benefits:
· Testers spend less time on repetitive regression testing. When acceptance criteria and the corresponding scenarios are written in close collaboration with testers, automated versions of these scenarios give testers more confidence in new releases. The testers can understand and relate more easily to what the automated tests are verifying, because they took part in defining them. In addition, the application that the testers receive for testing will have already passed a broad range of simpler test cases, letting the testers focus on more complex or exploratory testing.
· New versions can be released faster and more reliably. Because less manual testing is required, new releases can be pushed out more efficiently. New versions are less likely to introduce regressions. Comprehensive automated testing is essential if you’re trying to implement continuous integration, continuous delivery, or continuous deployment (see chapter 12).
· The automated scenarios give a more accurate vision of the current state of the project. You can use them to build a progress dashboard that describes which features have been delivered and how they’ve been tested, based on the results of the automated scenarios.
Continuous integration, continuous delivery, and continuous deployment
Continuous integration is a practice that involves automatically building and testing a project whenever a new code change is committed to the source code repository. Continuous integration is a valuable feedback mechanism, alerting developers to potential integration issues or regressions as early as possible. But to be really effective, continuous integration relies strongly on a robust and comprehensive set of automated tests.
Continuous delivery is an extension of continuous integration, where every build is a potential release. Whenever a developer puts new code into the source code repository, a build server compiles a new release candidate version. If this release candidate passes a series of automated quality checks (unit tests, automated acceptance tests, automated performance tests, code quality metrics, and so on), it can be pushed into production as soon as business stakeholders give their go-ahead.
Continuous deployment is similar to continuous delivery, but there’s no manual approval stage. Any release candidate that passes the automated quality checks will automatically be deployed into production. The deployment process itself is often automated using tools like Chef, Puppet, or Octopus Deploy.
Both continuous delivery and continuous deployment encourage a much more streamlined, efficient deployment process. And both require a very high degree of confidence in the application’s automated test suites.
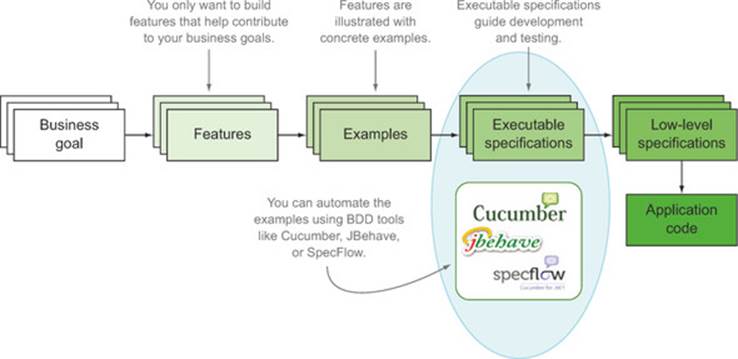
In chapter 5 you saw how to express scenarios using the “Given ... When ... Then” notation. In this chapter, you’ll learn how to write the test code that automates these scenarios (see figure 6.1).
Figure 6.1. In this chapter we’ll concentrate on how you can automate the executable specifications using BDD tools like JBehave, Cucumber, and SpecFlow.
In this chapter, you’ll learn how to automate these scenarios:
· You can automate a scenario by writing step definitions that interpret each step in a scenario and execute the corresponding test code.
· By using different BDD tools, step definitions can be implemented in different languages, including Java (JBehave and Cucumber), JavaScript (Cucumber-JS), Python (Behave), and .NET (SpecFlow).
BDD automation libraries are all quite similar, and what’s applicable to one tool can often be directly transferred to others, with one minor caveat. The “Given ... When ... Then” format you learned in chapter 5 is often referred to as Gherkin syntax. For the purists, this isn’t strictly accurate: Gherkin is the syntax used by Cucumber and by the ports of Cucumber in different languages. JBehave has its own syntax, which was developed independently and has a few minor differences.
For the rest of this chapter, we’ll take a closer look at what BDD-style automation looks like on a variety of platforms, pointing out the specificities of each platform. But before we do this, we need to discuss some general principles that will apply no matter what tool you choose.
6.1. Introduction to automating scenarios
Before we look at specific tools, let’s go through the basics. In chapter 5, you saw how to describe requirements in terms of plain-text scenarios like the following:

This scenario is just loosely structured text. It explains what requirement you’re trying to illustrate ![]() and how you intend to demonstrate that your application fulfills this requirement
and how you intend to demonstrate that your application fulfills this requirement ![]() . But how you actually perform each step will depend on your application and on how you decide to interact with it.
. But how you actually perform each step will depend on your application and on how you decide to interact with it.
For example, the preceding scenario is made up of four steps ![]() . Each of these steps needs to interact with the application to prepare the test environment, perform the action under test, and check the results. For example, consider the first Given step:
. Each of these steps needs to interact with the application to prepare the test environment, perform the action under test, and check the results. For example, consider the first Given step:
Given the flying distance between Sydney and Melbourne is 878 km
Here you need to configure a test database to provide the correct distance between Sydney and Melbourne. You could do this in many ways: you may want to inject data directly into a test database, call a web service, or manipulate a user interface. The text describes what you intend to do, but how you do this will depend on the nature of the application and on your technical choices.
The other steps are similar. For example, the first When step describes the action you’re testing:
When I fly from Sydney to Melbourne
Again, this step describes what you want to do. You want to record a flight from Sydney to Melbourne so that you can check how many points the member earns. But how you do this requires more knowledge about your application and its architecture.
Tools like JBehave and Cucumber can’t turn a text scenario into an automated test by themselves; they need your help. You need a way to tell your testing framework what each of these steps means in terms of your application, and how it must manipulate or query your application to perform its task. This is where step definitions come into play.
6.1.1. Step definitions interpret the steps
Step definitions are essentially bits of code that interpret the text in feature files and know what to do for each step (see figure 6.2).
Figure 6.2. Each line (or “step”) of a scenario maps to a step definition.
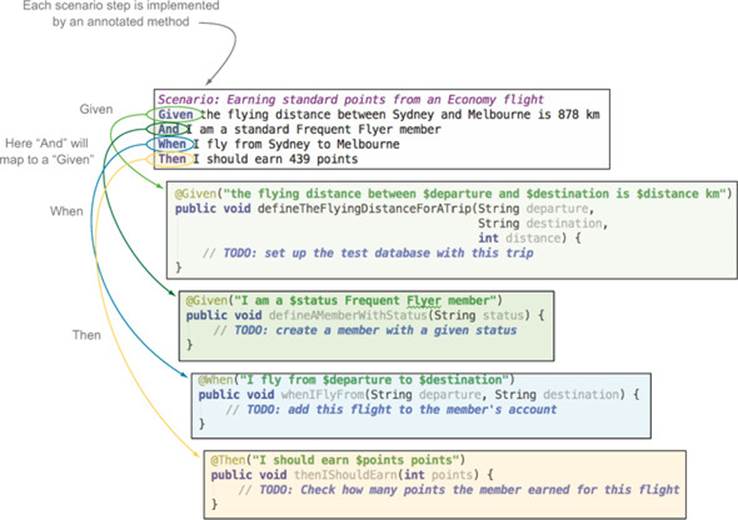
Step definitions can be implemented in a variety of programming languages depending on the test automation library being used. In some cases, the language used to implement the step definitions may even be different than that used to write the application.
For example, a JBehave step definition written in Java might look like this:

The form varies from one language to another, but the essential information is the same. For example, the equivalent in .NET using SpecFlow might look like this:
[Given(@"the flying distance between (.*) and (.*) is (.*) km")]
public void DefineTheFlyingDistanceForATrip(string departure,
string destination,
int distance)
{
...
}
In Ruby it would look like this:
Given /^the flying distance between (.*) and (.*) is (\d+) km$/ do |departure, destination, distance|
...
end
The test automation library will read the feature files and figure out what method it should call for each step. You can also tell the library how to extract important data out of the text and pass that data to the step definition method. But it’s the step definition’s job to do whatever needs to be done to perform this step.
Because the feature files and annotations consist of free text, there’s always a risk that when the text in a feature file is modified, you may forget to update the text in the annotation, or vice versa. In this case, the affected scenario or scenarios will be flagged as pending once again. To help developers manage this sort of issue, many modern IDEs have plugins for BDD tools like JBehave, Cucumber, and SpecFlow, which highlight steps in scenarios that don’t have matching methods.
6.1.2. Keep the step definition methods simple
A step definition method is like the conductor of an orchestra: it knows at a high level how to perform a task, and it coordinates calls to other more application-specific libraries that do the more detailed work.
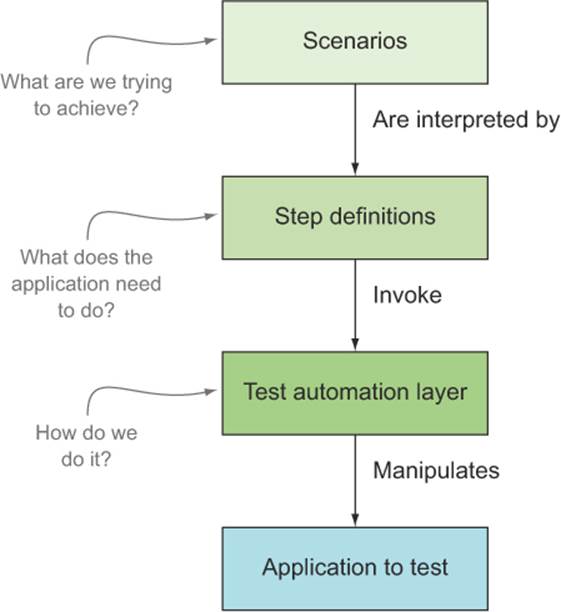
Step definitions should be clean, simple, and descriptive: they should describe what you need to do to the application, or what you need to ask it. For any but the most trivial of applications, you should regroup the code that manipulates the application into a layer that’s separate from the step definitions themselves. A typical architecture involves a minimum of three layers:
· Scenarios describe the high-level requirement:
· Scenario: Earning standard points from an Economy flight
· Given the flying distance between Sydney and Melbourne is 878 km
· And I am a standard Frequent Flyer member
· When I fly from Sydney to Melbourne
Then I should earn 439 points
· Step definitions interpret the scenario texts and call the test automation layer to perform the actual tasks:
· @Given("the flying distance between $a and $b is $distance km")
public void defineTheFlyingDistanceForATrip(...) {...}
· The test automation layer interacts with the application under test:
· inTheTestDatabase.theDistanceBetween(departure)
· .and(destination)
.is(distance);
This architecture is illustrated in figure 6.3.
Figure 6.3. A well-designed test automation suite has a number of layers.
For example, you could implement the step that defines the flying distance by directly injecting data into a test database, by calling a web service, or via the user interface. But the step definition shouldn’t need to worry about such details; its job is to set up the test data described in the scenario. You might do this as shown here:
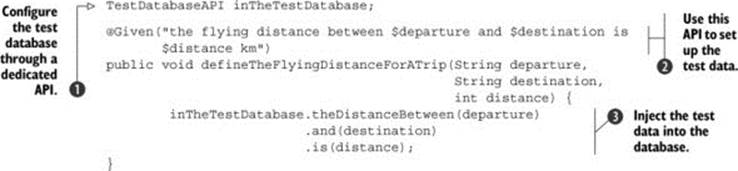
In this example, the step definition method interprets the text in the feature file ![]() and uses a dedicated class
and uses a dedicated class ![]() to configure the test database
to configure the test database ![]() . The step definition method doesn’t care how it’s done; it just describes the action it needs to achieve. The application-specific library worries about the rest.
. The step definition method doesn’t care how it’s done; it just describes the action it needs to achieve. The application-specific library worries about the rest.
Using a layered architecture like this is a key part of writing maintainable, readable, automated acceptance tests. You’ll see much more of this approach in the coming chapters, particularly in chapter 7.
6.2. Implementing step definitions: general principles
There are many BDD tools you can use to automate scenarios like the ones we’ve been looking at, using different languages and often targeting different environments. The choice of which tool is right for your team will depend on how comfortable the team is with a particular language and environment (and how willing they are to learn a new one!), what technology stack your project is using, and the goals and target audience of your BDD activities. Throughout the rest of this chapter, we’ll compare and contrast several of the major BDD tools. The list of tools we’ll study is far from exhaustive, but the techniques we’ll discuss should be generally applicable no matter which tool you choose.
To explore the features of each tool, we’ll look at how you might automate scenarios involving the Flying High airline’s Frequent Flyer application, introduced in chapter 3. The Frequent Flyer program is designed to encourage flyers to fly with Flying High by allowing them to accumulate points that they can spend on flights or on other purchases. In this chapter’s examples, we’ll study some of the requirements around accumulating and managing Frequent Flyer points.
But first, let’s take a general look at some of these tools’ principles and uses.
6.2.1. Installing BDD tools
When it comes to installation, BDD tools fall generally into one of two categories. Some, like the original Ruby implementation of Cucumber, and most of the Cucumber family, are essentially command-line tools. These are easy to install and run from the command line, though they can be executed from a build script as well. For example, to run Cucumber scenarios written in a scripting language like Ruby, you simply place your feature files in a directory called features and run Cucumber from the command line.
Others are primarily run from within a build scripting environment (such as Maven, Ant, or Gradle in the JVM world), or from within an IDE. This includes JBehave (as you’ll see in this section), Cucumber-JVM, and SpecFlow. These tools require a little more work and project infrastructure to set up.
6.2.2. Implementing step definitions
Implementing step definitions is at the heart of any BDD automation library. Step definitions tell the BDD tool exactly what code it should execute for each step in the feature file, and they extract any variables that are embedded in the text so that they can be used in the test code.
The way this is done is generally constrained by the language you’re using to implement the steps. Many BDD tools use annotations, as illustrated here for JBehave:
@When("I register for the Frequent Flyer program")
public void whenIRegisterForTheFrequentFlyerProgram() {
...
}
Scripting languages such as Ruby and Groovy can take advantage of language features to make the step definitions more concise. In Ruby,[2] for example, a Cucumber step implementation might look like this:
2 Although Ruby is a major actor in the BDD universe, I won’t cover Cucumber in Ruby in as much detail as the other tools. This is mainly because of space—there are other great references for implementing BDD automation in Ruby, in particular The Cucumber Book by Matt Wynne and Aslak Hellesøy (Pragmatic Bookshelf, 2012).
When /^I register for the Frequent Flyer program$/ do
...
end
If you prefer sticking to the JVM ecosystem, the following would be the equivalent of the previous step implementation using Cucumber-JVM and Groovy:[3]
3 Groovy is a dynamic JVM language with a syntax similar to Java but with many features usually found in more flexible languages such as Ruby and Python.
@When(~"I register for the Frequent Flyer program") {
...
}
No matter which tool you’re using, step definitions are usually global—you can’t have the same text referring to different methods in different scenarios, although at times this might be useful.
6.2.3. Passing parameters to step implementations
Simple step definitions like the preceding ones won’t get you very far. To automate scenarios effectively, you need to be able to extract data from the step definitions so that you can use them in the implementation code. Fortunately, BDD tools make it very easy to do this.
Suppose you need to automate the following three steps from different scenarios:
Given I am a Bronze Frequent Flyer member
Given I am a Silver Frequent Flyer member
Given I am a Gold Frequent Flyer member
These all represent effectively the same action (setting up a Frequent Flyer member with a given status). It would clearly be inefficient if you had to write a separate step implementation for each one of these variations. Fortunately, there’s an alternative. All of the BDD tools let you pass variables into your step implementations—both individual field values and entire tables of data. For example, in Ruby, you could parameterize the previous steps like this:
Given /^I am a (.*) Frequent Flyer member$/ do | status |
...
end
This would pass the Frequent Flyer status value in to the status parameter, so that it could be used in the step implementation.
BDD tools that use typed languages can also often take advantage of automatic type conversions when the parameters are passed in to the step implementations. For example, here’s the same step implementation, implemented using Cucumber-JVM in Java, which uses an enumeration to define the different possible status values:
public enum Status {Gold, Silver, Bronze};
@Given("I am a (.*) Frequent Flyer member")
public void useAMemberWithAGivenStatus(Status status) {
...
}
This use of regular expressions is typical of most of the Cucumber-based tools. Regular expressions are extremely powerful and allow a great deal of flexibility in how you express your step definitions. But they can be intimidating for developers who aren’t used to them. Some tools, such as JBehave and SpecFlow, propose simpler (and often more readable) alternatives to regular expressions. For example, in JBehave you can use variable names instead of regular expressions, as shown here:
@Given("I am a $status Frequent Flyer member")
public void useAMemberWithAGivenStatus(Status status) {
...
}
This style gains in readability, at the cost of a certain loss of flexibility.
6.2.4. Maintaining state between steps
A scenario contains several steps, and sometimes you’ll need to pass information from one step to another. The simplest way to do this is to use member variables within the class or script containing the step definitions. A new instance of the step definitions will be created for each new scenario execution, so there’s no chance of the values being overwritten.
The following code illustrates this principle. Suppose you’re implementing the following scenario:
Scenario: Earning extra points on flights based on frequent flyer status
Given I am a Silver Frequent Flyer member
When I fly from Sydney to Melbourne on 01/01/2013 at 09:00
Then I should earn 439 points
To do this, you need to create or retrieve a Frequent Flyer member object in the first step and an object corresponding to the requested trip in the second, and then use both of these objects to calculate how many points this member would earn for this trip. The corresponding step definition class using JBehave might look like this:
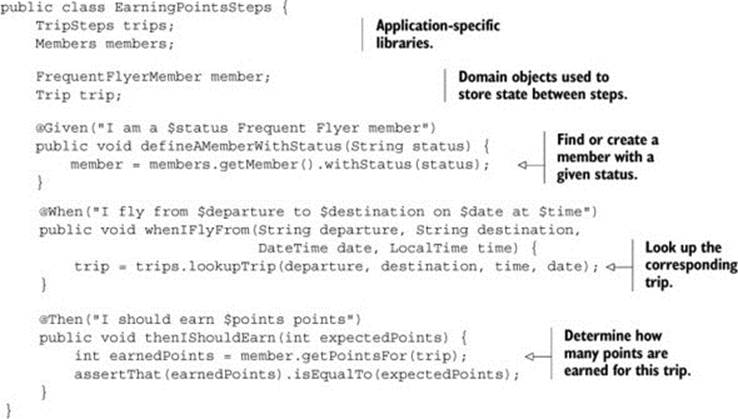
Because a new instance of the class containing the step definitions will be created for each scenario, it’s safe to use member variables this way. Even if these steps are used in other scenarios, each scenario will have its own member variable.
Although this practice is safe and simple, it can lead to code that’s hard to maintain if there are variables used by different scenarios in the same step definition class. This is why many practitioners prefer to put related step definitions (for example, the step definitions for a given feature file or even for a given scenario) in the same class to make the flow of the steps easier to understand.
6.2.5. Using table data from step definitions
In chapter 5 you saw that you can embed tables within the steps to represent more complicated structures. The following scenario uses embedded tabular data to both set up the initial test database and verify the outcomes:
Scenario: Transfer points between existing members
Given the following accounts:
| owner | points | statusPoints |
| Jill | 100,000| 800 |
| Joe | 50,000 | 50 |
When Joe transfers 40000 points to Jill
Then the accounts should be the following:
| owner | points | statusPoints |
| Jill | 140,000| 800 |
| Joe | 10,000 | 50 |
Using tabular data like this is an important part of step implementation, and it’s something you’re likely to do often. In the preceding scenario, for example, you’d use the data in the first step to create these Frequent Flyer accounts, and then read the resulting accounts and compare them with the figures provided in the second table.
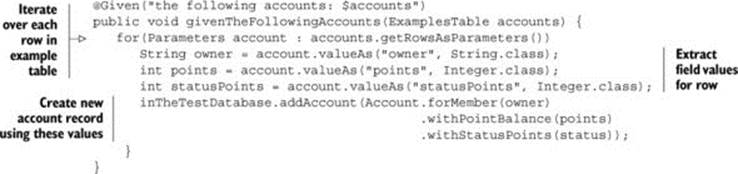
Most tools provide APIs to help you do this sort of thing. The capabilities of these APIs vary from one tool to another, and some languages are easier to work with in this regard than others. One very common requirement is to iterate over the table rows and extract the field values, and then use them to set up test data. In JBehave, for example, you could write a step implementation to do this in the following way:
An equivalent Cucumber implementation written in Ruby, on the other hand, could use some of Ruby’s dynamic language features to write a more concise step implementation:

Most tools also let you use more advanced API or language-related features to convert example tables directly into domain objects, which can simplify the automation code considerably. We’ll look at some examples of these more advanced features in the sections on each specific tool, later in this chapter.
The other main use of tabular data is to compare actual results to expected results. For example, you might want to check that records in the database have been correctly added or updated, or that you obtain the search results you expect from a multicriteria search. But writing custom logic to compare the results row by row is time-consuming and error-prone.
Fortunately all the tools make it easy to compare sets of tabular data, either with other tables that you build or by comparing the data tables with lists of hash maps or domain objects. For example, using Cucumber-JVM in Java, you can directly compare a table with a list of domain objects:

When you use the provided table APIs, error reporting is better and troubleshooting easier. For example, when you run this scenario, if the accounts aren’t what you expect, the tools will report what data you were expecting and what it actually found.
6.2.6. Implementing example-based scenarios
You saw in chapter 5 how you can summarize a number of related examples into a single scenario using tables of examples, like the following:
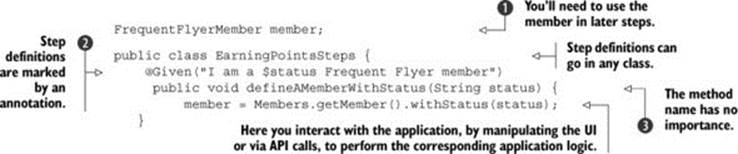
Although this has a similar format to the embedded data tables in the previous section, it’s a very different beast and generally easier to use. For example, in JBehave, for line ![]() you could simply reuse the step definition you saw earlier:
you could simply reuse the step definition you saw earlier:
@Given("I am a $status Frequent Flyer member")
public void defineAMemberWithStatus(String status) {
member = members.getMember().withStatus(status);
}
This is useful, as steps are often used interchangeably between the two types of scenarios.
6.2.7. Understanding scenario outcomes
Traditional unit tests generally pass (green) or fail (red). But in BDD tests, several extra outcomes are possible. For example, scenarios can also be pending (when they haven’t been started yet, or haven’t yet been completely implemented).
When you run a scenario, each step will have its own outcome. The overall result of the scenario will depend on the outcomes of the different steps. If all of the steps succeed, then the scenario will succeed. If one of the steps fails, then the scenario will fail. And if any of the steps are incomplete or undefined, then the scenario as a whole will be reported as pending. Furthermore, when a step fails or is pending, there’s no point running the subsequent steps because the test outcome is already compromised. In this case, any steps following the failed or pending step are marked as skipped.
The outcome of each step depends on a number of factors (see figure 6.4), including whether the step succeeded or not and the outcomes of previous steps.
Figure 6.4. Individual steps can have several possible outcomes.
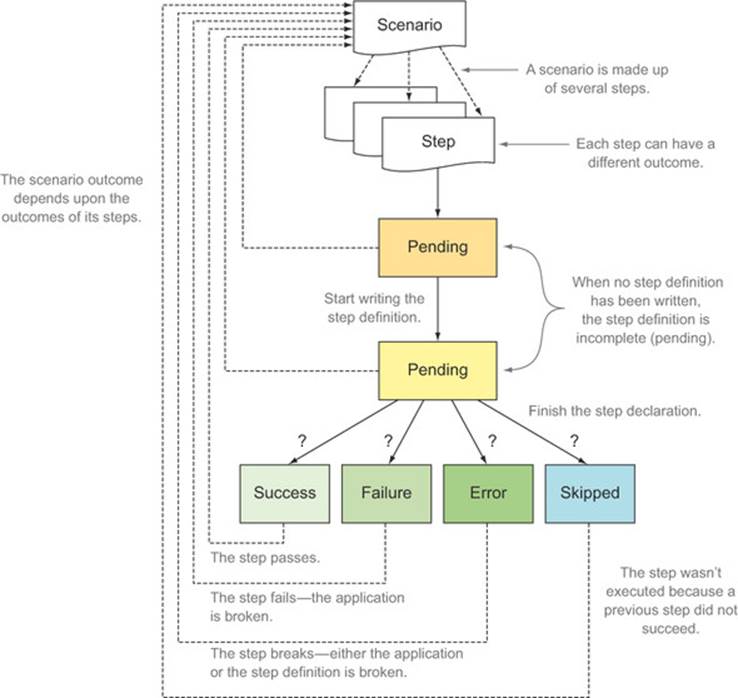
If a BDD tool finds no matching definition for a step in a scenario, it will report this step as pending. It will also write a skeleton step definition to the console, which you can use as a starting point for your own step definition.
Any step that’s implemented and doesn’t fail in some way is considered successful. Because of this, if you have only partially implemented a step, it may be reported as successful even if the corresponding application code isn’t complete. To avoid this, you sometimes need to mark a step aswork-in-progress. Each tool provides its own way of doing this. In Ruby, for example, you can mark a partially implemented test as pending like this:
When /^Joe transfers (\d+) points to Jill$/ do |pointCount|
pending
end
In Cucumber-JVM you throw a PendingException:
@Given("I am a (.*) Frequent Flyer member")
public void useAMemberWithAGivenStatus(String status) {
throw new PendingException();
}
Before we look at how you can implement the step definitions in various BDD tools like JBehave, Cucumber, and SpecFlow, we need to discuss another tool that we’ll use at various stages: Thucydides.
6.3. Implementing BDD more effectively with Thucydides
Thucydides (http://thucydides.info) is an open source library that adds better-integrated and more-comprehensive reporting capabilities to conventional BDD tools such as JBehave and Cucumber.
You’ve already briefly seen Thucydides in action in chapter 2, where it helped generate the test reports. When you use it with a fully supported BDD tool, it helps you break down scenario implementations into smaller reusable steps and report on these steps in the living documentation. At the time of writing, Thucydides works well with JVM-based testing libraries such as JBehave and JUnit, but you can also import test results generated by other BDD tools such as Cucumber-JVM,[4] SpecFlow, Cucumber-JS, or Behave.
4 At the time of writing, full Cucumber integration was being actively developed.
For the fully integrated tools, Thucydides also makes writing automated acceptance tests with WebDriver, a popular open source browser automation library, easier and more productive.
But the specialty of Thucydides is taking the test results produced by BDD tools like JBehave and turning them into rich, well-integrated living documentation, such as by relating the test outcomes to the requirements they test. This gives stakeholders a clear picture of not only what tests have been executed, but what requirements have been tested, and how well they’ve been tested.
Even if you’re not using one of the fully supported BDD tools, you can still benefit from many of the reporting and requirements integration features, and use Thucydides as a generator of living documentation. We’ll look at Thucydides in much more detail when we discuss Living Documentation in chapter 11.
In the remainder of this chapter, we’ll discuss specific BDD tools so you can get started using a BDD tool in your environment and trying out these techniques for yourself. The first tool we’ll look at is JBehave.
6.4. Automating scenarios in Java with JBehave
JBehave (http://jbehave.org) is a popular Java-based BDD framework that was originally written by Dan North. In JBehave, you write step definition methods in Java or in other JVM languages such as Groovy or Scala.
We’ll look at how to use JBehave in conjunction with Thucydides, as Thucydides supports a number of conventions that make setting up and configuring a JBehave project simpler.
6.4.1. Installing and setting up JBehave
The easiest way to build and run a JBehave/Thucydides test suite is to use Maven. Maven (http://maven.apache.org) is a widely used build tool in the Java world. Maven provides a number of features that simplify and standardize the build project for Java-based projects, including a standardized directory structure and build lifecycle, and powerful dependency management capabilities.
You can incorporate JBehave and Thucydides into an existing Maven project[5] by adding the corresponding dependencies to the Maven pom.xml file:
5 For a detailed description of how to create a brand new Thucydides/Maven project, refer to http://thucydides.info/docs/thucydides-one-page/thucydides.html#_getting_started_with_thucydides.
<dependency>
<groupId>net.thucydides</groupId>
<artifactId>thucydides-core</artifactId>
<version>0.9.239<version>
</dependency>
<dependency>
<groupId>net.thucydides</groupId>
<artifactId>thucydides-jbehave-plugin</artifactId>
<version>0.9.236</version>
</dependency>
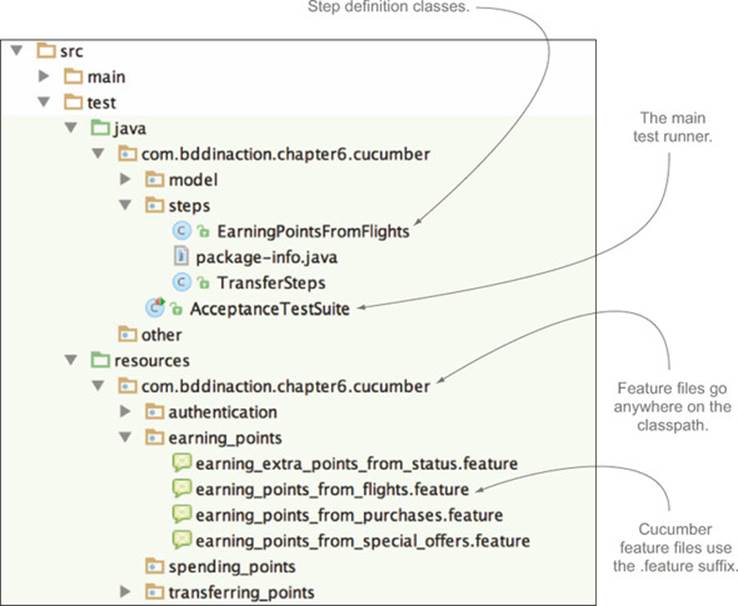
By convention, Thucydides relies on a few simple directory conventions, illustrated in figure 6.5. In particular, Thucydides will configure JBehave to look for feature files in the src/test/resources directory of your project (or in subdirectories of this directory).
Figure 6.5. The default project directory structure for a JBehave project using Thucydides

The AcceptanceTestSuite class is a test runner that will execute all of the scenarios in the feature files. This is simply an empty class that extends the Thucydides-JUnitStories class:
public class AcceptanceTestSuite extends ThucydidesJUnitStories {}
Alternatively, some teams prefer to write a separate test runner for each story. This makes it easier to run individual stories from within the IDE and to run the stories in parallel. By default, Thucydides uses the name of the class to know what story to run. For example, the following class will run the earning_points_from_flights.story story:
public class EarningPointsFromFlights extends ThucydidesJUnitStory {}
Step definition classes can be placed in the same directory (or package, in Java terminology) as the test runner, or in any package underneath this package.
6.4.2. JBehave step definitions
Like many Java-based tools, JBehave uses annotations to bind the text in the feature files to the Java methods that implement them. Suppose you wanted to automate the following step in one of your scenarios:
Given I am a Gold Frequent Flyer member
You could write a definition for this step like this:
JBehave step definitions are just annotated Java[6] methods that live in ordinary Java classes ![]() . JBehave uses an @Given, @When, or @Then annotation
. JBehave uses an @Given, @When, or @Then annotation ![]() to match a step definition method with a line in the feature file. The method name itself
to match a step definition method with a line in the feature file. The method name itself ![]() isn’t important.
isn’t important.
6 Or Groovy or Scala, depending on the language you choose.
Unlike some of the other tools, Given, When, and Then steps can’t be used interchangeably; JBehave will treat them as different steps. For example, “When I fly from Sydney to Melbourne” (an action under test) will run a different step definition than “Given I fly from Sydney to Melbourne” (a precondition).
JBehave lets you pass parameters to your step definitions by putting placeholder variables at the appropriate spots in the annotation text. In the preceding step definition-, you pass the Frequent Flyer status parameter to the step definition. The actual name of the variable you use makes no difference; JBehave will pass any parameter values it finds to the annotated method in their order of appearance.
Steps often contain more than one piece of useful information, and you can pass any number of parameters into a step definition. For example, let’s revisit the following step, which sets up the database with a flight for your test:
Given the flying distance between Sydney and Melbourne is 878 km
Here, there are three key fields you might want to pass to your step definition: the departure city, the destination city, and the distance. You could do this with a step definition like the following:

Here JBehave isolates the three fields you need and passes them to the step method. As mentioned earlier, the parameters extracted from the annotation ![]() are passed in to the method
are passed in to the method ![]() in their natural order; the parameter names are not important.
in their natural order; the parameter names are not important.
Notice how JBehave even converts the type for you, so you get the distance field directly in the form of an integer. JBehave will automatically convert numerical values, and with a little extra configuration, you can set it up to convert many other parameter types as well.
6.4.3. Sharing data between steps
When implementing step definitions, you’ll frequently need to share data across multiple steps. For example, you might fetch a member account in one step, and then use this account in a subsequent step. You can do this with member variables, but this requires all of the step implementations to be in the same class or inherit from a common base class containing the shared member variables.
If you’re using JBehave with Thucydides, a better alternative is to use the Thucydides session. Thucydides maintains a hash map for the life of a scenario that you can use to share data between steps, no matter what class they’re implemented in. For example, you might retrieve a Frequent Flyer member from the database in a step like this:

You could then reuse this data in subsequent steps, like this:

6.4.4. Passing tables to steps
As you’ve seen, JBehave provides the ExamplesTable class to handle embedded tables in your scenarios. In JBehave, these parameters are known as tabular parameters. Suppose you need to automate the following scenario step:
Given I have travelled on the following flights:
| flight | from | to | date |
| FH-603 | Sydney | Cairns | 01-05-2012 |
| FH-604 | Cairns | Sydney | 05-05-2012 |
| FH-603 | Sydney | Melbourne | 01-07-2012 |
| FH-604 | Melbourne | Sydney | 02-07-2012 |
| FH-603 | Sydney | Brisbane | 28-07-2012 |
| FH-604 | Brisbane | Sydney | 02-08-2012 |
You could implement a step in JBehave using an ExamplesTable parameter like this:
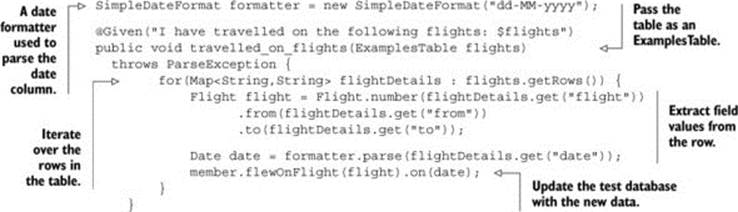
This is a very basic use of the ExamplesTable class, but it does reflect typical usage of tabular parameters.
6.4.5. Step definitions for tables of examples
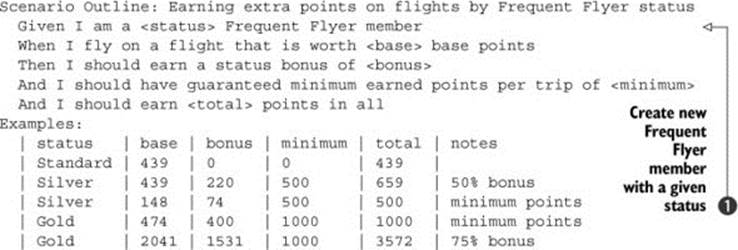
Another very powerful use of tables, which you saw in section 5.3.2, is to summarize a number of similar scenarios into a single scenario with a table of examples, as shown here:
Scenario: Earning extra points on flights by Frequent Flyer status
Given I am a <status> Frequent Flyer member
When I fly on a flight that is worth <base> base points
Then I should earn a status bonus of <bonus>
And I should have guaranteed minimum earned points per trip of <minimum>
And I should earn <total> points in all
Examples:
| status | base | bonus | minimum | total | notes
| Standard | 439 | 0 | 0 | 439 |
| Silver | 439 | 220 | 500 | 659 | 50% bonus
| Silver | 148 | 74 | 500 | 500 | minimum points
| Gold | 474 | 356 | 1000 | 1000 | minimum points
| Gold | 2041 | 1531 | 1000 | 3572 | 75% bonus
When JBehave runs this scenario, it’ll replace the placeholder variables (<status>, <base>, and so on) with values from the example table and call the corresponding step definitions. When you write a step definition method for these steps, JBehave practitioners often quote the step text exactly as it appears in the scenario, including the angle brackets:
@Given("I am a <status> Frequent Flyer member")
public void defineAMemberWithStatus(String status) {
member = Members.getMember().withStatus(status);
}
This makes it more obvious that the data is coming from a table of examples, and it was required in older versions of JBehave for proper reporting. Current versions[7] of JBehave are more flexible on this point, and will match step definitions that use the conventional $ notation as well:
7 From JBehave 3.8 onwards.
@Given("I am a $status Frequent Flyer member")
public void defineAMemberWithStatus(String status) {
member = Members.getMember().withStatus(status);
}
Using the $ notation also makes it easier to reuse step definitions in both example-based and standard scenarios.
6.4.6. Pattern variants
Sometimes it’s useful to have several similar expressions in different scenarios match the same step definition. For example, you might want to be able to write both “When I fly from Sydney to Melbourne” and “When I travel from Sydney to Melbourne.”
In JBehave, you can use the @Alias annotation, as shown here:
@When("I fly from $departure to $destination")
@Alias("I travel from $departure to $destination")
public void whenIFlyFrom(String departure,
String destination) {
// TODO: add this flight to the member's account
}
Aliases are also useful when you need to reuse the same step definition for an example-based scenario and a normal scenario, because the step definition syntax is slightly different:
@When("I fly from $departure to $destination")
@Alias("I travel from <departure> to <destination>")
public void whenIFlyFrom(String departure,
String destination) {
// TODO: add this flight to the member's account
}
If the variations are very close, you can also use the more compact format shown here:
@When("I {fly|travel} from $departure to $destination on $date at $time")
public void whenIFlyFrom(String departure,
String destination,
DateTime date,
LocalTime time) {
// TODO: add this flight to the member's account
}
These approaches give more flexibility in writing the scenarios, and streamline implementing the step definitions, because there’s no need to write duplicate methods or normalize the scenario texts unnecessarily.
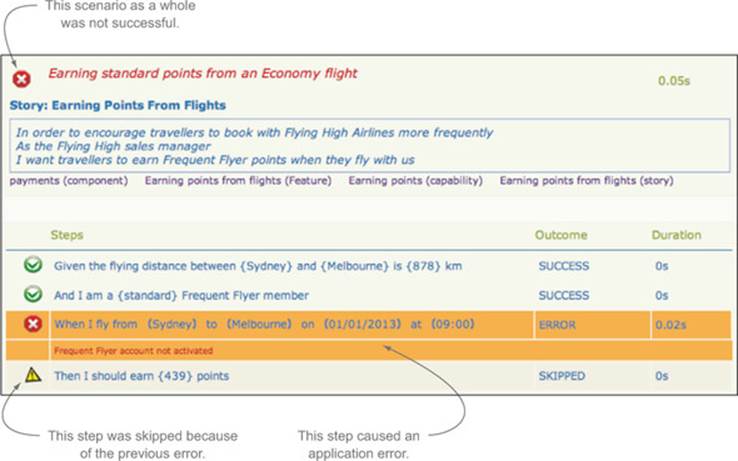
6.4.7. Failures and errors in the scenario outcomes
As with all BDD tools, JBehave reports on successful, failing, and pending steps. But when used with Thucydides, JBehave also distinguishes between failures (the application doesn’t produce the expected outcome) and errors (the application, or possibly the scenario itself, throws an unexpected exception). A failure generally indicates an application bug, whereas an error may indicate a scenario that’s broken or that no longer reflects the correct behavior of the application. For example, you saw this scenario earlier:
Scenario: Earning standard points from an Economy flight
Given the flying distance between Sydney and Melbourne is 878 km
And I am a standard Frequent Flyer member
When I fly from Sydney to Melbourne on 01/01/2013 at 09:00
Then I should earn 439 points
You could implement the last step of this scenario using the following step definition:

Here you’re checking that the calculated number of points is what you expected ![]() . If the number of points earned isn’t 439, this step will fail, which will cause the scenario as a whole to fail.
. If the number of points earned isn’t 439, this step will fail, which will cause the scenario as a whole to fail.
But failures are not always this simple. In figure 6.6, the third step has failed with the error message, “Frequent Flyer account not activated.” This isn’t an expected exception, and it could come either from an application bug or incorrect test logic. For example, perhaps the “And I am a standard Frequent Flyer member” line failed to create a correctly configured account. When you’re writing and maintaining automated acceptance criteria, it’s important to be able to distinguish between these two cases.
Figure 6.6. Each step in a scenario has its own outcome.
To make this sort of issue easier to spot and troubleshoot, Thucydides flags any exception that’s not an AssertionError[8] as an error and not as a failure.
8 AssertionErrors are caused by logical tests such as the one in the “I should earn $points points” step definition.
6.5. Automating scenarios in Java using Cucumber-JVM
The next tool we’ll look at is Cucumber (http://cukes.info). Cucumber is a very popular BDD tool from the Ruby world. Using Cucumber in Ruby is well documented on the Cucumber website and in The Cucumber Book,[9] so in this section we’ll focus on writing scenarios using Cucumber-JVM. Cucumber-JVM is a more recent Java implementation of Cucumber, which allows you to write step definitions in Java and other JVM languages. Teams familiar with the Ruby version of Cucumber may be more comfortable with the Cucumber flavor of “Given ... When ... Then” scenarios than with the JBehave variation. But at the time of writing, Thucydides doesn’t yet provide full Cucumber integration.
9 Matt Wynne and Aslak Hellesøy, The Cucumber Book (Pragmatic Bookshelf, 2012).
6.5.1. Cucumber-JVM project setup and structure
Setting up Cucumber-JVM in a Maven project is just a matter of adding the Cucumber dependencies to the Maven pom.xml file.[10] Cucumber then runs on top of JUnit, like any other unit test. You can find a full Cucumber-JVM sample project in the sample code for this chapter.
10 You can find an example of the exact dependencies in the sample code for this chapter.
The Cucumber project structure for Java projects is similar to the structure for JBehave/Thucydides and is illustrated in figure 6.7. The main difference relates to the feature files: in Cucumber, they use the .feature suffix instead of .story, and they go in a package directory structure in src/test/resources matching the one found in src/test/java, rather than directly underneath the src/test/resources directory. In figure 6.7, the Cucumber test classes are in the com.bddinaction.chapter6.cucumber package in src/test/java, so the Cucumber feature files need to be in the com/bddinaction/chapter6/cucumber subdirectory of the src/test/resources directory.
Figure 6.7. The Cucumber-JVM project directory structure
The features are executed by an annotated test runner class like this one:
@RunWith(Cucumber.class)
@Cucumber.Options(format = {"html:target/cucumber-html-report"})
public class AcceptanceTestSuite {}
As with JBehave, Cucumber expects the step definition classes to be in a package below the test runner class.
6.5.2. Cucumber-JVM step definitions
Let’s see how you could use Cucumber-JVM to automate the following scenario:
Given the flying distance between Sydney and Melbourne is 878 km
And I am a Gold Frequent Flyer member
When I fly from Sydney to Melbourne
Then I should earn 878 travel points
Cucumber-JVM step definitions are annotated Java methods, similar to the ones used by JBehave:[11]
11 In fact, the only difference here is that the @Given annotation comes from a different package.

Unlike JBehave, Cucumber doesn’t mind which annotation you use: @Given, @When, and @Then are treated as synonyms.
As you’ve seen, the Gherkin language used by Cucumber relies on regular expressions to identify variables in the steps. For example, if you want to pass the status to the step definition just discussed, you could write something like this:

Cucumber will match the regular expressions in parentheses and assign them to the method parameters. In the following step definition, you pass in three parameters:

Cucumber will convert many parameter types for you. In this step definition, for example, the third parameter will be converted to a Date.
6.5.3. Pattern variants
The use of regular expressions adds a great deal of power to step definitions, and it’s easy to define several variations of the same step. But there are a few tricks to know. The following scenario, for example, won’t work, because the (fly|travel) expression will be considered a regular expression, and Cucumber will try to pass it to one of the parameters. As a result, there will be too many parameters, and the step definition will break:

To get around this, you need to tell Cucumber that the first regular expression shouldn’t be passed as a parameter. In regular expression terms, this is known as a non-capturing expression, and you can write it as follows:

This will allow both variations, but will only pass the parameters you want to the step definition method.
6.5.4. Passing tables to steps
In Cucumber, you can use the DataTable class to pass tabular data to a step definition, which provides a rich API to extract, manipulate, and compare values in the table. But Cucumber also provides powerful built-in converters that can convert an embedded table to a list of domain objects.
Suppose you’re writing Cucumber step definitions for the following scenario:
Scenario: Transfer points between existing members
Given the following accounts:
| owner | points | statusPoints |
| Jill | 100000 | 800 |
| Joe | 50000 | 50 |
When Joe transfers 40000 points to Jill
Then the accounts should be the following:
| owner | points | statusPoints |
| Jill | 140000 | 800 |
| John | 10000 | 50 |
Now suppose you have an Account class that represents these fields:
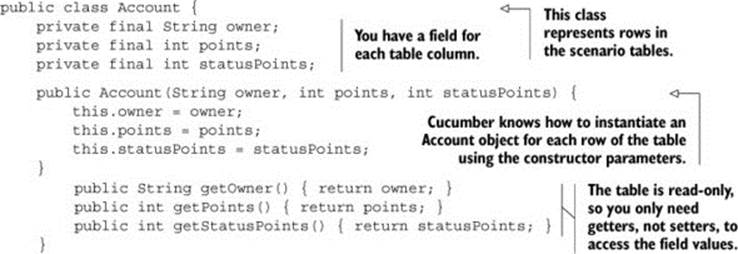
Cucumber lets you pass a list of Accounts directly to the step definition, as shown here:
@Given("^the following accounts:$")
public void the_following_accounts(List<Account> accounts) {
InTestDatabase.createAccounts(accounts);
}
This will automatically use the table header values to create a list of matching Account objects.
6.5.5. Step definitions for tables of examples
Step definitions for example tables are easy to implement in Cucumber-JVM. In fact, because the step definitions are based on regular expressions, there’s no difference between a step definition written for a normal scenario step and one written for an example-based step.
Suppose you’re automating the following scenario in Cucumber-JVM:
Scenario Outline: Earning extra points on flights by Frequent Flyer status
Given I am a <status> Frequent Flyer member
When I fly on a flight that is worth <base> base points
Then I should earn a status bonus of <bonus>
And I should have guaranteed minimum earned points per trip of <minimum>
And I should earn <total> points in all
Examples:
| status | base | bonus | minimum | total | notes
| Standard | 439 | 0 | 0 | 439 |
| Silver | 439 | 220 | 500 | 659 | 50% bonus
| Silver | 148 | 111 | 500 | 500 | minimum points
| Gold | 474 | 400 | 1000 | 1000 | minimum points
| Gold | 2041 | 1531 | 1000 | 3572 | 75% bonus
You could use the following step implementation to match the first line of this scenario:

This makes it easy to reuse step definitions between table-based and conventional scenarios.
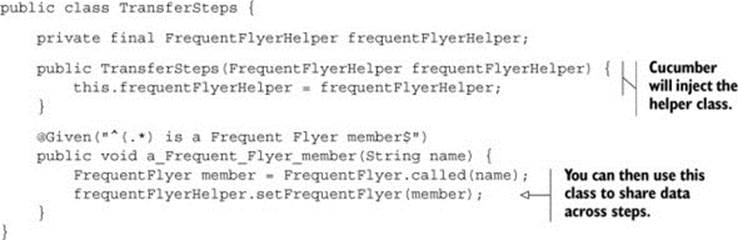
6.5.6. Sharing data between steps
Cucumber provides a simple and convenient way to share data between steps using dependency injection. You can create a helper class to store information you want to share between steps, and then inject it into the constructor of each step definition class that uses this information.
For example, suppose you want to store the Frequent Flyer member details between steps. You could do this as follows:
public class FrequentFlyerHelper {
private FrequentFlyer frequentFlyer;
public void setFrequentFlyer(FrequentFlyer frequentFlyer) {...}
public FrequentFlyer getFrequentFlyer() {...}
}
You could then inject this class into your step definitions, as shown here:
6.5.7. Pending steps and step outcomes
In Cucumber, the recommended way to say that a step implementation is still a work-in-progress is to throw a PendingException:
import cucumber.api.PendingException;
...
@Given("^the (flying|travelling) distance between (.*) and (.*) is (\\d+) km$")
public void define_flying_distance(String flightMode,
String departure,
String destination,
int distance) {
throw new PendingException("Not finished yet");
}
This will cause this step and the scenario as a whole to be flagged as pending.
Cucumber-JVM can do a great deal more than what we’ve touched on here. But this should give you enough to get you started with Cucumber-JVM, or to understand a set of existing automated acceptance criteria implemented this way. You can learn more about Cucumber-JVM athttp://cukes.info/.
6.6. Automating scenarios in Python with Behave
Python is a popular, general-purpose, open source dynamic language, and there are several Gherkin-based BDD tools available for the Python language. Cucumber itself can be used to run scenarios written in Python, though it uses a Python interpreter embedded inside a Ruby process, which can be brittle. For those who prefer a pure Python solution, there are currently three tools available: Lettuce (http://pythonhosted.org/lettuce), Freshen (https://github.com/rlisagor/freshen), and Behave (http://pythonhosted.org/behave).
These tools are similar, but at the time of writing, Behave is the most stable, best documented, and most feature-rich of the three. Despite the name, Behave has no relationship with JBehave. There’s also a Thucydides plugin that allows you to generate Thucydides reports from the Behave test results.
Let’s take a closer look at BDD in Python using Behave.
6.6.1. Installing Behave
Unlike the JVM BDD tools we’ve looked at so far, Behave is primarily a command-line tool. Installing Behave is straightforward and can be done using Pip, the standard Python package installation tool. Pip is the Python equivalent of Gem for Ruby, NuGet for .NET, or npm for Node.js. You use it like this:
$ pip install behave
This will install the behave command-line tool and make the Behave package available to your Python scripts. When this is done, you should be able to run Behave from the command line:
$ behave --version
behave 1.2.3
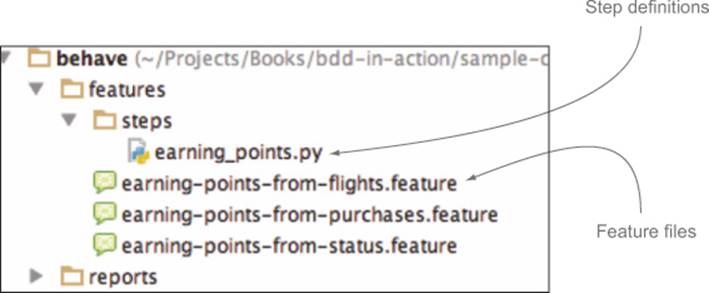
6.6.2. The Behave project structure
Behave projects use a simple directory structure, illustrated in figure 6.8. Feature files go in a directory called features, and the step definitions go in a subdirectory of this directory called steps.
Figure 6.8. The Behave project directory structure
6.6.3. Behave step definitions
Behave uses the Gherkin format for its scenarios. In fact, Behave is essentially a Python port of Cucumber, so the feature files are very similar to those used by Cucumber.
Step definitions are written in Python, using @given, @when, and @then decorators, as shown here:
from behave import given, when, then
@given('I am a Gold Frequent Flyer member')
def step_impl(context):
assert True
Behave uses a different notation when passing parameters in to step definitions. Although Behave can be configured to use regular expressions, by default it uses named variables, a little like JBehave:

Naturally, you can pass in more than one parameter:
@given('the flying distance between {departure} and {destination} is
{distance} km')
def step_impl(context, departure, destination, distance):
assert True
Behave will automatically convert basic parameter types such as numbers, percentages, dates, and times. You can also, with a little extra effort, configure automatic type conversions for the parameters that you pass in to the step definitions.
6.6.4. Combining steps
It’s often useful to be able to combine several steps into a single step in order to avoid repetition and to simplify the scenarios. For example, suppose you already implemented the following two scenario steps:
Given Joe is a Frequent Flyer member
Given Joe logs in
In some scenarios, it would be useful to combine these two steps into a single one:
Given a Frequent Flyer member Joe has logged in
You could implement this step in Behave by reusing the previous two step definitions as shown here:

This is a useful trick, as it encourages step reuse, limits duplication, and makes it easier to write shorter, more concise scenarios.
6.6.5. Step definitions using embedded tables
Like most of the other tools discussed here, Behave lets you pass tabular parameters to your step definitions. Suppose you’re implementing the following scenario using Behave:
Feature: Transfer points to other members
@transfers
Scenario: Transfer points between existing members
Given the following accounts:
| owner | points | statusPoints |
| Jill | 100000 | 800 |
| Joe | 50000 | 50 |
When Joe transfers 40000 points to Jill
Then the accounts should be the following:
| owner | points | statusPoints |
| Jill | 140000 | 800 |
| John | 10000 | 50 |
Behave will pass the tabular data to each step in the context object, as illustrated here:

6.6.6. Step definitions for tables of examples
Like Cucumber, Behave makes example tables simple: steps for example tables are no different from any other kind of step.
6.6.7. Running scenarios in Behave
To run your features, just call behave from the command line. There are quite a few command-line options (run behave --help to see them all), but one of the most useful is the --tags option, which lets you limit the scenarios you execute to those with a given tag or set of tags. For example, the following scenario is annotated with the @transfers tag:
@transfers
Scenario: Transfer points between existing members
...
You could execute this scenario, and any other scenarios with this tag, by using the --tags option:
$ behave --tags=transfers
Another very useful option is the --junit option, which generates JUnit-compatible test reports in the reports directory. This makes it easy to incorporate Behave tests into your build process using a continuous integration server, and also allows for more sophisticated reporting with Thucydides.
Again, we’ve just scratched the surface of what you can do with Behave. For more information, take a look at the Behave website (http://pythonhosted.org/behave/).
6.7. Automating scenarios in .NET with SpecFlow
If you’re in a .NET environment, your best option for BDD is SpecFlow (http://specflow.org). SpecFlow is an open source Visual Studio extension that provides support for Gherkin scenarios in the .NET and Windows development ecosystem. The rest of this section will assume that you’re reasonably familiar with the Visual Studio development environment.
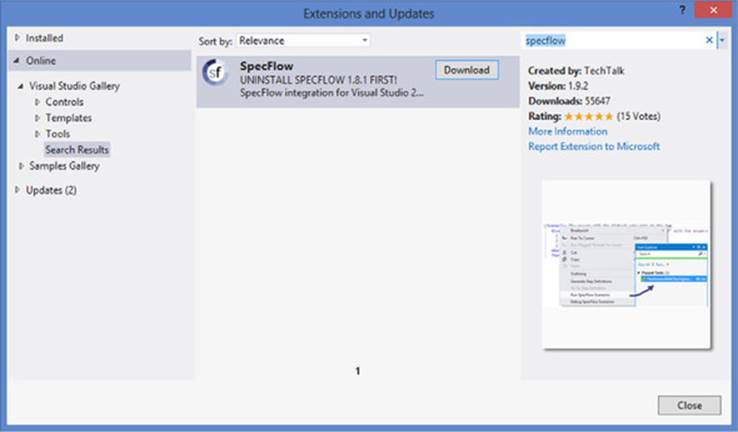
6.7.1. Setting up SpecFlow
SpecFlow is a Visual Studio extension, so you can install it directly from the Visual Studio Gallery (see figure 6.9). Once it’s installed, you’ll need to create a new Unit Test project in Visual Studio and add the SpecFlow package to your project using NuGet (the .NET package manager found at http://www.nuget.org/).
Figure 6.9. You can install SpecFlow in the Visual Studio Gallery.
SpecFlow works with several .NET unit testing frameworks, including NUnit, xUnit, and a more specialized commercial tool called SpecRun. In this example, we’ll be using NUnit.
You can install SpecFlow with NUnit through the Manage NuGet Packages screen or directly from the NuGet Package Management Console using the following command:
PM> Install-Package SpecFlow.NUnit
6.7.2. Adding feature files
SpecFlow uses Gherkin feature files like the ones used by Cucumber and Behave. Once SpecFlow is installed, you can add a new item to your project and choose SpecFlow Feature File. This will open a new feature file in the SpecFlow editor (see figure 6.10).
Figure 6.10. Editing a SpecFlow feature file

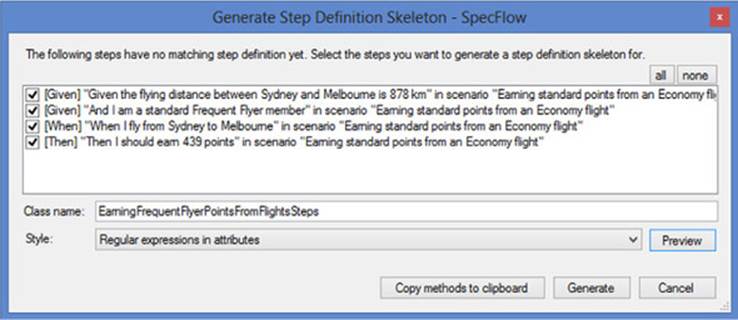
One of the areas where SpecFlow shines is its tight integration with Visual Studio. In addition to syntax highlighting and auto-complete, this editor has a number of nice integrated features. In particular, you can run or debug the scenarios directly from within the editor, or even perform code-coverage analysis, just like an ordinary unit test. Another handy feature allows you to generate step-definition skeleton methods by right-clicking in the feature file (see figure 6.11).
Figure 6.11. SpecFlow lets you generate step definitions from within the feature file editor.
6.7.3. Running scenarios
The scenario execution will depend on the unit test provider that SpecFlow uses. You can configure this in the app.config file of your test project. If you configure the MsTest provider as shown next, you’ll be able to run scenarios from within the Visual Studio Test Explorer window:
<specFlow>
<unitTestProvider name="MsTest" />
...
</specFlow>
Alternatively, you can run the tests using NUnit, in which case you’ll be running the scenarios via the NUnit test runner:
<specFlow>
<unitTestProvider name="NUnit" />
...
</specFlow>
6.7.4. SpecFlow step definitions
SpecFlow step definitions are implemented as .NET methods annotated with the [Given], [When], or [Then] attributes. SpecFlow expects these methods to be public, and to be placed in a public class that’s marked with the [Binding] attribute.
SpecFlow step definitions use regular expressions in a similar way to the Cucumber-JVM methods you saw in section 6.3. For example, one of the steps in the Flying High scenarios looks like this:
Given the flying distance between Sydney and Melbourne is 878 km
The step definition for this step might look like this:

In SpecFlow, the step definition texts are typically prefixed by an @ symbol ![]() : this disables escape sequences starting with a backslash (\), making it easier to write some of the more complex Cucumber regular expressions.
: this disables escape sequences starting with a backslash (\), making it easier to write some of the more complex Cucumber regular expressions.
A step definition method can also have several attributes, so that the same method can be used for several different variations in the scenario texts:
[When(@"I go from (.*) to (.*)")]
[When(@"I travel from (.*) to (.*)")]
public void GivenTheFlyingDistance(string departure, string destination)
{
...
}
If you aren’t fond of regular expressions, SpecFlow also supports alternative step-definition matching rules based on the method name. You name the step definition method after the step text you want to match, using either underscores or camel case. You can also include parameter placeholders in uppercase. The parameter placeholders will be matched with the corresponding method parameters. For example, you could use this approach for the following step:
Given I am a <status> Frequent Flyer member
Using this convention, the corresponding step definition could be written as follows:
[Given]
public void I_am_a_STATUS_Frequent_Flyer_member(string status)
{
...
}
6.7.5. Sharing data between steps
As you saw previously, it’s often useful to be able to share data between steps during a scenario execution, even if the step definitions aren’t in the same class. The SpecFlow scenario context provides a clean and convenient API that lets you do just that.
For example, you could store a Frequent Flyer member that you obtained from the database like this:

This field is now available for future use in subsequent steps executed during this scenario. Here, for example, you fetch it in order to let the member make a flight booking:

6.7.6. Step definitions using example tables
If you need to pass a table of data to a step method, you can add a parameter of type Table to the step definition method. This class encapsulates the contents of the tabular parameter with a convenient API that lets you both extract data and compare tables.
Suppose you’re writing a step definition for the following step:
Given the following accounts:
| owner | points | statusPoints |
| Jill | 100000 | 800 |
| Joe | 50000 | 50 |
You could do this in SpecFlow as follows:
[Given(@"the following accounts:")]
public void givenTheFollowingAccounts(Table accounts)
{
foreach (var row in accounts.Rows)
{
var owner = row["owner"]
var points = row["points"]
var statusPoints = row["statusPoints "]
...
}
}
You can also convert tabular parameters to domain objects or collections of domain objects. For example, you could convert the previous table into a list of Account objects like this:

In a similar way, you could use the table in the Then step to compare expected results with actual results:
Then the accounts should be the following:
| owner | points | statusPoints |
| Jill | 140000 | 800 |
| John | 10000 | 50 |
You could implement this step in the following way:

What you’ve seen here is just a small overview of some of SpecFlow’s more interesting features. SpecFlow is a very complete Gherkin implementation that’s tightly integrated into the .NET development environment, which makes it a logical choice for teams using BDD in a .NET context.
6.8. Automating scenarios in JavaScript with Cucumber-JS
Users are increasingly expecting richer and more interactive websites, and as a result, JavaScript is becoming increasingly important in modern web development. If you’re writing rich client-side applications with complex business logic, it makes good sense to write BDD scenarios related to this business logic natively in JavaScript.
Unit testing is well supported in JavaScript, and low-level BDD unit-testing libraries like Jasmine and Mocha are widely used. We’ll look at these libraries in chapter 10, when we discuss BDD-style unit and integration testing. But in this chapter we’ll focus on options available for higher-level BDD in JavaScript, using Gherkin-style scenario definitions.
There are a number of tools available to JavaScript developers that support Gherkin scenario descriptions, including Cucumber-JS (https://github.com/cucumber/cucumber-js), which is probably the best known of the JavaScript BDD libraries, and Yadda (https://github.com/acuminous/yadda), an alternative to Cucumber-JS that allows more flexibility in the scenario wording.
Let’s take a closer look at what BDD in JavaScript using Cucumber-JS involves.
6.8.1. Setting up Cucumber-JS
Cucumber-JS is intuitive and easy to set up, and it’s straightforward to use. Cucumber-JS relies on Node.js (a JavaScript application platform widely used in modern Java-Script development, found at http://nodejs.org) and npm (the Node.js package manager) to work, so you will need to install Node.js if you want to follow along with this example. Once it’s installed, you can install Cucumber-JS by running the following:
$ npm install -g cucumber
This will install Cucumber-JS globally, so you can call it from any project. To check that it worked, run cucumber-js -help from the command line.
6.8.2. Writing feature files in Cucumber-JS
By default, Cucumber will expect the feature files and step definitions to be in specific directories, as illustrated in figure 6.12. Of course, you can override this structure if you want to, but for this example you’ll go with the flow and use the defaults.
Figure 6.12. The default Cucumber-JS directory conventions

Much like Cucumber-JVM, Cucumber-JS expects the feature files to be in a directory called features. Cucumber-JS also understands the same Gherkin syntax that you’ve seen for the other Cucumber-derived BDD tools.
Imagine you’re writing a client JavaScript application for the Frequent Flyer website that needs to be able to calculate the points earned for a given trip in real time. You might reuse the following scenario for your client-side business logic:
Feature: Calculating earned Frequent Flyer points
Scenario: Earning standard domestic Frequent Flyer points
Given the flying distance between Sydney and Melbourne is 878 km
And I am a standard Frequent Flyer member
When I fly from Sydney to Melbourne
Then I should earn 439 travel points
And I should earn 40 status points
The code might call a web service on the server or do the calculations locally. From the point of view of the requirements, this doesn’t matter. What’s important here is the application’s behavior from the point of view of the user.
If you place this scenario in a feature file called earning-frequent-flyer-points.feature in the feature directory, Cucumber-JS will be able to find it. You can run Cucumber-JS from the command line by typing cucumber-js. Like Cucumber-JVM, if there are no matching step implementations, Cucumber-JS will propose some skeleton steps to get you started:
$ cucumber-js
1 scenario (1 undefined)
5 steps (5 undefined)
You can implement step definitions for undefined steps with these snippets:
this.Given(/^the flying distance between Sydney and Melbourne is (\d+) km$/, function(arg1, callback) {
// express the regexp above with the code you wish you had
callback.pending();
});
this.Given(/^I am a standard Frequent Flyer member$/, function(callback) {
// express the regexp above with the code you wish you had
callback.pending();
});
...
This shows that you’ve specified pending scenarios. Now you can add some test logic.
6.8.3. Implementing the steps
Let’s look at how to implement steps in Cucumber-JS. By default, Cucumber-JS will look for the step definition file in the step_definitions directory. A very simple step implementation file might look like this:
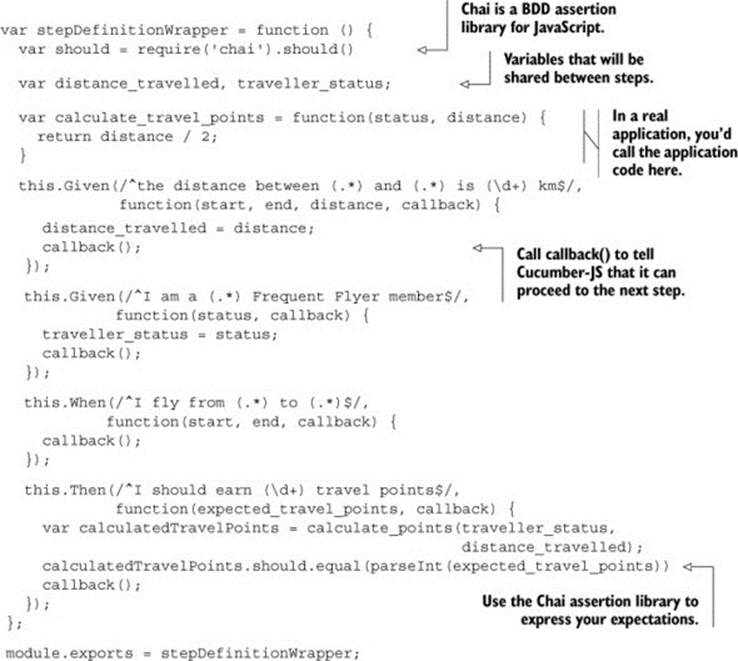
This is a simple example to give you a feel for what BDD in JavaScript looks like. We’ll look at some more advanced features of Cucumber-JS in the next chapter.
6.8.4. Running the scenarios
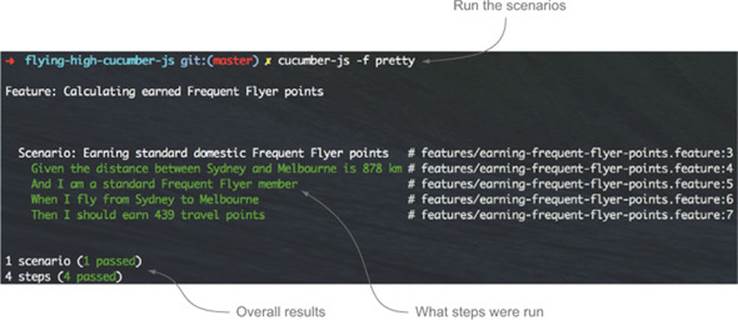
When you run Cucumber-JS feature files that have step implementations, Cucumber-JS will produce colored output on the console (see figure 6.13). You can also produce output in JSON format that can be used to import the results into other reporting tools such as Thucydides for more comprehensive reporting, or display them on a continuous integration server.
Figure 6.13. Running Cucumber-JS on the command line
Cucumber-JS enjoys a large developer community, and it’s easy to set up and use. It also integrates well with other tools in the JavaScript ecosystem. For example, if you’re writing an AngularJS application using the Karma test runner, you can use the Cucumber/Karma integration package (https://npmjs.org/package/karma-cucumberjs) to test your AngularJS code directly using Cucumber. At the time of writing, this tool is still under active development, and not all of its features are mature or available, but it’s an active project with frequent updates.[12]
12 The Cucumber-JS web page (https://github.com/cucumber/cucumber-js) has a table summarizing the current status of feature implementation.
6.9. Summary
In this chapter, you learned about automating scenarios:
· To automate a scenario, you write step definitions using the BDD tool of your choice.
· Step definition methods interpret the step text and call the appropriate methods to manipulate the application under test.
· JBehave is a well-documented Java-based BDD tool with tight Thucydides integration.
· Cucumber-JVM provides a Gherkin implementation for JVM-based languages.
· Behave is a Gherkin implementation for Python.
· SpecFlow is a Gherkin implementation for .NET with tight Visual Studio integration.
· Cucumber-JS is one of several BDD implementations in JavaScript.
You should now have a good idea of how to automate your acceptance criteria using the language and framework of your choice. But automating scenarios is only the first step—you also need to get these automated scenarios to actually test your application. In the next chapter, you’ll learn how to turn these automated scenarios into effective, expressive, and maintainable automated acceptance tests.
All materials on the site are licensed Creative Commons Attribution-Sharealike 3.0 Unported CC BY-SA 3.0 & GNU Free Documentation License (GFDL)
If you are the copyright holder of any material contained on our site and intend to remove it, please contact our site administrator for approval.
© 2016-2026 All site design rights belong to S.Y.A.