BDD in Action: Behavior-Driven Development for the whole software lifecycle (2015)
Part 3. How do I build it? Coding the BDD way
In part 2 you learned about the importance of conversation and collaboration in the BDD process, and that you need to work together to define acceptance criteria in a clear and unambiguous format that can be automated using tools such as Cucumber, JBehave, or SpecFlow. In part 3, we’ll look under the hood and see how you can do this automation. Whereas part 2 should be understood by the whole team, part 3 gets a bit more technical and will be of more interest to testers and developers.
As with any code base, the maintenance of automated acceptance tests can be costly if they’re not written well from the onset. In chapter 7, you’ll learn how to structure and organize your automated acceptance criteria to make them easier to understand and to maintain.
In chapter 8, you’ll learn about writing automated acceptance criteria for web applications, including why and when you should implement your acceptance criteria as web tests. This is an area where many teams struggle, so we’ll look in some detail at how to write high-quality automated web tests using Selenium WebDriver.
Automated acceptance tests aren’t just for web testing. In chapter 9, we’ll look at techniques for implementing automated acceptance tests for pure business rules and other requirements that don’t need to be verified through the UI.
Finally, it’s important to remember that BDD is not just about requirements analysis and automated acceptance testing. In chapter 10, you’ll learn how to apply BDD principles to coding. You’ll see how BDD principles, techniques, and tools make traditional test-driven development easier and more effective. You’ll see how BDD unit tests flow naturally from BDD acceptance criteria. You’ll learn how to use unit tests to design, document, and verify your application code, and indeed how to think in terms of writing low-level specifications rather than unit tests.
Chapter 7. From executable specifications to rock-solid automated acceptance tests
This chapter covers
· The importance of writing high-quality automated tests
· Preparing test data for the tests
· Implementing reliable and sustainable tests
In the next few chapters, we’ll look at turning the automated scenarios we discussed in chapter 6 into fully automated acceptance tests for different types of applications and technologies.
When automated acceptance tests are poorly designed, they can add to the maintenance overhead, costing more to update and fix when new features are added than they contribute in value to the project. For this reason, it’s important to design your acceptance tests well. In this chapter, we’ll look at a number of techniques and patterns that can help you write automated acceptance tests that are meaningful, reliable, and maintainable (see figure 7.1).
Figure 7.1. In this chapter we’ll look at how to make the automated executable specifications robust and maintainable.
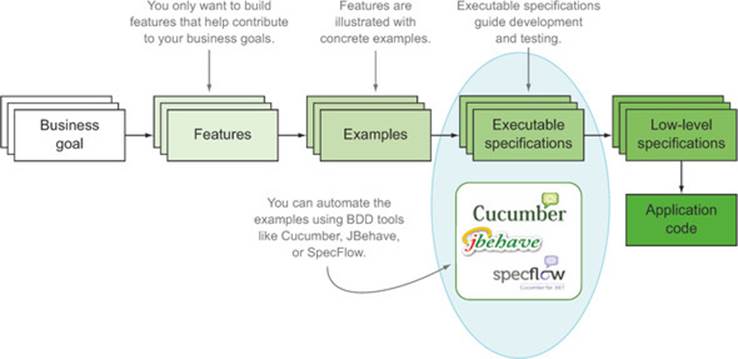
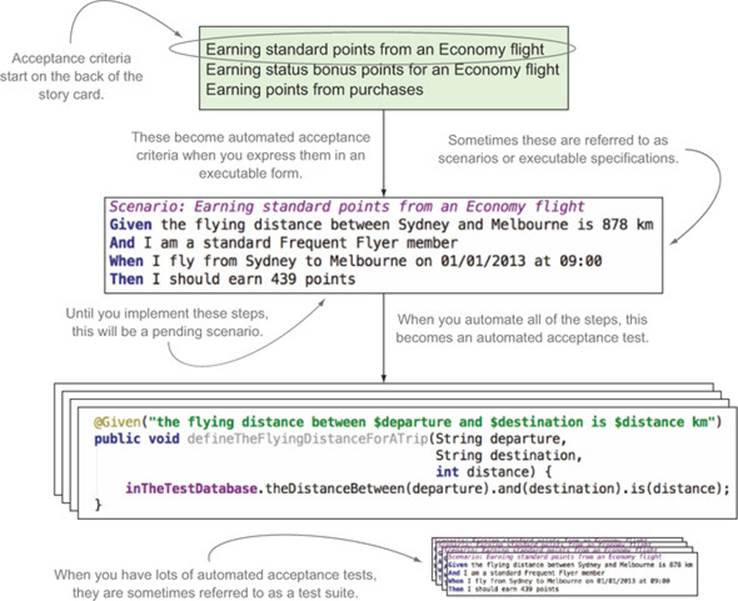
Over the previous few chapters, you’ve seen how the BDD lifecycle takes acceptance criteria and turns them into executable specifications (see figure 7.2). Acceptance criteria are those brief notes you write on the back of your story cards that help define when a story or feature is complete. As you’ve seen, you can write more complete versions of these acceptance criteria in the form of scenarios, which you can automate using BDD tools such as JBehave, Cucumber, and SpecFlow. When you automate these scenarios, they become executable specifications, but these will be reported as pending until you write the underlying code that actually exercises the application and verifies the outcomes. Once this happens, you can talk of automated acceptance tests.
Figure 7.2. Automated data setup is a key part of automated acceptance criteria.
Throughout the rest of this chapter, I’ll refer to automated acceptance tests as automated tests or simply as tests. And for this chapter, test suite will refer to all of the automated acceptance tests for a project.
You’re now ready to learn how to turn your pending executable specifications into full-fledged automated acceptance tests. But before we can discuss specific test automation approaches and technologies, we need to lay the groundwork and discuss how to ensure that these tests are implemented in a way that will be easy to extend and maintain as the test suite grows:
· A good acceptance test should communicate its intent clearly and provide meaningful feedback about the current state of the application. It should also be reliable and easy to maintain, so that the value provided by the test outweighs the cost of maintaining it.
· Techniques such as initialization hooks and personas can be used to ensure that the system is in a known state at the start of each test.
· Layers of abstraction can help make the tests clearer and easier to maintain by separating the what from the how.
Let’s start off by discussing what makes an industrial-strength acceptance test.
7.1. Writing industrial-strength acceptance tests
It’s not hard to write a simple automated test. There are plenty of books and resources on the internet that can show you how to write automated tests for all sorts of technologies, and we’ll look at a few of these later on in this book. But what’s harder is ensuring that your tests will stand the test of time. Will your tests continue to provide useful feedback several months down the track? Will they become harder to maintain as the code base grows? Will they become brittle and fragile, discouraging the team from fixing them when they break? Many teams spend a great deal of effort in building large and complex test suites, only to abandon them because they find that the cost of maintaining and updating them outweighs the value of the feedback they provide.
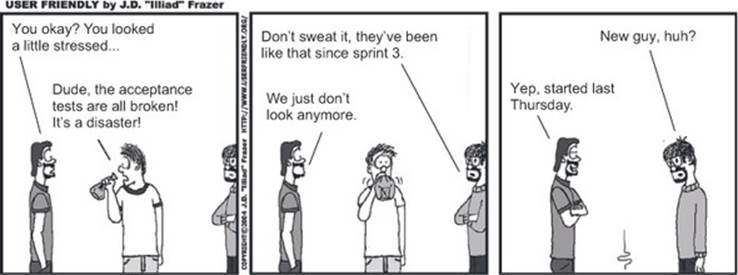
The tests in a well-written automated acceptance test suite should be either passing or pending. A failing automated acceptance test should be a red flag for the development team that demands immediate attention. But when tests fail too often due to sporadic technical issues, the team will lose confidence in them as a feedback mechanism and be less motivated to fix them when they break (see figure 7.3). This leads to a vicious circle, where there are always a few broken tests in the build. When this happens, the automated acceptance criteria no longer perform their primary role of providing feedback about the project’s current health. This is what you want to avoid.
Figure 7.3. Acceptance tests that fail too often can lead to complacency.
It’s an important issue, and it’s worth putting in some effort up front to ensure that the time you invest automating your acceptance criteria yields its full fruits over the duration of the project and beyond. Automated tests are like any other kind of code—if you want them to be robust and easy to maintain, you need to put a little effort into their design and write them in a way that’s clear and easy to understand. Writing good automated acceptance tests requires the same software engineering skills and disciplines, and the same level of craftsmanship, as well-written production code. The best automated acceptance tests tend to be the result of a collaborative effort between testers and developers.
Unfortunately, automated tests often don’t receive the attention they need. Part of this problem is historical—for many years, test automation has been synonymous with “test scripts.” Teams have been reluctant to put too much effort into writing scripts when they could be writing production code. Many of the more traditional testing tools do indeed use scripting languages that have poor support for, or simply don’t encourage, standard software engineering practices, such as refactoring to avoid code duplication, writing reusable components, and writing code in a clean and readable manner.
Many of these issues can be avoided if teams apply a few simple principles. A good automated acceptance test needs to respect a few key rules:
· It should communicate clearly. Automated acceptance tests are first and foremost communication tools. Wording and semantics are important: the tests need to clearly explain the business behavior they’re demonstrating. They need to explain to stakeholders, business analysts, testers, and other team members what business tasks the application is intended to support, and illustrate how it does so. Ideally, these tests will outlive the development phase of the project and go on to help the maintenance or BAU[1] team understand the project requirements and how they’ve been implemented.
1 Business as Usual—the team that takes care of applications once they’re deployed into production. In many organizations, this is a different team than the one developing the project.
· It should provide meaningful feedback. If a test fails, a developer should be able to understand what the underlying requirement is trying to achieve, and also how it’s interacting with the application to do so.
· It should be reliable. To get value out of the tests, the team needs to be able to trust the test results. A test should pass if (and only if) the application satisfies the underlying business requirement, and should fail if it doesn’t. If a test does break for technical reasons, the issue should be easy to isolate and simple to fix. Although this sounds obvious, it can require care and discipline to ensure that the more complex tests respect this rule.
· It should be easy to maintain. A test that breaks too often when the application is updated or modified, or that requires constant maintenance to keep up to date, rapidly becomes a liability for the development team. If this happens too frequently, the developers will often simply cease updating the tests and leave them in a broken state. When this happens, any useful feedback from the test results is lost, and the time invested in building up the test suite is wasted.
In the rest of this chapter, we’ll look at how you can write high-quality tests that respect these rules, and that provide valuable feedback and are robust and easy to maintain.
7.2. Automating your test setup process
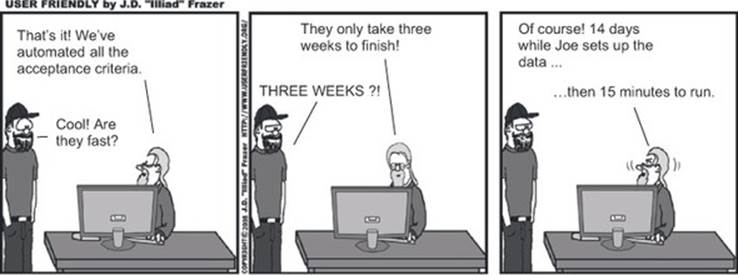
Before you can automate any acceptance criteria, you need to make sure the system is in a correct and well-known initial state. Also, many automated acceptance criteria—particularly the end-to-end variety—will need to refer to or update data in a database. Some tests may need other services or resources, such as file systems or remote web services, to be initialized and configured. In order to have effective automated acceptance criteria, you need to be able to set up all of these things quickly, precisely, and automatically (see figure 7.4).
Figure 7.4. Automated data setup is a key part of automated acceptance criteria.
If your automated acceptance criteria use a database at all, you should reserve a dedicated database instance for them. Try to ensure that the database configuration is as close to the production one as possible. It’s also a bad idea to use a database that’s shared by developers or testers; it should be reserved for the exclusive use of your automated acceptance criteria.
Many teams today try to automate this provisioning process using tools like Puppet and Chef to create a clean test environment from scratch on a freshly created virtual machine before each test run.
Any test that uses a database will typically need the database to be in a known, predictable state at the start of the test. When it comes to setting up your test database, there are several possible approaches; the one that works best for you will largely depend on the nature of your project and technical environment. In the following sections, we’ll discuss a few possible strategies.
7.2.1. Initializing the database before each test
The most reliable way to set up your test database is to automatically reinitialize the database schema before each test, possibly populating it with a sensible predefined set of reference data. This way, no test can inadvertently break another test by adding unexpected data into the database. It also ensures that each scenario is independent of the others and doesn’t rely on another scenario to have been executed beforehand.
7.2.2. Initializing the database at the start of the test suite
Unfortunately, in practice your database or technology stack may make initializing the database schema before each test too slow to be a viable option. I’ve seen several organizations use this approach very successfully, even with large relational databases, but fast feedback is important, and you may have to make trade-offs in this area.
The next-best way to prepare test data is to automatically reinitialize the database schema every time you run the test suite. This is faster than reinitializing the database before each scenario, but it means that each scenario is responsible for deleting any test data that it creates, which isn’t without risk. This approach can also introduce subtle dependencies between the scenarios, which can lead to hard-to-reproduce errors.
7.2.3. Using initialization hooks
No matter which option you chose, most BDD tools provide “hooks” that allow you to perform actions before and after each scenario and at other strategic points in the test suite lifecycle.
As you’ve seen, BDD tools like JBehave express requirements in the form of scenarios. When the tests are executed, a scenario will generally correspond to a single automated test, although for table-driven scenarios a test will be executed for each row in the table. The scenarios are placed in feature files or story files. I’ll refer to all of these story and feature files as the test suite.
Different tools let you intervene at slightly different stages of test execution, but the main steps in test execution are similar for all of the BDD tools we’ll discuss, and they lead to the intervention points illustrated in figure 7.5.
Figure 7.5. Hooks let you intervene at different stages in the test execution.
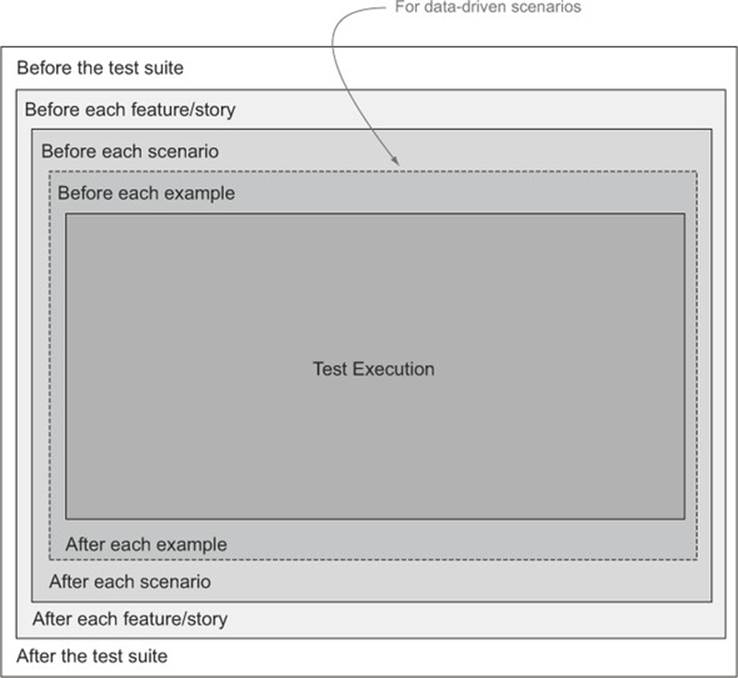
Table 7.1 illustrates some of the methods available in the various tools for intervening at each of these points.
Table 7.1. Initialization and teardown hooks used by different BDD tools
|
Stage |
JBehave |
Cucumber/JVM |
Lettuce |
SpecFlow |
|
Before the test suite |
@BeforeStories |
- |
before_all |
[BeforeTestRun] |
|
Before each feature or story |
@BeforeStory |
- |
before_feature |
[BeforeFeature] |
|
Before each scenario |
@BeforeScenario |
@Before |
before_scenario |
[BeforeScenario] |
|
Before each example |
@BeforeScenario |
- |
- |
|
|
After each example |
@AfterScenario |
- |
- |
|
|
After each scenario |
@AfterScenario |
@After |
after_scenario |
[AfterScenario] |
|
After each feature or story |
@AfterStory |
- |
after_feature |
[AfterFeature] |
|
After the test suite |
@AfterStories |
- |
after_all |
[AfterTestRun] |
|
Before a given tag |
- |
@Before |
before_tag |
[BeforeScenario] |
|
After a given tag |
- |
@After |
after_tag |
[AfterScenario] |
Let’s look at how these hooks work in each of these tools.
Initialization hooks in JBehave
In JBehave you can use the @BeforeScenario or @BeforeStory annotation to reset the database before each scenario or story, whereas @BeforeStories lets you reset the database once at the start of the test suite.
For example, suppose you’ve written a Database class that’s responsible for setting up your test database. To reset the database before each scenario, you could write something like this:

The @BeforeStory annotation can also be used to intervene before the execution of a row in a table-driven test, as shown here:
![]()
There are also symmetrical @AfterScenario, @AfterStory, and @AfterStories annotations that can be used to tidy up the database afterwards.
Initialization hooks in Cucumber-JVM
Other BDD frameworks support similar features. For example, Cucumber-JVM has a more limited set of annotations, providing the @Before and @After annotations to mark methods that will be called before and after each scenario:

Although it has no equivalent to JBehave’s @BeforeStory and @BeforeStories annotations, Cucumber does provide a feature that native JBehave lacks.[2] The preceding method will be called before each and every scenario in the test suite, whether it uses the database or not. This is clearly not ideal, especially if only a small part of your acceptance criteria are end-to-end acceptance criteria. Cucumber provides for a more selective approach, where you specify an annotation to indicate which scenarios this hook should apply to:
2 The Thucydides extension for JBehave does provide support for this feature.

You can then refer to this tag in the @Before annotation, causing Cucumber to only call this method for scenarios with the @end-to-end tag:

In this way, Cucumber-JVM provides an elegant way of resetting your test database only when you really need to do so.
Initialization hooks in Behave
Behave, the Python BDD tool introduced in chapter 6, also provides a rich set of hook methods that you can define in the environment.py module. These methods are intuitively named:
· before_scenario and after_scenario
· before_feature and after_feature
· before_tag and after_tag
· before_all and after_all
To reset the test database before each scenario, you might do something like this:
def before_scenario(context, scenario):
context.database.reset()
If you needed to reset the database uniquely for end-to-end scenarios, you could check for the presence of the @end-to-end tag, as shown here:
def before_scenario(context, scenario):
if 'end-to-end' in scenario.tags:
context.database.reset()
Initialization hooks in SpecFlow
SpecFlow has a particularly broad set of hooks, including BeforeTestRun, Before-Feature, and BeforeScenario. Like Cucumber-JVM, it allows you to optionally specify a tag that indicates the scenarios where you would like a method executed. For example, the code to reset the database before each end-to-end scenario might look something like this:
[BeforeScenario("end-to-end")]
public static void BeforeEndToEndScenario()
{
InitializeTestDatabase();
}
You’ve now seen how you could place the test database into a clean state before each scenario. Now let’s consider how to inject specific data for each scenario.
7.2.4. Setting up scenario-specific data
When you create a new database, you’ll usually want to populate it with (at least) reference data and possibly some sample production-like data. But even with a fresh database for each new scenario, it’s not a good idea to rely too heavily on prepopulated data. Scenarios should be self-explanatory, and if you rely on predefined test data, it can make it harder to know what the test is actually doing. For example, the following scenario uses a prepopulated set of timetables:
Scenario: Tell users about the next departure times from a given station
Given I want to travel from Parramatta to Town Hall at 8:00
When I ask about the next trains to depart
Then I should be told about the trains at: 8:02, 8:11, 8:14
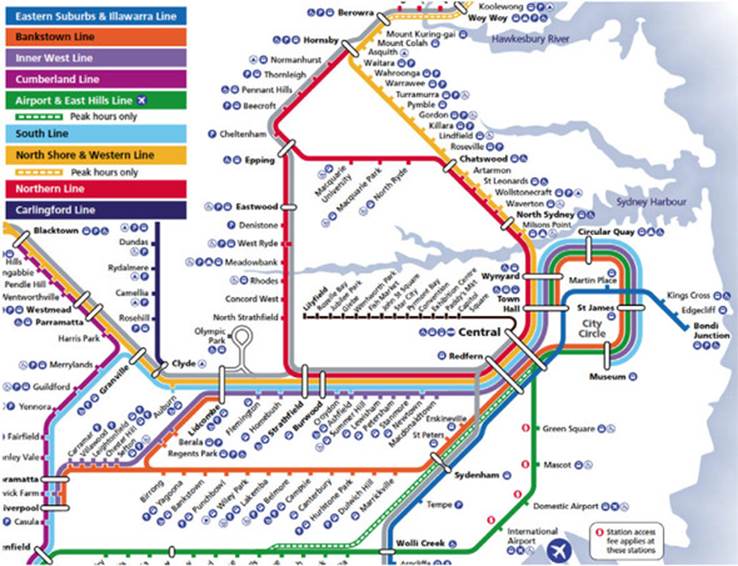
This scenario assumes not only that project team members and stakeholders know about the geographical locations of Parramatta and Town Hall stations (this isn’t an unreasonable expectation for people working in the Sydney public transport network—see figure 7.6), but also that they know the times of trains that are scheduled to arrive at Town Hall. This is less obvious, and as a result, the intent of the scenario is unclear. Why these trains and not others? What trains should not be included?
Figure 7.6. Part of the Sydney rail network used in the scenarios for this chapter
Some data, such as the names of the stations and the lines that connect them, would be well known to stakeholders. You can safely populate the initial test database with this sort of reference data; putting it into the scenario would just add clutter and distract from the more essential information. But details that are likely to change often, or that are central to the business rule you’re trying to illustrate, should be included in the scenario.
A better way to express this scenario might be as follows:
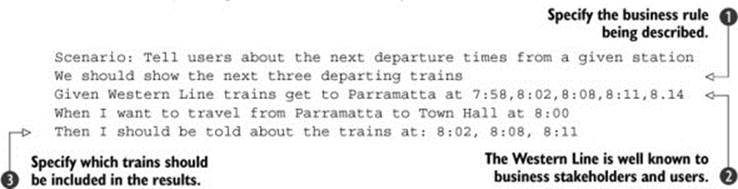
In this version, you assume that the stakeholder knows where the Western Line runs, but you spell out the timetable data you’re using in the example ![]() . In this context, the results
. In this context, the results ![]() illustrate not only which trains should be returned, but which trains should be excluded from the mix. For more clarity, you also include a short comment to explain the business rule that you’re illustrating
illustrate not only which trains should be returned, but which trains should be excluded from the mix. For more clarity, you also include a short comment to explain the business rule that you’re illustrating ![]() .
.
Notice how examples like this can help raise questions about counterexamples and corner cases. What if a train arrives at 8:00? What if there are no more trains until the following day—do you still display the next three?
Embedding tables inside the scenario steps is another popular way to set up test data for a scenario. For example, in the following scenario, you need to tell a traveller how to get to a particular station. You can inject a number of sample timetable entries into the database before using this timetable data to illustrate what scheduled trains you’d like the traveller to see at a given time and station:
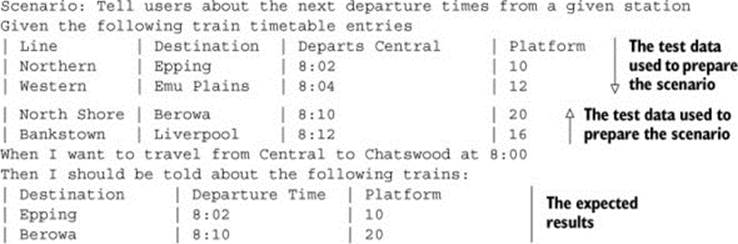
Of course, this scenario would only test one test case, and the feature might be better illustrated by several different examples. Alternatively, you could use a more example-driven approach, as shown here:

Here you set up the test data as in the previous example ![]() and then illustrate the scenario with examples of several different search criteria
and then illustrate the scenario with examples of several different search criteria ![]() . Note that you express the expected results as a list of line names, which will be checked against the actual records found by the search.
. Note that you express the expected results as a list of line names, which will be checked against the actual records found by the search.
7.2.5. Using personas and known entities
Another useful technique when setting up data for a scenario is to use personas or known entities. In the domain of user experience (UX), personas are fictional characters that are meant to represent the different types of people who will be using the system. A persona usually comes with a very detailed description, including everything from the fictional person’s name and email address to their interests, hobbies, and work habits. Figure 7.7 shows a persona for a Flying High customer.
Figure 7.7. A persona is a fictional character meant to represent a category of user of the system.
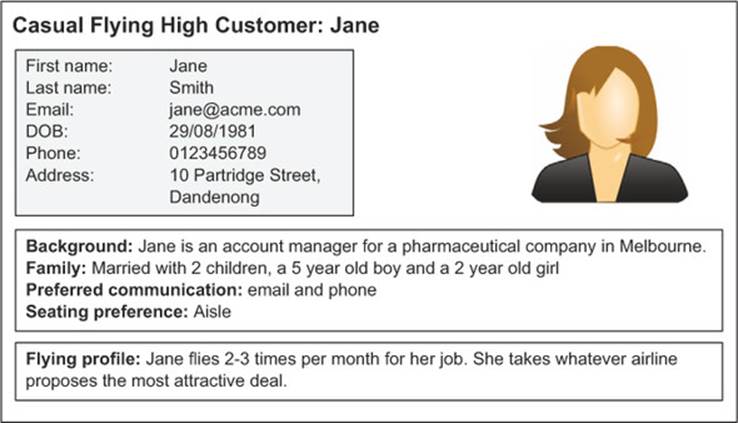
When it comes to setting up test data for your scenarios, a persona assembles a set of precise data under a well-known name. So when you refer to Jane in the following scenario, everyone on the team will know who you’re talking about. Here’s an example of one of Jane’s scenarios:

In the implementation of the first step, you can use the name Jane ![]() as an indicator to inject all of the relevant data about this persona into the test database. In subsequent steps, you can use the persona name to identify the data set you need to use for the rest of the scenario.
as an indicator to inject all of the relevant data about this persona into the test database. In subsequent steps, you can use the persona name to identify the data set you need to use for the rest of the scenario.
When you initially configure this test data, you might do something like this:

The Persona class ![]() is created for these tests to define the known personas and inject them into the test database. In the method body, you retrieve the corresponding persona data
is created for these tests to define the known personas and inject them into the test database. In the method body, you retrieve the corresponding persona data ![]() , ensure that this persona isn’t a Frequent Flyer member
, ensure that this persona isn’t a Frequent Flyer member ![]() , and then save the updated persona to the test database
, and then save the updated persona to the test database ![]() . Note that not all persona objects would need to go into the test database—some might simply be configured in the initial steps and then used in subsequent steps. In either case, the primary goal is to make the scenario more readable and easier to maintain by removing any unnecessary clutter.
. Note that not all persona objects would need to go into the test database—some might simply be configured in the initial steps and then used in subsequent steps. In either case, the primary goal is to make the scenario more readable and easier to maintain by removing any unnecessary clutter.
You can also use the persona data as a kind of template, changing other fields as required. For example, suppose you needed to implement the following step:
Given Jane is 60 years old
You could implement this step as shown here:
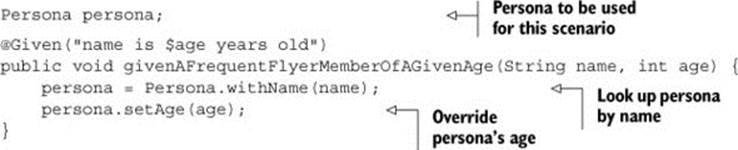
Here you’re simply starting off with the default field values for this persona and overriding the fields you want to change. This is very useful for scenarios where there are only slight variations in the data to be used.
A similar approach can be used with other types of test data. The team defines known entities—domain objects in a well-known state. For example, a banking application working on transferring bank statement files might define a few standard file types, and then only specify the fields that have different values for a given scenario.
7.3. Separating the what from the how
Automated acceptance tests need to be stable and reliable. When small changes happen in the application, you shouldn’t need to update hundreds of acceptance tests just to keep the test suite running. Maintaining your automated acceptance tests should never be a hindrance to your ability to embrace change.
Yet when many teams start automating their acceptance criteria, this is exactly what happens. Often a small change in a single commonly used web page will break a large swath of tests, and developers will need to fix each test individually before the test suite can work again. This is thankless, unproductive work that does little to encourage the team to automate more acceptance tests.
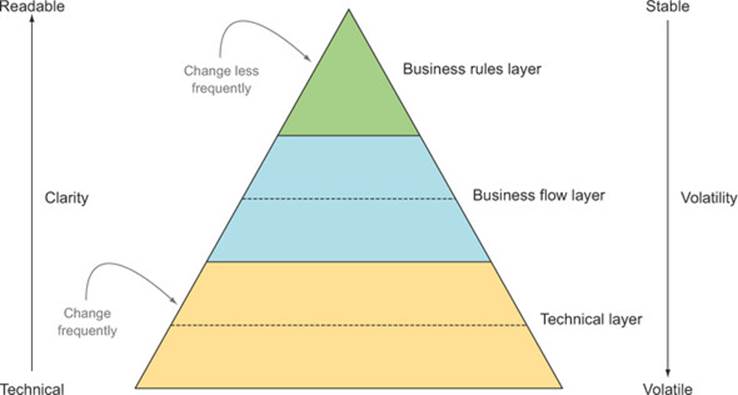
It doesn’t have to be this way. The trick is to apply a basic principle of software engineering, known as layers of abstraction. Layers of abstraction hide implementation details inside a function or object. This makes the high-level layers cleaner and easier to understand and also isolates them from changes in the implementation details hidden inside the lower layers.
When you write automated acceptance criteria, using layers can help you isolate the more volatile, low-level implementation details of your tests from the higher level, more stable business rules. High-level business rules tend to be relatively stable, and changes to them will be driven by the business rather than by technical constraints. Lower-level implementation details, such as screen layouts, field names, and how a low-level library is called, tend to change more frequently. When changes do happen at the lower implementation levels, the impact on the automated acceptance criteria should be minimal.
Experienced BDD practitioners[3] typically use at least three layers of abstraction in their tests, divided into three categories, like the ones illustrated in figure 7.8.
3 See, for example, Gojko Adzik, “How to implement UI testing without shooting yourself in the foot,” http://gojko.net/2010/04/13/how-to-implement-ui-testing-without-shooting-yourself-in-the-foot-2/.
Figure 7.8. Well-written automated acceptance criteria are organized in three main layers.
Let’s take a look at each of these three main layers.
7.3.1. The Business Rules layer describes the expected outcomes
The Business Rules layer describes the requirement under test in high-level business terms. If you’re using a BDD tool such as JBehave, Cucumber, or SpecFlow, the business rule will typically take the form of a scenario in a feature file using either a table or a narrative structure, like the following:

As you saw in the previous chapter, this sort of scenario focuses on the business outcomes of a requirement ![]() and
and ![]() , and isn’t too worried about how the system delivers these outcomes. Requirements expressed in this way should only need to change if the business changes its mind (or its understanding evolves) about the expected outcomes.
, and isn’t too worried about how the system delivers these outcomes. Requirements expressed in this way should only need to change if the business changes its mind (or its understanding evolves) about the expected outcomes.
Figure 7.9 illustrates the way the Business Rules layer works together with the other two layers to implement this scenario. Don’t worry about the details of the code just yet; we’ll discuss the technologies used in this example later on in the chapter and in the following chapters.
Figure 7.9. Each automation layer uses services from the layer beneath to implement a scenario.
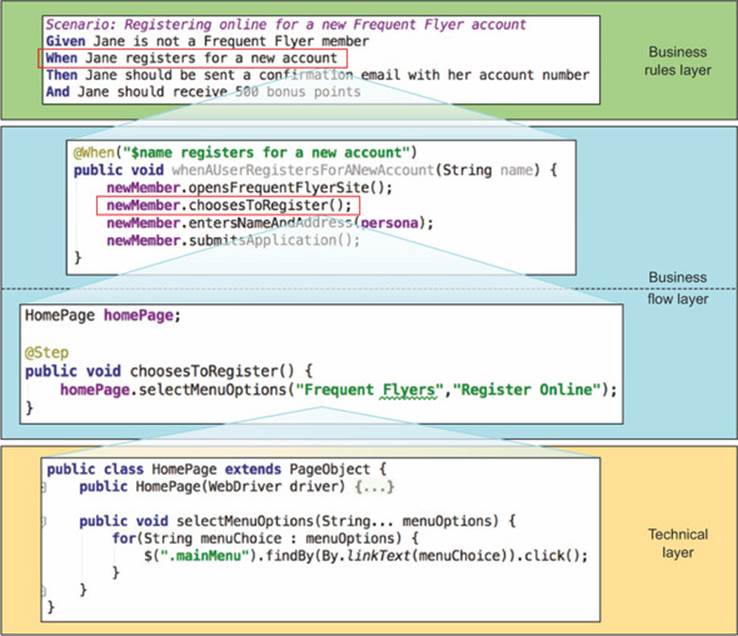
7.3.2. The Business Flow layer describes the user’s journey
You implement the scenarios defined in the Business Rules layer using libraries and functions defined in the Business Flow layer. This layer represents the user’s journey through the system to achieve a particular business goal. What high-level actions does Jane need to perform to register for a new account? How will you know that she has received 500 bonus points? How would you step through the application to demonstrate this scenario?
For example, you might break down the “When Jane registers for a new account” part of the high-level business requirement into the following steps:
· Jane goes to the Frequent Flyer website.
· Jane chooses to register for a new account.
· Jane enters her name and address.
· Jane submits her application.
You’ll try to express these steps in a very readable, business-friendly way. For example, the scenario corresponding to this example might look like this:
Scenario: Registering online for a new Frequent Flyer account
Given Jane is not a Frequent Flyer member
When Jane registers for a new account
Then Jane should be sent a confirmation email with her account number
And Jane should receive 500 bonus points
Using Java and JBehave, you might write step definitions for the first two lines of this scenario like this:[4]
4 This code follows the @Given step you saw in section 7.1.5.
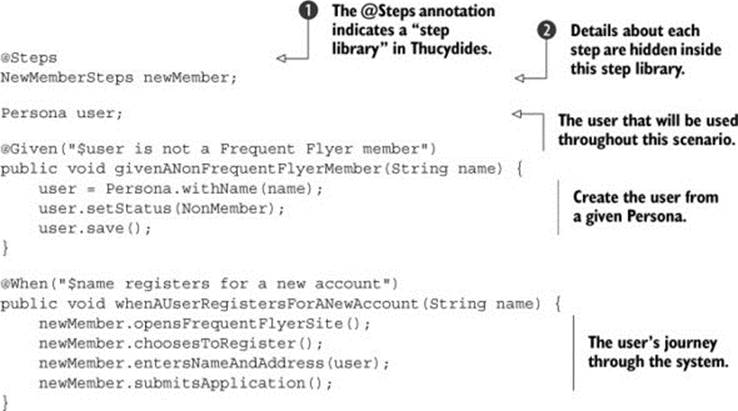
A business stakeholder or Scrum product owner should have no trouble reading and providing feedback on this. In fact, code like this is often defined and implemented collaboratively by a combination of developers and testers, UX experts, and business analysts. In some teams, the testers even take a very active role in implementing this layer, using the technical components provided by the developers.
These steps are more likely to change than the core business requirements, but they’ll only need to be changed if some aspect of the application workflow changes. For example, maybe you’ll need to add a step where Jane also needs to agree to a set of terms and conditions.
The Business Flow layer may contain several sublayers, depending on the complexity of the scenarios and application being tested. For example, in the whenAUser-RegistersForANewAccount() method in the preceding code, you don’t interact directly with the technical UI components. Instead, you delegate to a step library that describes the details of each step of the business flow. When you use Thucydides with JBehave, the @Steps annotation ![]() injects a step library object
injects a step library object ![]() into the step definition class. The choosesToRegister() method in theNewMemberSteps step library, for example, could be implemented like this:
into the step definition class. The choosesToRegister() method in theNewMemberSteps step library, for example, could be implemented like this:

Other steps might be more involved, but they’ll still use descriptive method names provided by components in the Technical layer:
@Step
public void entersNameAndAddress(Persona user) {
homePage.enterFirstName(user.getFirstName());
homePage.enterLastName(user.getLastName());
homePage.enterAddress(user.getAddress());
}
Still other steps might interact with other technical components or services. For example, the third step of the scenario might be implemented using a call to an email service component:
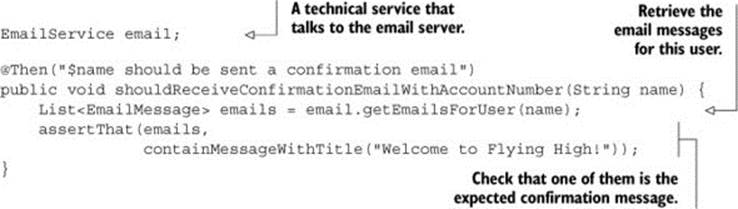
Methods in the Business Flow layer don’t need to be concerned about how these actions are implemented. This highlights one of the advantages of using layers of abstraction: they isolate the what from the how. The Business Flow steps don’t need to worry about how you talk to the email server. At this level, all you’re interested in is describing what email message you expect the user to receive.
The more technical actions are implemented using reusable components from the Technical layer, which we’ll look at in the next section.
7.3.3. The Technical layer interacts with the system
The Technical layer represents how the user interacts with the system at a detailed level—how they navigate to the registration page, what they enter when they get there, how you identify these fields on the HTML page, and so forth.
These technical steps are generally implemented by developers. The steps interact with the application code either through the user interface or by accessing some other service layer, or by accessing the application code directly. Writing these steps requires knowledge of both the implementation of the application (how the web pages are structured, what web services exist, and so forth) and the test automation software.
The developers effectively provide a library of reusable components and methods to be used by steps in the Business Flow layer. For example, if you’re working with a web application, you’ll design page objects—classes that hide the technical details about HTML fields and CSS classes behind descriptively named methods, such as enter-Name() or submitApplicationRequest().
Following on from the previous example, suppose you were writing a Technical layer using Thucydides and WebDriver, a popular open source web automation tool that we’ll discuss in detail in chapter 8. Using this technology stack, the selectMenu-Options() method might look like this:
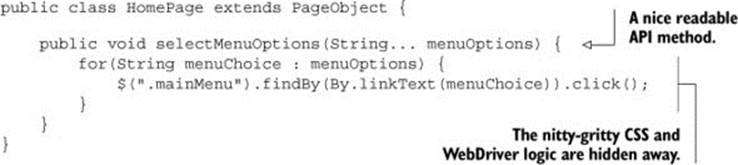
A well-written Technical layer does wonders to isolate the other layers from the impact of low-level changes. For example, suppose the design of the registration page changes, involving changes to the HTML structure and field names. Such a change would modify neither the business rule nor the workflow for this requirement, and those levels wouldn’t be affected. The only code you’d need to update is within the page object that encapsulates the registration page. This update would work for any scenario that uses this page.
In addition, you can implement the Business Rules and the Business Flow layers before the user interface has been implemented. The first layers are written in collaboration with the testers and business analysts and act as guidelines for development work. Only when the user interface is reasonably stable do you implement the technical components.
7.3.4. How many layers?
The precise number of layers you need to make your automated tests readable and maintainable will vary depending on the scope and complexity of the acceptance criteria. There are many different types of acceptance criteria, and some will be more complicated and involved than others.
Some will describe how a user interacts with the application to achieve some business goal, narrating the user’s journey through the system and the expected business outcomes, like the “Registering online for a new Frequent Flyer account” scenario you saw earlier. Others will focus on more specific business rules, as with the Frequent Flyer point calculation examples you saw in chapter 6:
Scenario: Calculating travel and status points for a domestic flight
Given the flying distance between Sydney and Melbourne is 878 km
And I am a standard Frequent Flyer member
When I fly from Sydney to Melbourne
Then I should earn 439 travel points
And I should earn 40 status points
The layered approach we’ve discussed here is fairly common among experienced practitioners for web-based acceptance testing, but it’s equally applicable for other types of acceptance criteria. In the next few chapters, you’ll see it applied to a number of different technologies.
7.4. Summary
In this chapter you learned how to structure your automated acceptance criteria:
· The general principles of designing meaningful, reliable, and maintainable automated acceptance tests
· How to prepare your test database before executing your automated acceptance criteria
· How using layers of abstraction makes the automated acceptance criteria more robust by separating the what from the how at multiple levels
In the next chapter, you’ll learn how to write automated acceptance tests that exercise a web interface.
All materials on the site are licensed Creative Commons Attribution-Sharealike 3.0 Unported CC BY-SA 3.0 & GNU Free Documentation License (GFDL)
If you are the copyright holder of any material contained on our site and intend to remove it, please contact our site administrator for approval.
© 2016-2026 All site design rights belong to S.Y.A.