Test-Driven Infrastructure with Chef (2011)
Chapter 7. Test-Driven Infrastructure: A Recommended Toolchain
This book began with two philosophical foundations:
1. Infrastructure can and should be treated as code.
2. Infrastructure developers should adhere to the same principles of professionalism as other software developers.
It then outlined how to go about endeavoring to fulfill the second by the mechanism of practicing the first.
We’ve provided a thorough introduction to the core principles and primitives of Chef, and we’ve explored them through the means of a thorough set of worked examples.
We then set the groundwork for the program of developing the highest standards of software professionalism by presenting a directed but thorough introduction to the Ruby programming language, and the principles and practices of test-driven and behavior-driven development.
We set out a manifesto and framework around which to organize ourselves as we seek to apply these TDD and BDD principles and practices to the paradigm of infrastructure as code.
In this closing chapter, we give a clear recommendation and strategy for top-to-bottom test-driven infrastructure by illustrating and evaluating the leading tools and workflows available to assist us in our quest at this point in the evolution of this young but exciting discipline.
Tool Selection
There is surely nothing quite so useless as doing with great efficiency that which should not be done at all.
— Peter Drucker
Our selection of tools and recommended workflow and approach needs to be informed by a holistic perspective on testing (and building) software in general. Underpinning our every decision must be the core mantra that the purpose of our testing endeavors is to ensure that not only do we build the thing right, but that we build the right thing.
We need to check that our infrastructure code works—that it does what we intended, but also that our infrastructure delivers the functionality that is required. Beyond these considerations, our testing strategy must also account for ongoing maintainability; we need to be confident in our ability to refactor, share, and reuse our work. This moves the conversation beyond simplistic unit testing to be an all-encompassing testing strategy.
When thinking about what a testing strategy should look like, I find Brian Marick’s testing quadrant diagram to be particularly helpful.
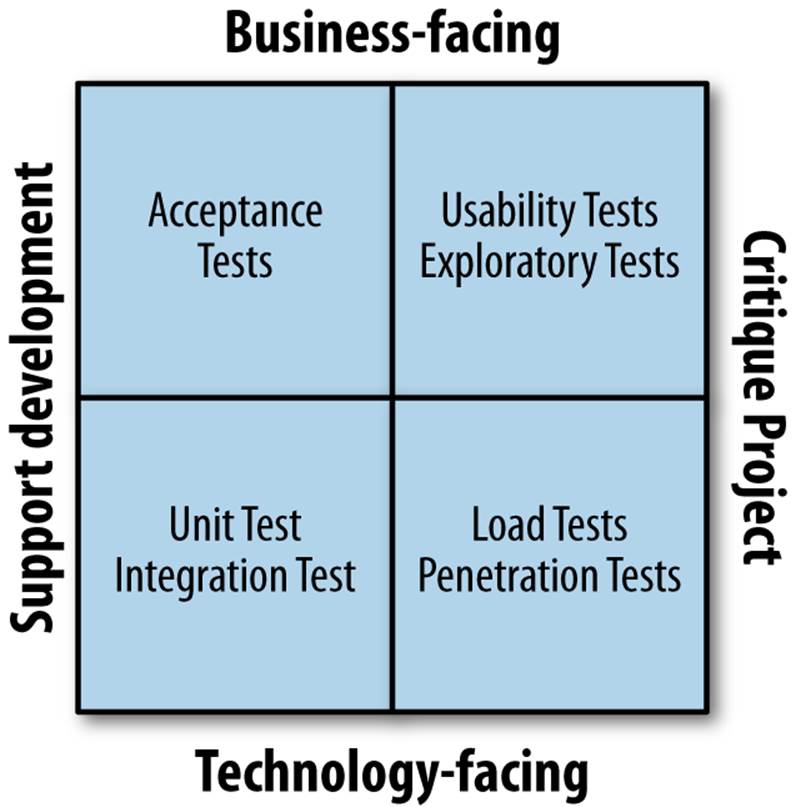
A successful infrastructure-testing strategy must encapsulate behaviors in all four of the quadrants; that is, it must include activities directed around supporting the engineering effort, both in terms of the people doing the work, and the technology and implementation, but also in terms of supporting the business it serves, in terms of the core stakeholders, but also at the highest level, in terms of verifying that value has been delivered to the business.
There are some observations associated with activities in this matrix. Activities towards the left—those that support the engineering effort—tend to lend themselves to automation. Activities towards the top—those that face the business and the stakeholder—tend to be more resource-intensive, but ultimately deliver the most value.
Tasks such as load testing, penetration testing, usability testing, and exploratory testing are really out of the scope of this book. With that in mind, of the plethora of tools and approaches available within the world of infrastructure testing, I’m aiming to recommend a subset that will assist us in our activities in quadrants one and three (i.e., tasks that support the delivery of infrastructure, rather than critique it, but face both the business and the engineering sides).
Let’s quickly clarify terms before proceeding to a deeper discussion of the tooling that supports their implementation.
Unit Testing
Within quadrant three, we have traditional unit tests and integration tests. A simple definition of a unit test is:
The execution of a complete class, routine, or small program that has been written by a single programmer or team of programmers, which is tested in isolation from the more complete system.
— by Steve McConnell “Code Complete” (Microsoft Press)
This simple definition suffices to describe what a unit test looks like. However, I think it’s valuable to express explicitly what a unit test does not look like. A test is not a unit test if:
§ The test is not automated and not repeatable.
§ It is difficult to implement.
§ It isn’t kept around for future use.
§ Only a few informed people know how to run it.
§ It requires more than one step to run.
§ It takes more than a few seconds.
Integration Testing
Where unit tests are designed to test individual units of code (in as much isolation as possible), integration tests explore how the code units interact. This could be as simple as removing any mocks and stubs, but it could also involve crafting a special test that explicitly tests relationships between components.
Both have value, and both need to be in place.
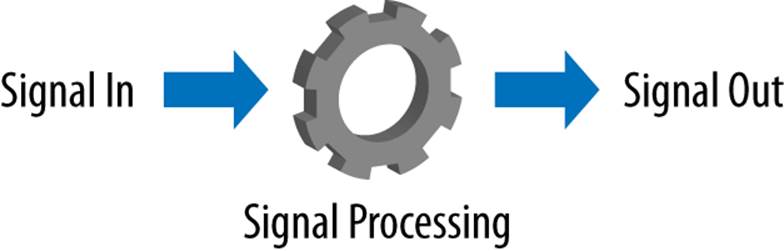
When thinking about unit and integration tests for Chef, it makes sense to think about testing in terms of signal in, signal processing, and signal out. Signal input asks the question, “Did we send Chef the correct command?” Signal processing asks the question, “Did Chef carry out my instructions?” Signal output asks the question: “Did my expressed intent, executed by Chef, deliver the intended result?”
Chef itself is fully tested—we don’t need to test that Chef providers will do what we ask. But we do need to check that we asked Chef to do the right thing, and that what Chef did was what we actually wanted.
For testing signal input, I recommend Chefspec. For testing signal output, I recommend running tests using Test Kitchen, using a framework that allows you to be effective. I think there’s significant value using the same expectation syntax for signal in and signal out, so I offer as an option the use of Serverspec, but also give an example of a different approach, using Bats. Honorable mention goes to Minitest Handler on account of its ease and speed of use.
Acceptance Testing
Acceptance tests describe a requirement or a feature. They are a clear indicator of success or completion—passing acceptance tests are an unambiguous definition of “done.” They involve close collaboration with stakeholders and clarify the expectations of the end users. In his book, Lean-Agile Acceptance Test-Driven Development (Addison-Wesley), Ken Pugh gives as an example the following kind of discussion:
Ken: Does anyone want a fast car?
Student: Yes please
Ken: Stand by...OK, here's a fast car! It goes 0-60 in 20 seconds!
Student: That's not fast!
Ken: Oh...I thought that was fast. Give me a test that would indicate that the car is fast?
Student: It does 0-60 in 4.5 seconds.
Ken: Stand by...OK, here's the fast car! It does 0-60 in 4.5 seconds. By the way, the top speed is 60 mph.
Student: That's not fast!
Ken: Oh...OK, give me a test that would indicate that the car is fast?
Student: The top speed is 150 mph.
Ken: Stand by...OK, here's the fast car! 0-60 in 4.5 seconds, top speed 150 mph, 60-150 in 2 minutes.
The point being made is that without customer-facing acceptance tests, it’s difficult to know if we’ve built the right thing. Leaving an engineer to make that decision is probably not a great idea. Something similar happens when building infrastructure. We’re never building infrastructure in a vacuum, there’s always a reason for the infrastructure, and the person who’s going to use it almost certainly has some requirements. Leaving the requirements down to the implementor opens up a high risk of the endeavor being wasteful. To give a trivial example:
Me: Do you need a load balancer?
Stakeholder: Yes!
Me: <some time later> There, a load balancer! It uses a simple round-robin algorithm.
Stakeholder: Oh...I wanted to balance based on number of sessions.
Me: Oh...<replaces load balancer> There, a load balancer!
Stakeholder: Oh...I wanted to terminate SSL.
Me: Oh...
The following diagram, from Gojko Adžić, illustrates the importance of striving to build both the right thing and the thing right—a philosophy that is every bit as applicable in the world of infrastructure as code as it is in the world of building the software that runs on top of the infrastructure.
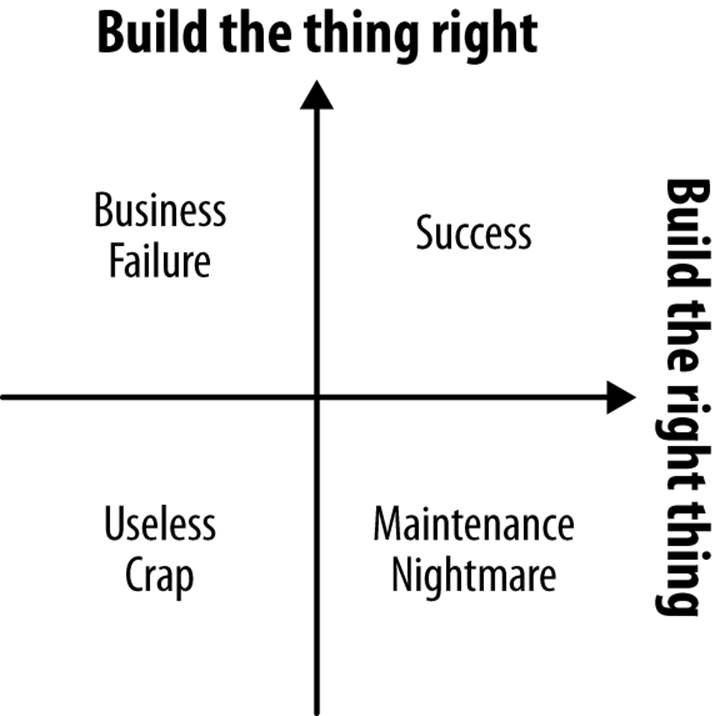
Speaking from personal experience, as a consultant specializing in building automated infrastructures, and having worked with dozens of clients, I’ve seen a number of expensive failures and presided over more than one myself. It’s all too easy to spend time, and the customer’s money, building a perfect infrastructure that doesn’t do the right thing. I’ve also seen cases where the operations team has been forced into building a system that meets business requirements but is a nightmare to maintain. Succeeding in infrastructure development means striking the right balance, to land in quadrant two, and deliver success.
Striking this balance demands collaboration to drive out precise examples that encapsulate requirements, and making these examples the single source of truth. These examples become the documentation, the acceptance criteria, and the implementation plan—all in one place. This delivers the following advantages:
§ Stakeholders and implementors have a common understanding of the requirements.
§ Requirements are captured in a precise and unambiguous format.
§ Documentation that enables change remains fresh and meaningful.
§ An objective definition of “done” is universally understood.
The building of automated acceptance tests that represent these requirements and can demonstrate repeatably that the right thing has been built, from an external perspective, requires a different approach to test writing and a different set of tools.
For acceptance testing, I recommend Cucumber, paired with the orchestration capabilities of Test Kitchen. The enabling agent—which makes it easy for Cucumber and Test Kitchen to work together—is a theoretically simple task, but at present there isn’t an obvious stand-out exemplar, so I’ve written one, which I’ve called Leibniz.
Testing Workflow
I think at this stage it makes sense to describe the workflow that I feel best delivers results against our desired objectives. I am much indebted to the excellent description of the Red/Green/Refactor workflow described by David Chelimsky in “The RSpec Book” (Pragmatic Bookshelf). This is the standard methodology used by BDD practitioners:
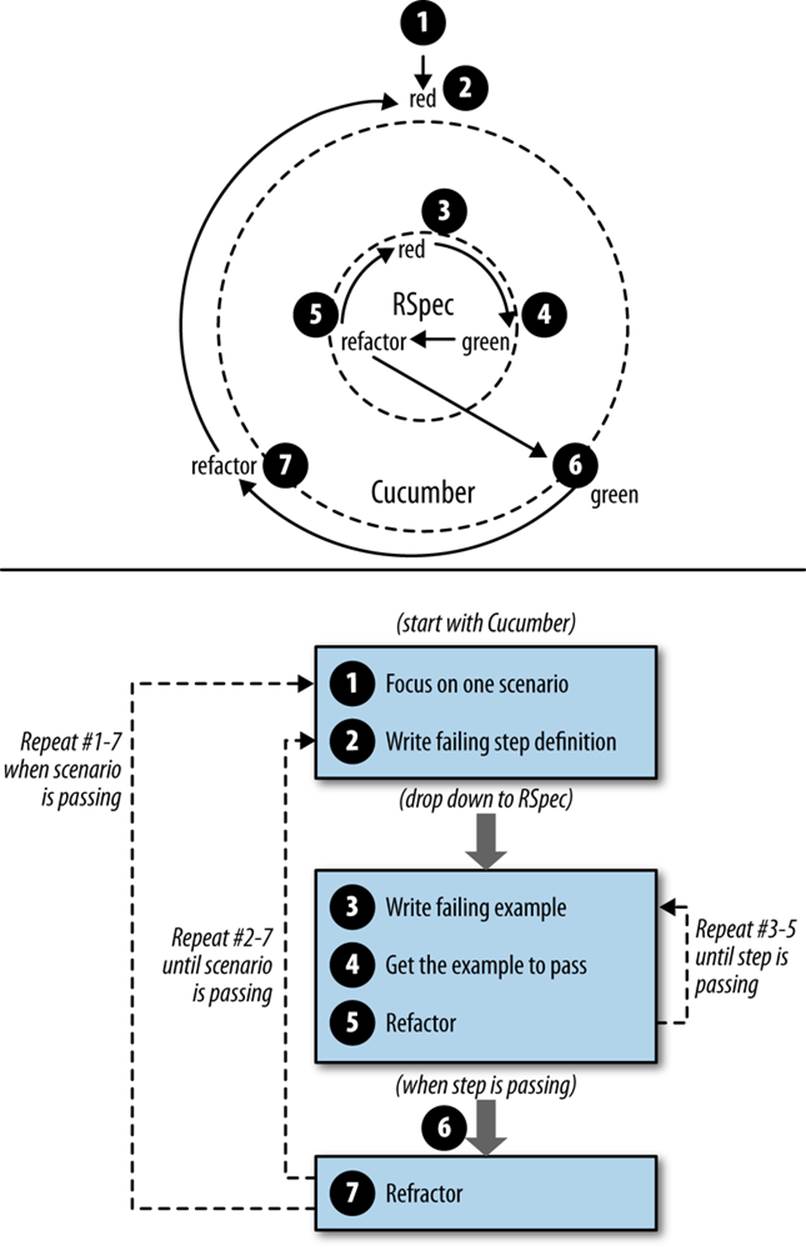
As engineers we navigate a continuously iterative cycle of testing and development, until we have met the acceptance criteria. The three phases are:
Red
We’ve written a failing test, which describes the behavior of a feature we need to implement, but we haven’t written the code.
Green
We’ve written just enough code make the test pass.
Refactor
Having got the feature to work and the test to pass, we refactor the code to improve its structure, maintainability, or performance, without altering its external behavior.
It’s accepted practice to navigate this cycle from the outside-in; that is, to start with the acceptance tests, and move in to unit tests, and then back out again. I propose a variation on this patten for infrastructure code.
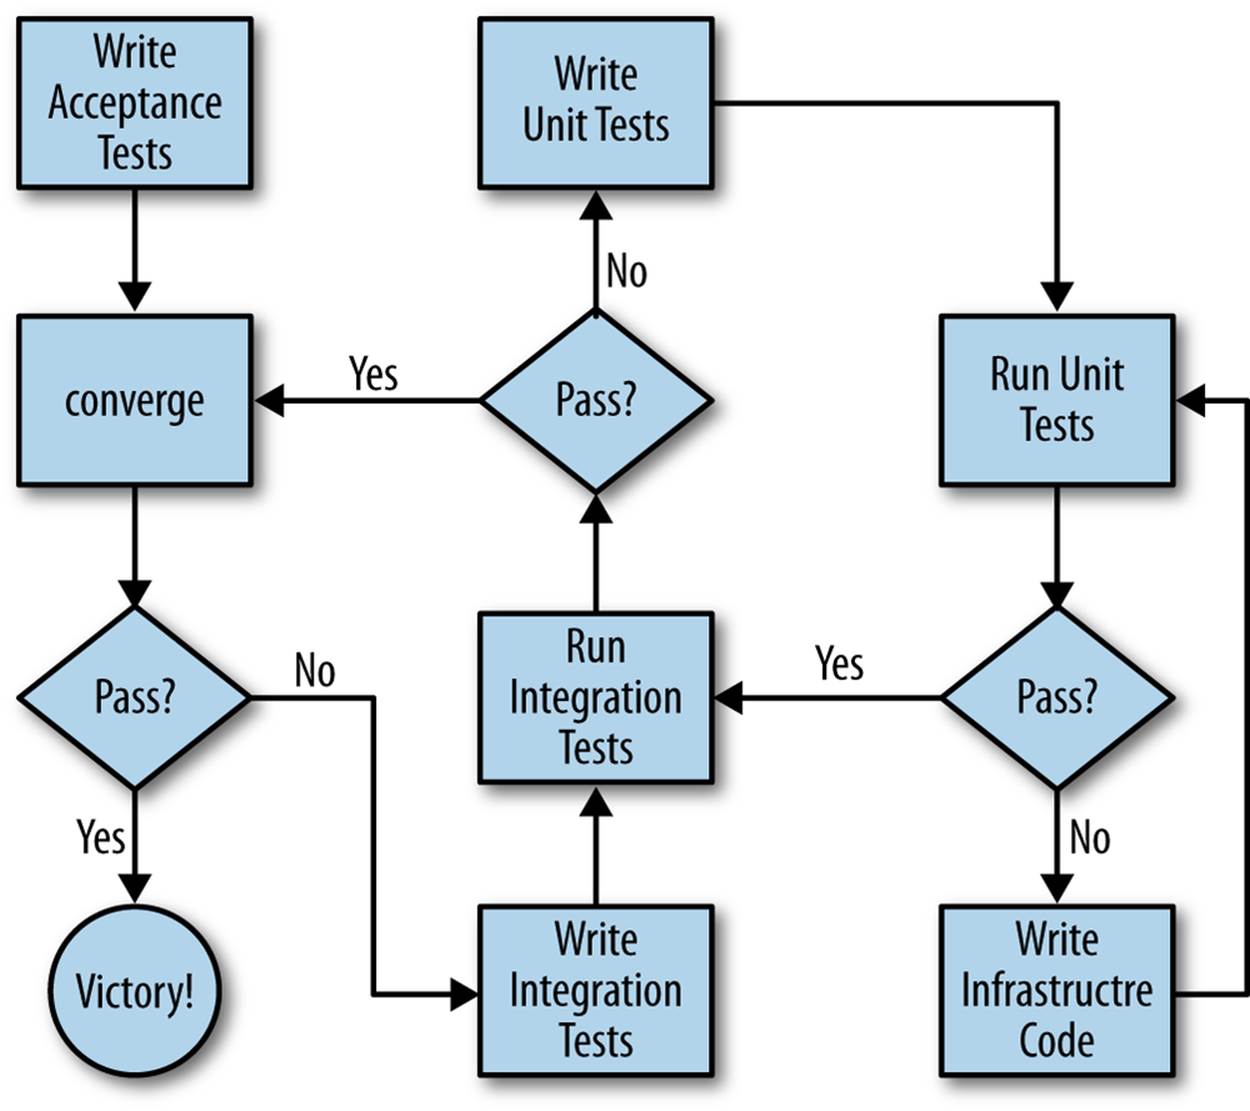
By this approach, we would structure our workflow as follows:
1. Capture examples that specify external acceptance criteria, from the perspective of a consumer of the infrastructure we are building.
2. Write executable specifications using Cucumber.
3. Watch them fail.
4. Write integration tests that describe the intended behavior of a machine once a run list has been applied to it, from the perspective of an engineer looking at the machine itself.
5. Watch them fail.
6. Write unit tests that describe the messages we pass to Chef, and the state of the resource collection, from the perspective of a recipe author.
7. Watch them fail.
8. Write the recipe to make the unit tests pass.
9. Navigate back up the hierarchy until all tests pass.
10.Refactor.
Before examining the recommended toolchain that helps us achieve this approach, we need first to discuss some supporting tooling, which will assist us in our quest.
Supporting Tools: Berkshelf
It is widely accepted and understood that effective use of Chef requires the employment of a dependency management system. This is a common requirement in the software development world. Berkshelf is the leading solution in the Chef community at present.
Overview
At the conclusion of our introduction to Ruby, we discussed Bundler—a dependency solver and portable sandboxing tool for Rubygems. If you understood the principles of Bundler, the basic idea of Berkshelf should be very easy to grasp. Berkshelf is, at its most basic level, Bundler for cookbooks. Let’s review the twin goals of Bundler:
§ Ensure that the appropriate dependencies are installed for a given problem without encountering unpleasant ordering issues or cyclical dependencies.
§ Ensure code can be shared between other developers, or other machines or environments, and be confident the code and its dependencies will behave in the same way.
Berkshelf solves these problems for cookbooks, only in the place of a Gemfile, Berkshelf has a Berksfile.
You’ll remember from our introduction to Chef that as soon as we started relying on recipes from other cookbooks and made use of the include_recipe resource, we needed to update the metadata.rb file to specify an explicit dependency on the cookbook that provided the recipe or LWRP that we wanted. That’s perfectly reasonable and to be expected. However, my expectation is that you pretty soon got tired of having to solve cookbook dependencies manually and recursively. Similarly, having to upload cookbooks in the right order, one at a time, was equally tiresome. Berkshelf takes these pains away by providing a local dependency solving solution, and by functioning as a Chef API client for uploading cookbooks.
Berkshelf provides considerably more functionality than this. It’s pivotal to an entire Chef development workflow, dubbed “The Berkshelf Way” by the group of developers from Riot Games, the company behind Berkshelf, who open sourced it and its component tools. We’ll touch on many of these capabilities and concepts as we explore the tooling in this chapter.
Getting Started
Berkshelf is distributed as a Rubygem. This gives you the opportunity simply to install it with gem install berkshelf, or ensure it’s installed as part of your Ruby/Developer cookbooks and/or roles. The other obvious approach is to use Bundler.
$ gem install berkshelf
Fetching: nio4r-0.4.6.gem (100%)
Building native extensions. This could take a while...
Successfully installed nio4r-0.4.6
Fetching: celluloid-io-0.14.1.gem (100%)
Successfully installed celluloid-io-0.14.1
Fetching: ridley-1.0.1.gem (100%)
Successfully installed ridley-1.0.1
Fetching: safe_yaml-0.9.3.gem (100%)
Successfully installed safe_yaml-0.9.3
Fetching: test-kitchen-1.0.0.alpha.7.gem (100%)
Successfully installed test-kitchen-1.0.0.alpha.7
Fetching: berkshelf-2.0.1.gem (100%)
Successfully installed berkshelf-2.0.1
Installing ri documentation for nio4r-0.4.6
Installing ri documentation for celluloid-io-0.14.1
Installing ri documentation for ridley-1.0.1
Installing ri documentation for safe_yaml-0.9.3
Installing ri documentation for test-kitchen-1.0.0.alpha.7
Installing ri documentation for berkshelf-2.0.1
6 gems installed
Once Berkshelf is installed, access the help by running the following:
$ berks help
Commands:
berks apply ENVIRONMENT # Apply the cookbook version locks from Berksfile.lock to a Chef environment
berks configure # Create a new Berkshelf configuration file
berks contingent COOKBOOK # List all cookbooks that depend on the given cookbook
berks cookbook NAME # Create a skeleton for a new cookbook
berks help [COMMAND] # Describe available commands or one specific command
berks init [PATH] # Initialize Berkshelf in the given directory
berks install # Install the cookbooks specified in the Berksfile
berks list # List all cookbooks (and dependencies) specified in the Berksfile
berks outdated [COOKBOOKS] # Show outdated cookbooks (from the community site)
berks package [COOKBOOK] # Package a cookbook (and dependencies) as a tarball
berks shelf SUBCOMMAND # Interact with the cookbook store
berks show [COOKBOOK] # Display name, author, copyright, and dependency information about a cookbook
berks update [COOKBOOKS] # Update the cookbooks (and dependencies) specified in the Berksfile
berks upload [COOKBOOKS] # Upload the cookbook specified in the Berksfile to the Chef Server
berks version # Display version and copyright information
Options:
-c, [--config=PATH] # Path to Berkshelf configuration to use.
-F, [--format=FORMAT] # Output format to use.
# Default: human
-q, [--quiet] # Silence all informational output.
-d, [--debug] # Output debug information
Example
Find the irc cookbook we created in Chapter 3. Change into its top-level directory, and have a look at the files:
$ ls
CHANGELOG.md files metadata.rb README.md recipes
Now, let’s initialize the cookbook, so we can manage its dependencies with Berkshelf:
$ berks init
create Berksfile
create Thorfile
create chefignore
create .gitignore
run git init from "."
create Gemfile
create .kitchen.yml
append Thorfile
create test/integration/default
append .gitignore
append .gitignore
append Gemfile
append Gemfile
You must run `bundle install' to fetch any new gems.
create Vagrantfile
Successfully initialized
Wow, that did a lot! Some of these files will look familiar; we know about Vagrantfiles and Gemfiles, and I’ve already indicated that Berkshelf uses a Berksfile. We’ve had a look at Thor—it, too, has a file of its own. The .gitignore and chefignore files are simply there to blacklist files and directories from being uploaded to the Chef server or checked into version control. That leaves us with the .kitchen.yml and test/integration/default directory. We’ll cover these later in this chapter.
Let’s have a look at the Gemfile and the Berksfile:
$ cat Gemfile
source 'https://rubygems.org'
gem 'berkshelf'
gem 'test-kitchen', :group => :integration
gem 'kitchen-vagrant', :group => :integration
$ cat Berksfile
site :opscode
metadata
The Gemfile shows three dependencies. Berkshelf itself, plus two others. We’ll discuss the kitchen-related files when we get to our section on Test Kitchen. The main thing of note here is the use of the :integration group. This allows us to install the core dependency, Berkshelf, on a continuous integration server, where we might want to solve dependencies, and carry out lint and static analysis tests—and perhaps fast unit tests—but where we don’t want to ever run integration tests, which is the purpose of Test Kitchen. This uses Bundler’s --without flag, allowing us to specify to install the dependencies, omitting certain groups.
The Berksfile follows the same pattern as the Gemfile. We specify a source—in this case, we’re stating that by default we want to pull in dependencies from the Opscode community site. The metadata line delegates dependencies to the cookbook metadata.rb file. It’s effectively saying, “I’m a cookbook. If you want to know my dependencies, check out my metadata file.”
Unsurprisingly, Berkshelf follows Bundler in having an install command:
$ berks install
Using irc (0.1.0) at path: '/home/tdi/chef-repo/cookbooks/irc'
Using yum (2.2.2)
Again, like Bundler, Berkshelf recognizes that it already has local cookbooks that satisfy the dependency, so it “uses” them. Note that these cookbooks, and all other versions of the cookbook ever used by Berkshelf, are all stored in a conventional directory (.berkshelf, in this case). If there were not local copies available, it would download them from the community site.
At this stage, the similarities with Bundler evaporate, and we start to see some of the individual power and characteristics of Berkshelf. Reviewing the commands in the help text, I would draw your attention to three in particular:
§ berks configure # Create a new Berkshelf configuration file
§ berks upload [COOKBOOKS] # Upload the cookbook specified in the Berksfile to the Chef Server
§ berks apply ENVIRONMENT # Apply the cookbook version locks from Berksfile.lock to a Chef environment
Berkshelf and Vagrant
Berkshelf provides some of the functionality we found in Knife to interact with a Chef server. Now, remember, everything in Chef is an API client; this means we need to configure Berkshelf as an API client. Berkshelf provides and uses its own API client library, Ridley. We could create a new key pair, but it’s simpler just to use the key pair we used ourselves, when we used Knife.
The berks configure command will make educated guesses based on the content of your knife.rb file. This will be fine in our case. Let’s run the command, and accept all the defaults:
$ berks configure
Enter value for chef.chef_server_url (default: 'https://api.opscode.com/organizations/hunterhayes'):
Enter value for chef.node_name (default: 'tdiexample'):
Enter value for chef.client_key (default: '/home/tdi/chef-repo/.chef/tdiexample.pem'):
Enter value for chef.validation_client_name (default: 'hunterhayes-validator'):
Enter value for chef.validation_key_path (default: '/home/tdi/chef-repo/.chef/hunterhayes-validator.pem'):
Enter value for vagrant.vm.box (default: 'Berkshelf-CentOS-6.3-x86_64-minimal'):
Enter value for vagrant.vm.box_url (default: 'https://dl.dropbox.com/u/31081437/Berkshelf-CentOS-6.3-x86_64-minimal.box'):
Config written to: '/home/tdi/.berkshelf/config.json'
This all looks plausible. The only values I would draw your attention to are those for vagrant.vm. These values exist because Berkshelf is designed to interact with Vagrant, such that when running vagrant up, any cookbook dependencies are solved and made available on the machine under test, and the default recipe is converged. Now, we already downloaded a Vagrant box from the Opscode Bento project. We should use that in preference to the default. We can find out its name by running vagrant box list, and then we can edit the config file:
$ vagrant box list
opscode-ubuntu-10.04 (virtualbox)
opscode-ubuntu-12.04 (virtualbox)
opscode-centos-6.4 (virtualbox)
opscode-centos-5.9 (virtualbox)
On this particular machine, I have four machines, provided by the Vagrant/VirtualBox combination. Let’s stick with the CentOS 6.4 machine. Unfortunately, the output of the berks configure command seems to be a bit hard to read:
{"chef":{"chef_server_url":"https://api.opscode.com/organizations/hunterhayes","validation_client_name":"hunterhayes-validator","validation_key_path":"/home/tdi/chef-repo/.chef/hunterhayes-validator.pem","client_key":"/home/tdi/chef-repo/.chef/tdiexample.pem","node_name":"tdiexample"},"cookbook":{"copyright":"YOUR_NAME","email":"YOUR_EMAIL","license":"reserved"},"allowed_licenses":[],"raise_license_exception":false,"vagrant":{"vm":{"box":"Berkshelf-CentOS-6.3-x86_64-minimal","box_url":"https://dl.dropbox.com/u/31081437/Berkshelf-CentOS-6.3-x86_64-minimal.box","forward_port":{},"network":{"bridged":false,"hostonly":"33.33.33.10"},"provision":"chef_solo"}},"ssl":{"verify":true}}
But we can fix this easily enough:[6]
$ python -mjson.tool < /home/tdi/.berkshelf/config.json > /home/tdi/.berkshelf/config.json.readable
$ grep box /home/tdi/.berkshelf/config.json.readable
"box": "Berkshelf-CentOS-6.3-x86_64-minimal",
"box_url": "https://dl.dropbox.com/u/31081437/Berkshelf-CentOS-6.3-x86_64-minimal.box",
Open the file in an editor, remove the box_url line, and update the box entry. This will ensure that the next time berks init is run, it will set the Vagrantfile to use our favored box. We’re going to need to make the same edit to the Vagrantfile within the irc cookbook: remove the box_urlentry and change the box entry. While we’re there, we should add the config entry, which tells the Vagrant machine to install the latest Chef client from the omnibus package. This leaves our Vagrantfile looking like this:
$ grep -v '^$' Vagrantfile |grep -v '^ *#'
Vagrant.configure("2") do |config|
config.omnibus.chef_version = :latest
config.vm.hostname = "irc-berkshelf"
config.vm.box = "opscode-centos-6.4"
config.vm.network :private_network, ip: "33.33.33.10"
config.ssh.max_tries = 40
config.ssh.timeout = 120
config.berkshelf.enabled = true
config.vm.provision :chef_solo do |chef|
chef.json = {
:mysql => {
:server_root_password => 'rootpass',
:server_debian_password => 'debpass',
:server_repl_password => 'replpass'
}
}
chef.run_list = [
"recipe[irc::default]"
]
end
end
All that remains to do is to ensure the vagrant-berkshelf plug-in is installed, and then run vagrant up to watch the magic!
$ vagrant plugin install vagrant-berkshelf
...
$ vagrant plugin install vagrant-omnibus
...
$ vagrant up
Bringing machine 'default' up with 'virtualbox' provider...
[default] Importing base box 'opscode-centos-6.4'...
[default] Matching MAC address for NAT networking...
[default] Setting the name of the VM...
[default] Clearing any previously set forwarded ports...
[Berkshelf] This version of the Berkshelf plugin has not been fully tested on this version of Vagrant.
[Berkshelf] You should check for a newer version of vagrant-berkshelf.
[Berkshelf] If you encounter any errors with this version, please report them at https://github.com/RiotGames/vagrant-berkshelf/issues
[Berkshelf] You can also join the discussion in #berkshelf on Freenode.
[Berkshelf] Updating Vagrant's berkshelf: '/home/tdi/.berkshelf/vagrant/berkshelf-20130607-26262-mra02l'
[Berkshelf] Using irc (0.1.0) at path: '/home/tdi/chef-repo/cookbooks/irc'
[Berkshelf] Using yum (2.2.2)
[default] Fixed port collision for 22 => 2222. Now on port 2202.
[default] Creating shared folders metadata...
[default] Clearing any previously set network interfaces...
[default] Preparing network interfaces based on configuration...
[default] Forwarding ports...
[default] -- 22 => 2202 (adapter 1)
[default] Booting VM...
[default] Waiting for VM to boot. This can take a few minutes.
[default] VM booted and ready for use!
[default] Ensuring Chef is installed at requested version of 11.4.4.
[default] Chef 11.4.4 Omnibus package is not installed...installing now.
Downloading Chef 11.4.4 for el...
Installing Chef 11.4.4
warning: /tmp/tmp.OQLalPCu/chef-11.4.4.x86_64.rpm: Header V4 DSA/SHA1 Signature, key ID 83ef826a: NOKEY
Preparing... ##################################################
chef ##################################################
Thank you for installing Chef!
[default] Setting hostname...
[default] Configuring and enabling network interfaces...
[default] Mounting shared folders...
[default] -- /vagrant
[default] -- /tmp/vagrant-chef-1/chef-solo-1/cookbooks
[default] Running provisioner: chef_solo...
Generating chef JSON and uploading...
Running chef-solo...
[2013-06-07T08:38:25+00:00] INFO: *** Chef 11.4.4 ***
[2013-06-07T08:38:25+00:00] INFO: Setting the run_list to ["recipe[irc::default]"] from JSON
[2013-06-07T08:38:25+00:00] INFO: Run List is [recipe[irc::default]]
[2013-06-07T08:38:25+00:00] INFO: Run List expands to [irc::default]
[2013-06-07T08:38:25+00:00] INFO: Starting Chef Run for irc-berkshelf
[2013-06-07T08:38:25+00:00] INFO: Running start handlers
[2013-06-07T08:38:25+00:00] INFO: Start handlers complete.
[2013-06-07T08:38:25+00:00] INFO: Processing yum_key[RPM-GPG-KEY-EPEL-6] action add (yum::epel line 22)
[2013-06-07T08:38:25+00:00] INFO: Adding RPM-GPG-KEY-EPEL-6 GPG key to /etc/pki/rpm-gpg/
[2013-06-07T08:38:25+00:00] INFO: Processing package[gnupg2] action install (/tmp/vagrant-chef-1/chef-solo-1/cookbooks/yum/providers/key.rb line 32)
[2013-06-07T08:38:32+00:00] INFO: Processing execute[import-rpm-gpg-key-RPM-GPG-KEY-EPEL-6] action nothing (/tmp/vagrant-chef-1/chef-solo-1/cookbooks/yum/providers/key.rb line 35)
[2013-06-07T08:38:32+00:00] INFO: Processing remote_file[/etc/pki/rpm-gpg/RPM-GPG-KEY-EPEL-6] action create (/tmp/vagrant-chef-1/chef-solo-1/cookbooks/yum/providers/key.rb line 61)
[2013-06-07T08:38:32+00:00] INFO: remote_file[/etc/pki/rpm-gpg/RPM-GPG-KEY-EPEL-6] updated
[2013-06-07T08:38:32+00:00] INFO: remote_file[/etc/pki/rpm-gpg/RPM-GPG-KEY-EPEL-6] mode changed to 644
[2013-06-07T08:38:32+00:00] INFO: remote_file[/etc/pki/rpm-gpg/RPM-GPG-KEY-EPEL-6] sending run action to execute[import-rpm-gpg-key-RPM-GPG-KEY-EPEL-6] (immediate)
[2013-06-07T08:38:32+00:00] INFO: Processing execute[import-rpm-gpg-key-RPM-GPG-KEY-EPEL-6] action run (/tmp/vagrant-chef-1/chef-solo-1/cookbooks/yum/providers/key.rb line 35)
[2013-06-07T08:38:33+00:00] INFO: execute[import-rpm-gpg-key-RPM-GPG-KEY-EPEL-6] ran successfully
[2013-06-07T08:38:33+00:00] INFO: Processing yum_repository[epel] action create (yum::epel line 27)
[2013-06-07T08:38:33+00:00] INFO: Adding and updating epel repository in /etc/yum.repos.d/epel.repo
[2013-06-07T08:38:33+00:00] WARN: Cloning resource attributes for yum_key[RPM-GPG-KEY-EPEL-6] from prior resource (CHEF-3694)
[2013-06-07T08:38:33+00:00] WARN: Previous yum_key[RPM-GPG-KEY-EPEL-6]: /tmp/vagrant-chef-1/chef-solo-1/cookbooks/yum/recipes/epel.rb:22:in `from_file'
[2013-06-07T08:38:33+00:00] WARN: Current yum_key[RPM-GPG-KEY-EPEL-6]: /tmp/vagrant-chef-1/chef-solo-1/cookbooks/yum/providers/repository.rb:85:in `repo_config'
[2013-06-07T08:38:33+00:00] INFO: Processing yum_key[RPM-GPG-KEY-EPEL-6] action add (/tmp/vagrant-chef-1/chef-solo-1/cookbooks/yum/providers/repository.rb line 85)
[2013-06-07T08:38:33+00:00] INFO: Processing execute[yum-makecache] action nothing (/tmp/vagrant-chef-1/chef-solo-1/cookbooks/yum/providers/repository.rb line 88)
[2013-06-07T08:38:33+00:00] INFO: Processing ruby_block[reload-internal-yum-cache] action nothing (/tmp/vagrant-chef-1/chef-solo-1/cookbooks/yum/providers/repository.rb line 93)
[2013-06-07T08:38:33+00:00] INFO: Processing template[/etc/yum.repos.d/epel.repo] action create (/tmp/vagrant-chef-1/chef-solo-1/cookbooks/yum/providers/repository.rb line 100)
[2013-06-07T08:38:33+00:00] INFO: template[/etc/yum.repos.d/epel.repo] updated content
[2013-06-07T08:38:33+00:00] INFO: template[/etc/yum.repos.d/epel.repo] mode changed to 644
[2013-06-07T08:38:33+00:00] INFO: template[/etc/yum.repos.d/epel.repo] sending run action to execute[yum-makecache] (immediate)
[2013-06-07T08:38:33+00:00] INFO: Processing execute[yum-makecache] action run (/tmp/vagrant-chef-1/chef-solo-1/cookbooks/yum/providers/repository.rb line 88)
[2013-06-07T08:38:42+00:00] INFO: execute[yum-makecache] ran successfully
[2013-06-07T08:38:42+00:00] INFO: template[/etc/yum.repos.d/epel.repo] sending create action to ruby_block[reload-internal-yum-cache] (immediate)
[2013-06-07T08:38:42+00:00] INFO: Processing ruby_block[reload-internal-yum-cache] action create (/tmp/vagrant-chef-1/chef-solo-1/cookbooks/yum/providers/repository.rb line 93)
[2013-06-07T08:38:42+00:00] INFO: ruby_block[reload-internal-yum-cache] called
[2013-06-07T08:38:42+00:00] INFO: Processing user[tdi] action create (irc::default line 11)
[2013-06-07T08:38:42+00:00] INFO: user[tdi] created
[2013-06-07T08:38:42+00:00] INFO: Processing package[irssi] action install (irc::default line 18)
[2013-06-07T08:38:46+00:00] INFO: package[irssi] installing irssi-0.8.15-5.el6 from base repository
[2013-06-07T08:38:50+00:00] INFO: Processing directory[/home/tdi/.irssi] action create (irc::default line 26)
[2013-06-07T08:38:50+00:00] INFO: directory[/home/tdi/.irssi] created directory /home/tdi/.irssi
[2013-06-07T08:38:50+00:00] INFO: directory[/home/tdi/.irssi] owner changed to 901
[2013-06-07T08:38:50+00:00] INFO: directory[/home/tdi/.irssi] group changed to 901
[2013-06-07T08:38:50+00:00] INFO: Processing cookbook_file[/home/tdi/.irssi/config] action create (irc::default line 31)
[2013-06-07T08:38:50+00:00] INFO: cookbook_file[/home/tdi/.irssi/config] owner changed to 901
[2013-06-07T08:38:50+00:00] INFO: cookbook_file[/home/tdi/.irssi/config] group changed to 901
[2013-06-07T08:38:50+00:00] INFO: cookbook_file[/home/tdi/.irssi/config] created file /home/tdi/.irssi/config
[2013-06-07T08:38:50+00:00] INFO: Chef Run complete in 25.150121171 seconds
[2013-06-07T08:38:50+00:00] INFO: Running report handlers
[2013-06-07T08:38:50+00:00] INFO: Report handlers complete
Well, that’s pretty impressive! In the time it would have taken us to read the metadata file of a single machine—let alone upload all the cookbooks, connect to the machine, run chef-client, and wait for it to finish—we’ve built a brand new machine from scratch, installed Chef, solved dependencies, and converged a node.
We can connect to the machine as before, using vagrant ssh, and check out the configuration. This increase of speed in the feedback loop is vital if we’re to make testing of infrastructure mainstream.
One caveat here: the current Vagrant machine is using chef-solo rather than chef-client. Frankly, for testing functionality within a single cookbook, this is frequently sufficient, and the speed of feedback is a tremendous bonus. However, if a convergence against a Chef server is needed, Vagrant can be easily configured to use chef-client. Also worthy of attention is chef-zero—an in-memory implementation of the Chef server, designed for rapid testing against a real API. As this is a very new project, I haven’t explored it in sufficient detail to be able to discuss it with authority, but I recommend at least checking out the Chef Zero project.
Berkshelf and Chef environments
The second command I wanted to draw your attention to was the berks upload command. You’ll recall when we first began interacting with the Chef server, using Knife, we used knife cookbook upload. This was a little frustrating if we didn’t upload the cookbooks in the correct order. Berkshelf combines the package set functionality of Bundler with the cookbook uploading functionality of Knife. This means that once a set of cookbooks has been tested on a Vagrant machine, that set of cookbooks can be uploaded to the Chef server, dependencies and all, in a single command. Just like Bundler had a Gemfile.lock, if we now take a look in the base directory of the cookbook, we’ll see a Berkshelf.lock file:
$ cat Berksfile.lock
{
"sha": "6ef716553a56267bb3eb743ece483db8aa94cecb",
"sources": {
"irc": {
"locked_version": "0.1.0",
"constraint": "= 0.1.0",
"path": "."
},
"yum": {
"locked_version": "2.2.2"
}
}
}
This introduces a vitally important question in Chef. Once we’ve tested and approved cookbooks, and pushed them to a Chef server, how can we be confident that these are the cookbooks that will be used in perpetuity, or at least until we decide to introduce a change?
At the same time, it is likely that we will be enhancing, fixing, or otherwise refactoring perhaps the same cookbooks, following the test-first paradigm explored in this book. In order to protect against the cookbooks under test interfering with our production systems, Chef provides a mechanism for specifying exactly which version of a cookbook should be used for machines in this environment. Chef also supports the idea of freezing cookbooks, to prevent them from being accidentally updated or altered once uploaded to a server. This mechanism is referred to as Chef Environments.
Let’s take a quick look at the node attributes of one our machines:
$ knife node show romanesco
Node Name: romanesco
Environment: _default
FQDN: romanesco
IP: 192.168.26.2
Run List: role[debian], role[developer]
Roles:
Recipes:
Platform: ubuntu 13.04
Tags:
Unless explicitly set, a node in Chef will belong to a default environment called default. In the default environment, nodes will simply use the most recently uploaded cookbook on the platform, regardless of version number or quality. There is no policy at all. Obviously this is a dangerous state of affairs, so it’s considered best practice to manage the versioning of your cookbooks in such a way as to make it easy for you to set a policy determining which versions of your cookbooks are to be used in which environment.
When you feel you have cookbooks and recipes that are of production quality, create an environment to enforce safe version constraints for machines whose stability is vital. Once the node attribute of the servers you feel should have these stable, reliable cookbooks has been set, they will not get any other versions, and the versions in use can be frozen, so they aren’t accidentally overwritten.
A small aside on the name “environments”: I feel that the term “environment” is one of those rather overloaded terms in our industry. When I work with clients, and they describe environments to me, they are usually referring to phases in the application lifecycle and use names such as “development,” “staging,” “uat,” “perftest,” or “preprod.” It’s pretty clear that the comparison between these environments is a function of the version of the application deployed on them, and the type of people who will be using them. By contrast, the problem domain that Chef environments addresses is related primarily to the ability to set and enforce version constraints on the infrastructure code—the code that delivers the core platform upon which the “development” or “staging” or “live” environments are deployed. I think this namespace collision is both unfortunate and confusing. We’re not really talking about the same kinds of environments at all. While there may well be differences in the way in which the staging, development, and production systems are configured, the core functionality and behavior of the Chef code should actually be fundamentally identical between “development,” “staging,” and “live.” For this reason, I prefer to think of Chef environments more in terms of “testing” and “stable,” or perhaps, to borrow vocabuary from Maven, “RELEASE” and “SNAPSHOT.” If you’re familiar with Linux distribution development, you’ll probably recognize this model as being that around which the Debian project package maintainers organize. This approach to environments takes cookbooks that are known to be stable, production-ready, and trusted and sets and freezes their known versions. Development of new features and bug fixing can take place in the testing environment, pending promotion to stable. Should there be a need to test multiple combinations of multiple versions, there’s no limit to the number of environments on a Chef server, so one could be created and mapped onto a project or branch.
Although this approach is the one I like most, as with pretty much all aspects of Chef, there is great flexibility and plenty of opportunity to use a different model. For example, if you are attracted to using environments in Chef in a way that models software development lifecycles akin to DEV→TEST→STAGING→PROD, this can be achieved. In this instance, use the cookbook metadata,rb as the place to lock dependencies. A straightforward approch to generating these dependencies is to take the output of berks list and simply transform the output to dependsstatements. This works particularly well with the “application cookbook” pattern, which we will discuss later in this chapter. There are clear advantages and disadvantages to both approaches. If I’m honest, I’d state that I am not convinced with the current environments implementation, and that the various approaches in place all feel a little uncomfortable. For one more approach, I recommend you take a look at Dan DeLeo’s knife boxer. Born out of Dan’s experience that “the default environments workflow makes me want to punch someone in the face,” it offers an alternative approach based on Dan’s rethinking of the whole environment’s concept. I urge you to give thought to these alternatives, to experiment, and find the approach that works best for you. However, for the time being, we’ll work with my model.
Chef has a DSL for creating and managing environments. Simply change into the environment’s directory in your Chef repository and create a file named stable.rb. The DSL only needs a name, and zero or more cookbook constraints. These can be entered individually, or using thecookbook_versions method, which takes a hash of cookbook name and version:
name "stable"
description "Stable Cookbooks"
cookbook_versions({
"irc"=>"= 0.1.0",
"yum"=>"~> 2.2.0"
})
This specifies that in the stable environment only version 0.1.0 of the irc cookbook will be used; any version greater than or equal to 2.2.0 but less than 3.0.0 is acceptable for the yum cookbook. The version constraint syntax mirrors that of Rubygem’s. To freeze a version of a cookbook, such that a developer is prevented from attempting to upload an altered version of the cookbook with the same version number, --freeze is appended to knife cookbook upload. By combining freezing and environments, you can be maximally confident that your production environments will be secure and safe.
Maintaining this environment is a case of keeping track of versions that you believe to be stable, maintaining their versions in a stable.rb environment file, and periodically running knife environment from file to upload the environment to the server. Chef does provide an alternative mechanism via the knife environment edit command. This invocation, similar to knife node edit, allows the JSON representation of the Chef environment to be set in real time on the Chef server, over the API.
The berks apply command takes this complexity out of the environment management process:
$ knife environment create berks_stable
Created berks_stable
$ berks apply berks_stable
Using irc (0.1.0) at path: '/home/tdi/chef-repo/cookbooks/irc'
Using yum (2.2.2) at path
[tdi@tk01 irc]$ knife environment show berks_stable
chef_type: environment
cookbook_versions:
irc: 0.1.0
yum: 2.2.2
default_attributes:
description:
json_class: Chef::Environment
name: berks_stable
override_attributes:
This has the effect of both setting and freezing the known stable cookbooks tested via Berkshelf.
Nodes are associated with environments by means of the chef_environment attribute. This must be explicitly set. The simplest way to ensure your production nodes are associated with the production environment is to specify it explicitly on the command line when provisioning or bootstrapping a machine. For more information on the process of provisioning a machine, see http://docs.opscode.com/knife_bootstrap.html.
Advantages and Disadvantages
Berkshelf was developed with the principal aim of simplifying the workflow required to interact with a Chef server in a production-responsible fashion. Its main advantage is that it provides slick usability with much less hassle than interacting with the server via a series of knife commands. A further advantage is that, within the Chef community, the Berkshelf tool, and the workflow patterns it encourages, have gained a lot of traction. You are likely to enjoy responsive support, and enthusiastic associates on the mailing lists and IRC channels.
If there’s a disadvantage to Berkshelf, it’s that the tool is integral to a highly opinionated set of principles around how cookbook development should take place, including a number of design patterns such as wrapper and library cookbooks. This approach is at odds with the way in which Chef has been traditionally taught and documented, and introduces a number of additional and new tools. We’ll discuss this in more detail later in the chapter.
Summary and Conclusion
Berkshelf is fundamental to a whole philosophical approach to cookbook development. However, at its core, it’s just a dependency solver and publishing tool. Whether you agree with the underlying philosophy about roles and wrapper cookbooks and libraries, it’s a tool that will make your life easier, and should be in your toolkit. We’ll assume its use henceforth.
Supporting Tools: Test Kitchen
In my preliminary comments about tool selection I identified Test Kitchen as a cornerstone. It’s a great enabler, allowing us to automate the running of tests and the building of infrastructure. In this respect, it stands outside the workflow I describe but as one of its dependencies.
Overview
Test Kitchen is an orchestration tool—it runs tests across multiple nodes, converging them, verifying the resulting state across different platforms, and in complete isolation. It is designed to ensure an entirely clean state for testing. However, it isn’t a testing tool, it doesn’t makes sense to speak of writing tests “in” Test Kitchen. Rather, it provides a framework that enables you to verify the state of a node.
As cookbook developers, it’s common to want a simple way to increase our confidence that our Chef code will work on a real platform in a real situation. For example, we’d like to be confident that our recipes will work repeatably against different operating systems or flavors of operating system, especially if our cookbooks are designed to work across a large number of platforms. My reference Linux platform is CentOS, but I try to ensure my cookbook will also work on Debian-derived systems. However, if a community member submits a pull request to add support for Arch Linux or Suse, I first want to be reassured that this enhancement doesn’t introduce any regressions that the cookbook still works on CentOS and Ubuntu, and second, if I accept the pull request, I now have a responsibility to ensure that the cookbook continues to work on Arch Linux or Suse. I don’t develop on or use these distributions very frequently, so the ability to be able to verify the functionality of the cookbook on all supported platforms is very advantageous.
Running these tests is expensive, in terms of time. Anything that can be done to automate and speed up the feedback loop is attractive. The foundational design goal for Test Kitchen was to provide the simplest, leanest orchestration framework possible that would deliver the requirements for continuously integrating cookbooks across multiple platforms. The simplest way to achieve this would be for the continuous integration server to be preinstalled with Rubygem, or have a Gemfile, followed by a bundle install. Then simply running a Rake or Thor task will carry out everything required to test the cookbooks, with no need for further configuration unless the specific behavior of Test Kitchen needs to be altered. To support operation in continuous integration environments, the tasks finish with a non-zero exit code only if something in the testing process failed. Otherwise the explicit assumption is that the tests passed.
Although specifically built to facilitate continuous integration, Test Kitchen also provides a complete cookbook development testing environment for the user simply wishing to write cookbooks in an iterative and test-driven fashion.
The current version of Test Kitchen is effectively a complete rewrite of an earlier project. Although an excellent utility, the earlier version didn’t meet the requirement of doing the simplest thing that could possibly work for CI. For example, it provided the apt cookbook and ran apt-get update, it installed Rsync, and assumed the use of Minitest Handler. All machines were created in serial, which meant the process of testing across many platforms was very time-consuming. The new version tackles these weaknesses and provides a complete framework for creating, provisioning, testing, and destroying a range of systems, rapidly, in parallel, and in a way that is designed to plug into continuous integration and deployment pipelines.
Getting Started
At the time of this writing, the 1.0 release of Test Kitchen is being prepared; by the time you read this, it’ll be released. To make the tool available, simply add test-kitchen to your Gemfile. Since Berkshelf 2.0, Test Kitchen support is included in the Gemfile created by berks cookbookor berks init.
$ gem install test-kitchen
The primary context in which Test Kitchen operates is a single cookbook. The expectation is that it will be used to test and maintain the functionality of a given individual cookbook across multiple platforms, ensuring that the contract it claims to provide to infrastructure developers using the cookbook is honored.
Test Kitchen is driven entirely by a YAML file: a simple data representation format, which describes the configuration of systems and the tests we wish to run. If you’ve used TravisCI, this will be very familiar as an approach. The idea is to have an expressive way to define our testing strategy statically. It allows the developer to define that these tests should be run on these platforms, in these places. For example, we might wish to run all tests on EC2 with one exception, which we want to run on Rackspace. The file that describes this—.kitchen.yml—is, therefore, a testing manifest, and is explicitly not executable code.
Test Kitchen additionally has a command-line interface and is built upon Thor, meaning each command is also accessible as a Thor task, executable by a job runner or continuous delivery server.
Running kitchen without arguments gives the various options available:
kitchen
Commands:
kitchen console # Kitchen Console!
kitchen converge [(all|<REGEX>)] [opts] # Converge one or more instances
kitchen create [(all|<REGEX>)] [opts] # Create one or more instances
kitchen destroy [(all|<REGEX>)] [opts] # Destroy one or more instances
kitchen driver # Driver subcommands
kitchen driver create [NAME] # Create a new Kitchen Driver gem project
kitchen driver discover # Discover Test Kitchen drivers published on RubyGems
kitchen driver help [COMMAND] # Describe subcommands or one specific subcommand
kitchen help [COMMAND] # Describe available commands or one specific command
kitchen init # Adds some configuration to your cookbook so Kitchen can rock
kitchen list [(all|<REGEX>)] # List all instances
kitchen login (['REGEX']|[INSTANCE]) # Log in to one instance
kitchen setup [(all|<REGEX>)] [opts] # Setup one or more instances
kitchen test [all|<REGEX>)] [opts] # Test one or more instances
kitchen verify [(all|<REGEX>)] [opts] # Verify one or more instances
kitchen version # Print Kitchen's version information
The basic unit of reasoning in Test Kitchen is called an instance. An instance is composed of a platform and a suite. A platform is a combination of operating system, version, Chef version, architecture, and name. Conceivably it could also include a specification as to whether the instance is a physical or virtual machine. A suite is a run list with optional node attributes. It represents something we wish to test, for example, a Redis cookbook using a package or building from source.
Test Kitchen will then build a pairwise matrix of platforms and suites, resulting in the final set of instances that will be managed.
There are five lifecycle events in the existence of an instance:
create
Brings an instance into existence and boots it, providing a system ready for work to begin
converge
Installs Chef, creates a sandbox of what is needed for testing—roles, databags, attribute data—and uploads it to the instance. Next, Chef is run, either in chef-solo or chef-zero form.
setup
Sets up a gem, called Busser, on the instance, which is responsible for preparing whatever test harness runners and plug-ins are needed to test the cookbook. The mechanism has no dependencies, and uses the embedded Ruby provided by Chef.
verify
Runs any test suites that have been written. It will take no action if no tests are found. In the event of a test failure, the action will return with a non-zero exit code, suitable for signalling a broken build to a continuous integration service.
destroy
Simply destroys the instance and returns the host system to a clean state.
Additionally, there is a master action—test—designed for clean CI purposes, which will run the destroy, create, converge, setup, and verify tasks, before finally running destroy once more.
Test Kitchen has the concept of drivers, which determine how and where the infrastructure required for the tests will be built. By default, the driver used is Vagrant, but Test Kitchen also supports cloud-based systems and is easily extensible.
Summary and Conclusion
We will cover detailed use of Test Kitchen shortly, with examples, when we look at using Serverspec and Bats for integration testing, but in summary, let me state that Test Kitchen is shaping up to be the one-stop-shop for cookbook testing. It is very actively developed and has considerable community traction. Support for Windows systems is under active development, and while improvements and enhancements are happening on a daily basis, the core design and API has been stable for a number of months.
Test Kitchen is the tool you should have at the very heart of your workflow. Because of its integration with Berkshelf and Vagrant, it replaces these as your primary interface to provisioning systems. It can easily be configured to use alternative provisioning backends, instead of Vagrant, and with the chef-zero driver, provides a complete client/server testing experience with a very fast feedback loop.
The Busser architecture makes Test Kitchen an effectively unlimited framework in terms of flexibility. The growing ecosystem of plug-ins can be observed by performing a search on rubygems.org for the string “busser-”.
The high-level tasks available on the command line make the iterative process of creating, converging, verifying, and destroying simple and effective. And the ability to develop on a preferred platform and then test across a range of platforms all from the same interface is extremely convenient.
For further documentation and examples, I recommend looking at the project homepage on GitHub, and at Fletcher Nichol’s cookbooks, particularly the rbenv and razor cookbooks.
Acceptance Testing: Cucumber and Leibniz
The first edition of this book introduced the fundamental idea of applying behavior-driven development (BDD) and the acceptance testing paradigm to infrastructure code. As the world of test-driven infrastructure has matured, the approach of the first infrastructure BDD tool, Cucumber-Chef, has been superseded by a more modular approach, which can be implemented by writing examples using Gherkin/Cucumber, and orchestrating the provisioning of infrastructure and running of tests using a separate tool—one such example is the newly released Leibniz project by the current author.
Overview
Testing classes and methods is trivial. Mature unit testing frameworks exist that make it very easy to write simple code test-first. As the complexity of the system under test increases and the requirement to test code that depends on other services arises, the frameworks become more sophisticated, allowing for the creation of mock services and the ability to stub out slow-responding or third-party interfaces. As a relevant aside, see “Mocks Aren’t Stubs” by Martin Fowler for an excellent discussion of the difference between mocking and stubbing.
Writing integration tests that exercise the code end-to-end is an order of magnitude more involved. A successful integration testing strategy will require the use of specialist testing libraries for testing network services, GUI components, or JavaScript.
Testing code that builds an entire infrastructure is a different proposition altogether. Not only do we need sophisticated libraries of code to verify the intended behavior of our systems, we need to be able to build and install the systems themselves. Consider the following test:
Scenario: Bluepill restarts Unicorn
Given I have a newly installed Ubuntu machine managed by Chef
And I apply the Unicorn role
And I apply the Bluepill role
And the Unicorn service is running
When I kill the Unicorn process
Then within 2 seconds the Unicorn process should be running again
To test this manually we would need to find a machine, install Ubuntu on it, bootstrap it with Chef, apply the role, run Chef, log onto the machine, check Unicorn is running, kill Unicorn, then finally check that it has restarted. This would be tremendously time-consuming and expensive—so much so that nobody would do it. Indeed, almost no one does because despite the benefits of being able to be sure that our recipe does as it is supposed to, the cost definitely outweighs the benefit.
The answer is, of course, automation. The explosion of adoption of virtualization, both on workstations and servers, and the widespread adoption of public and private cloud computing, makes it much easier to provision new machines, and most implementations expose an API to make it easy to bring up machines programmatically. Similarly of course, Chef is designed from the ground up as a RESTful API. Libraries exist and can be built upon to access remote machines and perform various tests. What is required is a way to integrate the Chef management, the machine provisioning, and the verification steps with a testing framework that enables us to build our infrastructure in a behavior-driven way.
Cucumber provides the ideal framework for capturing requirements in a form in which they can be tested. It provides a very high-level domain specific language for achieving this. By following a few simple language rules, it’s possible to write something that is highly readable and understandable by the business, but which itself is an executable specification—something that functions as an automated acceptance.
Cucumber achieves this by wiring the high-level requirements to Ruby code that sets up state and makes assertions. In Cucumber terminology, we capture features, which are mapped onto tests in steps. These steps have the responsibility of setting up the state we need prior to making assertions against the requirements, perhaps making changes to the state, in line with the requirements, before finally tearing down whatever state was needed in order to be able to run the tests.
The significant difference when compared to unit testing, especially in our specific context, is that the number of steps and relative complexity is considerably higher. We need to write steps that build machines, install Chef, set up run lists, make cookbooks available, maybe make changes, maybe disable services. We then need to carry out external probes: for example, using a web page, logging onto a machine, or speaking to a service over the network. These kinds of steps are difficult to write and time-consuming. However, they do provide excellent value—they truly demonstrate whether the infrastructure code we have developed has delivered the functionality that is needed.
My first foray into this space was to write an integrated tool that generated examples tests, built infrastructure, handled all aspects of the Chef provisioning process, and finally reported results. That tool—Cucumber-Chef—is still widely used, but with the benefit of a few years’ more experience, I now feel a slightly different model is called for.
With recent releases of both Vagrant and Test Kitchen, we now have mature tooling for provisioning infrastructure and running Chef, fully customizable to our needs, whether those are containerized app or OS deployments with Linux Containers, local virtualization solutions with VirtualBox or VMware, private cloud infrastructures with Openstack or Openshift, or public cloud infrastructures with Amazon AWS, Rackspace cloud, or Microsoft Azure. In the same way that Chef provides primitives for automating the components of an infrastructure upon which we deploy our applications, what is needed is a set of primitives for building stacks of machines and delivering desired state through configuration management. In the spirit of the Unix philosophy, we should write programs that do one thing and do it well, and write programs to work together.
Cucumber admirably fits into this philosophy—it runs executable specifications and reports their result. Vagrant and Test Kitchen similarly. What is missing is a tool that ties them together, which would make it easy, in the context of Cucumber steps, to provision and test infrastructure.Leibniz provides this capability.
Leibniz provides an integration layer between Cucumber and Test Kitchen, in the form of steps that can be used in feature files to describe and provision infrastructure for acceptance testing.
Getting Started
We already know how to get started with Cucumber, as we covered it in the Hipster Assessor. Leibniz is a very simple Rubygem, which provides steps to Cucumber to provision machines via Test Kitchen.
Therefore we need only add the following three things to a Gemfile:
gem 'cucumber'
gem 'rspec-expectations'
gem 'leibniz'
However, where should the Gemfile be? That may seem like a ridiculous question, but think for a moment. As a cookbook author, especially a cookbook that is widely used in the community, the task of developing, testing, and releasing code is somewhat akin to that of a Rubygem, or even of working on an aspect of a core library within Ruby. This is code that is used by people to perform a task. It’s building-block code. The way we test a library in Ruby is very different from the way we test a Rails application. The Rails application provides a service to an external user. Sure it might actually just be an internal API, but it sets up a contract with and is consumed by an external agency. That’s not quite the same as StringIO within the Ruby standard library. Let me come at this from a different perspective.
When we are building infrastructure with Chef, it’s essential to think from the outside in. Why are we actually building this infrastructure? What service does it provide? As Jamie Winsor, developer at Riot Games, creators of Berkshelf and makers of League of Legends, says, “Nobody plays CentOS, or Nginx. They play League of Legends!”
With this in mind, I would argue that the kind of acceptance testing that I advocate makes most sense not so much in the context of the Nginx cookbook, as in a cookbook that describes the top-level service that consumes the Nginx cookbook. This pattern is known as The Application Cookbook.
The application cookbook pattern is characterized by having decided the top-level service that we provide and creating a cookbook for that service. That cookbook wraps all the dependent services that are needed to deliver the top-level service. For example, an “awesome” web application might need components such as an app server, a database server, a load balancer. Each of these components is given a recipe that includes—and if necessary alters the behavior of—cookbooks that provide infrastructure modeling primitives such as Nginx, MySQL, and Redis.
This looks a lot like the kind of thing that might be accomplished using a Chef role, but has some significant advantages.
First of all, cookbooks can be explicitly versioned and tracked in a way that roles can’t. Roles function as a (potentially dangerous) global variable that, when changed, will impact every node that has the role on its run list. Cookbooks can be explicitly versioned, frozen, and pinned, depending on use case.
Second, the behavior that the role describes, and encapsulates its meaning, should be tested. Where do we keep the tests? Where do we keep any documentation or change log? If the need should arise (and we should avoid it) to incorporate logic to control the behavior of the role, we have the power and flexibility to do so, and to test that logic. None of these options look easy when using the role DSL and a run list.
Third, we can use precisely the same toolkit for solving dependencies, interacting with the Chef API, and performing local testing, without having to maintain an additional primitive and its state.
If we look at the function of a role, it really does three things:
1. Contains and manipulates run lists
2. Alters recipe behavior using attributes
3. Provides simple taxonomy to label and tag nodes
The use of an application cookbook removes the need for the first and the second, although one consideration is that with a single cookbook/recipe on the run list, it’s not possible to find, via the Chef API, which recipes will be run on a node. This can be found, however, using the knife audit command.
Nodes simply get either the top-level awesome recipe, if the node includes absolutely everything in one place, or it is given the recipe that corresponds to the logical function in the application, such as awesome::cache_server.
If there is a need to alter the behavior of an upstream cookbook, attributes can be set in a recipe, and if functionality needs to be added, tested, or tweaked, this can be achieved by wrapping upstream cookbooks in a manner that looks much like object inheritance. This has the twin advantages again of being testable, but also of avoiding constant forking of upstream cookbooks.
Tagging can be achieved by using the explicit tagging capabilities of Chef, or with a custom attribute set with a recipe in a cookbook. On occasions where cookbooks search for machines having a certain role, this can be supported by using an empty “marker” role, or by modifying the recipe to use a different way to categorize and find nodes.
Finally, I think that keeping as much as possible in cookbooks allows us to design our cookbooks in accordance with good object-oriented design principles. This is because we can treat cookbooks, recipes, and resources much more like objects than we can a mixture of data and code, which is what we have with the combination of roles and cookbooks.
At this point I urge you to buy and read the excellent Practical Object-Oriented Design in Ruby by Sandi Metz (Addison-Wesley). Let me summarize very briefly some key takeaways as directly applicable to infrastructure as code:
§ Change is inevitable. We can’t predict how things will change, but they will. We should design our infrastructure code in such a way as to accommodate the inevitability of change.
§ Tying tests to the implementation makes refactoring difficult, so testing the external interface, outside-in, is the best way to build for change.
§ We should favor loose coupling and build to test, valuing highly ease of change and embracing refactoring.
§ Dependencies are inevitable. We will need to express and use dependencies in our designs, but should think carefully about them.
§ Building our cookbooks to be pluggable and reusable, with clearly defined behavior, will help keep dependencies healthy.
§ Object-orientation is all about message-sending. We should follow the principles of encapsulation and trust; our cookbooks don’t need to know a lot about each other.
With this in mind, I would advocate that when modeling infrastructure, the first thing we should do is create a cookbook that presents the external service in a way that can be reasoned about and tested.
Example
The use of Cucumber and Leibniz is actually fundamentally pretty trivial. The value is first in the conversations, and second in the downward descent into the lower regions of the testing workflow. It’s here that the design will emerge, and that the nuts and bolts infrastructure code takes place.
All we’re doing at the top-most level is writing a test that will exercise the external interface of the infrastructure we’re building.
Of course, such words cover a multitude of complications, and the actual process of writing those steps is not actually so easy. Nevertheless, I’ll show an example of testing an application cookbook, from the outside in, beginning with Cucumber, and ending with the test passing.
Let’s start with the requirements.
We’re going to begin with a trivially simple infrastructure project. I usually find that it makes sense to make it into a bit of a story, to get into the mood of capturing requirements. In practice, I’m going to have you serve a simple website. But let’s make it a bit more fun.
The scenario I am painting for you is that we, as infrastructure developers, have been approached by a small graphic design agency. This sort of thing happens quite often at Atalanta Systems—because we provide outsourced sysadmin and infrastructure development services, it’s not uncommon for even very small companies to approach us and ask us to help them with their infrastructure.
The owner of the company has sent you an email, which reads:
Hi there,
I run a small graphic design agency. It’s been running for a year or two, mostly on the basis of word-of-mouth and referral. However, we’d like to expand our horizons a little, and so we’d like to put together a simple website that describes what we do, with a few case studies or references. A friend of mine suggested you might be a good person to speak to about putting together whatever is necessary to get this running in the cloud. We can handle the design of the content, and we’ve hired a web designer who is going to pull it together. However, we’re not really technically minded, so we’d appreciate some help with actually getting it live in a reliable and secure fashion. Can you help?
Best,
Miles Hunt
This sounds pretty trivial to you; all that’s needed is a web server and a mechanism of getting their content onto it. Of course we don’t yet know anything about whether the design agency is using a CMS, and we don’t know about the various non-functional requirements, such as how frequently it should be backed up, how many users are expected, what a reasonable response time might be, and so on.
The very first step, therefore, is to find the stakeholder, and book some time with her. You arrange a meeting and bring your laptop with you to the meeting. This is important because in the meeting you’re going to talk about the rationale for the project and the acceptance criteria, and these need to go into the feature specification. You could take notes on paper and then go away, but part of the beauty of Cucumber is that you can sit down with non-technical people and start writing the test right there and then.
I found one of my children roaming around the house looking for something to do, so I sat him down and made him pretend to be a person wanting a website, like our fictional depiction of Miles Hunt.
I opened up a buffer in Emacs, and I wrote:
Feature:
We talked for a bit, and we agreed that the minimum viable feature for the project was that a prospective customer could browse to the website and read about the services offered by the design agency. As a result, we added “Potential customer can read about services” to the feature, and described the feature as follows:
Feature: Potential customer can read about services
In order to generate more leads for my business
As a business owner
I want web users to be able to read about my services
We then talked about a possible example that would demonstrate that the most fundamental requirements had been met. We agreed that the following would make sense:
Scenario: User visits home page
Given a url http://wonderstuff-design.me
When a web user browses to the URL
Then the user should see "Wonderstuff Design is a boutique graphics design agency."
We agreed that if this test passed, we’d feel that significant progress had been made, so we didn’t write any more scenarios at this stage.
As we discussed earlier, Gherkin is a plain text DSL for mapping high-level stakeholder requirements to source code that sets up state and verifies it against those requirements. When starting an infrastructure project, I’d recommend setting aside some time to talk through the reasons for the requirement, and to understand what the simplest thing would be that would deliver value and move the project forward.
I’m not a big fan of capturing dozens of detailed stories at the start; I’d rather get two or three down first and get started on that. You can always go back for more later.
It doesn’t matter if the form in which you take down the initial requirement doesn’t end up being exactly the form you use—you can go back and check language later; the most important thing to do is have the conversation and capture the output of that conversation. For this reason, I asked you to write the feature before anything else.
Having captured the requirement, we need to work out how to test it.
Let’s start by creating a cookbook to encapsulate the services we need:
$ berks cookbook wonderstuff
create wonderstuff/files/default
create wonderstuff/templates/default
create wonderstuff/attributes
create wonderstuff/definitions
create wonderstuff/libraries
create wonderstuff/providers
create wonderstuff/recipes
create wonderstuff/resources
create wonderstuff/recipes/default.rb
create wonderstuff/metadata.rb
create wonderstuff/LICENSE
create wonderstuff/README.md
create wonderstuff/Berksfile
create wonderstuff/Thorfile
create wonderstuff/chefignore
create wonderstuff/.gitignore
run git init from "./wonderstuff"
create wonderstuff/Gemfile
create .kitchen.yml
append Thorfile
create test/integration/default
append .gitignore
append .gitignore
append Gemfile
append Gemfile
You must run `bundle install' to fetch any new gems.
create wonderstuff/Vagrantfile
Now let’s update the Gemfile and then run Bundle:
$ cat Gemfile
source 'https://rubygems.org'
gem 'berkshelf'
gem 'test-kitchen', :group => :integration
gem 'kitchen-vagrant', :group => :integration
gem 'cucumber', :group => :integration
gem 'rspec-expectations', :group => :integration
gem 'leibniz', :group => :integration
Now, we already know from our Hipster Assessor, that we need to create a features directory and a steps directory, and then create a feature containing the acceptance criteria:
$ mkdir -p wonderstuff/features/step_definitions
$ cat <<EOF > wonderstuff/features/readable_services.feature
> Feature: Potential customer can read about services
>
> In order to generate more leads for my business
> As a business owner
> I want web users to be able to read about my services
>
> Scenario: User visits home page
> Given a url http://wonderstuff-design.me
> When a web user browses to the URL
> Then the user should see "Wonderstuff Design is a boutique graphics design agency."
> EOF
Now, let’s think about this a little bit. We’ve captured the basic requirement, now let’s think about what’s involved in testing this infrastructure. We’re going to need a machine, an operating system, Chef, a cookbook, a run list, and then we need to run Chef. Leibniz exists to make this easy for us. To use Leibniz, all we need to do is add a background description, containing a table detailing the infrastructure we want to build:
Background:
Given I have provisioned the following infrastructure:
| Server Name | Operating System | Version | Chef Version | Run List |
| wonderstuff | ubuntu | 12.04 | 11.4.4 | wonderstuff::default |
And I have run Chef
What this will do is launch a machine using Test Kitchen, with the preceding specification, and make available an object that provides instance data from Test Kitchen.
Let’s look again at the example we took from Corin, I mean, Miles Hunt:
Scenario: User visits home page
Given a url http://wonderstuff-design.me
When a web user browses to the URL
Then the user should see "Wonderstuff Design is a boutique graphics design agency."
This seems fine—it describes the behavior as needed. Let’s run our test, which currently reads:
Feature: Potential customer can read about services
In order to generate more leads for my business
As a business owner
I want web users to be able to read about my services
Background:
Given I have provisioned the following infrastructure:
| Server Name | Operating System | Version | Chef Version | Run List |
| wonderstuff | ubuntu | 12.04 | 11.4.4 | wonderstuff::default |
And I have run Chef
Scenario: User visits home page
Given a url http://wonderstuff-design.me
When a web user browses to the URL
Then the user should see "Wonderstuff Design is a boutique graphics design agency."
Now let’s run our test:
$ cucumber
Feature: Potential customer can read about services
In order to generate more leads for my business
As a business owner
I want web users to be able to read about my services
Background: # features/readable_services.feature:7
Given I have provisioned the following infrastructure:# features/readable_services.feature:9
| Server Name | Operating System | Version | Chef Version | Run List |
| wonderstuff | ubuntu | 12.04 | 11.4.4 | wonderstuff::default |
And I have run Chef # features/readable_services.feature:12
Scenario: User visits home page # features/readable_services.feature:14
Given a url http://wonderstuff-design.me # features/readable_services.feature:16
When a web user browses to the URL # features/readable_services.feature:17
Then the user should see "Wonderstuff Design is a boutique graphics design agency." # features/readable_services.feature:18
1 scenario (1 undefined)
5 steps (5 undefined)
0m0.003s
You can implement step definitions for undefined steps with these snippets:
Given(/^I have provisioned the following infrastructure:$/) do |table|
# table is a Cucumber::Ast::Table
pending # express the regexp above with the code you wish you had
end
Given(/^I have run Chef$/) do
pending # express the regexp above with the code you wish you had
end
Given(/^a url http:\/\/wonderstuff\-design\.me$/) do
pending # express the regexp above with the code you wish you had
end
When(/^a web user browses to the URL$/) do
pending # express the regexp above with the code you wish you had
end
Then(/^the user should see "(.*?)"$/) do |arg1|
pending # express the regexp above with the code you wish you had
end
If you want snippets in a different programming language,
just make sure a file with the appropriate file extension
exists where Cucumber looks for step definitions.
This should look familiar. We’re now going to write the steps that map the Gherkin code to real Ruby that will provision and exercise our infrastructure.
require 'leibniz'
require 'faraday'
Given(/^I have provisioned the following infrastructure:$/) do |specification|
@infrastructure = Leibniz.build(specification)
end
Given(/^I have run Chef$/) do
@infrastructure.destroy
@infrastructure.converge
end
Given(/^a url "(.*?)"$/) do |url|
@host_header = url.split('/').last
end
When(/^a web user browses to the URL$/) do
connection = Faraday.new(:url => "http://#{@infrastructure['wonderstuff'].ip}",
:headers => {'Host' => @host_header}) do |faraday|
faraday.adapter Faraday.default_adapter
end
@page = connection.get('/').body
end
Then(/^the user should see "(.*?)"$/) do |content|
expect(@page).to match /#{content}/
end
We begin by requiring the Leibniz library to give us access to the steps that allow us to interact with Test Kitchen. We also require the Faraday library, which is a powerful and pleasant-to-use Ruby HTTP client library.
The first two steps come from Leibniz, and do pretty much exactly what they say: they build infrastructure according to the specification in the table, run the destroy task to ensure a clean environment, and then run the converge task.
The third step simply takes the URL and extracts what will be necessary to pass as the Host header to the web server. Given that we’re not going to have a real DNS entry, this is a tidy way to have a scenario devoid of testing and implementation detail, which translates to a trivial Ruby method.
The fourth step instantiates an instance of the Faraday HTTP client, passing as its arguments the IP address of the machine we provisioned, and the Host header we calculated. We then perform an HTTP GET and capture the body.
Finally we assert that the page will match the content we specified in the scenario.
A very simple example, but one that exercises the system from top to bottom and demonstrates the principles at play.
Let’s run the test:
$ cucumber
Feature: Potential customer can read about services
In order to generate more leads for my business
As a business owner
I want web users to be able to read about my services
Background: # features/readable_services.feature:7
Given I have provisioned the following infrastructure: # features/step_definitions/visit-home-page-steps.rb:4
| Server Name | Operating System | Version | Chef Version | Run List |
| wonderstuff | ubuntu | 12.04 | 11.4.4 | wonderstuff::default |
And I have run Chef # features/step_definitions/visit-home-page-steps.rb:8
Scenario: User visits home page # features/readable_services.feature:14
Given a url "http://wonderstuff-design.me" # features/step_definitions/visit-home-page-steps.rb:13
When a web user browses to the URL # features/step_definitions/visit-home-page-steps.rb:18
Connection refused - connect(2) (Faraday::Error::ConnectionFailed)
/opt/rubies/1.9.3-p429/lib/ruby/1.9.1/net/http.rb:763:in `initialize'
/opt/rubies/1.9.3-p429/lib/ruby/1.9.1/net/http.rb:763:in `open'
/opt/rubies/1.9.3-p429/lib/ruby/1.9.1/net/http.rb:763:in `block in connect'
/opt/rubies/1.9.3-p429/lib/ruby/1.9.1/timeout.rb:55:in `timeout'
/opt/rubies/1.9.3-p429/lib/ruby/1.9.1/timeout.rb:100:in `timeout'
/opt/rubies/1.9.3-p429/lib/ruby/1.9.1/net/http.rb:763:in `connect'
/opt/rubies/1.9.3-p429/lib/ruby/1.9.1/net/http.rb:756:in `do_start'
/opt/rubies/1.9.3-p429/lib/ruby/1.9.1/net/http.rb:745:in `start'
/opt/rubies/1.9.3-p429/lib/ruby/1.9.1/net/http.rb:1285:in `request'
/opt/rubies/1.9.3-p429/lib/ruby/1.9.1/net/http.rb:1027:in `get'
/home/tdi/.gem/ruby/1.9.3/gems/faraday-0.8.7/lib/faraday/adapter/net_http.rb:73:in `perform_request'
/home/tdi/.gem/ruby/1.9.3/gems/faraday-0.8.7/lib/faraday/adapter/net_http.rb:38:in `call'
/home/tdi/.gem/ruby/1.9.3/gems/faraday-0.8.7/lib/faraday/connection.rb:247:in `run_request'
/home/tdi/.gem/ruby/1.9.3/gems/faraday-0.8.7/lib/faraday/connection.rb:100:in `get'
./features/step_definitions/visit-home-page-steps.rb:23:in `/^a web user browses to the URL$/'
features/readable_services.feature:17:in `When a web user browses to the URL'
Then the user should see "Wonderstuff Design is a boutique graphics design agency." # features/step_definitions/visit-home-page-steps.rb:27
Failing Scenarios:
cucumber features/readable_services.feature:14 # Scenario: User visits home page
1 scenario (1 failed)
5 steps (1 failed, 1 skipped, 3 passed)
1m5.946s
We have a failing acceptance test—unsurprisingly because we haven’t built anything. I’m now going to race through the steps of adding integration tests and unit tests, without comment, as we’ll discuss these in detail shortly. Once we have the unit and integration tests passing, we’ll run the Cucumber test again, and we should be all green!
Next we write the integration tests:
require 'spec_helper'
describe 'Wonderstuff Design' do
it 'should install the lighttpd package' do
expect(package 'lighttpd').to be_installed
end
it 'should enable and start the lighttpd service' do
expect(service 'lighttpd').to be_enabled
expect(service 'lighttpd').to be_running
end
it 'should render the Wonderstuff Design web page' do
expect(file('/var/www/index.html')).to be_file
expect(file('/var/www/index.html')).to contain 'Wonderstuff Design is a boutique graphics design agency.'
end
end
And run it:
$ kitchen verify
-----> Starting Kitchen (v1.0.0.alpha.7)
-----> Verifying <default-ubuntu-1204>
Removing /opt/busser/suites/serverspec
Uploading /opt/busser/suites/serverspec/spec_helper.rb (mode=0664)
Uploading /opt/busser/suites/serverspec/localhost/cisco_spec.rb (mode=0664)
Uploading /opt/busser/suites/serverspec/localhost/cisco_spec.rb~ (mode=0664)
-----> Running serverspec test suite
/opt/chef/embedded/bin/ruby -I/opt/busser/suites/serverspec -S /opt/chef/embedded/bin/rspec /opt/busser/suites/serverspec/localhost/cisco_spec.rb
Package `lighttpd' is not installed and no info is available.
Use dpkg --info (= dpkg-deb --info) to examine archive files,
and dpkg --contents (= dpkg-deb --contents) to list their contents.
FFF
Failures:
1) Wonderstuff Design should install the lighttpd package
Failure/Error: expect(package 'lighttpd').to be_installed
dpkg -s lighttpd && ! dpkg -s lighttpd | grep -E '^Status: .+ not-installed$'
# /opt/busser/suites/serverspec/localhost/cisco_spec.rb:5:in `block (2 levels) in <top (required)>'
2) Wonderstuff Design should enable and start the lighttpd service
Failure/Error: expect(service 'lighttpd').to be_enabled
ls /etc/rc3.d/ | grep -- lighttpd || grep 'start on' /etc/init/lighttpd.conf
grep: /etc/init/lighttpd.conf: No such file or directory
# /opt/busser/suites/serverspec/localhost/cisco_spec.rb:9:in `block (2 levels) in <top (required)>'
3) Wonderstuff Design should render the Wonderstuff Design web page
Failure/Error: expect(file('/var/www/index.html')).to be_file
test -f /var/www/index.html
# /opt/busser/suites/serverspec/localhost/cisco_spec.rb:14:in `block (2 levels) in <top (required)>'
Finished in 0.02524 seconds
3 examples, 3 failures
Failed examples:
rspec /opt/busser/suites/serverspec/localhost/cisco_spec.rb:4 # Wonderstuff Design should install the lighttpd package
rspec /opt/busser/suites/serverspec/localhost/cisco_spec.rb:8 # Wonderstuff Design should enable and start the lighttpd service
rspec /opt/busser/suites/serverspec/localhost/cisco_spec.rb:13 # Wonderstuff Design should render the Wonderstuff Design web page
Now we write the unit tests:
require 'spec_helper'
describe "wonderstuff::default" do
let(:chef_run) do
runner = ChefSpec::ChefRunner.new(
log_level: :error,
cookbook_path: COOKBOOK_PATH,
)
Chef::Config.force_logger true
runner.converge('recipe[wonderstuff::default]')
end
it "installs the lighttpd package" do
expect(chef_run).to install_package 'lighttpd'
end
it "creates a webpage to be served" do
expect(chef_run).to create_file_with_content '/var/www/index.html', 'Wonderstuff Design is a boutique graphics design agency.'
end
it "starts the lighttpd service" do
expect(chef_run).to start_service 'lighttpd'
end
it "enables the lighttpd service" do
expect(chef_run).to set_service_to_start_on_boot 'lighttpd'
end
end
And run them:
$ rspec -fd
Using wonderstuff (0.1.0) at path: '/home/tdi/wonderstuff'
wonderstuff::default
installs the lighttpd package (FAILED - 1)
creates a webpage to be served (FAILED - 2)
starts the lighttpd service (FAILED - 3)
enables the lighttpd service (FAILED - 4)
Failures:
1) wonderstuff::default installs the lighttpd package
Failure/Error: expect(chef_run).to install_package 'lighttpd'
No package resource named 'lighttpd' with action :install found.
# ./spec/unit/recipes/default_spec.rb:14:in `block (2 levels) in <top (required)>'
2) wonderstuff::default creates a webpage to be served
Failure/Error: expect(chef_run).to create_file_with_content '/var/www/index.html', 'Wonderstuff Design is a boutique graphics design agency.'
File content:
does not match expected:
Wonderstuff Design is a boutique graphics design agency.
# ./spec/unit/recipes/default_spec.rb:18:in `block (2 levels) in <top (required)>'
3) wonderstuff::default starts the lighttpd service
Failure/Error: expect(chef_run).to start_service 'lighttpd'
No service resource named 'lighttpd' with action :start found.
# ./spec/unit/recipes/default_spec.rb:22:in `block (2 levels) in <top (required)>'
4) wonderstuff::default enables the lighttpd service
Failure/Error: expect(chef_run).to set_service_to_start_on_boot 'food'
expected chef_run: recipe[wonderstuff::default] to set service to start on boot "lighttpd"
# ./spec/unit/recipes/default_spec.rb:26:in `block (2 levels) in <top (required)>'
Finished in 0.00969 seconds
4 examples, 4 failures
Failed examples:
rspec ./spec/unit/recipes/default_spec.rb:13 # wonderstuff::default installs the lighttpd package
rspec ./spec/unit/recipes/default_spec.rb:17 # wonderstuff::default creates a webpage to be served
rspec ./spec/unit/recipes/default_spec.rb:21 # wonderstuff::default starts the lighttpd service
rspec ./spec/unit/recipes/default_spec.rb:25 # wonderstuff::default enables the lighttpd service
Now we write the cookbook:
$ cat recipes/default.rb
package 'lighttpd'
service 'lighttpd' do
action [:enable, :start]
end
cookbook_file '/var/www/index.html' do
source 'wonderstuff.html'
end
$ cat files/default/wonderstuff.html
<html>
<body>
<p>Wonderstuff Design is a boutique graphics design agency.</p>
</body>
</html>
Now we run the unit tests again:
$ rspec -fd
Using wonderstuff (0.1.0) at path: '/home/tdi/wonderstuff'
wonderstuff::default
installs the lighttpd package
creates a webpage to be served
starts the lighttpd service
enables the lighttpd service
Finished in 0.01352 seconds
4 examples, 0 failures
Now we run the integration tests:
$ kitchen verify 12
-----> Starting Kitchen (v1.0.0.dev)
-----> Setting up <default-ubuntu-1204>
-----> Setting up Busser
Creating BUSSER_ROOT in /opt/busser
Creating busser binstub
Plugin serverspec already installed
Finished setting up <default-ubuntu-1204> (0m3.21s).
-----> Verifying <default-ubuntu-1204>
Removing /opt/busser/suites/serverspec
Uploading /opt/busser/suites/serverspec/spec_helper.rb (mode=0664)
Uploading /opt/busser/suites/serverspec/localhost/cisco_spec.rb (mode=0664)
Uploading /opt/busser/suites/serverspec/localhost/cisco_spec.rb~ (mode=0664)
-----> Running serverspec test suite
/opt/chef/embedded/bin/ruby -I/opt/busser/suites/serverspec -S /opt/chef/embedded/bin/rspec /opt/busser/suites/serverspec/localhost/cisco_spec.rb
...
Finished in 0.04747 seconds
3 examples, 0 failures
Finished verifying <default-ubuntu-1204> (0m2.12s).
-----> Kitchen is finished. (0m6.40s)
And finally, we run Cucumber again:
$ cucumber
Feature: Potential customer can read about services
In order to generate more leads for my business
As a business owner
I want web users to be able to read about my services
Background: # features/readable_services.feature:7
Given I have provisioned the following infrastructure: # features/step_definitions/visit-home-page-steps.rb:4
| Server Name | Operating System | Version | Chef Version | Run List |
| wonderstuff | ubuntu | 12.04 | 11.4.4 | wonderstuff::default |
Using wonderstuff (0.1.0) at path: '/home/tdi/wonderstuff'
And I have run Chef # features/step_definitions/visit-home-page-steps.rb:8
Scenario: User visits home page # features/readable_services.feature:14
Given a url "http://wonderstuff-design.me" # features/step_definitions/visit-home-page-steps.rb:13
When a web user browses to the URL # features/step_definitions/visit-home-page-steps.rb:18
Then the user should see "Wonderstuff Design is a boutique graphics design agency." # features/step_definitions/visit-home-page-steps.rb:27
expected "<?xml version=\"1.0\" encoding=\"iso-8859-1\"?>\n<!DOCTYPE html PUBLIC \"-//W3C//DTD XHTML 1.0 Transitional//EN\"\n \"http://www.w3.org/TR/xhtml1/DTD/xhtml1-transitional.dtd\">\n<html xmlns=\"http://www.w3.org/1999/xhtml\" xml:lang=\"en\" lang=\"en\">\n <head>\n <title>403 - Forbidden</title>\n </head>\n <body>\n <h1>403 - Forbidden</h1>\n </body>\n</html>\n" to match /Wonderstuff Design is a boutique graphics design agency./ (RSpec::Expectations::ExpectationNotMetError)
./features/step_definitions/visit-home-page-steps.rb:28:in `/^the user should see "(.*?)"$/'
features/readable_services.feature:18:in `Then the user should see "Wonderstuff Design is a boutique graphics design agency."'
Failing Scenarios:
cucumber features/readable_services.feature:14 # Scenario: User visits home page
1 scenario (1 failed)
5 steps (1 failed, 4 passed)
1m11.921s
Aha! What happened!
Upon investigation, we discover that we didn’t set the ownership and group of the html page, so the user under which lighttpd runs won’t be able to read it!
Now, at this point it is very important to write a failing test that catches the mistake:
it "creates a webpage to be served" do
expect(chef_run).to create_file_with_content '/var/www/index.html', 'Wonderstuff Design is a boutique graphics design agency.'
expect(file).to be_owned_by('www-data', 'www-data')
end
Let’s run the test:
$ rspec -fd
Using wonderstuff (0.1.0) at path: '/home/tdi/wonderstuff'
wonderstuff::default
installs the lighttpd package
creates a webpage to be served (FAILED - 1)
starts the lighttpd service
enables the lighttpd service
Failures:
1) wonderstuff::default creates a webpage to be served
Failure/Error: expect(file).to be_owned_by('www-data', 'www-data')
NameError:
undefined local variable or method `file' for #<RSpec::Core::ExampleGroup::Nested_1:0x00000003ddd418>
# ./spec/unit/recipes/default_spec.rb:19:in `block (2 levels) in <top (required)>'
Finished in 0.013 seconds
4 examples, 1 failure
Failed examples:
rspec ./spec/unit/recipes/default_spec.rb:17 # wonderstuff::default creates a webpage to be served
Now let’s make the test pass by updating the resource in the recipe:
package 'lighttpd'
service 'lighttpd' do
action [:enable, :start]
end
cookbook_file '/var/www/index.html' do
source 'wonderstuff.html'
owner 'www-data'
group 'www-data'
end
Now, let’s run Cucumber one last time:
$ cucumber
Feature: Potential customer can read about services
In order to generate more leads for my business
As a business owner
I want web users to be able to read about my services
Background: # features/readable_services.feature:7
Given I have provisioned the following infrastructure: # features/step_definitions/visit-home-page-steps.rb:4
| Server Name | Operating System | Version | Chef Version | Run List |
| wonderstuff | ubuntu | 12.04 | 11.4.4 | wonderstuff::default |
Using wonderstuff (0.1.0) at path: '/home/tdi/wonderstuff'
And I have run Chef # features/step_definitions/visit-home-page-steps.rb:8
Scenario: User visits home page # features/readable_services.feature:14
Given a url "http://wonderstuff-design.me" # features/step_definitions/visit-home-page-steps.rb:13
When a web user browses to the URL # features/step_definitions/visit-home-page-steps.rb:18
Then the user should see "Wonderstuff Design is a boutique graphics design agency." # features/step_definitions/visit-home-page-steps.rb:27
1 scenario (1 passed)
5 steps (5 passed)
1m10.105s
Although a truly trivial example, I hope this gives a sense of the workflow and the ideas behind writing acceptance tests for application cookbooks. Indeed, even on this simple example we see the benefit of a true acceptance test—our unit tests passed, our integration tests passed, but what we delivered was useless crap. Only with the true exercising of the system we built did we discover our mistake!
I will be documenting far more complex examples on the website or on my blog. I would welcome your enthusiastic contributions and discussions on the Chef users’ mailing list.
As an appetite whetter, I offer the following feature:
Feature: Highly Available Jenkins
Infrastructure developers should be able to enjoy uninterrupted access to their build jobs.
Background:
Given I have provisioned the following infrastructure:
| Server Name | Operating System | Architecture | Version | Chef Version | Run List |
| lb1 | CentOS | 64 bit | 6.4 | 11.4.4 | tedious::ha |
| lb2 | CentOS | 64 bit | 6.4 | 11.4.4 | tedious::ha |
| jenkins1 | CentOS | 64 bit | 6.4 | 11.4.4 | tedious::jenkins |
| jenkins2 | CentOS | 64 bit | 6.4 | 11.4.4 | tedious::jenkins |
And 'http://tedio.us' resolves to the virtual IP of the loadbalancer
Scenario: Jenkins should be available
Infrastructure developers should be able to reach and use a Jenkins server.
When I try to download the Jenkins CLI tool
Then the download will succeed
And when I query the version number
Then the version number will be returned
Scenario: Jenkins should be load-balanced
Infrastructure developers should be able to use Jenkins in the event of a Jenkins server failure
Given I am using a Jenkins server
When that Jenkins server is switched off
Then I should be able to reach an alternative Jenkins server
Scenario: Load balancers should be in a redundant pair
Given that I am using Jenkins
When one of the load balancers is switched off
Then I should still be able to use Jenkins
Advantages and Disadvantages
The advantages of writing executable specifications, using Gherkin and Cucumber, have been expressed throughout this book. As an approach, it is widely regarded as offering outstanding value.
The main disadvantage is simply that it’s not easy. The tooling is immature compared to the other resources discussed in this section. In its current evolutionary state, the requirement to do one’s own heavy lifting is not inconsiderable. However, the more people that engage in the process, and the more the tooling matures, the greater the differential between effort in and value out.
Other than this, I would like to address two particular objections to the approach.
The first is the argument that “a good monitoring system” takes care of the requirement for externally facing acceptance tests.
While I certainly agree that a monitoring system should be measuring the extent to which one’s system meets its acceptance criteria, I think this is missing the point to a significant degree.
Doubtless, a monitoring system that doesn’t measure and alert on the fundamental purpose of the business is not a very valuable monitoring system. Indeed, it’s for this reason that I have long advocated that acceptance tests can be used as an input to, or in certain cases, even directly as one’s monitoring system. However, the tests that comprise that monitoring system still need to be written, the requirements still need to be captured, and that is a collaborative effort that belongs squarely in the same conversation and workflow as the rest of the program of cookbook testing. Ducking the issue, or delegating it to a separate monitoring discussion, is to introduce segregation and siloization where there should be none.
Furthermore, certain acceptance tests, or even smoke tests, could be destructive, expensive, or impose hostile load burdens, or probe security issues. These don’t belong in a production monitoring system, but they are very much requirements and specifications that need to be considered when beginning to build infrastructure as code.
If we accept the view that acceptance tests are the same as, or function as, monitoring checks, then these monitoring checks should be the first thing we write. This is the purest interpretation of the mandate to develop outside-in.
On this point, it’s illuminating to think about outside-in as being fractal. Post Chef-run convergence testing is outside-in from the perspective of the Chef run, although it’s not truly at the level of a test from outside the node itself. Thus the kind of approach that Cucumber and Leibniz offer can be viewed as a higher-order testing approach.
Ultimately, I think it’s as plain as this: for most organizations building infrastructure at scale using Chef, the business is the application. If the application doesn’t function—if customers cannot login and perform critical business actions—then all other monitoring is for naught.
The second objection is that when building infrastructure, the stakeholders are frequently technical, so the domain language is shared, and the value in capturing requirements in Gherkin is diminished.
This is a deceptively attractive sounding position. It is indeed frequently the case that the stakeholders for infrastructure projects are technical architects, developers, or even system administrators. In these cases the ubiquitous language shared between stakeholders and implementers is imbued with technical concepts to a more significant degree than when designing software to be consumed by users.
However, this does not remove the need for acceptance tests or documentation. It is still imperative that, as engineers, we both build the thing right and build the right thing. To do so, we need to ensure the following are in place:
§ A common and unambiguous understanding of what needs to be delivered
§ Explicit and univocal specification of requirements to minimize rework
§ A concrete and measurable definition of done
§ Documentation to support future change and maintenance
Traditional project management approaches invested large amounts of time and money in big upfront specifications and testing phases, which, to an extent, assisted (although some might argue hindered) the achievement of these prerequisites. However, in today’s fast-paced, continuously delivering universe, such an approach simply isn’t an option anymore. Nonetheless, the necessity of these foundational cornerstones is still apparent.
Now, more than ever, there is an urgent need for efficient specification, and lean planning; for reliable, always-right, and easily changeable documentation; for objective mechanisms to verify that the system meets requirements. How can this be achieved in a world of constant improvement, rapid change, auto-scaling, and cloud-bursting?
Gojko Adzic offers the following visualization:
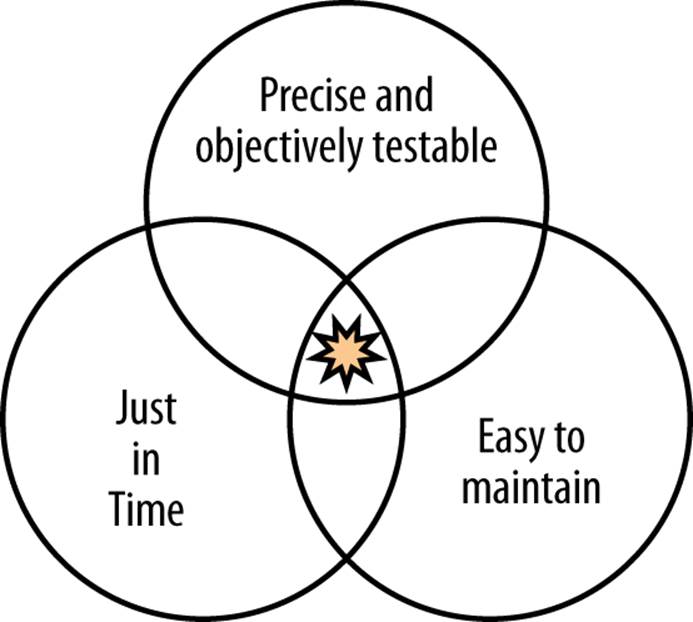
The intersection of just-in-time delivery, highly maintainable documentation, and precise and objectively testable specifications lies in the very thing this book holds as pivotal—in requirements as executable acceptance tests. And this is required as much for highly technical stakeholders as for any other consumer of services.
Summary and Conclusion
Full acceptance testing of complex multi-node systems, conducted from a perspective outside of the systems under test, is the holy grail of test-driven infrastructure. The tooling is not yet up to scratch for solving problems of this complexity, but it’s without a doubt an area where much experimentation and research is being carried out.
With hindsight, my decision to begin my crusade to bring test-driven and behavior-driven development practices into the world of infrastructure as code, with the purest form of outside-in acceptance testing, was wildly optimistic. However, I stand by my view that this is the correct methodology, and we should be pushing at the boundaries of the possible.
Leibniz is a brand new project, but initial feedback on the concept has been positive, and the problems it attempts to solve are real, topical, and tractable. Doubtless, its implementation and approach will change rapidly, so please consider this section very much an appetite-whetter and discussion-starter rather than a definitive description of a mature framework.
The other area where we are sure to see important developments is in the emergence of mature orchestration frameworks functioning at a level higher than the node. Opscode’s "push jobs" looks to be the beginning of a process of releasing primitives for sophisticated orchestration capability within the Opscode product roadmap. At the same time, Riot Games has been promising to open source Motherbrain, their orchestration system. Alongside this, the engineers at Heavy Water have also been experimenting with proofs of concept playing in this space. Add to this the role already played by the popular MCollective framework in current orchestration frameworks, and it’s clear this is an area of great potential.
Integration Testing: Test Kitchen with Serverspec and Bats
We introduced Test Kitchen as a foundational tool for orchestration and test running earlier in the chapter. We now turn to a detailed worked example of building infrastructure tests using both Serverspec and Bats.
Within a cookbook, the kitchen init command will generate a core testing structure, consisting of a YAML file, .kitchen.yml, which describes the various run configurations to test, and a directory for tests and supporting material, test/integration/default.
A default .kitchen.yml file contains the following:
---
driver_plugin: vagrant
driver_config:
require_chef_omnibus: true
platforms:
- name: ubuntu-12.04
driver_config:
box: opscode-ubuntu-12.04
box_url: https://opscode-vm.s3.amazonaws.com/vagrant/opscode_ubuntu-12.04_provisionerless.box
- name: ubuntu-10.04
driver_config:
box: opscode-ubuntu-10.04
box_url: https://opscode-vm.s3.amazonaws.com/vagrant/opscode_ubuntu-10.04_provisionerless.box
- name: centos-6.4
driver_config:
box: opscode-centos-6.4
box_url: https://opscode-vm.s3.amazonaws.com/vagrant/opscode_centos-6.4_provisionerless.box
- name: centos-5.9
driver_config:
box: opscode-centos-5.9
box_url: https://opscode-vm.s3.amazonaws.com/vagrant/opscode_centos-5.9_provisionerless.box
suites:
- name: default
run_list: ["recipe[ruby-install]"]
attributes: {}
The driver plug-in is Vagrant, as mentioned. We hand off installation of Chef to the Omnibus plug-in, enabling us to keep our base boxes as minimal as possible. We then specify the platforms we’re interested in testing against. By default, the assumption is that a cookbook developer wants to test against CentOS and Ubuntu, on both CentOS 5 and 6 and Ubuntu 10.04 and 12.04. These can easily be altered, as they are simply references to a Vagrant box name and source URL, exactly as would go into a Vagrantfile. Finally, we list suites of tests we want to run against each platform—in this case, by default, we want to apply the default recipe from the ruby-install cookbook. The possibility of specifying node attributes in the suite is also available.
It’s entirely possible that you decide you don’t want to test against all four of these systems—in which case, simply delete the ones that aren’t relevant.
Running kitchen list will give a quick status review of your test kitchen:
$ bundle exec kitchen list
Instance Last Action
default-ubuntu-1204 <Not Created>
default-ubuntu-1004 <Not Created>
default-centos-64 <Not Created>
default-centos-59 <Not Created>
Let’s create a cookbook that will install the Pound load balancer. We want to be sure it will work on CentOS 5 as well as CentOS 6. We don’t have any CentOS 5 machines, but we want to support this platform for the sake of the community, and as responsible cookbook developers, we want to be sure that as we develop on a Mac and deploy on CentOS 6, we don’t introduce any regressions that would cause a problem on an earlier version of CentOS.
$ berks cookbook pound
create pound/files/default
create pound/templates/default
create pound/attributes
create pound/definitions
create pound/libraries
create pound/providers
create pound/recipes
create pound/resources
create pound/recipes/default.rb
create pound/metadata.rb
create pound/LICENSE
create pound/README.md
create pound/Berksfile
create pound/Thorfile
create pound/chefignore
create pound/.gitignore
run git init from "./pound"
create pound/Gemfile
create .kitchen.yml
append Thorfile
create test/integration/default
append .gitignore
append .gitignore
append Gemfile
append Gemfile
You must run `bundle install' to fetch any new gems.
create pound/Vagrantfile
Now let’s slim down the platforms:
---
driver_plugin: vagrant
driver_config:
require_chef_omnibus: true
platforms:
- name: centos-6.4
driver_config:
box: opscode-centos-6.4
box_url: https://opscode-vm.s3.amazonaws.com/vagrant/opscode_centos-6.4_provisionerless.box
- name: centos-5.9
driver_config:
box: opscode-centos-5.9
box_url: https://opscode-vm.s3.amazonaws.com/vagrant/opscode_centos-5.9_provisionerless.box
suites:
- name: default
run_list: ["recipe[pound]"]
attributes: {}
Now we can create the base machines using the kitchen create command:
$ kitchen create all
-----> Starting Kitchen (v1.0.0.alpha.7)
-----> Creating <default-centos-64>
[kitchen::driver::vagrant command] BEGIN (vagrant up --no-provision)
Bringing machine 'default' up with 'virtualbox' provider...
[default] Importing base box 'opscode-centos-6.4'...
[default] Matching MAC address for NAT networking...
[default] Setting the name of the VM...
[default] Clearing any previously set forwarded ports...
[Berkshelf] Skipping Berkshelf with --no-provision
[default] Fixed port collision for 22 => 2222. Now on port 2204.
[default] Creating shared folders metadata...
[default] Clearing any previously set network interfaces...
[default] Preparing network interfaces based on configuration...
[default] Forwarding ports...
[default] -- 22 => 2204 (adapter 1)
[default] Running any VM customizations...
[default] Booting VM...
[default] Waiting for VM to boot. This can take a few minutes.
[default] VM booted and ready for use!
[default] Setting hostname...
[default] Configuring and enabling network interfaces...
[default] Mounting shared folders...
[default] -- /vagrant
[kitchen::driver::vagrant command] END (0m37.01s)
[kitchen::driver::vagrant command] BEGIN (vagrant ssh-config)
[kitchen::driver::vagrant command] END (0m1.27s)
Vagrant instance <default-centos-64> created.
Finished creating <default-centos-64> (0m38.95s).
-----> Creating <default-centos-59>
[kitchen::driver::vagrant command] BEGIN (vagrant up --no-provision)
Bringing machine 'default' up with 'virtualbox' provider...
[default] Box 'opscode-centos-5.9' was not found. Fetching box from specified URL for
the provider 'virtualbox'. Note that if the URL does not have
a box for this provider, you should interrupt Vagrant now and add
the box yourself. Otherwise Vagrant will attempt to download the
full box prior to discovering this error.
Downloading or copying the box...
Extracting box...3k/s, Estimated time remaining: --:--:--)
Successfully added box 'opscode-centos-5.9' with provider 'virtualbox'!
[default] Importing base box 'opscode-centos-5.9'...
[default] Matching MAC address for NAT networking...
[default] Setting the name of the VM...
[default] Clearing any previously set forwarded ports...
[Berkshelf] Skipping Berkshelf with --no-provision
[default] Fixed port collision for 22 => 2222. Now on port 2205.
[default] Creating shared folders metadata...
[default] Clearing any previously set network interfaces...
[default] Preparing network interfaces based on configuration...
[default] Forwarding ports...
[default] -- 22 => 2205 (adapter 1)
[default] Running any VM customizations...
[default] Booting VM...
[default] Waiting for VM to boot. This can take a few minutes.
[default] VM booted and ready for use!
[default] Setting hostname...
[default] Configuring and enabling network interfaces...
[default] Mounting shared folders...
[default] -- /vagrant
[kitchen::driver::vagrant command] END (6m6.32s)
[kitchen::driver::vagrant command] BEGIN (vagrant ssh-config)
[kitchen::driver::vagrant command] END (0m1.26s)
Vagrant instance <default-centos-59> created.
Finished creating <default-centos-59> (6m14.04s).
-----> Kitchen is finished. (6m54.05s)
This will download the boxes if needed. After the creation has finished, kitchen list will show the updated status:
$ bundle exec kitchen list
Instance Last Action
default-centos-64 Created
default-centos-59 Created
Now that we have the platforms available, we can attempt to converge the nodes with kitchen converge. Even though we haven’t written a recipe yet, this will install Chef using the Omnibus plug-in, and prove that we have machines ready to test:
$ bundle exec kitchen converge
-----> Starting Kitchen (v1.0.0.alpha.7)
-----> Converging <default-centos-64>
[local command] BEGIN (if ! command -v berks >/dev/null; then exit 1; fi)
[local command] END (0m0.01s)
[local command] BEGIN (berks install --path /tmp/default-centos-64-cookbooks20130613-31209-12t45x0)
Using pound (0.1.0) at path: '/home/tdi/pound'
[local command] END (0m0.99s)
Uploaded pound/chefignore (985 bytes)
Uploaded pound/Berksfile.lock (179 bytes)
Uploaded pound/Vagrantfile (3259 bytes)
Uploaded pound/recipes/default.rb (127 bytes)
Uploaded pound/metadata.rb (267 bytes)
Uploaded pound/Gemfile.lock (2830 bytes)
Uploaded pound/Berksfile (24 bytes)
Uploaded pound/README.md (112 bytes)
Uploaded pound/Gemfile (136 bytes)
Uploaded pound/Thorfile (241 bytes)
Uploaded pound/LICENSE (72 bytes)
Starting Chef Client, version 11.4.4
[2013-06-13T04:53:31+00:00] INFO: *** Chef 11.4.4 ***
[2013-06-13T04:53:31+00:00] INFO: Setting the run_list to ["recipe[pound]"] from JSON
[2013-06-13T04:53:31+00:00] INFO: Run List is [recipe[pound]]
[2013-06-13T04:53:31+00:00] INFO: Run List expands to [pound]
[2013-06-13T04:53:31+00:00] INFO: Starting Chef Run for default-centos-64
[2013-06-13T04:53:31+00:00] INFO: Running start handlers
[2013-06-13T04:53:31+00:00] INFO: Start handlers complete.
Compiling Cookbooks...
Converging 0 resources
[2013-06-13T04:53:31+00:00] INFO: Chef Run complete in 0.001873196 seconds
[2013-06-13T04:53:31+00:00] INFO: Running report handlers
[2013-06-13T04:53:31+00:00] INFO: Report handlers complete
Chef Client finished, 0 resources updated
Finished converging <default-centos-64> (0m3.05s).
-----> Converging <default-centos-59>
[local command] BEGIN (if ! command -v berks >/dev/null; then exit 1; fi)
[local command] END (0m0.01s)
[local command] BEGIN (berks install --path /tmp/default-centos-59-cookbooks20130613-31209-dcec44)
Using pound (0.1.0) at path: '/home/tdi/pound'
[local command] END (0m0.99s)
Uploaded pound/chefignore (985 bytes)
Uploaded pound/Berksfile.lock (179 bytes)
Uploaded pound/Vagrantfile (3259 bytes)
Uploaded pound/recipes/default.rb (127 bytes)
Uploaded pound/metadata.rb (267 bytes)
Uploaded pound/Gemfile.lock (2830 bytes)
Uploaded pound/Berksfile (24 bytes)
Uploaded pound/README.md (112 bytes)
Uploaded pound/Gemfile (136 bytes)
Uploaded pound/Thorfile (241 bytes)
Uploaded pound/LICENSE (72 bytes)
Starting Chef Client, version 11.4.4
[2013-06-13T04:53:34+00:00] INFO: *** Chef 11.4.4 ***
[2013-06-13T04:53:34+00:00] INFO: Setting the run_list to ["recipe[pound]"] from JSON
[2013-06-13T04:53:34+00:00] INFO: Run List is [recipe[pound]]
[2013-06-13T04:53:34+00:00] INFO: Run List expands to [pound]
[2013-06-13T04:53:34+00:00] INFO: Starting Chef Run for default-centos-59
[2013-06-13T04:53:34+00:00] INFO: Running start handlers
[2013-06-13T04:53:34+00:00] INFO: Start handlers complete.
Compiling Cookbooks...
Converging 0 resources
[2013-06-13T04:53:34+00:00] INFO: Chef Run complete in 0.002037 seconds
[2013-06-13T04:53:34+00:00] INFO: Running report handlers
[2013-06-13T04:53:34+00:00] INFO: Report handlers complete
Chef Client finished, 0 resources updated
Finished converging <default-centos-59> (0m2.99s).
-----> Kitchen is finished. (0m7.15s)
After converge, the state is reported as:
$ bundle exec kitchen list
Instance Last Action
default-centos-64 Converged
default-centos-59 Converged
Note that Test Kitchen uploaded the cookbooks, and would have solved any dependencies if we’d needed. The next step is to get it to run some tests. It’s critical at this stage to understand how Test Kitchen achieves this. While it’s perfectly possible to use Test Kitchen to run Minitest Handler tests, it’s essentially designed to run what I call “Post Chef-run” tests. That is, after the Chef run has completely finished, inspect the state of the converged node, and report back. Minitest Handler is a nice approach and brings post-converge testing with minimal setup, but it does rely on being able to peek into Chef’s internals, and the tests won’t even attempt to run if Chef doesn’t finish converging cleanly. The Test Kitchen approach is to allow the node to converge fully and after Chef has finished, inspect the state.
Test Kitchen achieves this testing using the concept of a Busser. Unless you’re from North America, this term could be puzzling. The best explanation I can give is to refer you to a classic early episode of Seinfeld, called “The Busboy.” If you’ve never watched Seinfeld before, stop what you’re doing right now, go watch Seinfeld, and then come back. Seriously—work can wait. Back? Great, so in “The Busboy,” the three friends Jerry, George, and Elaine, are eating in a restaurant, where the adjacent table catches fire. George explains to the manager of the restaurant that the fire was caused by the busboy leaving the menu too close to the candle. Elaine comments that she’ll never eat at the restaurant again, and the manager, taking this seriously, fires the busboy. I won’t spoil the rest of the episode, but you get the picture: a busboy, or busser, is a waiter’s helper in a restaurant. It’s his responsibility to ensure that the fruits of the chef, the produce from the kitchen, can be enjoyed by the patrons of the establishment. In Test Kitchen, the metaphor is similar. Busser is a Rubygem that is responsible for ensuring whatever is needed to run tests after akitchen converge is in place. Specifically, it installs any required testing Gems, and generally helps get the remote node ready to receive test files and run them.
In theory, we could use anything we liked to test the system, after Chef has run. If you were particularly keen on Perl or Python, there would be no reason not to write tests in Perl or Python to verify the state; as long as it reports back test results, it doesn’t matter what is used. Busser is fully pluggable, and creation of plug-ins is very easy. We’ll look at two Busser plug-ins to demonstrate the principle.
When thinking about these sorts of tests, I think it makes sense to consider the steps you might take if you were asked to manually examine a machine to verify that something had been set up or installed. In the case of Pound, what would we do? Off the top of my head, if someone gave me a computer, told me that another sysadmin had installed Pound, and asked me to verify it, I’d probably do some of the following:
§ Check to see if a Pound service was running.
§ See if I could find a Pound config file.
§ Look at the Pound config file to see if it looked sane.
§ Look at what backends were configured.
§ Make an HTTP request to a backend and note the response.
§ Make an HTTP request to Pound, and compare the response to the request from the backend.
These are the sorts of tests we want Test Kitchen to run. How, then, shall we construct these tests? Well, as I mentioned, the possibilities are effectively limitless, but I will draw attention to two particularly interesting options, then mention alternatives you might like to consider.
Introducing Bats
The first is to use Bats, the Bourne-again shell (Bash) testing framework. About as simple as a test framework can be, a Bats test is simply a shell function with a description. Here’s an example from Fletcher Nichol’s rbenv cookbook:
@test "global Ruby can install nokogiri gem" {
export RBENV_VERSION=$global_ruby
run gem install nokogiri --no-ri --no-rdoc
[ $status -eq 0 ]
}
Just like any test framework, we set up some state, and then make an assertion. In this case, the assertion is simply the exit status of a shell command. An exit status of 0 is interpreted as a test passing, while any non-zero exit status is interpreted as a test failure. Assertions can be any valid shell command, but the Bats framework also provides a helper method, run, which will run a command and store the exit status and output. These are available as three variables:
$status
The exit code of the command passed as an argument to run.
$output
The combined contents of the shell’s standard out and standard error.
$lines
An array that stores multiple lines of output.
This makes the final assertion as simple as utilizing the bash shell’s [ ] testing mechanism; examples might include:
[ $status -eq 0 ]
[ $(echo "$output" | grep "^$global_ruby$") = "$global_ruby" ]
[ ${lines[0]} = "$global_ruby" ]
If you come from a Linux or Unix system administration background, you’ll find this a powerful, quick, and effective way to investigate state. If this looks somewhat arcane to you, but you can see its inherent simplicity and power, there are a number of excellent introductory works on shell scripting, study of which would yield reward. Alternatively, of course, you could simply ignore this option, and move on to a testing mechanism that suits your background and purposes.
Introducing Serverspec
The second option I want to draw your attention to is Serverspec. Serverspec is a set of custom matchers and expectations for RSpec, designed specifically to test configured infrastructure. Although it can be configured to use SSH and connect to a remote machine, for our purposes, we’re simply going to run the test after the Chef run has finished and return the result.
The project offers the following examples. I would point out that these examples use the old RSpec expectation format, which is no longer the preferred or recommended approach. Later, we’ll use the current approach, but I leave these examples per the documentation, so you can see examples of each.
describe 'Apache package' do
it 'should be installed' do
end
package('httpd') do
it { should be_installed }
describe service('httpd') do
it { should be_enabled }
it { should be_running }
end
describe port(80) do
it { should be_listening }
end
describe file('/etc/httpd/conf/httpd.conf') do
it { should be_file }
it { should contain "ServerName www.example.jp" }
end
This approach has the advantage of being familiar for anyone who has done any development in Ruby and has any exposure to RSpec. It also has the advantage that we’re already using RSpec expectations in Chefspec, and RSpec expectations are commonly used with Cucumber; this gives us the opportunity to standardize on a single testing format. Additionally, there is a large number of very useful, pre-defined matchers, which makes the task of creating some immediately useful tests very easy to achieve, quickly. Finally, the project has broad cross-config-management support, being used by Puppet and CFengine users, so the community support and development effort is healthy.
The final two options I’ll mention are simply writing your own tests in either Minitest or RSpec. In this case, you simply write tests using the standard library or importing any gems you need. This has the advantage of minimum fuss and maximum flexibility. If you’re comfortable in the world of Ruby and Ruby testing, this will be no different from your day-to-day test-writing.
The Busser is responsible for installing any software that is required for running tests. It does this via a plug-in mechanism and by filesystem layout convention. Busser will load the plug-in that corresponds to the name of the directory. The format is as follows:
/path/to/my/cookbook/test/integration/<SUITE-NAME>/<BUSSER-PLUGIN>
So, to run Bats tests for the default suite, simply drop tests in:
/path/to/my/cookbook/test/integration/default/bats
Let’s write some tests for the Pound cookbook using Bats. Create a file pound.bats under /test/integration/default/bats/ with the following content:
match() {
local p=$1 v
shift for v
do [[ $v = $p ]] && return
done
return 1
}
@test "The Pound service is running" {
run service pound status
echo "$output" | grep -Eq 'pound.*is running'
}
@test "Two Pound backends are active" {
run poundctl -c /var/lib/pound/pound.cfg
match "*Backend*8000*active*" "${lines[@]}"
match "*Backend*8001*active*" "${lines[@]}"
}
@test "Pound has an HTTP listener" {
run poundctl -c /var/lib/pound/pound.cfg
match "*http Listener*" "${lines[@]}"
}
@test "Pound does not have an HTTPS listener" {
run poundctl -c /var/lib/pound/pound.cfg
! match "*HTTPS Listener*" "${lines[@]}"
}
@test "Server is listening on port 80" {
run nmap -sT -p80 localhost
match "80/tcp open http" "${lines[@]}"
}
@test "Server accepts HTTP requests" {
echo "GET / HTTP/1.1" | nc localhost 80
}
Obviously being able to write this test assumes some degree of familiarity with the system you’re going to configure. Naturally you could write much more basic tests at first and evolve more complex ones as you discover functionality you want to test.
Let’s quickly run through the test. First, we set up a function that will check for a match in the lines of an array. In the first test, we’re just checking that we see the Pound service running. This isn’t very cross-platform, as we’re relying on the format of the service command, which may be different on alternative versions or distributions, but it illustrates a simple grep. The next three tests all use the match function, and the built-in run function. Poundctl is a command-line utility that will dump out the running configuration of the service—we’re just checking against its output. The final two tests use the netcat and nmap commands to do primitive network testing. These could be much more complex if needed. The latter of the two tests simply makes use of the return code—if netcat cannot reach the machine on port 80, it will have a non-zero exit code.
These two tests illustrate a further important feature of Test Kitchen. Fairly often we find that for test purposes we would like to have some handy commands—for example netcat, lsof, or telnet. We might not normally have these in our base build, but we want them to be available for running our post–Chef-run tests. Test Kitchen allows these prerequisites to be installed after the Chef run by dropping off a file called prepare_recipe.rb, containing recipe DSL code, which is executed using a slightly modified chef-apply. In our case we would add:
$ cat test/integration/default/bats/prepare_recipe.rb
%w{ nc nmap }.each { |pkg| package pkg }
Of course, to be truly cross-platform, we’d need to take into account the different naming conventions of various Linux distributions, but the principle is clear.
Having written the tests, we now want to run them. Based on the five lifecycle phases, as described earlier, Test Kitchen provides a number of commands that control the lifecycle of a test suite. In order, they are:
kitchen create
Creates the base machine
kitchen converge
Installs and runs Chef with the run list specified in the .kitchen.yml file
kitchen setup
Instructs Busser to set up whatever is needed to run tests
kitchen verify
Runs the tests to verify that the state of the machine is as desired and/or expected
kitchen destroy
Destroys the machine entirely, leaving the host OS in a clean state
These tasks can be called individually—one at a time—but later commands in the lifecycle will attempt to call previous steps. So, running kitchen verify will create, converge, and set up a machine before verifying. The tasks take an argument of which instance to control. The commands perform a regular expression match, which makes it convenient to run actions against a specified subset of machines reported by kitchen list. With no pattern, the default is to take action against all the instances. This can be made explicit with the all keyword.
Let’s run them one at a time to see how they function:
$ kitchen create 6
-----> Starting Kitchen (v1.0.0.alpha.7)
-----> Creating <default-centos-64>
[kitchen::driver::vagrant command] BEGIN (vagrant up --no-provision)
Bringing machine 'default' up with 'virtualbox' provider...
[default] Importing base box 'opscode-centos-6.4'...
[default] Matching MAC address for NAT networking...
[default] Setting the name of the VM...
[default] Clearing any previously set forwarded ports...
[Berkshelf] Skipping Berkshelf with --no-provision
[default] Fixed port collision for 22 => 2222. Now on port 2204.
[default] Creating shared folders metadata...
[default] Clearing any previously set network interfaces...
[default] Preparing network interfaces based on configuration...
[default] Forwarding ports...
[default] -- 22 => 2204 (adapter 1)
[default] Running any VM customizations...
[default] Booting VM...
[default] Waiting for VM to boot. This can take a few minutes.
[default] VM booted and ready for use!
[default] Setting hostname...
[default] Configuring and enabling network interfaces...
[default] Mounting shared folders...
[default] -- /vagrant
[kitchen::driver::vagrant command] END (0m37.19s)
[kitchen::driver::vagrant command] BEGIN (vagrant ssh-config)
[kitchen::driver::vagrant command] END (0m1.25s)
Vagrant instance <default-centos-64> created.
Finished creating <default-centos-64> (0m39.43s).
-----> Kitchen is finished. (0m40.49s)
We now have a CentOS 6.4 machine ready for action. We can connect to the machine and look around using kitchen login:
$ kitchen login 6
Last login: Sat May 11 04:55:22 2013 from 10.0.2.2
[vagrant@default-centos-64 ~]$ uname -a
Linux default-centos-64.vagrantup.com 2.6.32-358.el6.x86_64 #1 SMP Fri Feb 22 00:31:26 UTC 2013 x86_64 x86_64 x86_64 GNU/Linux
[vagrant@default-centos-64 ~]$ exit
logout
Connection to 127.0.0.1 closed.
Now let’s converge the node:
$ kitchen converge 6
-----> Starting Kitchen (v1.0.0.alpha.7)
-----> Converging <default-centos-64>
-----> Installing Chef Omnibus (true)
--2013-06-15 02:56:11-- https://www.opscode.com/chef/install.sh
Resolving www.opscode.com... 184.106.28.83
Connecting to www.opscode.com|184.106.28.83|:443...
connected.
HTTP request sent, awaiting response... 200 OK
Length: 6510 (6.4K) [application/x-sh]
Saving to: “STDOUT”
0% [ ] 0 --.-K/s
100%[======================================>] 6,510 --.-K/s in 0s
2013-06-15 02:56:11 (1.28 GB/s) - written to stdout [6510/6510]
Downloading Chef for el...
Installing Chef
warning: /tmp/tmp.69MKcEOA/chef-.x86_64.rpm: Header V4 DSA/SHA1 Signature, key ID 83ef826a: NOKEY
Preparing... ##### ########################################### [100%]
1:chef ########################################### [100%]
Thank you for installing Chef!
[local command] BEGIN (if ! command -v berks >/dev/null; then exit 1; fi)
[local command] END (0m0.01s)
[local command] BEGIN (berks install --path /tmp/default-centos-64-cookbooks20130615-18465-o79vfq)
Using pound (0.1.0) at path: '/home/tdi/pound'
[local command] END (0m1.63s)
Uploaded pound/chefignore (985 bytes)
Uploaded pound/Berksfile.lock (179 bytes)
Uploaded pound/Vagrantfile (3259 bytes)
Uploaded pound/recipes/default.rb (226 bytes)
Uploaded pound/metadata.rb (281 bytes)
Uploaded pound/Gemfile.lock (2830 bytes)
Uploaded pound/Berksfile (24 bytes)
Uploaded pound/README.md (112 bytes)
Uploaded pound/Gemfile (136 bytes)
Uploaded pound/test/integration/default/bats/.kitchen/logs/celluloid.log (0 bytes)
Uploaded pound/test/integration/default/bats/.kitchen/logs/kitchen.log (3033 bytes)
Uploaded pound/test/integration/default/bats/pound.bats-disabled (942 bytes)
Uploaded pound/test/integration/default/bats/prepare_recipe.rb (42 bytes)
Uploaded pound/test/integration/default/bats/pound.bats (942 bytes)
Uploaded pound/test/.kitchen/logs/celluloid.log (0 bytes)
Uploaded pound/test/.kitchen/logs/kitchen.log (3735 bytes)
Uploaded pound/Thorfile (241 bytes)
Uploaded pound/LICENSE (72 bytes)
Starting Chef Client, version 11.4.4
[2013-06-15T02:56:35+00:00] INFO: *** Chef 11.4.4 ***
[2013-06-15T02:56:35+00:00] INFO: Setting the run_list to ["recipe[pound]"] from JSON
[2013-06-15T02:56:35+00:00] INFO: Run List is [recipe[pound]]
[2013-06-15T02:56:35+00:00] INFO: Run List expands to [pound]
[2013-06-15T02:56:35+00:00] INFO: Starting Chef Run for default-centos-64
[2013-06-15T02:56:35+00:00] INFO: Running start handlers
[2013-06-15T02:56:35+00:00] INFO: Start handlers complete.
Compiling Cookbooks...
Converging 0 resources
[2013-06-15T02:56:35+00:00] INFO: Chef Run complete in 0.001689128 seconds
[2013-06-15T02:56:35+00:00] INFO: Running report handlers
[2013-06-15T02:56:35+00:00] INFO: Report handlers complete
Chef Client finished, 0 resources updated
Finished converging <default-centos-64> (0m24.62s).
-----> Kitchen is finished. (0m25.69s)
Test Kitchen installs Chef, and then runs it. It also uses Berkshelf to solve any dependencies. Now let’s run the setup task:
$ kitchen setup 6
-----> Starting Kitchen (v1.0.0.alpha.7)
-----> Setting up <default-centos-64>
Fetching: thor-0.18.1.gem (100%)
Fetching: busser-0.4.1.gem (100%)
Successfully installed thor-0.18.1
Successfully installed busser-0.4.1
2 gems installed
-----> Setting up Busser
Creating BUSSER_ROOT in /opt/busser
Creating busser binstub
Plugin bats installed (version 0.1.0)
-----> Running postinstall for bats plugin
create /tmp/bats20130615-2256-hylsr3/bats
create /tmp/bats20130615-2256-hylsr3/bats.tar.gz
Installed Bats to /opt/busser/vendor/bats/bin/bats
remove /tmp/bats20130615-2256-hylsr3
Finished setting up <default-centos-64> (0m8.30s).
-----> Kitchen is finished. (0m9.37s)
We’re ready to run the tests now:
$ kitchen verify 6
-----> Starting Kitchen (v1.0.0.alpha.7)
-----> Verifying <default-centos-64>
Suite path directory /opt/busser/suites does not exist, skipping.
Uploading /opt/busser/suites/bats/prepare_recipe.rb (mode=0664)
Uploading /opt/busser/suites/bats/pound.bats (mode=0664)
Uploading /opt/busser/suites/bats/pound.bats-disabled (mode=0664)
-----> Running bats test suite
-----> Preparing bats suite with /opt/busser/suites/bats/prepare_recipe.rb
[2013-06-15T02:58:27+00:00] INFO: Run List is []
[2013-06-15T02:58:27+00:00] INFO: Run List expands to []
Recipe: (chef-apply cookbook)::(chef-apply recipe)
* package[nc] action install[2013-06-15T02:58:27+00:00] INFO: Processing package[nc] action install ((chef-apply cookbook)::(chef-apply recipe) line 1)
[2013-06-15T02:58:37+00:00] INFO: package[nc] installing nc-1.84-22.el6 from base repository
- install version 1.84-22.el6 of package nc
* package[nmap] action install[2013-06-15T02:58:40+00:00] INFO: Processing package[nmap] action install ((chef-apply cookbook)::(chef-apply recipe) line 1)
[2013-06-15T02:58:40+00:00] INFO: package[nmap] installing nmap-5.51-2.el6 from base repository
- install version 5.51-2.el6 of package nmap
1..6
not ok 1 The Pound service is running
# /opt/busser/suites/bats/pound.bats:12
not ok 2 Two Pound backends are active
# /opt/busser/suites/bats/pound.bats:17
not ok 3 Pound has an HTTP listener
# /opt/busser/suites/bats/pound.bats:7
ok 4 Pound does not have an HTTPS listener
not ok 5 Server is listening on port 80
# /opt/busser/suites/bats/pound.bats:7
not ok 6 Server accepts HTTP requests
# /opt/busser/suites/bats/pound.bats:38
Command [/opt/busser/vendor/bats/bin/bats /opt/busser/suites/bats] exit code was 1
>>>>>> Verify failed on instance <default-centos-64>.
>>>>>> Please see .kitchen/logs/default-centos-64.log for more details
>>>>>> ------Exception-------
>>>>>> Class: Kitchen::ActionFailed
>>>>>> Message: SSH exited (1) for command: [sudo -E /opt/busser/bin/busser test]
>>>>>> ----------------------
Alright! Failing tests! We see the extra tools being installed, and then the tests running and failing. Note that we could have done this in one go, by calling the kitchen verify step, rather than each individual step.
We can make these tests pass very easily. Open up the default recipe and add the following:
include_recipe 'yum::epel'
package 'Pound'
service 'pound' do
action [:enable, :start]
end
Add the dependency on the yum cookbook to the metadata and run kitchen converge. Take a deep breath, there’s a lot of output to read:
$ kitchen converge 6
-----> Starting Kitchen (v1.0.0.alpha.7)
-----> Converging <default-centos-64>
[local command] BEGIN (if ! command -v berks >/dev/null; then exit 1; fi)
[local command] END (0m0.01s)
[local command] BEGIN (berks install --path /tmp/default-centos-64-cookbooks20130615-31535-12jfpi7)
Using pound (0.1.0) at path: '/home/tdi/pound'
Using yum (2.2.2)
[local command] END (0m1.75s)
Uploaded yum/metadata.json (11004 bytes)
Uploaded yum/CONTRIBUTING.md (10811 bytes)
Uploaded yum/resources/key.rb (831 bytes)
Uploaded yum/resources/repository.rb (1585 bytes)
Uploaded yum/files/default/tests/minitest/support/helpers.rb (1280 bytes)
Uploaded yum/files/default/tests/minitest/test_test.rb (1709 bytes)
Uploaded yum/files/default/tests/minitest/default_test.rb (828 bytes)
Uploaded yum/recipes/ius.rb (1537 bytes)
Uploaded yum/recipes/remi.rb (1140 bytes)
Uploaded yum/recipes/test.rb (1150 bytes)
Uploaded yum/recipes/repoforge.rb (1716 bytes)
Uploaded yum/recipes/yum.rb (748 bytes)
Uploaded yum/recipes/elrepo.rb (1028 bytes)
Uploaded yum/recipes/default.rb (625 bytes)
Uploaded yum/recipes/epel.rb (1181 bytes)
Uploaded yum/metadata.rb (1492 bytes)
Uploaded yum/Berksfile (81 bytes)
Uploaded yum/providers/key.rb (2242 bytes)
Uploaded yum/providers/repository.rb (4235 bytes)
Uploaded yum/templates/default/yum-rhel6.conf.erb (1367 bytes)
Uploaded yum/templates/default/yum-rhel5.conf.erb (900 bytes)
Uploaded yum/templates/default/repo.erb (803 bytes)
Uploaded yum/README.md (8405 bytes)
Uploaded yum/CHANGELOG.md (2797 bytes)
Uploaded yum/attributes/remi.rb (1146 bytes)
Uploaded yum/attributes/elrepo.rb (970 bytes)
Uploaded yum/attributes/default.rb (1076 bytes)
Uploaded yum/attributes/epel.rb (1448 bytes)
Uploaded yum/LICENSE (10850 bytes)
Uploaded pound/chefignore (985 bytes)
Uploaded pound/Berksfile.lock (179 bytes)
Uploaded pound/Vagrantfile (3259 bytes)
Uploaded pound/recipes/default.rb (223 bytes)
Uploaded pound/metadata.rb (280 bytes)
Uploaded pound/Gemfile.lock (2830 bytes)
Uploaded pound/Berksfile (24 bytes)
Uploaded pound/README.md (112 bytes)
Uploaded pound/Gemfile (136 bytes)
Uploaded pound/test/integration/default/bats/.kitchen/logs/celluloid.log (0 bytes)
Uploaded pound/test/integration/default/bats/.kitchen/logs/kitchen.log (3033 bytes)
Uploaded pound/test/integration/default/bats/pound.bats-disabled (942 bytes)
Uploaded pound/test/integration/default/bats/prepare_recipe.rb (42 bytes)
Uploaded pound/test/integration/default/bats/pound.bats (942 bytes)
Uploaded pound/test/.kitchen/logs/celluloid.log (0 bytes)
Uploaded pound/test/.kitchen/logs/kitchen.log (3735 bytes)
Uploaded pound/Thorfile (241 bytes)
Uploaded pound/LICENSE (72 bytes)
Starting Chef Client, version 11.4.4
[2013-06-15T05:43:35+00:00] INFO: *** Chef 11.4.4 ***
[2013-06-15T05:43:36+00:00] INFO: Setting the run_list to ["recipe[pound]"] from JSON
[2013-06-15T05:43:36+00:00] INFO: Run List is [recipe[pound]]
[2013-06-15T05:43:36+00:00] INFO: Run List expands to [pound]
[2013-06-15T05:43:36+00:00] INFO: Starting Chef Run for default-centos-64
[2013-06-15T05:43:36+00:00] INFO: Running start handlers
[2013-06-15T05:43:36+00:00] INFO: Start handlers complete.
Compiling Cookbooks...
Converging 4 resources
Recipe: yum::epel
* yum_key[RPM-GPG-KEY-EPEL-6] action add[2013-06-15T05:43:36+00:00] INFO: Processing yum_key[RPM-GPG-KEY-EPEL-6] action add (yum::epel line 22)
[2013-06-15T05:43:36+00:00] INFO: Adding RPM-GPG-KEY-EPEL-6 GPG key to /etc/pki/rpm-gpg/
(up to date)
Recipe: <Dynamically Defined Resource>
* package[gnupg2] action install[2013-06-15T05:43:36+00:00] INFO: Processing package[gnupg2] action install (/tmp/kitchen-chef-solo/cookbooks/yum/providers/key.rb line 32)
(up to date)
* execute[import-rpm-gpg-key-RPM-GPG-KEY-EPEL-6] action nothing[2013-06-15T05:43:37+00:00] INFO: Processing execute[import-rpm-gpg-key-RPM-GPG-KEY-EPEL-6] action nothing (/tmp/kitchen-chef-solo/cookbooks/yum/providers/key.rb line 35)
(skipped due to not_if)
* remote_file[/etc/pki/rpm-gpg/RPM-GPG-KEY-EPEL-6] action create
[2013-06-15T05:43:37+00:00] INFO: Processing remote_file[/etc/pki/rpm-gpg/RPM-GPG-KEY-EPEL-6] action create (/tmp/kitchen-chef-solo/cookbooks/yum/providers/key.rb line 61)
[2013-06-15T05:43:38+00:00] INFO: remote_file[/etc/pki/rpm-gpg/RPM-GPG-KEY-EPEL-6] updated
- copy file downloaded from [] into /etc/pki/rpm-gpg/RPM-GPG-KEY-EPEL-6
--- /tmp/chef-tempfile20130615-578-gjrfug 2013-06-15 05:43:38.676574342 +0000
+++ /tmp/chef-rest20130615-578-1bv08zs 2013-06-15 05:43:38.676574339 +0000
@@ -0,0 +1,29 @@
+-----BEGIN PGP PUBLIC KEY BLOCK-----
+Version: GnuPG v1.4.5 (GNU/Linux)
+
+mQINBEvSKUIBEADLGnUj24ZVKW7liFN/JA5CgtzlNnKs7sBg7fVbNWryiE3URbn1
+JXvrdwHtkKyY96/ifZ1Ld3lE2gOF61bGZ2CWwJNee76Sp9Z+isP8RQXbG5jwj/4B
+M9HK7phktqFVJ8VbY2jfTjcfxRvGM8YBwXF8hx0CDZURAjvf1xRSQJ7iAo58qcHn
+XtxOAvQmAbR9z6Q/h/D+Y/PhoIJp1OV4VNHCbCs9M7HUVBpgC53PDcTUQuwcgeY6
+pQgo9eT1eLNSZVrJ5Bctivl1UcD6P6CIGkkeT2gNhqindRPngUXGXW7Qzoefe+fV
+QqJSm7Tq2q9oqVZ46J964waCRItRySpuW5dxZO34WM6wsw2BP2MlACbH4l3luqtp
+Xo3Bvfnk+HAFH3HcMuwdaulxv7zYKXCfNoSfgrpEfo2Ex4Im/I3WdtwME/Gbnwdq
+3VJzgAxLVFhczDHwNkjmIdPAlNJ9/ixRjip4dgZtW8VcBCrNoL+LhDrIfjvnLdRu
+vBHy9P3sCF7FZycaHlMWP6RiLtHnEMGcbZ8QpQHi2dReU1wyr9QgguGU+jqSXYar
+1yEcsdRGasppNIZ8+Qawbm/a4doT10TEtPArhSoHlwbvqTDYjtfV92lC/2iwgO6g
+YgG9XrO4V8dV39Ffm7oLFfvTbg5mv4Q/E6AWo/gkjmtxkculbyAvjFtYAQARAQAB
+tCFFUEVMICg2KSA8ZXBlbEBmZWRvcmFwcm9qZWN0Lm9yZz6JAjYEEwECACAFAkvS
+KUICGw8GCwkIBwMCBBUCCAMEFgIDAQIeAQIXgAAKCRA7Sd8qBgi4lR/GD/wLGPv9
+qO39eyb9NlrwfKdUEo1tHxKdrhNz+XYrO4yVDTBZRPSuvL2yaoeSIhQOKhNPfEgT
+9mdsbsgcfmoHxmGVcn+lbheWsSvcgrXuz0gLt8TGGKGGROAoLXpuUsb1HNtKEOwP
+Q4z1uQ2nOz5hLRyDOV0I2LwYV8BjGIjBKUMFEUxFTsL7XOZkrAg/WbTH2PW3hrfS
+WtcRA7EYonI3B80d39ffws7SmyKbS5PmZjqOPuTvV2F0tMhKIhncBwoojWZPExft
+HpKhzKVh8fdDO/3P1y1Fk3Cin8UbCO9MWMFNR27fVzCANlEPljsHA+3Ez4F7uboF
+p0OOEov4Yyi4BEbgqZnthTG4ub9nyiupIZ3ckPHr3nVcDUGcL6lQD/nkmNVIeLYP
+x1uHPOSlWfuojAYgzRH6LL7Idg4FHHBA0to7FW8dQXFIOyNiJFAOT2j8P5+tVdq8
+wB0PDSH8yRpn4HdJ9RYquau4OkjluxOWf0uRaS//SUcCZh+1/KBEOmcvBHYRZA5J
+l/nakCgxGb2paQOzqqpOcHKvlyLuzO5uybMXaipLExTGJXBlXrbbASfXa/yGYSAG
+iVrGz9CE6676dMlm8F+s3XXE13QZrXmjloc6jwOljnfAkjTGXjiB7OULESed96MR
+XtfLk0W5Ab9pd7tKDR6QHI7rgHXfCopRnZ2VVQ==
+=V/6I
+-----END PGP PUBLIC KEY BLOCK-----[2013-06-15T05:43:38+00:00] INFO: remote_file[/etc/pki/rpm-gpg/RPM-GPG-KEY-EPEL-6] mode changed to 644
- change mode from '' to '0644'
[2013-06-15T05:43:38+00:00] INFO: remote_file[/etc/pki/rpm-gpg/RPM-GPG-KEY-EPEL-6] sending run action to execute[import-rpm-gpg-key-RPM-GPG-KEY-EPEL-6] (immediate)
* execute[import-rpm-gpg-key-RPM-GPG-KEY-EPEL-6] action run[2013-06-15T05:43:38+00:00] INFO: Processing execute[import-rpm-gpg-key-RPM-GPG-KEY-EPEL-6] action run (/tmp/kitchen-chef-solo/cookbooks/yum/providers/key.rb line 35)
[2013-06-15T05:43:38+00:00] INFO: execute[import-rpm-gpg-key-RPM-GPG-KEY-EPEL-6] ran successfully
- execute rpm --import /etc/pki/rpm-gpg/RPM-GPG-KEY-EPEL-6
Recipe: yum::epel
* yum_repository[epel] action create[2013-06-15T05:43:38+00:00] INFO: Processing yum_repository[epel] action create (yum::epel line 27)
[2013-06-15T05:43:38+00:00] INFO: Adding and updating epel repository in /etc/yum.repos.d/epel.repo
[2013-06-15T05:43:38+00:00] WARN: Cloning resource attributes for yum_key[RPM-GPG-KEY-EPEL-6] from prior resource (CHEF-3694)
[2013-06-15T05:43:38+00:00] WARN: Previous yum_key[RPM-GPG-KEY-EPEL-6]: /tmp/kitchen-chef-solo/cookbooks/yum/recipes/epel.rb:22:in `from_file'
[2013-06-15T05:43:38+00:00] WARN: Current yum_key[RPM-GPG-KEY-EPEL-6]: /tmp/kitchen-chef-solo/cookbooks/yum/providers/repository.rb:85:in `repo_config'
(up to date)
Recipe: <Dynamically Defined Resource>
* yum_key[RPM-GPG-KEY-EPEL-6] action add[2013-06-15T05:43:38+00:00] INFO: Processing yum_key[RPM-GPG-KEY-EPEL-6] action add (/tmp/kitchen-chef-solo/cookbooks/yum/providers/repository.rb line 85)
(up to date)
* execute[yum-makecache] action nothing[2013-06-15T05:43:38+00:00] INFO: Processing execute[yum-makecache] action nothing (/tmp/kitchen-chef-solo/cookbooks/yum/providers/repository.rb line 88)
(up to date)
* ruby_block[reload-internal-yum-cache] action nothing[2013-06-15T05:43:38+00:00] INFO: Processing ruby_block[reload-internal-yum-cache] action nothing (/tmp/kitchen-chef-solo/cookbooks/yum/providers/repository.rb line 93)
(up to date)
* template[/etc/yum.repos.d/epel.repo] action create
[2013-06-15T05:43:38+00:00] INFO: Processing template[/etc/yum.repos.d/epel.repo] action create (/tmp/kitchen-chef-solo/cookbooks/yum/providers/repository.rb line 100)
[2013-06-15T05:43:38+00:00] INFO: template[/etc/yum.repos.d/epel.repo] updated content
[2013-06-15T05:43:38+00:00] INFO: template[/etc/yum.repos.d/epel.repo] mode changed to 644
- create template[/etc/yum.repos.d/epel.repo]
--- /tmp/chef-tempfile20130615-578-1rq8217 2013-06-15 05:43:38.819576393 +0000
+++ /tmp/chef-rendered-template20130615-578-z3junu 2013-06-15 05:43:38.819576393 +0000
@@ -0,0 +1,8 @@
+# Generated by Chef for default-centos-64.vagrantup.com
+# Local modifications will be overwritten.
+[epel]
+name=Extra Packages for Enterprise Linux
+mirrorlist=http://mirrors.fedoraproject.org/mirrorlist?repo=epel-6&arch=$basearch
+gpgcheck=1
+gpgkey=file:///etc/pki/rpm-gpg/RPM-GPG-KEY-EPEL-6
+enabled=1
[2013-06-15T05:43:38+00:00] INFO: template[/etc/yum.repos.d/epel.repo] sending run action to execute[yum-makecache] (immediate)
* execute[yum-makecache] action run[2013-06-15T05:43:38+00:00] INFO: Processing execute[yum-makecache] action run (/tmp/kitchen-chef-solo/cookbooks/yum/providers/repository.rb line 88)
[2013-06-15T05:43:57+00:00] INFO: execute[yum-makecache] ran successfully
- execute yum -q makecache
[2013-06-15T05:43:57+00:00] INFO: template[/etc/yum.repos.d/epel.repo] sending create action to ruby_block[reload-internal-yum-cache] (immediate)
* ruby_block[reload-internal-yum-cache] action create[2013-06-15T05:43:57+00:00] INFO: Processing ruby_block[reload-internal-yum-cache] action create (/tmp/kitchen-chef-solo/cookbooks/yum/providers/repository.rb line 93)
[2013-06-15T05:43:57+00:00] INFO: ruby_block[reload-internal-yum-cache] called
- execute the ruby block reload-internal-yum-cache
Recipe: pound::default
* package[Pound] action install[2013-06-15T05:43:57+00:00] INFO: Processing package[Pound] action install (pound::default line 11)
[2013-06-15T05:44:00+00:00] INFO: package[Pound] installing Pound-2.6-2.el6 from epel repository
- install version 2.6-2.el6 of package Pound
* service[pound] action enable[2013-06-15T05:44:03+00:00] INFO: Processing service[pound] action enable (pound::default line 13)
[2013-06-15T05:44:03+00:00] INFO: service[pound] enabled
- enable service service[pound]
* service[pound] action start[2013-06-15T05:44:03+00:00] INFO: Processing service[pound] action start (pound::default line 13)
[2013-06-15T05:44:03+00:00] INFO: service[pound] started
- start service service[pound]
[2013-06-15T05:44:03+00:00] INFO: Chef Run complete in 27.503439435 seconds
[2013-06-15T05:44:03+00:00] INFO: Running report handlers
[2013-06-15T05:44:03+00:00] INFO: Report handlers complete
Chef Client finished, 8 resources updated
Finished converging <default-centos-64> (0m32.78s).
-----> Kitchen is finished. (0m33.85s)
Test Kitchen passed off the dependency to Berkshelf, the node was converged, the EPEL repo was installed, then Pound was installed, and the service was started. In 30 seconds. Now let’s look at the tests:
$ kitchen verify 6
-----> Starting Kitchen (v1.0.0.alpha.7)
-----> Verifying <default-centos-64>
Removing /opt/busser/suites/bats
Uploading /opt/busser/suites/bats/prepare_recipe.rb (mode=0664)
Uploading /opt/busser/suites/bats/pound.bats (mode=0664)
Uploading /opt/busser/suites/bats/pound.bats-disabled (mode=0664)
-----> Running bats test suite
-----> Preparing bats suite with /opt/busser/suites/bats/prepare_recipe.rb
[2013-06-15T05:48:23+00:00] INFO: Run List is []
[2013-06-15T05:48:23+00:00] INFO: Run List expands to []
Recipe: (chef-apply cookbook)::(chef-apply recipe)
* package[nc] action install[2013-06-15T05:48:23+00:00] INFO: Processing package[nc] action install ((chef-apply cookbook)::(chef-apply recipe) line 1)
(up to date)
* package[nmap] action install[2013-06-15T05:48:26+00:00] INFO: Processing package[nmap] action install ((chef-apply cookbook)::(chef-apply recipe) line 1)
(up to date)
1..6
ok 1 The Pound service is running
ok 2 Two Pound backends are active
ok 3 Pound has an HTTP listener
not ok 4 Pound does not have an HTTPS listener
# /opt/busser/suites/bats/pound.bats:5
ok 5 Server is listening on port 80
ok 6 Server accepts HTTP requests
Command [/opt/busser/vendor/bats/bin/bats /opt/busser/suites/bats] exit code was 1
>>>>>> Verify failed on instance <default-centos-64>.
>>>>>> Please see .kitchen/logs/default-centos-64.log for more details
>>>>>> ------Exception-------
>>>>>> Class: Kitchen::ActionFailed
>>>>>> Message: SSH exited (1) for command: [sudo -E /opt/busser/bin/busser test]
>>>>>> ----------------------
Five out of six tests pass. However, we do have an HTTPS listener. We’ll need to disable that in the configuration. This allows us to introduce another feature of the Chef DSL: templates.
Templates
Templates are much like the parlor game “Consequences,” one version of which has the following rules: The object is to construct an amusingly random narrative based around a chance encounter between two people. Three or more players get together. Each player takes a sheet of blank paper and writes one section of the narrative. The paper is then folded and passed on. Here are the sections:
1. A description beginning with the word the (e.g., The beautiful, The very talkative)
2. A man’s name
3. A second description, as above
4. A woman’s name
5. Where they met
6. What he gave her
7. What she said
8. What he did
9. What the consequence was
10.What the world said about it
After all the sections have been completed, each part of the narrative is read aloud, inserting the words “met,” “at,” and so on, where appropriate. Much hilarity ensues.
We all understand these instructions; we interpret the sections and replace each one with appropriate words. What we’re doing is following a template. Ruby (and indeed Chef) has this concept. Let’s illustrate this with the same game. A template that matches these instructions might look like the following:
The <%= @description_one.downcase %> <%= @man %> met the <%= @description_two.downcase %> <%= @woman %> at <%= @location %>.
He gave her <%= @gift.downcase %>, and she said "<%= @woman_saying %>". He did <%= @man_action.downcase %>.
The consequence was <%= @consequence %>, and the world said "<%= @world_saying %>"
This is an Embedded Ruby, or ERB, template. This allows Ruby code to be embedded within a pair of <% and %> delimiters. These embedded code blocks are then evaluated in place (they are replaced by the result of their evaluation). In this example, we’re using expression result substitution, which is denoted by <%= %> delimiters. The result of the Ruby expression is printed. The @something variables are instance variables, which you’ll remember are variables that describe the attributes of an instance of a class, in object-oriented programming. They’re always preceded with the @ sign—you can remember them by the connection between the @ symbol, and the attributes they describe. In this case we’re seeing the attributes of an ERB template. These variables are said to be passed into the template—in this case as strings, which is why in places we can call theString#downcase method.
I wrote this silly example to introduce ERB templates:
require 'ztk'
male_descriptions = [
"dashingly handsome",
"tanned, muscular",
"shockingly rude",
"diffident, bespectacled"
]
men = [
"Karl Barth",
"Nelson Mandela",
"Tigran Petrosian",
"Ian Botham"
]
female_descriptions = [
"doughty, tweedy",
"ravishing",
"brilliantly intelligent",
"austere, high-minded"
]
women = [
"Zola Budd",
"Margaret Thatcher",
"Audrey Hepburn",
"Marie Antoinette"
]
locations = [
"the pub",
"freshers' fair",
"Chefconf",
"the opera"
]
gifts = [
"jam trousers",
"chocolate cake",
"fish knives",
"a blank cheque"
]
woman_sayings = [
"I have a dream!",
"The future is much like the present, only longer",
"The wisest men follow their own direction",
"I despise the pleasure of pleasing people that I despise"
]
man_actions = [
"Danced a jig",
"joined a Buddhist monastery",
"fell dead on the spot",
"sold all his possessions"
]
consequences = [
"world peace",
"global warming",
"a sharp rise in interest rates",
"entirely unremarkable"
]
world_sayings = [
"I don't suffer from insanity. I enjoy every minute of it.",
"I'll be the in to your sane.",
"Use it or lose it is a cliche because it's true.",
"That which does not kill us makes us stronger."
]
output = ZTK::Template.render( "consequences.erb",
{
:description_one => male_descriptions.sample,
:man => men.sample,
:description_two => female_descriptions.sample,
:woman => women.sample,
:location => locations.sample,
:gift => gifts.sample,
:woman_saying => woman_sayings.sample,
:man_action => actions.sample,
:consequence => consequences.sample,
:world_saying => world_sayings.sample
}
)
puts output
All this does is feed random strings into the template and print the output. It uses the handy ZTK template class from Zachary Patten, co-author of Cucumber-Chef. Let’s give it a few spins:
> ruby consequences.rb
The dashingly handsome Karl Barth met the austere, high-minded Audrey Hepburn at Chefconf.
He gave her jam trousers, and she said "The wisest men follow their own direction". He fell dead on the spot.
The consequence was entirely unremarkable, and the world said "Use it or lose it is a cliche because it's true."
> ruby consequences.rb
The diffident, bespectacled Nelson Mandela met the brilliantly intelligent Margaret Thatcher at the pub.
He gave her fish knives, and she said "The wisest men follow their own direction". He joined a Buddhist monastery.
The consequence was entirely unremarkable, and the world said "I don't suffer from insanity. I enjoy every minute of it."
> ruby consequences.rb
The shockingly rude Tigran Petrosian met the doughty, tweedy Audrey Hepburn at freshers' fair.
He gave her a blank cheque, and she said "The future is much like the present, only longer". He sold all his possessions.
The consequence was global warming, and the world said "That which does not kill us makes us stronger."
The Chef template resource behaves very similarly. We can pass in variables that are rendered as instance variables in the template, or we can use attributes on the node, directly within <%= %> tags.
Copy the config file from the machine under test into templates/default/pound.cfg.erb/.
User "pound"
Group "pound"
Control "/var/lib/pound/pound.cfg"
ListenHTTP
Address 0.0.0.0
Port 80
End
ListenHTTPS
Address 0.0.0.0
Port 443
Cert "/etc/pki/tls/certs/pound.pem"
End
Service
BackEnd
Address 127.0.0.1
Port 8000
End
BackEnd
Address 127.0.0.1
Port 8001
End
End
We need to disable the HTTPS functionality. We could simply delete it and serve the configuration file as a static asset. However, as a cookbook maintainer, it’s usually wise to provide attributes to make the cookbook flexible and easy to configure. Looking at this file, I can see a number of candidates for abstraction into attributes—the user and group, the ports, whether or not to even run SSL, where the SSL certificate is found, the control file, and even the address of the backends. All these are data that we would like to be able to control. Let’s leave the backend config for now, but configure the rest. Create a default attributes file in the cookbook:
default['pound']['user'] = 'pound'
default['pound']['group'] = 'pound'
default['pound']['port'] = '80'
default['pound']['control'] = '/var/lib/pound/pound.cfg'
default['pound']['ssl']['enabled'] = false
default['pound']['ssl']['cert'] = '/etc/pki/tls/certs/pound.pem'
default['pound']['ssl']['port'] = '443'
Now we need to get these values into the template:
User "<%= node['pound']['user'] %>"
Group "<%= node['pound']['group'] %>"
Control "<%= node['pound']['control'] %>"
ListenHTTP
Address 0.0.0.0
Port <%= node['pound']['port'] %>
End
<% if node['pound']['ssl']['enabled'] -%>
ListenHTTPS
Address 0.0.0.0
Port <%= node['pound']['ssl']['port'] %>
Cert "<%= node['pound']['ssl']['cert'] %>"
End
<% end -%>
Service
BackEnd
Address 127.0.0.1
Port 8000
End
BackEnd
Address 127.0.0.1
Port 8001
End
End
Finally we need to render the config file in the recipe by adding the following resource:
template '/etc/pound.cfg' do
source 'pound.cfg.erb'
end
Now let’s converge the node and run the tests again. If you look carefully at the output you should see:
[2013-06-15T06:18:54+00:00] INFO: template[/etc/pound.cfg] backed up to /var/chef/backup/etc/pound.cfg.chef-20130615061854
[2013-06-15T06:18:54+00:00] INFO: template[/etc/pound.cfg] updated content
- update template[/etc/pound.cfg] from bc2726 to d81205
--- /etc/pound.cfg 2013-06-15 06:17:31.154571676 +0000
+++ /tmp/chef-rendered-template20130615-3712-1nfupzj 2013-06-15 06:18:54.694571487 +0000
@@ -16,11 +16,6 @@
Port 80
End
-ListenHTTPS
- Address 0.0.0.0
- Port 443
- Cert "/etc/pki/tls/certs/pound.pem"
-End
Service
BackEnd
So Chef has removed the HTTPS block. Now the tests should pass:
1..6
ok 1 The Pound service is running
ok 2 Two Pound backends are active
ok 3 Pound has an HTTP listener
not ok 4 Pound does not have an HTTPS listener
# /opt/busser/suites/bats/pound.bats:5
ok 5 Server is listening on port 80
ok 6 Server accepts HTTP requests
What? What happened? We just saw the file change! Why didn’t the test pass? Well, what would you do as a sysadmin, after making a change to the configuration? You’d restart the service! We didn’t ask Chef to do that, so it didn’t. This allows us to introduce the idea of notifications. We want to restart the service if the config file changes. All resources can send and receive messages using the notifies metaparameter. Update the template resource as follows:
template '/etc/pound.cfg' do
source 'pound.cfg.erb'
notifies :restart, 'service[pound]'
end
Converge the node again, and see what happens:
* template[/etc/pound.cfg] action create[2013-06-15T06:24:17+00:00] INFO: Processing template[/etc/pound.cfg] action create (pound::default line 17)
(up to date)
[2013-06-15T06:24:17+00:00] INFO: Chef Run complete in 5.792886113 seconds
[2013-06-15T06:24:17+00:00] INFO: Running report handlers
[2013-06-15T06:24:17+00:00] INFO: Report handlers complete
Chef Client finished, 0 resources updated
Finished converging <default-centos-64> (0m11.22s).
Curiouser and curiouser. Why didn’t the service get restarted? This is a common gotcha in Chef and requires careful attention. The config file didn’t change so we didn’t trigger a restart. Conceivably our system could now be in a broken state and not recoverable without either manually logging onto the machine and removing the file, so Chef can replace it, or by making a change in the template. The lesson to learn is to make sure you pay careful attention to your resources and messages.
I logged on with kitchen login and deleted the file, before finally converging the node again. This time we see the following message:
[2013-06-15T06:29:56+00:00] INFO: template[/etc/pound.cfg] sending restart action to service[pound] (delayed)
* service[pound] action restart[2013-06-15T06:29:56+00:00] INFO: Processing service[pound] action restart (pound::default line 13)
[2013-06-15T06:29:57+00:00] INFO: service[pound] restarted
- restart service service[pound]
And now all our tests pass!
1..6
ok 1 The Pound service is running
ok 2 Two Pound backends are active
ok 3 Pound has an HTTP listener
ok 4 Pound does not have an HTTPS listener
ok 5 Server is listening on port 80
ok 6 Server accepts HTTP requests
A brief discussion on services and templates is needed at this stage. This basic pattern—install a package, render a dynamic config file using a template, and manage a service—is what I call the holy trinity of configuration management. About 80% of the configuration management you’ll need to do will be a variation on this theme.
Installing the package is the obvious part of the trinity—we want to provide some kind of functionality and that requires us to install some software. Software is frequently distributed in packages, and Chef knows how to install them. Nothing much to say here.
Templates represent the most obviously flexible way to manage files on a node. Because we can pass in data either from an external place or insert values from the node attributes, it’s the perfect way to separate configuration from data. When combined with Chef’s ability to search for data, it opens up effectively limitless opportunity for dynamic configuration. The most obvious example would be the case where the backends for a load balancer could be determined in real time by searching for all machines with an application server recipe or role, and returning the IP address.
When a template changes, we want to be able to restart the service it configures. In order to do that we need to explicitly declare the service, but then having declared it, we can send it a message in the event of a change to the template. This is what’s going on in the preceding template resource:
notifies :restart, 'service[pound]'
We do that using the notifies metaparameter. It’s called a “metaparameter” because all services can send (and receive) notifications. The syntax is as follows:
resource "name" do
...
notifies :restart, "resource[something]"
end
In our case we used:
template '/etc/pound.cfg' do
source 'pound.cfg.erb'
notifies :restart, 'service[pound]'
end
The ordering sounds a bit funny—you don’t notify a restart. I find it helps to think of the resource doing the notifying as a rather keen but desperately unreliable child to whom you have entrusted a message:
"Wilfrid, please will you tell Atty to feed her Guinea Pigs?"
"OK! .... <scurries off>"
"Wait a second Wilfrid... tell me the message..."
"Feed the Guinea Pigs!"
"And who are you going to tell?"
"Atty."
"Jolly good."
Similarly, we say, “What’s the message? And what resource is getting the message?”
Before we move on, I want to demonstrate the same procedure using Serverspec instead of Bats. First, destroy your instance using kitchen destroy, and then comment out the default recipe so no action is taken.
Now, rename the Bats file to pound.bats-disabled. We do this because the tests run in alphabetical order, and will stop as soon as a failure is reached. This means we’d never see our Serverspec tests!
Create a directory for the Serverspec tests, and add the following file:
$ cat test/integration/default/serverspec/spec_helper.rb
require 'serverspec'
require 'pathname'
include Serverspec::Helper::Exec
include Serverspec::Helper::DetectOS
RSpec.configure do |c|
c.before :all do
c.os = backend(Serverspec::Commands::Base).check_os
end
end
This file is needed to ensure the helpers and operating system detection is in place. Now create a subdirectory inside Serverspec, called localhost, and add the following test:
$ cat test/integration/default/serverspec/localhost/pound_spec.rb
require 'spec_helper'
describe 'Pound Loadbalancer' do
it 'should be listening on port 80' do
expect(port 80).to be_listening
end
it 'should be running the pound service' do
expect(service 'pound').to be_running
end
it 'should have two active backends' do
expect(command 'poundctl -c /var/lib/pound/pound.cfg').to return_stdout /.*Backend.*800[01].*active/
end
it 'should have an HTTP listener' do
expect(command 'poundctl -c /var/lib/pound/pound.cfg').to return_stdout /.*http Listener.*/
end
it 'should not have an HTTPS listener' do
expect(command 'poundctl -c /var/lib/pound/pound.cfg').not_to return_stdout /.*HTTPS Listener.*/
end
it 'should accept HTTP connections on port 80' do
expect(command "echo 'GET / HTTP/1.1' | nc localhost 80").to return_stdout /Content-Length:.*/
end
end
We’re testing more or less the same thing, but with a different testing framework. This time we can run kitchen verify in one go, which will create the machine, install Chef, run Chef, and run the tests:
-----> Running serverspec test suite
/opt/chef/embedded/bin/ruby -I/opt/busser/suites/serverspec -S /opt/chef/embedded/bin/rspec /opt/busser/suites/serverspec/localhost/pound_spec.rb
FFFF. F
Failures:
1) Pound Loadbalancer should be listening on port 80
Failure/Error: expect(port 80).to be_listening
netstat -tunl | grep -- :80\
# /opt/busser/suites/serverspec/localhost/pound_spec.rb:6:in `block (2 levels) in <top (required)>'
2) Pound Loadbalancer should be running the pound service
Failure/Error: expect(service 'pound').to be_running
service pound status
pound: unrecognized service
# /opt/busser/suites/serverspec/localhost/pound_spec.rb:10:in `block (2 levels) in <top (required)>'
3) Pound Loadbalancer should have two active backends
Failure/Error: expect(command 'poundctl -c /var/lib/pound/pound.cfg').to return_stdout /.*Backend.*800[01].*active/
poundctl -c /var/lib/pound/pound.cfg
sh: poundctl: command not found
# /opt/busser/suites/serverspec/localhost/pound_spec.rb:14:in `block (2 levels) in <top (required)>'
4) Pound Loadbalancer should have an HTTP listener
Failure/Error: expect(command 'poundctl -c /var/lib/pound/pound.cfg').to return_stdout /.*http Listener.*/
poundctl -c /var/lib/pound/pound.cfg
sh: poundctl: command not found
# /opt/busser/suites/serverspec/localhost/pound_spec.rb:18:in `block (2 levels) in <top (required)>'
5) Pound Loadbalancer should accept HTTP connections on port 80
Failure/Error: expect(command "echo 'GET / HTTP/1.1' | nc localhost 80").to return_stdout /Content-Length:.*/
echo 'GET / HTTP/1.1' | nc localhost 80
# /opt/busser/suites/serverspec/localhost/pound_spec.rb:26:in `block (2 levels) in <top (required)>'
Finished in 0.05315 seconds
6 examples, 5 failures
The output of the failures is much more verbose, but very much as expected. Now uncomment the recipe, converge the node, and run the tests again:
-----> Running serverspec test suite
/opt/chef/embedded/bin/ruby -I/opt/busser/suites/serverspec -S /opt/chef/embedded/bin/rspec /opt/busser/suites/serverspec/localhost/pound_spec.rb
..... .
Finished in 0.11034 seconds
6 examples, 0 failures
Finished verifying <default-centos-64> (0m12.07s).
We already covered the basics of RSpec in Chapter 5. All Serverspec adds is a set of matchers that check the state of various common resources across a range of operating systems. The resources are documented at Serverspec’s website, although the example code given uses the deprecated expectation syntax. My examples use the recommended and current approach, and I recommend you follow this format.
Integration Testing: Minitest Handler
One of the early approaches to integration testing with Chef is Minitest Handler. Considered by some to be no longer as relevant, given the advent of the latest breed of tools, it is nevertheless a popular and useful tool.
Overview
We can view unit tests as being simple, discrete, isolated tests, exercising one piece of functionality, and integration tests as tests that exercise examples of those units of functionality talking to one another. We described this in Chef terms, as signal in and signal out.
Minitest Handler allows Minitest suites to be run after recipes have been applied to a node to verify the status of the system. In this respect, it’s a good approach to testing signal out.
Unlike most of the other tools we discuss in this chapter, the process of writing and running tests via Minitest Handler is managed through a combination of a cookbook and a Chef run itself.
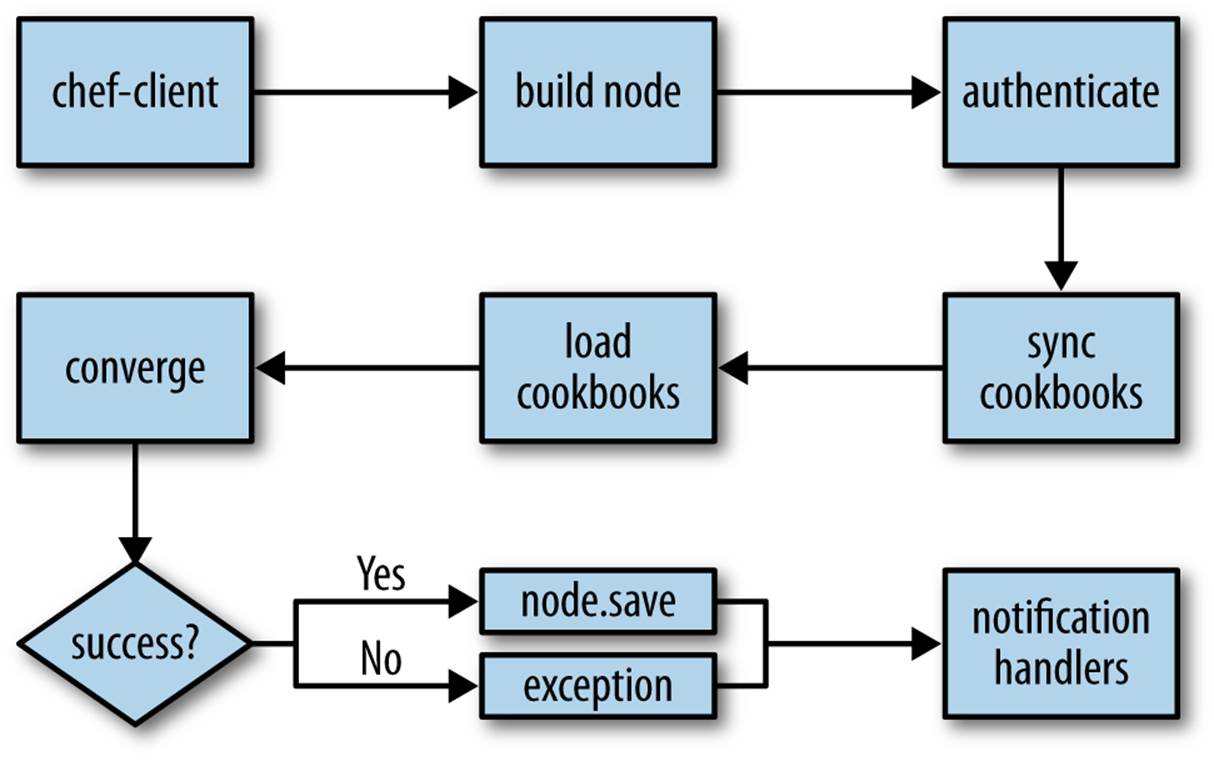
When Chef runs, and configures a node, the last stage of the process is to run so-called report and exception handlers. In simple terms, these provide an interface through which we can collect and display information about the result of a Chef run. The report handler displays information about what happened; the exception handler displays information about what went wrong. The design of the system is such that anyone can write a custom handler that takes data from the Chef run and formats it, sends it, processes it, or displays it in whichever way suits the user.
While these are frequently used to provide notification, for example via IRC or Campfire, they can, of course, be used to do anything at all. Minitest Handler uses this feature to run Minitest suites at the end of the Chef run. This is achieved by adding an entry to the run list to ensure the tests run.
The Minitest Handler cookbook sets up everything needed to use it for the running of tests. The naming is slightly confusing, so I’ll clarify quickly:
§ Minitest Handler is a cookbook that sets up your system to enable you to write Minitest examples to verify the state of your system after your Chef node has converged.
§ Minitest Chef Handler is a Rubygem that provides the handler itself, and library code for assertions, matchers, and helpers to make the writing and running of these tests possible.
The cookbook carries out the following tasks:
§ Installs the latest Minitest gem
§ Installs the Chef Minitest gem
§ Places test files from cookbooks on the target node as part of a Chef run
For each recipe we wish to test, we must create a corresponding test under the files/default/tests/minitest directory. The naming of the test is significant and follows the name of the recipe. So, if we had a recipe called server.rb, the test file would be located atfiles/default/tests/minitest/server_test.rb.
These tests are just the same as the Minitest spec examples we wrote when we were developing the Hipster assessor. The only difference is that instead of testing an instance of a Ruby class we wrote, we’re testing the results of a Chef run.
Running the tests is simply a matter of running Chef and looking at the output printed to the screen. In this respect, Minitest Handler is one of the simplest tools to start using.
Getting Started
Berkshelf has a command-line option that will add Minitest Handler support to a cookbook it creates. This is the best way to get started. Let’s create a cookbook to install GNU Screen—a common screen multiplexer:
$ berks cookbook --chef-minitest screen
create screen/files/default
create screen/templates/default
create screen/attributes
create screen/definitions
create screen/libraries
create screen/providers
create screen/recipes
create screen/resources
create screen/recipes/default.rb
create screen/metadata.rb
create screen/LICENSE
create screen/README.md
create screen/Berksfile
create screen/Thorfile
create screen/chefignore
create screen/.gitignore
run git init from "./screen"
create screen/files/default/tests/minitest/support
create screen/files/default/tests/minitest/default_test.rb
create screen/files/default/tests/minitest/support/helpers.rb
create screen/Gemfile
create .kitchen.yml
append Thorfile
create test/integration/default
append .gitignore
append .gitignore
append Gemfile
append Gemfile
You must run `bundle install' to fetch any new gems.
create screen/Vagrantfile
The key sections here are as follows:
create screen/files/default/tests/minitest/support
create screen/files/default/tests/minitest/default_test.rb
create screen/files/default/tests/minitest/support/helpers.rb
This sets up an example test and a helper file, which includes the Chef-Minitest code, and provides a convenient place for us to put any of our own functions to support our tests. The helper file created for us by Berkshelf looks like this:
module Helpers
module Screen
include MiniTest::Chef::Assertions
include MiniTest::Chef::Context
include MiniTest::Chef::Resources
end
end
And the example test looks like this:
$ cat default_test.rb
require File.expand_path('../support/helpers', __FILE__)
describe 'screen::default' do
include Helpers::Screen
# Example spec tests can be found at http://git.io/Fahwsw
it 'runs no tests by default' do
end
end
This introduces the important ideas of Modules and Mixins, which we mentioned earlier. Modules are a particularly excellent feature of Ruby. They serve two purposes; they implement namespaces, so that as program complexity and size grows, we don’t get into a situation where multiple methods with the same name, but serving very different purposes, clash with each other. Instead, we use modules to make it clear which we mean:
module Trig
def sin(degrees)
end
def tan(degrees)
end
def cos(degrees)
end
end
module Catholic
def sin(naughty_thing)
end
def confess(naughty_thing)
end
def pray(saint)
end
end
If there was a situation in which the programmer wanted to use both Trig and Catholic modules, all that would be required would be to specify the dependency on the module, and then use the namespace:
require 'trig'
require 'catholic'
dice_roll = rand(5)+1
def do_maths_homework
def find_opposite(theta, hypotenuse)
Trig::sin(theta) * hypotenuse
end
def submit_homework
...
end
result = find_opposite(30, 100)
if dice_roll > 3
Catholic::sin("Lie about using a computer")
submit_homework
Catholic::confess("I claimed I didn't use a computer, but I did!")
else
submit_homework
end
end
The second, and more immediately relevant benefit of modules, is the concept of “mixing in.” We’ve already seen in my silly example earlier that modules can have methods. If you include a module in a class, all the methods from that class automatically become available to the class. This is known as the mixin facility. We see this facility in use throughout Ruby’s core.
>= ri Array
= Array <= Object
------------------------------------------------------------------------------
= Includes:
Enumerable (from ruby core)
(from ruby core)
------------------------------------------------------------------------------
Arrays are ordered, integer-indexed collections of any object. Array indexing
starts at 0, as in C or Java. A negative index is assumed to be relative to
the end of the array---that is, an index of -1 indicates the last element of
the array, -2 is the next to last element in the array, and so on.
------------------------------------------------------------------------------
The Array class mixes in the Enumerable module:
>= ri Enumerable
= Enumerable
(from ruby core)
------------------------------------------------------------------------------
The Enumerable mixin provides collection classes with several traversal and
searching methods, and with the ability to sort. The class must provide a
method each, which yields successive members of the collection. If
Enumerable#max, #min, or #sort is used, the objects in the collection must
also implement a meaningful <=> operator, as these methods rely on an ordering
between members of the collection.
------------------------------------------------------------------------------
Here we see the Enumerable mixin and our class can interact. As long as we define an “each” method, and include Enumerable, we’ll get a whole bunch of extra stuff.
Normally to include a mixin, we explicitly call include mymixin, and that’s exactly what we see in the example test. By including Helpers::Screen, we get access to the functionality within that module.
The last relevant step that the Berkshelf generator took was to add a line to our Berksfile, ensuring that we have access to the cookbook and its content:
$ cat Berksfile
site :opscode
group :integration do
cookbook 'minitest-handler'
end
metadata
Berkshelf has provided everything we need: the cookbook itself, an example test, and helper code. To run the tests, all we need to do is run vagrant up:
$ vagrant up
Bringing machine 'default' up with 'virtualbox' provider...
[default] Setting the name of the VM...
[default] Clearing any previously set forwarded ports...
[Berkshelf] This version of the Berkshelf plugin has not been fully tested on this version of Vagrant.
[Berkshelf] You should check for a newer version of vagrant-berkshelf.
[Berkshelf] If you encounter any errors with this version, please report them at https://github.com/RiotGames/vagrant-berkshelf/issues
[Berkshelf] You can also join the discussion in #berkshelf on Freenode.
[Berkshelf] Updating Vagrant's berkshelf: '/home/tdi/.berkshelf/vagrant/berkshelf-20130618-27272-1cv4qos'
[Berkshelf] Using minitest-handler (0.2.1)
[Berkshelf] Using screen (0.1.0) at path: '/home/tdi/screen'
[Berkshelf] Using chef_handler (1.1.4)
[default] Creating shared folders metadata...
[default] Clearing any previously set network interfaces...
[default] Preparing network interfaces based on configuration...
[default] Forwarding ports...
[default] -- 22 => 2222 (adapter 1)
[default] Booting VM...
[default] Waiting for VM to boot. This can take a few minutes.
[default] VM booted and ready for use!
[default] Setting hostname...
[default] Configuring and enabling network interfaces...
[default] Mounting shared folders...
[default] -- /vagrant
[default] -- /tmp/vagrant-chef-1/chef-solo-1/cookbooks
[default] Running provisioner: chef_solo...
Generating chef JSON and uploading...
Running chef-solo...
[2013-06-18T06:06:02+00:00] INFO: *** Chef 10.14.2 ***
[2013-06-18T06:06:03+00:00] INFO: Setting the run_list to ["recipe[minitest-handler::default]", "recipe[screen::default]"] from JSON
[2013-06-18T06:06:03+00:00] INFO: Run List is [recipe[minitest-handler::default], recipe[screen::default]]
[2013-06-18T06:06:03+00:00] INFO: Run List expands to [minitest-handler::default, screen::default]
[2013-06-18T06:06:03+00:00] INFO: Starting Chef Run for screen-berkshelf
[2013-06-18T06:06:03+00:00] INFO: Running start handlers
[2013-06-18T06:06:03+00:00] INFO: Start handlers complete.
[2013-06-18T06:06:03+00:00] INFO: Processing chef_gem[minitest] action nothing (minitest-handler::default line 2)
[2013-06-18T06:06:03+00:00] INFO: Processing chef_gem[minitest] action install (minitest-handler::default line 2)
[2013-06-18T06:06:03+00:00] INFO: Processing chef_gem[minitest-chef-handler] action nothing (minitest-handler::default line 9)
[2013-06-18T06:06:03+00:00] INFO: Processing chef_gem[minitest-chef-handler] action install (minitest-handler::default line 9)
[2013-06-18T06:06:34+00:00] INFO: Processing chef_gem[minitest] action nothing (minitest-handler::default line 2)
[2013-06-18T06:06:34+00:00] INFO: Processing chef_gem[minitest-chef-handler] action nothing (minitest-handler::default line 9)
[2013-06-18T06:06:34+00:00] INFO: Processing directory[minitest test location] action delete (minitest-handler::default line 18)
[2013-06-18T06:06:34+00:00] INFO: Processing directory[minitest test location] action create (minitest-handler::default line 18)
[2013-06-18T06:06:34+00:00] INFO: directory[minitest test location] created directory /var/chef/minitest
[2013-06-18T06:06:34+00:00] INFO: directory[minitest test location] owner changed to 0
[2013-06-18T06:06:34+00:00] INFO: directory[minitest test location] group changed to 0
[2013-06-18T06:06:34+00:00] INFO: directory[minitest test location] mode changed to 775
[2013-06-18T06:06:34+00:00] INFO: Processing ruby_block[load tests] action create (minitest-handler::default line 29)
[2013-06-18T06:06:34+00:00] INFO: Processing directory[/var/chef/minitest/minitest-handler] action create (dynamically defined)
[2013-06-18T06:06:34+00:00] INFO: directory[/var/chef/minitest/minitest-handler] created directory /var/chef/minitest/minitest-handler
[2013-06-18T06:06:34+00:00] INFO: Processing directory[/var/chef/minitest/screen] action create (dynamically defined)
[2013-06-18T06:06:34+00:00] INFO: directory[/var/chef/minitest/screen] created directory /var/chef/minitest/screen
[2013-06-18T06:06:34+00:00] INFO: Enabling minitest-chef-handler as a report handler
[2013-06-18T06:06:34+00:00] INFO: ruby_block[load tests] called
[2013-06-18T06:06:34+00:00] INFO: Chef Run complete in 31.002947638 seconds
[2013-06-18T06:06:34+00:00] INFO: Running report handlers
Run options: -v --seed 30025
# Running tests:
screen::default#test_0001_runs no tests by default =
0.00 s =
.
Finished tests in 0.001883s, 531.0494 tests/s, 0.0000 assertions/s.
1 tests, 0 assertions, 0 failures, 0 errors, 0 skips
[2013-06-18T06:06:34+00:00] INFO: Report handlers complete
Naturally, this used the default Vagrantfile created by Berkshelf, which might not use the Vagrant box you want, and at the time of this writing, installs Chef 10 rather than Chef 11. But this is mere detail—we already know how to swap out Vagrant boxes.
Berkshelf made the Minitest Handler cookbook available, and the existence of the tests under the files/default/tests/minitest location meant that the tests were picked up and run, with the test results visible at the conclusion of the Chef run.
Example
Let’s write a couple of trivial tests for our screen cookbook before looking at some more involved examples.
I think the two obvious things we’d want to test when installing Screen would be that the package was installed and that a standard, customized screen config was made available to users. We can make assertions about this as follows. Edit the files/default/tests/minitest/default.rb file:
require File.expand_path('../support/helpers', __FILE__)
describe 'screen::default' do
include Helpers::Screen
it "installs Screen" do
package("screen").must_be_installed
end
it "provides a global, customized default configuration" do
file("/usr/local/etc/screenrc").must_exist
file('/usr/local/etc/screenrc').must_match /^caption string .*%\?%F%{= Bk}%\?.*$/
file('/usr/local/etc/screenrc').must_match /^hardstatus string '%{= kG}.*$/
end
end
We can run these tests with vagrant provision:
[2013-06-18T08:32:52+00:00] INFO: Running report handlers
Run options: -v --seed 16917
# Running tests:
screen::default#test_0001_installs Screen =
5.73 s = F
screen::default#test_0002_provide a global, customized default configuration =
0.00 s = F
Finished tests in 5.735119s, 0.3487 tests/s, 0.3487 assertions/s.
1) Failure:
screen::default#test_0001_installs Screen [/var/chef/minitest/screen/default_test.rb:8]:
Expected package 'screen' to be installed
2) Failure:
screen::default#test_0002_provide a global, customized default configuration [/var/chef/minitest/screen/default_test.rb:12]:
Expected path '/usr/local/etc/screenrc' to exist
2 tests, 2 assertions, 2 failures, 0 errors, 0 skips
[2013-06-18T08:32:58+00:00] INFO: Report handlers complete
[2013-06-18T08:32:58+00:00] ERROR: Running exception handlers
[2013-06-18T08:32:58+00:00] ERROR: Exception handlers complete
[2013-06-18T08:32:58+00:00] FATAL: Stacktrace dumped to /tmp/vagrant-chef-1/chef-stacktrace.out
[2013-06-18T08:32:58+00:00] FATAL: RuntimeError: MiniTest failed with 2 failure(s) and 0 error(s).
Failure:
screen::default#test_0001_installs Screen [/var/chef/minitest/screen/default_test.rb:8]:
Expected package 'screen' to be installed
Failure:
screen::default#test_0002_provide a global, customized default configuration [/var/chef/minitest/screen/default_test.rb:12]:
Expected path '/usr/local/etc/screenrc' to exist
Now let’s write the code to make the test pass:
$ cat recipes/default.rb
package "screen"
cookbook_file "/etc/screenrc" do
source "screenrc"
end
$ cat files/default/screenrc
caption string "%?%F%{= Bk}%? %C%A %D %d-%m-%Y %{= kB} %t%= %?%F%{= Bk}%:%{= wk}%? %n "
hardstatus alwayslastline
hardstatus string '%{= kG}[ %{G}%H %{g}][%= %{= kw}%?%-Lw%?%{r}(%{W}%n*%f%t%?(%u)%?%{r})%{w}%?%+Lw%?%?%= %{g}][%{B} %d/%m %{W}%c %{g}]'
defscrollback 30000
escape ^Zz
Now if we run vagrant provision, Chef should apply our recipe and then run the tests, and they should pass:
[default] Running provisioner: chef_solo...
Generating chef JSON and uploading...
Running chef-solo...
[2013-06-18T08:55:34+00:00] INFO: *** Chef 10.14.2 ***
[2013-06-18T08:55:34+00:00] INFO: Setting the run_list to ["recipe[minitest-handler::default]", "recipe[screen::default]"] from JSON
[2013-06-18T08:55:34+00:00] INFO: Run List is [recipe[minitest-handler::default], recipe[screen::default]]
[2013-06-18T08:55:34+00:00] INFO: Run List expands to [minitest-handler::default, screen::default]
[2013-06-18T08:55:34+00:00] INFO: Starting Chef Run for screen-berkshelf
[2013-06-18T08:55:34+00:00] INFO: Running start handlers
[2013-06-18T08:55:34+00:00] INFO: Start handlers complete.
[2013-06-18T08:55:34+00:00] INFO: Processing chef_gem[minitest] action nothing (minitest-handler::default line 2)
[2013-06-18T08:55:34+00:00] INFO: Processing chef_gem[minitest] action install (minitest-handler::default line 2)
[2013-06-18T08:55:34+00:00] INFO: Processing chef_gem[minitest-chef-handler] action nothing (minitest-handler::default line 9)
[2013-06-18T08:55:34+00:00] INFO: Processing chef_gem[minitest-chef-handler] action install (minitest-handler::default line 9)
[2013-06-18T08:56:02+00:00] INFO: Processing chef_gem[minitest] action nothing (minitest-handler::default line 2)
[2013-06-18T08:56:02+00:00] INFO: Processing chef_gem[minitest-chef-handler] action nothing (minitest-handler::default line 9)
[2013-06-18T08:56:02+00:00] INFO: Processing directory[minitest test location] action delete (minitest-handler::default line 18)
[2013-06-18T08:56:02+00:00] INFO: Processing directory[minitest test location] action create (minitest-handler::default line 18)
[2013-06-18T08:56:02+00:00] INFO: directory[minitest test location] created directory /var/chef/minitest
[2013-06-18T08:56:02+00:00] INFO: directory[minitest test location] owner changed to 0
[2013-06-18T08:56:02+00:00] INFO: directory[minitest test location] group changed to 0
[2013-06-18T08:56:02+00:00] INFO: directory[minitest test location] mode changed to 775
[2013-06-18T08:56:02+00:00] INFO: Processing ruby_block[load tests] action create (minitest-handler::default line 29)
[2013-06-18T08:56:02+00:00] INFO: Processing directory[/var/chef/minitest/minitest-handler] action create (dynamically defined)
[2013-06-18T08:56:02+00:00] INFO: directory[/var/chef/minitest/minitest-handler] created directory /var/chef/minitest/minitest-handler
[2013-06-18T08:56:02+00:00] INFO: Processing directory[/var/chef/minitest/screen] action create (dynamically defined)
[2013-06-18T08:56:02+00:00] INFO: directory[/var/chef/minitest/screen] created directory /var/chef/minitest/screen
[2013-06-18T08:56:02+00:00] INFO: Enabling minitest-chef-handler as a report handler
[2013-06-18T08:56:02+00:00] INFO: ruby_block[load tests] called
[2013-06-18T08:56:02+00:00] INFO: Processing package[screen] action install (screen::default line 10)
[2013-06-18T08:56:09+00:00] INFO: package[screen] installing screen-4.0.3-16.el6 from base repository
[2013-06-18T08:56:13+00:00] INFO: Processing cookbook_file[/usr/local/etc/screenrc] action create (screen::default line 12)
[2013-06-18T08:56:13+00:00] INFO: cookbook_file[/usr/local/etc/screenrc] created file /usr/local/etc/screenrc
[2013-06-18T08:56:13+00:00] INFO: Chef Run complete in 38.732347486 seconds
[2013-06-18T08:56:13+00:00] INFO: Running report handlers
Run options: -v --seed 23177
# Running tests:
screen::default#test_0001_installs Screen =
0.16 s = .
screen::default#test_0002_provides a global, customized default configuration =
0.00 s = .
Finished tests in 0.168615s, 11.8613 tests/s, 23.7227 assertions/s.
2 tests, 4 assertions, 0 failures, 0 errors, 0 skips
[2013-06-18T08:56:13+00:00] INFO: Report handlers complete
Although very simple, this should give a good sense of how easy it is to use the Minitest Handler process to carry out integration tests with nothing more than Vagrant and Berkshelf.
Moving on to a more complex example, consider the following tests from the Opscode apache cookbook:
it 'installs apache' do
package(node['apache']['package']).must_be_installed
end
it 'starts apache' do
apache_service.must_be_running
end
it 'enables apache' do
apache_service.must_be_enabled
end
it 'creates the conf.d directory' do
directory("#{node['apache']['dir']}/conf.d").must_exist.with(:mode, "755")
end
it 'creates the logs directory' do
directory(node['apache']['log_dir']).must_exist
end
it 'enables the default site' do
file("#{node['apache']['dir']}/sites-enabled/000-default").must_exist
file("#{node['apache']['dir']}/sites-available/default").must_exist
end
it 'ensures the debian-style apache module scripts are present' do
%w{a2ensite a2dissite a2enmod a2dismod}.each do |mod_script|
file("/usr/sbin/#{mod_script}").must_exist
end
end
it 'reports server name only, not detailed version info' do
assert_match(/^ServerTokens Prod *$/, File.read("#{node['apache']['dir']}/conf.d/security"))
end
These tests demonstrate one very important feature of Minitest Handler—the tests are all executed in the context of a Chef run. This has profound implications for testing. At any point we have access to three important objects from Chef: the run_status, the node itself, and therun_context. This is potentially very useful to us; in these examples, we’re using node attributes in our test. However, it’s also important to understand that the tests we’re carrying out are often based on knowledge Chef has rather than external validation of desired state. Now, of course, we implicitly trust Chef, but it’s worth stating explicitly that, in certain cases, what these tests are doing is inspecting Chef’s knowledge rather than carrying out probes on a configured server.
The final example I’ll cover is one where we use a helper method:
it 'listens on port 80' do
apache_configured_ports.must_include(80)
end
it 'only listens on port 443 when SSL is enabled' do
unless ran_recipe?('apache2::mod_ssl')
apache_configured_ports.wont_include(443)
end
end
Here we have an example of helper code. This could go in the helper module we already discussed:
def apache_configured_ports
port_config = File.read("#{node['apache']['dir']}/ports.conf")
port_config.scan(/^Listen ([0-9]+)/).flatten.map{|p| p.to_i}
end
def ran_recipe?(recipe)
node.run_state[:seen_recipes].keys.include?(recipe)
end
Herein we see examples of the kind of heavy lifting that is necessary to make the writing of tests more accessible to infrastructure developers. A line must carefully be walked between providing reusable helper methods that make the writing of tests fast and easy, and creating chunks of code that encourage lazy and brittle test writing. The right balance will emerge as the discipline and community matures, but for now, the infrastructure developer is well-served by matchers and expectations built into minitest-chef-handler, and creative programming will furnish helper methods that over time may emerge as reusable patterns.
Minitest Handler with Test Kitchen
Before looking at the advantages and disadvantages and drawing a conclusion, I want to demonstrate how to run Minitest Handler tests using Test Kitchen.
Here’s an example .kitchen.yml file:
$ cat .kitchen.yml
---
driver_plugin: vagrant
driver_config:
require_chef_omnibus: true
platforms:
- name: ubuntu-10.04
driver_config:
box: opscode-ubuntu-10.04
box_url: https://opscode-vm.s3.amazonaws.com/vagrant/opscode_ubuntu-10.04_provisionerless.box
- name: centos-5.9
driver_config:
box: opscode-centos-5.9
box_url: https://opscode-vm.s3.amazonaws.com/vagrant/opscode_centos-5.9_provisionerless.box
suites:
- name: default
run_list: ["recipe[minitest-handler]", "recipe[screen]"]
attributes: {}
All we need to do is ensure that the minitest-handler recipe is included on the run list for whichever suite we care about. As long as we have minitest-handler in the Berksfile (or in the cookbook metadata), the cookbook will be made available and applied, and the tests will be run on akitchen converge action:
[2013-06-18T09:33:35+00:00] INFO: Chef Run complete in 26.619225 seconds
[2013-06-18T09:33:35+00:00] INFO: Running report handlers
Run options: -v --seed 2739
# Running tests:
screen::default#test_0001_installs Screen = 0.00 s = .
screen::default#test_0002_provides a global, customized default configuration = 0.00 s = .
Finished tests in 0.003959s, 505.1781 tests/s, 1010.3562 assertions/s.
2 tests, 4 assertions, 0 failures, 0 errors, 0 skips
[2013-06-18T09:33:35+00:00] INFO: Report handlers complete
Chef Client finished, 5 resources updated
Finished converging <default-centos-59> (0m30.77s).
-----> Kitchen is finished. (1m0.12s)
Advantages and Disadvantages
The immediate advantage of Minitest Handler is that the barrier to entry is very low. If you’re using Berkshelf, and you should be, the generator will create all you need to start writing and running tests. There’s good coverage in terms of assertions and matchers, and the feedback cycle is quick.
I have two main concerns with this approach, though. First, I’m not entirely comfortable with expecting new users to learn and use two different expectation syntaxes. On the assumption that unit testing will be done using Chefspec, it’s rather irksome that the integration tests use a different approach. The second area where I feel a certain skepticism is in the reliance upon, or use of, Chef’s internal knowledge. I feel that we’re not really doing true integration testing here. In places, we’re relying on magical knowledge from within the framework that had responsibility for bringing our infrastructure in line with policy. For these reasons, I feel much more comfortable recommending an integration framework that is entirely ignorant of Chef, as this provides the opportunity to standardize on RSpec expectation syntax and to run tests that have absolutely no knowledge of, or dependence upon, the configuration management framework.
A final potential gotcha should be noted. The most recent release of the Minitest Handler cookbook altered the mechanism that makes the test files available to the host upon which the tests are being run. This means that tests will not be run on machines using a client/server model rather thanchef-solo. At the time of this writing, there is work ongoing to resolve this issue, but for now this should be noted as a consideration for this testing approach.
Summary and Conclusion
Minitest Handler is easy to use, capable, and fast. It needs minimal setup and offers immediate value. However, I feel that the central tool in the infrastructure developer’s kit is going to be Test Kitchen, and having invested in making the Test Kitchen framework available, I see little use for Minitest Handler, and prefer to use tests run by the kitchen Busser.
Unit Testing: Chefspec
The purest, fastest, and most lightweight unit-testing approach belongs to Chefspec—a popular and powerful tool enabling the infrastructure developer to create RSpec examples for cookbook code.
Overview
Well-written unit tests have the following characteristics:
§ Exercise every aspect of the code under test
§ Run in isolation, shielded from external forces, with any external functions (including the operating system) mocked out, to give complete control over the environment
§ Written in such a way as to be easy for any developer to run
§ Run very quickly, giving fast feedback
§ Checked into the same version control system as the code they test
Chefspec allows the infrastructure developer to write RSpec examples for cookbooks that meet these characteristics. The Chef run itself is mocked, allowing us to assert that the Chef providers are called with the correct parameters. Any input data, including attribute data from Ohai, roles, cookbooks, or recipes can be set on whatever platform is required, giving comprehensive coverage. Because the node is never actually converged, and because there is never any genuine API traffic, the tests are very fast and give extremely rapid feedback.
It’s important to emphasize that, as I argued in the first edition, there is little point in writing tests that verify the Chef resources and providers behave as they should. We trust that behavior implicitly. Chef is tested, and Chef is production quality code, widely deployed across hundreds of thousands of machines all over the world. We don’t need to test that when we ask Chef to install Apache that Chef does indeed install Apache. If the Chef run completes without error, and you asked it to install Apache, Apache will be installed. That’s the whole point of Chef as a declarative interface to infrastructure resources.
However, what we do need to test is that we asked Chef to do the right thing. Chefspec provides this capability—it allows us to check what is in the resource collection and what actions would be taken. We can compare that against what we expected. This is useful on a couple of levels. First, as we grow our test coverage, so we will catch regressions and foolish errors. Especially when developing for multiple operating systems or distributions, the task of ensuring that no unwanted side effects have been introduced is very valuable. Second, the discipline of writing the tests (especially writing the tests first) helps the infrastructure developer think through the feature being added. By thinking about the intended outcome, and by writing a test to capture that, the features are emerged incrementally, and in accordance with demand.
When writing Chefspec tests it makes sense to think of the cookbooks as a black box. We’re interested in how the code handles various inputs. Just as when writing unit tests for traditional software, where we would write tests to verify the behavior of the code when given different arguments, so we do the same with Chef. In Chef we can provide input to our cookbooks from attributes (whether from Ohai, or cookbooks, roles or environments), search results, and databag look-ups. We could also, of course, provide input from arbitrary helper methods calling external services, or making calculations during the Chef run.
Given that one of the great advantages of the Chef framework is the ease with which we can write data-driven cookbooks, it’s very helpful to be able to exercise our code by feeding it data, allowing us to test edge cases and verify our reasoning and understanding about how Chef will behave, but without having to provision a large number of different machines to run Chef a large number of times.
Getting Started
Chefspec is, again, distributed as a Rubygem. Simply add it to the Gemfile, and run bundle update.
Once installed, Chefspec provides an extension to the knife cookbook command, which will create a basic RSpec boilerplate. Let’s create a cookbook that installs the handy network utility netcat.
For the purposes of illustration, we’ll create this cookbook using Knife rather than Berkshelf.
$ knife cookbook create netcat -o .
WARNING: No knife configuration file found
** Creating cookbook netcat
** Creating README for cookbook: netcat
** Creating CHANGELOG for cookbook: netcat
** Creating metadata for cookbook: netcat
$ knife cookbook create_specs netcat -o .
WARNING: No knife configuration file found
** Creating specs for cookbook: netcat
This creates a spec directory and populates it with an example test:
$ cat netcat/spec/default_spec.rb
require 'chefspec'
describe 'netcat::default' do
let (:chef_run) { ChefSpec::ChefRunner.new.converge 'netcat::default' }
it 'should do something' do
pending 'Your recipe examples go here.'
end
end
Again, note the naming convention. We’re initially testing the default cookbook; create a file named default_spec.rb. Running the test is a simple matter of running the rspec command in the top-level directory of the cookbook:
$ rspec
Pending:
netcat::default should do something
# Your recipe examples go here.
# ./spec/default_spec.rb:5
Finished in 0.00028 seconds
1 example, 0 failures, 1 pending
Example
Let’s look again at the boilerplate example that we created with knife cookbook create_specs:
require 'chefspec'
describe 'netcat::default' do
let (:chef_run) { ChefSpec::ChefRunner.new.converge 'netcat::default' }
it 'should do something' do
pending 'Your recipe examples go here.'
end
end
The first line simply pulls in Chefspec, much like our Thor example, when we pulled in library code from elsewhere. Next we do exactly as we did in the Hipster test—set up a describe block. I always like to imagine having a conversation here:
Me: "Describe the default recipe in the netcat cookbook."
You: "It installs netcat!"
It’s helpful to remember when we’re writing these tests that we’re describing the behavior of the system, in terms of examples that demonstrate the intended functionality of the thing we’re building.
The next thing we need to do is create an instance of a Chef Runner. A Chef Runner is the object responsible for running Chef in the context of our tests. Incidentally, here’s a cutely recursive way to learn what a Chef Runner is:
$ cd ~/src/chefspec
$ rspec -fd spec/chefspec/chef_runner_spec.rb
ChefSpec::ChefRunner
#initialize
should create a node for use within the examples
should set the chef cookbook path to a default if not provided
should set the chef cookbook path to any provided value
should support the chef cookbook path being passed as a string for backwards compatibility
should default the log_level to warn
should set the log_level to any provided value
should alias the real resource actions
should capture the resources created
should execute the real action if resource is in the step_into list
should accept a block to set node attributes
should allow evaluate_guards to be falsey
should allow evaluate_guards to be truthy
...
...
I throw that in as an example of how tests can function as documentation, and shed light on our understanding of how software functions.
So we need an instance of a Chef Runner. There are a couple of ways to do this, but the approach adopted here is the most commonly used:
let (:chef_run) { ChefSpec::ChefRunner.new.converge 'netcat::default' }
This line of code introduces a couple of useful Ruby ideas, so I’ll cover them briefly.
The let method defines a memoized helper method. What does this mean? Well, memoization is a simple pattern, which simply means “cache the result of the method.” This is a handy technique for storing values of a function instead of recomputing them each time the function is called.
Suppose we had a method to run, which we know is always going to return the same result. Suppose we also knew that running this method was rather slow, or resource intensive. Wouldn’t it make sense to cache the result the first time we ran it? That’s the basic idea behind memoization. Here’s a dumb example:
def album_and_song
"#{album} - #{song}"
end
Although not hugely expensive, this method does require the string to be reconstructed every time. The classic way to memoize in Ruby is to use the conditional assignment operator, ||=.
def album_and_song
@album_and_song ||= "#{album} - #{song}"
end
This means, if @album_and_song is not initialized, or if it is set to nil or false, it will be assigned to the value of the expression to the right—the result of the string interpolation creating the album/song combination. However, if it’s already set to a truthy value (anything other than nil or false), it will remain unchanged.
This is a handy technique when writing tests that instantiate something we want to use. We can define a method that describes the thing we want to instantiate, use memoization behind the scenes, and henceforth just use the method without ever having to worry about instantiating it.
The let method does exactly this—it gives us an instance of something we need to use but with some handy advantages. Specifically, using let() over instance variables is safer because it creates a method rather than a variable, and so if we ever mistype the name we’ll get a clearNameError rather than nil, which you’ll quickly learn is hard to track down. let is also lazy-evaluated—that is, it is not evaluated until the first time the method it defines is invoked, so the code runs only if the example calls it; by contrast, the obvious alternative, which is to use an instance variable in a before(:each), will run before every example, which is wasteful.
Now we have the Chef Runner available to use, and we set it up to converge the default recipe in our netcat cookbook. All we need to do is use the chef_run object to make assertions.
The simplest thing we could assert would be that the Chef Runner will install the netcat package:
it 'installs the netcat package' do
expect(chef_run).to install_package('netcat')
end
Let’s try running the test:
$ rspec
F
Failures:
1) netcat::default installs the netcat package
Failure/Error: expect(chef_run).to install_package('netcat')
No package resource named 'netcat' with action :install found.
# ./spec/default_spec.rb:6:in `block (2 levels) in <top (required)>'
Finished in 0.05371 seconds
1 example, 1 failure
Failed examples:
rspec ./spec/default_spec.rb:5 # netcat::default installs the netcat package
As we expected, we have a failure. We’ve asserted that when we converge the default recipe, the Chef runner will be asked to install the netcat package. But we haven’t written the default recipe yet, so the test fails. Let’s fix that:
$ cat recipes/default.rb
package 'netcat'
Now when we run RSpec, the test passes:
$ rspec
.
Finished in 0.01144 seconds
1 example, 0 failures
This is great, but remember, we’ve tested only signal in. We need to test signal out. Also, we might want to support installing netcat on multiple platforms, so it would be sensible to test it on multiple platforms. Let’s fire up Test Kitchen again, and see what happens when we converge the recipe for real on both CentOS and Ubuntu:
$ kitchen converge
[tdi@tk01 netcat]$ kitchen converge
-----> Starting Kitchen (v1.0.0.dev)
-----> Creating <default-ubuntu-1204>
...
...
-----> Converging <default-ubuntu-1204>
...
Converging 1 resources
Recipe: netcat::default
* package[netcat] action install[2013-06-18T11:47:02+00:00] INFO: Processing package[netcat] action install (netcat::default line 1)
- install version 1.10-39 of package netcat
[2013-06-18T11:47:06+00:00] INFO: Chef Run complete in 4.114389784 seconds
Finished converging <default-ubuntu-1204> (0m17.76s).
-----> Creating <default-centos-64>
...
...
-----> Converging <default-centos-64>
...
Converging 1 resources
Recipe: netcat::default
* package[netcat] action install[2013-06-18T11:48:41+00:00] INFO: Processing package[netcat] action install (netcat::default line 1)
* No version specified, and no candidate version available for netcat
================================================================================
Error executing action `install` on resource 'package[netcat]'
================================================================================
Chef::Exceptions::Package
-------------------------
No version specified, and no candidate version available for netcat
...
Chef::Exceptions::Package: No version specified, and no candidate version available for netcat
>>>>>> Converge failed on instance <default-centos-64>.
>>>>>> Please see .kitchen/logs/default-centos-64.log for more details
>>>>>> ------Exception-------
>>>>>> Class: Kitchen::ActionFailed
>>>>>> Message: SSH exited (1) for command: [sudo -E chef-solo --config /tmp/kitchen-chef-solo/solo.rb --json-attributes /tmp/kitchen-chef-solo/dna.json --log_level info]
>>>>>> ----------------------
Here we see the value of having Test Kitchen to hand. We didn’t even write any tests, but we were able to see, with a single command, whether our recipe would even converge on both platforms. And we learned it wouldn’t. The reason for this is that, although Chef providers know how to take appropriate action on all supported platforms, Chef isn’t clever enough to know that Debian calls netcat “netcat,” whereas CentOS calls it “nc.” We need to put that logic in the recipe.
You’ll remember that when we run Chef on a node, one of the first things that happens is Ohai runs, profiling the system, and providing useful information to the recipe DSL, such as the platform version or the family of operating system. Chefspec has the ability to mock this data, using a little library called Fauxhai. Fauxhai is effectively an open source store of Ohai data for multiple platforms, which Chefspec can use in order to pretend to be a machine running on, for example, Solaris 10.
We make use of this capability by providing a platform and version to the constructor when we instantiate a Chef runner. Our current Chef runner looks like this:
let (:chef_run) { ChefSpec::ChefRunner.new.converge 'netcat::default' }
If we want the runner to look like a CentOS machine, we instead call it like this:
let(:chef_run) do
runner = ChefSpec::ChefRunner.new(
platform: 'centos',
version: '6.3'
)
runner.converge 'netcat::default'
end
However, we want to do this for more than one platform. This is where RSpec contexts come in handy.
A context is an important concept in RSpec. In RSpec, we are generally concerned with an Example Group. This is a set of tests that describe the behavior of the item under test. The two keywords used to build and test example groups are describe() and it(). For example:
describe "MusicPlayer" do
it "lists available tracks" do
end
end
Describe blocks can be nested to provide a richer description of behavior. For example:
describe "MusicPlayer" do
describe "when in select music mode" do
it "lists available tracks" do
end
end
end
RSpec provides the context() method as an alias for describe(). This allows us to word our examples to set the context in which the item under test is used. For example, we could express the previous example as:
describe "MusicPlayer" do
context "when in select music mode" do
it "lists available tracks" do
end
end
end
We can use the same pattern in our Chefspec examples, by using a context for each platform:
require 'chefspec'
describe 'netcat::default' do
context 'centos' do
let(:chef_run) do
runner = ChefSpec::ChefRunner.new(
platform: 'centos',
version: '6.3'
)
runner.converge 'netcat::default'
end
it 'installs the nc package' do
expect(chef_run).to install_package('nc')
end
end
context 'ubuntu' do
let(:chef_run) do
runner = ChefSpec::ChefRunner.new(
platform: 'ubuntu',
version: '12.04'
)
runner.converge 'netcat::default'
end
it 'installs the netcat package' do
expect(chef_run).to install_package('netcat')
end
end
end
Now let’s run the test:
$ rspec
.
Failures:
1) netcat::default centos installs the nc package
Failure/Error: expect(chef_run).to install_package('nc')
No package resource named 'nc' with action :install found.
# ./spec/default_spec.rb:13:in `block (3 levels) in <top (required)>'
Finished in 0.04224 seconds
2 examples, 1 failure
Failed examples:
rspec ./spec/default_spec.rb:12 # netcat::default centos installs the nc package
So, as we already know, the recipe doesn’t try to install “nc” when the machine is a CentOS machine. We need to fix this in the recipe:
package 'nc' do
package_name case node['platform_family']
when 'debian'
'netcat'
else
'nc'
end
end
Now the test passes:
$ rspec
..
Finished in 0.04242 seconds
2 examples, 0 failures
And when we converge the node:
$ kitchen converge
-----> Starting Kitchen (v1.0.0.dev)
-----> Converging <default-ubuntu-1204>
Resolving cookbook dependencies with Berkshelf
Using netcat (0.1.0)
Removing non-cookbook files in sandbox
Uploaded /tmp/default-ubuntu-1204-sandbox-20130618-30672-y0aiqp/solo.rb (168 bytes)
Uploaded /tmp/default-ubuntu-1204-sandbox-20130618-30672-y0aiqp/cookbooks/netcat/recipes/default.rb (180 bytes)
Uploaded /tmp/default-ubuntu-1204-sandbox-20130618-30672-y0aiqp/cookbooks/netcat/metadata.rb (276 bytes)
Uploaded /tmp/default-ubuntu-1204-sandbox-20130618-30672-y0aiqp/cookbooks/netcat/README.md (1447 bytes)
Uploaded /tmp/default-ubuntu-1204-sandbox-20130618-30672-y0aiqp/dna.json (31 bytes)
Starting Chef Client, version 11.4.4
[2013-06-18T12:42:55+00:00] INFO: *** Chef 11.4.4 ***
[2013-06-18T12:42:55+00:00] INFO: Setting the run_list to ["recipe[netcat]"] from JSON
[2013-06-18T12:42:55+00:00] INFO: Run List is [recipe[netcat]]
[2013-06-18T12:42:55+00:00] INFO: Run List expands to [netcat]
[2013-06-18T12:42:55+00:00] INFO: Starting Chef Run for default-ubuntu-1204
[2013-06-18T12:42:55+00:00] INFO: Running start handlers
[2013-06-18T12:42:55+00:00] INFO: Start handlers complete.
Compiling Cookbooks...
Converging 1 resources
Recipe: netcat::default
* package[nc] action install[2013-06-18T12:42:55+00:00] INFO: Processing package[nc] action install (netcat::default line 1)
(up to date)
[2013-06-18T12:42:55+00:00] INFO: Chef Run complete in 0.027679985 seconds
[2013-06-18T12:42:55+00:00] INFO: Running report handlers
[2013-06-18T12:42:55+00:00] INFO: Report handlers complete
Chef Client finished, 0 resources updated
Finished converging <default-ubuntu-1204> (0m2.29s).
-----> Converging <default-centos-64>
Resolving cookbook dependencies with Berkshelf
Using netcat (0.1.0)
Removing non-cookbook files in sandbox
Uploaded /tmp/default-centos-64-sandbox-20130618-30672-131b8ou/solo.rb (166 bytes)
Uploaded /tmp/default-centos-64-sandbox-20130618-30672-131b8ou/cookbooks/netcat/recipes/default.rb (180 bytes)
Uploaded /tmp/default-centos-64-sandbox-20130618-30672-131b8ou/cookbooks/netcat/metadata.rb (276 bytes)
Uploaded /tmp/default-centos-64-sandbox-20130618-30672-131b8ou/cookbooks/netcat/README.md (1447 bytes)
Uploaded /tmp/default-centos-64-sandbox-20130618-30672-131b8ou/dna.json (31 bytes)
Starting Chef Client, version 11.4.4
[2013-06-18T12:43:18+00:00] INFO: *** Chef 11.4.4 ***
[2013-06-18T12:43:18+00:00] INFO: Setting the run_list to ["recipe[netcat]"] from JSON
[2013-06-18T12:43:18+00:00] INFO: Run List is [recipe[netcat]]
[2013-06-18T12:43:18+00:00] INFO: Run List expands to [netcat]
[2013-06-18T12:43:18+00:00] INFO: Starting Chef Run for default-centos-64
[2013-06-18T12:43:18+00:00] INFO: Running start handlers
[2013-06-18T12:43:18+00:00] INFO: Start handlers complete.
Compiling Cookbooks...
Converging 1 resources
Recipe: netcat::default
* package[nc] action install[2013-06-18T12:43:18+00:00] INFO: Processing package[nc] action install (netcat::default line 1)
[2013-06-18T12:43:20+00:00] INFO: package[nc] installing nc-1.84-22.el6 from base repository
- install version 1.84-22.el6 of package nc
[2013-06-18T12:43:22+00:00] INFO: Chef Run complete in 4.099788551 seconds
[2013-06-18T12:43:22+00:00] INFO: Running report handlers
[2013-06-18T12:43:22+00:00] INFO: Report handlers complete
Chef Client finished, 1 resources updated
Finished converging <default-centos-64> (0m5.62s).
-----> Kitchen is finished. (0m8.97s)
[tdi@tk01 netcat]$ kitchen list
Instance Driver Provisioner Last Action
default-ubuntu-1204 Vagrant Chef Solo Converged
default-centos-64 Vagrant Chef Solo Converged
Now everything works fine!
Advantages and Disadvantages
I started out as a skeptic, when it came to Chefspec. The system doesn’t do a real converge and is really only decoration atop Chef’s own recipe DSL. Chef, by virtue of being a declarative system, is inherently providing the most basic test of all. If I declare the state I want, and I run Chef, Chef will take action to make my wishes take effect. The Chef run will either succeed, in which case my desired state will take effect, or it will fail, with an error message and a stack trace.
However, the fact is that this is a clumsy and ineffective way of catching mistakes. Chefspec allows us to get feedback almost instantly, without having to take action on a real node, and very rapidly pays for itself in terms of time saved. Because the Chef run takes place in memory, and the provider actions are always set to not truly take effect, the speed of the test is remarkable. To give a sense of the speed, it’s possible to run 10,000 tests in 30 seconds. Realistically you might have as many as 50 tests in a single cookbook, and they should all run in about a second. This is a much more effective and efficient way to catch mistakes. When Chefspec is partnered with Guard, for immediate feedback whenever the filesystem changes, the feedback is even quicker.
One common mistake I see people make is to forget to create a cookbook file or template, or to give it a subtly incorrect name, or perhaps to fail to put it in the default directory. Chefspec catches such errors without us having to go through the cycle of cookbook edit, cookbook upload, run Chef, and then wait for a bunch of resources to be applied, only to discover a simple error.
The ability to test multiplatform logic without ever needing to fire up machines of different types is also hugely advantageous. Fauxhai allows us to mock any platform and test the logic of our recipes even if we only ever develop on a Mac or Windows machine.
Perhaps the biggest business benefit that Chefspec delivers is in supporting the effort of refactoring a recipe. A common example would be perhaps reaching a decision to split up a large and complex cookbook into smaller, more logical components. This could deliver results in terms of faster Chef runs, and enhanced readability and maintainability. However, when refactoring, it’s surprisingly easy to miss a resource out—perhaps a seemingly insignificant file, or package resource. I’ve certainly experienced exactly this scenario: the recipe computes, the Chef run completes, with no indication of a problem. On a machine that has already been configured with Chef, the error may not ever be discovered because the effect of running Chef previously was to configure the resource, and simply removing the resource from the recipe won’t undo the state of the machine where Chef previously took action. This means that only when Chef is run against a new machine does the missing resource cause an issue, often to the bafflement of the developer. Chefspec catches these regressions. If we write a test for the resource, and then accidentally change or delete the resource in the recipe, Chefspec will fail, immediately, never leaving a real machine in an incorrect or unknown state.
Sometimes the errors that Chefspec could catch or prevent are surprisingly inconvenient or damaging. Imagine the case of a cookbook responsible for configuring ssh access, or firewall or network settings. It’s very easy to make a silly mistake—forget to write out a config, or set an incorrect permission—and when working with a remote machine, access to the whole system could be lost, with costly consequences.
Yet another example is the use of search to write out hosts entries, or perhaps load balancer configuration. A simple typing mistake—specifying the wrong index, or a subtly incorrect query—could result in a badly misconfigured system. With Chefspec, we stub out the search but make explicit the expectation that search should be called against a specific node with a specific query. If by some means, this query is incorrect in the recipe, our tests will fail, and we’ll avoid misconfiguring the system. I’ve certainly had the experience where I’ve accidentally pressed a key in an open buffer, saved the buffer, and uploaded a recipe with a syntax error. Running Chefspec, under Guard, alerts in this situation immediately, resulting in far fewer silly mistakes.
However, it’s not just catching silly mistakes or regressions that delivers value. There’s something deeply satisfying, something addictively enjoyable about watching a recipe’s journey from red to green. It introduces a sense of achievement, a yardstick for progress, and delivers a delicious experience of knowing when you’re done, an experience that is painfully absent in most forms of knowledge work.
The simple fact is that writing your cookbooks test-first and using Chefspec as part of your development workflow will result in you writing better cookbooks.
Summary and Conclusion
Chefspec has deservedly earned a strong following within the Chef community already. It provides excellent return on investment, delivers rapid feedback, and enhances code quality and maintainability. The project is actively developed and well-documented. Unit testing at the level of resources and recipes is an essential part of the infrastructure developer’s workflow, and Chefspec is the tool to use for this purpose.
Chefspec is a very powerful tool and can be used to perform very complex tests involving sophisticated mocking and stubbing, stepping into LWRPs to test their internal actions, and working with Berkshelf. It’s also highly extensible—third-party additions exist, and if you write cookbooks including library or LWRP resources, you can create and ship custom matchers for other people to use. Although already providing rapid feedback, this can be improved and made near-instantaneous by using Guard—a command-line tool that watches for filesystem events and runs tests as soon as a file is changed. Sadly these subjects are beyond the scope of this book, but examples and documentation can be found online, or guidance can be found via the usual channels.
Static Analysis and Linting Tools
As a wrapper around the testing workflow I recommended earlier, there is tremendous value in having mechanisms in place to help maintain code quality and standards, and reduce waste and rework owing to trivial mistakes. This brief section discusses tools that support this effort.
Overview
I’m often asked “How can I get started with testing? What’s the simplest thing I can do that adds value?” The lowest level of syntax, style, and lint testing is probably the answer.
Writing Chef recipes is, in some respects, similar to the slower pace of the early computer programmers. Running Chef on a node could take a few minutes to complete, only to yield an error that was the result of a foolish mistake. If this happens two or three times, we could easily have wasted 10 minutes or more. It’s not uncommon to introduce peculiar little bugs such as a misnamed action argument or a typo on an attribute. This all builds up. When added to the already stated desire to start to define and check against community-agreed coding standards, it seems that what would be ideal would be some kind of static analysis of our Chef code before we run it.
There are a number of related tools that provide elements of this functionality. We’ll look at:
§ Foodcritic
§ Knife Cookbook Test
§ Tailor
§ Strainer
Foodcritic is a linting tool for cookbooks. It sets out its two primary objectives as follows:
To make it easier to flag problems in your Chef cookbooks that will cause Chef to blow up when you attempt to converge. This is about faster feedback. If you automate checks for common problems you can save a lot of time.
To encourage discussion within the Chef community on the more subjective stuff—what does a good cookbook look like? Opscode has avoided being overly prescriptive, which by and large I think is a good thing. Having a set of rules to base discussion on helps drive out what we as a community think is good style.
Foodcritic ships with more than 30 default rules and can be easily extended. Both Etsy and CustomInk have contributed extensive and valuable rules, which extend the coverage, and the Foodcritic documentation gives clear instructions on how to add your own, either to be considered as default rules or pertinent to your own organization’s standards.
Foodcritic is an excellent tool, but it doesn’t actually test the syntax of your Ruby. Thankfully, Knife already has built-in functionality for this. It’s simple but effective, using Ruby syntax checking to verify every file in a cookbook ending in .rb and erb.
The final obvious area to test is the style of your cookbooks against community Ruby standards. An ideal tool for this is Tailor. The project describes itself as follows:
Tailor parses Ruby files and measures them with some style and static analysis “rulers.” Default values for the Rulers are based on a number of style guides in the Ruby community as well as what seems to be common. More on this here.
Tailor’s goal is to help you be consistent with your style throughout your project, whatever style that may be.
Strainer grew out of the realization that with the combination of a linter, syntax checker, and style guide, one potentially has three separate commands to run to test one’s code. That’s not very convenient or efficient. Strainer allows a collection of testing tools to be grouped together under one file and run with one command. This makes it very easy to plumb the whole collection of tools together, and run as a single job on a continuous integration server.
Getting Started
Knife cookbook test is already included for you if you installed Chef. To check syntax, simply run:
$ knife cookbook test mycookbook
You may need to specify your cookbook path with the -o, --cookbook-path option.
Assuming you have already run berks init in your cookbook directory, you will already have a Gemfile. Foodcritic, Tailor, and Strainer are all shipped as Rubygems, so add a line in your Gemfile for each gem, and then run bundle install. For now we’ll remove the kitchen paraphernalia, and concentrate purely on the linting and static analysis aspects. Our Gemfile, therefore, looks like this:
$ cat Gemfile
source 'https://rubygems.org'
gem 'berkshelf'
gem 'foodcritic'
gem 'tailor'
gem 'strainer'
Running bundle install yields:
$ bundle install
Fetching gem metadata from https://rubygems.org/........
Fetching gem metadata from https://rubygems.org/..
Resolving dependencies...
Using i18n (0.6.1)
Using multi_json (1.7.6)
Using activesupport (3.2.13)
Using addressable (2.3.4)
Using builder (3.2.2)
Using gyoku (1.0.0)
Using nokogiri (1.5.9)
Using akami (1.2.0)
Using timers (1.1.0)
Using celluloid (0.14.1)
Using hashie (2.0.5)
Using chozo (0.6.1)
Using multipart-post (1.2.0)
Using faraday (0.8.7)
Using json (1.8.0)
Using minitar (0.5.4)
Using mixlib-config (1.1.2)
Using mixlib-shellout (1.1.0)
Using retryable (1.3.3)
Using erubis (2.7.0)
Using mixlib-log (1.6.0)
Using mixlib-authentication (1.3.0)
Using net-http-persistent (2.8)
Using net-ssh (2.6.7)
Using solve (0.4.4)
Using ffi (1.8.1)
Using gssapi (1.0.3)
Using httpclient (2.2.0.2)
Using little-plugger (1.1.3)
Using logging (1.6.2)
Using rubyntlm (0.1.1)
Using rack (1.5.2)
Using httpi (0.9.7)
Using nori (1.1.5)
Using wasabi (1.0.0)
Using savon (0.9.5)
Using uuidtools (2.1.4)
Using winrm (1.1.2)
Using ridley (0.12.4)
Using thor (0.18.1)
Using yajl-ruby (1.1.0)
Using berkshelf (1.4.5)
Using gherkin (2.11.8)
Using rak (1.4)
Using polyglot (0.3.3)
Using treetop (1.4.14)
Using foodcritic (2.1.0)
Using log_switch (0.4.0)
Using strainer (2.1.0)
Using tins (0.8.0)
Using term-ansicolor (1.2.2)
Using text-table (1.2.3)
Using tailor (1.2.1)
Using bundler (1.3.5)
Your bundle is complete!
Gems in the group integration were not installed.
Use `bundle show [gemname]` to see where a bundled gem is installed.
Once installed, running foodcritic without options will yield the following (or similar) options:
> foodcritic
foodcritic [cookbook_paths]
-r, --[no-]repl Drop into a REPL for interactive rule editing.
-t, --tags TAGS Only check against rules with the specified tags.
-f, --epic-fail TAGS Fail the build if any of the specified tags are matched.
-c, --chef-version VERSION Only check against rules valid for this version of Chef.
-C, --[no-]context Show lines matched against rather than the default summary.
-I, --include PATH Additional rule file path(s) to load.
-S, --search-grammar PATH Specify grammar to use when validating search syntax.
-V, --version Display the foodcritic version.
Foodcritic has the idea of rules, against which your cookbook code is tested. Examples range from stylistic—FC019: Access node attributes in a consistent manner—to syntactical—FC010: Invalid search syntax—to portable: FC024: Consider adding platform equivalents.
To get started, simply navigate to a directory or folder containing a cookbook and run:
> foodcritic .
If you wish to include extra rules, clone the CustomInk and Etsy repositories into a convenient location, and include the location with the -I --include argument.
The tailor command line will, by default, look in a lib directory for Ruby files, and check style against a standard set of guidelines. These guidelines are configurable, either on the command line or in a configuration file. For testing cookbooks, the following command line will provide a sensible testing regime:
$ tailor */**/*.rb
Note that this will not check ERB templates, and it won’t find any files more than one directory deep. You can compare what Tailor tested against what you have in your cookbook by running the following (on a Linux/Unix system):
$ find . -name \*.rb
Example
To explore Foodcritic, let’s pick a cookbook from the community site at random, and see how it measures up:
PS C:\Users\stephen\src> knife cookbook site download monit
Downloading monit from the cookbooks site at version 0.7.0 to C:/Users/stephen/src/monit-0.7.0.tar.gz
Cookbook saved: C:/Users/stephen/src/monit-0.7.0.tar.gz
PS C:\Users\stephen\src> tar xzvf .\monit-0.7.0.tar.gz
...
PS C:\Users\stephen\src> cd .\monit
PS C:\Users\stephen\src\monit> foodcritic .
FC012: Use Markdown for README rather than RDoc: ./README.rdoc:1
FC023: Prefer conditional attributes: ./recipes/default.rb:5
FC027: Resource sets internal attribute: ./recipes/default.rb:14
FC043: Prefer new notification syntax: ./libraries/monitrc.rb:8
FC043: Prefer new notification syntax: ./recipes/default.rb:20
FC045: Consider setting cookbook name in metadata: ./metadata.rb:1
PS C:\Users\stephen\src\monit>
In this case, the Monit cookbook is using an out-of-date README format. Additionally, when dropping off the default Monit config, it wraps the resource in an if condition rather than using the cookbook\_file only\_if metaparameter. The Monit service explicitly sets the enabled attribute to true, when this would be better set by using the action parameter. On two occasions, deprecated notification syntax is used and finally, the name of the cookbook is not explicitly set in the metadata.
Let’s fix each of these in turn. First, on closer inspection, there’s already a README.md, but it isn’t written in Markdown. Fixing that is pretty simple in this case. Now let’s remove the old rdoc version.
Looking at the conditional logic in the default recipe:
if platform?("ubuntu")
cookbook_file "/etc/default/monit" do
source "monit.default"
owner "root"
group "root"
mode 0644
end
end
The cookbook metadata doesn’t specify which platforms it supports, but it seems to assume based on which Monit is available in the default package repositories. Rather than leave it to guesswork, it would be better to remove the platform check altogether and explicitly state that the cookbook supports only Ubuntu. As other platforms are tested, they can and should be added to both the README and the metadata. While we’re at it, we can add a name parameter to the metadata, so if the name of the directory containing the cookbook changes, knife cookbookcommands still function. The metadata now reads:
name "monit"
maintainer "Alex Soto"
maintainer_email "apsoto@gmail.com"
license "MIT"
description "Configures monit. Originally based off the 37 Signals Cookbook."
long_description IO.read(File.join(File.dirname(__FILE__), 'README.md'))
version "0.7"
supports "ubuntu"
The notification syntax is next. It currently reads:
notifies :restart, resources(:service => "monit"), :immediately
This should be:
notifies :restart, "service[monit]", :immediately
Finally, let’s change the service resource to start and enable Monit:
service "monit" do
action [:enable, :start]
supports [:start, :restart, :stop]
end
Having made these changes, let’s run Foodcritic again:
PS C:\Users\stephen\src\monit> foodcritic .
PS C:\Users\stephen\src\monit>
We now have a clean cookbook, which meets all the default Foodcritic rules.
So what about knife cookbook test? You get this for free, it’s just available within Chef. We can test our irc cookbook:
$ knife cookbook test irc
checking irc
Running syntax check on irc
Validating ruby files
Validating templates
Running Tailor against our irc cookbook gives promising results:
$ tailor **/*.rb
#------------------------------------------------------------------------------#
# Tailor Summary |
#------------------------------------------------------------------------------#
# File | Probs |
#------------------------------------------------------------------------------#
# recipes/default.rb | 0 |
#------------------------------------------------------------------------------#
# TOTAL | 0 |
#------------------------------------------------------------------------------#
However, running against another randomly selected cookbook from the community site yields complaints about line length:
$ tailor **/*.rb
#------------------------------------------------------------------------------#
# File:
# attributes/default.rb
#
# File Set:
# default
#
# Problems:
# 1.
# * position: 20:114
# * property: max_line_length
# * message: Line is 114 chars long, but should be 80.
# 2.
# * position: 21:99
# * property: max_line_length
# * message: Line is 99 chars long, but should be 80.
#
#------------------------------------------------------------------------------#
#------------------------------------------------------------------------------#
# File:
# recipes/default.rb
#
# File Set:
# default
#
# Problems:
# 1.
# * position: 22:99
# * property: max_line_length
# * message: Line is 99 chars long, but should be 80.
#
#------------------------------------------------------------------------------#
#------------------------------------------------------------------------------#
# Tailor Summary |
#------------------------------------------------------------------------------#
# File | Probs |
#------------------------------------------------------------------------------#
# attributes/default.rb | 2 |
# recipes/default.rb | 1 |
#------------------------------------------------------------------------------#
# Error | 3 |
#------------------------------------------------------------------------------#
# TOTAL | 3 |
#------------------------------------------------------------------------------#
Strainer is designed to funnel a range of disparate tests into one place. With a single configuration file, we can encapsulate all the tests we want to run, into a single command that is trivial for a continuous integration server to run. All that is required is the creation of a Strainerfile in the root of the cookbook:
$ cat Strainerfile
# Strainerfile
knife test: bundle exec knife cookbook test $COOKBOOK
foodcritic: bundle exec foodcritic -f any $SANDBOX/$COOKBOOK
tailor: bundle exec tailor $SANDBOX/$COOKBOOK/**/*.rb
Now in a single command we can see the health of our cookbook:
$ bundle exec strainer test
# Straining 'irc (v0.1.0)'
knife test | bundle exec knife cookbook test irc
knife test | /home/tdi/.gem/ruby/1.9.3/gems/bundler-1.3.5/lib/bundler/rubygems_integration.rb:214:in `block in replace_gem': chef is not part of the bundle. Add it to Gemfile. (Gem::LoadError)
knife test | from /home/tdi/.gem/ruby/1.9.3/bin/knife:22:in `<main>'
knife test | Terminated with a non-zero exit status. Strainer assumes this is a failure.
knife test | FAILURE!
foodcritic | bundle exec foodcritic -f any /home/tdi/chef-repo/cookbooks/irc
foodcritic | FC008: Generated cookbook metadata needs updating: /home/tdi/chef-repo/cookbooks/irc/metadata.rb:2
foodcritic | FC008: Generated cookbook metadata needs updating: /home/tdi/chef-repo/cookbooks/irc/metadata.rb:3
foodcritic | Terminated with a non-zero exit status. Strainer assumes this is a failure.
foodcritic | FAILURE!
tailor | bundle exec tailor /home/tdi/chef-repo/cookbooks/irc/**/*.rb
tailor | #------------------------------------------------------------------------------#
tailor | # Tailor Summary |
tailor | #------------------------------------------------------------------------------#
tailor | # File | Probs |
tailor | #------------------------------------------------------------------------------#
tailor | # irc/recipes/default.rb | 0 |
tailor | #------------------------------------------------------------------------------#
tailor | # TOTAL | 0 |
tailor | #------------------------------------------------------------------------------#
tailor | SUCCESS!
Aha, we just need to ensure that Chef is in the Gemfile. I know from experience that if we don’t set a version constraint, Bundler installs a prehistoric version of Chef, which breaks everything. I don’t fully understand why, but in the spirit of full disclosure, I tell you. This sort of thing will happen—you’ll bash your head on the desk for a few hours wondering why things aren’t working as they should, but at times like this, I think it’s valuable to reflect on quite how pioneering this discipline is. Many of the ideas we’re putting into practice, and the tools we’re using, are very new. The community is responsive, supportive, and fun. The cost of this is that sometimes things don’t always go as smoothly as we’d like.
Update the Gemfile, include Chef, and run bundle install. Once the bundle has installed, we can run Strainer one more time:
$ bundle exec strainer test
# Straining 'irc (v0.1.0)'
knife test | bundle exec knife cookbook test irc
knife test | checking irc
knife test | Running syntax check on irc
knife test | Validating ruby files
knife test | Validating templates
knife test | SUCCESS!
foodcritic | bundle exec foodcritic -f any /home/tdi/chef-repo/cookbooks/irc
foodcritic | FC008: Generated cookbook metadata needs updating: /home/tdi/chef-repo/cookbooks/irc/metadata.rb:2
foodcritic | FC008: Generated cookbook metadata needs updating: /home/tdi/chef-repo/cookbooks/irc/metadata.rb:3
foodcritic | Terminated with a non-zero exit status. Strainer assumes this is a failure.
foodcritic | FAILURE!
tailor | bundle exec tailor /home/tdi/chef-repo/cookbooks/irc/**/*.rb
tailor | #------------------------------------------------------------------------------#
tailor | # Tailor Summary |
tailor | #------------------------------------------------------------------------------#
tailor | # File | Probs |
tailor | #------------------------------------------------------------------------------#
tailor | # irc/recipes/default.rb | 0 |
tailor | #------------------------------------------------------------------------------#
tailor | # TOTAL | 0 |
tailor | #------------------------------------------------------------------------------#
tailor | SUCCESS!
Our irc cookbook has failed on FC008. Fixing this is left as an exercise for the reader!
Advantages and Disadvantages
The advantage of this set of tools is that they are absolutely the lowest barrier to entry possible. They can be built right into a simple continuous integration or continuous delivery pipeline. For an example of how simple this is to achieve with a public service such as TravisCI, see Nathen Harvey’s blog posts on Foodcritic and TravisCI and Knife Test and TravisCI.
Once you’ve got the discipline of running regular tests, checking your style and syntax against community standards, you can start to layer in more complex testing.
The only disadvantage is that there can be some tension in finding a community style that suits all the members of your team, and then enforcing it. Thankfully, Tailor is pretty much infinitely configurable, so as long as you can find a style that you all agree on, and isn’t massively at odds with the rest of the Ruby or Chef community, you’re probably going to derive benefit from monitoring, measuring, and enforcing adherence to that style.
Summary and Conclusion
If you do nothing else, do this. The cost of implementation is low, and the return on investment is high. Get yourself set up with the basics of a continuous integration pipeline, where your static analysis and linting tests are run on every commit, and then start to layer on more advanced testing.
To Conclude
The workflow and tooling recommended in this chapter represent a snapshot in time. It is very much my hope that by emphasizing the philosophical aspects of test-driven infrastructure and the rationale behind the current selection of tools, there is value in this book that extends way beyond a specific set of recommendations.
However, to summarize, my current recommended toolchain and workflows are, in brief, as follows:
1. Build upon a solid foundation by using a combination of Berkshelf and Test Kitchen to orchestrate and manage the infrastructure and cookbooks that build it.
2. Write acceptance tests first, using Gherkin as the requirements capturing language, Cucumber as the test runner, and Leibniz as the interface to the provisioning engine of Test Kitchen and Berkshelf.
3. Write integration tests next, using Test Kitchen as the test runner, and using whichever test framework most suits your experience and skillset.
4. Write unit tests last, using Chefspec, and think seriously about the art and science of unit testing, and making appropriate use of RSpec’s mocking and stubbing capabilities to keep tests isolated and fast.
5. Wrap all your cookbook development endeavors in a process that reinforces agreed standards of code quality and style, using Strainer as the collecting and running mechanism, and using Knife Cookbook Test, Foodcritic, and Tailor.
6. Automate the running of your static, linting, and unit tests, using Guard, and also a form of continuous integration such as Travis CI or Jenkins.
7. Automate the running of cookbook integration tests by driving Test Kitchen from within a continuous integration system such as Jenkins, or if using an appropriate driver, Travis.
8. Treat your acceptance tests as a foundation for monitoring the day-to-day behavior of your built systems, plugging relative components into your monitoring and alerting systems.
[6] We can do this with Ruby easily enough, too: ruby -e "require 'json'; JSON.pretty_generate(IO.read('/home/tdi/.berkshelf/config.json'\))"
All materials on the site are licensed Creative Commons Attribution-Sharealike 3.0 Unported CC BY-SA 3.0 & GNU Free Documentation License (GFDL)
If you are the copyright holder of any material contained on our site and intend to remove it, please contact our site administrator for approval.
© 2016-2026 All site design rights belong to S.Y.A.