Coding For Dummies (2015)
Part III. Putting Together a Web Application
Chapter 11. Researching Your First Web Application
In This Chapter
![]() Dividing an app into smaller pieces, or steps
Dividing an app into smaller pieces, or steps
![]() Using code from various sources to perform those steps
Using code from various sources to perform those steps
![]() Creating app designs by reviewing and improving upon existing solutions
Creating app designs by reviewing and improving upon existing solutions
If we knew what it was we were doing, it would not be called research.
—Albert Einstein
With the basic requirements defined, the next step is researching how to build the application. Apps consist of two main parts: functionality and form (design). For each of these parts, you must:
· Divide the app into steps: Although it’s good practice to divide anything you are going to build into steps, diving apps into manageable pieces is an absolute necessity for large software projects with many people working across multiple teams.
· Research each step: When doing your research, the first question to ask is whether you must build a solution yourself or use an existing solution built by someone else. Building your own solution usually is the best way to directly address your need, but it takes time, whereas implementing someone else’s solution is fast but may only meet part of your needs.
· Choose a solution for each step: You should have all the solutions selected before writing any code. For each step, decide whether you are writing your own code, or using pre-built code. If you are not writing the code yourself, compare a few options so you can pick one with confidence.
Dividing the App into Steps
The biggest challenge with dividing an app into steps is knowing how big or small to make each step. The key is to make sure each step is discrete and independent. To test whether you have the right number of steps, ask yourself if someone else could solve and complete the step with minimal guidance.
Finding your app’s functionality
Recall that McDuck’s wants to promote restaurant visits by using a web application that sends customers an offer or coupon if they’re close to a restaurant. To make this job easier, you are to create the app for customers visiting just one store.
Your first move is to break down this app into steps needed for the app to function. These steps should not be too specific: Think of them in broad terms, as if you were explaining the process to a kindergartner. With a pen and paper, write down these steps in order. Don’t worry about whether each step is correct, as your skill will improve with practice and time. To help you start, here are some clues:
· Assume the McDuck’s app activates when the customer presses a button in the app to check-in to a store.
· When the button is pressed, what are the two locations that the app must be aware of?
· When the app is aware of these two locations, what calculation involving these two locations must the computer make?
· After computing this calculation, what effect will the computer show?
Fill out your list now, and don’t continue reading until you’ve completed it.
Finding your app’s functionality: My version
The following is my version of the steps needed to make the app function according to McDuck’s specifications. My steps may differ from yours, of course, and this variation is completely fine. The important lesson here is that you understand why each of these steps is necessary for the app to work:
1. The customer presses a button on the app.
The instructions above said to initiate the app with the press of a button. That being said, there are two other options for launching the app:
· Executing the steps continuously in the background, regularly checking the customer’s location. Currently, this technique places a heavy drain on the battery, and is not usually recommended.
· Executing the steps only when the customer opens the app.
2. After the button is pressed, find the customer’s current location.
The customer’s location is one of the two locations you need to identify. The customer’s current location is not fixed, and it changes, for example, when the customer is walking or driving.
3. Find the fixed location of a McDuck’s store.
The McDuck’s restaurant location is the other location you need to identify. Because this is a pilot, you only need to identify the location for one McDuck’s restaurant, a fixed location that will not change. Hypothetically, assuming that the pilot is successful and that McDuck’s wants to implement this app for users visiting all 35,000 restaurants, you’d have to track many more restaurant locations. Additionally, in a larger rollout the locations would need to be updated regularly, as new restaurants open, and as existing restaurants move or close.
4. Calculate the distance between the customer’s current location and the McDuck’s restaurant, and name this distance Customer Distance.
This step calculates how far away the customer is from the McDuck’s restaurant. One complexity to be aware of — but not to worry about right now — is the direction in which the customer is moving. Although McDuck’s did not specify whether they want to display offers to customers heading both toward and away from their store, this may be a question worth asking anyway.
5. Convert five to ten minutes of customer travel into a distance called Threshold Distance.
McDuck’s CEO Duck Corleone wants to target customers who are five to ten minutes away from the store. Distance, in this sense, can be measured in both time and in units of distance such as miles. For consistency, however, plan to convert time into distance — translate those five to ten minutes into miles. The number of miles traveled in this time will vary by common mode of transportation and by location, because five to ten minutes of travel in New York City won’t get you as far as five to ten minutes of travel in Houston, Texas.
6. If the Customer Distance is less than the Threshold Distance, then show an offer to the customer.
Following McDuck’s specifications, the app should attract customers to come to the store, and so the app only shows offers to customers who are close to the restaurant. Another complexity to be aware of — but not to worry about right now — is that the Customer Distance can change quickly. Customers traveling by car could easily be outside the Threshold Distance one minute and inside it the next. Figure 11-1 shows the customers we want to target, relative to a fixed restaurant location.
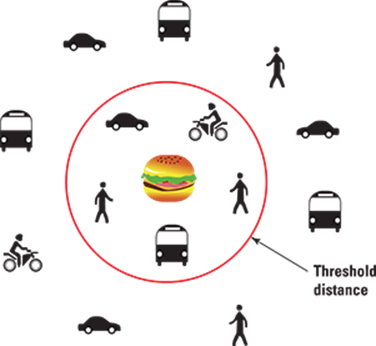
Figure 11-1: Customers we want to target based on a fixed restaurant location.
 Many software logic mistakes happen at this stage, because the programmer forgets to include a step. Take your time reviewing these steps and understanding why each step is essential, and why this list of steps is the minimum necessary to operate the app.
Finding your app’s form
After you settle on what the app will do, you must find the best way to present this functionality to users. There are many ways that users can interact with your app’s functionality, so picking out the right approach can be tricky. Designing an app can be fun and rewarding, but it’s hard work. After the first iteration of an app’s design, developers are often disappointed: Users will rarely use the product as intended and will find many parts of the app confusing. This is natural — especially because at this stage you’re often creating something or having the user do something that hasn’t been done before. Your only choice is to keep trying, to keep testing, modifying, and creating new designs until your app is easy for everyone to use. Although the iPod is a hardware product, the approach Apple took to perfect it is basically the same. Figure 11-2shows how the design can change over time, with the button layout changing from the original click-wheel to individual horizontal buttons, and finally back to the click-wheel again.
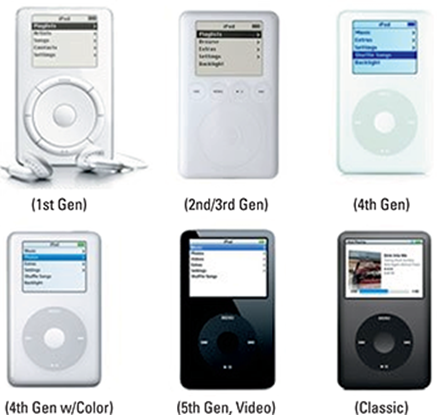
Figure 11-2: Apple’s iPod design changes over multiple product releases.
The following list describes a basic design process to create the look and feel of your app:
1. Define the main goals of your app.
If you were at a party, and you had to explain what your app did in one sentence, what would it be? Some apps help you hail a taxi, reserve a table at a restaurant, or book a flight. Famously, the goal for the iPod was 1,000 songs in your pocket accessible within three clicks, which helped create an easy to use user interface. An explicitly defined goal will serve as your north star, helping you to resolve questions and forcing you to keep trying.
2. Break these goals into tasks.
Each goal is the sum of many tasks, and listing them will help you design the shortest path to completing each task and ultimately the goal. For instance, if your app’s goal is for a user to book a flight, then the app will likely need to record desired flying times and destinations, search and select flights departing during those times, record personal and payment information, present seats for selection, and confirm payment of the flight. Sometimes designers will segment tasks by user persona, another name for the person completing the task. For example, this app may be used by business and leisure travelers. Leisure travelers may need to do heavy searching and pick flights based on price, while business travelers mostly rebook completed flights and pick flights based on schedule.
3. Research the flows and interactions necessary to accomplish these tasks.
For example, our flight app requires the user to select dates and times. One immediate question is whether the date and time should be two separate fields or one field, and on a different or same screen as the destination. Try to sketch what feels intuitive for you, and research how others have solved this problem. You can use Google to find other travel apps, list all the various designs, and either pick or improve upon the design you like best. Figure 11-3 shows two different approaches to flight search. Similarly, you can also use design-centric sites, such aswww.dribbble.com, to search designer portfolios for features and commentary.
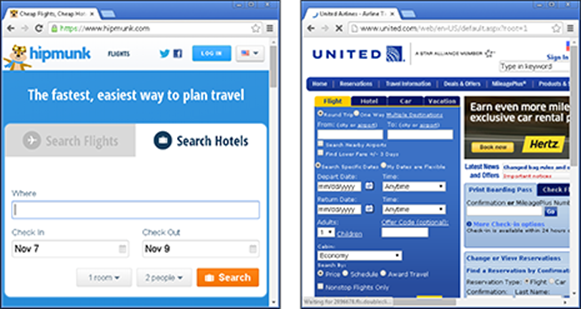
Figure 11-3: Different designs for flight reservation from Hipmunk.com and United Airlines.
4. Create basic designs, called wireframes, and collect feedback.
Wireframes, as shown in Figure 11-4, are low fidelity website drawings which show structurally how site content and interface interact. Wireframes are simple to create, but should have enough detail to elicit feedback from others. Many wireframe tools use a simple almost pencil-like drawing to help anyone providing comments to focus on the structural and bigger picture design, instead of smaller details like button colors or border thicknesses. Feedback at this stage to refine design is so important because the first wireframe likely does not address users’ main concerns and overcomplicates the tasks a user needs to do.
With mobile devices increasing in popularity relative to desktop devices, remember to create mobile and desktop versions of your wireframes.
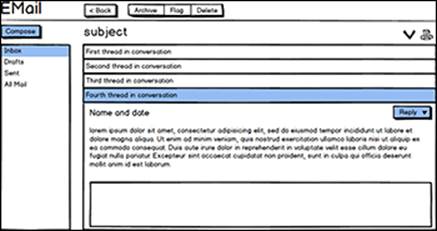
Figure 11-4: A wireframe for an email client.
5. Create mock-ups and collect more feedback. (See Figure 11-5.)
After you have finished talking to your client and to users, it is time to create mock-ups, which are high fidelity website previews. These designs have all the details a developer needs to create the website including final layout, colors, images, logos, and sequences of screens to show when the user interacts with the web page. After creating a mock-up, plan to collect more feedback.
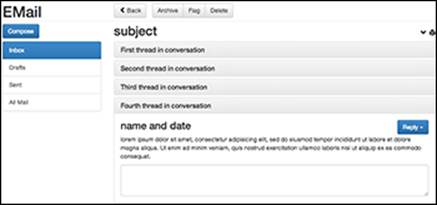
Figure 11-5: A mock-up for an email client.
Collecting feedback at every stage of the design process might seem unnecessary, but it is much easier to explore different designs and make changes before any code has been written.
6. Send the final file to the developers.
After the mock-up has been created and approved, you typically send a final image file to the developer. Although this file could be in any image file format like PNG or JPG, the most popular file format used by designers is PSD, created using Adobe Photoshop.
Finding your app’s form: The McDuck’s Offer App design
In this section you follow the design process described in the previous section to create a simple design for the McDuck’s Offer app. As part of the design, you should do the following things:
1. Define the main goals of your app.
The main goal for McDuck’s is to use offers to attract customers to restaurants.
2. Break these goals into tasks.
Customers need to view the offer, navigate to the store, and use the offer.
3. Research the flows and interactions needed to accomplish these tasks.
Because this is the first iteration of the app, let’s focus on just allowing the customer to view the offer.
One function that McDuck’s did not specify is the ability to save single-use coupons and to share general-use coupons. However, when looking at other apps, like the ones in Figure 11-6, the need for this becomes more obvious. Also, some similar apps allow the customer to spend money to buy coupons — maybe this functionality should be added as well. These questions would be great to present to McDuck’s later.
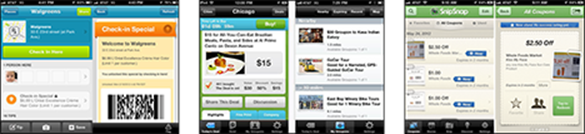
Figure 11-6: Example flow from deals and offer apps currently in the market.
The apps in Figure 11-6 also all display various “call to action” buttons to the user before displaying the deal. Some apps ask the user to check-in to a location, other apps ask the user to purchase the coupon, and still others show a collection of new or trending coupons today.
For now, and to keep things simple, let’s assume that our McDuck’s app has a button that allows customers to check-in to their favorite McDuck’s location, and when clicked within the target distance the app displays a general-use coupon that customers receive for free.
4. Create basic designs, called wireframes, and collect feedback.
A sample design for the app, based on the look and feel of other apps, appears in Figure 11-7.

Figure 11-7: A sample wireframe for the McDuck’s offer app.
5. Create mock-ups and collect more feedback.
Ordinarily, you would create mock-ups, which are more polished designs with real images, from the wireframes and present them to customers for feedback. In this case, however, the app is simple enough that you can just start coding.
Identifying Research Sources
Now that you know what your app will do, you can focus on how your app will do it. After breaking down your app into steps, you go over each step to determine how to accomplish it. For more complicated apps, developers first decide which of these two methods is the best way to complete each step:
· Building code from scratch: This is the best option if the functionality in a particular step is unique or strategically important, an area of strength for the app, and existing solutions are expensive or non-existent. With this option, you and developers within the company write the code.
· Buying or using a pre-existing solution: This is the best option if the functionality in a particular step is common, non-core technical area for the app, and existing solutions are competitively priced. With this option, you and developers working on the app use code written by external third party developers.
One company that recently made this decision — publicly and painfully — is Apple with its Maps product. In 2012, after years of using Google Maps on its mobile devices, Apple decided to introduce its own maps application that it had been developing for two years. Although the Maps product Apple built internally turned out to initially be a failure, Apple decided to build its own mapping application because it viewed mapping capabilities as strategically important and because turn-by-turn navigation solutions were not available in the solution provided by Google.
Whether you’re building or buying, research is your next step. Here are some sources to consider when researching:
· Search engines: Use Google.com or another search engine to type in what you are trying to accomplish with each step. One challenge can be discovering how the task you’re trying to achieve is referred to by programmers. For instance, if I want to find my current location, I might enter show my location in an app into a search engine, but this results in a list of location-sharing apps. After reading a few of the top ten results, I see that location-tracking is also referred to as geolocation. When I search again for geolocation the top results include many examples of code that shows my current location.
For more generic searches for code examples, try including the name of the computer language and the word syntax. For example, if you want to insert an image on a web page, search for image html syntax to find code examples.
· Prior commercial and open-source apps: Examining how others built their apps can give you ideas on how to improve upon what already exists, and insight into pushing existing technology to the limit to achieve an interesting effect. For instance, say you wanted to build a mobile app that recognized TV ads from the “audio fingerprint” of those ads and directed viewers to a product page on a mobile device. To create this app, you could build your own audio fingerprinting technology, which would likely take months or longer to build, or you could partner with Shazam, a commercial application, or Echoprint, an open-source music fingerprinting service. Either app can record a 10 to 20-second audio sample, create a digital fingerprint after overcoming background noise and poor microphone quality, compare the fingerprint to large audio database, and then return identification information for the audio sample.
· Industry news and blogs: Traditional newspapers, like the Wall Street Journal, and tech blogs, like TechCrunch.com, report on the latest innovations in technology. Regularly reading or searching through these sites is a good way to find others who have launched apps in your space.
· API directories: You can easily search thousands of APIs for the functionality you need to implement. For example, if you were creating an app that used face recognition instead of a password, you could search for face detection APIs and use an API you find instead of trying to build a face detection algorithm from scratch. Popular API directories include www.programmableweb.com and www.mashape.com.
As discussed in Chapter 9, APIs are a way for you to request and receive data from other programs in a structured, predictable, documented way.
· User-generated coding websites: Developers in different companies frequently face the same questions on how to implement functionality for features. Communities of developers online talk about shared problems and contribute code so anyone can see how these problems have been solved in the past. You can participate in developer conversation and see the code other developers have written by using www.stackoverflow.com and www.github.com.
Researching the Steps in the McDuck’s Offer App
To implement the functionality in the McDuck’s Offer app, you broke down the app into six steps using plain English. Now, research how you can convert those steps into code using the resources listed in the previous section. Your app will require HTML to put content on the page, CSS to style that content, and JavaScript for the more interactive effects. Do your best to research each of the steps on your own, write down the answers, and then look over the suggested code in the next section:
· “The customer presses a button on the app”: This code creates a button that triggers every subsequent step. Creating a button on a web page is a very common task, so to narrow down the results search for html button tag. Review some of the links in the top 10 search results, and then write down the HTML tag syntax to create a button that says “McDuck’s Check-in.”
In your search results, sites like w3schools.com are designed for beginners, and will include example code and simple explanations.
· “After the button is pressed, find the customer’s current location:” In web lingo, finding a user’s location is called geolocation. I will provide you with JavaScript geolocation code, along with an explanation for how it works and where I found it. To trigger this JavaScript code, you need to add an attribute to the HTML button tag to call a JavaScript function named getlocation().
 As described in Chapter 4, HTML attributes are inserted in the opening HTML tag.
Search for html button javascript button on click to find out how to insert the onclick attribute to your button HTML code. Review the search results, and then write down the HTML syntax for your button code.
· “Find the fixed location of a McDuck’s store:” You’ll need a real-world address to serve as the McDuck’s store. Use a mapping application like maps.google.com to find the street address of a burger restaurant near you. Computers typically represent physical addresses using latitude and longitude numbers instead of street addresses. You can search for websites that convert street addresses into latitude and longitude numbers, or if you’re using Google Maps, you can find the numbers in the URL, as shown in Figure 11-8. The first number after the @ sign and up to the comma is the latitude, and the second number between the two commas is the longitude. Figure 11-8 shows a McDonald’s store in New York City, and the latitude is 40.7410344, and the longitude is –73.9880763.
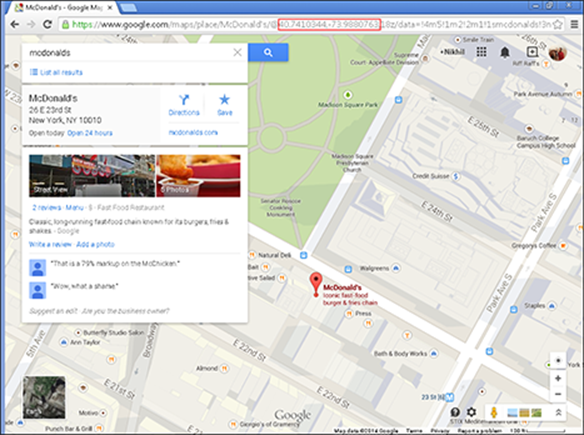
Figure 11-8: Latitude and longitude of a McDonald’s in New York City.
Track down the latitude and longitude numbers for the burger restaurant of your choice, up to seven decimal places, and write them down on a piece of paper.
Include a negative sign if you see one, and all seven decimal places for the greatest accuracy.
· “Calculate the distance between the customer’s current location and the McDuck’s restaurant, and name this distance Customer Distance”: Latitude and longitude are coordinates that represent a location on a sphere. The distance along the surface of the sphere between two sets of latitude and longitude coordinates is calculated using the Haversine formula. You can find a JavaScript version of the formula at stackoverflow.com/questions/27928/how-do-i-calculate-distance-between-two-latitude-longitude-points. This is the formula you will use to calculate distance when creating the McDuck’s app, and I will include this code for you.
Don’t get bogged down in the details of how the Haversine formula works. Abstraction is an important concept to remember when programming, and this basically means that as long as you understand the inputs to a system, and the outputs, you don’t really need to understand the system itself, much as you don’t need to understand the mechanics of the internal combustion engine in order to drive a car.
· “Convert five to ten minutes of customer travel into a distance called Threshold Distance”: Using the most common method of transportation in your current city, write down the number of miles you could you travel, on average, in five to ten minutes.
· “If the Customer Distance is less than the Threshold Distance then show an offer to the customer”: The two pieces to research for this step are the conditional statement that decides when to show the offer to the consumer, and the actual offer:
· The conditional statement: This is written in JavaScript using an if-else statement. If the customer is within the threshold distance, then it shows the offer; otherwise (else) it shows another message. To review the if-else syntax, search Google or another search engine forJavaScript if-else statement syntax (or refer to Chapter 9 to review the coverage of the if-else statement syntax there).
· The offer to show to the consumer: The easiest way to show an offer is to use the JavaScript alert(). Search for JavaScript alert syntax.
After you’ve conducted your searches, write down your if-else statement with a text alert() for a free burger if the customer is within the Threshold Distance, and a text alert() notifying the customer they have checked in.
When you have the if-else statement working, you can replace the text alert() with an image. Search http://images.google.com for a burger coupon image. After you find the image, left-click on it from the image grid in the search results, and left-click again on View Image button. When the image loads the direct link to the image will be in the URL address bar in the browser. The code to insert the image is shown in Chapter 4.
Choosing a Solution for Each Step
With your research finished, it’s time to find the best solution. If multiple solutions exist for each step, you now need to choose one. To help you choose, weigh each of your multiple solutions across a variety of factors, such as these:
· Functionality: Will the code you write or pre-built solution you found do everything you need?
· Documentation: Is there documentation for the pre-built solution, like instructions or a manual, that is well written with examples?
· Community and support: If something goes wrong while writing your code, is there a community you can turn to for help? Similarly, does the pre-built solution have support options you can turn to if needed?
· Ease of implementation: Is implementation as simple as copying a few lines of code? Or is a more complex setup or an installation of other supporting software necessary?
· Price: Every solution has a price, whether it is the time spent coding your own solution or the money paid for someone else’s pre-built code. Think carefully about whether your time or money is more important to you at this stage.
The following are suggested solutions for the previous McDuck’s Offer app research questions. Your answers may vary, so review each answer to see where your code differs from mine:
· “The customer presses a button on the app”: The HTML tag syntax to create a button that says “McDuck’s Check-in” is:
<button>McDuck's Check-in</button>
The syntax for an HTML button is available here www.w3schools.com/tags/tag_button.asp.
· “After the button is pressed, find the customer’s current location”: The HTML syntax for your button code is:
<button onclick="getLocation()">McDuck's Check-in</button>
The syntax for calling a JavaScript function by pressing a button is available here www.w3schools.com/jsref/event_onclick.asp.
· “Find the fixed location of a McDuck’s store”: I picked a McDonald’s store in New York City near Madison Square Park whose latitude is 40.7410344 and longitude is –73.9880763. The latitude and longitude for your restaurant, of course, will likely differ.
· “Calculate the distance between the customer’s current location and the McDuck’s restaurant, and name this distance Customer Distance”: The following is the actual code for the Haversine formula, used to calculate the distance between two location coordinates, found on Stackoverflow at stackoverflow.com/questions/27928/how-do-i-calculate-distance-between-two-latitude-longitude-points, I modified this code slightly so that it returned miles instead of kilometers:
function getDistanceFromLatLonInKm(lat1,lon1,lat2,lon2) {
var R = 6371; // Radius of the earth in km
var dLat = deg2rad(lat2-lat1); // deg2rad below
var dLon = deg2rad(lon2-lon1);
var a =
Math.sin(dLat/2) * Math.sin(dLat/2) +
Math.cos(deg2rad(lat1)) * Math.cos(deg2rad(lat2)) *
Math.sin(dLon/2) * Math.sin(dLon/2)
;
var c = 2 * Math.atan2(Math.sqrt(a), Math.sqrt(1-a));
var d = R * c * 0.621371; // Distance in miles
return d;
}
function deg2rad(deg) {
return deg * (Math.PI/180);
}
An explanation of how this formula works is outside the scope of this book, but make sure you understand the formula’s inputs (latitude and longitude) and the output (distance between two points in miles).
· “Convert five to ten minutes of customer travel into a distance called Threshold Distance”: In New York City, people usually walk, so traveling for five to ten minutes would take you 0.5 miles, which is my Threshold Distance.
· “If the Customer Distance is less than the Threshold Distance, then display an offer to the customer”: The syntax for the if-else statement with the two text alert() methods is:
If (distance < 0.5) {
alert("You get a free burger");
}
else {
alert("Thanks for checking in!");
}
The syntax for a JavaScript if-else statement is available at www.w3schools.com/js/js_if_else.asp.
All materials on the site are licensed Creative Commons Attribution-Sharealike 3.0 Unported CC BY-SA 3.0 & GNU Free Documentation License (GFDL)
If you are the copyright holder of any material contained on our site and intend to remove it, please contact our site administrator for approval.
© 2016-2026 All site design rights belong to S.Y.A.