Coding For Dummies (2015)
Part I. Getting Started with Coding
Chapter 3. Becoming a Programmer
In This Chapter
![]() Learning the process programmers follow when coding
Learning the process programmers follow when coding
![]() Seeing the different roles people play to create a program
Seeing the different roles people play to create a program
![]() Picking tools to starting coding offline or online
Picking tools to starting coding offline or online
The way to get started is to quit talking and begin doing.
—Walt Disney
Programming is a skill that can be learned by anyone. You might be a student in college wondering how to start learning, or a professional hoping to find a new job or improve your performance at your current job. In just about every case, the best way to learn how to code is to
· Have a goal of what you would like to build.
· Actually start coding.
In this chapter, you discover the process every programmer follows when programming, and the different roles programmers play to create a program (or, more commonly these days, an “app”). You also learn the tools to use when coding either offline or online.
Writing Code Using a Process
Writing code is much like painting, furniture making, or cooking — it isn’t always obvious how the end product was created. However, all programs, even mysterious ones, are created using a process. Two of the most popular processes used today are
· Waterfall: A set of sequential steps followed to create a program.
· Agile: A set of iterative steps followed to create a program. (See Figure 3-1.)
Let me describe a specific scenario to explain how these two process work. Imagine you want to build a restaurant app that does the following two things:
· It displays restaurant information, such as the hours of operation and the menu.
· It allows users to make or cancel reservations.
Using the waterfall method, you’d define everything the app needs to do: You’d design both the information-display and the reservation parts of the app, code the entire app, and then release the app to users. By contrast, using the agile method, you would define, design, and code only the information-display portion of the app, release it to users, and collect feedback. Based on the feedback collected, you would then redesign and make changes to the information-display to address major concerns. When you were satisfied with the information-display piece, you’d then define, design, and build the reservation part of the app. Again, you would collect feedback and refine the reservation feature to address major concerns.

Figure 3-1: The waterfall and agile processes are two different ways of creating software.
The agile methodology stresses shorter development times, and has increased in popularity as the pace of technological change has increased. The waterfall approach, on the other hand, demands that the developer code and release the entire app at once, but since completing a large project takes an enormous amount of time, changes in technology may have occurred before the finished product arrives. If you used the waterfall method to create our restaurant-app example, the technology to take user reservations may have changed by the time you get around to coding that portion of the app. Still, the waterfall approach remains popular in certain contexts, such as with financial and government software, where requirements and approval are obtained at the beginning of a project, and whose documentation of a project must be complete.
 The healthcare.gov website, released in October 2013, was developed using a waterfall style process. Testing of all the code occurred in September 2013, when the entire system was assembled. Unfortunately, the tests occurred too late and were not comprehensive, resulting in not enough time to fix errors before launching the site publicly.
Regardless of whether you pick the agile or waterfall methodology, coding an app involves four steps:
1. Researching what you want to build
2. Designing your app
3. Coding your app
4. Debugging your code
 On average, you will spend much more time researching, designing, and debugging your app than doing the actual coding, which is the opposite of what you may expect.
These steps are described in the sections that follow. You’ll use this process when you create your own app in Chapter 10.
Researching what you want to build
You have an idea for a web or mobile application, and usually it starts with “Wouldn’t it be great if … ” Before writing any code, it helps to do some investigating. Consider the possibilities in your project as you answer the following questions:
· What similar website/app already exists? What technology was used to build it?
· Which features should I include — and more importantly exclude — in my app?
· Which providers can help create these features? For example, companies like Google, Yahoo, Microsoft, or others may have software already built that you could incorporate into your app.
To illustrate, consider the restaurant app I discussed earlier. When conducting market research and answering the three questions above, searching using Google is usually the best resource. Searching for restaurant reservation app shows existing restaurant apps that include OpenTable, SeatMe, and Livebookings. OpenTable, for example, allows users to reserve a table from restaurants displayed on a map using Google Maps.
In the restaurant app example, you’d want to research exactly what kinds of restaurant information you’d need to provide, and how extensive the reservation system portion of the app should be. In addition, for each of these questions you must decide whether to build the feature from scratch or use an existing provider. For example, when providing restaurant information do you want to just show name, cuisine, address, telephone number, and hours of operation, or do you also want to show restaurant menus? When showing restaurant data, do you prefer extensive coverage of a single geographical area, or do you want national coverage even if that means you’d cover fewer restaurants in any specific area?
Designing your app
Your app’s visual design incorporates all of your research and describes exactly how your users will interact with every page and feature. Because your users will be accessing your site from desktop, laptop, and mobile devices, you’d want to make sure you create a responsive (multi-device) design and carefully consider how your site will look on all these devices. At this stage of the process, a general web designer, illustrator, or user interface specialist will help create visual designs for the app.
 Many responsive app designs and templates can be found on the Internet and used freely. For specific examples, see Chapter 8, or search Google using the query responsive website design examples.
There are two types of visual designs (see Figure 3-2):
· Wireframes: These are low fidelity website drawings that show structurally the ways your content and your site’s interface interact.
· Mockups: These are high fidelity website previews that include colors, images, and logos.
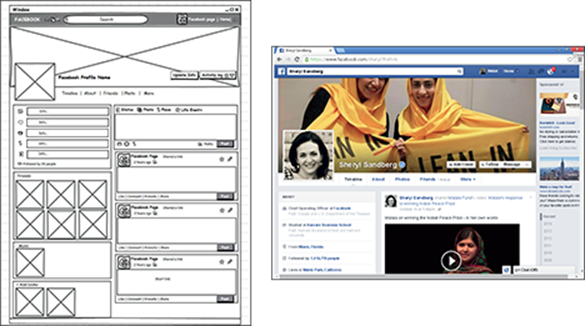
Figure 3-2: Wireframes (left) are simple site renderings, whereas mockups (right) show full site previews.
Balsamiq is a popular tool used to create wireframes, and Photoshop is a popular tool to create mockups. However, you can avoid paying for additional software by using PowerPoint (PC), Keynote (Mac), or the free and open-source OpenOffice to create your app designs.
Professional designers create mockups with Adobe Photoshop and use layers, which isolate individual site elements. A properly created layered Photoshop file helps developers more easily write the code for those website elements.
In addition to visual design, complex apps will also have technical designs and decisions to finalize. For example, if your app stores and retrieves user data you will need a database to perform these tasks. Initial decisions here will include the type of database to add, the specific database provider to use, and the best way to integrate the database into the application. Additionally, developers must design the database by choosing the fields to store. The process is similar to the process of creating a spreadsheet to model a company’s income — you first decide the number of columns to use, and whether you’ll include fields as a percentage of revenue or a numerical value, and so on. Similarly, other features like user logins or credit card payments all require you to make choices on how to implement these features.
Coding your app
With research and design done, you are now ready to code your application. In everyday web development, you would begin by choosing which pages and features to start coding. As you work through the projects in this book, however, I will guide you on what to code first.
Knowing how much to code and when to stop can be tough. Developers call the first iteration of an app the minimum viable product — meaning you’ve coded just enough to test your app with real users and receive feedback. If no one likes your app or thinks it’s useful, it’s best to find out as soon as possible.
An app is the sum of its features, and for any individual feature it’s a good idea to write the minimum code necessary and then add to it. For example, your restaurant app may have a toolbar at the top of the page with drop-down menus. Instead of trying to create the whole menu at once, it’s better to just create the menu, and then later create the drop-down menu effect.
Projects can involve front-end developers, who’ll code the appearance of the app, and back-end developers, who’ll code the logic and create databases. A “full stack developer” is one who can do both front-end and back-end development. On large projects it’s more common to see specialized front-end and back-end developers, along with project managers who ensure everyone is communicating with each other and adhering to the schedule so the project finishes on time.
Debugging your code
Debugging is going to be a natural part of any application. The computer always follows your instructions exactly and yet no program ever works as you expect it to. Debugging can be frustrating. Three of the more common mistakes to watch out for are
· Syntax errors: These are errors caused by misspelling words/commands, by omitting characters, or by including extra characters. Some languages, such as HTML and CSS, are forgiving of these errors and your code will still work even with some syntax errors, whereas other languages, such as JavaScript, are more particular and your code won’t run when any such error is present.
· Logic errors: These are harder to fix. With logic errors, your syntax is correct but the program behaves differently than you expected, such as when the prices of the items in the shopping cart of an e-commerce site do not sum up to the correct total.
· Display errors: These are common mainly to web applications. With display errors, your program might run and work properly, but it won’t appear properly. Web apps today run on many devices, browsers, and screen sizes, so extensive testing is the only way to catch these types of errors.
The word debugging was popularized in the 1940s by Grace Hopper, who fixed a computer error by literally removing a moth from a computer.
Picking Tools for the Job
Now you’re ready to actually start coding. You can develop websites either offline, by working with an editor, or online, with a web service such as Codecademy.com. Especially if you have never done any coding before, I would strongly recommend you code with access to an Internet connection using the Codecademy.com platform because you do not have to download and install any software to start coding, you do not have to find a web host to serve your web pages, and you do not need to upload your web page to a web host. As you code, the Codecademy.com platform will do these tasks for you automatically.
Working offline
To code offline, you’ll need the following:
· Editor: This refers to the text editor you’ll use to write all the code you learn in this book, including HTML, CSS, JavaScript, Ruby, Python, and PHP. The editor you use will depend on the type of computer you have:
· PC: Use the pre-installed Notepad, or install Notepad++, a free editor available for download at http://notepad-plus-plus.org.
· Mac: Use the pre-installed TextEdit or install TextMate 2.0, an open-source editor available for download at http://macromates.com.
· Browser: Many browsers exist, including Firefox, Safari, Internet Explorer, and Opera; however, I recommend you use Chrome, because it offers the most support for the latest HTML standards. It’s available for download at www.google.com/chrome/browser.
· Web host: In order for your website code to be accessible to everyone on the Internet, you need to host your website online. Freemium web hosts include Weebly (www.weebly.com) and Wix (www.wix.com); these sites offer basic hosting but charge for additional features like additional storage or removing ads. Google provides free web hosting through Sites (http://sites.google.com) and Drive (http://drive.google.com).
Working online with Codecademy.com
Codecademy.com is the easiest way to start learning how to code online, and lessons from the site form the basis of this book. The site doesn’t require you to install a code editor or sign up for a web host before you start coding, and it’s free to individual users like you.
The site can be accessed using any up-to-date modern browser, but Google Chrome or Mozilla Firefox is recommended.
Touring the learning environment
After signing up or signing into the site, you will either see an interactive card or the coding interface, depending on the content you learn. (See Figure 3-3.)
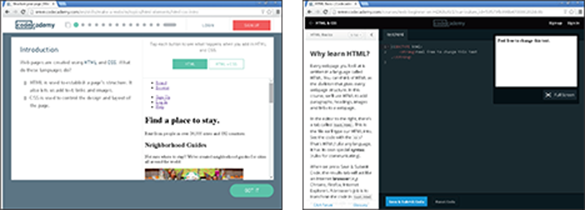
Figure 3-3: Codecademy.com interactive cards (left) and the coding interface (right).
The interactive cards allow you to click toggle buttons to demonstrate effects of pre-written code, whereas the coding interface has an coding editor and a live preview window that shows you the effects of the code entered into the coding editor.
The coding interface has four parts:
· Background information on the upper-left side of the screen tells you about the coding task you are about to do.
· The lower-left side of the screen shows instructions to complete in the coding window.
· The coding window allows you to follow the exercise instructions and write code. The coding window also includes a preview screen that shows a live preview of your code as you type.
· After completing the coding instructions, press Save & Submit or Run. If you successfully followed the instructions, you advance to the next exercise; otherwise, the site will give you a helpful error message and a hint.
The interactive cards have three parts:
· Background information about a coding concept.
· A coding window to complete one simple coding task. A preview window also shows a live preview of your code as you type.
· After completing the coding instructions, press the Got It button. You can review any previous interactive cards by clicking the Go Back button.
Receiving support from the community
If you run into a problem or have a bug you cannot fix, try the following steps
· Click on the hint underneath the instructions.
· Use the Q&A Forums to post your problem or question, and review questions others have posted.
· Tweet me at @nikhilgabraham with your question or problem, and include the hashtag #codingFD at the end of your tweet.
All materials on the site are licensed Creative Commons Attribution-Sharealike 3.0 Unported CC BY-SA 3.0 & GNU Free Documentation License (GFDL)
If you are the copyright holder of any material contained on our site and intend to remove it, please contact our site administrator for approval.
© 2016-2026 All site design rights belong to S.Y.A.