Coding For Dummies (2015)
Part II. Building the Silent and Interactive Web Page
Chapter 5. Getting More Out of HTML
In This Chapter
![]() Organizing content in a web page
Organizing content in a web page
![]() Writing HTML lists
Writing HTML lists
![]() Creating HTML tables
Creating HTML tables
![]() Filling out HTML forms
Filling out HTML forms
I’m controlling, and I want everything orderly, and I need lists.
— Sandra Bullock
Even your best content needs structure to increase readability for your users. This book is no exception. Consider the “In This Chapter” bulleted list of items at the top of this page, or the table of contents at the beginning of the book. Lists and tables make things easier for you to understand at a glance. By mirroring the structure you find in a book or magazine, web elements let you precisely define how content, such as text and images, appear on the web.
In this chapter, you learn how to use HTML elements such as lists, tables, and forms, and how to know when these elements are appropriate for your content.
Organizing Content on the Page
Readability is the most important principle for organizing and displaying content on your web page. Your web page should allow visitors to easily read, understand, and act on your content. The desired action you have in mind for your visitors may be to click on and read additional content, share the content with others, or perhaps make a purchase. Poorly organized content will lead users to leave your website before engaging with your content for long enough to complete the desired action.
Figures 5-1 and 5-2 show two examples of website readability. In Figure 5-1, I searched Craigslist.org for an apartment in New York. The search results are structured like a list, and you can limit the content displayed using the filters and search forms. Each listing has multiple attributes, such as a description, the number of bedrooms, the neighborhood, and, most importantly, the price. Comparing similar attributes from different listings takes some effort — notice the jagged line your eye must follow.
Figure 5-2 shows the results of a search I conducted at Hipmunk.com for flights from New York to London. As with the Craigslist search results, you can limit the content displayed using the filters and search forms. Additionally, each flight listing has multiple attributes, including price, carrier, departure time, landing time, and duration, which are similar to the attributes of the apartment listings. Comparing similar attributes from different flights is much easier with the Hipmunk layout, however. Notice how the content, in contrast to Craigslist’s, has a layout that allows your eye to follow a straight line down the page, so you can easily rank and compare different options.
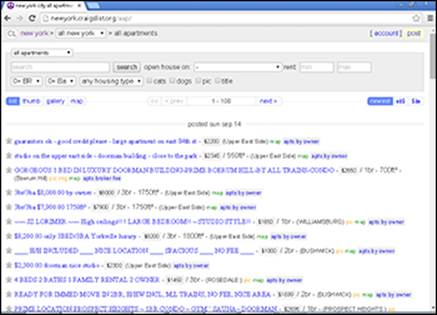
Figure 5-1: A Craigslist.org listing of apartments in New York (2014).
 Don’t underestimate the power of simplicity when displaying content. Although Craigslist’s content layout may look almost too simple, the site is one of the top 50 most visited websites in the world. Reddit.com is another example of a top 50 website with a simple layout.
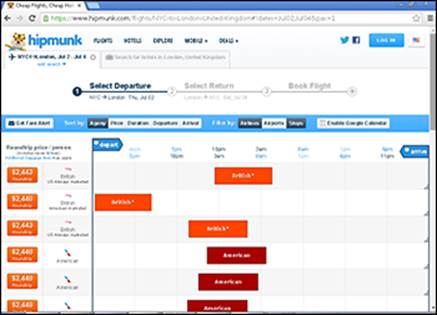
Figure 5-2: A Hipmunk.com listing of flights from New York to London (2014).
Before displaying your content, ask yourself a few questions first:
· Does your content have one attribute with related data, or does it follow sequential steps? If so, consider using lists.
· Does your content have multiple attributes suitable for comparison? If so, consider using tables.
· Do you need to collect input from the visitor? If so, consider using forms.
Don’t let these choices overwhelm you. Pick one, see how your visitors react, and if necessary change how you display the content. The process of evaluating one version against another version of the same web page is called A/B testing.
Listing Data
Websites have used lists for decades to convey related or hierarchical information. In Figure 5-3, you can see an older version of Yahoo.com that uses bulleted lists to display various categories and today’s Allrecipes.com recipe page, which uses lists to display various ingredients.
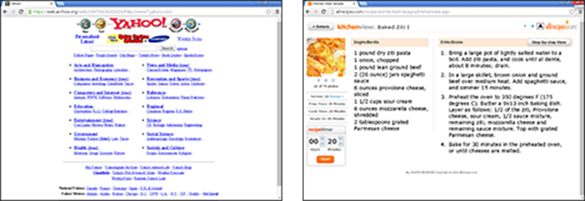
Figure 5-3: Yahoo’s 1997 homepage using an unordered list (left) and Allrecipes.com’s 2014 recipe using an ordered list (right).
Lists begin with a symbol, an indentation, and then the list item. The symbol used can be a number, letter, bullet, or no symbol at all.
Creating ordered and unordered lists
The two most popular types of lists are:
· Ordered: Ordered lists are numerical or alphabetical lists in which the sequence of list items is important.
· Unordered: These lists are usually bulleted lists in which the sequence of list items has no importance.
You create lists by specifying the type of list as ordered or unordered, and then adding each list item using the li tag, as shown in the following steps:
1. Specify the type of list.
Add opening and closing list tags that specify either an ordered (ol) or unordered (ul) list, as follows:
· ol to specify the beginning and end of an ordered list.
· ul to specify the beginning and end of an unordered list.
2. Add an opening and closing tag (that is, <li> and </li>) for each item in the list.
For example, here’s an ordered list:
<ol>
<li> List item #1 </li>
<li> List item #2 </li>
<li> List item #3 </li>
</ol>
Nesting lists
Additionally, you can nest lists within lists. A list of any type can be nested inside another list; to nest a list, replace the list item tag <li> with a list type tag, either <ol> or <ul>.
The example code in Figure 5-4 shows various lists types including a nested list. (See Figures 5-4 and 5-5.)
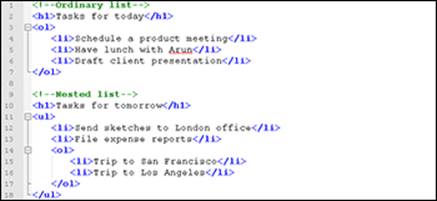
Figure 5-4: Coding an ordered list and a nested list.
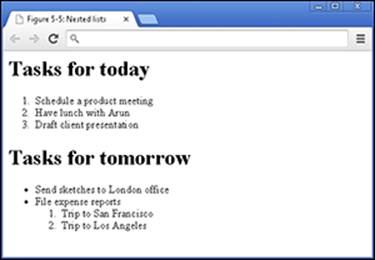
Figure 5-5: The page produced by the code in Figure 5-4.
The <h1> tag shown in this code sample is not necessary to create a list. I use it here only to name each list.
Every opening list or list item tag must be followed with a closing list or list item tag.
Putting Data in Tables
Tables help further organize text and tabular data on the page. (See Figure 5-6.) The table format is especially appropriate when displaying pricing information, comparing features across products, or in any situation where the columns or rows share a common attribute. Tables act as containers, and can hold and display any type of content, including text, such as heading and lists, and images. For example, the table in Figure 5-6 includes additional content and styling like icons at the top of each column, gray background shading, and rounded buttons. This content and styling can make tables you see online differ from tables you ordinarily see in books.
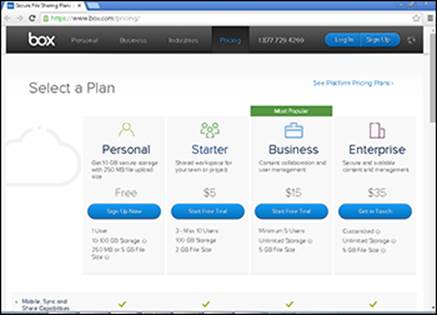
Figure 5-6: Box.net uses tables to display pricing information.
Avoid using tables to create page layouts. In the past, developers created multi-column layouts using tables, but today developers use CSS (see Chapter 7) for layout-related tasks.
Basic table structuring
Tables are comprised of several parts, like the one shown in Figure 5-7.
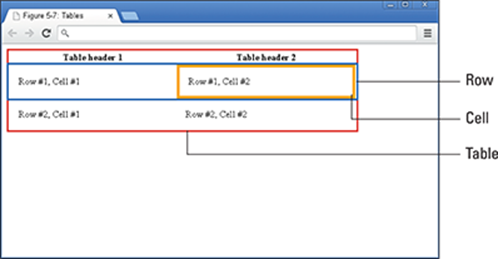
Figure 5-7: The different parts of a table.
You create a table by using the following basic steps:
1. Define a table with the table element.
To do this, add the opening and closing <table> tags.
2. Divide the table into rows with the tr element.
Between the opening and closing table tags, create opening <tr> tags and closing </tr> tags for each row of your table.
3. Divide rows into cells using the td element.
Between the opening and closing tr tags, create opening and closing td tags for each cell in the row.
4. Highlight cells that are headers using the th element.
Finally, specify any cells that are headers by replacing the td element with a th element.
 Your table will have only one opening and closing <table> tag; however, you can have one or more table rows (tr) and cells (td).
The following example code shows the syntax for creating the table shown in Figure 5-7.
<table>
<tr>
<th>Table header 1</th>
<th>Table header 2</th>
</tr>
<tr>
<td>Row #1, Cell #1</td>
<td>Row #1, Cell #2</td>
</tr>
<tr>
<td>Row #2, Cell #1</td>
<td>Row #2, Cell #2</td>
</tr>
</table>
After you’ve decided how many rows and columns your table will have, make sure to use an opening and closing <tr> tag for each row, and an opening and closing <td> tag for each cell in the row.
Stretching table columns and rows
Take a look at the table describing Facebook’s income statement in Figure 5-8. Data for 2011, 2012, and 2013 appears in individual columns of equal-sized width. Now look at Total Revenue, which appears in a cell that stretches or spans across several columns.

Figure 5-8: An income statement in a table with columns of different sizes.
 Stretching a cell across columns or rows is called spanning.
The colspan attribute spans a column over subsequent vertical columns. The value of the colspan attribute is set equal to the number of columns you want to span. You always span a column from left to right. Similarly, the rowspan attribute spans a row over subsequent horizontal rows. Set rowspan equal to the number of rows you want to span.
The following code generates a part of the table shown in Figure 5-8. You can see the colspan attribute spans the Total Revenue cell across two columns. As described in Chapter 4, the <strong> tag is used to mark important text, and is shown as bold by the browser.
<tr>
<td colspan="2">
<strong>Total Revenue</strong>
</td>
<td>
<strong>7,872,000</strong>
</td>
<td>
<strong>5,089,000</strong>
</td>
<td>
<strong>3,711,000</strong>
</td>
</tr>
 If you set a column or row to span by more columns or rows than are actually present in the table, the browser will insert additional columns or rows, changing your table layout.
 CSS helps size individual columns and rows, as well as entire tables. See Chapter 7.
Aligning tables and cells
 The latest version of HTML does not support the tags and attributes in this section. Although your browser may correctly render this code, there is no guarantee your browser will correctly render it in the future. I include these attributes because as of this writing, HTML code on the Internet, including the Yahoo Finance site in the previous examples, still use these deprecated (older) attributes in tables. This code is similar to expletives — recognize them but try not to use them. Refer to Chapter 6 to see modern techniques using Cascading Style Sheets (CSS) for achieving the identical effects.
The table element has three deprecated attributes to know — align, width, and border. These attributes are described in Table 5-1.
Table 5-1 Table attributes replaced by CSS
|
Attribute name |
Possible values |
Description |
|
align |
left center right |
Position of table relative to the containing document according to the value of the attribute. For example, align="right" positions the table on the right side of the web page. |
|
width |
pixels (#) % |
Width of table measured either in pixels on-screen or as a percentage of the browser window or container tag. |
|
border |
pixels (#) |
Width of table border in pixels. |
The following example code shows the syntax for creating the table in Figure 5-9 with align, width, and border attributes.
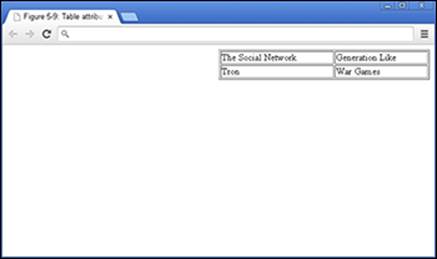
Figure 5-9: A table with deprecated align, width, and border attributes.
<table align="right" width=50% border=1>
<tr>
<td>The Social Network</td>
<td>Generation Like</td>
</tr>
<tr>
<td>Tron</td>
<td>War Games</td>
</tr>
</table>
Always insert attributes inside the opening <html> tag, and enclose words in quotes.
The tr element has two deprecated attributes to know — align, and valign. These are described in Table 5-2.
Table 5-2 Table row attributes replaced by CSS
|
Attribute name |
Possible values |
Description |
|
align |
left right center justify |
Horizontal alignment of a row’s cell contents according to the value of the attribute. For example, align="right" positions a row’s cell contents on the right side of each cell. |
|
valign |
top middle bottom |
Vertical alignment of a row’s cell contents according to the value of the attribute. For example, align="bottom" positions a row’s cell contents on the bottom of each cell. |
The td element has four deprecated attributes to know — align, valign, width, and height. These are described in Table 5-3.
Table 5-3 Table cell attributes replaced by CSS
|
Attribute name |
Possible values |
Description |
|
align |
left right center justify |
Horizontal alignment of a cell’s contents according to the value of the attribute. For example, align="center" positions the cell’s contents in the center of the cell. |
|
valign |
top middle bottom |
Vertical alignment of a cell’s contents according to the value of the attribute. For example, align="middle" positions a cell’s contents in the middle of the cell. |
|
width |
pixels (#) % |
Width of a cell measured either in pixels on-screen or as a percentage of the table width. |
|
height |
pixels (#) % |
Height of a cell measured either in pixels on-screen or as a percentage of the table width. |
The following example code shows the syntax for creating the table in Figure 5-10 with align, valign, width, and height attributes.
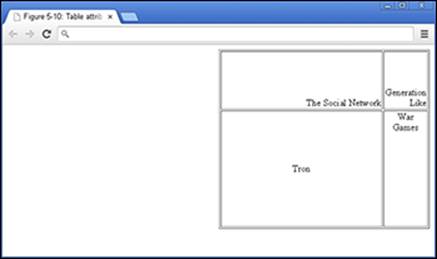
Figure 5-10: A table with deprecated align, valign, width, and height attributes.
<table align="right" width=50% border=1>
<tr align="right">
<td height=100>The Social Network</td>
<td>Generation Like</td>
</tr>
<tr>
<td height=200 class="center" valign="middle">Tron</td>
<td class="center" width=20%>War Games</td>
</tr>
</table>
Remember, these attributes are no longer supported and should not be used in your code.
Filling Out Forms
Forms allow you to capture input from your website visitors. Until now we have displayed content as-is, but capturing input from visitors allows you to:
· Modify existing content on the page. For example, price and date filters on airline websites allow for finding a desired flight more quickly.
· Store the input for later use. For example, a website may use a registration form to collect your email, username, and password information to allow you to access it at a later date.
Understanding how forms work
Forms pass information entered by a user to a server by using the following process:
1. The browser displays a form on the client machine.
2. The user completes the form and presses the submit button.
3. The browser submits the data collected from the form to a server.
4. The server processes and stores the data and sends a response to the client machine.
5. The browser displays the response, usually indicating whether the submission was successful.
See Chapter 2 for an additional discussion about the relationship between the client and server.
A full description of how the server receives and stores data (Steps 3 to 5) is beyond the scope of this book. For now, all you need to know is that server-side programming languages such as Python, PHP, and Ruby are used to write scripts that receive and store form submissions.
Forms are very flexible, and can record a variety of user inputs. Input fields used in forms can include free text fields, radio buttons, checkboxes, drop-down menus, range sliders, dates, phone numbers, and more. (See Table 5-4.) Additionally, input fields can be set to initial default values without any user input.
Table 5-4 Selected form attributes
|
Attribute name |
Possible values |
Description |
|
type |
checkbox submit text password radio (a complete list of values has been omitted here for brevity) |
Defines the type of input field to display in the form. For example, text is used for free text fields, and submit is used to create a submit button. |
|
value |
text |
The initial value of the input control. |
View the entire list of form input types and example code at www.w3schools.com/tags/att_input_type.asp.
Creating basic forms
You create a basic form by
1. Defining a form with the form element.
Start by adding an opening <form> tag and closing </form> tag.
2. Using the action attribute, specify in the form element where to send form data.
Add an action attribute to your opening <form> tag and set it equal to the URL of a script that will process and store the user input.
3. Using the method attribute, specify in the form element how to send form data.
Add a method attribute to your opening <form> tag and set it equal to POST.
The method attribute is set equal to GET or POST. The technicalities of each are beyond the scope of this book, but, in general, POST is used for storing sensitive information (such as credit card numbers), whereas GET is used to allow users to bookmark or share with others the results of a submitted form (such as, for example, airline flight listings).
4. Providing a way for users to input and submit responses with the input element.
Between the opening <form> and closing </form> tags, create one <input> tag.
Your form will have only one opening and closing <form> tag; however, you will have at least two <input> tags to collect and submit user data.
5. Specify input types using the type attribute in the input element.
For this example, set the type attribute equal to "text".
The <input> tag does not have a closing tag, which is an exception to the “close every tag you open” rule. These tags are called self-closing tags, and you can see more examples in Chapter 4.
6. Finally, create another <input> tag and set the type attribute equal to submit.
The following example code shows the syntax for creating the form shown in Figure 5-11.
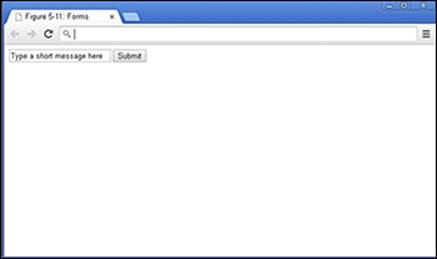
Figure 5-11: A form with one user input and a submit button.
<form action="mailto:nikhil.abraham@gmail.com" method="POST">
<input type="text" value="Type a short message here">
<input type="submit">
</form>
The action attribute in this form is set equal to mailto, which signals to the browser to send an email using your default mail client (such as Outlook or Gmail). If your browser is not configured to handle email links, then this form won’t work. Ordinarily, forms are submitted to a server to process and store the form's contents, but in this example form the contents are submitted to the user's email application.
Practicing More with HTML
Practice your HTML online using the Codecademy website. Codecademy is a free website created in 2011 to allow anyone to learn how to code right in the browser, without installing or downloading any software. Practice all of the tags (and a few more) that you learned in this chapter by following these steps:
1. Open your browser, go to www.dummies.com/go/coding and click on the link to Codecademy.
2. Sign in to your Codecademy account.
Signing up is discussed in Chapter 3. Creating an account allows you to save your progress as you work, but it’s optional.
3. Navigate to and click on HTML Basics II to practice creating lists, and HTML Basics III to practice creating tables.
4. Background information is presented in the upper left portion of the site, and instructions are presented in the lower left portion of the site.
5. Complete the instructions in the main coding window. As you type, a live preview of your code is generated.
6. After you have finished completing the instructions, click the Save and Submit Code button.
If you have followed the instructions correctly, a green checkmark appears, and you proceed to the next exercise. If an error exists in your code a warning appears with a suggested fix. If you run into a problem or a bug you cannot fix, click on the hint, use the Q&A Forum, or tweet me at @nikhilgabraham and include hashtag #codingFD.
All materials on the site are licensed Creative Commons Attribution-Sharealike 3.0 Unported CC BY-SA 3.0 & GNU Free Documentation License (GFDL)
If you are the copyright holder of any material contained on our site and intend to remove it, please contact our site administrator for approval.
© 2016-2026 All site design rights belong to S.Y.A.