F# Deep Dives (2015)
Part 4. F# in the larger context
When selecting the chapters for this book, I was lucky enough to get content from people who are successfully using F# to build a really interesting set of applications and systems. So, I have no doubt that you can now see the benefits of F# for your work and that you can think of projects or components where F# would be a great fit. Unfortunately, the world isn’t that simple, and many other factors contribute to the choice of technology, especially in large companies.
In this last part of the book, we look at topics that can help you introduce F# into large and more complex ecosystems. In chapter 11, Chris Ballard talks about F# in the enterprise. You’ll see how to use F# in an enterprise-friendly way; the key takeaway is that your F# projects need to smoothly interoperate, even if that means you occasionally have to resort to using mutable types or do additional work to make the interoperability hassle-free.
In chapter 12, Phil Trelford looks at software quality. The chapter starts from a bigger picture: “What is software quality about?” After answering that question, it covers a wide range of libraries and techniques that you can use to create tests in F#. Tests are often treated as second-class citizens in the codebase, so writing them in F# is a risk-free way of introducing F# into larger organizations. And as you’ll see in Phil’s chapter, testing can be fun!
Chapter 11. F# in the enterprise
Chris Ballard
Let’s be blunt: adoption of F# in the enterprise has two significant problems as things currently stand. First, existing enterprise developers typically don’t know much about functional development; second, there aren’t many people on the job market with demonstrable skills in functional development. Few companies can afford to send their entire development staff off to an intensive course in F# and functional programming, or to introduce this training as a general overhead for new joiners.
Organizations need to be smart and ensure that the way they develop code matches the experience levels of their development staff. Because F# is a CLR-based language, fully integrated into Visual Studio, it’s easy to design software that uses F# for the “sweet spots” and C# for the rest (or even Visual Basic, if that floats your boat). Don’t forget, also, that more and more functional concepts are being absorbed into the C# language, so the skills gap between imperative and functional development is definitely becoming narrower, at least in the .NET world.
In this chapter, I’ll show you how F# can be used as one part of an overall enterprise project. Depending on the experience of the team, F# could play either a small or a large role. You’ll use a sample project to explore building a small to medium-sized application using a mix of C# and F# (but I’m biased, so in this case it will be mostly F#!).
Sample project
To learn some of the practices needed to develop in F# as part of an enterprise development project, you’ll develop an example application that mixes a number of technologies and is thus typical of a project in a corporate/commercial environment. I decided that a sensible, real-world application would be a desktop-based chat client, which allows multiple users to communicate with one another by joining a “room” and contributing to ongoing discussion threads within that room. You’ll build the rough outline of this application next.
Note
The completed application is available on GitHub here: https://github.com/ChrisBallard/ThePeopleWhoChat. I recommend downloading it so that you can see the big picture as you work through the building blocks in the following pages.
Obviously this is an F# book, so I’ll try to keep as much of the coding in F# as possible. You’ll create a WPF application using Prism[1] for the UI and RavenDB[2] for storage. You’ll mix in some Representational State Transfer (REST) service calls and a bit of security coding, and you’ll have a good approximation of an enterprise application. Some C# may be needed for the UI shell itself, and there will also be occasions where perhaps something could be implemented in F#, but it’s less effort and more maintainable to implement in C#. Let’s see how this goes!
1 Prism is a composite UI framework by Microsoft Patterns & Practices: compositewpf.codeplex.com.
2 RavenDB is a second-generation document database: http://ravendb.net.
We’ll start with some data
You’ll use RavenDB for the database, because it’s a modern, document-based database designed from the ground up for the .NET platform. Also, its schema-less nature aligns itself well to the fluidity of development in a functional language.
As all well-behaved F# developers should, you’ll start off in the F# Interactive (FSI) window (for this chapter I’m using Microsoft Visual Studio 2012, Premium edition). First you must install RavenDB and the .NET driver into a new Visual Studio solution using NuGet.[3] Load the relevant assemblies into the FSI session (I’ve shortened the paths):
3 NuGet is a package manager for third-party libraries—an extension for Visual Studio: http://nuget.org.
> #r @"...\Raven.Client.Lightweight.dll";;
--> Referenced ...\Raven.Client.Lightweight.dll'
This code loads the assemblies, so now you can reference the namespaces and create some database connections. For all these demonstrations, you should have Raven .Server.exe running locally to provide the simplest database connection logic. As you can see here, you don’t even need a connection string. All you need is to point the client to the server using the localhost URL and a default port number:
> open Raven;;
> open Raven.Client;;
> open Raven.Client.Document;;
> let ds = new DocumentStore();;
val ds : DocumentStore
> ds.Url <- "http://localhost:8080/";;
val it : unit = ()
> ds.Initialize();;
val it : IDocumentStore =
Raven.Client.Document.DocumentStore
{ApiKey = null;
...
WasDisposed = false;}
Note
Although F# doesn’t require the new keyword (used here to create the DocumentStore), I recommend still using it, to avoid confusing any C# developers who find themselves in the F# code. I’ll mention how important it is to avoid confusing C# developers coming to F# several times in this chapter, because I think it’s a key to success of any application that mixes C# and F# code.
RavenDB deals in collections and documents, which roughly translate to tables and rows in traditional relational database parlance. In addition, by default RavenDB will attempt to infer collection names based on the name of the type that you save, and there’s no need for create commands—the first time a document is saved, the database will create the collection for you. So you can go straight into this code:
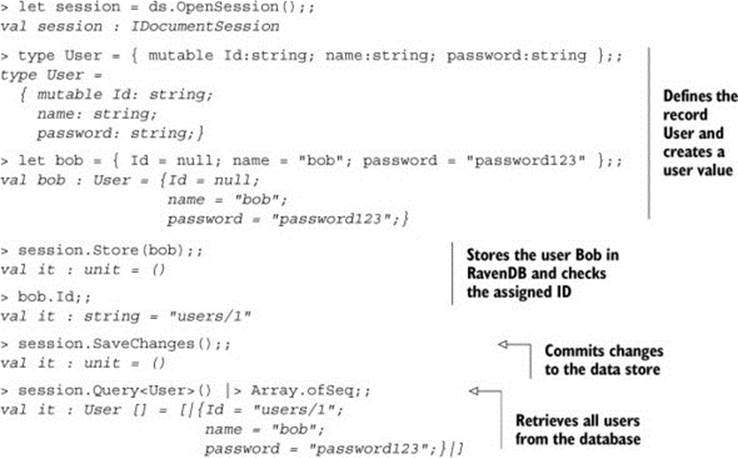
Notice that at no point did you have to tell RavenDB to create a collection for users or even define what the schema for users is. You’re able to create a new user and store it in the database just like that.
The pragmatic F# developer knows when to compromise
Although RavenDB can automatically serialize and deserialize documents that are F# record types, you have to make the Id field mutable in order for the automated identity generation to be able to work. Here you’ve encountered a typical compromise in F# development: you have to sacrifice the purity of an immutable type in order to gain from the flexibility of interoperating with an object-oriented third-party framework. The pragmatic enterprise F# developer will recognize and embrace these situations!
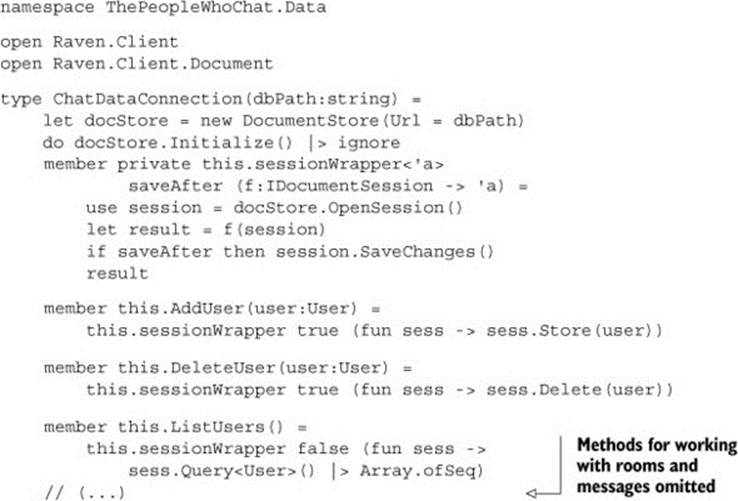
At this point, you’ve done enough experimentation to be able to understand how to create a central type for the chat room service, within which you can encapsulate the database connection details alongside all data operations. Next, you’ll create a new F# Library project, add a package reference to the RavenDB client assemblies using NuGet, and finally add a new a new F# source file containing the following code.
Listing 1. ChatDataConnection.fs, a function within a module
module Data
open Raven.Client.Document
let ChatDataConnection(dbPath:string) =
let docStore = new DocumentStore(Url = dbPath)
docStore.Initialize()
This code demonstrates a typical way to write an F# module: you aren’t specifically defining any .NET types here, and although this is a reasonable (or possibly even the definitive) way to construct code in an F#-only application, it violates the principle of least surprise for a project shared with C# code (and therefore C# developers). See figure 1 for a look at ILSpy[4] that shows what sort of Intermediate Language (IL) code (decompiled into C#) is generated by listing 1.
4 ILSpy is an open source .NET assembly browser and decompiler: http://ilspy.net.
Figure 1. Decompiled IL code generated for inline F# within a module
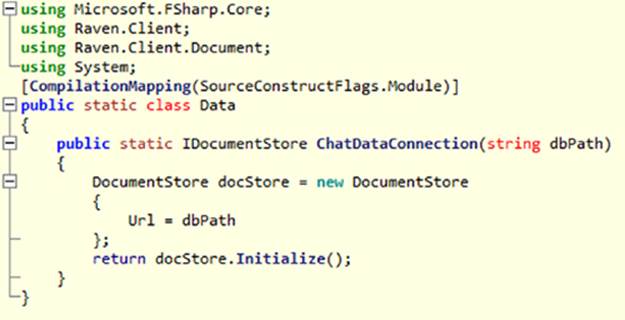
You can see that the module Data is translated into a static class, and the function ChatDataConnection becomes a static method of that class. This class exists within the default namespace.
Note that this code is perfectly interoperable with C#—you can refer to the static method as Data.ChatDataConnection()—but in an enterprise scenario, I recommend ensuring that any public types are created within namespaces, and as types that “play nicely” with C# code—for example, object types or records—wherever possible.
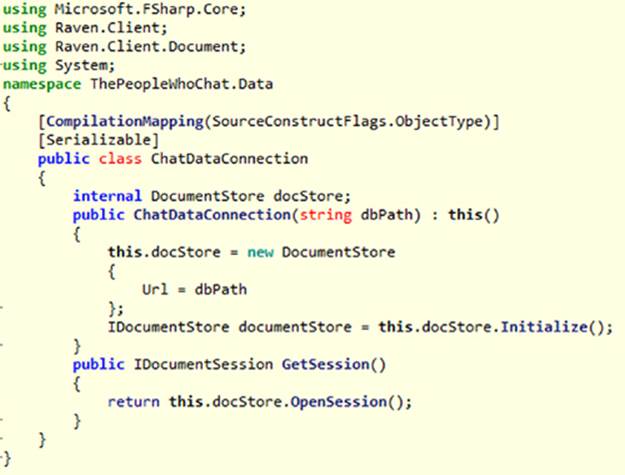
The database connection may need to be called from C# code, so let’s clean things up and refactor the previous snippet into an object type, declared within a namespace (see the following listing).
Listing 2. ChatDataConnection.fs as an F# type within a namespace
namespace ThePeopleWhoChat.Data
open Raven.Client.Document
type ChatDataConnection(dbPath:string) =
let docStore = new DocumentStore(Url = dbPath)
do docStore.Initialize() |> ignore
member this.GetSession() =
docStore.OpenSession()
Listing 2 produces code that’s much more aligned to object-oriented development (see figure 2) and that therefore will result in fewer headaches and less confusion for your C# developers!
Figure 2. Decompiled IL code generated for an F# type defined within a namespace
Now that you have the encapsulated connection code, you can check it out by choosing Execute in Interactive (or pressing Alt-Enter) to use this new type in the FSI window:
type ChatDataConnection =
class
new : dbPath:string -> ChatDataConnection
member GetSession : unit -> IDocumentSession
end
> let con = ChatDataConnection("http://localhost:8080");;
val con : ChatDataConnection
> let session = con.GetSession();;
val session : IDocumentSession
> session.Query<User>() |> Array.ofSeq;;
val it : User [] = [|{Id = "users/1";
name = "bob";
password = "password123";}|]
Next you’ll create a connection to the database. You’ve reached the point where you’d like to store the rest of the data. With F# record types, you have a lightweight way to define a hierarchy of data access objects, as shown next.
Listing 3. Defining some types for your data objects
type User =
{ mutable Id: string;
name: string;
passwordHash: string;
fullName: string;
isAdmin: bool }
type Room =
{ mutable Id: string;
name: string;
description: string }
type Message =
{ mutable Id: string;
roomId: string;
timestamp: DateTime;
userName: string;
rawMessage: string;
html: string }
Tip
Because of the conciseness of F# type definitions, I recommend ignoring the “one class per file” mandate of C# development. Try to group these definitions into one appropriately named F# source file per logical group—for example, DataTypes.fs for listing 3.
At this point, you have a database connection helper and some serializable data types. To conclude this section, let’s bring this all together and look at what it takes to store and retrieve this data from the local RavenDB database.
Listing 4. Putting it all together
In listing 4, the connection type is expanded to include methods for each of the key data operations that you want to encapsulate. Note also that session management is moved into a higher-order function, sessionWrapper, which provides a convenient way for each implementation method to manage its session, including an option to automatically save changes on completion.
The database you’ve created is rudimentary at the moment; you haven’t thought much about schema or requirements for indexing, for example. But RavenDB allows you to work this way. You have enough in place to move on to the REST-based service, which you’ll learn about in the next section.
Creating the basic service implementation
You could allow the client to connect to RavenDB directly via its own REST interface, but you need to provide a further abstraction in order to manage session state and security. The next step, therefore, is to implement a Windows Communication Foundation (WCF) REST service as a middle tier for the application.
Following best practices, you’ll put the service implementation in a separate project, say ThePeopleWhoChat.Service, which references the projects with core data types and data access layer implemented in the previous section. Once the project is created, begin by defining the operations to be used by the service. The following listing shows the F# type signatures of the functions you’ll implement.
Listing 5. Service operations
Login: string * string -> string
Logout: string -> unit
AddUser: string * User -> string
RemoveUser: string * string -> unit
ListUsers: string -> User array
Listing 5 starts with a few functions that manage the session state: Login, which takes a username and password and returns a session token; and Logout, which takes the session token and returns nothing. All other functions require a valid session token as the first parameter—a robust but not particularly scalable security implementation. This implementation will suffice for this application, because you’ll be supporting only a few hundred concurrent user connections.
Let’s look at how you implement the main service type with one of the more trivial member functions: ListUsers. This function doesn’t alter state and returns a list of users; in REST terms, this aligns with the HTTP GET verb, which is implemented in WCF as shown next.
Listing 6. Implementing an operation with HTTP GET
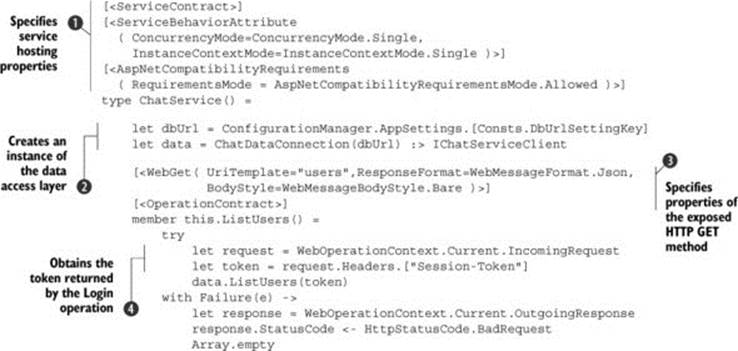
This listing defines a type ChatService with a single method ListUsers. It uses ASP.NET and WCF to host the service, so the class and the method are annotated with attributes that specify how to host the service ![]() and how the method should be exposed as an HTTP GET operation
and how the method should be exposed as an HTTP GET operation ![]() .
.
You assume the caller will add an HTTP header to the incoming request containing the session token ![]() , which it obtains via a call to the Login operation you’ll add in listing 7. You defer all the session management to the DB connection type, a single instance of which is maintained by the service implementation
, which it obtains via a call to the Login operation you’ll add in listing 7. You defer all the session management to the DB connection type, a single instance of which is maintained by the service implementation ![]() .
.
Notice, though, that you need a lot of boilerplate code to handle the token and to marshal service failures into an HTTP-friendly status code result. You can make things easier here by adding a function to wrap all the boilerplate code. Listing 7 shows a number of reusable helper functions and a nicer implementation of ListUsers. Note that it doesn’t repeat the class declaration ![]() and initialization of the connection
and initialization of the connection ![]() , because those stay the same.
, because those stay the same.
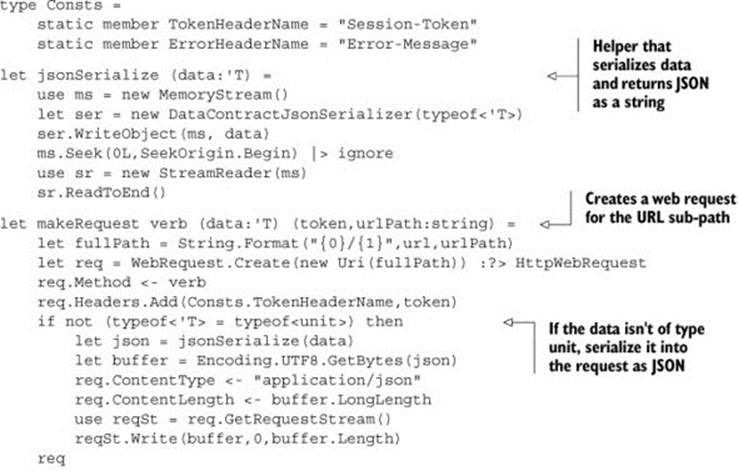
Listing 7. Wrapping an HTTP service operation implementation
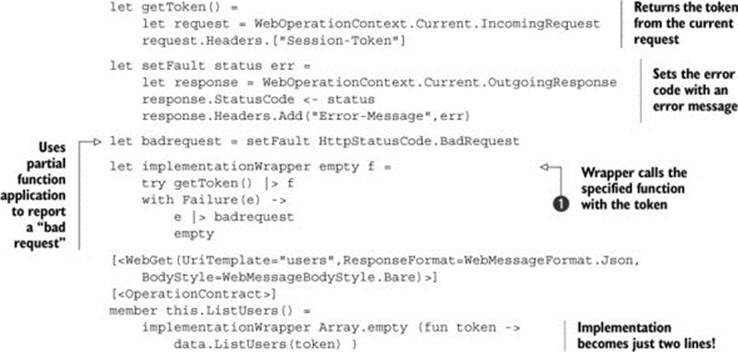
With the addition of a few helper functions and the implementation wrapper ![]() , you now have a more succinct means of defining service operations. The wrapper manages the token and handles service failures. You should probably expand it to specifically handle missing or invalid tokens and return NotAuthorized, but we won’t go into that now.
, you now have a more succinct means of defining service operations. The wrapper manages the token and handles service failures. You should probably expand it to specifically handle missing or invalid tokens and return NotAuthorized, but we won’t go into that now.
Note that the implementation wrapper function takes as arguments both of the following:
· A function that’s used to determine the correct result value
· A value, of the same type as that function’s return type, to represent an empty result should the function call result in an exception
With the implementationWrapper function in place, adding new operations becomes easy. The following operation adds a new user to the database.
Listing 8. Implementing an operation with HTTP PUT
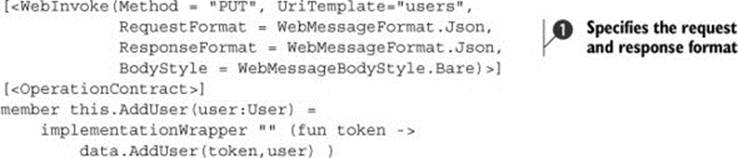
This function takes a data structure as input. In order for this to work, you tell .NET to send it over the wire formatted as a JSON string ![]() . Note how the framework automatically handles the input parameters and function result for you, so all you have to do is call the same implementation wrapper you defined earlier. Finally, let’s look at a method that takes input parameters as part of the URL in true REST style.
. Note how the framework automatically handles the input parameters and function result for you, so all you have to do is call the same implementation wrapper you defined earlier. Finally, let’s look at a method that takes input parameters as part of the URL in true REST style.
Listing 9. Implementing an operation with HTTP DELETE

This listing shows all the wiring you need to carry on and complete the service implementation. You’ll have groups of functions for management of users and passwords, management of rooms, and posting and listing of messages from users in the rooms.
Creating a client wrapper for the service
In the previous section, you defined and implemented your REST-based web service. Next you’ll create a new type that wraps service calls into simple member functions in order to allow the service to be easily called through your UI code.
You can either place the code for the client into a new project or add it to the project that defines the core data types for the application (ThePeopleWhoChat.Core). After you add a new file, you start by creating a class ServiceClient. Next, you’ll put together the basic code needed in order to call a method with the HTTP GET verb and deserialize a JSON formatted result. The following listing shows the first version of the implementation (without the enclosing class).
Listing 10. Making an HTTP GET service call
member this.ListUsers(token:string) =
let url = "http://localhost:53691/Chat.svc"
let fullPath = String.Format("{0}/{1}",url,"users")
let req = WebRequest.Create(new Uri(fullPath)) :?> HttpWebRequest
req.Method <- "GET"
req.Headers.Add("Session-Token",token)
let res = req.GetResponse() :?> HttpWebResponse
use resSt = res.GetResponseStream()
let ser = DataContractJsonSerializer(typeof<User array>)
ser.ReadObject(resSt) :?> User array
Once again there’s a lot of boilerplate code here. Pretty much any of the REST service calls you make will follow a standard pattern: you provide a URL and optionally serialize some data in JSON format in the outgoing request, you make the request, and finally, also optionally, you deserialize JSON data from the response stream into a result (as you did earlier). Using this pattern, you can easily define a few functions that encapsulate all possible REST calls for you.
Listing 11 shows the helper functions that let you reduce the code duplication. Once you read the helper functions, you’ll find a couple of methods that use them in listing 12.
Listing 11. Encapsulating REST service calls
We won’t go through listing 11 line by line, but you can see that you’re able to use the pattern defined in the previous section to give you the makeRequest method for creating the outgoing request, with or without data, and two versions of getResponse: one for making the call and getting result data, and the other for just making a “fire and forget” call. Additionally, you’ve created some utility functions to wrap based on the HTTP verb; these functions will allow your wrapper implementation methods to be simple.
Listing 12. Simplified service wrapper implementation
member this.AddUser(token:string, user:User) =
putData (token,"users",user)
member this.RemoveUser(token:string, userId:string) =
if userId.StartsWith("users/") then deleteData (token,userId)
else failwith (sprintf "invalid userId: %s" userId)
member this.ListUsers(token:string):User array =
getData (token,"users")
Giving your application a user interface
The subject of UI development is a thorny one in the world of functional languages. This style of development is, by its very nature, littered with parallel paths of execution and rife with side effects. In this section you’ll see that by using a mixture of imperative object-oriented code and pragmatic functional code, you can reach a reasonable compromise.
The UI you’ll develop won’t be much more than a skeleton (the topic would warrant a book in its own right) but will hopefully demonstrate how an enterprise-scale client could be developed, with mixed language development. You’ll use the Prism framework to develop a UI based on a shell written in C#, with a plug-in module developed in F#.
Note
I’ll assume that you’re familiar with Prism; if not, plenty of resources are available to help get you started. When writing this chapter, I re-familiarized myself using “Modularity QuickStarts Using the Prism Library 5.0 for WPF” at http://mng.bz/Zv8f.
Creating the basic Prism shell
To get started, you need a shell for your UI. The shell serves as the point for initializing all the wiring within Prism (showing it how to locate all the services and UI components) and provides the main window inside which all other UI components will reside.
Note
For the purposes of demonstration, you’ll start with a desktop C# WPF application: ThePeopleWhoChat.App.CS. The project could be implemented as an F# application too, but it makes a good demonstration to try to build the shell as a C# application and the plug-in UI modules as F# assemblies.
Using NuGet, search for the online package Prism.UnityExtensions and install it (in turn, it installs Prism itself, because this is a package dependency). This installs Prism with the Unity IoC container. Out of the box, Prism also supports MEF, so feel free to use that (by installingPrism.MEFExtensions), if that’s your preference. The examples in this chapter use Unity.
Take a look at the source code for this application, or the Stock Trader demo application on the Prism CodePlex download, for more in-depth details. The shell boils down to the following components:
· App.xaml.cs —Used to override the default WPF application initialization.
· Bootstrapper.cs —A Prism artifact used to initialize the application and to facilitate module discovery and loading.
· Mainwindow.xaml —The outer view of the shell. Can contain normal WPF elements and also container elements into which the modular UI is hosted.
· Modules.xaml —The runtime configuration for resolving the location of plug-in modules.
For an initial demonstration, you’ll define two F# libraries to contain your UI modules and dynamically load them via the module catalog in Modules.xaml.
Listing 13. Loading the F# modules with a module catalog
<Modularity:ModuleCatalog
xmlns="http://schemas.microsoft.com/winfx/2006/xaml/presentation"
xmlns:x="http://schemas.microsoft.com/winfx/2006/xaml"
xmlns:sys="clr-namespace:System;assembly=mscorlib"
xmlns:Modularity="clr-namespace:Microsoft.Practices.Prism.Modularity;
assembly=Microsoft.Practices.Prism">
<Modularity:ModuleInfo ModuleName="RoomsList"
Ref="file://ThePeopleWhoChat.App.RoomsList.dll"
ModuleType="ThePeopleWhoChat.App.RoomsList.ModuleDef,
ThePeopleWhoChat.App.RoomsList, Version=1.0.0.0,
Culture=neutral, PublicKeyToken=null">
</Modularity:ModuleInfo>
<Modularity:ModuleInfo ModuleName="MessagesList"
Ref="file://ThePeopleWhoChat.App.MessagesList.dll"
ModuleType="ThePeopleWhoChat.App.MessagesList.ModuleDef,
ThePeopleWhoChat.App.MessagesList, Version=1.0.0.0,
Culture=neutral, PublicKeyToken=null">
</Modularity:ModuleInfo>
</Modularity:ModuleCatalog>
We’ll explore the implementation of these modules in F# shortly, but to finish the shell, you need to ensure that MainWindow.xaml has placeholders into which Prism will wire your dynamically loaded views. You can do so with the ContentControl type, as shown in the following listing.
Listing 14. Hosting dynamic UI content with ContentControl
<Window x:Class="ThePeopleWhoChat.App.CS.MainWindow"
xmlns:Regions="http://www.codeplex.com/prism"
... >
<ContentControl
Regions:RegionManager.RegionName="RoomsList" />
<ContentControl
Regions:RegionManager.RegionName="MessagesList" />
...
</Window>
Creating a Prism WPF plug-in module in F#
To complete this demonstration application, let’s now look at how you go about writing the Prism plug-ins for WPF completely in F#. As with a standalone desktop application, you get some disadvantages in terms of Visual Studio integration. Unfortunately, at the moment you can’t automatically wire a WPF (XAML) window to code-behind in F#. You’ll need to do some manual wiring to connect the declarative XAML file to the code-behind type.
Even more unfortunately, a technique[5] I used previously for Silverlight doesn’t translate to WPF; this is because the Application.LoadComponent method when called in a WPF application expects the resource stream to be BAML (the binary XAML format) and not plain XAML, which is what you get when you set the compile action to Resource.
5 See my blog (roundthecampfire.net) post “Creating Composable UI with F# and Prism” at http://mng.bz/SF9d.
To circumvent this limitation, I’ve discovered a technique to dynamically load the XAML file from an embedded resource and to use this definition to override the visual content in the code-behind file. The next listing shows this technique.
Listing 15. Dynamically loading XAML from an embedded resource
namespace ThePeopleWhoChat.App.RoomsList
open System.Reflection
open System.Windows.Controls
open System.Windows.Markup
type RoomsListView() as this =
inherit UserControl()
do
let asm = Assembly.GetExecutingAssembly()
let sr = asm.GetManifestResourceStream("RoomsListView.xaml")
this.Content <- XamlReader.Load(sr) :?> UserControl
Put the contents of listing 15 in a new file, RoomsListView.fs. This represents the code-behind for the control. Next, create the corresponding file, RoomsListView.xaml, containing the XAML from listing 16. Before you compile the project, set the build action of the XAML file to Embedded Resource.
Listing 16. RoomsListView.xaml
<UserControl
xmlns="http://schemas.microsoft.com/winfx/2006/xaml/presentation"
xmlns:x="http://schemas.microsoft.com/winfx/2006/xaml" >
<Grid x:Name="LayoutRoot" Background="Green">
<TextBlock FontSize="36">Hello, Modular UI</TextBlock>
</Grid>
</UserControl>
Later you can create a ViewModel type and wire it in as a data context for the LayoutRoot Grid control, but for the time being you need to create the ModuleDef type (defined earlier in modules.xaml) and use it to allow Prism to discover the Rooms-ListView (see the following listing).
Listing 17. ModuleDef.fs
namespace ThePeopleWhoChat.App.RoomsList
open Microsoft.Practices.Prism.Modularity
open Microsoft.Practices.Prism.Regions
open Microsoft.Practices.Unity
type ModuleDef(rm: IRegionManager) =
interface IModule with
member this.Initialize() =
rm.RegisterViewWithRegion("RoomsList", typeof<RoomsListView>)
|> ignore
Note that this type will be initialized by Unity, which will pass in the requested IRegion-Manager to the constructor. You use IRegionManager to register the view type for the RoomsList region name, which corresponds to the region name in the main window ContentControl. It’s simpler than it sounds once you get used to it!
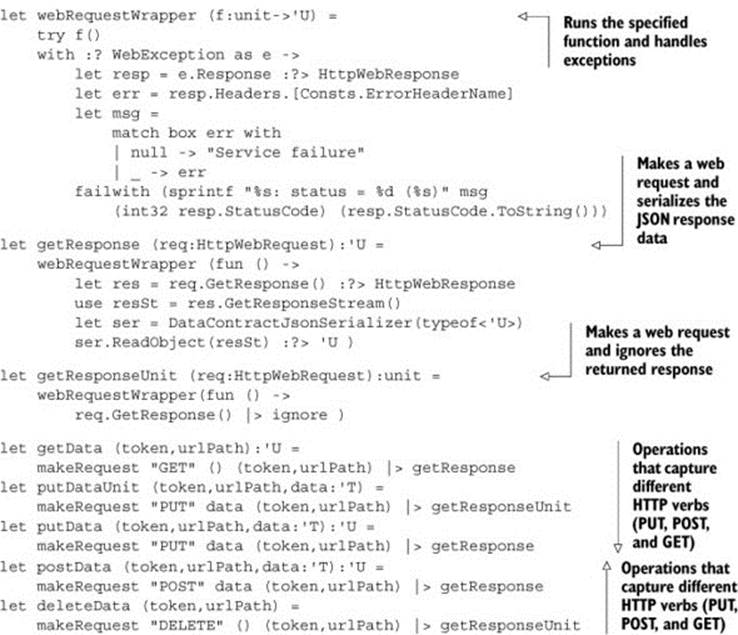
You now have all the wiring you need (in the full source code for the project, I provide a similar implementation for the MessagesList module in a separate F# assembly). So if you run this application now, the main window is shown, and it includes content from the two F# plug-in assemblies, as shown in figure 3.
Figure 3. Output showing the main window contents, including visual elements from the two F# modules
Making your service available throughout the application
The visual wiring is complete. You can host the module UI implemented in F# in your C#-based shell. It’s not much use unless you can connect to your backend data and ensure that each module can present an appropriate UI representation of that data.
To kick off this process, you’ll need to set up a connection to your service layer in the application shell. So in Bootstrapper.cs, you’ll override ConfigureContainer.
Listing 18. Registering the service client wrapper instance with ConfigureContainer
protected override void ConfigureContainer()
{
base.ConfigureContainer();
string url = "http://localhost:53691/Chat.svc";
IChatService svc = new ServiceClient(url);
svc.Login("root", "password1");
Container.RegisterInstance(typeof(IChatService), null, svc,
new ContainerControlledLifetimeManager());
}
For the time being, you’ll hardcode the service URL and forgo a login dialog box in favor of automatically logging in as root—clearly not much use for a multiuser chat application, but at least I can demonstrate getting real data through the service to the UI.
Once you register this service with Unity, it’s automatically available in any other types configured by Unity. So, to make it available to your plug-in modules, add a constructor parameter of type IChatService to the relevant view type—for example, the RoomsListView:
type RoomsListView(model:IChatService) as this =
...
With this knowledge, you can now create a view model class, allowing a bridge between the view and any data you need to extract from the model. In this case, you’ll populate a collection of rooms by calling ListRooms on the service.
Listing 19. Creating RoomsListViewModel.fs
type RoomsListViewModel(model:IChatService) =
let rooms = new ObservableCollection<Room>(model.ListRooms())
member this.Rooms = rooms
Next, update RoomsListView to create an instance of the view model and attach it as DataContext for the top-level component.
Listing 20. Binding to the view model in the revised RoomsListView.fs
type RoomsListView(model:IChatService) as this =
inherit UserControl()
do
let asm = Assembly.GetExecutingAssembly()
let sr = asm.GetManifestResourceStream("RoomsListView.xaml")
let root = XamlReader.Load(sr) :?> UserControl
root.DataContext <- new RoomsListViewModel(model) :> obj;
this.Content <- root
And finally, you can update RoomsListView.xaml to add a DataGrid control and a binding from that to the view model’s Rooms property.
Listing 21. Adding a bound DataGrid to RoomsListView.xaml
<UserControl
xmlns="http://schemas.microsoft.com/winfx/2006/xaml/presentation"
xmlns:x="http://schemas.microsoft.com/winfx/2006/xaml">
<Grid x:Name="LayoutRoot" Background="LightGray">
<DataGrid ItemsSource="{Binding Rooms}" />
</Grid>
</UserControl>
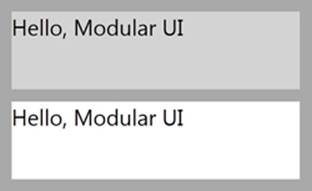
That’s your application, wired end to end. If you run this application, you can see that the service gets called from the rooms-list plug-in and that part of the UI shell is populated with real data, as shown in figure 4.
Figure 4. Output showing the main window with the rooms list populated from the service call
This is as far as you’ll take the UI development. It’s not pretty yet, but you can see how easy it is to develop an application composed of separate UI modules written in different languages.
Summary
Obviously it isn’t possible to cover the development of a major application in just a few pages. This chapter has touched on the thought process involved at the major decision points in the development of a modestly sized application, and you learned how to make pragmatic decisions about the use of F#.
In developing the database access layer, you saw how the use of F# record types provides simplifications over a similar C# implementation. You also saw how it’s good practice to carefully encapsulate F# code within an object-oriented type, whose external signature will be more or less identical to an equivalent C# implementation and whose implementation will at least be understandable by anyone unfamiliar with F#.
In the service layer, you learned how to implement a REST-based service and a client wrapper entirely in F#. In addition, you saw how you can distill the implementation of the service methods and client wrapper methods down to a bare minimum through the use of higher-order functions in F#.
Finally in the UI layer, you bowed to pragmatism a little by implementing the shell itself in C#, but you saw how a technology like Prism can mean that even the UI can consist of a mixture of F# and C# components.
About the author

Chris Ballard is a senior developer and architect currently working in the financial services industry. Over the years Chris has worked on defense systems, test equipment, transportation systems, police databases, and robotic life science systems. He mostly develops in C# by day (although F# is creeping in slowly but surely), and he’s a strong advocate of F# by night. You can reach Chris here: @_ChrisBallard on Twitter.
All materials on the site are licensed Creative Commons Attribution-Sharealike 3.0 Unported CC BY-SA 3.0 & GNU Free Documentation License (GFDL)
If you are the copyright holder of any material contained on our site and intend to remove it, please contact our site administrator for approval.
© 2016-2026 All site design rights belong to S.Y.A.