Development with the Force.com Platform: Building Business Applications in the Cloud, Third Edition (2014)
10. Integration with Force.com
The Force.com platform offers various features to integrate its data and processes with those of other applications. These features are leveraged by independent software vendors as part of stand-alone integration products and also exposed to developers and system administrators of Force.com. This chapter describes the integration features that can bridge Force.com with other applications.
Force.com integration features leverage the Web standards of REST and SOAP to send and receive data over HTTP. REST stands for Representational State Transfer, a common form of Web-accessible API. SOAP is an acronym for Simple Object Access Protocol. These standards can be used to communicate with Force.com bidirectionally, meaning you can call into and out of Force.com with them.
This chapter is divided into the following sections:
![]() Apex callouts—Initiate requests to systems on the Web via REST and SOAP directly from inside your Apex code.
Apex callouts—Initiate requests to systems on the Web via REST and SOAP directly from inside your Apex code.
![]() Calling into Force.com using REST—With the Force.com REST API, you can access Force.com data and logic using a REST-style interface.
Calling into Force.com using REST—With the Force.com REST API, you can access Force.com data and logic using a REST-style interface.
![]() Calling into Force.com using SOAP—Learn how to use the Enterprise API to make the data objects and Apex code in your organization available outside of Force.com.
Calling into Force.com using SOAP—Learn how to use the Enterprise API to make the data objects and Apex code in your organization available outside of Force.com.
![]() Sample application—Walk through an integration scenario with the Services Manager sample application, extending it to calculate and transmit corporate performance metrics to a fictional industry-benchmarking organization.
Sample application—Walk through an integration scenario with the Services Manager sample application, extending it to calculate and transmit corporate performance metrics to a fictional industry-benchmarking organization.
Note
The code listings in this chapter are available in a GitHub Gist at http://goo.gl/GBXT6.
Apex Callouts
A callout is a request made to a system outside of Force.com from within the platform. There are many Web APIs, free and premium, that can be quickly integrated into your Apex code using Apex callouts. This section describes how to work with the two different styles of callouts in Force.com:
1. Calling RESTful services from Apex—Force.com includes classes for issuing HTTP and HTTPS requests, encoding and decoding URLs and Base64 content, and performing cryptographic signing and hashing often needed to comply with the security requirements of external services.
2. Calling SOAP services from Apex—Apex code can be generated directly from WSDL, producing methods for invoking an external Web service and representing the input and output data in native Apex data structures rather than SOAP.
Caution
Force.com tightly controls outbound requests from its platform. Understanding the limits before jumping into development of integrations is important. These limitations apply to both Web service callouts and HTTP requests.
Request and response messages cannot exceed the maximum Apex heap size, normally 6MB. Apex code can make a maximum of ten HTTP requests in a single transaction. By default, a single request cannot run longer than 10 seconds. If a transaction contains more than one request, the total time of all requests cannot exceed 120 seconds.
Calling RESTful Services from Apex
Twitter, Facebook, Yahoo!, Google, and countless others provide REST APIs for their services. REST is designed for lightweight clients, those running inside Web browsers or other scripting environments. Rather than generating static language bindings from a metadata description, as found with WSDL in the Web services world, the REST approach is dynamic. Its emphasis is on a concise syntax for URLs that represent resources and the use of HTTP methods to describe actions on those resources.
REST services usually return data in XML or JSON format, with the format specified by the caller of the service. JSON stands for JavaScript Object Notation, a standard format for representing JavaScript objects as strings. Like XML, it’s widely used for communication between programs.
To invoke REST-style services, Apex can make HTTP requests from the Force.com platform to external servers on the Internet, as well as parse their JSON and XML responses. The core Apex classes that allow you to work with HTTP are described here:
![]() HttpRequest—This class contains the parameters for making an HTTP request. It includes methods for working with the request body, HTTP headers, the HTTP method type, client certificates, HTTP compression, and timeouts.
HttpRequest—This class contains the parameters for making an HTTP request. It includes methods for working with the request body, HTTP headers, the HTTP method type, client certificates, HTTP compression, and timeouts.
![]() HttpResponse—When an HTTP request is sent, an instance of the HttpResponse class is returned. Methods are available for getting the raw response body, HTTP status code, and HTTP headers.
HttpResponse—When an HTTP request is sent, an instance of the HttpResponse class is returned. Methods are available for getting the raw response body, HTTP status code, and HTTP headers.
![]() Http—This class is used to perform the HTTP operation. It contains a single method called send to initiate the operation, which accepts an instance of HttpRequest and returns an HttpResponse.
Http—This class is used to perform the HTTP operation. It contains a single method called send to initiate the operation, which accepts an instance of HttpRequest and returns an HttpResponse.
In addition to these three classes, here are two other useful classes for working with HTTP in Apex:
1. EncodingUtil—This class contains methods for URL and Base64 encoding and decoding.
2. Crypto—Use the Crypto class to compute cryptographic hashes and signatures commonly required to authenticate to HTTP services. It includes the methods generateDigest to generate a one-way hash digest for a message, generateMac to generate a message authentication code given a private key, and sign to produce a digital signature for a message using a private key.
To get started with HTTP in Apex, try writing a method to invoke a RESTful service. The service used in the following example is provided by Yahoo!. It’s a geocoding service, returning latitude and longitude given a street, city, and state. The service is documented athttp://developer.yahoo.com/boss/geo. Listing 10.1 is a sample of the result of invoking the service.
Listing 10.1 Sample JSON Response from Yahoo! Geocoding REST Service
cbfunc({
"query": {
"count": 1,
"created": "2013-07-21T05:03:20Z",
"lang": "en-US",
"results": {
"place": {
"centroid": {
"latitude": "37.547031",
"longitude": "-122.314827"
}
}
}
}
});
In the code sample in Listing 10.2, the geocoding service is called and its response parsed using the JSON API provided by Force.com.
Listing 10.2 Integrating the Yahoo! Geocoding Service
public class Listing10_2 {
private static String APP_ID = 'B1tiUc7k';
public static Result geocode(String location) {
HttpRequest req = new HttpRequest();
String query = 'select centroid from geo.places where text="'
+ location + '"';
String url = 'http://query.yahooapis.com/v1/public/yql?appid='
+ APP_ID + '&q=' + EncodingUtil.urlEncode(query, 'UTF-8')
+ '&format=json';
req.setEndpoint(url);
req.setMethod('GET');
Http http = new Http();
HTTPResponse res = http.send(req);
JSONParser parser = JSON.createParser(res.getBody());
while (parser.nextToken() != null) {
if ((parser.getCurrentToken() == JSONToken.FIELD_NAME) &&
(parser.getText() == 'centroid')) {
parser.nextToken();
return (Result)parser.readValueAs(Result.class);
}
}
return null;
}
public class Result {
public String latitude;
public String longitude;
public String asString() {
return latitude + ', ' + longitude;
}
}
}
Tip
The Listing10_2 class will not work without a Remote Site Setting authorizing Force.com to call out to the Yahoo! service. To add this setting, go to the Administration Setup area and click Security Controls, Remote Site Settings. Click the New Remote Site button and enter a name to remember the site (no spaces allowed) and the root of the URL (http://query.yahooapis.com).
To test the code, open the Execute Anonymous view in the Force.com IDE and execute the statements given in Listing 10.3. The result (contained in the debug log) should be a single line containing the latitude and longitude of the input address.
Listing 10.3 Testing the Yahoo! Geocoding Integration
Listing10_2.Result r = Listing10_2.geocode
('1 market st san francisco ca');
System.debug(r.toString());
Calling SOAP Services from Apex
Force.com provides a code generation tool in its native user interface for creating Apex-friendly classes and methods from SOAP Web service definitions found in WSDL files. Like most code generation tools, using it is a hit-or-miss experience. When it works on your WSDL, it can save considerable effort over the alternative of manually constructing and parsing SOAP messages. But be prepared for cryptic error messages when code cannot be generated due to the impedance mismatch between WSDL, SOAP, and Apex.
If you’re able to use your WSDL wholesale or slim it down to successfully generate Apex code, most of your work is done. Invoking the remote SOAP Web service becomes a relatively simple matter of preparing the right input via Apex classes, invoking a method, and using the resulting Apex classes in your program. No interaction with HTTP or XML is necessary because these details are hidden by the generated Apex code.
Caution
For integrations that require a series of Web service calls strung together with cookies to maintain state between them, you cannot use the Apex code generated from WSDL. Additionally, generated code does not support HTTP-level authentication.
In general, no developer-modifiable options exist in the generated code, which uses an internal, undocumented API to perform the actual Web service callout. If your Web service call requires control over the SOAP message content or HTTP headers, you must write code to make the request from scratch using HTTPRequest, as described in the next subsection.
Here are the steps needed to generate Apex from WSDL:
1. Save the WSDL file on your local machine.
2. Go to the App Setup area and click Develop, Apex Classes.
3. Click the Generate from WSDL button.
4. Click the Browse button and locate the WSDL in your file system and then click the Parse WSDL button. The WSDL must describe a document-style service because Remote Procedure Call (RPC) is not supported.
5. Each WSDL namespace can be mapped to an Apex class name to be generated. You can map multiple namespaces to the same class. Force.com suggests an Apex class name based on the WSDL, but you can override this suggestion. When you’re done naming the classes, click the Generate Apex Code button.
6. If you refresh your Force.com IDE by right-clicking the project and selecting Force.com, Refresh from Server, you should see the new Apex class. If not, make sure that it was generated successfully and that you’ve subscribed to new Apex classes by right-clicking the Force.com project and selecting Force.com, Add/Remove Metadata Components.
Caution
Due to the complexity of WSDL, conflicts between its naming conventions and Apex syntax rules, and the limit on Apex class size, the WSDL to Apex feature might not work as expected in all cases. Investigate these issues further in the Force.com online help. As a best practice, keep your WSDL as simple as possible. Manually edit it to strip out extraneous services and ports.
Before you can run this code, you must authorize Force.com to make an outbound call to the endpoint of the Web service. Go to the Administration Setup area, click Security Controls, Remote Site Settings, and then add the host.
Calling into Force.com Using REST
Force.com provides a REST form of its core data access API to query and modify standard and custom objects. It also allows Apex developers to turn custom classes into REST Web services. This section provides an introduction to using REST to call into Force.com in three parts:
![]() Getting started with Force.com REST API—Learn how Force.com functionality is exposed in the REST style and how to authenticate to it.
Getting started with Force.com REST API—Learn how Force.com functionality is exposed in the REST style and how to authenticate to it.
![]() Force.com REST API walk-through—Using your computer’s command line, you can take an interactive tour of the Force.com REST API.
Force.com REST API walk-through—Using your computer’s command line, you can take an interactive tour of the Force.com REST API.
![]() Creating custom Apex REST Web services—With a few simple modifications, an Apex class can be serving REST-style requests from the Web.
Creating custom Apex REST Web services—With a few simple modifications, an Apex class can be serving REST-style requests from the Web.
Note
Because REST requests and responses are typically so concise, you can practice using them directly from your computer’s command line using standard OS-level tools to make Web requests. The examples in this section rely on the tool named cURL, available free for every platform at http://curl.haxx.se.
Getting Started with Force.com REST API
Data access concepts in Force.com translate naturally into the REST style of API. SObjects and rows within them become URLs, and HTTP actions express DML operations: GET for read-only requests for basic information, POST to create records, PATCH to update records, and DELETE to delete them. Because not all HTTP clients support the full range of methods, Force.com also allows a special URL parameter (_HttpMethod) to specify the action. By default, REST API calls return JSON-encoded responses, but you can override this by appending .xml to the end of URLs, or by sending the standard HTTP Accept header with the desired content type.
Almost every REST API call requires authentication to Force.com. This is done using OAuth. OAuth is an industry-standard way of negotiating access to a system without requiring users to share their login credentials. OAuth operates using tokens instead. Tokens have advantages over the typical username/password credentials. They can be audited and revoked by the user. They also typically provide limited access to the system. In the case of Force.com, OAuth access tokens grant bearers the ability to make API calls only. They cannot log in to the Salesforce Web user interface.
Note
OAuth is a complex subject well beyond the scope of this book. The Force.com REST API Developer’s Guide, found at www.salesforce.com/us/developer/docs/api_rest/index.htm, provides some introductory information on using OAuth to authenticate to Force.com.
If you are calling the REST API on behalf of another user, OAuth is the recommended approach for authentication because you do not need to store others’ usernames and passwords. But when you’re learning and experimenting with simple REST API examples, OAuth can present a significant hurdle.
A shortcut is to use the username-password OAuth flow, which still accepts username and password directly. Listing 10.4 provides a sample request and response.
Listing 10.4 Sample Password Authentication Request and Response
curl https://login.salesforce.com/services/oauth2/token
-d "grant_type=password" -d "client_id=$CLIENT_ID"
-d "client_secret=$CLIENT_SECRET"
-d "username=$USERNAME" -d "password=$PASSWORD"
{
"id": "https://login.salesforce.com/id/...",
"issued_at": "1374386510993",
"instance_url": "https://na15.salesforce.com",
"signature": "...",
"access_token": "..."
}
The value in the response’s access_token field is needed to run all of the examples in this section. To get one yourself, set the $USERNAME environment variable to your Salesforce username, $PASSWORD to your Salesforce password with security token appended. The variables$CLIENT_ID and $CLIENT_SECRET are your OAuth Consumer Key and Consumer Secret. These come from a Connected App, which you can create using the following steps:
1. In the App Setup area, click Create, Apps.
2. Click the New button in the Connected Apps section.
3. Fill out Connected App Name, API Name, and Contact Email.
4. Check Enable OAuth Settings.
5. Set the Callback URL to http://localhost.
6. In Available OAuth Scopes, select Access and Manage Your Data (api).
The resulting Connected App is shown in Figure 10.1.
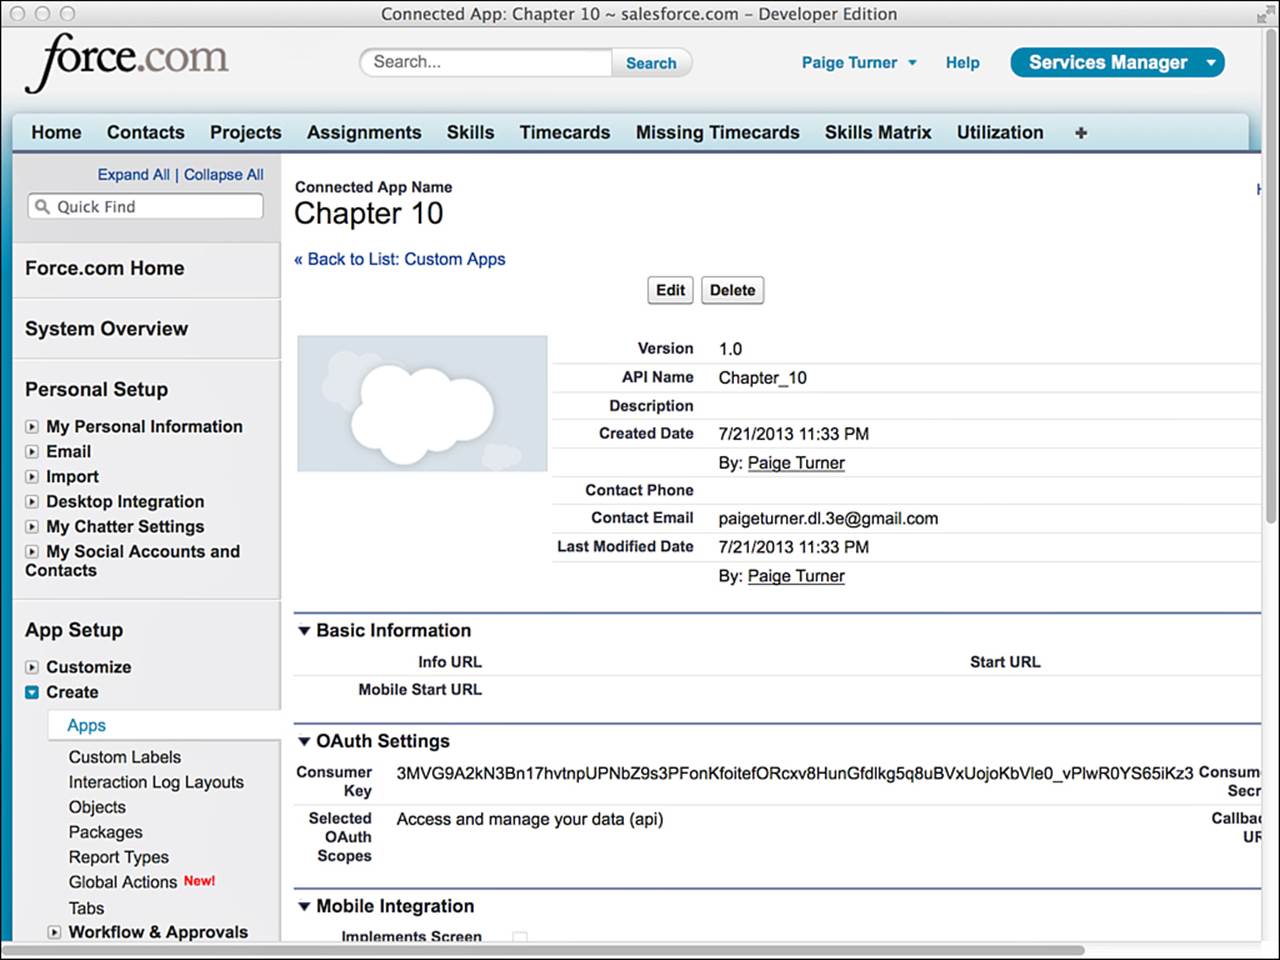
Figure 10.1 Connected App configuration
Force.com REST API Walk-Through
Now that you have obtained an OAuth access token, you are ready to try the Force.com REST API. Set the access token as the environment variable $TOKEN. Also, be sure to replace na15 in the following examples with your own instance of Force.com. To identify your instance, look at theinstance_url field of the OAuth username-password flow, or the URL in your Web browser when you log in to Force.com.
Note
This section is not a complete reference to the REST API. Consult the Force.com REST API Developer’s Guide, found at www.salesforce.com/us/developer/docs/api_rest/index.htm, for the latest and most detailed information on the REST API, which Salesforce continuously improves in each major release of the platform.
Listing 10.5 is an example of one of the simplest REST API calls. It returns the services available via REST in the specified version and instance of the Force.com platform. Here, the result indicates four services. In subsequent examples, you’ll try all the services, except recent. Therecent service returns the same data as you see in the Recent Items box in the Web user interface.
Listing 10.5 Services Available Request and Response
curl https://na15.salesforce.com/services/data/v28.0\
-H "Authorization: OAuth "$TOKEN -H "X-PrettyPrint:1"
{
"sobjects" : "/services/data/v28.0/sobjects",
"identity" : "https://login.salesforce.com/id/... ",
"connect" : "/services/data/v28.0/connect",
"search" : "/services/data/v28.0/search",
"quickActions" : "/services/data/v28.0/quickActions",
"query" : "/services/data/v28.0/query",
"tooling" : "/services/data/v28.0/tooling",
"chatter" : "/services/data/v28.0/chatter",
"recent" : "/services/data/v28.0/recent"
}
Tip
The backslash (\) character found at the end of the first line in Listing 10.5 and other listings in this chapter is a line-continuation character for UNIX shells. Translate it as appropriate to your own command-line environment.
To retrieve basic information on an SObject, use the sobjects service, as demonstrated in Listing 10.6. You can also omit the object name (/Project__c) to get a list of all SObjects, or append /describe to the end of the URL to obtain the full, detailed list of fields on the SObject. If an error occurs in processing this request or any REST request, the response contains message and errorCode keys to communicate the error message and code.
Listing 10.6 Basic Information Request for an SObject
curl https://na15.salesforce.com/services/data/v28.0/sobjects/Project__c\
-H "Authorization: OAuth "$TOKEN -H "X-PrettyPrint:1"
Another usage of the sobjects service is shown in Listing 10.7. Here an individual record is returned, identified by its unique identifier. The fields parameter specifies a subset of fields to return. You can omit this parameter to retrieve all fields. If your record is a binary object such as a Document, append /body to the URL to retrieve the binary content.
Listing 10.7 Record Retrieval by Unique Identifier Request and Response
curl https://na15.salesforce.com/services/data/v28.0\
/sobjects/Project__c/a01i0000000rMq1?fields=Name,Status__c\
-H "Authorization: OAuth "$TOKEN -H "X-PrettyPrint:1"
{
"attributes" : {
"type" : "Project__c",
"url" : "/services/data/v20.0/sobjects/Proj__c/a01i0000000rMq1AAE"
},
"Name" : "GenePoint",
"Status__c" : "Green",
"Id" : "a01i0000000rMq1AAE"
}
Listing 10.8 demonstrates record retrieval by external identifier. The record with a Project_ID__c value of Project-00001 on the Project__c SObject is returned.
Listing 10.8 Request for Retrieval of Record by External Identifier
curl https://na15.salesforce.com/services/data/v28.0\
/sobjects/Project__c/Project_ID__c/Project-00001\
-H "Authorization: OAuth "$TOKEN -H "X-PrettyPrint:1"
A simple SOQL query is shown in Listing 10.9. To run a SOSL query, use search instead of query in the URL.
Listing 10.9 SOQL Query Request
curl https://na15.salesforce.com/services/data/v28.0\
/query?q=SELECT+Name+FROM+Project__c\
-H "Authorization: OAuth "$TOKEN -H "X-PrettyPrint:1"
To create a record, make a POST request with the SObject type in the URL and a JSON or XML request body containing the record’s field values. Listing 10.10 creates a new Project__c record named Test Project. A successful response provides the new record’s unique identifier.
Listing 10.10 Create Record Request and Response
echo '{ "Name": "Test Project" }' |\
curl -X POST -H 'Content-type: application/json'\
-H "Authorization: OAuth "$TOKEN -H "X-PrettyPrint:1" -d @-\
https://na15.salesforce.com/services/data/v28.0/sobjects/Project__c
{
"id" : "a01i0000003aFzrAAE",
"success" : true,
"errors" : [ ]
}
Tip
To adapt the command in Listing 10.10 to run in Windows Command Prompt, remove the single quotation mark characters (') in the echo statement, replace the single quotation mark characters around the Content-type header with double quotation mark characters ("), remove the backslash (\) line-continuation characters and concatenate the lines into a single line, and replace $TOKEN with %TOKEN%.
Updating a record follows a similar process to creating a record. Make a PATCH request with the URL containing the SObject type and unique identifier, and a request body with the field values to update. In Listing 10.11, the record created in Listing 10.10 gets its name updated.
Listing 10.11 Update Record Request
echo '{ "Name": "Updated Test Project" }' |\
curl -X PATCH -H 'Content-type: application/json'\
-H 'Authorization: OAuth '$TOKEN -H "X-PrettyPrint:1" -d @-\
https://na15.salesforce.com/services/data/v28.0\
/sobjects/Project__c/a01i0000003aFzrAAE
The only difference between an upsert and update request is that upsert uses an external identifier rather than the unique identifier. If the external identifier value is not found, the request creates the record and its unique identifier is returned. Otherwise, the record is updated, and nothing is returned upon success. Listing 10.12 demonstrates an upsert of a Project__c record.
Note
Listing 10.12 will return an INVALID_FIELD_FOR_INSERT_UPDATE error unless you change the Project_ID__c field type from Auto Number to Text first because Auto Number fields are read-only.
Listing 10.12 Upsert Record Request and Response
echo '{ "Name": "Upserted Project" }' |\
curl -X PATCH -H 'Content-type: application/json'\
-H "Authorization: OAuth "$TOKEN -H "X-PrettyPrint:1" -d @-\
https://na15.salesforce.com/services/data/v28.0\
/sobjects/Project__c/Project_ID__c/Project-11111
Deleting a record by its unique identifier is shown in Listing 10.13. You can also delete a record by its external identifier. In both cases, nothing is returned by a successful request.
Listing 10.13 Delete Record Request
curl -X DELETE\
-H 'Authorization: OAuth '$TOKEN -H "X-PrettyPrint:1"\
https://na15.salesforce.com/services/data/v28.0\
/sobjects/Project__c/a01i0000003aFzrAAE
Creating Custom Apex REST Web Services
Force.com REST API is a powerful but generic way to access data. For some application-specific data access scenarios, such as those involving transactions that span multiple database objects, a custom API is helpful. You can expose your Apex classes as REST services, making simple atomic units of work accessible to callers outside of Force.com, and hiding the implementation details from them. Requests to custom Apex REST services are made via HTTP in JSON or XML format, dictated by the Content-Type header, with JSON the default.
For an Apex class to become a REST Web service, it must follow different rules than ordinary Apex classes. The most significant rules are listed here:
![]() Global class access modifier—A class that contains any REST services must use the global access modifier. This means the class is visible to all programs running in the Force.com organization.
Global class access modifier—A class that contains any REST services must use the global access modifier. This means the class is visible to all programs running in the Force.com organization.
![]() URL mapping annotation—A class containing REST services must be mapped to a URL so that it can be invoked. Define the URL mapping using the @RestResource annotation.
URL mapping annotation—A class containing REST services must be mapped to a URL so that it can be invoked. Define the URL mapping using the @RestResource annotation.
![]() HTTP verb annotation—Each method accessible via REST must be annotated with a corresponding HTTP verb. The verbs are @HttpDelete, @HttpGet, @HttpPatch, @HttpPost, and @HttpPut, and the same verb can’t be assigned to more than one method. These methods must also be global and static.
HTTP verb annotation—Each method accessible via REST must be annotated with a corresponding HTTP verb. The verbs are @HttpDelete, @HttpGet, @HttpPatch, @HttpPost, and @HttpPut, and the same verb can’t be assigned to more than one method. These methods must also be global and static.
![]() Method parameters—The REST request body is automatically mapped into the parameters of the method. Method parameters are not supported for the @HttpDelete and @HttpGet verbs. The REST request URL is never automatically mapped to method parameters and requires code to extract its values.
Method parameters—The REST request body is automatically mapped into the parameters of the method. Method parameters are not supported for the @HttpDelete and @HttpGet verbs. The REST request URL is never automatically mapped to method parameters and requires code to extract its values.
![]() Data types—Data types supported in REST methods are primitive types (except Blob and sObject), sObjects, List and Map (String keys only) containing primitives or sObjects, and user-defined classes.
Data types—Data types supported in REST methods are primitive types (except Blob and sObject), sObjects, List and Map (String keys only) containing primitives or sObjects, and user-defined classes.
![]() Security—REST methods run as a system administrator, without regard for object-, field-, or record-level sharing rules. To enforce record sharing rules, define the class with the with sharing keyword. To enforce object- and field-level security, use the results of thegetDescribe method (Schema.DescribeSObjectResult and Schema.DescribeFieldResult) to check the user’s permission to the data.
Security—REST methods run as a system administrator, without regard for object-, field-, or record-level sharing rules. To enforce record sharing rules, define the class with the with sharing keyword. To enforce object- and field-level security, use the results of thegetDescribe method (Schema.DescribeSObjectResult and Schema.DescribeFieldResult) to check the user’s permission to the data.
![]() Supporting classes—User-defined Apex classes, inner or outer, that are arguments or return values for a REST service method must be defined as global.
Supporting classes—User-defined Apex classes, inner or outer, that are arguments or return values for a REST service method must be defined as global.
Additionally, custom Apex REST Web services are subject to standard Apex governor limits. A subset of these governor limits is listed in Table 10.1.
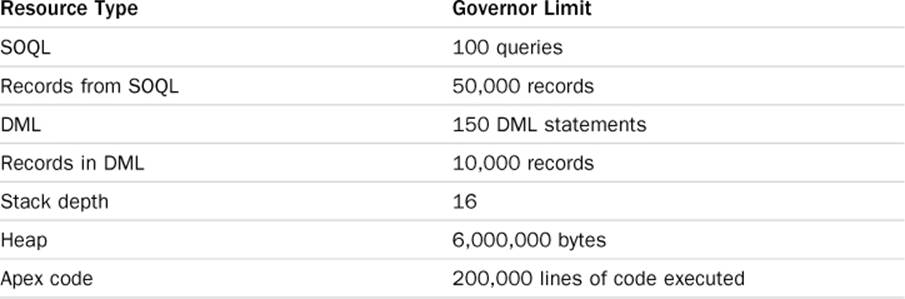
Table 10.1 Subset of Apex REST Service Governor Limits
Listing 10.14 defines a simple Apex REST service that returns a record in the Project custom object given its unique identifier.
Listing 10.14 Custom Apex REST Web Service
@RestResource(urlMapping='/Listing10_14/*')
global with sharing class Listing10_14 {
@HttpGet
global static Project__c doGet() {
RestRequest req = RestContext.request;
String projectId = req.requestURI.substring(
req.requestURI.lastIndexOf('/')+1);
Project__c result = [SELECT Id, Name, Status__c, Owner.Name
FROM Project__c WHERE Id = :projectId];
return result;
}
}
In Listing 10.15, the custom REST Web service is invoked and returns fields from the Project record with unique identifier a01i0000000rMq1.
Listing 10.15 Custom Apex REST Web Service Request and Response
curl -H 'Authorization: OAuth '$TOKEN -H "X-PrettyPrint:1"\
"https://na15.salesforce.com/services/apexrest/Listing10_14/a01i0000000rMq1"
{
"attributes" : {
"type" : "Project__c",
"url" : "/services/data/v27.0/sobjects/Project__c/a01i0000000rMq1AAE"
},
"Name" : "GenePoint",
"Owner" : {
"attributes" : {
"type" : "Name",
"url" : "/services/data/v27.0/sobjects/User/005i0000000LUJsAAO"
},
"Name" : "Tim Barr",
"Id" : "005i0000000LUJsAAO"
},
"OwnerId" : "005i0000000LUJsAAO",
"Id" : "a01i0000000rMq1AAE",
"Status__c" : "Green"
}
Calling into Force.com Using SOAP
Force.com provides many SOAP APIs, each focused on a different area of platform functionality. For example, you can query and modify standard and custom objects using SOAP. You can also make custom classes into SOAP Web services. This section provides an introduction to using SOAP to call into Force.com in three parts:
1. Understanding Force.com SOAP API—This section describes high-level concepts common to all the subsequent sections, including how to invoke SOAP Web services from Java and the handling of data types and errors.
2. Using the Enterprise API—The Enterprise API is a set of SOAP Web services that allow fine-grained, strongly typed access to the data in your Force.com database, including execution of SOQL and SOSL queries and full read and write capabilities on the records of all objects.
3. Creating custom Apex SOAP Web services—Although Force.com provides a built-in SOAP API to access your data, you can also define your own custom SOAP API using Apex code. Custom Apex SOAP Web services are typically written to optimize for application-specific usage patterns; for example, combining what would be many SOAP API calls into a single, robust method executed entirely on the Force.com platform.
Understanding Force.com SOAP API
Force.com SOAP API allows data, logic, and metadata to be accessed from outside the Force.com platform by any program that can communicate using SOAP messages over HTTP. With a strongly typed language like Java or C#.NET, stub code is generated from the Force.com SOAP API’s WSDL. The program must log in to Force.com to establish a session and can then invoke the SOAP API methods.
This section describes concepts that can be applied to using any Force.com SOAP API method. It consists of the following parts:
![]() Basics of Force.com SOAP API—Learn about the two different styles of Force.com SOAP API methods, how they are secured, and limits placed on their use.
Basics of Force.com SOAP API—Learn about the two different styles of Force.com SOAP API methods, how they are secured, and limits placed on their use.
![]() Generating stub code—Walk through the process for generating Java code from Force.com SOAP API WSDL.
Generating stub code—Walk through the process for generating Java code from Force.com SOAP API WSDL.
![]() Logging in—The first SOAP API call typically establishes a session with Force.com by logging in. This session is used to make subsequent SOAP API calls until it is invalidated explicitly or it expires.
Logging in—The first SOAP API call typically establishes a session with Force.com by logging in. This session is used to make subsequent SOAP API calls until it is invalidated explicitly or it expires.
![]() Force.com data types in SOAP—Understand how data types in Force.com objects are expressed in the SOAP API.
Force.com data types in SOAP—Understand how data types in Force.com objects are expressed in the SOAP API.
![]() Error handling—Force.com SOAP API signals errors in a few ways, depending on where the errors originate.
Error handling—Force.com SOAP API signals errors in a few ways, depending on where the errors originate.
Basics of Force.com SOAP API
The Force.com SOAP API comes in two forms, Enterprise and Partner. Both APIs have the same core set of calls, such as query to execute a SOQL query. The difference between the APIs is how database objects are represented in your code.
The Enterprise API provides a strongly typed representation of the objects in your Force.com database. This allows your code to operate naturally with Force.com data, using the field names and data types as you would in Apex code. When you redefine an object or add a new object, the Enterprise WSDL is automatically updated to reflect the changes. You need to manually regenerate the client code from the latest WSDL, but this is a small price to pay for concise, maintainable code.
The Partner API is designed for independent software vendors who write applications that must interoperate with many different Force.com organizations. They cannot rely on a single, static representation of standard and custom objects because all customers of Force.com are free to create their own database schemas. With the Partner API, you can write generic code to access any object in any Force.com organization. It’s more verbose to work with than the Enterprise API, but more flexible as well.
Note
This book does not cover the Partner API. For more information about it, consult the Force.com SOAP API Developer’s Guide, available at www.salesforce.com/us/developer/docs/api/index.htm.
Versions
With each major release of the Force.com platform, new versions of its WSDL are also released. To take advantage of new features, your code must be updated to use the latest WSDL.
If the new features are not needed, no action is required. Your code will continue to work without modification. This is because each WSDL has an endpoint URL in it that includes its version.
Note
In its documentation, Salesforce commits to maintaining Web service versions for a minimum of three years. It also states that one year of notice will be provided for discontinued Web service versions.
Security
Force.com uses Secure Sockets Layer (SSL) v3 and Transport Layer Security (TLS) to protect the communications between your client application and the Force.com platform.
After your client program has logged in, all the API calls respect the full set of data security features in Force.com at the object, field, and record level. For this reason, configuring a Force.com profile and user account dedicated solely to integration is a good practice. It might have elevated privileges compared with other, Web-based users. You can configure this profile to accept logins only from the API address of your corporate integration server using the Login IP Ranges on the profile or logins at specific times that your integration is scheduled to run using the Login Hours section.
API Limits
Salesforce limits the number of API calls that can be executed during a 24-hour period. Every call into Force.com is counted against this limit, including calls made by the Force.com IDE. The exact limit depends on the edition of Force.com you have licensed.
To view your API limit and current consumption, go to the Administration Setup area and click Company Profile, Company Information. You can configure Force.com to email you when your organization is close to its API call limit. Go to the Administration Setup area and click Monitoring, API Usage Notifications. Click the New button to define a new notification, specifying the user to receive the notification, the usage threshold that triggers notifications, and how often they are sent.
Generating Stub Code
If you’re using a strongly typed language like C#.NET or Java to integrate with Force.com, your first step is to generate stub code from a Force.com WSDL. All standard Force.com WSDLs are available in the App Setup area; to access them, click Develop, API. Click each WSDL link and save the resulting document on your local file system.
Each language and development tool typically provides a facility for parsing WSDL and generating stub code that can be incorporated into your program. The steps for generating Java stub code from WSDL are described next.
Note
Salesforce advises that you use the Force.com Web Service Connector (WSC) with its SOAP API. Download it from https://github.com/forcedotcom/wsc. Download the source code from https://github.com/forcedotcom/wsc. Follow the instructions there to compile the source code into a WSC JAR file, which requires Maven (http://maven.apache.org/). If you would rather download a WSC JAR file than build it, find one at http://code.google.com/p/sfdc-wsc/downloads/list.
Follow these steps to create Java stub code using WSC and the Eclipse IDE:
1. Create a new Java project. In this example, the project is named Chapter10.
2. Copy the WSC jar and enterprise.wsdl files into the top level of your Java project.
3. Create a new Run Configuration to execute the stub generator. Figure 10.2 shows the Run Configuration.
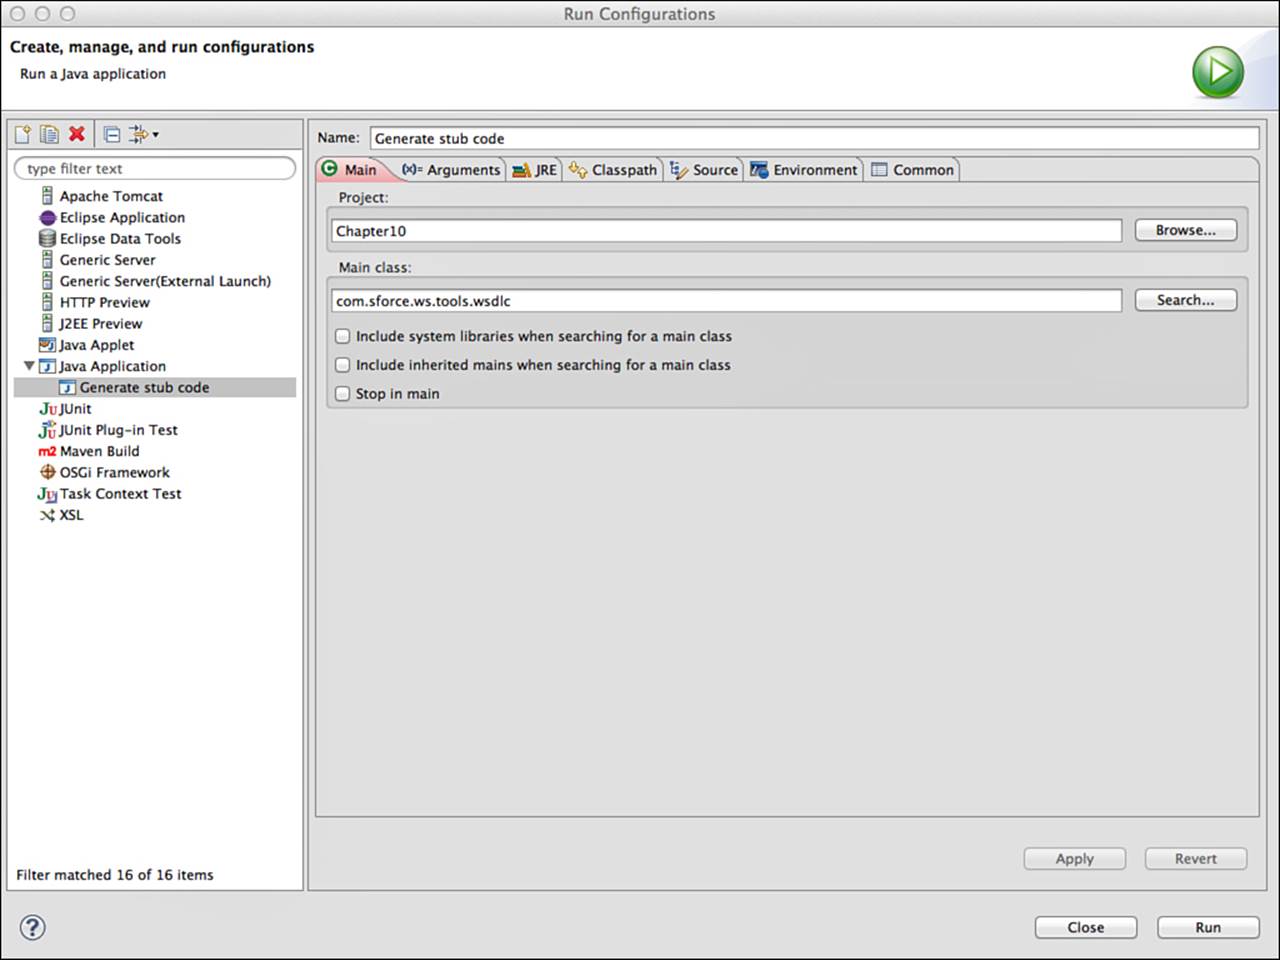
Figure 10.2 Eclipse Run Configuration to generate stub code using WSC
4. Click the Arguments tab and enter enterprise.wsdl.xml ./enterprise.jar in the Program Arguments text box. These arguments tell the program to generate the stub code for the enterprise.xml.wsdl file into a jar named enterprise.jar.
5. Click the Run button on the Run Configuration and refresh your project. It should contain the stub code for the Force.com Enterprise API, as depicted in Figure 10.3.
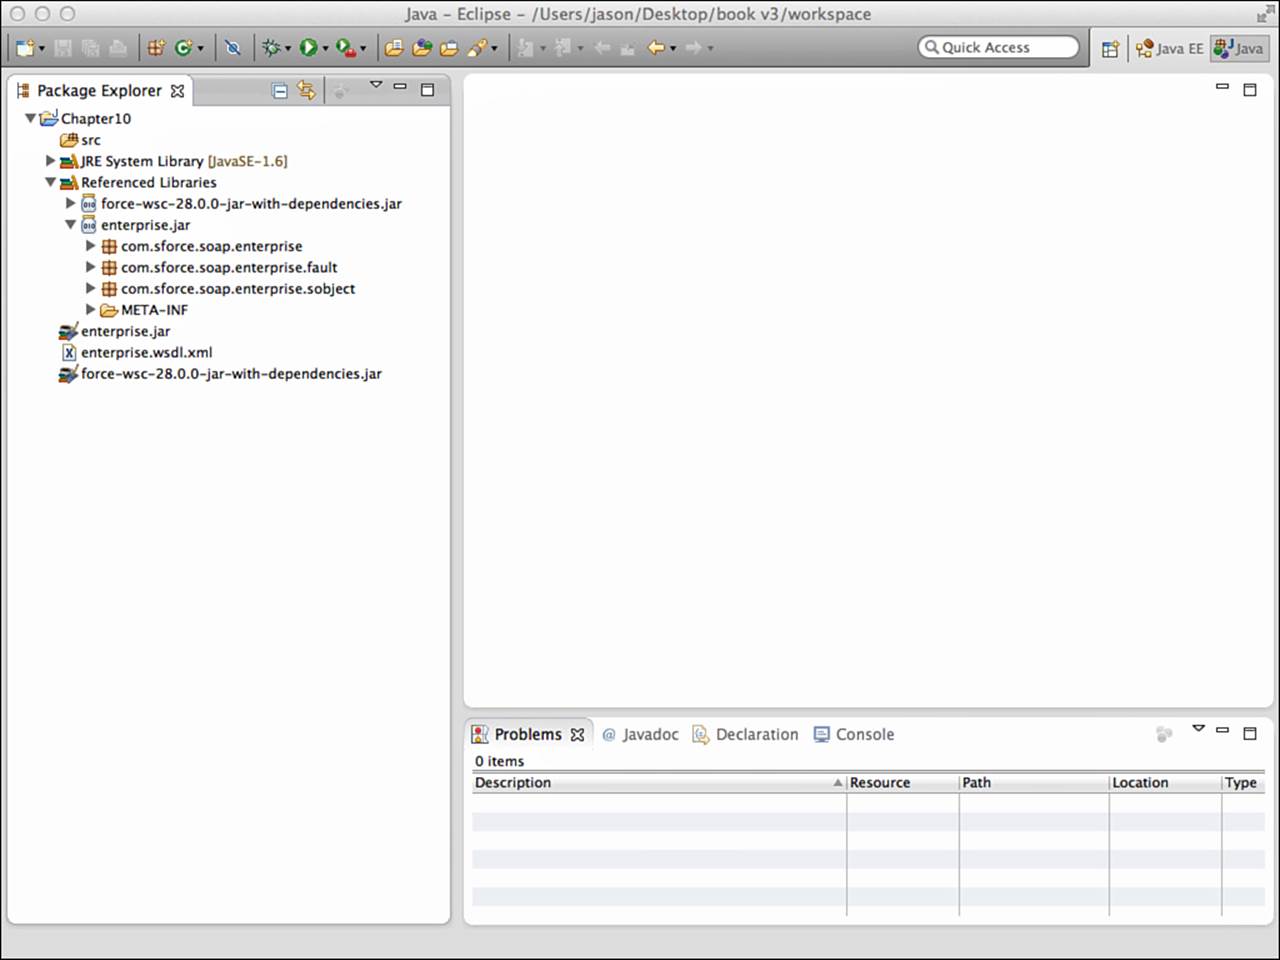
Figure 10.3 Java project with stub code generated
Logging In
Logging in to Force.com from a program begins with the user credentials of username and password, the same as logging in to the native user interface using a Web browser. This subsection describes four additional details to be aware of to successfully log in, summarized here:
![]() API Enabled permission—The user logging in must have the API Enabled permission on his or her profile.
API Enabled permission—The user logging in must have the API Enabled permission on his or her profile.
![]() Security token or white-listed IP address—Force.com requires either a security token appended to the password or API calls to be issued from a white-listed IP address.
Security token or white-listed IP address—Force.com requires either a security token appended to the password or API calls to be issued from a white-listed IP address.
![]() Login call—When successful, the login method returns two items of information needed in subsequent calls: a URL to the Salesforce server and the user’s session identifier.
Login call—When successful, the login method returns two items of information needed in subsequent calls: a URL to the Salesforce server and the user’s session identifier.
![]() Troubleshooting login problems—Force.com includes a Login History report that can be helpful in identifying problems.
Troubleshooting login problems—Force.com includes a Login History report that can be helpful in identifying problems.
API Enabled Permission
The user logging in via API must have the API Enabled permission set on his or her profile. This permission is found in the Administrative Permissions section. A profile with the API Enabled permission is shown in Figure 10.4.
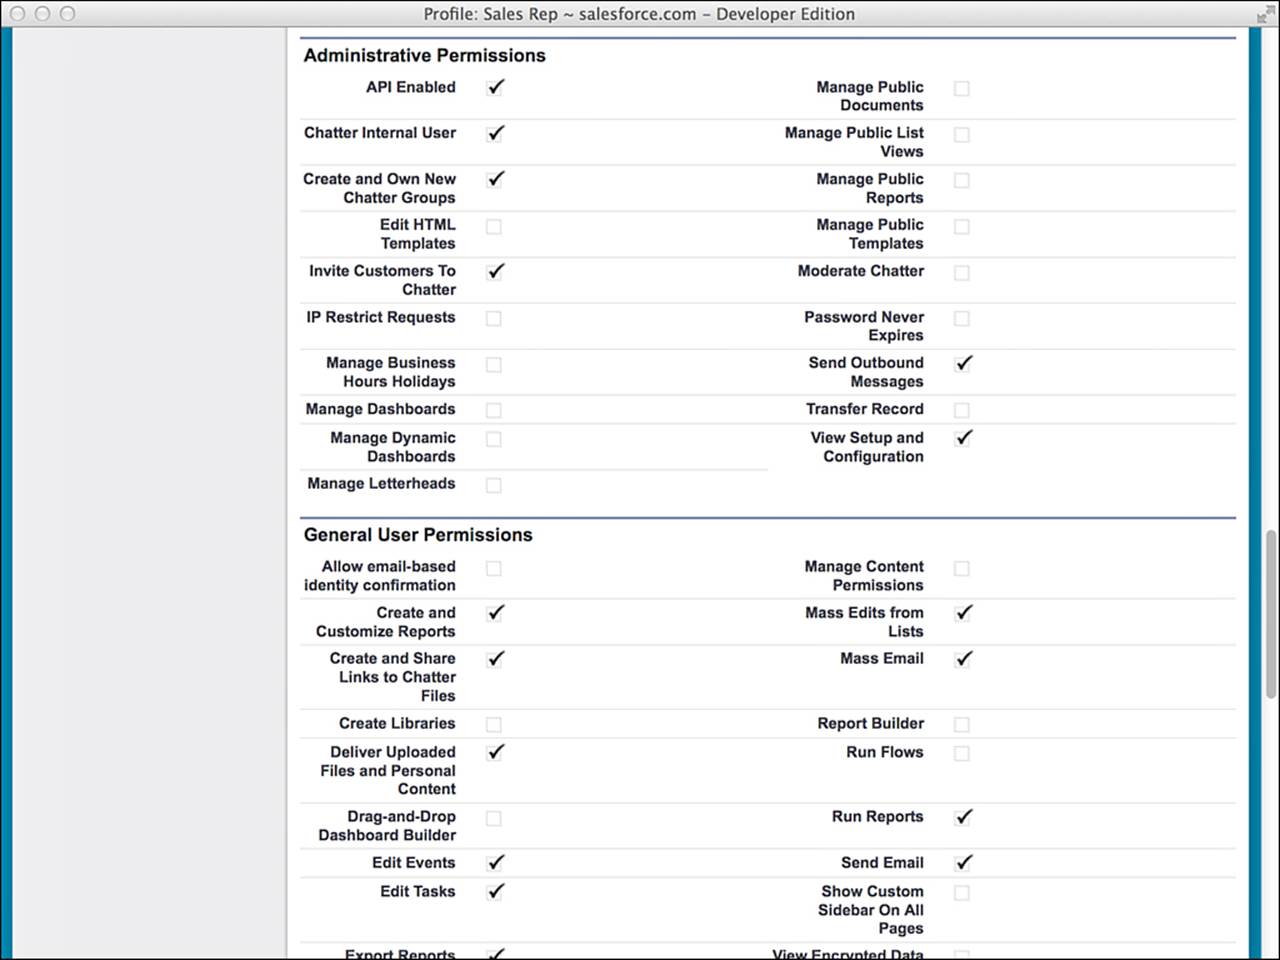
Figure 10.4 Profile with the API Enabled permission
Caution
A few editions of Force.com don’t allow API access. If you don’t see the API Enabled permission on the profile page or cannot enable it, contact Salesforce support.
Security Token or White-Listed IP Address
The security token is a string of characters appended to the end of a user’s password. It allows a user to log in to Force.com from any IP address, assuming that IP address restrictions are not configured on his or her profile. To obtain a security token, visit the Personal Setup area and click My Personal Information, Reset My Security Token. A new security token is generated and emailed to the address associated with the user.
An alternative to security tokens is IP white-listing. White-listing instructs Force.com to accept requests from a specific IP address. To white-list an IP address, go to the Administration Setup area and click Security Controls, Network Access. Click the New button, enter the IP address in the Start IP Address and End IP Address fields, and then click the Save button.
The Login Call
To log in, invoke the login method with a username and password. If the login is successful, a LoginResult object is returned; otherwise, an exception is raised. The LoginResult object contains the URL of the server to send SOAP API requests to and the session identifier that uniquely identifies your authenticated session with Force.com. Both of these attributes must be sent in the HTTP headers of subsequent requests for them to succeed.
Listing 10.16 contains sample Java code to log in. Note that WSC takes care of the details described earlier for logging in, but this is not the case if you use a different Web service stack, such as Apache Axis.
Note
The code in Listing 10.16 doesn’t include exception handling or importing the generated stub code. It also doesn’t factor in the use of corporate proxies, which might block outbound HTTPS traffic. Java can be configured to pass connections through a proxy. If your connections to Force.com are failing, check with your network administrator to see whether a proxy could be the cause.
Listing 10.16 Java Fragment to Log In
ConnectorConfig config = new ConnectorConfig();
config.setUsername(user);
config.setPassword(pass);
EnterpriseConnection connection = Connector.newConnection(config);
When you’re done with a session, you can invoke the logout API call. It causes the session to become invalid, ensuring that it is not used accidentally elsewhere by your program.
By default, sessions expire after two hours, but you can change this in the Administration Setup area by clicking Security Controls, Session Settings. Web service calls that use an expired or invalid session throw an exception with an INVALID_SESSION_ID exception code.
Troubleshooting Login Problems
All logins to Force.com create an entry in the login history, shown in Figure 10.5. To view it, go to the Administration Setup area and click Manage Users, Login History.
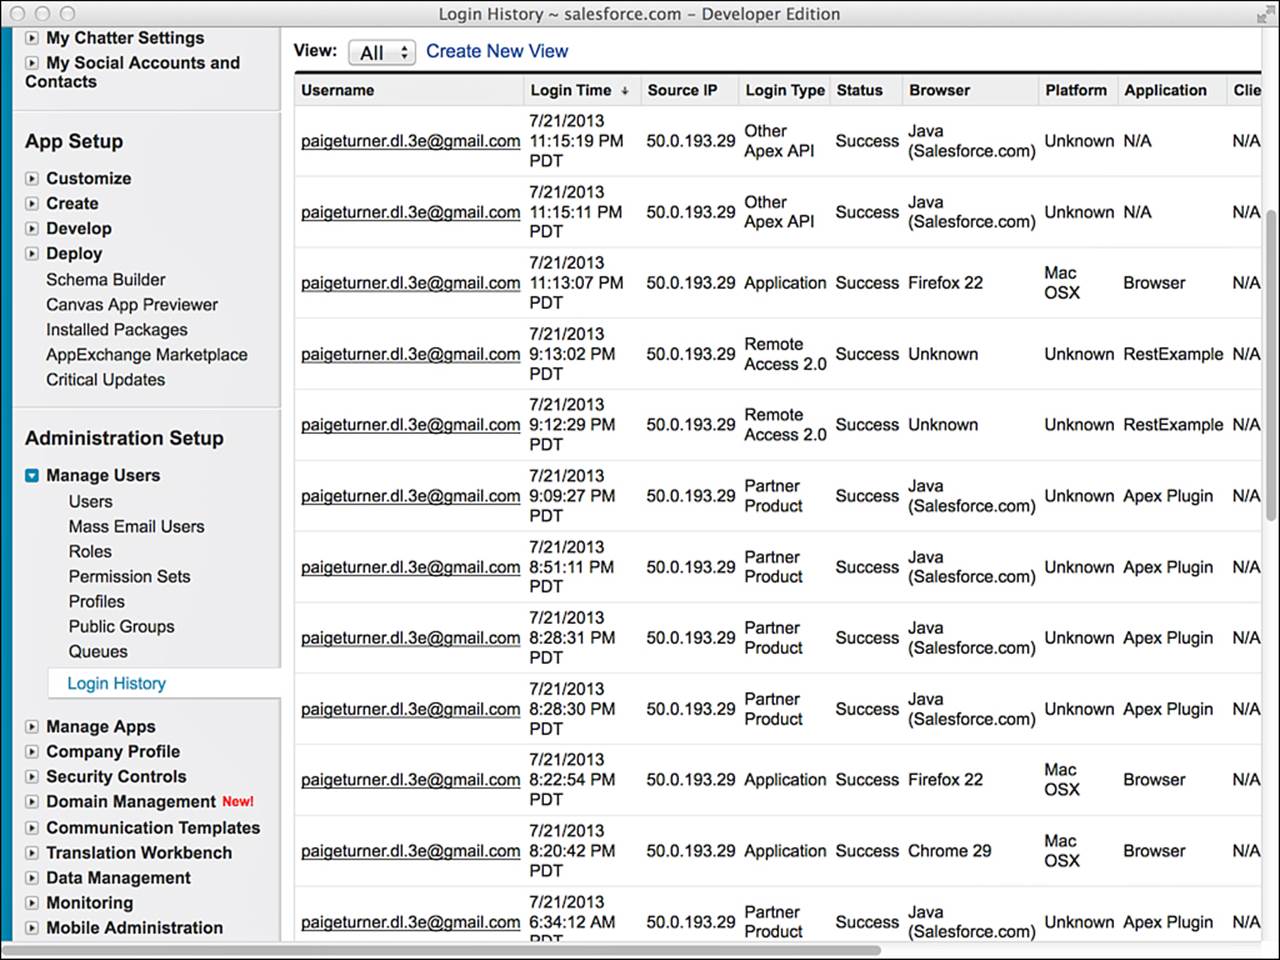
Figure 10.5 Login history page
The login history can be helpful for troubleshooting login problems. If you see your program’s login attempt listed but failed, the login request has successfully reached Force.com’s servers but is being rejected. If the request is not listed at all, you need to investigate the connection between your server and Force.com.
Force.com Data Types in SOAP
Table 10.2 lists the Force.com data types and their mapping to SOAP data types.
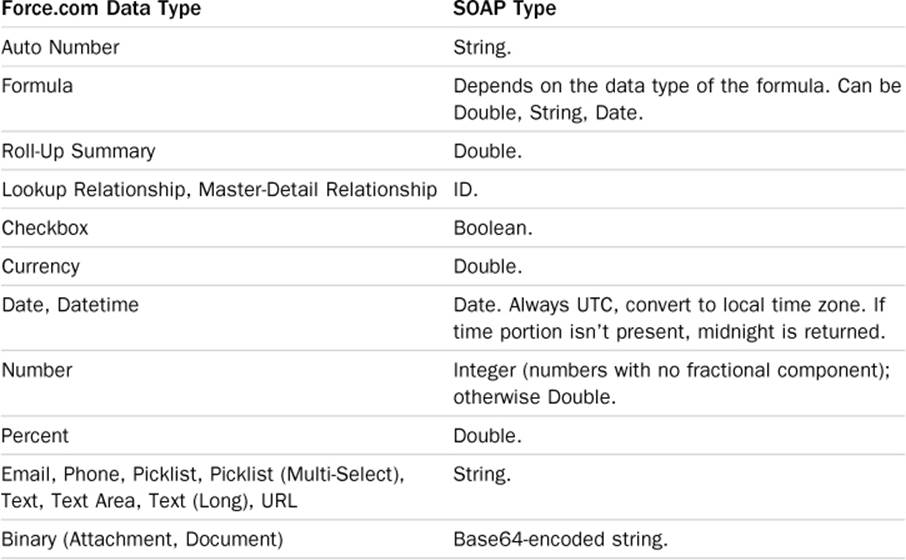
Table 10.2 Mapping of Force.com Data Types to SOAP Types
Note
Refer to the documentation for your programming language or SOAP utility library to map SOAP types to language-specific data types.
Error Handling
Three categories of errors are raised by Force.com SOAP API, described here from lowest to highest level of abstraction:
1. System exceptions—System exceptions are language-specific and indicate lower-level problems occurring in the Web services stack. For example, using Java with the WSC, the ConnectionException contains nested exceptions to indicate specific problems, such as ajava.net.SocketException.
2. API faults—API faults are caused by malformed SOAP messages, authentication failures, or query-related problems. They are SOAP-level errors that contain an exception code and a message. For example, in Java, a LoginFault class extends ApiFault and indicates that the login to Force.com failed. A general API fault with an exception code of INSUFFICIENT_ACCESS indicates that the user does not have sufficient access to perform the operation.
3. Application errors—These are language-neutral, Force.com-specific errors that vary based on the Web services involved. For example, services that modify one or more records return an Error object upon failure. The Error object contains a status code, a message, and an array of fields impacted by the error. As a concrete example, if your record modification violates the referential integrity of the Force.com database, an Error object containing FIELD_INTEGRITY_EXCEPTION as its status code is returned.
Using the Enterprise API
At the highest level, the Enterprise API consists of core services that allow query and modification of Force.com data, plus a set of types reflecting the standard and custom objects defined in your Force.com organization. Using these core services and types is a fairly straightforward exercise after your code has established a session with Force.com.
This section divides the Enterprise API into four functional groups, described here:
1. Retrieving records—Retrieve records using SOQL or SOSL queries, by unique identifier, or based on their modification or deletion time stamp.
2. Writing records—Learn how to create and update records using the Enterprise API.
3. Deleting and undeleting records—By deleting records, you send them to the recycling bin, where they can later be undeleted if necessary.
4. Modifications in bulk—Modifications can be performed on up to 200 records at a time to conserve API calls and improve performance.
Retrieving Records
The most common way to retrieve records is via SOQL. This is accomplished with the query service. A SOQL statement is passed as input, and a QueryResult object is returned. This object contains an array of records returned by the query.
The number of records returned by the query service is a function of the batch size. The default batch size in Java using WSC is 2,000 records, 500 for Axis and other Web service clients. If a query result contains more records than the batch size, use the queryMore service to retrieve additional batches of records.
The code in Listing 10.17 demonstrates the query and queryMore services in Java to build a list of Project records.
Listing 10.17 Java Fragment to Execute SOQL Query
List<Project__c> projects = new ArrayList<Project__c>();
QueryResult qr = connection.query("SELECT Id, Name FROM Project__c");
boolean done = false;
if (qr.getSize() > 0) {
while (!done) {
SObject[] records = qr.getRecords();
if (records != null) {
for (SObject record : records) {
projects.add((Project__c)record);
}
if (qr.isDone()) {
done = true;
} else {
qr = connection.queryMore(qr.getQueryLocator());
}
}
}
}
You can set a custom batch size (up to 2,000 records) by providing a QueryOptions header. This is demonstrated in Java in Listing 10.18.
Listing 10.18 Java Fragment for Setting Query Batch Size
connection.setQueryOptions(2000);
There’s no guarantee Force.com will return the requested number of records in a batch. For example, if a SOQL statement selects two or more custom fields of type long text, the batch size will never be more than 200 records. Queries on binary data always return a single record at a time.
Other Ways to Retrieve Records
A few other approaches are available for retrieving records, described next:
![]() Using SOSL—The search service executes a SOSL statement and returns a Search Result object, which contains an array of SearchRecord objects. Each SearchRecord contains an SObject instance representing a matching record. Because SOSL can return many object types, each SearchRecord object can contain a different type of SObject.
Using SOSL—The search service executes a SOSL statement and returns a Search Result object, which contains an array of SearchRecord objects. Each SearchRecord contains an SObject instance representing a matching record. Because SOSL can return many object types, each SearchRecord object can contain a different type of SObject.
![]() By unique identifier—If you know the unique identifier of an object, you can retrieve it by using the retrieve service. Its inputs are a string containing a comma-separated list of field names to retrieve, the type of object as a string, and an array of up to 2,000 record unique identifiers. It returns an array of SObject instances.
By unique identifier—If you know the unique identifier of an object, you can retrieve it by using the retrieve service. Its inputs are a string containing a comma-separated list of field names to retrieve, the type of object as a string, and an array of up to 2,000 record unique identifiers. It returns an array of SObject instances.
![]() By time stamp—The getUpdated and getDeleted services return the unique identifiers of records updated or deleted between a range of dates.
By time stamp—The getUpdated and getDeleted services return the unique identifiers of records updated or deleted between a range of dates.
Writing Records
The basic services for writing records closely resemble their counterparts in Apex code. Services exist for creating, updating, upserting, deleting, and undeleting records. These services can accept one record at a time or up to 200 records in a single invocation.
Creating Records
To create one or more records, invoke the create service, passing in an array of SObjects. Each SObject must contain at a minimum the values for the required fields defined on the object. The service returns an array of SaveResult objects. Each SaveResult indicates success or failure of an individual record. In the case of failure, the SaveResult also contains an array of Error objects indicating the error reason.
The code in Listing 10.19 demonstrates the create service in Java. It creates a Contact record from the values of firstName and lastName.
Listing 10.19 Java Fragment to Create Record
Contact contact = new Contact();
contact.setFirstName(firstName);
contact.setLastName(lastName);
SaveResult[] result = connection.create(
new SObject[] { contact });
if (result != null && result.length == 1) {
if (result[0].isSuccess()) {
System.out.println("Created contact with Id: "
+ result[0].getId());
} else {
System.out.println("Failed to create contact: " +
result[0].getErrors()[0].getMessage());
}
}
Updating Records
To modify existing records, use the update service. Its arguments and return value are identical to those of the create method. The major difference is that the SObjects must contain a value for the Id field. This value is the unique identifier of the record to be updated.
Use the upsert service when you want to create records that don’t exist and update them if they do exist. To determine whether a record exists, the upsert service examines a field containing unique identifiers. This field can be the internal Id field or a custom field designated as an external identifier. The first argument to the upsert service is the name of the unique identifier field, and the second is an array of SObjects. The service returns an array of UpsertResult objects. Like the SaveResult object, it contains a success or failure indicator and an array of errors upon failure.
Note
You must perform an additional step to set fields to null during an update or upsert. Each object instance has a special array field called fieldsToNull. To set a field to null, add the name of the field to this list.
Deleting and Undeleting Records
To delete records, call the delete service and pass in an array of record unique identifiers to delete. Unlike the other DML operations, delete accepts different types of objects in a single call. The service returns an array of DeleteResult objects indicating the success or failure of each deletion, as well as any error messages.
The undelete service restores deleted records from the Recycle Bin. Its input is a list of record unique identifiers, and it returns an array of UndeleteResult objects for use in tracking the outcome of each undeletion.
Modifications in Bulk
Bulk modifications involve more than one record. You can create, update, upsert, delete, or undelete a maximum of 200 records in a single call. By default, Force.com allows partial failure, meaning some records can fail while others succeed. To override this behavior, add theAllOrNoneHeader to the call and set it to true. This causes Force.com to roll back all modifications made by the call unless all records are successfully processed.
The ability to process multiple object types in a single call is a powerful feature of bulk modifications. This is supported on create, update, delete, and undelete operations, but not upsert. For example, you can create a Resource and Skill in one round-trip to Force.com. This requires that the Skill record references its parent Resource using an external identifier rather than an Id because an Id for the record doesn’t exist yet.
There are several important limitations of bulk create and update calls that involve multiple object types:
![]() Up to ten unique object types are allowed per call.
Up to ten unique object types are allowed per call.
![]() You can’t reference a new record of the same type in a single call. For example, if two Contact records were related to each other, you would need to create the parent first and then create the child and relate it to the parent in a separate call.
You can’t reference a new record of the same type in a single call. For example, if two Contact records were related to each other, you would need to create the parent first and then create the child and relate it to the parent in a separate call.
![]() If there are related records in the call, parent records must be located ahead of child records in the request.
If there are related records in the call, parent records must be located ahead of child records in the request.
![]() You cannot modify records of multiple object types if they participate in the Salesforce Setup menu. This limitation includes custom settings objects, GroupMember, Group, and User.
You cannot modify records of multiple object types if they participate in the Salesforce Setup menu. This limitation includes custom settings objects, GroupMember, Group, and User.
Creating Custom Apex SOAP Web Services
With SOAP Web services, you can create higher-level APIs of your own directly in the Force.com platform and invoke them from your own programs outside of Force. Your custom SOAP services can bundle a series of related queries or updates into a single call, providing an atomic unit of work and reducing network traffic and API call consumption.
Caution
Custom SOAP services run with administrative rights by default, granting your Apex code access to all data in the organization.
One way to understand the value of Apex SOAP Web services is to first examine limitations in the Enterprise API. The Enterprise API is a direct representation of the objects in your database as SOAP message types, with methods to query and modify them per record or in batches. This low-level access to the Force.com database through standard protocols and messages opens your Force.com applications to the outside world but isn’t perfect for every integration scenario. The following list points out some areas in which the Enterprise API can fall short:
![]() Transactions—There is limited support in the Enterprise API for transactions that span multiple objects. If an external program must modify many objects in an atomic operation, it needs to detect failure for each call and apply a compensating action to reverse prior successes.
Transactions—There is limited support in the Enterprise API for transactions that span multiple objects. If an external program must modify many objects in an atomic operation, it needs to detect failure for each call and apply a compensating action to reverse prior successes.
![]() Integrated security—The Enterprise API always applies object-, field-, and record-level sharing rules of the currently logged-in user. This cannot be disabled by an external program calling into Force.com. If greater rights are needed, an administrator must alter the user’s profile or the program must log in with the credentials of a more privileged user. This can complicate integration programs by requiring many logins of varying privileges or put the organization at risk by running integration programs with administrative rights.
Integrated security—The Enterprise API always applies object-, field-, and record-level sharing rules of the currently logged-in user. This cannot be disabled by an external program calling into Force.com. If greater rights are needed, an administrator must alter the user’s profile or the program must log in with the credentials of a more privileged user. This can complicate integration programs by requiring many logins of varying privileges or put the organization at risk by running integration programs with administrative rights.
![]() Performance—As your integration programs get more complex, they can become chatty, making many calls to Force.com to fetch different types of records and postprocess them off-platform. This consumes more of the API calls toward the organization’s daily limit and reduces performance by putting more data on the wire.
Performance—As your integration programs get more complex, they can become chatty, making many calls to Force.com to fetch different types of records and postprocess them off-platform. This consumes more of the API calls toward the organization’s daily limit and reduces performance by putting more data on the wire.
The definition of a custom SOAP service is slightly different from that of a regular Apex class. The differences are listed here:
![]() Global class access modifier—A class that contains any SOAP services must use the global access modifier. This means the class is visible to all programs running in the Force.com organization.
Global class access modifier—A class that contains any SOAP services must use the global access modifier. This means the class is visible to all programs running in the Force.com organization.
![]() SOAP methods—Each method accessible via SOAP must be defined with the webservice keyword. These methods must also be static.
SOAP methods—Each method accessible via SOAP must be defined with the webservice keyword. These methods must also be static.
![]() Security—SOAP methods run as a system administrator, without regard for object-, field-, or record-level sharing rules. To enforce record sharing rules, define the class with the with sharing keyword. To enforce object- and field-level security, use the results of thegetDescribe method (Schema.DescribeSObjectResult and Schema.DescribeFieldResult) to check the user’s permission to the data.
Security—SOAP methods run as a system administrator, without regard for object-, field-, or record-level sharing rules. To enforce record sharing rules, define the class with the with sharing keyword. To enforce object- and field-level security, use the results of thegetDescribe method (Schema.DescribeSObjectResult and Schema.DescribeFieldResult) to check the user’s permission to the data.
![]() Supporting classes—User-defined Apex classes, inner or outer, that are arguments or return values for a SOAP service method must be defined as global. Member variables of these classes must be defined using the webservice keyword.
Supporting classes—User-defined Apex classes, inner or outer, that are arguments or return values for a SOAP service method must be defined as global. Member variables of these classes must be defined using the webservice keyword.
![]() No overloading—SOAP service methods cannot be overloaded. Overloaded methods result in a compile error.
No overloading—SOAP service methods cannot be overloaded. Overloaded methods result in a compile error.
![]() Prohibited types—The Map, Set, Pattern, Matcher, Exception, and Enum types are not allowed in the arguments or return types of Apex SOAP services.
Prohibited types—The Map, Set, Pattern, Matcher, Exception, and Enum types are not allowed in the arguments or return types of Apex SOAP services.
Additionally, SOAP services written in Apex must abide by its governor limits. A subset of these governor limits is listed in Table 10.3.
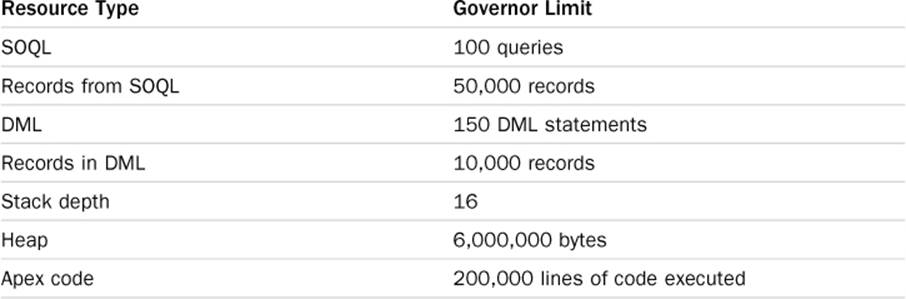
Table 10.3 Subset of Apex SOAP Service Governor Limits
Listing 10.20 defines a simple Apex SOAP service that creates a record in the Project custom object given a name.
Listing 10.20 Sample Apex Code for Custom SOAP Service
global class Listing10_20 {
webservice static ID createProject(String name) {
Project__c proj = new Project__c(Name = name);
insert proj;
return proj.Id;
}
}
Calling an Apex SOAP Service
To call an Apex SOAP service from client code, follow these steps:
1. In the App Setup area, click Develop, Apex Classes.
2. Locate the class containing the Apex SOAP service and click the WSDL link.
3. Save the WSDL on your local file system. You’ll need this plus the Enterprise WSDL in order to call the custom Apex SOAP service.
4. Generate stub code from the custom WSDL and add it to your project.
5. Authenticate using the Enterprise WSDL by passing a ConnectorConfig to Connector.newConnection method; then change the service endpoint to the one from the custom WSDL.
6. Create a new SoapConnection from the ConnectorConfig, and invoke the custom Apex SOAP service method.
Listing 10.21 demonstrates the invocation of the custom createProject service in Java using the WSC, with the stub code generated to a .jar file named Listing10_20.
Listing 10.21 Java Fragment for Invoking Custom Apex SOAP Service
ConnectorConfig config = new ConnectorConfig();
config.setUsername(user);
config.setPassword(pass);
Connector.newConnection(config);
config.setServiceEndpoint(com.sforce.soap.Listing10_20.Connector.END_POINT);
SoapConnection sconn = new SoapConnection(config);
String projectId = sconn.createProject("Test Project");
Sample Application: Anonymous Benchmarking
In a services organization, utilization is a valuable metric for managing the business. A simple definition of utilization is the number of hours worked, typically hours billable to the client, divided by the total number of hours in a time period, expressed as a percentage.
In this section, the Services Manager sample application is extended with a Visualforce page that performs a basic utilization calculation between two dates. To calculate billable hours worked, it queries the Timecard custom object. For available hours, it uses a built-in Apex function for date arithmetic to compute the number of working hours between the two dates.
Integration comes into the picture with the addition of anonymous benchmarking. Imagine an independent organization that collects and analyzes the performance data of services companies. Companies submit their anonymized metrics and compare their performance with that of other companies in their industry. For the Services Manager sample application, you have access to a fictional benchmarking organization reachable through a SOAP Web service call.
The remainder of the section describes the design and implementation of the utilization page, controller, and integration to the anonymous benchmarking SOAP Web service. It is divided into the following subsections:
![]() Visualforce page design—Build a simple Visualforce page to capture the start and end dates of the utilization calculation, and display the results.
Visualforce page design—Build a simple Visualforce page to capture the start and end dates of the utilization calculation, and display the results.
![]() Visualforce controller design—Develop a controller to retrieve the billable hours worked and the available hours, and perform the utilization calculation.
Visualforce controller design—Develop a controller to retrieve the billable hours worked and the available hours, and perform the utilization calculation.
![]() Integrating the SOAP Web service—Add code to the controller to call out to the anonymous benchmarking SOAP Web service to share the results of the utilization calculation.
Integrating the SOAP Web service—Add code to the controller to call out to the anonymous benchmarking SOAP Web service to share the results of the utilization calculation.
![]() Sample implementation—Examine sample code for the utilization page and controller. Try this code in its entirety, copy portions of it, or contrast it with your own implementation.
Sample implementation—Examine sample code for the utilization page and controller. Try this code in its entirety, copy portions of it, or contrast it with your own implementation.
Visualforce Page Design
The goal of this section is a Visualforce page resembling what’s shown in Figure 10.6. A user has entered start and end dates to compute utilization, selected the Share Anonymously check box to indicate that she would like the results sent out over the Web to the benchmarking service, and clicked the Calculate button. This populated the lower three rows with the utilization results. The results include the total hours worked in the time period (from the Timecard object), the total number of consulting resources in the system (from the Contact object), and the utilization as a percentage.
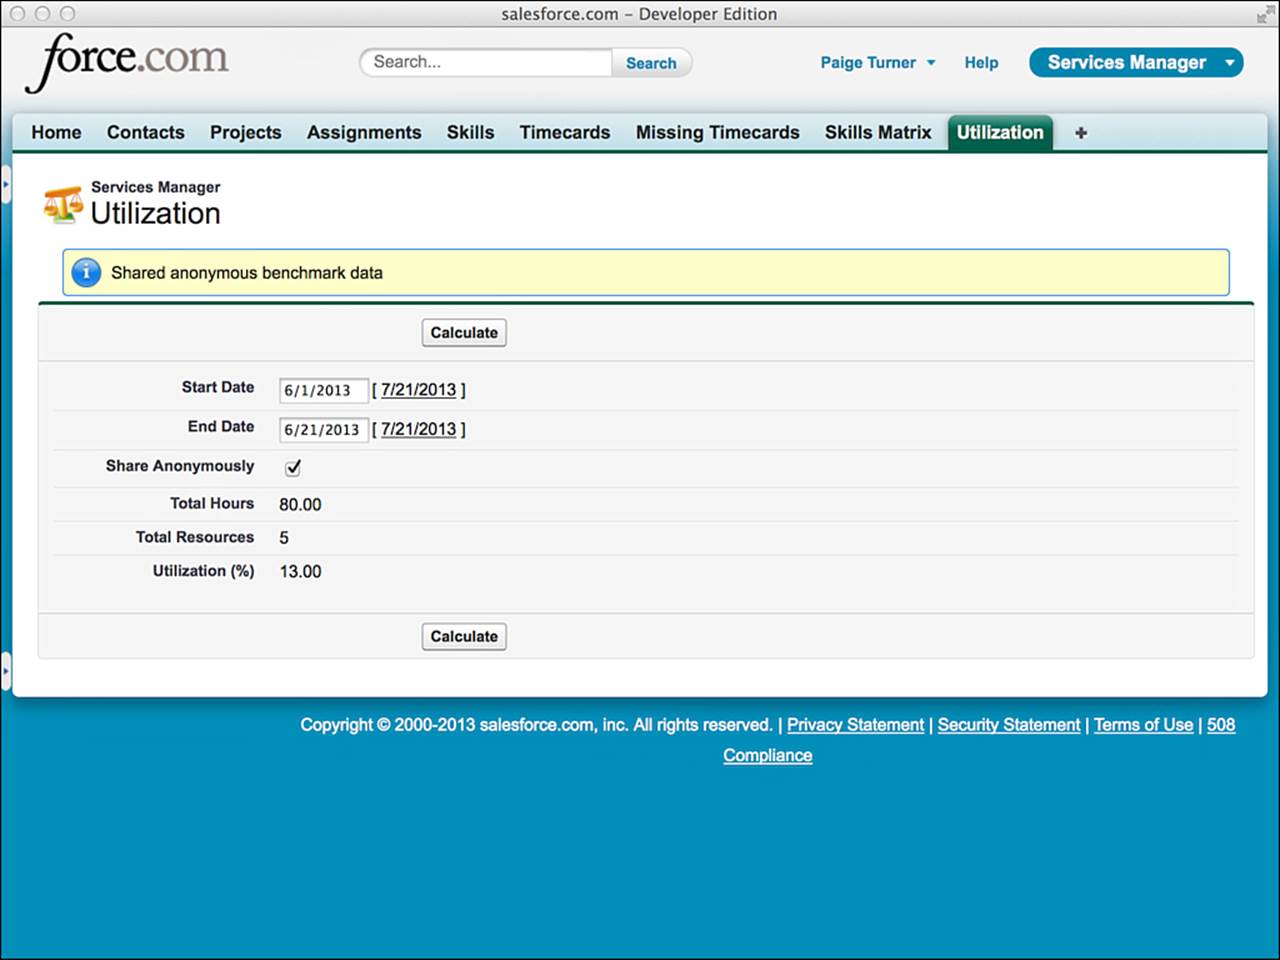
Figure 10.6 Utilization Visualforce page
The page is styled to look like part of the native Force.com native user interface. The sectionHeader component is used to render the heading bar. This is followed by the pageMessages component to show errors and information to the user. The Calculate button is acommandButton, enclosed in a pageBlockButtons component. The Start and End date fields are both inputField components with their value attributes set to SObject Date fields in the controller, providing a calendar picker user interface when focus is received. The styling of each row is accomplished by pageBlockSectionItem components, each with two child components. For example, the pageBlockSectionItem to render the row for Start Date contains an outputLabel and an inputField.
Begin by prototyping this page, focusing on the appearance, layout, and user interaction. Create a custom controller class, adding a placeholder action method to calculate the utilization. Create member variables for the start and end dates, binding them to any Date field in a standard or custom object. This binding means you can use the inputField component to render the start and end date fields, making them calendar input controls rather than plain text fields. Add a Boolean member variable for the Share Anonymously option, bound to an inputCheckboxcomponent.
You’re ready to move on to build out the controller to compute utilization and integrate the benchmarking SOAP Web service.
Visualforce Controller Design
The job of the controller is to take the user input and calculate utilization, optionally sending the results to the Web service. Real-world calculations of utilization can be complex. For example, some organizations subtract paid time off from the total hours available. Or with a large or diverse pool of resources, utilization might be calculated separately per business unit or geographic region.
In the Services Manager sample application, the utilization calculation is intentionally kept simple. One minor complication is in defining the available working hours, the denominator in the utilization formula. Rather than assuming that all consultants are billable 24 hours a day, use Force.com to store the company’s business hours.
To manage business hours, go to the Administration Setup area and click Company Profile, Business Hours. Force.com comes preconfigured with business hours that run for 24 hours per day, 7 days a week. Because you don’t expect your consultants to work 168-hour weeks, click the Edit link and update the default business hours to something more reasonable. To designate a day off, leave the start and end time blank. Figure 10.7 shows the business hours configuration for a 45-hour workweek, working 8:00 a.m. to 5:00 p.m. weekdays with Saturdays and Sundays off.
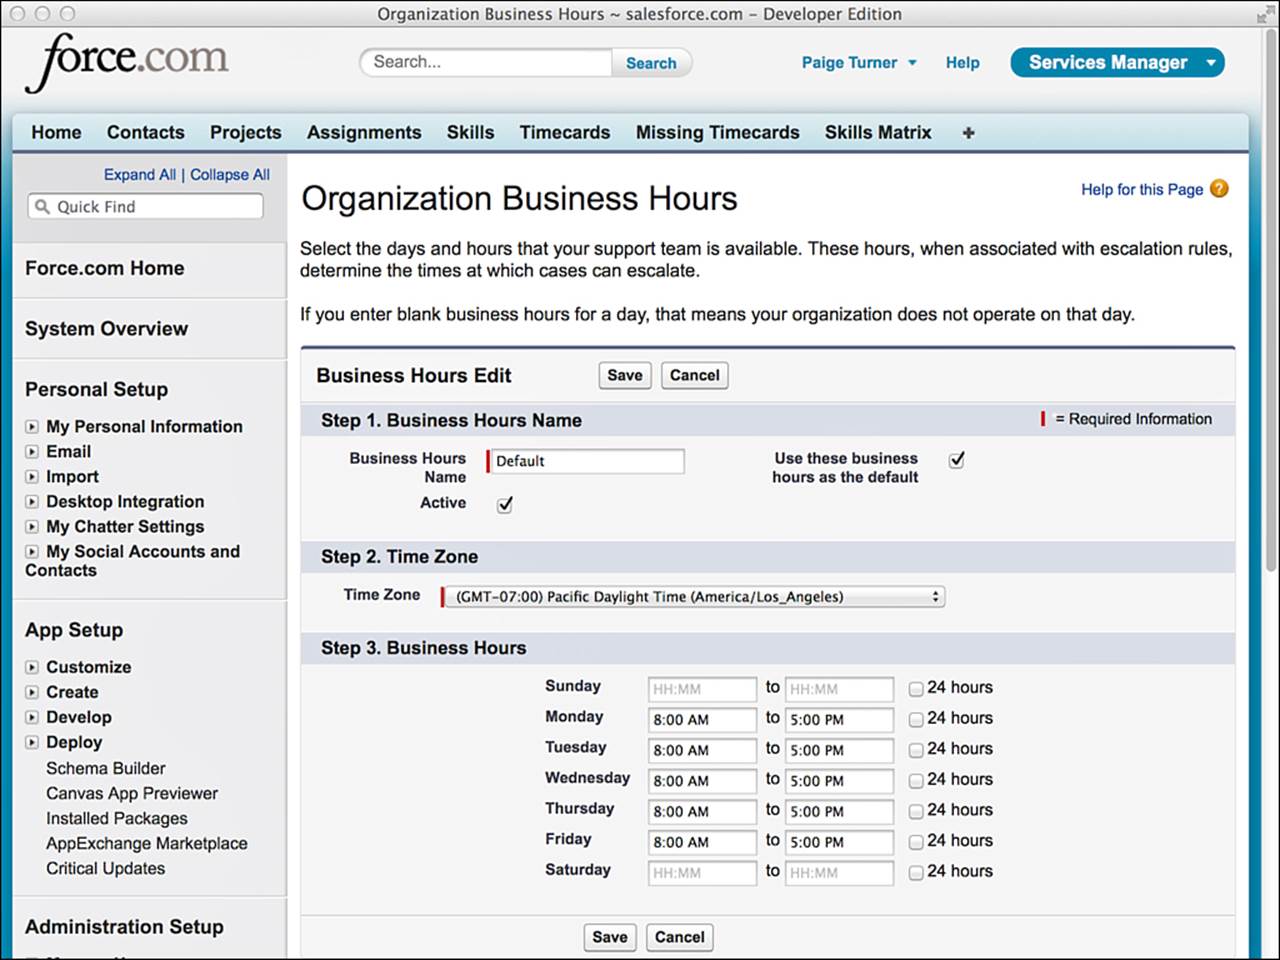
Figure 10.7 Configuring business hours
With business hours configured, you’re ready to compute utilization. The following list outlines the steps:
1. Write a SOQL query to select the Total_Hours__c field from all timecards that are billable and between the start and end dates entered by the user.
2. Add up all the values of the Total_Hours__c field. This is the numerator in the utilization calculation.
3. Assume that the Week_Ending__c field of timecards is always a Saturday. If the start or end date entered by the user is not a Saturday, adjust it accordingly. If you do not take this simplifying step, you’ll have to compensate for non-Saturday time ranges by subtracting the hours of individual days from the total.
4. The number of hours available must account for the business hours of the organization. The business hours you configured in the Force.com native user interface are stored in a standard object named BusinessHours, queryable from SOQL. Write SOQL to obtain the unique identifier of the default BusinessHours record. Call the static diff method on the BusinessHours class, passing the unique identifier and the adjusted start and end dates. This returns a long value with the number of milliseconds elapsed between the two dates during which the organization was open for business.
Integrating the SOAP Web Service
The fictional anonymous benchmarking service provides a URL to the WSDL for its Web service. The Web service allows companies to submit their utilization calculations anonymously for contribution in a database. Companies are differentiated by industry only, using a standard industry classification system called the North American Industry Classification System (NAICS), developed by the United States Census Bureau. NAICS codes are six-digit numbers. The list of NAICS codes is available at www.census.gov/eos/www/naics/reference_files_tools/2007/naics07_6.txt. For example, 541511 is the code for companies providing Custom Computer Programming Services.
To integrate the Web service, begin by generating an Apex class from the WSDL. The WSDL is available at http://force-book-developer-edition.na6.force.com/AnonymousBenchmarkWsdl. Download it to your local machine and then follow these steps:
1. In the App Setup area, click Develop, Apex Classes and click the Generate from WSDL button.
2. Click the Browse button, locate the WSDL file in your file system, and click the Parse WSDL button.
3. You should see the screen shown in Figure 10.8, which is prompting for an Apex class name to receive the generated code. You can name your class anything you want, but this example uses the name BenchmarkWS. Then click the Generate Apex Code button.
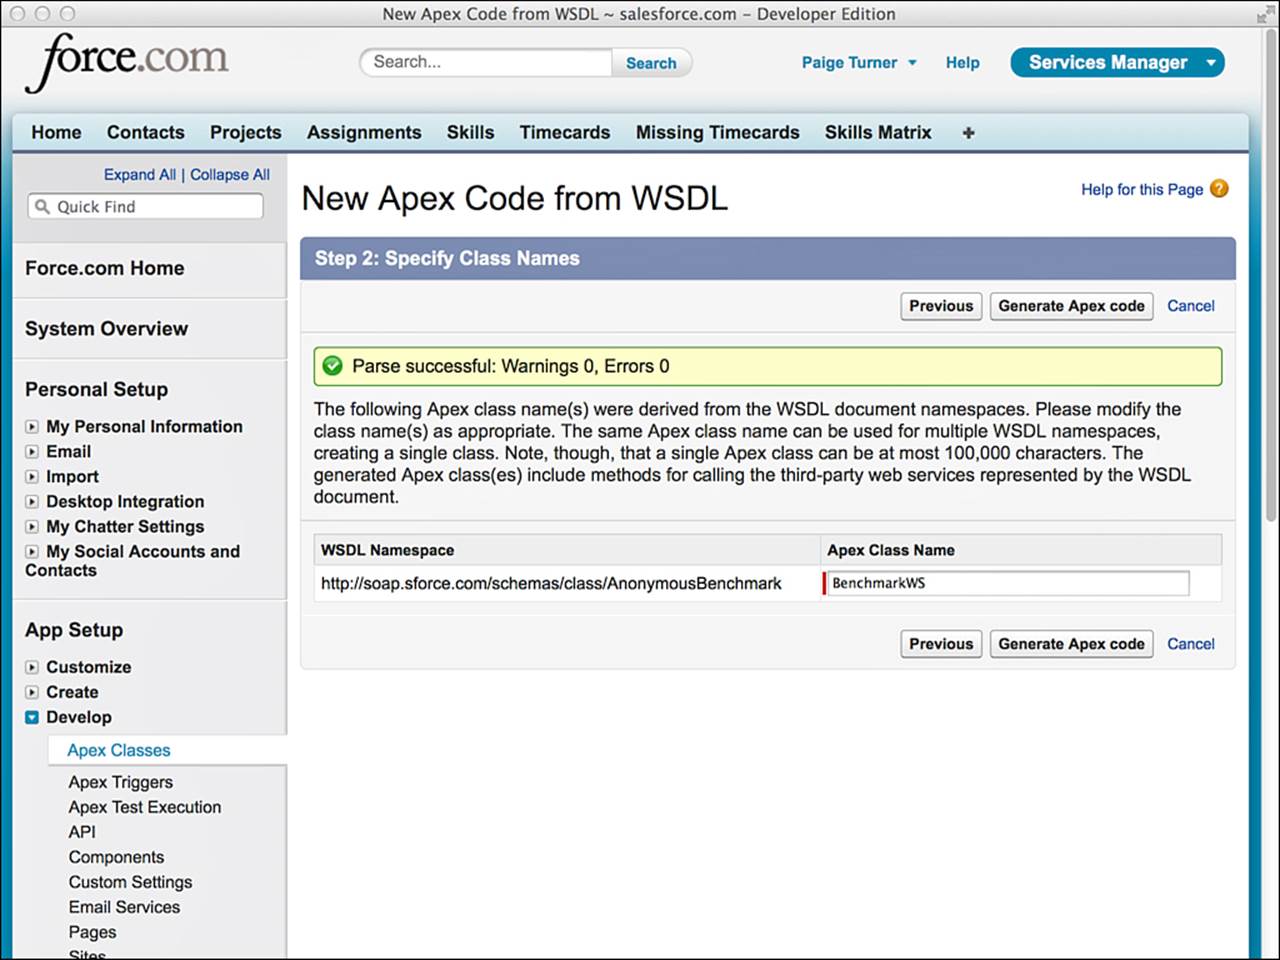
Figure 10.8 Generating Apex from anonymous benchmarking WSDL
You should now have a new Apex class called BenchmarkWS. Before you can test it out, enable the endpoint URL in Remote Site Settings. In the Administration Setup area, click Security Controls, Remote Site Settings. Click the New Remote Site button and enter a name for the site and its URL (https://force-book-developer-edition.na6.force.com). Figure 10.9 shows the result of adding the remote site.
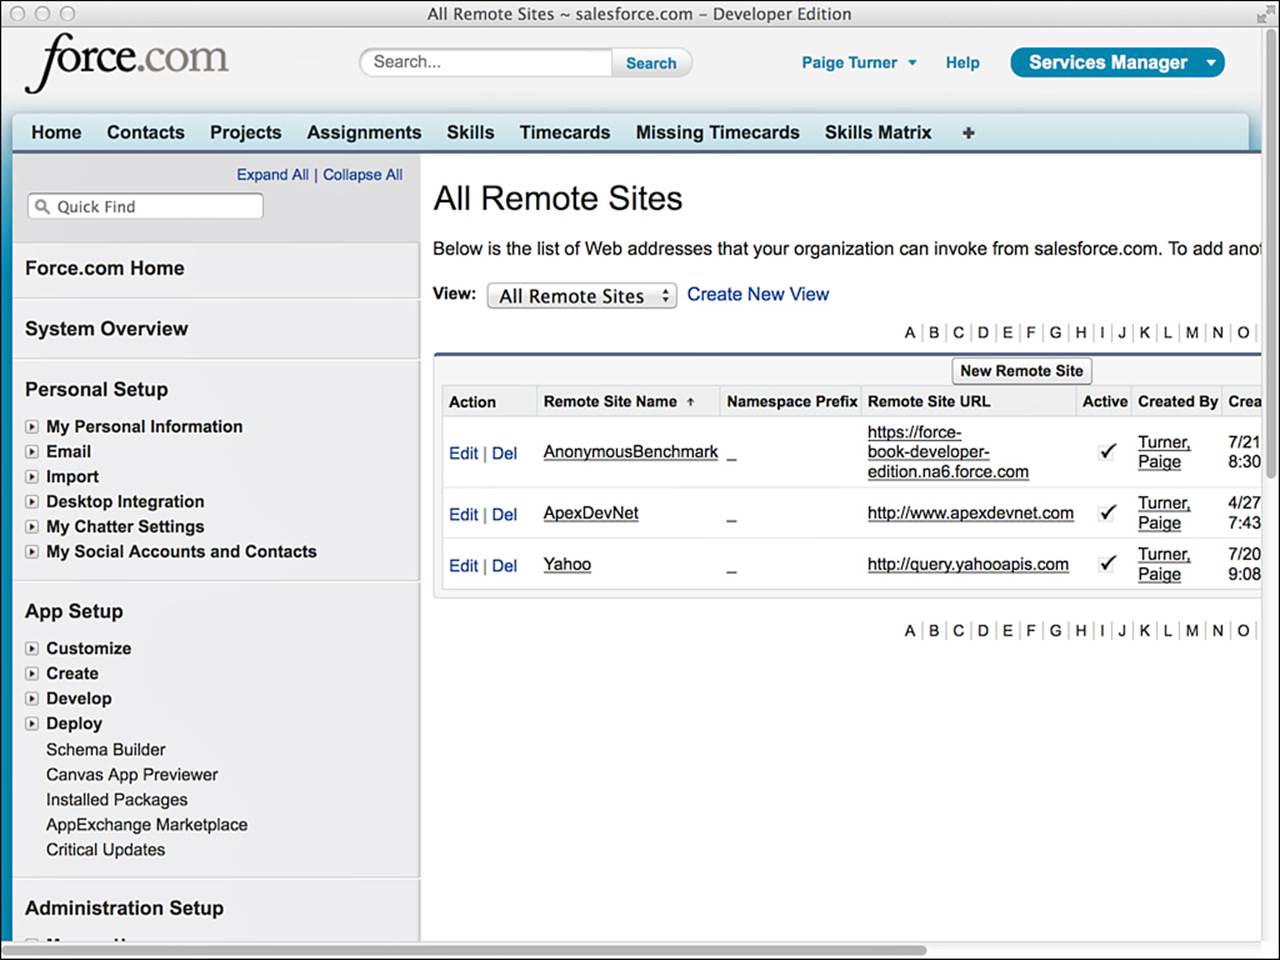
Figure 10.9 Remote site settings
Finally, test the generated Apex class using the code given in Listing 10.22. You can execute this code directly from the Execute Anonymous view.
Listing 10.22 Testing the Web Service Call from Apex
BenchmarkWS.AnonymousBenchmark service =
new BenchmarkWS.AnonymousBenchmark();
BenchmarkWS.UtilizationEntry ue =
new BenchmarkWS.UtilizationEntry();
ue.naicsCode = '541511';
ue.startDate = Date.parse('7/1/2013');
ue.endDate = Date.parse('7/31/2013');
ue.totalHours = 35;
ue.totalResources = 1;
ue.utilization = 88;
BenchmarkWS.SubmissionStatus[] results =
service.submitUtilizationData(
new BenchmarkWS.UtilizationEntry[] { ue });
if (results != null) {
for (BenchmarkWS.SubmissionStatus result : results) {
if (!result.success) {
System.debug(result.errorMessage);
}
}
}
Sample Implementation
Listing 10.23 contains the controller code for the utilization Visualforce page, and Listing 10.24 contains the page itself. This implementation brings together the three elements discussed in this section: the user interface to calculate utilization, the utilization computation itself, and the Web service callout.
Listing 10.23 Sample Code for Utilization Controller
public class UtilizationController {
public Timecard__c card1 { get; private set; }
public Timecard__c card2 { get; private set; }
public Boolean shared { get; set; }
public Decimal utilization { get; private set; }
public Decimal totalHours { get; private set; }
public Integer totalResources { get; private set; }
public UtilizationController() {
card1 = new Timecard__c();
card2 = new Timecard__c();
}
public PageReference calculate() {
Date startDate = card1.Week_Ending__c;
Date endDate = card2.Week_Ending__c;
// assumes all active resources are billable
List<Contact> contacts = [ SELECT Id FROM Contact
WHERE Active__c = TRUE AND Start_Date__c < :startDate ];
List<Timecard__c> timecards = [ SELECT Week_Ending__c,
Total_Hours__c FROM Timecard__c
WHERE Billable__c = true AND
Week_Ending__c >= :startDate AND
Week_Ending__c <= :endDate
ORDER BY Week_Ending__c ];
totalHours = 0;
if (timecards.size() == 0) {
return null;
}
for (Timecard__c timecard : timecards) {
totalHours += timecard.Total_Hours__c;
}
// adjust start and end dates to match timecard week endings
Timecard__c firstTimecard = timecards.get(0);
Timecard__c lastTimecard = timecards.get(timecards.size() - 1);
if (startDate < firstTimecard.Week_Ending__c) {
startDate = firstTimecard.Week_Ending__c.addDays(-6);
card1.Week_Ending__c = startDate;
}
if (endDate > lastTimecard.Week_Ending__c) {
endDate = lastTimecard.Week_Ending__c;
card2.Week_Ending__c = endDate;
}
totalResources = contacts.size();
Long availableHours = totalResources *
calculateAvailableHours(startDate, endDate);
utilization = 100 * totalHours.divide(availableHours, 2);
if (shared) {
shareUtilization();
}
return null;
}
public static Long calculateAvailableHours(
Date startDate, Date endDate) {
BusinessHours bh = [ SELECT id FROM BusinessHours
WHERE IsDefault = true ];
DateTime startTime = DateTime.newInstance(
startDate.year(), startDate.month(), startDate.day(),
0, 0, 0);
DateTime endTime = DateTime.newInstance(
endDate.year(), endDate.month(), endDate.day(),
0, 0, 0);
Decimal diff = Decimal.valueOf(
BusinessHours.diff(bh.id, startTime, endTime));
return diff.divide(3600000, 0).round();
}
private void shareUtilization() {
BenchmarkWS.AnonymousBenchmark service =
new BenchmarkWS.AnonymousBenchmark();
BenchmarkWS.UtilizationEntry ue =
new BenchmarkWS.UtilizationEntry();
ue.naicsCode = '541511';
ue.startDate = card1.Week_Ending__c;
ue.endDate = card2.Week_Ending__c;
ue.totalHours = totalHours;
ue.totalResources = totalResources;
ue.utilization = utilization;
BenchmarkWS.SubmissionStatus[] results =
service.submitUtilizationData(
new BenchmarkWS.UtilizationEntry[] { ue });
if (results != null) {
for (BenchmarkWS.SubmissionStatus result : results) {
if (!result.success) {
ApexPages.addMessage(new ApexPages.Message(
ApexPages.Severity.ERROR, result.errorMessage));
} else {
ApexPages.addMessage(new ApexPages.Message(
ApexPages.Severity.INFO,
'Shared anonymous benchmark data'));
}
}
}
}
}
Listing 10.24 Sample Code for Utilization Visualforce Page
<apex:page controller="UtilizationController">
<apex:sectionHeader title="Services Manager"
subtitle="Utilization" />
<apex:form>
<apex:pageMessages id="msgs" />
<apex:pageBlock id="util">
<apex:pageBlockButtons>
<apex:commandButton action="{!calculate}"
value="Calculate" rerender="msgs, util" />
</apex:pageBlockButtons>
<apex:pageBlockSection columns="1">
<apex:pageBlockSectionItem>
<apex:outputLabel value="Start Date" />
<apex:inputField value="{!card1.Week_Ending__c}" />
</apex:pageBlockSectionItem>
<apex:pageBlockSectionItem>
<apex:outputLabel value="End Date" />
<apex:inputField value="{!card2.Week_Ending__c}" />
</apex:pageBlockSectionItem>
<apex:pageBlockSectionItem>
<apex:outputLabel value="Share Anonymously" />
<apex:inputCheckbox value="{!shared}" />
</apex:pageBlockSectionItem>
<apex:pageBlockSectionItem>
<apex:outputLabel value="Total Hours" />
<apex:outputText value="{!totalHours}" />
</apex:pageBlockSectionItem>
<apex:pageBlockSectionItem>
<apex:outputLabel value="Total Resources" />
<apex:outputText value="{!totalResources}" />
</apex:pageBlockSectionItem>
<apex:pageBlockSectionItem>
<apex:outputLabel value="Utilization (%)" />
<apex:outputText value="{!utilization}" />
</apex:pageBlockSectionItem>
</apex:pageBlockSection>
</apex:pageBlock>
</apex:form>
</apex:page>
Summary
With its integration features, the Force.com platform is open for interoperability with other applications and systems running on Force.com, elsewhere on the Internet, and behind your corporate firewall. The capability to call the platform bidirectionally using Web standards helps to break down the functional silos of Force.com and other applications.
Chapter 11, “Advanced Integration,” covers additional integration features, such as the ability to securely embed other applications within the user interface, build custom developer tools, and provide external applications with a real-time stream of updated data. Before jumping in, take a minute to review the following points from this chapter:
![]() You can call out to SOAP and REST Web services from Apex using its built-in support for HTTP, XML, and JSON, as well as the WSDL to Apex tool.
You can call out to SOAP and REST Web services from Apex using its built-in support for HTTP, XML, and JSON, as well as the WSDL to Apex tool.
![]() OAuth is a Web standard for authentication, configured in Force.com using Connected Apps.
OAuth is a Web standard for authentication, configured in Force.com using Connected Apps.
![]() With code annotations and tools to map Apex to SOAP and REST, your Apex code can become Web services, ready for incorporation into programs running outside of Force.com.
With code annotations and tools to map Apex to SOAP and REST, your Apex code can become Web services, ready for incorporation into programs running outside of Force.com.
All materials on the site are licensed Creative Commons Attribution-Sharealike 3.0 Unported CC BY-SA 3.0 & GNU Free Documentation License (GFDL)
If you are the copyright holder of any material contained on our site and intend to remove it, please contact our site administrator for approval.
© 2016-2026 All site design rights belong to S.Y.A.