Development with the Force.com Platform: Building Business Applications in the Cloud, Third Edition (2014)
3. Database Security
For many developers, securing an application is the drudge work left after the fun and challenging development work is done. The good news is that Force.com makes security relatively painless, whether you think about it before, during, or after an application is built. The concepts of user identity, data ownership, and fine-grained access control are baked into the platform, requiring configuration rather than coding in most cases.
You might wonder why this chapter is about only database security rather than being a general discussion of security. After all, Force.com is more than a database. The reason is that the database is the center of Force.com development. Just as object definitions are leveraged throughout the platform to construct native user interfaces and strongly typed procedural code expressions, data security measures are equally pervasive.
This chapter contains the following sections:
![]() Overview of database security—Take a high-level view of the database security features available in Force.com and how they interact to protect your data.
Overview of database security—Take a high-level view of the database security features available in Force.com and how they interact to protect your data.
![]() Object-level security—Get in depth on the methods for protecting individual data objects and their fields.
Object-level security—Get in depth on the methods for protecting individual data objects and their fields.
![]() Record-level security—Learn how to control access to individual records within your Force.com database.
Record-level security—Learn how to control access to individual records within your Force.com database.
![]() Sample application—Walk through the design and implementation of the security model for the Services Manager.
Sample application—Walk through the design and implementation of the security model for the Services Manager.
Overview of Database Security
Force.com provides a multilayered approach to data security. Each layer secures data using a different approach, and the layers build on each other to provide a deep, configurable defense. Figure 3.1 identifies the layers of security and their relationship to data and other layers.
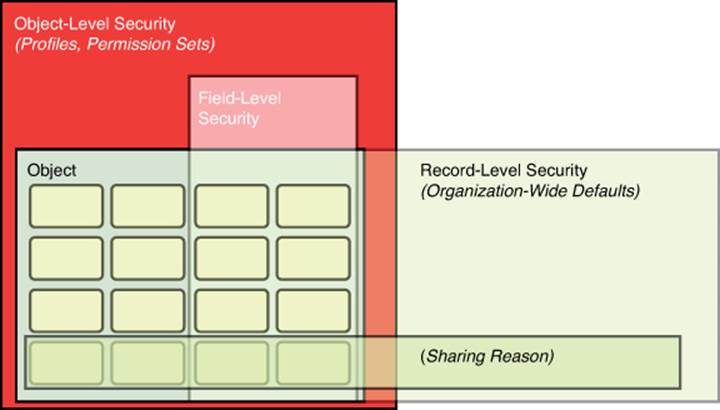
Figure 3.1 Security architecture
The box enclosing the Object represents object-level security, which is provided by profiles and permission sets. A profile is a unit of Force.com metadata used to group users with common data access requirements. It contains a set of permissions for every object defined in the Force.com organization. These permissions determine whether users belonging to the profile are authorized to read, create, edit, and delete records of each object. Also within the profile are rules determining access to individual fields of an object. Fields can be hidden entirely or defined as read-only directly in the profile or in page layouts.
Permission sets contain the same permission-related metadata as profiles, but a user can be assigned to many of them at once. In contrast, a user is assigned to a single profile at a time. Permission sets are generally used to override profiles on an individual user basis.
Record-level security is layered on top of object-level security. It further restricts access to data based on the concept of record ownership. But it can never override object-level security. Organization-wide defaults define the default, most restrictive sharing behavior of each object, and sharing reasons create exceptions to this default behavior, granting access to specific groups of users.
Another way to think about Force.com security features is to imagine them as a funnel, as shown in Figure 3.2. Requests for data enter the top of the funnel and descend, filtered through successive layers of security technology. If the requests survive until the bottom of the funnel, they have passed security clearance and are granted.
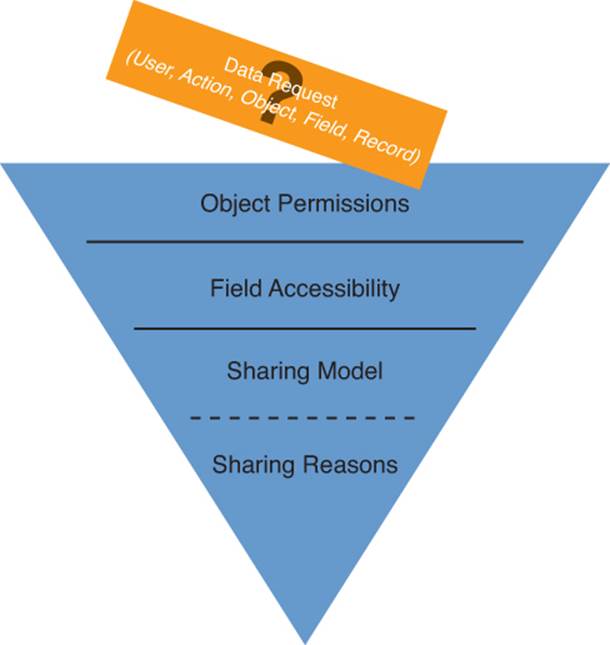
Figure 3.2 Security architecture as a funnel
The four filters in the funnel are described here:
1. Object permissions—At the top of the funnel, the data request is evaluated against the object permissions. They ensure that the requesting user is authorized by its profile to take the desired action on this object. The solid line under this level indicates that requests denied at this point stop moving through the funnel.
2. Field accessibility—The requesting user’s profile is consulted again to determine whether fields are included in the request that are read-only or hidden.
3. Sharing model—If the user is not the owner of this record or otherwise privileged with an administrative profile, organization-wide defaults are applied. These defaults designate records of each object as private, public with Read and Write access, or public with read-only access. In a slight break of the funnel concept indicated by the dashed line, if the sharing model prohibits access, the request has one more chance to be granted through exceptions called sharing reasons.
4. Sharing reasons—Sharing reasons override the organization-wide defaults. The owner of the requested record is matched against a list of sharing reasons relevant to its group affiliation. If a sharing reason is found, access is granted. Groups are defined as simple lists of users and other groups or as a hierarchy, allowing permissions of subordinates to be inherited by their superiors.
Object-Level Security
Object-level security is governed by the profile and permission sets assigned to the user. Profiles control data access for a group of users on the level of objects and fields. Permission sets also control data access at the object and field level, but are designed to maximize reuse and flexibility. This section describes profiles and permission sets and how they are configured.
Profiles
Profiles are the primary way to customize the Force.com user experience. They contain a large number of settings to control the user interface and data security of your organization. Users are assigned to profiles based on the tasks they need to perform in your system.
The two types of profiles are standard and custom. Standard profiles are provided with Force.com and cannot be renamed or deleted, although they can be reconfigured. Custom profiles have the same functionality as standard profiles but can be named. They can also be deleted if no users are assigned to them.
To manage profiles, click Setup, and in the Administration Setup area, click Manage Users, Profiles. In the realm of data security, the two primary sections to focus on are Administrative Permissions and Object Permissions.
Tip
Make sure Enhanced Profile List Views and Enhanced Profile User Interface options are enabled for your organization. The Enhanced Profile List Views feature allows up to 200 profiles at a time to be compared and modified easily, with far fewer clicks than the default user interface. The Enhanced Profile User Interface organizes profile settings by common administrative tasks and makes them searchable. To enable these features, click Setup, and in the App Setup area, click Customize, User Interface.
Administrative Permissions
Two administrative privileges in a profile trump all other security features in Force.com: Modify All Data and View All Data. Users of a profile with these permissions can modify and view all records of all objects, overriding all Force.com security measures. These permissions are powerful, so grant them with extreme care in a production environment. Developers need these permissions to work with tools such as the Force.com IDE, but this applies only in a sandbox or development environment.
Object Settings
Object permissions are divided into two sections: one for standard objects and another for custom objects. They have identical functionality. Note that object permissions cannot be edited on standard profiles. Figure 3.3 shows the section of a custom profile that defines object permissions.
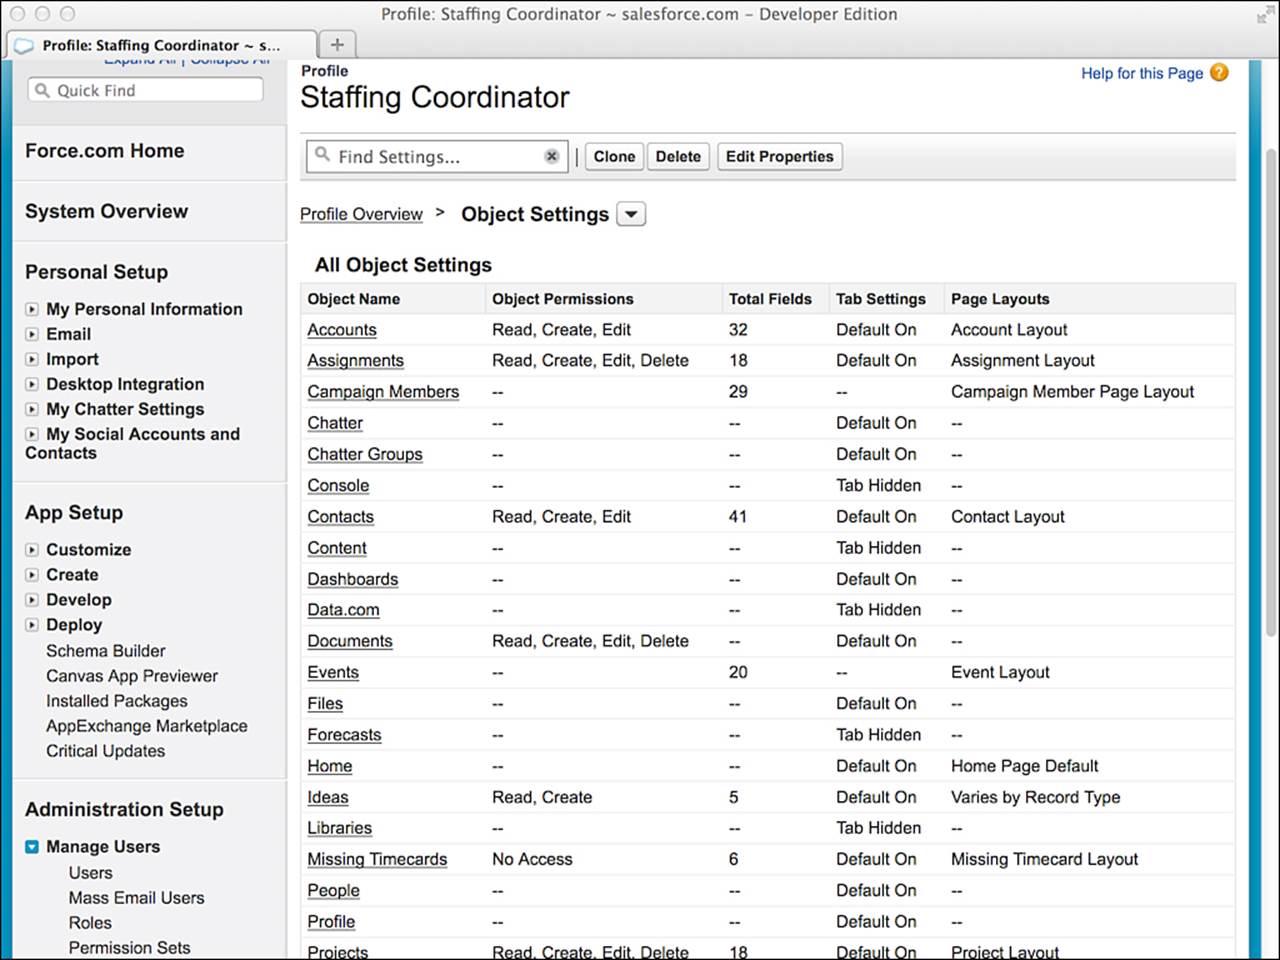
Figure 3.3 Configuring object permissions on a custom profile
Each object name is followed by a list of its permissions. The permissions are described in the following list:
![]() Read—The Read permission allows users to view records of this object.
Read—The Read permission allows users to view records of this object.
![]() Create—The Create permission permits Read access and the addition of new records to the object.
Create—The Create permission permits Read access and the addition of new records to the object.
![]() Edit—The Edit permission allows records in this object to be read and modified, unless overridden by field-level permissions.
Edit—The Edit permission allows records in this object to be read and modified, unless overridden by field-level permissions.
![]() Delete—The Delete permission enables users to read, edit, and remove records from this object. Deleted records are moved to the Recycle Bin, where they can be undeleted or permanently erased.
Delete—The Delete permission enables users to read, edit, and remove records from this object. Deleted records are moved to the Recycle Bin, where they can be undeleted or permanently erased.
![]() View All—The View All permission is like the systemwide View All administrative permission but scoped to a single object. It’s designed for use in exporting data because it circumvents other security features of the platform, ensuring that all records are accessible.
View All—The View All permission is like the systemwide View All administrative permission but scoped to a single object. It’s designed for use in exporting data because it circumvents other security features of the platform, ensuring that all records are accessible.
![]() Modify All—Like View All, the Modify All permission is intended for bulk data operations such as migration and cleansing. It allows users to modify all fields of all records in this object, overriding every other security measure.
Modify All—Like View All, the Modify All permission is intended for bulk data operations such as migration and cleansing. It allows users to modify all fields of all records in this object, overriding every other security measure.
New custom objects initially have all permissions disabled for all profiles, except those with View All Data or Modify All Data administrative permissions. This platform behavior of defaulting to the most secure configuration ensures that your data is not unintentionally exposed.
Licensing
Profiles are associated with a user license. Licenses are how Salesforce charges for the Force.com platform when you’re ready to go into production with an application. Salesforce has many license types to provide flexibility in pricing, including low-priced options for external customers and partners known as “portal licenses,” but the most basic licenses are Salesforce and Salesforce Platform. The Salesforce Platform license allows full use of Force.com but disables the business domain-specific functionality, such as CRM or Sales Force Automation (SFA). For example, a Salesforce license grants you the use of the Opportunity and Case objects, but a Salesforce Platform license does not. Sometimes even infrastructure features are downgraded. For example, profiles for a full Salesforce license can delegate administration on standard and custom objects. The Salesforce Platform license limits this feature to custom objects only.
Planning ahead pays in regard to licensing Force.com. If you are sure you do not need the extra features of the Salesforce license, select the Salesforce Platform license for your profiles. This cuts down on the number of objects and features you see during development and prevents you from accidentally referencing one of them. Also, in order to assign a user to a profile, that user must have a user license that matches the profile. Your custom profile cannot be associated with a different license after it has been created.
Permission Sets
Permission sets are a powerful complement to profiles. They contain the same user interface and data security settings as profiles, but are designed to address situations in which the settings do not apply to a large enough population of users to justify the use of a profile, or there are too many valid combinations of settings to create a profile for each one.
For example, if one special sales rep was allowed to tentatively staff consultants to projects, he or she would require the permissions resulting from a partial combination of the Sales Rep profile and the Staffing Coordinator profile. It is not possible to combine profiles or partially apply them, so without permission sets you would need to create a whole new one-off profile for this situation. Permission sets provide an elegant, maintainable solution. You would create a permission set to grant access to the Assignment object only. The special sales rep would get assigned to this permission set, leaving his or her profile unchanged.
To manage permission sets, click Setup, and in the Administration Setup area, click Manage Users, Permission Sets. The overview page of a permission set is shown in Figure 3.4. It provides links to all of the configurable areas of a permission set. They are divided into settings specific to applications and settings that apply to all applications. After a permission set is created, it can be assigned to users using the related list on the user page labeled Permission Set Assignments.
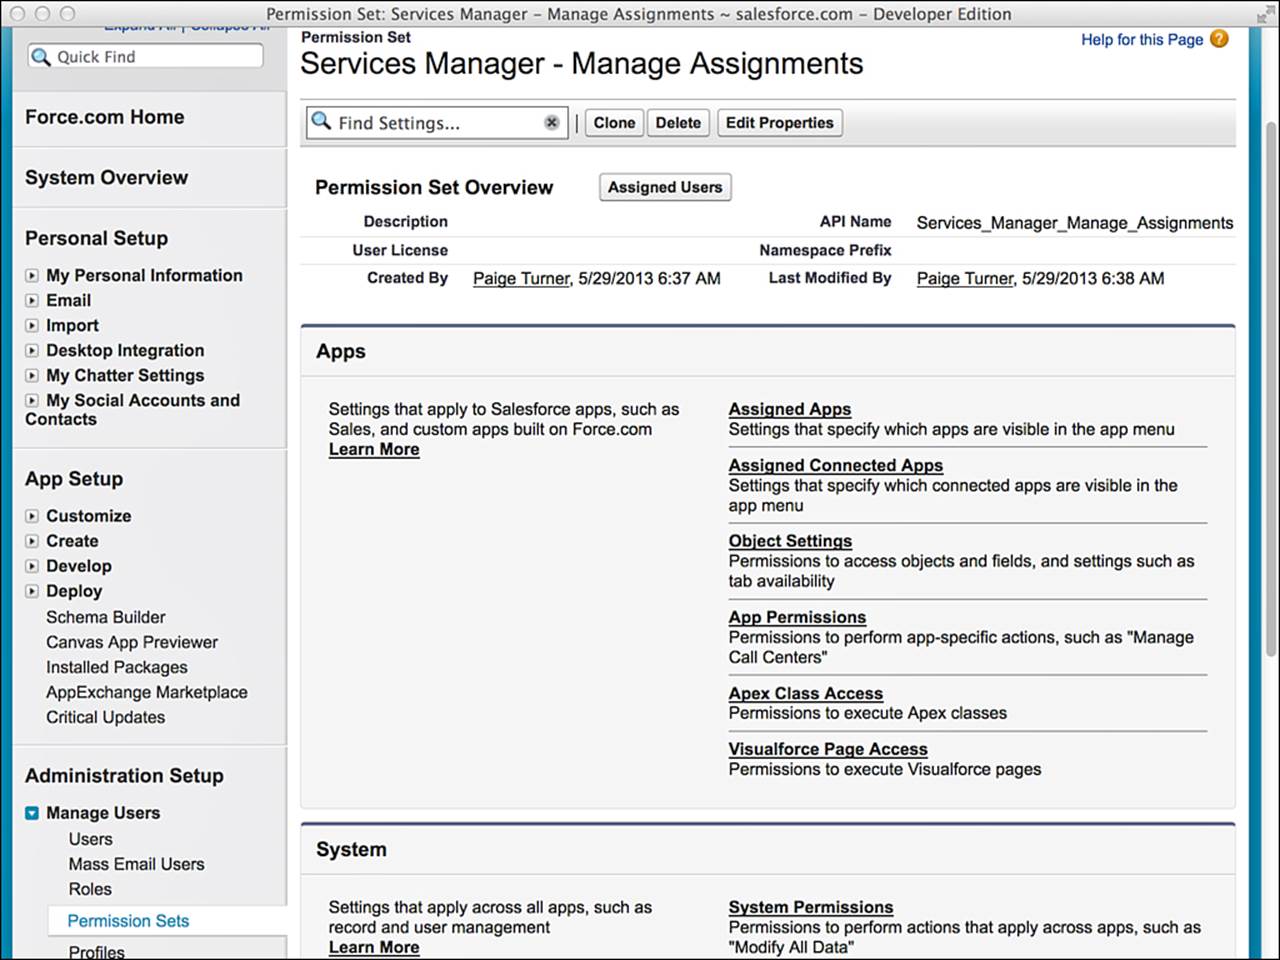
Figure 3.4 Permissions set overview
Field-Level Security
Security of fields is determined by a combination of the profile and the page layout. The more restrictive of the two always takes precedence. The two ways to edit field-level security are through the profile directly using the Field-Level Security section or through a feature called Field Accessibility. Field Accessibility is a bit more sophisticated because it provides a consolidated view of fields across page layouts and profiles.
Field-Level Security in Profiles
To reach the Field-Level Security section, click Setup, and in the Administration Setup area, click Manage Users, Profiles. Select a profile by clicking its name and scroll down to the Field-Level Security section. Click the View link next to the object name, such as Project, shown in Figure 3.5.
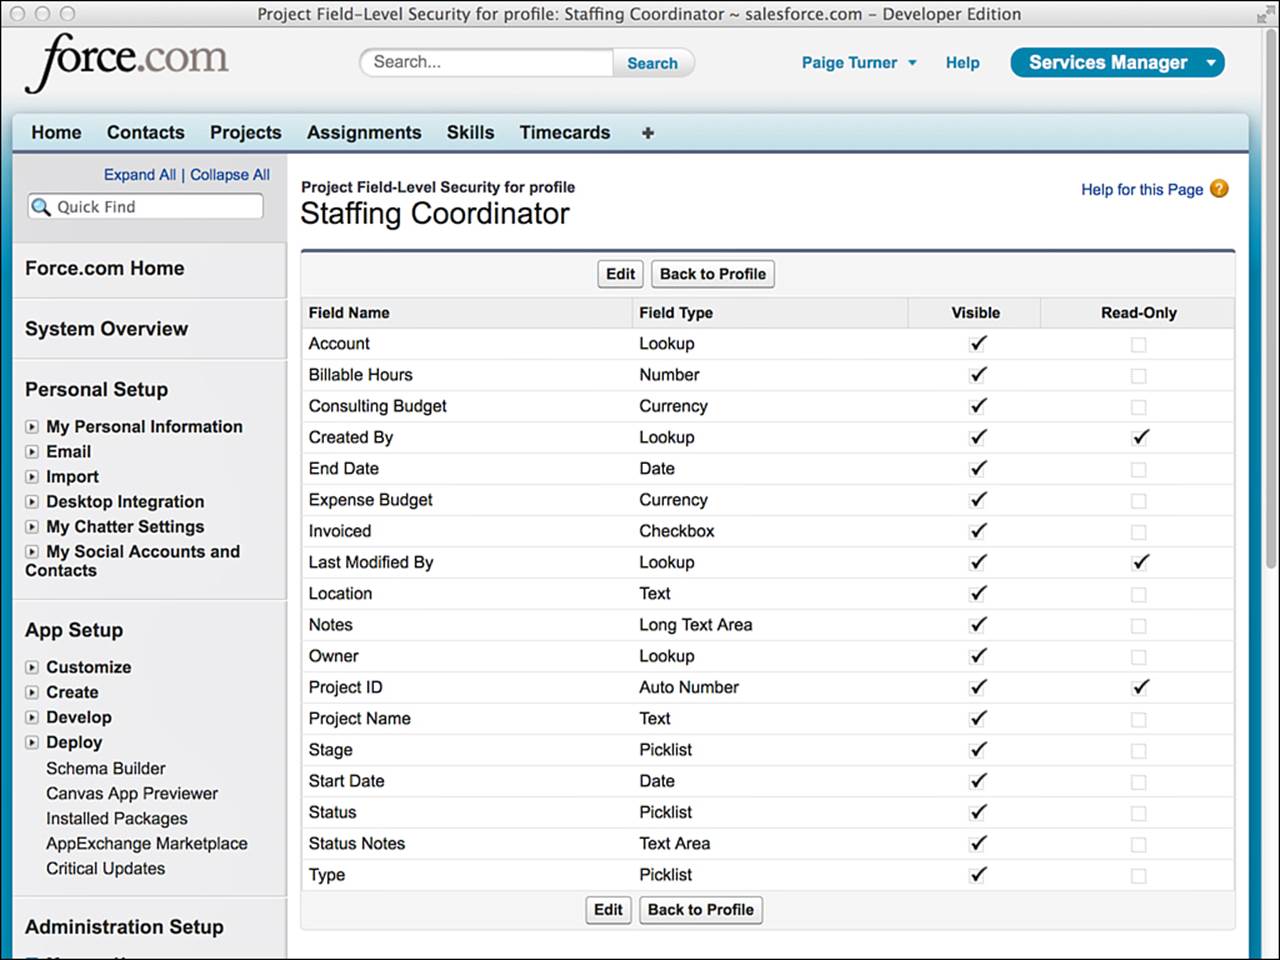
Figure 3.5 Configuring field-level security for the Project object
The two possible states for a field are visible and read-only. Fields marked as visible are available for display and modification on page layouts belonging to this profile. Read-only fields might also be visible on a page layout, but values in these fields cannot be modified.
Field Accessibility
Field Accessibility addresses the finer control of fields provided through the combination of page layout and profile. The more restrictive of two settings always wins. So, if a page layout defines a field as read-only that is defined in the profile as being invisible, the profile takes precedence, and the field is hidden. Field Accessibility provides an easy way to see this behavior in action.
To use Field Accessibility, click Setup, and in the Administration Setup area, click Security Controls, Field Accessibility. Select an object and then drill in by Field or Profile to see the corresponding field accessibility table. Each field has one of four accessibility values:
![]() Required—If a field is defined as required in its page layout and visible in its profile, it is a required field. This means for a record to be saved, it must contain a value for this field.
Required—If a field is defined as required in its page layout and visible in its profile, it is a required field. This means for a record to be saved, it must contain a value for this field.
![]() Editable—A field defined as visible in both the page layout and the profile is designated as editable. This field appears to the user and can be modified.
Editable—A field defined as visible in both the page layout and the profile is designated as editable. This field appears to the user and can be modified.
![]() Read-only—If a field is declared read-only on its profile or visible in its profile and read-only in its page layout, then it is a read-only field. It appears in the page layout, but its value cannot be modified.
Read-only—If a field is declared read-only on its profile or visible in its profile and read-only in its page layout, then it is a read-only field. It appears in the page layout, but its value cannot be modified.
![]() Hidden—Fields that are set to invisible on their profile or page layout are hidden. Hidden fields are never shown to the users of this profile.
Hidden—Fields that are set to invisible on their profile or page layout are hidden. Hidden fields are never shown to the users of this profile.
Try marking a field as read-only in its page layout but invisible in its profile. Then hover the cursor over the word Hidden in the field accessibility table. You’ll see the message that the field is hidden because of field security. If you edit the field again and make it visible via the profile, the field becomes read-only per the page layout.
Record-Level Security
In Force.com, individual data records within an object are secured through a combination of three concepts:
1. Record ownership—All records except those on the child side of a Master-Detail relationship have a single named owner. Record owners are individual users or groups of users. Ownership of a record can be transferred manually to another user or group.
2. User groups—Users can be organized into flat lists and placed in a hierarchy. Groups can contain individual users as well as other groups.
3. Sharing model—The sharing model consists of two parts: organization-wide defaults and sharing reasons. The organization-wide defaults can be configured to lock down all records by object, regardless of their owner. Sharing reasons selectively override the defaults to allow access based on record ownership or arbitrary criteria.
This section discusses each concept in more depth.
Record Ownership
When a new record is created, it’s owned by the user who created it. The owner has full control over the record. The owner can read, edit, and delete the record; share with other users; and transfer ownership to a different user.
You can experiment with record ownership by creating a record in the native user interface and examining its detail. Notice that its owner field is set to your user, the user creating the record. To share the record with others, click the Sharing button. To transfer ownership, click the Change link beside the owner name.
Owners are typically individual users, but a queue can also be an owner. A queue is a holding area for records to which users are assigned. When a user takes ownership of a record in queue, it leaves the queue and is assigned directly to that user. To configure queues, go to the Administration Setup area and click Manage Users, Queues.
Most objects support record ownership. The notable exception is child objects in a Master-Detail relationship. Records in these child objects have no owners. They inherit ownership from their parent records, and changes in ownership must be made on the parent record.
User Groups
Record-level sharing operates on groups of users, not individual users. Force.com provides two mechanisms for grouping users relevant to sharing: public groups and roles.
Public Groups
At its simplest level, a public group is a named list of users included in the group. This list can also contain other public groups. To define a public group, click Setup. In the Administration Setup area, click Manage Users, Public Groups.
A best practice for public groups is to keep the membership list as short as possible. This improves performance and simplifies maintenance. Build larger groups up from smaller subgroups rather than working with individual users.
Roles
Roles are also groups of users but are organized in a hierarchy. Users in roles can inherit the privileges of the roles below them in the hierarchy. This includes record ownership.
A user belongs to one role at a time, and all applications in your Force.com organization use a single role hierarchy.
To define roles, click Setup. In the Administration Setup area, click Manage Users, Roles. The first time you use this feature, Force.com asks you to select a sample set of roles to get started.
Sharing Model
The sharing model defines how record-level privileges are granted to users who do not own the record. Configuring the sharing model is a two-part process. Organization-wide defaults are used to establish the most restrictive level of access for each object. Sharing reasons override the defaults to grant access to individual records.
Organization-Wide Defaults
Every object that allows record ownership has an organization-wide default setting dictating how records are shared between the owner and other users. Custom objects have several default settings:
![]() Private—Records belong to the owner and only the owner. With the exception of the data administration-level privileges View All and Modify All, records are accessible only to their owners.
Private—Records belong to the owner and only the owner. With the exception of the data administration-level privileges View All and Modify All, records are accessible only to their owners.
![]() Public Read-Only—Any user can view records in this object but cannot edit or delete them. Only the owner and users with administrative privileges have rights to edit and delete.
Public Read-Only—Any user can view records in this object but cannot edit or delete them. Only the owner and users with administrative privileges have rights to edit and delete.
![]() Public Read/Write—Any user can view, edit, and delete records in this object. All newly created custom objects default to this setting.
Public Read/Write—Any user can view, edit, and delete records in this object. All newly created custom objects default to this setting.
![]() Controlled by Parent—This option is available only to child objects in Lookup relationships. It delegates record-sharing decisions to the parent record. The child records behave as if they lack an owner. Objects with this default setting have the same record-sharing behavior as children in a Master-Detail relationship.
Controlled by Parent—This option is available only to child objects in Lookup relationships. It delegates record-sharing decisions to the parent record. The child records behave as if they lack an owner. Objects with this default setting have the same record-sharing behavior as children in a Master-Detail relationship.
When setting organization-wide defaults, begin with the user to receive the minimum access to data. Set the organization-wide default settings with this user in mind. All users then have at least this level of access to records. To configure organization-wide defaults, click Setup. In the Administration Setup area, click Security Controls, Sharing Settings. Figure 3.6 shows the screen with organization-wide defaults.
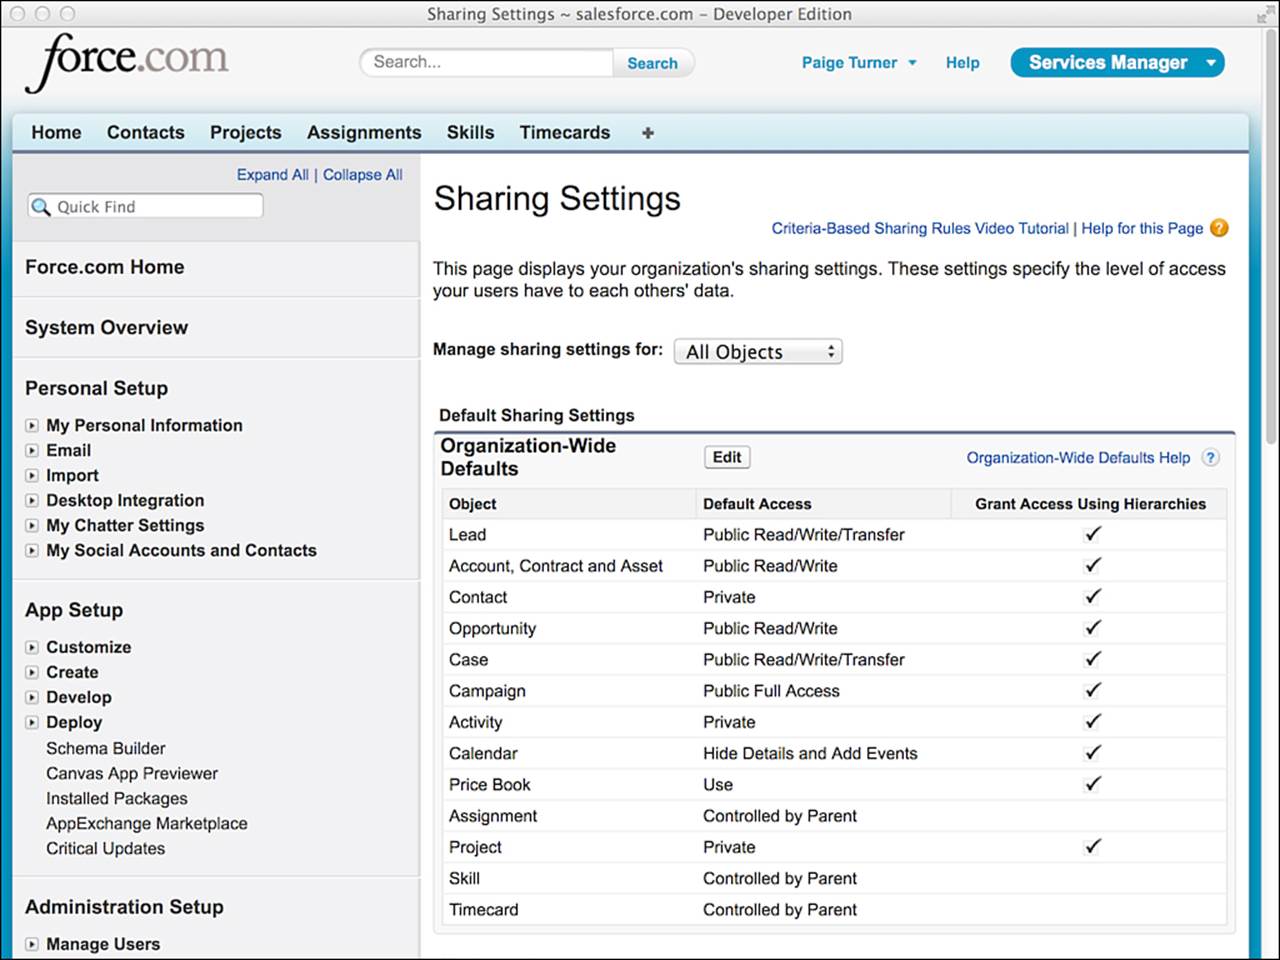
Figure 3.6 Configuring organization-wide defaults
The rightmost column of check boxes called Grant Access Using Hierarchies determines whether the role hierarchy is used on this object to propagate permissions upward to superior roles. By default, this behavior is enabled. Disabling it causes roles to function like public groups. Record permissions are shared only between a pair of roles, never aggregated up the role hierarchy.
Sharing Reasons
Sharing reasons override the organization-wide defaults to allow individual records to be shared between groups of users. The groups can be roles or public groups. The behavior of the sharing reason depends on the groups involved and the type of sharing reason.
Sharing between roles results in asymmetric privileges. Users in subordinate roles do not receive any privileges of their superiors, but superiors receive all the privileges of their subordinates. Sharing with public groups is symmetric, granting equal rights to both parties. In other words, a user has access to all records that are accessible to its descendants in the role hierarchy.
Note
Objects with the most permissive organization-wide default (public read/write) cannot use sharing reasons.
Objects with the most permissive organization-wide default (public read/write) cannot use sharing reasons. The four types of sharing reasons are as follows:
1. Manual—The owner of a record can elect to manually share it with another user or group of users. The owner specifies the level of access (Read Only or Read/Write) to be granted. To configure manual sharing, click the Sharing button on a detail record in the Force.com native user interface. Figure 3.7 shows the user interface for sharing a record named GenePoint in the Project object.
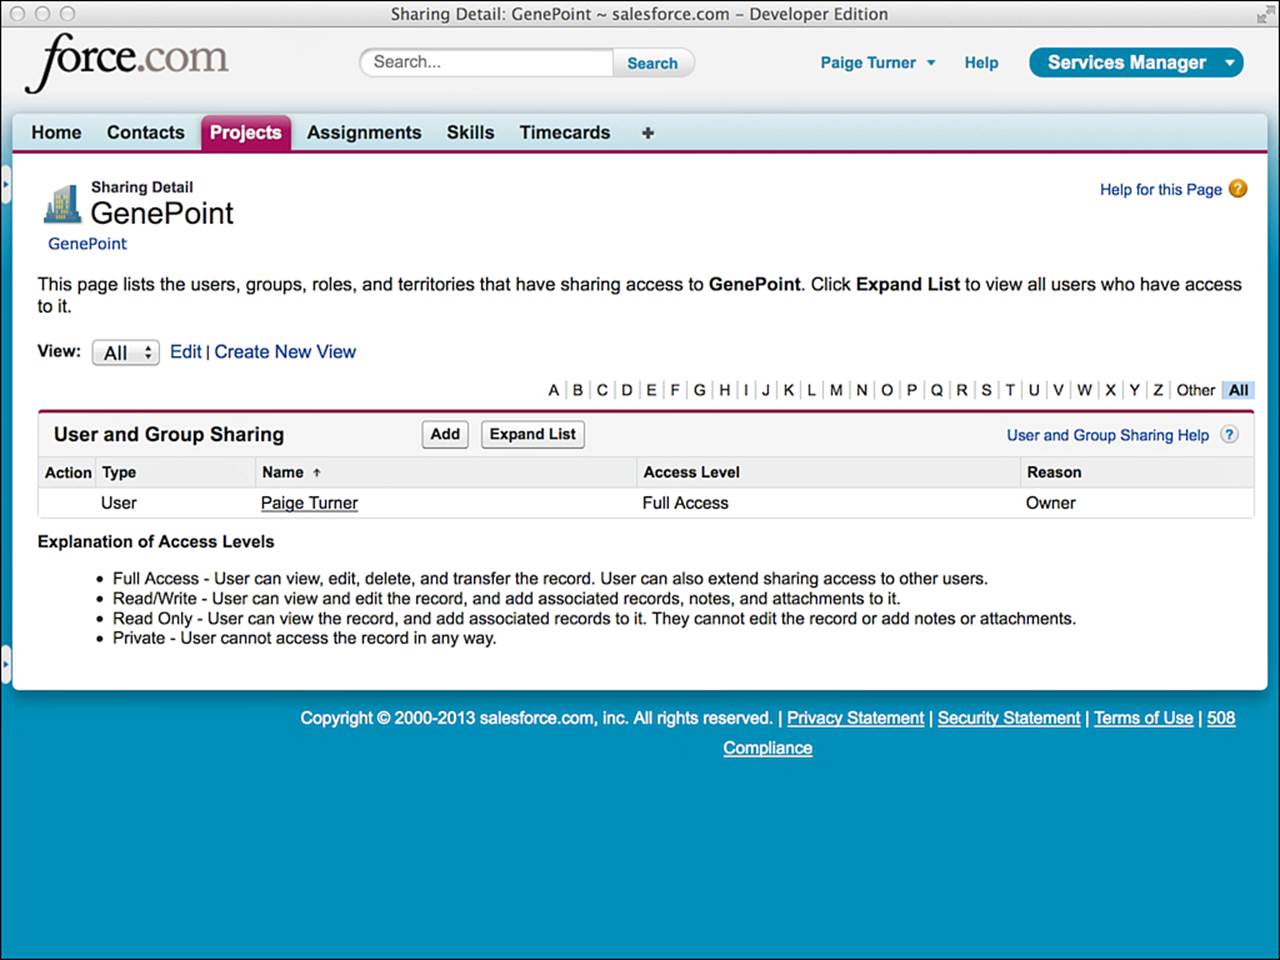
Figure 3.7 Manually sharing a Project record
2. Sharing rules—Sharing rules allow records to be shared automatically by Force.com based on group membership or arbitrary criteria. In Figure 3.8, a sharing rule is being created for the Project object. It specifies that members of the West business unit can automatically read and write all Project records owned by their colleagues in the same business unit. In Figure 3.9, a criteria-based sharing rule is being defined to provide users in the Executive role with Read and Write access to billable projects.
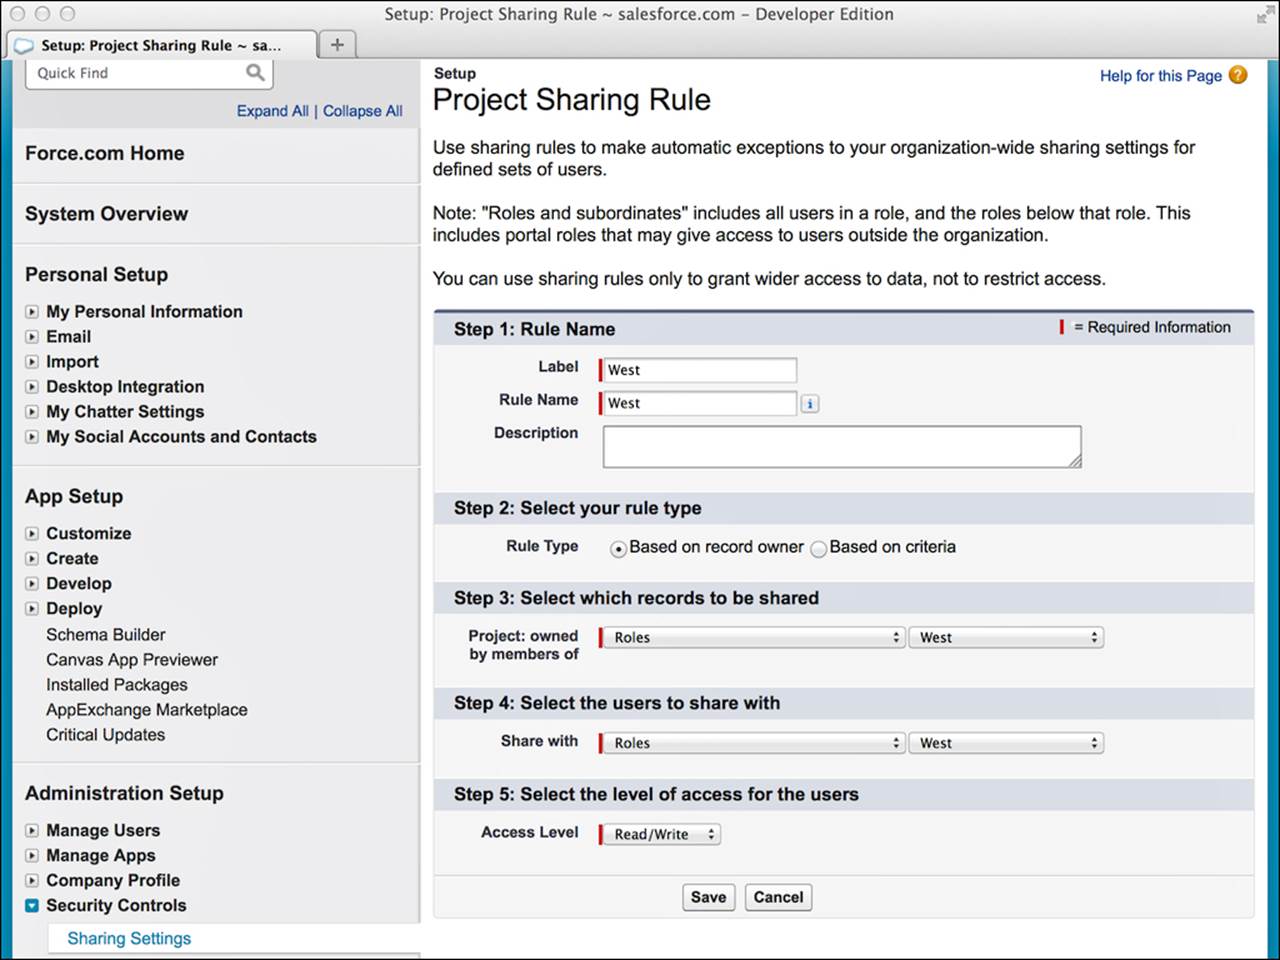
Figure 3.8 Creating a sharing rule for projects
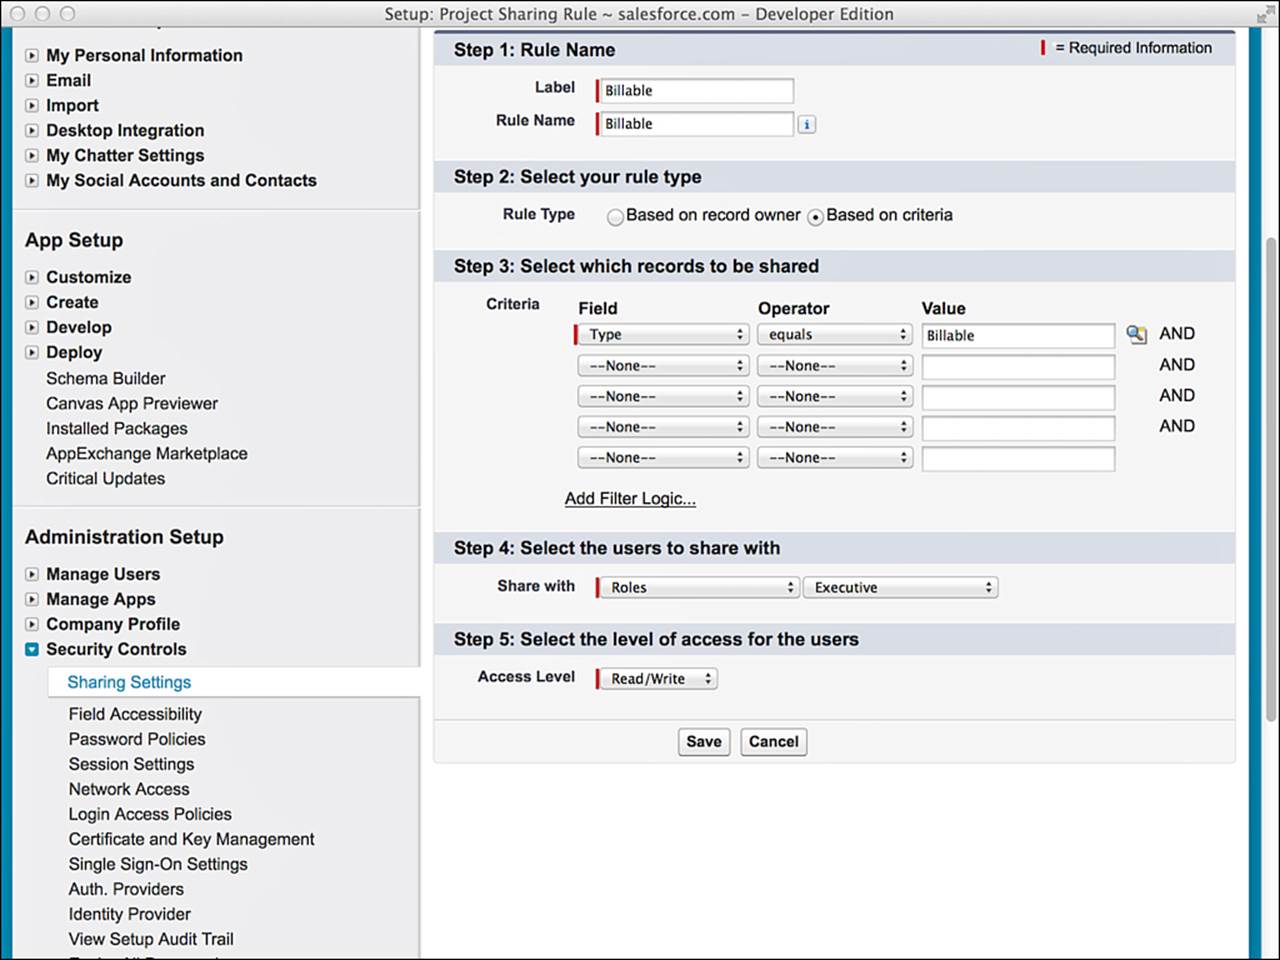
Figure 3.9 Creating a criteria-based sharing rule for projects
3. Procedural—Records can be shared programmatically using Apex code. This allows a developer to define the conditions that govern the sharing of a record. This is discussed in Chapter 5, “Advanced Business Logic.”
4. Delegated administration—Profiles contain two special systems permissions called View All Data and Modify All Data. If these are granted, they exempt users in that profile from all sharing rules, giving them access to all records regardless of owner. This privilege is intended for data import, export, and cleansing programs that need to run unencumbered by sharing rules.
Sample Application: Securing Data
The fictional organization driving the development of your Services Manager sample application is organized into independent business units by geography. Business units generally do not share resources or projects, but might do so in special circumstances. All business units roll up to an executive team, which has access to all data. The employees of each business unit perform essentially the same tasks: booking deals, staffing projects, billing time on projects, and invoicing their clients.
From this description of the organization’s structure, consider how to make the best use of the data security features of Force.com. The goal is to allow users access to precisely the right data they need in order to perform their jobs, no more and no less. The configuration of Force.com security features necessary to achieve the goal will be referred to as the security model.
In this section, you will walk through the design, implementation, and testing of the security model for the Services Manager application.
Designing the Security Model
To begin the design process, review the fundamentals of Force.com security and the sample application’s security requirements:
![]() Force.com data security has two facets: profiles and the sharing model. Profiles protect objects and their fields, and the sharing model controls access to individual records.
Force.com data security has two facets: profiles and the sharing model. Profiles protect objects and their fields, and the sharing model controls access to individual records.
![]() Data security in the sample application is determined by an employee’s job function and business unit. Job functions are identical across business units, and business units do not normally share data.
Data security in the sample application is determined by an employee’s job function and business unit. Job functions are identical across business units, and business units do not normally share data.
The design strategy followed in the remainder of this section examines each of the sample application’s security requirements and discusses the configuration of the Force.com security features necessary to satisfy them.
Security by Job Function
Job functions dictate what type of data a user is allowed to view and modify. For example, consultants should not create projects or assignments. A staffing coordinator creates projects and assigns resources to them. But a consultant is allowed to create and edit timecards.
As you’re thinking about job functions, you’re naturally discussing the objects that make up the application. In Force.com, profiles control access to objects and fields. To design profiles for the Services Manager application, start by listing all job functions and objects in a grid. At the intersection of each job function and object, determine the level of access needed. The level of access is expressed as a series of permissions. The permissions are read, create, edit, and delete. Table 3.1 shows the output of this exercise.
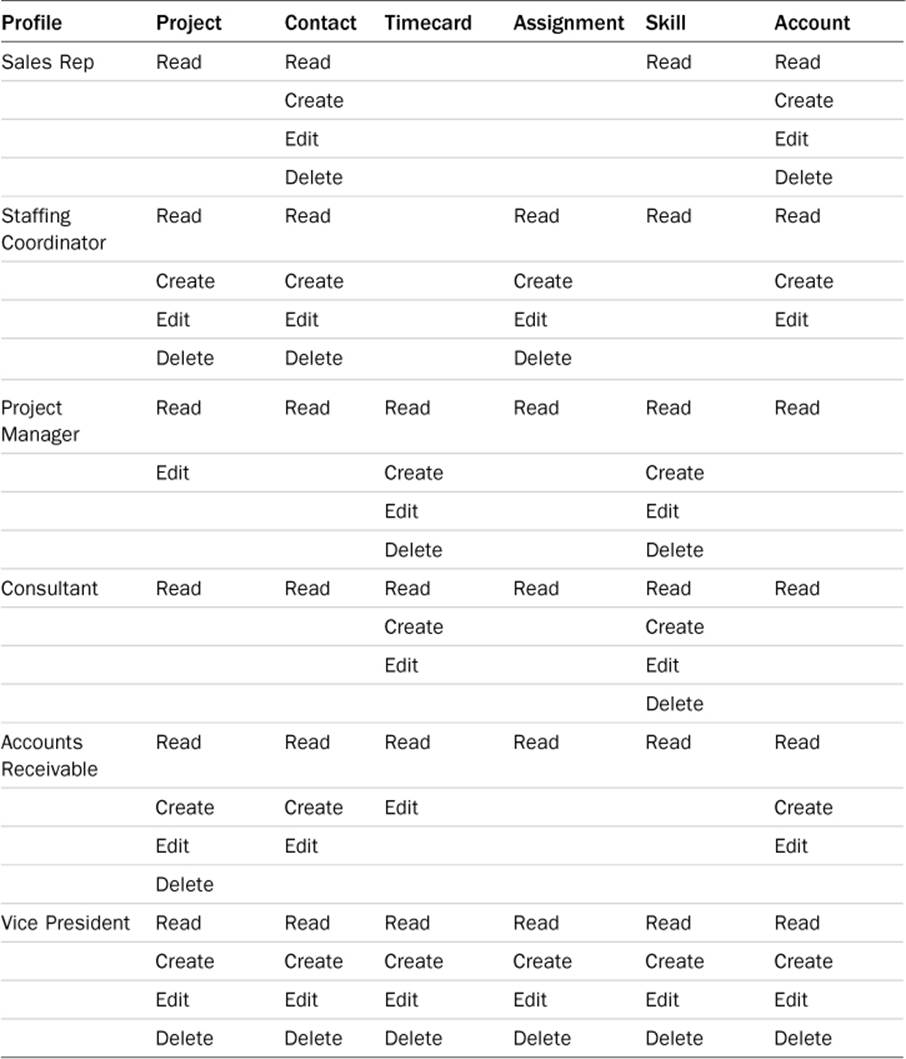
Table 3.1 Services Manager Profiles
Security by Business Unit
Business units are autonomous minicompanies that have a somewhat competitive relationship with each other. All business units report to an executive team. The sample organization is shown in Figure 3.10.
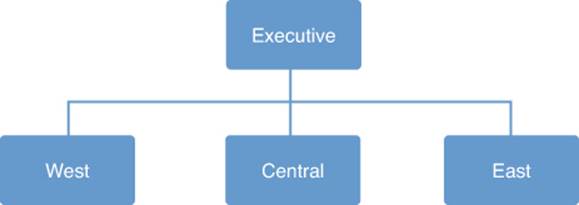
Figure 3.10 Services Manager business units
The Force.com security model must account for the following facts about the organization:
![]() In normal day-to-day operations, business units do not share data. This includes projects, resources, customers, and contacts. All data is private, belonging to the business unit that created it.
In normal day-to-day operations, business units do not share data. This includes projects, resources, customers, and contacts. All data is private, belonging to the business unit that created it.
![]() In some cases, business units might need to share records. For example, a consultant with specialized skills is needed on projects in all three business units.
In some cases, business units might need to share records. For example, a consultant with specialized skills is needed on projects in all three business units.
![]() Members of the executive team are able to read and write all data.
Members of the executive team are able to read and write all data.
In the preceding section, you designed profiles to provide each job function in the organization with access to objects and fields. Now you must look at the requirements to protect each record of data. This is where Force.com’s record-level security features come into play. To design for record-level security, use the following three steps:
1. Establish the sharing model—For each object, determine the most restrictive mode of sharing that is called for on its records. For the custom objects found in Services Manager, the options are Private, Public Read Only, and Public Read/Write. Private means that records remain under the control of their owners. Do not consider objects on the Detail side of Master-Detail relationships because records in these objects inherit ownership from their parent record. The output of this step is a list of objects, each with a default access setting (Private, Public Read Only, or Public Read/Write).
2. Build groups of users—Identify scenarios in which users need to share data outside of the restrictive defaults defined in the sharing model. Look for groups of users involved in these exceptions to the sharing model. Examine the flow of information between the two groups. It can be symmetric, with both groups getting equal access to the data. Or it can be one-sided, with one group receiving elevated rights to another group’s data without reciprocation. The output of this step is a list of roles and public groups. Use roles where the sharing relationship is one-sided, and public groups where the relationship is equal.
3. Set sharing rules—Using the list of roles and public groups from the preceding step, build a list of sharing rules. To build each rule, follow three steps, as shown here:
a. Determine which group owns the record to be shared.
b. Identify the other group requiring access to the records owned by the first group.
c. Decide whether the other group requires Read Only or Read/Write access to the shared record.
Following the first step creates the results given in Table 3.2, which shows the sharing model chosen for each object.

Table 3.2 Sharing Model for Services Manager
In the second step, the groups of users are defined. In Services Manager, the only groups relevant to sharing are the business units. Each business unit will become a role, including the executive team.
For the final step of defining sharing rules between the groups, the requirement is to allow users in the same business unit to collaborate on records. To accomplish this task, grant each business unit Read/Write access to records owned by users in its business unit.
Implementing the Security Model
In the preceding section, you designed the sharing model for the Services Manager sample application. In this section, you will implement it in your Force.com DE organization. The implementation involves five separate tasks:
1. Create profiles—Profiles control access to objects and fields. The profiles in Services Manager are modeled after job functions such as Consultant and Project Manager.
2. Configure field accessibility—Profiles also provide fine-grained control over the fields within an object. In Services Manager, several cases exist in which a particular type of user needs Read access to an object, but not the whole object. Some fields are sensitive and should be hidden. Supporting these cases using field-level accessibility settings is easy.
3. Set organization-wide defaults—This is the first step in defining record-level control over data. All records have an owner, initially the user who created the record. Organization-wide defaults are defined on each object and dictate which users besides the owner, if any, also receive access to the records.
4. Establish role hierarchy—Roles provide a way to group users into a hierarchy. Users at higher levels in the hierarchy receive access to all records owned by their subordinates. In the Services Manager example, roles are used to model geographically distinct business units. By default, business units do not share data with each other. An executive team at the top of the hierarchy receives access to all data.
5. Add sharing rules—Sharing rules are one way to override the organization-wide defaults. They automatically share records between two groups of users based on record ownership and group membership. In Services Manager, sharing rules are used to allow record owners in the same business unit to collaborate on the same data. For example, if two Project Managers are in the West, they should be able to see each other’s Project records because they work on the same team.
Create Profiles
On the Setup screen in the Administration Setup area, click Manage Users, Profiles. For each profile identified in Table 3.1, follow these steps:
1. Click the New Profile button.
2. Select an existing profile to use as the starting point for the new custom profile. Standard Platform User is a good choice because the Services Manager sample application can work with a Salesforce Platform user license.
3. Enter the profile name and click the Save button.
4. The new profile is created—a copy of the existing one. Click the Edit button to customize it.
5. In Custom App Settings, select Services Manager as the default.
6. Scroll down to the Standard Object Permissions section. Check off the boxes as appropriate to grant access to Accounts and Contacts. Repeat the same process in the Custom Object Permissions section for the four custom objects in the Services Manager application.
7. Click the Save button. As a shortcut to create more profiles, click the Clone button and start building the next profile from step 3.
When you’re done, your Profiles page should resemble Figure 3.11.
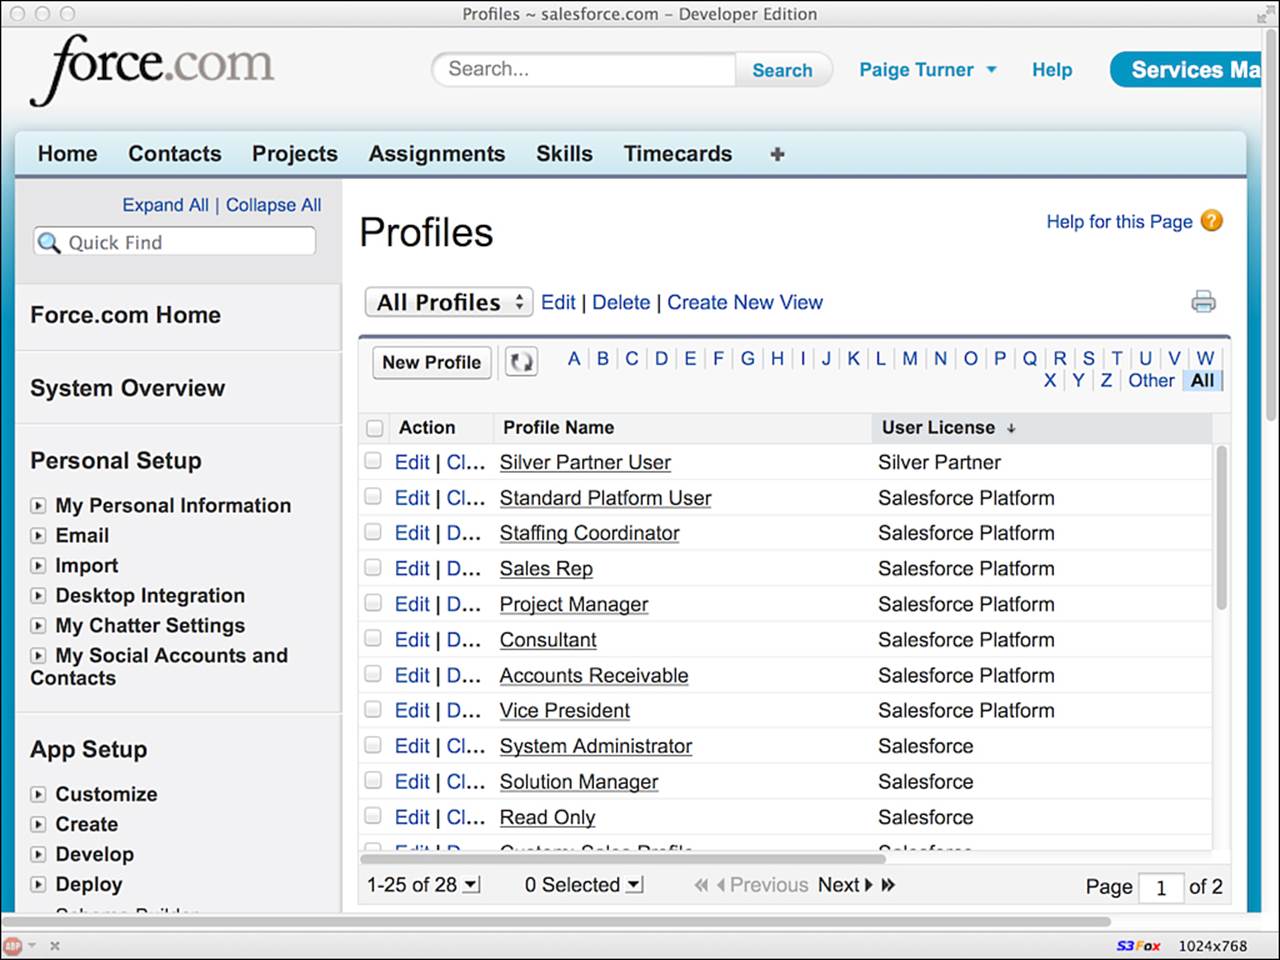
Figure 3.11 Services Manager profiles
Configure Field Accessibility
In addition to object-level security, you also need to protect sensitive fields. Newly created custom fields are always invisible. They must be explicitly made visible using a profile or permission set. You need to consider the sensitivity of each field to each type of user, an excellent security best practice enforced by Force.com. For example, a Consultant can see all of the fields on a Project object except the finance-related fields Consulting Budget, Expense Budget, and Invoiced.
Follow this procedure to set the visibility of fields in an object:
1. Click Setup, and in the Administration Setup area, click Security Controls, Field Accessibility.
2. Click the object to configure—for example, Project.
3. Click View by Profiles.
4. Select the profile—for example, Consultant. At a glance, you can see the access level of every field in the profile.
5. For each field to change, click its corresponding field access value.
6. Click the first Visible check box to make the field visible to this profile.
7. Click the Save button.
8. Repeat from step 4 until every profile is assigned the correct access levels for this object.
Make all fields on the object visible for the remaining profiles. When you’re done with these steps for the Project object, your Field Accessibility screen for the Consultant profile should resemble that shown in Figure 3.12.
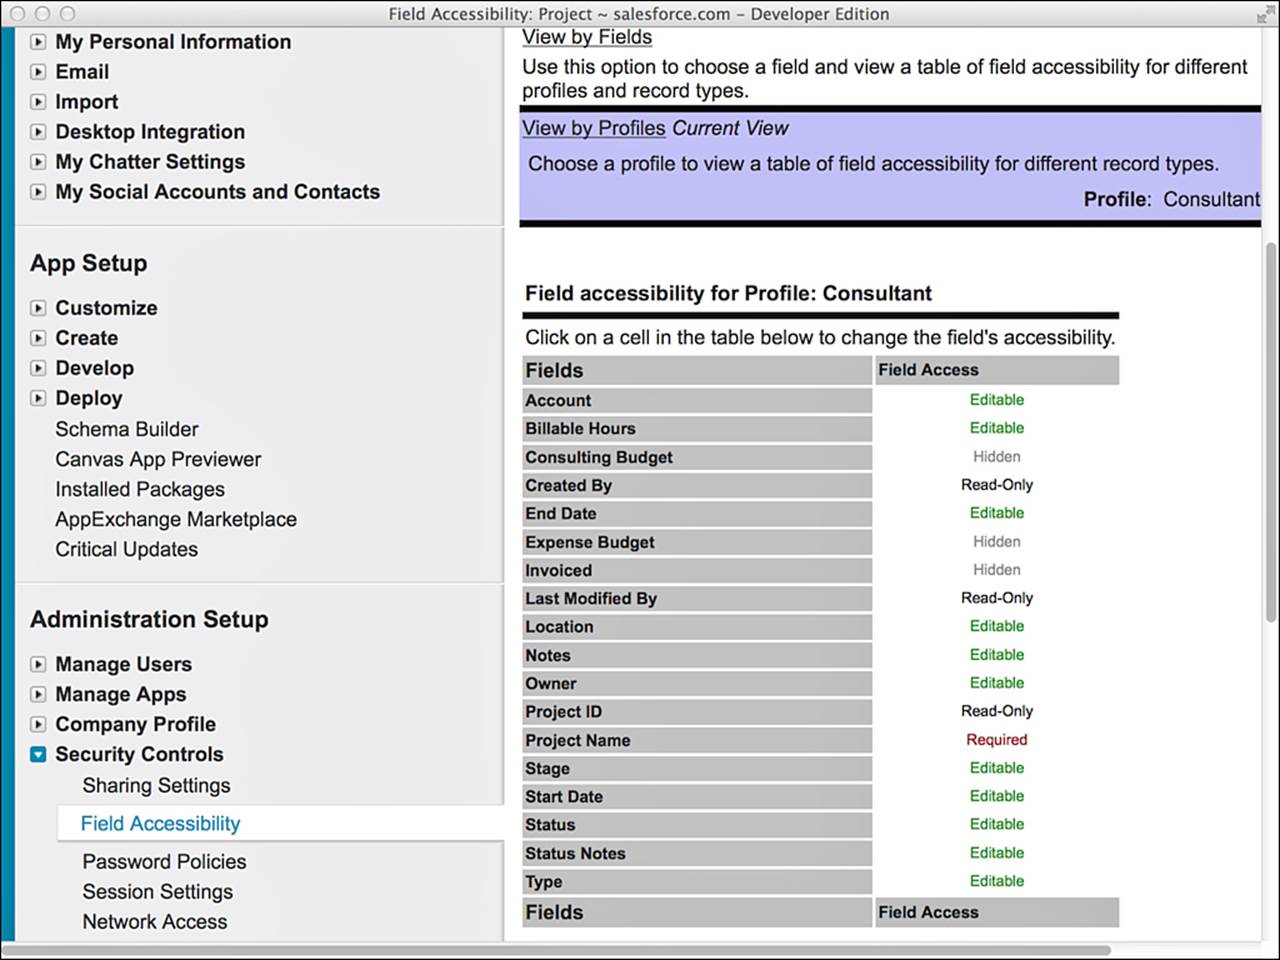
Figure 3.12 Accessibility of Project fields to Consultant profile
Repeat this process on the following objects:
![]() Timecard—All fields visible, but invoice-related fields (Invoiced, Invoice Number, Invoice Date) are hidden from the Consultant profile.
Timecard—All fields visible, but invoice-related fields (Invoiced, Invoice Number, Invoice Date) are hidden from the Consultant profile.
![]() Assignment—All fields visible, but finance-related fields (Hourly Cost, Hourly Rate, Planned Cost, Planned Margin, Planned Revenue) are hidden from the Consultant profile.
Assignment—All fields visible, but finance-related fields (Hourly Cost, Hourly Rate, Planned Cost, Planned Margin, Planned Revenue) are hidden from the Consultant profile.
![]() Contact—All fields visible, but the Hourly Cost Rate field is hidden from the Consultant profile.
Contact—All fields visible, but the Hourly Cost Rate field is hidden from the Consultant profile.
Set Organization-Wide Defaults
Follow these steps to configure the organization-wide defaults:
1. Click Setup. In the Administration Setup area, click Security Controls, Sharing Settings.
2. Click the Edit button.
3. In the Project row, select Private. Repeat this for Contact.
4. Click the Save button.
All Projects and Contacts are now private. This means that only the owner of a Project or Contact is able to see it. Although this is not the desired behavior, it is the most restrictive setting. From there, you will use sharing rules to open access to members of the same business unit.
Establish Role Hierarchy
In the Services Manager sample application, business units are represented using roles. Roles are chosen over public groups because they provide the one-way sharing needed between business units and the executive team.
To configure the roles, follow these steps:
1. Click Setup. In the Administration Setup area, click Manage Users, Roles. If you’ve never used this feature before, click the Set Up Roles button to continue past the display of sample role hierarchies.
2. Rename CEO to Executive.
3. Rename three of the roles reporting to Executive to West, Central, and East.
4. Delete the unneeded roles, starting with those at the lowest level of the hierarchy.
When you’re done, your role hierarchy should appear as shown in Figure 3.13.
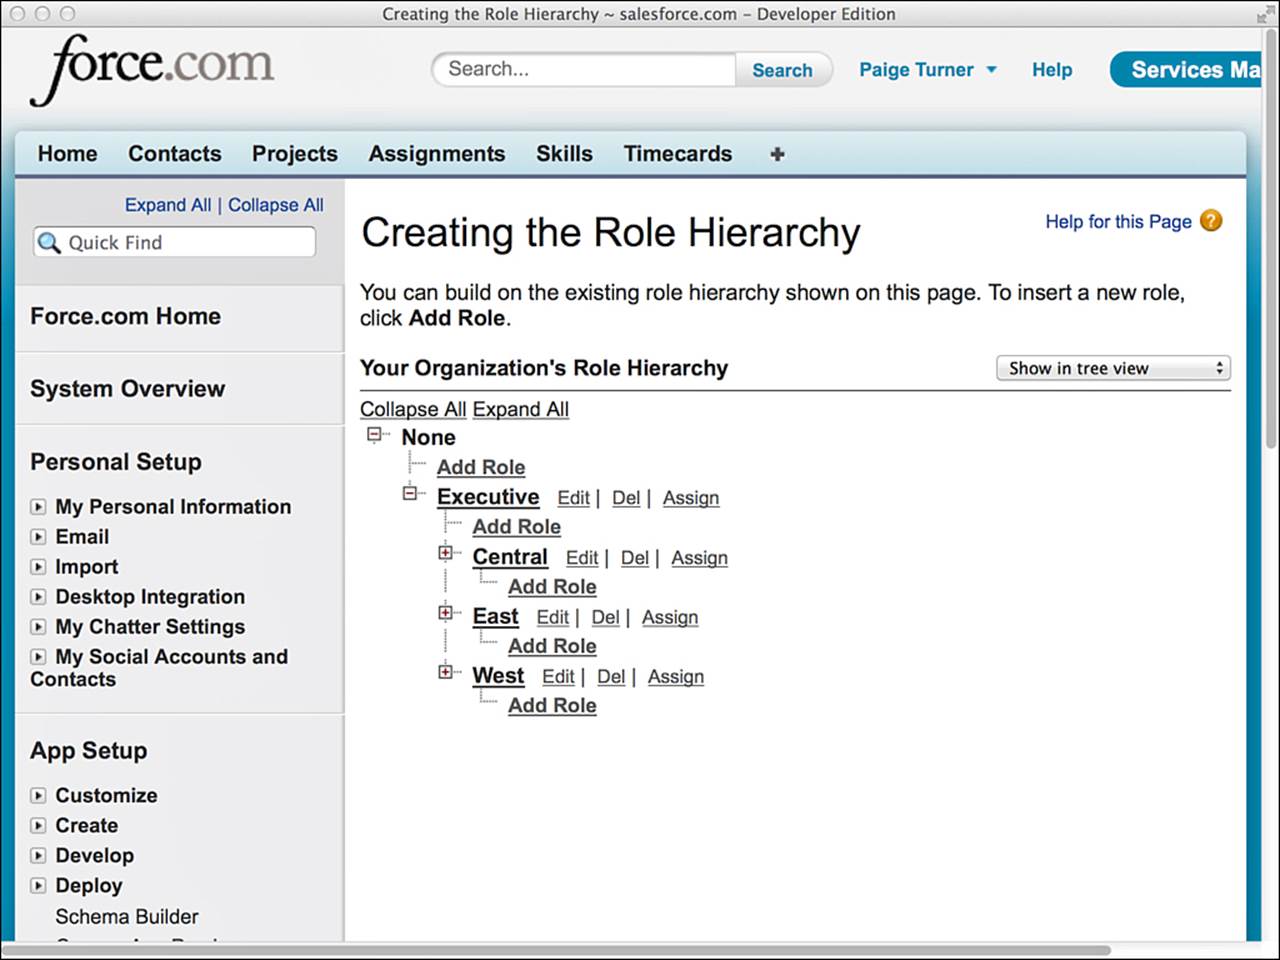
Figure 3.13 Services Manager roles
Add Sharing Rules
The goal in using sharing rules is to allow users in the same business unit to collaborate and share data. A record created by one user should be available to all users in the same business unit and their superiors, the executive team.
To configure sharing rules, follow these steps:
1. Click Setup. In the Administration Setup area, click Security Controls, Sharing Settings.
2. Scroll to the bottom of the screen. Click the New button in the Project Sharing Rules section.
3. Enter a rule label, and its name will be automatically set based on the label—for example, West.
4. The first pair of drop-down lists identifies the record owners who will be sharing. Select Roles from the first drop-down list and a role from the second—for example, West.
5. Select the group of users to share with. To share records within the same business unit, set this pair of drop-downs to the same values as those in the preceding step—for example, Roles and West.
6. The final drop-down list, Access Level, specifies the level of access that the second group of users receives to the shared records. Select Read/Write.
Repeat this process to share Project records within the other two business units, Central and East. Records are automatically shared with executives because they lie above the business units on the role hierarchy. Figure 3.14 shows the completed list of sharing rules.
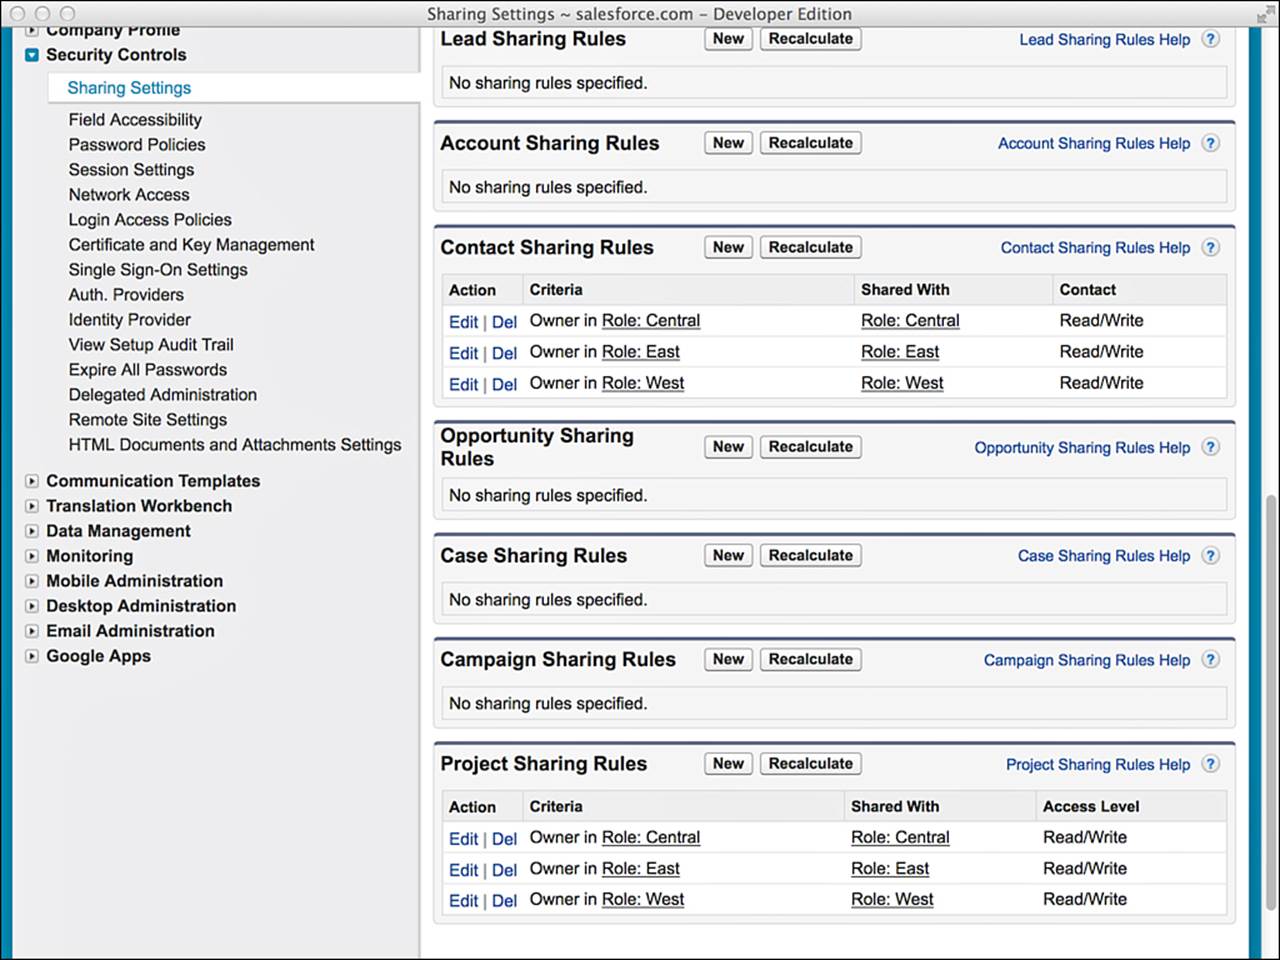
Figure 3.14 Services Manager sharing rules
Testing the Security Model
Although Services Manager is a sample application, it’s a good idea to get into the habit of testing the security of all Force.com applications before you go into production with them. If you do not take the time to test methodically, a user or group of users could be unable to perform their jobs or become exposed to confidential data intended for other users.
Security testing requires the same level of patience and attention to detail as the actual configuration. If you’ve kept a spreadsheet or another document with the details of your configuration, you can use it to construct a test plan. Where feasible, make sure you test from the perspective of every group of uniquely privileged users. The native user interface is a great tool for security testing because it exposes the underlying security model accurately, without the distortion of potentially buggy custom code found in custom user interfaces.
Test object and field visibility by visiting tabs. Test access levels by looking for buttons that modify the state of the record on the pages in these tabs. Test sharing rules by creating records with different owners and checking their visibility to other users.
In the following subsections, you will create three additional users for testing, prepare some test data, verify object and field visibility for three profiles, and test manual sharing between two roles.
Create Additional Users
Force.com Developer Edition provides you with up to seven free users for your testing. Two of the users are licensed to use the full Salesforce functionality, which includes all the standard objects. Three of the users are Salesforce Platform Users, meaning they have access to a subset of the standard objects. Two of the users are Force.com - App Subscription users, which are roughly equivalent to Salesforce Platform Users. Services Manager can be tested using Salesforce Platform Users.
Although you could use one user and cycle him through the various roles and profiles, creating as many users as you can makes testing more efficient and intuitive. Start with a Staffing Coordinator in the West, a Consultant in the West, and a Vice President in the Executive team.
Follow these steps to create each new Salesforce Platform user:
1. Click Setup. In the Administration Setup area, click Manage Users, Users.
2. Click the New User button.
3. Enter First and Last name and then Email. Set Profile to one of the custom Services Manager profiles and select a role. Make sure that the check box Generate New Password and Notify User Immediately is selected. Then click the Save button.
4. You will receive an email with a link to log in as your new user. Visit this login link.
5. Set your new password.
6. Click Setup. In the Personal Setup area, click My Personal Information, Grant Login Access.
7. Grant login access to your administrator by entering a date in the second input field and clicking the Save button. This is a time-saving step that allows you, the administrator, to log in temporarily as the user without going through the full login process of entering a username and password.
Repeat this process for each new user. When you’re done, you should have a list of users resembling the one shown in Figure 3.15.
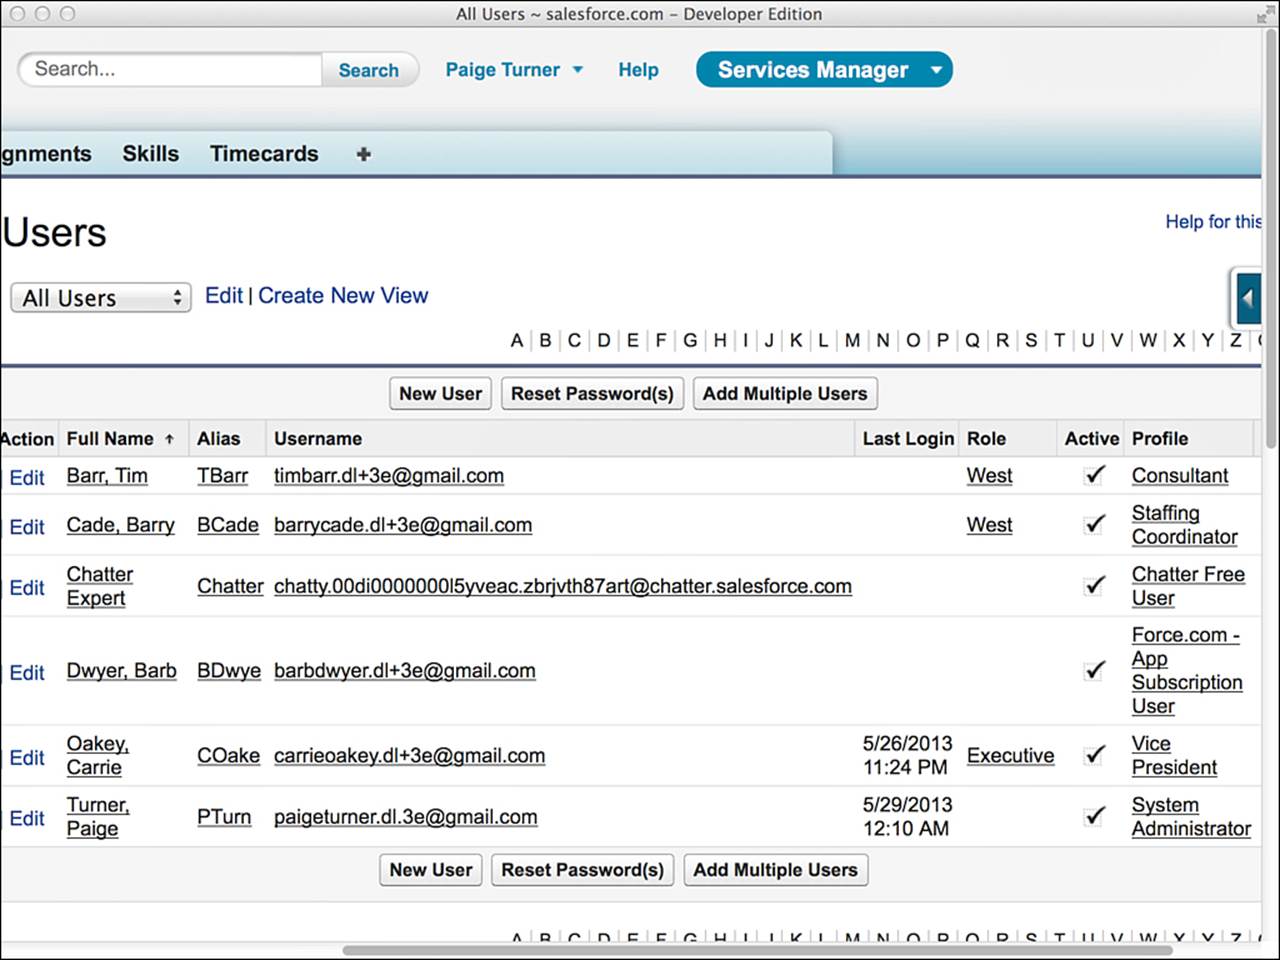
Figure 3.15 Services Manager users
Prepare Data
If you log in as a nonadministrator, you’ll notice that no Project records are visible. But you imported some in the preceding chapter, so where are they? Because your sharing model is set to Private, they are accessible only to the owner, which is the administrator user you used to import them.
To get started with testing profiles, you need to transfer ownership of some records. Log in as the administrator. Grant your Consultant user ownership of a Contact record by visiting the record and clicking the Change link beside the owner name. Figure 3.16 shows the record with a new owner. Note that the owner is different from the user who created the record.
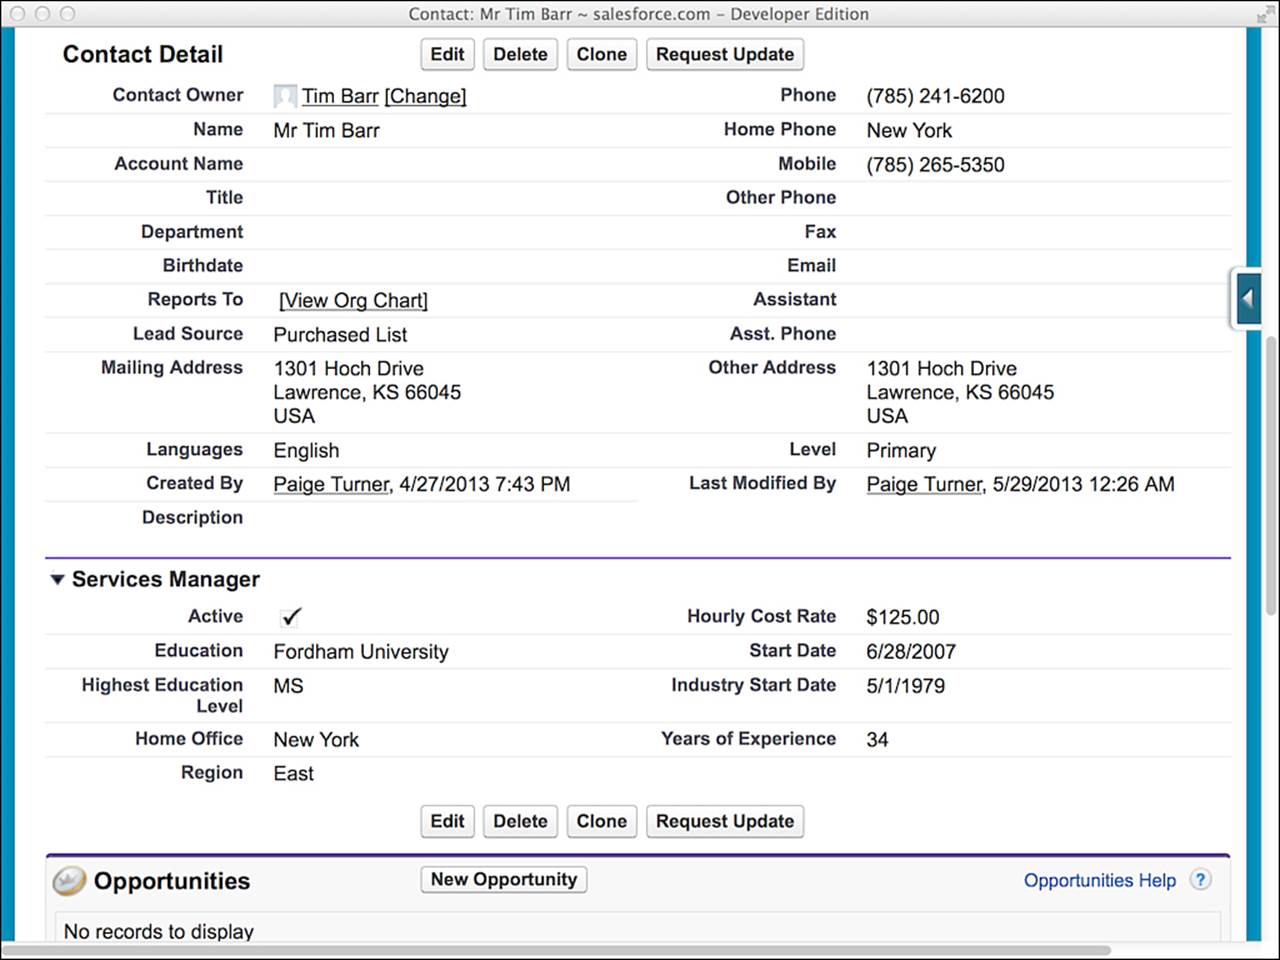
Figure 3.16 Contact record with new owner
Repeat the same process to transfer ownership of a Project to your user in the Staffing Coordinator profile.
Test the Consultant Profile
Now log in as a user in the Consultant profile. Click the Contacts tab and click the Go button. You should see the Contact record. Using the Timecard tab, verify that you can create a new record. Do the same for the Skills tab. Note that the Assignment tab does not contain a New button. That’s because the Consultant profile prohibits this user from creating an Assignment record. Also notice that the Hourly Cost field is hidden.
Before you leave this record, click the New Skill button and add a few skills to the consultant. Then click around in the other tabs to verify that the consultant cannot create a Project or Contact and cannot see the hidden fields in these objects.
Test the Staffing Coordinator Profile
When you’re satisfied with the Consultant, log out and log in as a Staffing Coordinator. Verify the following behaviors of this profile:
![]() Can create, edit, and delete Projects and view all their fields
Can create, edit, and delete Projects and view all their fields
![]() Can create, edit, and delete Assignments
Can create, edit, and delete Assignments
![]() Can create, edit, and delete Contacts
Can create, edit, and delete Contacts
![]() Cannot create, edit, or delete Skills
Cannot create, edit, or delete Skills
![]() Cannot create, read, edit, or delete Timecards
Cannot create, read, edit, or delete Timecards
Test the Executive Role, Vice President Profile
Log in as your Executive VP user and verify that this user has full access to any of the records owned by the other users. This includes the ability to edit, delete, and change ownership and share the records.
Recall that the privileged access of this user stems from a combination of two Force.com security features:
1. Executive role—The Executive role is at the top of the role hierarchy. All Project and Resource records owned by users below this level are automatically shared with users belonging to the Executive role.
2. Vice President profile—The Vice President profile has full access to all the objects and fields used in the Services Manager.
Test Business Unit Collaboration
Say that the Central business unit’s Staffing Coordinator requests a specialized consultant for a high-profile project, but this consultant works in the West. Verify that the security model supports this scenario using the following steps:
1. Log in as the System Administrator or an Executive VP user.
2. Locate the record of a Contact working in the West. Verify this by clicking the Contact record’s Owner field and examining the value of that user’s role.
3. Click the Sharing button.
4. Click the Add button.
5. In the Search drop-down list, select Roles.
6. Select Role: Central and click the Add button. The Share With list now contains Role: Central. Keep the Access Level at Read Only because you do not want the Central users to be modifying this West-owned Contact.
7. Click the Save button.
The sharing detail screen for this Contact should look like Figure 3.17. Note the presence of both the sharing rule and the newly added manual share.
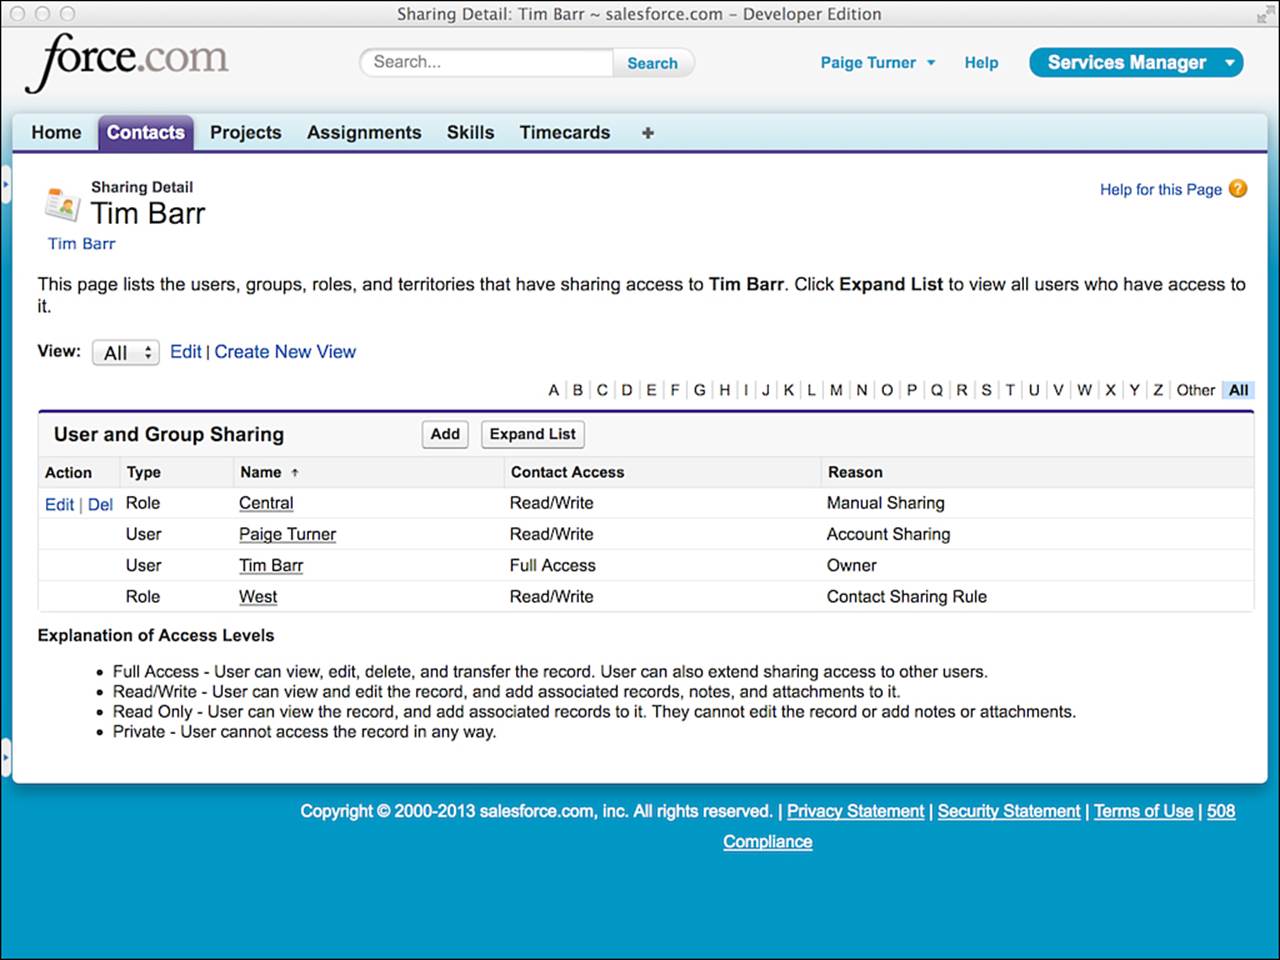
Figure 3.17 Sharing detail for a Contact record
Now that the record is shared with Central, it’s time to test it. Make sure you’re logged in as the System Administrator. Modify the Staffing Coordinator user so that it belongs to the Central role, and log in as that user. Staff the West consultant to a project by creating an Assignment, setting this consultant as the Contact. If you are able to do this, the manual share is working as intended.
Summary
This chapter introduced the data security features provided by the Force.com platform. These features can eliminate much of the effort required in traditional application development to build basic security infrastructure. Here are a few points to consider before moving on:
![]() Data can be protected at the object, field, and record level.
Data can be protected at the object, field, and record level.
![]() Profiles control access to objects and fields. A combination of object and field permissions plus page layouts determines the degree to which a field is accessible to users.
Profiles control access to objects and fields. A combination of object and field permissions plus page layouts determines the degree to which a field is accessible to users.
![]() Most records have a built-in concept of ownership. The record’s owner, plus organization-wide defaults and sharing reasons that override these defaults, determines nonowners’ rights to view and modify records.
Most records have a built-in concept of ownership. The record’s owner, plus organization-wide defaults and sharing reasons that override these defaults, determines nonowners’ rights to view and modify records.
All materials on the site are licensed Creative Commons Attribution-Sharealike 3.0 Unported CC BY-SA 3.0 & GNU Free Documentation License (GFDL)
If you are the copyright holder of any material contained on our site and intend to remove it, please contact our site administrator for approval.
© 2016-2026 All site design rights belong to S.Y.A.