Beginning Lua Programming (2007)
Chapter 12. Using Community Libraries
In Chapter 7, you learned how to modularize your Lua programs and why it's a good practice to do so. At the end of that chapter, you saw that you can write modules in languages like C as well as Lua. Throughout the remaining chapters of this book, the term library will refer to a collection of one or more routines that have been compiled from a lower-level language like C, C++ or Pascal. Depending on the context, a library may or may not have anything to do with Lua. A library that acts as an intermediary between Lua and another library is often called a binding.
This chapter extends the topic of libraries and how they interact with Lua. In it, you will become familiar with some libraries and bindings that have been made available to the open source community. The bindings cover a small cross-section of the many ways you can enhance Lua, including the following:
· Structuring binary data
· Constructing dynamic graphics
· Transferring files with various Internet protocols
· Interfacing with a relational database
Seeing how these libraries work with Lua should allow you to make use of a large number of other libraries. Plan on visiting the LuaForge site to see what's available. Chapter 13 will extend this topic to applications and libraries that you write yourself.
Library Overview
A library is a collection of routines and variables that can be linked to an executable program such as a web browser or the Lua interpreter. By providing a well-established interface to common functionality, the use of libraries helps to modularize and standardize an application. For example, the standard C runtime library used by many programs (not just those written in C) implements a wide range of application tasks, including dynamic memory management, file handling, and string operations.
Most libraries can be linked to an application either statically, in which portions of a library are directly embedded, or dynamically, in which portions of a library are shared concurrently among applications. An application that is statically linked to its libraries is operationally simpler, and consequently easier to deploy, than its dynamically linked counterpart. Such an application is also larger and needs to be relinked if it is to take advantage of updates to any of its libraries.
However, any system like Lua that uses modules loaded at runtime has its own problems with static libraries. The problem has to do with multiple copies of certain library functions linked to the main application and one or more of its loaded modules. In many cases, multiple copies of a statically linked function simply waste space, but with functions that share some internal state, like dynamic memory management functions, it is possible that synchronization problems will occur. For example, if memory is allocated using one copy of the C library and freed using another copy, it is inevitable that unpleasant memory bugs will result.
The solution is to make sure that only one copy of each library is used throughout an application and its loaded modules. This is best managed though libraries that are linked dynamically.
Dynamically Linked Libraries
Modern operating systems support libraries that can be linked to multiple running processes. On Unixlike systems, these are generally known as shared libraries; on Windows, these are usually referred to as dynamic-link libraries. A common abbreviation for dynamic-link library is DLL.
Resolving External References
The source code in a particular file typically contains references to functions and variables that are defined externally, such as in some other application file or in a library. It is one of the compiler's jobs to create object code that handles these references properly. For example, it sets up calls to external functions using the correct calling convention and arguments. One thing the compiler doesn't know, however, is where in memory these functions will actually reside when the application is executed. When source code is compiled into an object module, enough information to resolve these unknown addresses is provided by the compiler. It is the linker's job to knit the related object modules and any statically linked libraries together into a single application. While doing this, it resolves the addresses that it knows about. However, at this stage, the linker doesn't know the addresses of functions and variables that are part of dynamic-link libraries.
An application can be configured to have dynamic-link addresses resolved when it is loaded by the operating system. Alternatively, an application can explicitly assign dynamic-link addresses to variables using a system-provided function. The first approach is used by Lua for functions such assprintf from the C library. The second approach is used by Lua when loading modules dynamically.
Configuration Options
You can configure the Lua interpreter (or any program that embeds it) in one of two ways so that only one copy of a library is present when running. In the proceeding figures, the application is represented with a bold rectangle and each dynamic-link library with a thin rectangle. Figure 12-1shows a configuration in which Lua's core functionality is part of the application's main file. The application reaches into the module to run its initialization function (for example, luaopen_pack), represented here with the right-pointing arrow. The left pointing arrow indicates that the module reaches into the application to make use of Lua's C interface.

Figure 12-1
By default, Lua is built this way on Unix-like systems. The advantage is that Lua's executable program file (usually named lua) is never separated from its core functionality. Windows supports this scheme, but it has been reported that some software development kits don't implement it well.Figure 12-2 shows the typical configuration for Windows.

Figure 12-2
Here, Lua's core functionality is placed into its own dynamic-link library and shared by both the application and its modules.
Libraries Built from Source Code
If the operating system you use is mainstream, you'll find many libraries that work very well on it. Due to the large number of platforms that Lua runs on, libraries are typically provided in the form of source code. As you saw in Chapter 1, this approach enables you to compile applications and libraries that are tailor-made to your operating system and its particular configuration.
If you want to press ahead with Lua libraries, refer to Chapter 1 for instructions on setting up development tools for your operating system. Start by following the instructions in that chapter to build Lua itself. In general, doing this will be easier than compiling libraries and will verify that your tools are properly configured.
In the overviews in this chapter, it will be assumed that you're familiar with the basic tasks of compiling an application or library. This includes downloading source packages, extracting the contents of tarballs and zip files, invoking a compiler and linker, and copying files from one location to another. Chapter 1 covers these operations in enough detail to enable you to build the libraries discussed in this chapter.
Some of the commands shown in the proceeding sections require that your system environment have certain variables assigned. A helpful diagnostic to make sure these commands are doing what you expect them to is to precede them with echo. For example, on Unix-like systems, do this:
echo cp *.so $LUA_DIR/
Or, if you're on Windows, do this:
echo xcopy *.dll "%LUA_DIR%\*.*"
If the resulting output shows that the environment variable has been properly replaced, you can recall the command, remove the echo portion, and execute the revised command. Most shells will let you recall a command by pressing the up arrow key.
Building Libraries on Unix-Like Systems
In general, the makefiles used to build many libraries that interface with Lua will reflect a bias toward Unix-style systems. These makefile scripts often work with little or no fuss. Most source packages include text files named README and INSTALL that contain essential information. Modifications to makefiles should be minimal, although you may need to change pathnames such as the one that identifies the location of the Lua header files. It is prudent to save a copy of any script that you modify.
The proceeding instructions assume the following:
· The LUA_DIR environment variable specifies the location where you put Lua modules, whether they are Lua scripts or compiled libraries.
· The LUA_PATH environment variable has the value ?.lua;$LUA_DlR/?.lua.
· The LUA_CPATH environment variable has the value ?.so;$LUA_DlR/?.so.
Building Libraries on Windows
The instructions in this chapter assume you are using version 6 of Microsoft's Visual C++ software development kit. Other mainstream C compiler kits usually work well, too, but note the following caveats:
· Make sure the SDK you use can link properly with the standard Windows library MSVCRT.DLL that some prebuilt libraries use.
· You may need to adjust some of the compiler and linker commands shown here.
Unfortunately, the small TCC compiler that builds Lua so well is harder to use for compiling libraries because of limitations with this development kit's header file collection.
The proceeding instructions assume the following:
· Whatever SDK you use, it is assumed that its installation directory contains the standard bin, lib, and include subdirectories.
· The SDK_DIR environment variable specifies the location of your software development kit.
· The LIB environment variable has the value
%SDK_DlR%\lib;%SDK_DlR%\lib\usr.
· The INCLUDE environment variable has the value %SDK_DIR%\include;%SDK_DIR%\include\usr.
· The import library for the Lua DLL, lua5.l.lib, has been copied to %SDK_DIR%\lib\usr.
· The public header files for Lua—lua.h, luaconf.h, lualib.h, and lauxlib.h —have been copied to %SDK_DIR%\include\usr.
· The LUA_DIR environment variable specifies the location where you put Lua modules, whether they are Lua scripts or compiled libraries.
· The LUA_PATH environment variable has the value ?.lua;%LUA_DIR%\?.lua.
· The LUA_CPATH environment variable has the value ?.dll;%LUA_DIR%\?.dll.
· The UTIL_DIR environment variable specifies the location where you keep certain applications and dynamic-link libraries, including lua.exe, lua5-1.dll, and luac.exe.
· The search path includes %SDK_DIR%\bin and %UTIL_DIR%.
The commands you use to build a library in Windows include one for linking various object files. The link command contains a /base option followed by a hexadecimal number. This number specifies the location in the virtual address space of a process where the operating system will attempt to load the library when it is dynamically linked. By providing a unique address to each dynamic-link library that will be loaded together, Windows avoids address corrections when the library is loaded and paging inefficiencies when the program is executed. Several rebasing utilities are available that will optimally assign base addresses to dynamic-link libraries after they have been compiled. The approach shown in this book is to explicitly assign them when a library is built, selecting unique addresses at one megabyte boundaries. Avoid using base addresses that interfere with libraries that are larger than one megabyte.
Limits to Portability
Libraries are generally written to be as portable as possible, but sometimes there are system-imposed limits to this. For example, some operating systems do not support signals or file system links, so they consequently can't support a library dealing with these features. A case in point is the lack of support for POSIX libraries on older versions of Windows.
Additionally, some libraries, especially small ones or ones with limited distribution, may require some modifications to build properly on platforms other than the one on which they were developed. You'll learn some of the things you may need to watch for in the following parts of this chapter.
How Lua Interacts with Libraries
You're familiar with using functions like print, string.gsub and io.open. These and Lua's other functions are implemented in C and made available to Lua scripts by means of a program interface. To understand how your Lua script can call these functions, first you need to know how the functions make it into your script's environment (the registration process), and second what happens when a call to a C function is actually made.
The Variable Registration Process
When the standard Lua interpreter starts, it calls a function named lua_open that allocates and initializes a state structure (sometimes called an instance or universe). A pointer to this structure is passed as the first argument to all other functions in the Lua C interface (usually called the application program interface, or API). Everything that pertains to your Lua script has its basis in this structure. It serves as a liaison that allows a C program to manipulate a script's environment, to be called by a script, and to call into a script. In fact, one of the first things an application does after receiving a pointer to this structure is to modify the initial (and, in practice, often the only) environment by placing functions and other variables (such as print, string.rep and _VERSION) into it. This is done by calling functions with names like luaopen_base and luaopen_string. These in turn call lower-level API functions that manipulate tables and the Lua call stack.
In the context of libraries, there are a couple of things to note here:
· It doesn't matter if functions like luaopen_string are embedded statically into the application or are located in an external dynamic-link library, as long as only one copy is accessible during execution and they are properly exported so that Lua bindings can call them.
· There is no difference between the way the base and standard libraries are loaded and the way external modules written in C or some other low-level language are loaded. For example, you could compile a Lua interpreter that doesn't load the math library by default. The math library could be built (with no changes to the source code) as a dynamic-link library. In this way, Lua scripts could use the math library by simply including the following line:
require(“math”)
Conversely, if you have a module that you want to be loaded by default in your Lua interpreter, you could load it the same way the standard libraries are usually loaded. Keep in mind that these kinds of alterations to Lua's default configuration can diminish the portability of Lua scripts. Unless you are building Lua for a special application where the benefits of these changes outweigh the portability costs, it's probably best to stay with the standard configuration.
Calling a C Function from Lua
When you call a function from a Lua script, you don't need to know whether it is implemented in Lua or in a lower-level language behind the Lua API. In fact, the bytecode that Lua generates for a function call doesn't distinguish between these two kinds of function calls. For example, if you redefine string.format in Lua, calls to the new function appear identical to calls to the original function, right down to the generated bytecode.
The following Try It Out illustrates how you can use Lua to call a function written in a language like C.
Try It Out
Building a Diminutive Lua
In this exercise, you'll build an interpreter that includes Lua's core functionality, but excludes its standard libraries. The small size of the source code makes it a great introduction to embedding and extending Lua in your own applications. (These topics are discussed in more detail inChapter 13.)
The Lua distribution includes a file called min.c in the etc directory. This file provides an excellent introduction to the way you can embed Lua into your own application and how you can create functions in C that can be called from Lua. Do one of the following, depending on the type of system you're using.
The makefile entry for this program is clearly oriented toward Unix-like platforms. However, instructions are given here for both Unix-like system users and Windows users.
If you've got a Unix-like system and have already built Lua successfully, follow these steps:
1. Navigate to the distribution's etc directory and execute the following command:
make min
This will result in the following three lines:
gcc -02 -Wall -I../src min.c -L../src -llua -lm
echo 'prinf'Hello there!"' | ./a.out
Hello there!
2. Verify that this handles computations and errors correctly by typing the following commands shown in bold:
The # symbol is the shell prompt; it may appear differently on your system.
# echo 'print(1+2*3^4)' | ./a.out
163
# echo 'print(1++2)' | ./a.out
stdin:1: unexpected symbol near '+'
If you are using version 6 of the Visual C++ toolkit on the Windows platform, follow these steps:
1. Build min.exe by navigating to the etc subdirectory of the Lua source distribution and executing the following commands:
cl /MD /02 /W3 /c /DLUA_BUILD_AS_DLL min.c
link /0UT:min.exe min.obj lua5.1.lib
2. Test the new scaled-down Lua interpreter by typing in the following commands shown in bold:
The > symbol is the shell prompt; it may appear differently on your system.
> echo print('Hello there!') | min.exe
Hello there!
> echo print(1+2*3/4) | min.exe
2.5
> echo print(1++2) | min.exe
stdin:1: unexpected symbol near '+'
If you encounter any problems building this program, be sure that the assumptions listed previously for application development on your system have been met.
How It Works
Examine the source code of min.c. At the top, the C library stdio.h header file is included to provide a prototype for printf. After this, the main Lua lua.h header file is included. It contains all of the information (including prototypes and definitions) that the C compiler needs to interface with Lua's core C API. Header information for Lua's auxiliary helper library is pulled in by including lauxlib.h. Double quotes are used to tell the preprocessor to look for the Lua header files first in the C file's directory and, failing this, in the standard header locations. The angle brackets indicate that the specified header file will be found in a standard location.
Skip to the function main at the bottom of min.c. The interaction with the Lua core begins with the call to lua_open. This function returns a pointer to an initialized record of type lua_State. This state pointer is used in all subsequent calls to the Lua core. The call to lua_open is balanced with a call to lua_close at the end of the program.
The print function defined in the middle of min.c is made available to Lua scripts with a call to lua_register:
lua_register(L,"print",print);
The arguments for this function, in the specified order, are as follows:
· The Lua state pointer originally returned by lua_open
· The name of the global variable that will be assigned the function
· The C function itself
In this case, the C function has the same name as its Lua counterpart, but this is not required.
The line below this contains the following statement:
luaL_dofile(L,NULL)
This auxiliary function loads the specified file and runs it in a protected environment. Here, the NULL argument specifies the standard input, which is why in this exercise, you piped the Lua scripts to the minimal interpreter.
Turn your attention to the print function in the middle of min.c. Its prototype is as follows:
static int print(lua_State *L)
Every function that you write in C to be called from Lua will look like this. It will receive a single argument—the Lua state pointer—and return an integer.
Given such a minimal argument list, how can a function know what was passed to it from Lua? How can it return values to Lua? The answer in both cases has to do with the Lua state pointer. With it, you can manipulate the Lua stack frame to find the arguments with which the function was called and to place values that will be returned to the caller.
Lua uses its own call stack to transfer values to and from functions, and to hold values for safekeeping during nested function calls. When a call to a C function is made from Lua, each argument in turn, from left to right, is placed on the stack and the stack count is incremented. This combination of stack operations is known as a push. A pop undoes the effect of a push—the topmost stack element is copied and the stack count is decremented.
The purpose of print in this minimal interpreter is much like it is in the full-featured Lua interpreter: to output a tab-delimited sequence of its arguments in textual form. It does this by first finding out the number of arguments passed to it, like this:
int n=lua_gettop(L);
This stack is one-based, so each argument can be visited in turn with an indexed loop ranging from 1 to the number n. Functions with names like lua_isstring and lua_isboolean are used to classify the arguments.
Throughout the loop, each argument is printed in turn. After the first, each argument is preceded with a tab character. After the loop, a newline is emitted.
Finally, print returns the value 0. This is the quantity of values that is returned to the caller of the print function. In addition to querying the stack for values, you can remove, add, and move elements. Values are returned by placing them at the top of the Lua stack and returning their quantity.
The pack Binary Structuring Library
Lua handles text as deftly as it handles numbers. Because strings can contain any byte value (which makes Lua what is known as 8-bit clean), they can be safely used to hold binary data. You can use the string.byte and string.char functions to work with string elements at the byte level. However, many of the binary blocks that you work with comprise elements that are larger than a byte. Moreover, the way the bytes within these elements are ordered may not correspond to the way your computing hardware orders them. This is the so-called endian issue that has its roots in machine architecture. Sometimes binary blocks contain embedded strings. The length of a string might be fixed or variable, and if variable, the length might be placed as a byte or an integer value preceding the string, or the string might be terminated with a null byte. Some binary structures are relatively straightforward, while others may have optional or repeating components and subcomponents.
One of Lua's three authors, Luiz Henrique de Figueiredo, has written and released a number of libraries that extend Lua in many useful ways. One of these libraries, pack, enables you to read and write binary structures from within Lua scripts. To obtain the source code for this library, visit Luiz Henrique's homepage (www.tecgraf.puc-rio.br/~lhf/) and follow the link to his libraries. An informative page explaining how to build, install, and use his libraries is available. Download the package lpack.tar.gz for Lua 5 and place it in the location where you want to build it.
Many of the libraries in Luiz Henrique's collections are bindings that connect Lua to other libraries. For example, the PDF binding allows Lua to interface with PDFLib, a well-known library that is used to generate files in portable document format (PDF). The pack library, however, is a standalone module. All of its functionality is expressed in the lpack.c file.
Building the pack Library on Unix-type Systems
Follow these steps to build the pack module for Unix-type systems:
Skip ahead if you're working on the Windows platform.
1. Extract the tarball as follows:
tar xzvf lpack.tar.gz
2. Drop into the pack directory with the following command:
cd pack
3. Build the shared library with the following command:
This command assumes that you have built Lua and installed it using the makefile provided with Lua.
cc -ansi -pedantic -Wall -02 -o pack.so -shared lpack.c
The compiler toolkit will locate the necessary header files and libraries in a standard location.
Building and Installing the pack Library on Windows
In this section, you'll compile the pack module for the Windows platform. Some of the steps are on the long side. As elsewhere in this book, if you see ![]() symbol, it means that the line has been broken to fit on the page. However, when you type in a command that has been broken like this, you should join the fragments together on one line.
symbol, it means that the line has been broken to fit on the page. However, when you type in a command that has been broken like this, you should join the fragments together on one line.
Follow these steps:
1. Extract the tarball as follows:
7z x lpack.tar.gz
7z x lpack.tar
del lpack.tar
2. Drop into the pack directory with the following command:
cd pack
3. Build the shared library with the following commands:
cl /c /Wl /Zl /Zd /Yd /MD /DWIN32 lpack.c
link /dll /out:pack.dll /base:0x67400000 /machine:ix86 ![]()
/export:luaopen_pack lpack.obj lua5.1.lib msvcrt.lib
Testing the pack Library
After building a library, it's good policy to test it before installing it. You'll do that now, but there is one small wrinkle to explain. The pack library has been written so that it can be loaded directly without an intermediate .lua file. The commands used to build the pack library make use of this fact by making the base name of the shared library pack rather than lpack. Because of this, the loading script pack.lua that comes with the library is rendered unnecessary. To prevent it from being inadvertently loaded, rename this file from pack.lua to pack.lua.0 as follows:
1. On Unix-type systems, execute the following:
mv pack.lua pack.lua.0
Or on Windows, execute following:
ren pack.lua pack.lua.0
2. Override the value of package.cpath in the test command so that shared libraries are sought only in the current directory. On Unix-type systems, test the library as follows:
lua -e 'package.cpath="./?.so" require "pack"![]()
print(string.pack("b3", 76, 117, 97))'
On Windows, run this command:
lua -e "package.cpath='./?.dll' require 'pack' ![]()
print(string.pack('b3', 76, 117, 97))"
If the library has been successfully built, the output should be as follows:
Lua
Installing the pack Library
To make the pack library accessible to Lua scripts on your system, copy pack.so or pack.dll to the Lua library directory as specified by the environment variable LUA_DIR. On Unix-like systems, execute the following:
cp pack.so $LUA_DIR/
On Windows, use this:
xcopy pack.dll "%LUA_DIR%\*.*"
Using the pack Library
The pack library is made available to your Lua script with the following line:
require("pack")
This introduces the new functions string.pack and string.unpack.
If the symbol USE_GLOBALS was defined when you compiled lpack.c, the global functions bpack and bunpack will be introduced instead. In this case, make the appropriate replacements to the examples that follow.
The string.pack function lets you construct a structured record from one or more elements. Its usage is as follows:
string.pack(format string, one or more arguments)
This returns a binary record, in the form of a Lua string, based on the format specifier and the string and number arguments that you pass it.
The string.pack function examines each character in the format specifier and takes the appropriate action. These actions fall into three categories:
· If the character is >, <, or =, the numeric conversions are set to big-endian, little-endian, or native-endian mode respectively. Examples of big-endian machines, in which the most significant byte is lower in memory, are Motorola 68K, Power PC, and Sparc. Network protocols typically require numbers to be big-endian. An example of a little-endian machine is the ubiquitous Intel x86, in which the least significant byte is lower in memory. The = character sets native-endian mode. This character is used to reset the numeric conversion mode back to its default in which a Lua number is converted to a form that is compatible with the underlying hardware. The conversion mode set by any of these three characters persists until another one of them occurs in the format specifier. The default is native-endian mode.
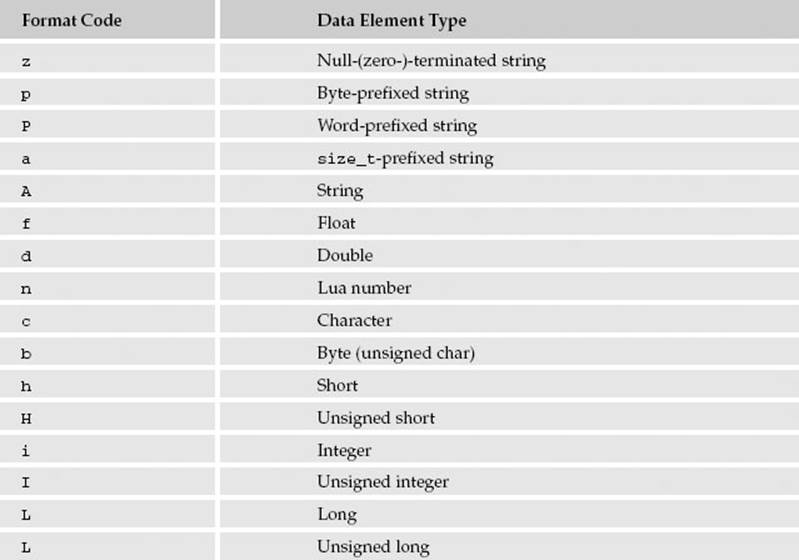
· If the character is A, a, b, c, d, f, h, H, i, I, l, L, n, p, P, or z, the next argument in the argument list is appended to the result string in a form that is specified by the letter. See the following table for the nature of the conversion for each of these characters. In general, the position of a letter in the format specifier corresponds to the position of the corresponding argument after the format specifier.
· If the character is a digit from 0 through 9, it and any digits after it are converted to an integer and applied as a repetition count for the preceding conversion code. For example, the H2b4 sequence” in a format specifier is equivalent to HHbbbb. A format specifier like this would be followed by six Lua numbers. The first two would be formatted as unsigned shorts and the remaining four would be formatted as bytes.
The string that string.pack returns is of little use within Lua. Generally, it is written to a file where it is to be used by some other application that understands its format. When you do write it to a file, make sure that the file is opened for writing in binary mode. This is neither required nor harmful on Unix-like systems, but it is imperative in Windows.
The function lets you deconstruct a structured binary record into one or more Lua strings and numbers. Its usage is as follows:
string.unpack(structure, format string, optional start position)
This returns the position just beyond the last byte read followed by the strings and numbers extracted from the specified structure.
Here is how the string.unpack function works. You first pass the binary structure (a Lua string from which primary elements are to be extracted) to it. Such a string will typically come from a file, and the usual caveats about reading the file in binary mode apply. Next, you include a format specifier string that, except for one small difference, is identical to the one used in string.pack. The difference is the meaning of an integer that follows the A code. Such a value indicates the length of the string to unpack rather than a repetition count. After this format specifier, you can then include a 1-based starting position. This is optional and is used to specify a position in the structure at which to start unpacking.
The string.unpack function returns a position followed by Lua strings and numbers that correspond positionally to codes in the format specifier. The first return value indicates the position just beyond the last byte read—the position at which the next call to string.unpack should start. This value turns out to be very useful in unpacking complex structures that contain repeating substructures. The remaining return values are structure elements that have been converted to Lua values.
Try It Out
Unpacking the Lua Icon Header
The Lua source distribution comes with an icon file that contains small images of the Lua logo. It is located in the etc subdirectory and is named lua.ico. The icon file format contains little-endian numbers of various sizes and a repeating substructure, so it is a useful file for exercising the capabilities of string.unpack.
1. Save the following code to a file named icotest.lua. This script uses the show module you created in Chapter 7. If you use the version of show that was revised in an exercise at the end of that chapter to include a namespace, you need to change ObjectShow to Object.Show.
require "pack"
require "show"
local function LclFileGet(FileStr)
local Str
local Hnd, ErrStr = io.open(FileStr, "rb")
if Hnd then
Str = Hnd:read("*all")
Hnd:close()
end
return Str, ErrStr
end
local FileStr = arg[1] or "../lua-5.1.1/etc/lua.ico"
local IcoStr, ErrStr = LclFileGet(FileStr)
if IcoStr then
local Ico = {}
local Pos
Pos, Ico.Reserved, Ico.Type, Ico.Count = string.unpack(IcoStr, "<H3")
Ico.List = {}
for J = 1, Ico.Count do
local Item = {}
Pos, Item.Width, Item.Height, Item.ColorCount, Item.Reserved,
Item.Planes, Item.BitCount, Item.Size, Item.Offset =
string.unpack(IcoStr, "<b4H2L2", Pos)
table.insert(Ico.List, Item)
end
Pos, Ico.HdrSize, Ico.Width, Ico.Height, Ico.Planes, Ico.Bitcount,
Ico.Compression, Ico.ImageSize, Ico.XPixelsPerM, Ico.YPixelsPerM,
Ico.ColorsUsed, Ico.ColorsImportant = string.unpack(IcoStr, "<L3H2L6", Pos)
ObjectShow(Ico, "Ico")
else
io.write(ErrStr, "\n")
end
2. As you can see by the require(“show”) line near the top, the script makes use of the show module introduced in Chapter 7. Invoke the script with the pathname of the icon file as an argument. For example, on a Unix-like system, execute the following command, adjusting the icon path if necessary:
lua icotest.lua /usr/local/src/lua-5.1.1/etc/lua.ico
This results in a display of the icon's header that looks like this:
["Ico"] table: 0x8070ee0 (n = 0)
["Bitcount"] 4
["ColorsImportant"] 0
["ColorsUsed"] 0
["Compression"] 0
["Count"] 2
["HdrSize"] 40
["Height"] 64
["ImageSize"] 512
["List"] table: 0x8070d88 (n = 2)
[1] table: 0x8070f48 (n = 0)
["BitCount"] 0
["ColorCount"] 16
["Height"] 32
["Offset"] 38
["Planes"] 0
["Reserved"] 0
["Size"] 744
["Width"] 32
[2] table: 0x8070f70 (n = 0)
["BitCount"] 0
["ColorCount"] 16
["Height"] 16
["Offset"] 782
["Planes"] 0
["Reserved"] 0
["Size"] 296
["Width"] 16
["Planes"] 1
["Reserved"] 0
["Type"] 1
["Width"] 32
["XPixelsPerM"] 0
["YPixelsPerM"] 0
How It Works
You can retrieve the details of the icon format from various sites on the Web. From a layout that identifies record elements and their data types and purpose, you have enough information to construct the format specifier and to give meaningful names to the result values. For example, the following line indicates that the first three elements are little-endian unsigned shorts:
Pos, Ico.Reserved, Ico.Type, Ico.Count = string.unpack(IcoStr, "<H3")
The first field is reserved, the second is an icon type code, and the third is the number of icons contained in the file. Notice that the results are assigned directly to associative table fields. This is generally a convenient way to keep the structure elements organized and accessible. Because there is no inherent order to associative table fields, however, any display of the contents will in general not match the order of the elements in the original data structure. Subsequent calls to string.unpack use the most recently returned position as the third argument. Doing so eliminates the need to manually count bytes in the structure.
If you use Lua to work with binary data of any kind, the pack library definitely belongs in your toolkit. Like Lua's regular expression functions that break apart plain text data, the use of string.pack and string.unpack becomes quite natural with a little familiarity.
The cURL File Transfer Library
The command line program cURL (a contraction of Client for URLs) is an extremely popular and portable tool for moving files around on the Internet using protocols such as http, https, ftp, and ftps. It hails from Sweden and is the work of hundreds of contributors, with Daniel Stenberg at the helm. One very nice feature of this program is that its core functionality is factored into a library that can be used by other applications as well. Additionally, the library has an interface that makes it conducive for use by scripting languages like Lua. Visit curl.haxx.se for more information on cURL.
Building libcurl
To use cURL from a Lua script, include the following line:
require("luacurl")
The luacurl module binds Lua to the main cURL library. This common arrangement involves a main library (libcurl.dll or libcurl.so) that provides functionality and a binding (which in this case is luacurl.dll or luacurl.so) that connects lua to the main library.
The cURL application and library are very popular, and it is quite possible that they are already installed on your system. You can check this by issuing the following command:
which curl
If curl is not found, you may be able to download it in the form of a package tailored to your particular platform. Doing so saves you the trouble of building cURL.
If you're going to build cURL, the first step is to make sure you've got a properly installed and up-to-date cURL library. One decision you'll need to make is whether you want support for file transfer protocols based on the secure sockets layer (SSL). Including SSL allows you to use the https and ftps protocols at the expense of more library dependencies and certificate management. The introduction in this chapter will not support SSL.
The libcurl library can use the OpenSSL, zlib, and OpenLDAP libraries if they are available. The cURL website can guide you to the websites where you can download these libraries if they are not already installed on your system.
Building libcurl on Unix-Like Systems
As is the case with many libraries, libcurl builds like a dream on Linux and friends. Obtain the tarball (curl-7.15.4.tar.gz is used here, but you'll want the most recent version if it has been updated) from curl.haxx.se/download.html and move it to the location where you want to build it. Then follow these steps:
1. Unpack it with the following command:
tar xzvf curl-7.15.4.tar.gz
Or if you are unpacking the bzipped package (with the extension tar.bz2 instead of tar.gz), unpack it as follows:
tar xjvf curl-7.15.4.tar.gz
2. Drop down into the newly created directory:
cd curl-7.15.4
3. Build the makefiles with the following command:
./configure
4. Make the entire package with the following command”
make
5. As root, install the package as follows:
make install
6. Test the build with the following command:
curl -V
This should result in a short version and features report.
Building libcurl on Windows
Follow these steps to compile the cURL library:
An alternative that saves you the trouble of building the library is to download a precompiled package.
1. After downloading the most recent version of the cURL source package from curl.haxx.se/ download.html, move it to the location where you will build it. If you are using the 7-zip utility, extract it as follows, adjusting the tarball name if you have a more recent version:
7z x curl-7.15.4.tar.gz
7z x curl-7.15.4.tar
The .tar.gz and .tar files may be deleted.
2. Navigate to the library source directory:
cd curl-7.15.4\lib
3. If you are using version 6 of Microsoft's Visual C++ software development kit, the makefile of interest is Makefile.vc6 located in the lib subdirectory. Some small adjustments may need to be made to this file on your system. Look for the definition of CFLAGS and add the following text to the end of the line:
/Dsocklen_t=int
4. Locate the section that begins with the line:
# release-dll
5. A few lines below this, on the line that begins with LNK, remove the occurrence of $(RTLIB). One line below this, on the line that begins with CC, add a space and $(RTLIB) following $(CCNODBG).
6. Execute the following to build the dynamic-link library:
nmake -f Makefile.vc6 CFG=release-dll
This generates the dynamic-link library libcurl.dll and its associated libcurl_imp.lib import library. The library should compile without warnings except for a few messages like this after the link step:
File not found - libcurl.lib
0 File(s) copied
These may be safely ignored.
7. Issue the following command to copy libcurl.dll to a standard location where it will be found by Windows when needed:
xcopy libcurl.dll "%UTIL_DIR%\*.*"
8. Use the following command to copy the import library to a standard development directory where the linker will be able to find it:
xcopy libcurl_imp.lib "%SDK_DIR%\lib\usr\*.*"
9. Use the following command to copy the cURL header to a standard development directory where the compiler can find them:
xcopy ..\include\curl\*.h "%SDK_DIR%\include\usr\curl\*.*"
10. Buildthe command line cURL program, curl.exe, as follows:
cd ..\src
nmake -f Makefile.vc6 CFG=release-dll
11. Test the build with the following command:
.\curl -V
This should result in the following output:
curl 7.15.4 (i386-pc-win32) libcurl/7.15.4
Protocols: tftp ftp telnet dict ldap http file
Features: Largefile
12. Copy curl.exe to your utility directory as follows:
xcopy curl.exe "%UTIL_DIR%\*.*"
Building luacurl
The luacurl library is a binding that joins Lua to libcurl. It was created by Alexander Marinov and is available at the LuaForge website at luaforge.net.
Download the latest version of the luacurl source package and place it in the location where you intend to build it. The example shown here is for version 1.1 of the binding, so you'll need to make the changes to its name in the following instructions if you are building an updated version.
Building luacurl on Unix-Like Systems
Follow these steps:
1. Extract the zip file in the location where you will build it:
unzip luacurl-1.1.zip
2. Drop into the luacurl directory:
cd luacurl-1.1
3. Compile the library was follows:
cc -ansi -pedantic -Wall -02 -o luacurl.so -shared luacurl.c -lcurl
4. Execute the following command to test whether the library can be loaded:
lua -e 'package.cpath="./?.so" require "luacurl" print(curl)
5. The curl table identifier should be reported. If it is, copy luacurl.so to your Lua library directory:
cp luacurl.so $LUA_DIR/
Building luacurl on Windows
Follow these steps:
1. Extract the zip file in the location where you will build it:
7z x luacurl-1.1.zip
2. Drop into the luacurl directory:
cd luacurl-1.1
3. Compile the library as follows. These instructions will work if you are using Microsoft Visual C++ 6.0. Join the line ending with ![]() with the fragment that follows it.
with the fragment that follows it.
cl /c /W1 /Zl /Zd /Yd /MD /DWIN32 luacurl.c
link /dll /base:0x68000000 /machine:ix86 /export:luaopen_luacurl ![]()
luacurl.obj lua5.1.lib msvcrt.lib libcurl_imp.lib
4. Execute the following command to make sure the library can be loaded:
lua -e "package.cpath='./?.dll' require 'luacurl' print(curl)"
5. The curl table identifier should be reported. If it is, copy luacurl.dll to your Lua library directory:
xcopy luacurl.dll "%LUA_DIR%\*.*"
Using luacurl
The luacurl binding provides file transfer capabilities to your Lua scripts by exposing functions from the cURL library. The documentation for luacurl is included in the source package as luacurl.html. Most of the library's functionality is encapsulated in the object that is returned from a call tocurl.new. With this object, various options are set using the setopt method. These options specify details of the request. The documentation for cURL itself, located in the docs subdirectory of the curl source tree, has more information about these options. When these options are set, the actual request is made using the perform method.
Try It Out
Retrieving a Web Document
In this exercise, you will use luacurl to programmatically request a resource on the Web.
1. Save the following listing as curltest.lua:
require "luacurl"
require "show"
local FileStr = "test"
local SiteStr = "http://www.lua.org/"
local function LclWrite(FileHnd, BufStr)
FileHnd:write(BufStr)
return string.len(BufStr)
end
local function LclProgress(UserPrm, DownTotal, DownNow, UpTotal, UpNow)
print(DownTotal, DownNow, UpTotal, UpNow)
end
local Hnd = curl.new()
if Hnd then
local FileHnd = io.open(FileStr, "wb")
if FileHnd then
Hnd:setopt(curl.0PT_WRITEFUNCTI0N, LclWrite)
Hnd:setopt(curl.0PT_WRITEDATA, FileHnd)
Hnd:setopt(curl.OPT_PROGRESSFUNCTION, LclProgress)
Hnd:setopt(curl.OPT_NOPROGRESS, false)
Hnd:setopt(curl.OPT_BUFFERSIZE, 5000)
Hnd:setopt(curl.0PT_HTTPHEADER, "Connection: Keep-Alive",
"Accept-Language: en-us")
Hnd:setopt(curl.OPT_URL, SiteStr)
Hnd:setopt(curl.OPT_CONNECTTIMEOUT, 15)
local R = { Hnd:perform() }
ObjectShow(R, "perform")
local Ok, ErrStr, RetCode = Hnd:perform()
if Ok then
io.write("Resource successfully saved as ", FileStr, "\n")
else
io.write("Error: ", ErrStr, " (", RetCode, ")\n")
end
FileHnd:close()
else
io.write("Error opening ", FileStr, "\n") "
end
Hnd:close()
else
io.write("Error instantiating curl object.\n")
end
2. Run the script with the Lua interpreter:
lua curltest.lua
This should result in the periodic printing of progress lines indicating the total size of the transfer and how much of it has been downloaded. Because the time needed to resolve the name of the web server is included in this progress, the first few notifications may indicate no transfer of content. The progress notification is done in a callback that could be used to drive a progress bar in an application.
How It Works
After requiring the luacurl module, some local variables are declared that identify the resource to be retrieved and the name with which to save it. Placing values like this near the top of a script can help make it a bit more convenient to modify later.
The LclWrite function is used as a callback, which is a function that is called by the library back into the script. In this case, it is called by luacurl when there is retrieved data to be written.
Beneath this is another callback. This one is called at intervals with arguments that indicate the number of bytes transferred and the number of bytes to be transferred.
This is followed by a call to curl.new, which is the function that creates a new transaction handle. If this succeeds, the returned value will not be nil and a new block is entered. Here, a file is opened in binary mode to save the resource to be downloaded. If the file is successfully opened, a number of options are set which modify how the request is to be made and handled. In this case, the two callbacks are registered. The curl.0PT_WRITEDATA option specifies the first parameter to the write callback. Here, the handle to the open file is passed. The cURL library merely passes this parameter back to the calling script without acting on it. This feature makes it easier to avoid global variables or the need to make a closure.
You can use the curl.0PT_PR0XY option to make a web request through a proxy server. It should receive a string of the form http://proxyserver:8888 where proxyserver and 8888 is the name and address of your proxy server and its port, respectively.
Even the address of the desired resource is conveyed to the cURL library by means of an option, in this case, curl.0PT_URL. There are dozens of other options, including timeout value, buffer size, and additional headers.
When all options have been set up, the actual request is made with a call to the perform method. This method returns true if the request succeeds, or false followed by a message and a result code if the request fails. Note that cURL considers the transaction a success if everything sent by the server is received. The returned page might, however, be a notification page indicating that the requested page could not be found or that some other error occurred at the server. You must examine the headers of the returned resource to determine that.
The cURL website, curl.haxx.se, contains a wealth of information on how the library can be used. In Chapter 16 you'll become familiar with LuaSocket, an alterative and more general package for network communication that was designed from the ground up to work with Lua.
The gd Graphics Library
The gd graphics library enables programs to noninteractively construct images in a number of formats. It has become a fixture on web servers around the world for dynamically generating web content at run-time, an example of which you will encounter in Chapter 15. The library was created by Thomas Boutell and is available from www.boutell.com/gd.
The notion of a graphics library that is entirely driven by program commands rather than through interactive use is a powerful one. As a programmer, you are accustomed to specifying in exact terms the steps needed to accomplish some goal. When applied to graphic generation, this skill can be leveraged to produce precise images repeatedly and automatically.
Building gd
The gd library makes use of a number of libraries for image formatting, font specification, and data compression. Meeting these library requirements on Unix-like systems is nothing out of the ordinary, but it can be a hardship on Windows. Consequently, the documentation for gd encourages developers on Windows to use the precompiled DLL and the related files it comes packaged with. That's the approach taken here.
Building gd on Unix-Like Systems
Before building gd, you should check to see if your system already has it. You can do this with the following command:
find / -name "libgd.*"
If you see lines like this, you've already got the gd library installed, and you can skip the building step:
/usr/local/lib/libgd.so.2.0.0
Even if the gd library is not present on your system, you may be able to install it as a package tailored for your platform.
Follow these steps to build gd:
1. Acquire gd-2.0.33.tar.gz from www.boutell.com/gd and place it in the location where you'll build it. Unpackage it with this:
tar xzvf gd-2.0.33.tar.gz
2. Drop into the newly-created directory like this:
cd gd-2.0.33
3. Take time to read the files README.TXT and INSTALL that are in this directory. They're short and explain library dependencies that may be relevant to your system. Assuming you've got the libraries you need, run the configure script as follows:
./configure
4. Compile and link the library by running this:
make
5. As root, install the library by running this:
make install
Installing gd on Windows
To install gd on Windows, follow these steps:
1. Download gdwin32.zip from www.boutell.com/gd and place it in the location where you'll unzip it. If you're using 7-zip, unpackage it as follows:
7z x gdwin32.zip
This extracts the zipfile's contents into a directory named gdwin32. Drop into that directory now by issuing this command:
cd gdwin32
The gd library is implemented in the bgd.dll file.
2. Copy that file to your utility directory like this:
xcopy bgd.dll "%UTIL_DIR%\*.*"
3. Assuming you're using version 6 of the Microsoft Visual C++ development kit, create and install the import library for this DLL as follows:
lib /machine:i386 /def:bgd.def
xcopy bgd.lib "%SDK_DIR%\lib\usr\*.*"
4. Install the header files as follows:
xcopy *.h "%SDK_DIR%\include\usr\*.*"
Building lua-gd
Alexandre Erwin Ittner has written a binding that allows the gd library to be used from Lua scripts. The following instructions use lua-gd-2.0.33r2.tar.gz. In the package name, the number to the left of the r corresponds to the gd library version, and the number to the right indicates the binding release version. If you are using an updated version, make sure it conforms to the gd library version you have installed.
Download the source tarball from lua-gd.luaforge.net and move it to location where you will build the library.
Building lua-gd on Unix-Like Systems
To build lua-gd on Unix-like systems, follow these steps:
1. Extract the package's contents as follows:
tar xzvf lua-gd-2.0.33r2.tar.gz
2. Change the working directory to this newly-created directory like this:
cd lua-gd-2.0.33r2
3. The luagd is built to match the functionality of the gd library. For example, if the gd library supports JPEG operations but not XPM operations, then the luagd library will provide bindings for JPEG but not XPM. In order to find out what libraries gd supports, run that library's configuration reporter, as follows:
gdlib-config --features --version
This should result in a report like this:
GD_JPEG GD_FREETYPE GD_PNG GD_GIF
2.0.33
4. Compile luagd as follows:
You may need to modify the symbol definitions to match the features of the gd library. Every feature shown in the previous output should be defined using the -D switch.
cc -ansi -pedantic -Wall -02 -DGD_JPEG -DGD_PNG -DGD_FREETYPE ![]()
-DGD_GIF -o gd.so -lgd -shared luagd.c
5. Test the new library as follows:
lua -e 'package.cpath="./?.so"' test_features.lua
A report like this should be generated:
Lua-GD version: lua-gd 2.0.33r2
Lua-GD features:
PNG support ..................... Enabled
GIF support ..................... Enabled
JPEG support .................... Enabled
XPM/XBM support ................. Disabled
FreeType support ................ Enabled
Fontconfig support .............. Disabled
6. Copy gd.so to the Lua module directory with this command:
cp gd.so $LUA_DIR/
Building lua-gd on Windows
To build lua-gd on Windows, follow these steps:
1. Extract the package's contents as follows:
7z x lua-gd-2.0.33r2.tar.gz
7z x lua-gd-2.0.33r2.tar
You can now delete these files.
2. Jump into the newly created directory as follows:
cd lua-gd-2.0.33r2
3. Compile the library as follows:
cl /c /W1 /Zl /Zd /Yd /MD /DWIN32 /DGD_PNG /DGD_GIF /DGD_FREETYPE ![]()
/DGD_JPEG /DGD_XPM /DGD_FONTCONFIG luagd.c
link /dll /out:gd.dll /base:0x67500000 /machine:ix86 ![]()
/export:luaopen_gd luagd.obj lua5.1.lib msvcrt.lib bgd.lib
4. Test the luagd library with the following command:
lua -e "package.cpath='./?.dll'" test_features.lua
The following report should be displayed:
Lua-GD version: lua-gd 2.0.33r2
Lua-GD features:
PNG support ..................... Enabled
GIF support ..................... Enabled
JPEG support .................... Enabled
XPM/XBM support ................. Enabled
FreeType support ................ Enabled
Fontconfig support .............. Enabled
5. If this test succeeds, install luagd as follows:
xcopy gd.dll "%LUA_DIR%\*.*"
Using lua-gd
The demos subdirectory of the luagd source package has an abundance of sample scripts that demonstrate the capabilities of the gd library and luagd binding. Most of the scripts end with a construction something like this:
im:png("out.png")
os.execute("display out.png")
That is, the gd library is called to create an image file, and then the system is called to display it. If this is appropriate for your system, no changes need to be made to the scripts. On Windows, however, you will likely need to modify the command submitted to os.execute. If you have a visual display program like IrfanView that is registered to display PNG files, then changing display to start is sufficient.
Now that you've installed the gd library and luagd module on your system, you'll use it in the following Try It Out to programmatically generate the Lua logo.
Try It Out
Generating the Lua Logo
The Lua logo would have delighted Euclid. The center of the moon element is positioned at the corner of the bounding square of the planet, and its radius is based on metrics of this bounding square. The instructions to construct the logo are adapted from a sample script in Luiz Henrique de Figueiredo's PDF binding, with a friendly tip of the hat to its author and to Alexandre Nakonechnyj, the designer of the Lua logo.
1. Copy the following contents to a script named lua-logo.lua:
require "gd"
local Lcl = {}
local function LclWriteCtr(Hnd, X, Y, Clr, FontStr, PtSize, TextStr)
local Ext = {gd.stringFT(nil, Clr, FontStr, PtSize, 0, 0, 0, TextStr)}
Hnd:stringFT(Clr, FontStr, PtSize, 0, X - (Ext[3] - Ext[1]) / 2,
Y + (Ext[4] - Ext[6]) / 2, TextStr)
end
Lcl.Size = 256
--Lcl.FontStr = "c:/windows/fonts/arial.ttf" -- Windows
Lcl.FontStr = "vera "—Linux and friends
Lcl.Scale = 1 - math.sqrt(2) / 2
Lcl.RadiusLg = Lcl.Size / 3
Lcl.DiameterLg = 2 * Lcl.RadiusLg
Lcl.RadiusSm = Lcl.Scale * Lcl.RadiusLg
Lcl.DiameterSm = 2 * Lcl.RadiusSm
Lcl.CenterX = (Lcl.Size - Lcl.RadiusSm / 2) / 2
Lcl.CenterY = (Lcl.Size + Lcl.RadiusSm / 2) / 2
Hnd = gd.createTrueColor(Lcl.Size, Lcl.Size)
Lcl.White = Hnd:colorAllocate(255, 255, 255)
Lcl.Blue = Hnd:colorAllocate(32, 32, 128)
Lcl.Gray = Hnd:colorAllocate(192, 192, 192)
Lcl.Black = Hnd:colorAllocate(0, 0, 0)
Hnd:setAntiAliased(Lcl.Blue)
Hnd:filledRectangle(0, 0, Lcl.Size - 1, Lcl.Size - 1, Lcl.White)
-- Planet
Hnd:filledArc(Lcl.CenterX, Lcl.CenterY, Lcl.DiameterLg, Lcl.DiameterLg,
0, 360, gd.ANTI_ALIASED, gd.ARC)
-- Moon
Hnd:filledArc(Lcl.CenterX + Lcl.RadiusLg, Lcl.CenterY - Lcl.RadiusLg,
Lcl.DiameterSm, Lcl.DiameterSm, 0, 360, gd.ANTI_ALIASED, gd.ARC)
-- Moonshadow
Hnd:setAntiAliased(Lcl.White)
Hnd:filledArc(Lcl.CenterX + Lcl.RadiusLg - Lcl.DiameterSm,
Lcl.CenterY - Lcl.RadiusLg + Lcl.DiameterSm,
Lcl.DiameterSm, Lcl.DiameterSm, 0, 360, gd.ANTI_ALIASED, gd.ARC)
-- Orbit
Hnd:setAntiAliased(Lcl.Gray)
Hnd:arc(Lcl.CenterX, Lcl.CenterY,
Lcl.DiameterLg + Lcl.DiameterSm, Lcl.DiameterLg + Lcl.DiameterSm, 0, 300,
gd.ANTI_ALIASED, gd.ARC)
Hnd:arc(Lcl.CenterX, Lcl.CenterY,
Lcl.DiameterLg + Lcl.DiameterSm, Lcl.DiameterLg + Lcl.DiameterSm, 330, 360,
gd.ANTI_ALIASED, gd.ARC)
-- Text
LclWriteCtr(Hnd, Lcl.CenterX, Lcl.CenterY + Lcl.RadiusSm, Lcl.White,
Lcl.FontStr, 48, "Lua")
Hnd:png("logo.png")
Hnd:gif("logo.gif")
Hnd:jpeg("logo.jpg", 90)
os.execute("start logo.png")
2. The font specification may need some adjustment on your system. On Windows, the full path of the Arial font is specified; on systems with Helvetica, use that instead. The gd library is generally successful in finding fonts without path information on Unix-type systems Also, depending on how you view PNG images, you may need to adjust the final line or remove it entirely.
3. To generate the logo, run the script with the Lua interpreter as follows:
lua lua-logo.lua
This will generate the file logo.png, which should look like Figure 12-3.

Figure 12-3
How It Works
Requiring the lua-gd module introduces the gd namespace to your script. A blank image is created by passing the width and height in pixels to the gd.createTrueColor function or the gd.createPalette function. These functions return an object that is used for subsequent image construction.
The origin for subsequent operations is the upper-left corner. X values increase to the right; Y values increase to the bottom. Units are measured in pixels. Arcs are drawn clockwise starting from the 3 o'clock position using degrees.
Colors need to be allocated using red, green and blue values ranging from 0 to 255. In the case of a palette image, the first color allocated becomes the background color. The stairstep appearance of nonvertical and nonhorizontal lines in the image can be mitigated by anti-aliasing, a technique which blends the boundary between different colors with appropriate shades. This feature is available only with truecolor images. To use it, call the setAntiAliased method with the color you will be using. Then, instead of specifying this color for a drawing operation, specifygd.ANTI_ALIASED.
The extent of a string is obtained using the same function used to render it on an image, namely the stringFT method. Instead of calling it as a method, however, it is called as an ordinary namespace function with the value nil instead of an image object. In this case, the coordinates of the bound rectangle are returned. Both the extent retrieval and text rendering are combined into a helper function named LclWriteCtr in this script.
The graphical drawing in this script is done with the filledRectangle, filledArc, and arc methods.
The gd library constructs the image using its own internal format. The actual file generation occurs with a call to png, pngEx, jpeg, gif, or gd2. These methods are not mutually exclusive—more than one can be called to generate copies in various destination formats. The last image type is the internal format of gd —it is not intended for use by other programs, but it can be useful when images will be subsequently processed by the gd library.
The gd library and lua-gd binding are well suited to many kinds of image production. In the next Try It Out, you use them to generate a graphical representation of a function's output.
Try It Out
Producing a Function Plot
In Chapter 11, a number of the math function summaries were accompanied by a graphical plot that was generated using gd and lua-gd. In this exercise, you specify a function that accepts a number and returns a correlated number. The Lua script creates and initializes a graphic object and uses it to plot the specified function over a range of values. The diagram is then saved as a PNG image.
1. With your text editor, create a new file with the following contents:
Depending on your platform, you may need to adjust the value of the FontStr field near the top of the script. In particular, you need to specify the full path of the directory in which fonts are stored.
require "gd"
local Cn = {
-- FontStr = "c:/windows/fonts/arial.ttf",
FontStr = "vera",
Height = 1024,
Margin = 12,
PointSize = 36,
}
local function ImgInit()
local Img = {}
Img.Height = Cn.Height
Img.Width = Img.Height * (1 + math.sqrt(5)) / 2
Img.Hnd = gd.createTrueColor(Img.Width, Img.Height)
Img.White = Img.Hnd:colorAllocate(255, 255, 255)
Img.Black = Img.Hnd:colorAllocate(0, 0, 0)
Img.Gray = Img.Hnd:colorAllocate(192, 192, 192)
local Ext = {gd.stringFT(nil, Img.White,
Cn.FontStr, Cn.PointSize, 0, Cn.Margin, Cn.Margin, "X")}
Img.ChHt = Ext[2] - Ext[8]
Img.Left = Cn.Margin
Img.Right = Img.Width - Img.Left - 1
Img.Top = Cn.Margin + Img.ChHt + Cn.Margin
Img.Bottom = Img.Height - Img.Left - 1
Img.Hnd:setAntiAliased(Img.Black)
Img.Hnd:filledRectangle(0, 0, Img.Width - 1, Img.Height - 1, Img.White)
Img.Hnd:rectangle(Img.Left, Img.Top, Img.Right, Img.Bottom, Img.Black)
return Img
end
-- Write antialiased text. XAlign is "left", "center", or "right" and qualifies
-- X. YAlign is "top", "middle", or "bottom" and qualifies Y.
local function LclWrite(Img, X, XAlign, Y, YAlign, Clr, TextStr)
local Lf, Bt, Rt, _, _, Tp = gd.stringFT(nil, Clr, Cn.FontStr,
Cn.PointSize, 0, 0, 0, TextStr)
local Wd = Rt - Lf
X = XAlign == "center" and X - Wd / 2 or XAlign == "right" and X - Wd or X
Y = YAlign == "middle" and Y + Img.ChHt / 2 or
YAlign == "top" and Y + Img.ChHt or Y
Img.Hnd:stringFT(Clr, Cn.FontStr, Cn.PointSize, 0, X, Y, TextStr)
end
-- Plot Y = Fnc(X) from X1 to X2. Disjoint is true if change in Y lifts pen.
local function Plot(Img, X1, Y1, X2, Y2, Fnc, TitleStr, Disjoint)
-- Mapping functions
-- X = Xm * H + Xb where H is horizontal pixel unit
-- H = Hm * X + Hb
-- Y = Fnc(X)
-- V = Vm * Y + Vb where V is vertical pixel unit
local Lift, X, Xm, Xb, V, Vm, Vb, Y, H, HPrv, VPrv, Ht, Wd,
Hm, Hb, YPrv, BadVal
Ht = Img.Bottom - Img.Top
Wd = Img.Right - Img.Left
Xm = (X2 - X1) / Wd
Xb = X2 - Xm * Img.Right
Hm = Wd / (X2 - X1)
Hb = Img.Left - Hm * X1
Vm = Ht / (Y1 - Y2)
Vb = Img.Bottom - Vm * Y1
LclWrite(Img, Cn.Margin, "left", Cn.Margin, "top", Img.Black, TitleStr)
Img.Hnd:setClip(Img.Left, Img.Top, Img.Right, Img.Bottom)
Img.Hnd:line(Img.Left + 1, Vb, Img.Right - 1, Vb, Img.Gray) -- Y = 0
Img.Hnd:line(Hb, Img.Top + 1, Hb, Img.Bottom - 1, Img.Gray) -- X = 0
BadVal = tostring(math.asin(2))
Lift = true
for H = Img.Left, Img.Right do
X = Xm * H + Xb
X = X < X1 and X1 or X > X2 and X2 or X -- Constrain sign at boundaries
Y = Fnc(X)
if tostring(Y) ~= BadVal then
if Disjoint and Y ~= YPrv then
Lift = true
end
YPrv = Y
V = Vm * Y + Vb
if Lift then
Lift = false
else
if Y >= Y1 and Y <= Y2 then
Img.Hnd:line(HPrv, VPrv, H, V, Img.Hnd.ANTI_ALIASED)
end
end
VPrv = V
HPrv = H
end
end
LclWrite(Img, Img.Left + Cn.Margin, "left", Img.Bottom - Cn.Margin, "bottom",
Img.Gray, "(" .. X1 .. ", " .. Y1 .. ")")
LclWrite(Img, Img.Right - Cn.Margin, "right", Img.Top + Cn.Margin, "top",
Img.Gray, "(" .. X2 .. ", " .. Y2 .. ")")
end
function Waveform(X)
return math.sin(3*X) * math.sin(X/3)
end
local Img = ImgInit()
Plot(Img, -12, -1.2, 12, 1.2, Waveform, "Waveform")
Img.Hnd:png("waveform.png")
2. Save this file as plot.lua.
3. Run the script as follows:
lua plot.lua
An image file in PNG format named waveform.png will be generated, which is shown in Figure 12-4.
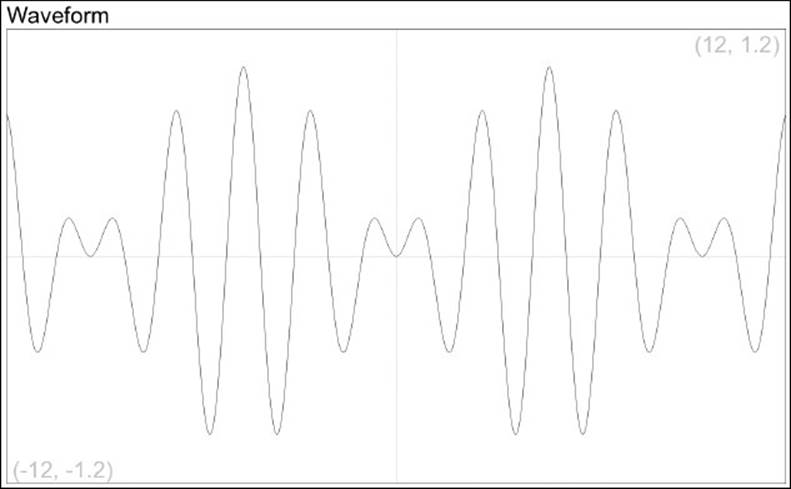
Figure 12-4
How It Works
The local table named Cn near the top of the script holds various constants that the script uses. Placing these values in one place makes it easier to make adjustments later if you need to modify the script's behavior.
The ImgInit function instantiates a graphic object using some of the specified constants. This is a general purpose routine that isn't bound to the plotting function called later in the script.
The LclWrite function is another general purpose routine. This one positions text in relation to a specified point. For example, you can render text so that it is centered horizontally on a point and positioned vertically just beneath the point.
The main function in the script is Plot. This function takes care of all the scaling and iterating needed to plot the function that you specify with an image object. As arguments, you specify the domain of the function (the allowable input values) and the range of the function (its output values). These are passed as endpoints. For example, in this script, the value for X1 indicates the low point at which the function is evaluated, and X2 indicates the high point. The main iteration begins with the following line:
for H = Img.Left, Img.Right do
This loop steps through the drawing region from the left side to the right. The block of the loop determines the input value that corresponds with the position and calls the passed-in function with this value. The value returned from the passed-in function is mapped to a vertical position, and a line is drawn to the previous point.
The Waveform function is a custom function that you pass to the Plot function for rendering. Experiment with different replacement functions, adjusting the values for X1, X2, Y1, and Y2 as needed.
The SQLite Database Library
There are Lua bindings to many relational databases systems. The one discussed here binds to SQLite, a fast and remarkably compact embeddable database engine that implements much of the SQL92 standard. SQLite is a trouble-free, dependable database system suitable for a wide spectrum of applications. It was created by D. Richard Hipp to fill a niche left vacant by large-scale relational database management systems, such as the need for serverless data management in which an application and its data can be moved together. Relational databases will be explored in more detail in Chapter 14.
Building SQLite3
The SQLite documentation, changelogs, source code comments, and rational version numbering all indicate an exemplary development environment. It is no surprise that SQLite compiles very nicely on a large number of platforms. The version covered here is 3.3.6—if you're using an updated version, make the appropriate changes to these instructions.
Building SQLite3 on Unix-Like Systems
SQLite is a very popular system, and there is a good chance that it is already installed on your Unix-like system or that a package has been prepared for your platform that will expedite its installation. To see if it is already installed, issue the following command:
which sqlite3
If this results in a line that looks like the following, then SQLite is installed and you can dispense with the following building procedure:
/usr/local/bin/sqlite3
If SQLite is not installed, or you have an outdated version of SQLite, you should check to see if a package is available for your platform.
If you are going to build SQLite, start by downloading sqlite-3.3.6.tar.gz from www.sqlite.org and placing it in your source code development directory. Then do the following:
1. Extract it with the following command:
tar xzvf sqlite-3.3.6.tar.gz
2. Make the newly created directory your working directory as follows:
cd sqlite-3.3.6
3. Configure the makefiles as follows:
./configure
4. Compile the library and database shell like this:
make
5. As root, install SQLite as follows:
make install
Building SQLite3 on Windows
Developers on the Windows platform are provided a zip file called sqlite-source-3_3_6.zip, which contains preconfigured source code that simplifies the process of building SQLite. Download this zip file and then follow these steps:
1. Create a directory for building the package as follows:
mkdir sqlite-3.3.6
cd sqlite-3.3.6
2. Extract the contents of the zip file into this directory, replacing path\to with the directory where the zip file is located, as follows:
7z x path\to\sqlite-source-3_3_6.zip
3. Some files can be effectively removed from the build. Do this by renaming them like this:
ren os_os2.c os_os2.c0
ren os_unix.c os_unix.c0
ren tclsqlite.c tclsqlite.c0
4. A small modification to the SQLite shell source file needs to be made to address Microsoft's naming conventions. Open shell.c with your editor and locate the following line:
extern int isatty();
5. Above this line, insert the following preprocessor definitions:
#define isatty _isatty
#define fileno _fileno
#define access _access
Unfortunately, these definitions can't be made on the compiler command line because they would interfere with definitions in the header files.
6. Compile the files as follows:
cl /c /nologo /I. /Zl /Zd /Yd /MD /W0 *.c
7. Exclude shell.obj from being pulled into the SQLite DLL by renaming it like this:
ren shell.obj shell.o
8. Create the DLL and its import library as follows:
link /DLL /OUT:sqlite3.dll /BASE:0x6 6000000 /DEF:sqlite3.def *.obj msvcrt.lib
9. Install these products and the SQLite header file as follows:
xcopy sqlite3.dll "%UTIL_DIR%\*.*"
xcopy sqlite3.lib "%SDK_DIR%\lib\usr\*.*"
xcopy sqlite3.h "%SDK_DIR%\include\usr\*.*"
10. Build the SQLite shell like this:
link shell.o /OUT:sqlite3.exe sqlite3.lib msvcrt.lib
The export definition file sqlite3.def has been problematic in recent releases of the SQLite source package for Windows. In version 3.3.7, you need to add the sqlite3_ enable_load_extensionand sqlite3_load_extension symbols to the file before the DLL can be linked properly. In version 3.3.8, the export definition file is missing completely.
11. Install the shell to your utility directory as follows:
xcopy sqlite3.exe "%UTIL_DIR%\*.*"
Building lua-sqlite3
Michael Roth has written a two-layer Lua binding to SQLite3. One layer, the backend, is written in C and serves as a thin binding to the SQLite API. This binding is thin in the sense that it doesn't add a lot of functionality to what is provided by SQLite. On top of this is the front-end layer. This is written in Lua and provides an interface that uses natural Lua expressions and capabilities. It permits query results to be read in a for loop, supports coroutines, and allows handlers to augment database operations.
Download lua-sqlite3-0.4.1.tar.bz2 from the LuaForge site to the location where you will build it.
Building lua-sqlite3 on Unix-Like Systems
Follow these steps:
1. Extract the source package as follows:
tar xjvf lua-sqlite3-0.4.1.tar.bz2
2. Drop into the source directory like this:
cd lua-sqlite3-0.4.1
3. Configure the build process as follows:
./configure
4. Compile the shared library as follows:
make
5. Open the file libluasqlite3-loader.lua with a text editor, and locate the line that begins with the following:
local shared_lib_path =
6. Modify the line so that it points to the directory where you place Lua shared libraries. For example, if this directory is /usr/local/lib/lua/5.1, then change the line to the following:
local shared_lib_path = "/usr/local/lib/lua/5.1"
7. Save the file and exit the editor.
8. Install the package as follows:
cp *.so $LUA_DIR/
cp libluasqlite3-loader.lua $LUA_DIR/
cp sqlite3.lua $LUA_DIR/
Building lua-sqlite3 on Windows
1. Extract the source package as follows:
7z x lua-sqlite3-0.4.1.tar.bz2
7z x lua-sqlite3-0.4.1.tar
del lua-sqlite3-0.4.1.tar
2. Make the source directory the default working directory like this:
cd lua-sqlite3-0.4.1
3. Compile the dynamic-link library as follows:
cl /c /Zl /Zd /Yd /MD /DWIN32 libluasqlite3.c
link /dll /base:0x67A00000 /machine:ix86 /export:luaopen_sqlite3 ![]()
libluasqlite3.obj lua5.1.lib msvcrt.lib sqlite3.lib
4. Create a new file with the following contents. If the directory in which you place your Lua bindings is different from that shown, make the appropriate change.
The value of LibStr is quoted using double brackets to ensure that the Microsoft-style path delimiters are treated literally.
local LibStr = [[c:\program files\lua\5.1\libluasqlite3.dll]]
load_libluasqlite3 = assert(package.loadlib(LibStr, "luaopen_sqlite3"))
5. Save this file as libluasqlite3-loader.lua.
6. Install the package as follows:
xcopy *.dll "%LUA_DIR%\*.*"
xcopy libluasqlite3-loader.lua "%LUA_DIR%\*.*"
xcopy sqlite3.lua "%LUA_DIR%\*.*"
Using lua-sqlite3
The documentation for lua-sqlite3 is named documentation.html and is located in the main directory of the source package. The documentation for SQLite, found at www.sqlite.org, is a very helpful source of information. Its pages on SQL language support, keywords, and pragmas provide a good introduction to using this database library. Pragmas are SQLite-specific commands that allow you to examine the details of a database and control the way SQLite operates.
If you are new to SQLite and lua-sqlite3, you'll find it helpful to initially include the show module that was developed in Chapter 7 in your scripts. The ObjectShow function can give you a thorough view of a function's return value. This can help you get your bearings when looking at query results.
Try It Out
Providing a Database Standard Deviation Function
The lua-sqlite3 library lets you write functions that can be called from within SQL commands, including an aggregate function that returns one value for an entire series of database rows. The way that an aggregate function is registered to lua-sqlite3 is elegant Lua. You register a function that itself returns two functions: a row-by-row function and a wrapup function. The advantage of this is that any variables that need to be shared between the two generated functions can do so by means of upvalues. This limits the scope of these variables to exactly the parties that need to access them.
As of version 3.3.6, SQLite doesn't have a built-in function to calculate the standard deviation of a series of numbers. This example fills that gap.
1. Copy the following script to a file named sqlstddev.lua:
require "sqlite3"
local Cn = {}
Cn.DbStr = "test.db"
Cn.InitStr = [[
BEGIN TRANSACTION;
DROP TABLE IF EXISTS T3;
CREATE TABLE T3(A);
INSERT INTO T3 VALUES (12);
INSERT INTO T3 VALUES (27);
INSERT INTO T3 VALUES (32);
INSERT INTO T3 VALUES (91);
INSERT INTO T3 VALUES (79);
INSERT INTO T3 VALUES (66);
INSERT INTO T3 VALUES (40);
INSERT INTO T3 VALUES ( 5);
INSERT INTO T3 VALUES (53);
END TRANSACTION;
]]
local function LclStdDev()
local Sum, List = 0, {}
local function LclStep(Val)
if type(Val) == "number" then
table.insert(List, Val)
Sum = Sum + Val
end
end
local function LclFinal(Count)
local StdDev = 0
Count = #List
if Count > 1 then
local SumDevSq = 0
local Mean = Sum / Count
for J, Val in ipairs(List) do
local Dev = Val - Mean
SumDevSq = SumDevSq + Dev * Dev
end
StdDev = math.sqrt(SumDevSq / (Count - 1))
end
return StdDev
end
return LclStep, LclFinal
end
local DbHnd, ErrStr = sqlite3.open(Cn.DbStr)
if DbHnd then
if DbHnd:exec(Cn.InitStr) then
DbHnd:set_aggregate("stddev", 1, LclStdDev)
print(DbHnd:first_cols("SELECT STDDEV(A) FROM T3"))
else
io.write("Error initializing ", Cn.DbStr, "\n")
end
DbHnd:close()
else
io.write("Error opening ", Cn.DbStr, ": ", tostring(ErrStr), "\n")
end
2. Run the script as follows:
lua sqlstddev.lua
This displays the following standard deviation:
29.546573405388
How It Works
This script initializes a table in the test.db database file. The file is created if it doesn't already exist. The T3 table is created, or effectively overwritten if it already exists, and is populated with a series of numbers.
The LclStdDev function is the factory function that produces the row-by-row function (LclStep) and the wrapup function (LclFinal). These two closures share a Lua table that holds each value submitted to LclStep. Also shared is a variable that holds the running sum of the values.
When all rows have been visited, the wrapup function is called. Here, the mean is calculated and, for each value in the series, the square of the deviation from this mean is summed. The variance is calculated by dividing this sum by the degrees of freedom in the sample. Finally, the square root of the variance, the standard deviation, is calculated and returned.
The set_aggregate method is used to register the aggregate function with the database instance. The first argument is the name of the function to be used case-insensitively in a query. The next argument specifies the number of arguments the row-by-row function is to be called with. The last argument is the factory function that generates the two closures. This function is not called with any arguments.
User functions can extend SQLite in many useful ways. If you find that you use certain extensions frequently, you can modularize them to promote their reusability and limit their scope. In this case, only a registration function that receives an open database handle need be exported from the module; everything else could be hidden inside it. The module would include the LclStdDev function and a line like the following, which registers the function with the specified database handle:
DbHnd:set_aggregate("stddev", 1, LclStdDev)
Summary
In this chapter, you learned about interfacing Lua with open source libraries. These libraries can be categorized as follows:
· Libraries that have nothing to do with Lua and everything to do with a particular functionality, such as the cURL, SQLite, and gd libraries.
· Libraries that provide a binding between Lua and another library, such as the luacurl, lua-sqlite3, and lua-gd libraries.
· Libraries that combine functionality with a Lua interface, such as the pack library.
You saw how a binding can expose a library's C API closely or, at the other end of the spectrum, through a layer of expressive Lua mechanisms such as iterators and objects.
By compiling and installing a small cross-section of libraries, you learned some techniques that can be applied to a large number of other open source libraries. Try your hand at the exercises that follow to stretch these techniques a bit.
If learning about how Lua can be extended with community libraries has stirred an interest in writing your own extensions in C, the next chapter will provide an introduction.
Exercises
1. The lua-sqlite3 binding lets you register a function, including one that can receive multiple arguments that can be called within a database query. Use this feature to provide a format function for SQLite results. Name the function format. It should receive a format string followed by a variable number of arguments to be formatted, very much like string.format (hint, hint). And just like string.format (hint, hint), it should return one value, the formatted string. An example of its usage is as follows:
print(DbHnd:first_cols("SELECT FORMAT('%05d %05d', 12, 34)"))
This should return the following:
00012 00034
The example shows FORMAT receiving fixed arguments, but ordinary database expressions are supported too. Note that the second argument to the set_function method can be -1 to indicate that the registered function can receive multiple arguments.
2. A PNG image file is made up of a signature string followed by a chunk, which is a variable length data structure that follows a relatively simple format. All numbers in a PNG file are big-endian. The signature is made up of the following eight bytes, shown here in decimal:
137, 80, 78, 71, 13, 10, 26, 10
The string.char function is useful for constructing strings from lists like this one.
Each chunk has the following layout:
Data length: unsigned long integer
Chunk header: four character string
Data: <Data length> bytes
CRC: unsigned long integer
CRC stands for Cyclic Redundancy Check, a standard hash checksum of data. In this case, it covers the chunk header and data, but not the data length field.
Chunks can come in any order, except that chunks with the IHDR and IEND headers are first and last respectively.
Write a script that steps through each chunk of a PNG file and prints a listing that shows the header, data length and CRC values. A chunk summary for the Lua logo that was constructed in the gd library discussion looks like this:
Header Length CRC
------ ------ ----------
IHDR 13 0xD3103F31
IDAT 4867 0xF5459E04
IEND 0 0xAE426082
Remember to open the PNG file in binary mode to prevent problems on Windows.
Because the data length field does not immediately precede the data field, you will need to make two calls to string.unpack for every chunk. The first will pick up the chunk's data length and header fields, and the second will pick up the CRC field. You don't need to read the data field for the purposes of this exercise.
All materials on the site are licensed Creative Commons Attribution-Sharealike 3.0 Unported CC BY-SA 3.0 & GNU Free Documentation License (GFDL)
If you are the copyright holder of any material contained on our site and intend to remove it, please contact our site administrator for approval.
© 2016-2026 All site design rights belong to S.Y.A.