Beginning Lua Programming (2007)
Chapter 17. Programming Games with Lua
Although Lua was not designed for video game programming in particular, it is quite popular with game programmers—in fact, they were the first programming subculture in which Lua became a household word.
This chapter is only a short introduction to a large topic. It talks about why and when you would want to use Lua in a game, but most of it is occupied with an example: a simple 2-D action game. In this chapter you learn how to do the following:
· Program with the SDL library
· Define sprites
· Make the sprites move, either automatically or in response to user input
· Detect collisions between sprites
Understanding Why and When to Use Lua
It is possible to write games entirely in Lua, but generally there's a division of labor between Lua and at least one other language. This is for two reasons:
· There are some things (graphics, sound, and interaction with non-character-oriented hardware) that Lua simply cannot do on its own.
· As languages of its type go, Lua is very fast, but some games, because of their real-time nature, have speed demands that can only be satisfied by less flexible languages like C and C++.
In parts of a game (or any program, really) where either of those reasons apply, you should use another language. In parts where they don't apply, you can use Lua and benefit from its strong points (that generally aren't shared by languages that beat it in the preceding two departments). The benefits of Lua include the following:
· Lightweight compilation: In Lua, there's a very short distance between changing a program and seeing the effects of the change. (By loading Lua code at run time, you can even make changes without restarting the program.)
· High-level nature: Lua includes as basic features things like tables, closures, and coroutines. These allow programs to be written at a higher level of abstraction.
· Ease of learning: Lua has a simple syntax and type system. It doesn't have a lot of rules that are there just to make things easier for the computer.
This division of labor means that things like graphics are generally written in some lower-level language, and things like game logic, AI for computer-controlled characters, level definitions, and saved-game files can be written in Lua, possibly by different team members than those working in the other language.
You can also use Lua for prototyping. Write as much of the game as possible in Lua, and then translate anything that's too slow (and can't be sufficiently optimized within Lua) to a lower-level language.
The rest of this chapter demonstrates a simple graphical game. So simple, in fact, that it barely deserves to be called a game (there is no scoring or way to win, and the gameplay gets old fast), but this simplicity is intentional—it allows you to examine some basic concepts in more detail than would be possible with a more amusing game.
Simple 2-D Action Game Using SDL
The example game will be entirely in Lua, except for the low-level graphics, which will use the Simple DirectMedia Layer (SDL) library. SDL is a cross-platform library that lets you do graphics, audio, joystick access, and other things that are useful in games. It is licensed under the GNU Lesser General Public License. More information, including documentation, is available at www.libsdl.org.
SDL is written in C, but you will be using a Lua binding to it in this chapter. Specifically, you'll be using the binding that comes with LuaCheia. LuaCheia (Portuguese for full moon) is a distribution of Lua that includes a bunch of add-on libraries, including SDL. (LuaCheia's SDL binding was done by Asko Kauppi, and an updated version is included in his Lua distribution LuaX, available at luaforge.net.)
LuaCheia uses Lua 5.0 rather than Lua 5.1, which is why math.mod is used instead of the % operator in the following examples.
Installing SDL and LuaCheia
For the SDL examples to work, you need to install LuaCheia. If you are using Windows, then your job is easy, because there's a Windows installer that installs everything you need.
On either platform, first follow these steps:
1. Go to LuaCheia's SourceForge.net page (sourceforge.net/projects/luacheia/). Click the Download LuaCheia link, select the file luacheia5-win32-5-0.1a5.exe (you may need to scroll down to see it), select a mirror site near you, save the file, and run it. This will install LuaCheia in the directoryC:\ProgramFiles\luacheia (or somewhere else if your Program Files directory is somewhere else).
2. In the following examples, you access LuaCheia typing luacheia5 at the shell. For this to work, add C:\Program Files\luacheia to your search path (as described in Chapter 1). Alternatively, you can run LuaCheia by typing the following:
C:\Program Files\luacheia\luacheia5"
Notice that you use quotes instead of just luacheia5.
If you are using a Windows system, you're done. If however, you're using a Unix-like operating system, then you have a bit more work ahead of you. Before installing anything, make sure that you have the following:
· gcc or another C compiler
· C++ compiler, such as g++ or c++ (because the LuaCheia SDL binding is actually done in C++)
This compiler may be gcc too, but gcc can be installed in a way that doesn't include its C++ components.
· The X Window System, including its header files (usually located at /usr/include/X11/)
You may be able to get the following examples to work without the X Window System, using the frame-buffer on Linux or native graphics on Mac OS X, but that's not covered here.
Follow these steps to install SDL:
1. Go to the SDL 1.2 section of www.libsdl.org (listed under the Download header) and download the file SDL-1.2.11.tar.gz to /usr/local/src/ or somewhere in your home directory. (If a more recent version is available, it will probably work too.)
2. Unpack the file and use cd to change to the directory that unpacking the file creates, as follows:
tar xzvf SDL-1.2.11.tar.gz
cd SDL-1.2.11
You can remove the .tar.gz file after it's unpacked.
3. Build the SDL makefiles as follows:
./configure
This will print a lot of data. Somewhere in the middle, you should see something like checking for X… libraries /usr/X11R6/lib, headers. If you instead see checking for X… no, then the X Window System (or its header files) could not be found.
4. Compile SDL as follows:
make
5. As root, install SDL like this:
make install
Now follow these steps to compile and install LuaCheia:
1. Go to LuaCheia's SourceForge.net page (sourceforge.net/projects/luacheia/). Click the Download LuaCheia link, select the file luacheia5-5.0.1a5.tar.gz, select a mirror site near you, and save the file to /usr/local/src/ or somewhere in your home directory.
2. Unpack the file and use cd to change to the directory that unpacking the file creates, as follows:
tar xzvf luacheia5-5.0.1a5.tar.gz
cd luacheia5-5.0.1a5
You can remove the .tar.gz file after it's unpacked.
3. Build LuaCheia's makefiles as follows:
./configure
This will print a lot of data, including something like this in the middle:
checking for sdl-config… /usr/local/bin/sdl-config
checking for SDL - version >= 1.2.5… yes
4. Compile LuaCheia as follows:
make
5. As root, install LuaCheia like this:
make install
Using SDL
Now that you have LuaCheia installed, it's time to use its binding to SDL in an example program. To make things a little more digestible, two versions of the example program will be given.
Try It Out
Writing Your First SDL Program
1. Save the following as movearound.lua:
-- Simple SDL graphics demo. Usage: luacheia5 test.lua
assert(cheia.load("SDL"))
assert(cheia.load("bit"))
-- Returns a "screen" (a canvas within a window upon which the
-- sprites will be drawn):
local function MakeScreen()
local ErrStr
local Screen = SDL.SDL_SetVideoMode(640, 480, 8,
bit.bor(SDL.SDL_SWSURFACE, SDL.SDL_ANYFORMAT))
if not Screen then
ErrStr = debug.traceback(SDL.SDL_GetError())
end
return Screen, ErrStr
end
-- Returns a sprite object; ImgName is the filename of a .bmp file:
local function MakeSprite(Screen, ImgName)
local Sprite, ErrStr
local Img = SDL.SDL_LoadBMP(ImgName)
if Img then
local Background = SDL.SDL_MapRGB(Screen.format, 0, 0, 0)
-- Current X and Y positions:
local CurX, CurY = 0, 0
-- Tables to be (re)used as rectangle arguments to
-- SDL_FillRect and SDL_BlitSurface:
local FillRect = {x = 0, y = 0, w = Img.w, h = Img.h}
local BlitRect = {x = 0, y = 0, w = Img.w, h = Img.h}
-- The sprite object:
Sprite = {}
-- Moves the sprite; X and Y default to the current position if
-- they are nil:
function Sprite:Move(X, Y)
local Succ, ErrStr
X, Y = math.floor(X or CurX), math.floor(Y or CurY)
-- Erase the sprite at its current position:
FillRect.x, FillRect.y = CurX, CurY
if SDL.SDL_FillRect(Screen, FillRect, Background) == 0 then
-- Write it to its new position:
BlitRect.x, BlitRect.y = X, Y
if SDL.SDL_BlitSurface(Img, nil, Screen, BlitRect) == 0 then
CurX, CurY = X, Y
Succ = true
else
Succ, ErrStr = false, debug.traceback(SDL.SDL_GetError())
end
else
Succ, ErrStr = false, debug.traceback(SDL.SDL_GetError())
end
return Succ, ErrStr
end
-- Give the sprite its initial position:
local Succ
Succ, ErrStr = Sprite:Move()
if not Succ then
Sprite = nil
end
else
ErrStr = debug.traceback(SDL.SDL_GetError())
end
return Sprite, ErrStr
end
-- Returns a function that gets pending events (all it returns in
-- this version is whether to quit):
local function MakeGetEvents()
-- An SDL_Event structure -- this is how SDL.SDL_PollEvent returns
-- any event it finds in the event queue:
local Event = SDL.SDL_Event_new()
-- Returns whether to quit:
return function()
local Quit = false
-- Consume pending events:
while not Quit and SDL.SDL_PollEvent(Event) == 1 do
-- Was the window closed?
if Event.type == SDL.SDL_QUIT then
Quit = true -- Break the loop.
-- Was "q" pressed?
elseif Event.type == SDL.SDL_KEYDOWN
and Event.key.keysym.sym == SDL.SDLK_q
then
Quit = true -- Break the loop.
end
end
return Quit
end
end
local function MainLoop(Screen, UserSprite)
local Succ, ErrStr = true
-- Put the sprite 32 pixels from the left side, and 0 pixels
-- from the top, of the screen (window):
Succ, ErrStr = UserSprite:Move(32, 0)
if Succ then
-- Update the entire screen:
SDL.SDL_UpdateRect(Screen, 0, 0, 0, 0)
local GetEvents = MakeGetEvents()
-- GetEvents returns true if the user quits; loop until that
-- happens:
while not GetEvents() do end
end
return Succ, ErrStr
end
local function Main()
local ErrStr
local InitRes = SDL.SDL_Init(SDL.SDL_INIT_VIDEO)
if InitRes == 0 then
local Screen
Screen, ErrStr = MakeScreen()
if Screen then
-- The window title is somewhat misleading in this initial
-- version:
SDL.SDL_WM_SetCaption("Move Around", "Move Around");
SDL.SDL_EnableKeyRepeat(SDL.SDL_DEFAULT_REPEAT_DELAY,
SDL.SDL_DEFAULT_REPEAT_INTERVAL)
-- Create a sprite (eventually to be controlled by the user):
local UserSprite
UserSprite, ErrStr = MakeSprite(Screen, "goodie.bmp")
if UserSprite then
io.write("In the new window, press 'q' (or close the",
" window) to quit.\n")
io.flush()
local _
_, ErrStr = MainLoop(Screen, UserSprite)
end
end
SDL.SDL_Quit()
else
ErrStr = debug.traceback(SDL.SDL_GetError())
end
return not ErrStr, ErrStr
end
local Succ, ErrStr = Main()
if not Succ then
io.stderr:write(ErrStr, "\n")
end
2. Use a drawing program (such as Microsoft Paint or The Gimp) to draw a picture roughly 32 pixels wide by 32 pixels tall, and save it in Windows bitmap format as goodie.bmp.
3. On Unix-like systems, start the X Window System if it's not already running.
4. Run movearound.lua as follows:
luacheia5 movearound.lua
As mentioned previously, if you're on Windows and you didn't add the LuaCheia directory to your search path, you'll need to type something like this instead:
"C:\Program Files\luacheia\luacheia5" movearound.lua
A new window will appear that looks like Figure 17-1. (For this example, the Lua logo was used to create goodie.bmp.)
5. Close the window with the mouse or by pressing q.
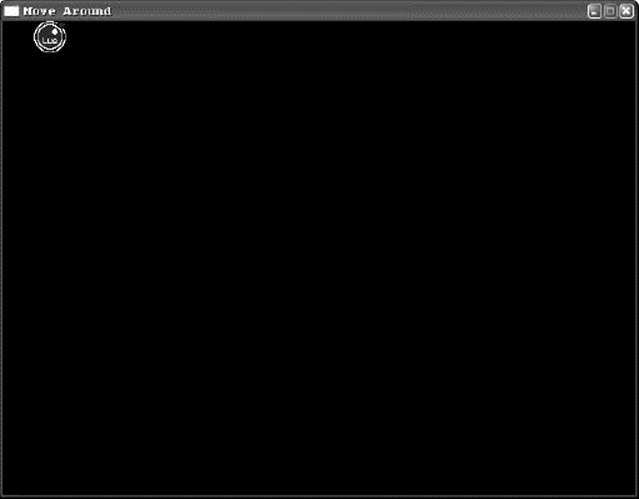
Figure 17-1
How It Works
This is a preliminary version of this example. Despite the name, nothing actually moves around yet.
assert(cheia.load("SDL")) loads the SDL library, creating a global table called SDL. This table contains the SDL library's functions and constants. SDL.SDL_Init is the Lua version of the C function SDL_Init, SDL.SDL_INIT_VIDEO is the Lua version of the C constant SDL_INIT_VIDEO, and so on. Before any of SDL's other functions can be used, SDL.SDL_Init is called as follows:
local function Main()
local ErrStr
local InitRes = SDL.SDL_Init(SDL.SDL_INIT_VIDEO)
The SDL.SDL_INIT_VIDEO argument tells SDL that you want to initialize the video (graphics) subsystem. (SDL also can do things with sound, joysticks, CD-ROMs, and more.) As documented on the SDL website, the SDL_Init C function returns 0 if it succeeds and -1 if it fails. From a Lua standpoint, it would be more idiomatic to return true on success and false on failure, but this binding is a relatively thin one that doesn't hide SDL's C-ish nature, so the check for success looks like this:
if InitRes == 0 then
The thinness of the binding also explains why the names are so verbose. The second SDL in SDL.SDL_Init is only there because all of the C functions (and constants) start with SDL_.
After SDL is initialized, the next step is to make a screen—a surface that you can draw on, which appears in its own window. This is accomplished with the following:
local function MakeScreen()
local ErrStr
local Screen = SDL.SDL_SetVideoMode(640, 480, 8,
bit.bor(SDL.SDL_SWSURFACE, SDL.SDL_ANYFORMAT))
For details about the SDL.SDL_SetVideoMode arguments, see the SDL website. For now, just note that this and some other functions take on-off switches (flags) for various behaviors, and that when multiple flags need to be given, they're combined with a bitwise or. A bitwise or means that two (or more) numbers are treated as binary and a logical or is performed on the ones columns, the twos columns, the fours columns, and so on, with 1 used for true and 0 for false. The bitwise or here (bit.bor) is supplied by the LuaCheia library loaded earlier in the file withcheia.load("bit"). (This particular set of flags, SDL.SDL_SWSURFACE and SDL.SDL_ANYFORMAT, actually could have been handled without a bitwise operation, but other sets of flags you may use cannot.)
A title is then given to the window, and key repeat is enabled (so that holding down a key is like rapidly tapping it over and over).
Next, a sprite is created. A sprite is basically a picture that can be moved around the screen as a unit. SDL has no built-in support for sprites, so they need to be implemented in terms of more basic operations. Specifically, MakeSprite returns a table with a Move method. When this method is called, the sprite's image (goodie.bmp) is erased from its current location on the screen and redrawn so that its upper-left corner is at the given coordinates.
The first coordinate, X, gives the horizontal component of the position, with 0 being the leftmost column of pixels on the screen. The second coordinate, Y, gives the vertical component of the position, with 0 being the topmost row of pixels.
The erasing is done with SDL.SDL_FillRect, whose second argument shows the position and size of the rectangle to be painted with the background color. This second argument is a rectangle, which in SDL means a table with x, y, w (width), and h (height) fields.
The redrawing is done with SDL.SDL_BlitSurface. (Blittingmeans copying pixels from one area of memory to another.) SDL.SDL_BlitSurface takes the following four arguments:
· The first argument is the source surface which in this example is the surface generated by reading goodie.bmp. (A surface is just a chunk of memory viewed as a rectangle of pixels.)
· The second argument is a rectangle showing what part of the source surface to copy. If this is nil , the whole source surface is copied.
· The third argument is the destination surface, which in this example is the screen.
· The fourth arument is a rectangle showing where in the destination surface to copy the source surface to (the w and h fields are ignored).
After the sprite is created, it's given to MainLoop, which moves it to 32, 0 (an arbitrary location chosen for demonstration purposes) and then makes sure that the sprite is visible by calling SDL.SDL_UpdateRect. Until SDL.SDL_UpdateRect is called, there's no guarantee that anything done bySDL.SDL_BlitSurface will be visible—it may be or it may not be. SDL.SDL_UpdateRect is your way of saying that you're done slinging bits around the screen and are ready for what you've done to become visible.
Apart from the surface to be updated, SDL.SDL_UpdateRect takes four arguments: the X position, Y position, width, and height of the rectangular section of the surface that is to be updated. As a special case, if it sees that all four of these arguments are 0 , it updates the whole surface (the screen in this case).
The GetEvents function uses SDL.SDL_PollEvent to check for new events. The only events it cares about are the window being closed and the Q key being pressed—if either of these happens, it returns true. If some other event or events occur, or if no events have occurred since the last timeSDL.SDL_ PollEvent was called, GetEvents returns false. Waiting for the user to quit is the job of the main loop of the program (which MainLoop is named after). This empty-bodied loop just calls GetEvents over and over until it returns true:
while not GetEvents() do end
Finally, SDL.SDL_Quit is called to shut down SDL, and if an error occurred anywhere along the way, its error message is printed.
The next version of movearound.lua will still have very low entertainment value as a game, but it will at least live up to its name —you'll be able to control the movement of a sprite. Meanwhile another sprite will be moving on its own.
Try It Out
Putting Sprites in Motion
1. Make the following changes to movearound.lua:
-- Simple SDL graphics demo. Usage: luacheia5 test.lua
assert(cheia.load("SDL"))
assert(cheia.load("bit"))
-- Returns a "screen" (a canvas within a window upon which the
-- sprites will be drawn):
local function MakeScreen()
local ErrStr
local Screen = SDL.SDL_SetVideoMode(640, 480, 8,
bit.bor(SDL.SDL_SWSURFACE, SDL.SDL_ANYFORMAT))
if not Screen then
ErrStr = debug.traceback(SDL.SDL_GetError())
end
return Screen, ErrStr
end
-- Returns N, or (if N is lower than Min), a number as much above Min
-- as N is below it, or (if N is higher than Max), a number as much
-- below Max as N is above it; also returns a second value telling
-- whether had to return a number other than N:
local function ComputeBounce(N, Min, Max)
local Fix = false
if N > Max then
N = Max - (N - Max)
Fix = true
elseif N < Min then
N = Min + (Min - N)
Fix = true
end
return N, Fix
end
-- Returns N, or Min if N is lower than Min, or Max, if N is higher
-- than Max:
local function Between(N, Min, Max)
return N > Max and Max or N < Min and Min or N
end
-- Returns 1, 0, or -1 depending on whether N is positive, zero, or
-- negative:
local function Sign(N)
if N > 0 then
N = 1
elseif N < 0 then
N = -1
end
return N
end
-- Returns a sprite object; ImgName is the filename of a .bmp file:
local function MakeSprite(Screen, ImgName)
local Sprite, ErrStr
local Img = SDL.SDL_LoadBMP(ImgName)
if Img then
local Background = SDL.SDL_MapRGB(Screen.format, 0, 0, 0)
-- Current X and Y positions:
local CurX, CurY = 0, 0
-- Current velocities along the X and Y axes, in pixels per tick
-- (minimum -1, maximum 1):
local VelX, VelY = 0, 0
-- Velocity increment (the smallest unit by which velocity along
-- a given axis changes):
local VelInc = 1 / 32
-- Tables to be (re)used as rectangle arguments to
-- SDL_FillRect and SDL_BlitSurface:
local FillRect = {x = 0, y = 0, w = Img.w, h = Img.h}
local BlitRect = {x = 0, y = 0, w = Img.w, h = Img.h}
-- The sprite object:
Sprite = {}
-- Moves the sprite; X and Y default to the current position if
-- they are nil:
function Sprite:Move(X, Y)
local Succ, ErrStr
X, Y = math.floor(X or CurX), math.floor(Y or CurY)
-- Erase the sprite at its current position:
FillRect.x, FillRect.y = CurX, CurY
if SDL.SDL_FillRect(Screen, FillRect, Background) == 0 then
-- Write it to its new position:
BlitRect.x, BlitRect.y = X, Y
if SDL.SDL_BlitSurface(Img, nil, Screen, BlitRect) == 0 then
CurX, CurY = X, Y
Succ = true
else
Succ, ErrStr = false, debug.traceback(SDL.SDL_GetError())
end
else
Succ, ErrStr = false, debug.traceback(SDL.SDL_GetError())
end
return Succ, ErrStr
end
-- Call this once for every tick:
function Sprite:Tick(Ticks)
local Succ, ErrStr = true
local NewX
if VelX ~= 0 and math.mod(Ticks, 1 / VelX) < 1 then
NewX = CurX + Sign(VelX)
-- Make sure it doesn't go off the edges:
local Fix
NewX, Fix = ComputeBounce(NewX, 0,
self:ScreenWidth() - self:Width())
if Fix then VelX = -VelX end
end
local NewY
if VelY ~= 0 and math.mod(Ticks, 1 / VelY) < 1 then
NewY = CurY + Sign(VelY)
-- Make sure it doesn't go off the edges:
local Fix
NewY, Fix = ComputeBounce(NewY, 0,
self:ScreenHeight() - self:Height())
if Fix then VelY = -VelY end
end
if NewX or NewY then
Succ, ErrStr = self:Move(NewX, NewY)
end
return Succ, ErrStr
end
-- Accelerates the sprite along the X axis (negative values of
-- Accel accelerate to the left):
function Sprite:AccelX(Accel)
if Accel ~= 0 then
VelX = Between(VelX + Accel * VelInc, -1, 1)
end
end
-- Accelerates the sprite along the Y axis (negative values of
-- Accel accelerate upward):
function Sprite:AccelY(Accel)
if Accel ~= 0 then
VelY = Between(VelY + Accel * VelInc, -1, 1)
end
end
-- Stops the sprite cold:
function Sprite:Stop()
VelX, VelY = 0, 0
end
-- More methods:
function Sprite:X() return CurX end
function Sprite:Y() return CurY end
function Sprite:Width() return Img.w end
function Sprite:Height() return Img.h end
function Sprite:ScreenWidth() return Screen.w end
function Sprite:ScreenHeight() return Screen.h end
-- Give the sprite its initial position:
local Succ
Succ, ErrStr = Sprite:Move()
if not Succ then
Sprite = nil
end
else
ErrStr = debug.traceback(SDL.SDL_GetError())
end
return Sprite, ErrStr
end
-- Returns a function that gets pending events:
local function MakeGetEvents()
-- An SDL_Event structure -- this is how SDL.SDL_PollEvent returns
-- any event it finds in the event queue:
local Event = SDL.SDL_Event_new()
-- Returns how much to accelerate to the right, how much to
-- accelerate downward, and whether to stop or quit:
return function()
local AccelX, AccelY, OtherEvent = 0, 0
-- Consume pending events:
while not OtherEvent and SDL.SDL_PollEvent(Event) == 1 do
-- Was the window closed?
if Event.type == SDL.SDL_QUIT then
OtherEvent = "Quit" -- Break the loop.
elseif Event.type == SDL.SDL_KEYDOWN then
local Key = Event.key.keysym.sym
-- Was "q" pressed?
if Key == SDL.SDLK_q then
OtherEvent = "Quit" -- Break the loop.
-- If an arrow key was pressed, accelerate the sprite in that
-- direction:
elseif Key == SDL.SDLK_LEFT then
AccelX = AccelX - 1
elseif Key == SDL.SDLK_RIGHT then
AccelX = AccelX + 1
elseif Key == SDL.SDLK_UP then
AccelY = AccelY - 1
elseif Key == SDL.SDLK_DOWN then
AccelY = AccelY + 1
elseif Key == SDL.SDLK_SPACE then
OtherEvent = "Stop" -- Break the loop.
else
-- Some other key; ignore it.
end
end
end
return AccelX, AccelY, OtherEvent
end
end
-- Moves the user sprite and automatic sprite the appropriate
-- distance for the given amount of ticks:
local function Step(UserSprite, AutoSprite, Ticks)
local Succ, ErrStr = true
-- Move the sprites:
Succ, ErrStr = UserSprite:Tick(Ticks)
if Succ then
Succ, ErrStr = AutoSprite:Tick(Ticks)
end
return Succ, ErrStr
end
-- Are Sprite1 and Sprite2 overlapping?
local function Overlap(Sprite1, Sprite2)
local Ret = false
-- This views the two sprites as rectangle-shaped, even if they
-- look like other shapes.
local DiffX = math.abs(Sprite1:X() - Sprite2:X())
local Width = (Sprite1:Width() + Sprite2:Width()) / 2
if DiffX < Width then
local DiffY = math.abs(Sprite1:Y() - Sprite2:Y())
local Height = (Sprite1:Height() + Sprite2:Height()) / 2
if DiffY < Height then
Ret = true
end
end
return Ret
end
local function MainLoop(Screen, UserSprite, AutoSprite)
local Succ, ErrStr = true
local GetEvents = MakeGetEvents()
-- Loop until the user quits (or an error occurs):
local PrevTicks = SDL.SDL_GetTicks();
local OtherEvent
while Succ and OtherEvent ~= "Quit" do
-- Get any and all pending events:
local AccelX, AccelY
AccelX, AccelY, OtherEvent = GetEvents()
-- Update the sprite's velocity:
UserSprite:AccelX(AccelX)
UserSprite:AccelY(AccelY)
-- Get the current number of elapsed ticks -- if it's the same as
-- the previous number, keep checking until it's different:
local Ticks = SDL.SDL_GetTicks();
while Ticks == PrevTicks do
Ticks = SDL.SDL_GetTicks();
end
-- Call Step once for each tick that has happened since
-- PrevTicks:
for I = PrevTicks + 1, Ticks do
Succ, ErrStr = Step(UserSprite, AutoSprite, I)
if not Succ then break end -- BREAK ON ERROR.
end
PrevTicks = Ticks
if OtherEvent == "Stop" then
-- Screeching halt:
UserSprite:Stop()
end
-- Are the two sprites overlapping?
if Overlap(UserSprite, AutoSprite) then
io.write("GAME OVER (collision)\n")
break -- EXIT THE MAIN LOOP.
end
-- Update the entire screen:
SDL.SDL_UpdateRect(Screen, 0, 0, 0, 0)
end
return Succ, ErrStr
end
local function Main()
local ErrStr
local InitRes = SDL.SDL_Init(SDL.SDL_INIT_VIDEO)
if InitRes == 0 then
local Screen
Screen, ErrStr = MakeScreen()
if Screen then
-- Set the window title; enable key repeat:
SDL.SDL_WM_SetCaption("Move Around", "Move Around");
SDL.SDL_EnableKeyRepeat(SDL.SDL_DEFAULT_REPEAT_DELAY,
SDL.SDL_DEFAULT_REPEAT_INTERVAL)
-- Create a sprite to be controlled by the user and another to
-- be controlled by the program:
local UserSprite
UserSprite, ErrStr = MakeSprite(Screen, "goodie.bmp")
if UserSprite then
local AutoSprite
AutoSprite, ErrStr = MakeSprite(Screen, "baddie.bmp")
if AutoSprite then
-- Give them their initial positions and velocities:
local Succ
local ScreenWidth, ScreenHeight = Screen.w, Screen.h
Succ, ErrStr = UserSprite:Move(
ScreenWidth / 3 - UserSprite:Width() / 2,
ScreenHeight / 2 - UserSprite:Height() / 2)
if Succ then
Succ, ErrStr = AutoSprite:Move(
ScreenWidth * (2 / 3) - AutoSprite:Width() / 2,
ScreenHeight / 2 - AutoSprite:Height() / 2)
if Succ then
-- Go in one of the four diagonal directions depending
-- on what time it is:
local Time = math.mod(os.time(), 4) + 1
local A = 5 -- AutoSprite initial acceleration.
local AccelX = ({A, A, -A, -A})[Time]
local AccelY = ({A, -A, -A, A})[Time]
AutoSprite:AccelX(AccelX)
AutoSprite:AccelY(AccelY)
io.write([[
In the new window:
- press the arrow keys to change speed
- press space to stop moving
- press 'q' (or close the window) to quit.
]])
io.flush()
Succ, ErrStr = MainLoop(Screen, UserSprite, AutoSprite)
end
end
end
end
end
SDL.SDL_Quit()
else
ErrStr = debug.traceback(SDL.SDL_GetError())
end
return not ErrStr, ErrStr
end
local Succ, ErrStr = Main()
if not Succ then
io.stderr:write(ErrStr, "\n")
end
2. Draw another picture roughly 32 pixels wide by 32 pixels tall, and save it in Windows bitmap format as baddie.bmp.
3. Run movearound.lua as follows:
luacheia5 movearound.lua
You'll see something like Figure 17-2. The baddie.bmp sprite is moving. The goodie.bmp sprite is standing still, and pressing an arrow key makes it move in the arrow key's direction. Pressing the key repeatedly makes it go faster and faster in that direction. Pressing the space bar makes it come to a complete stop. Both sprites bounce when they hit the edges of the screen. The program ends when baddie.bmp touches goodie.bmp.
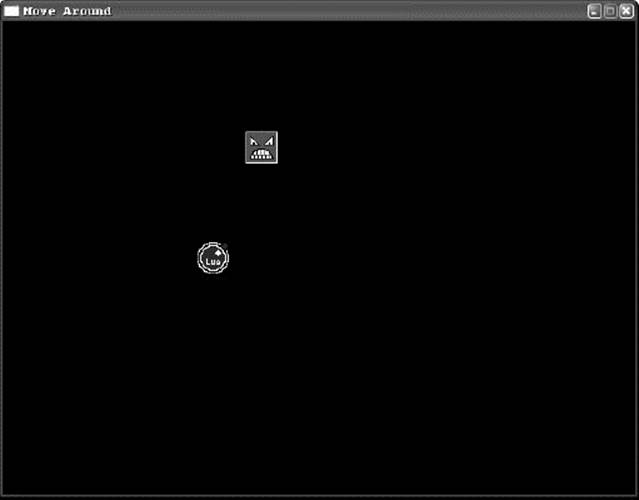
Figure 17-2
How It Works
This version creates two sprites: UserSprite (controlled by the user) and AutoSprite (controlled by the program). They are initially placed respectively to the left and to the right of the screen's center. Then AutoSprite is accelerated (given a push) in a randomly chosen diagonal direction. (The direction is chosen based on what time it is—on Unix-like systems and Windows, os.time returns a number of seconds from a particular date in the past.) This acceleration is done with AutoSprite's AccelX and AccelY methods as follows:
-- Go in one of the four diagonal directions depending
-- on what time it is:
local Time = math.mod(os.time(), 4) + 1
local A = 5 -- AutoSprite initial acceleration.
local AccelX = ({A, A, -A, -A})[Time]
local AccelY = ({A, -A, -A, A})[Time]
AutoSprite:AccelX(AccelX)
AutoSprite:AccelY(AccelY)
The AccelX method adds the product of its argument and VelInc (1/32) to the sprite's X velocity (VelX). Velocity is speed and direction. X velocity is speed along the X axis, but it's negative if the direction is to the left. So, if AccelX is called with an argument of 1, then / %2 is added to the sprite's X velocity (which is initialized to 0). AccelX makes sure, though, that the sprite's X velocity never gets lower than -1 or higher than 1 , like this:
-- Accelerates the sprite along the X axis (negative values of
-- Accel accelerate to the left):
function Sprite:AccelX(Accel)
if Accel ~= 0 then
VelX = Between(VelX + Accel * VelInc, -1, 1)
end
end
AccelY does the same thing for the sprite's Y velocity.
MainLoop and the main loop it contains are now more complex. Again, the loop (still a while loop) is based on repeatedly calling GetEvents, but the new GetEvents returns three values. The first two are based on how many times the arrow keys were pressed since the last call to GetEvents. They tell how much UserSprite needs to be accelerated along (respectively) the X and Y axes. The third return value tells whether an event other than an arrow keypress occurred. This third value can be nil, or "Quit" (if the user pressed q or closed the window), or "Stop" (if the user pressed the space bar).
The main loop keeps track of how many ticks (milliseconds in SDL) have taken place since its previous iteration. After accelerating UserSprite appropriately, it calls Step once for each elapsed tick:
-- Call Step once for each tick that has happened since
-- PrevTicks:
for I = PrevTicks + 1, Ticks do
Succ, ErrStr = Step(UserSprite, AutoSprite, I)
if not Succ then break end -- BREAK ON ERROR.
end
PrevTicks = Ticks
Step calls each sprite's Tick method with the current tick as an argument.
Actually, it may not be the current tick, but the for I loop lets the Tick method think that it's being called every time a tick occurs, even when several ticks go by in between iterations of the main loop.
In this program, velocity is expressed as the number of pixels to move per tick. Both the X and Y components of velocity have a minimum of -1 (one pixel per tick to the left or upwards) and a maximum of 1 (one pixel per tick to the right or downwards). These values are often fractional, so the Tick method needs to decide on every tick whether or not to move its sprite one pixel. For example, if VelX is 0.25, then Tick needs to move the sprite one pixel to the right on every fourth tick. It does this with modulo arithmetic (using the Lua 5.0 function math.mod) as follows:
-- Call this once for every tick:
function Sprite:Tick(Ticks)
local Succ, ErrStr = true
local NewX
if VelX ~= 0 and math.mod(Ticks, 1 / VelX) < 1 then
"<1" is used instead of "== 0" to account for the fact that 1 / VelX may not be an integer.
After a new X (always one more or one less than the current X) has been computed, the walls(the edges of the screen) need to be accounted for. If the new X puts part of the sprite offscreen, then it (the new X) is recomputed so that the sprite is fully onscreen, as though it had bounced off the screen's edge, and the sprite's X direction is reversed:
NewX = CurX + Sign(VelX)
-- Make sure it doesn't go off the edges:
local Fix
NewX, Fix = ComputeBounce(NewX, 0,
self:ScreenWidth() - self:Width())
if Fix then VelX = -VelX end
Notice that the sprite's width has to be taken into account, because the sprite's X position is actually the position of its left edge.
After doing the same thing for the Y velocity and position, the sprite is moved if necessary:
if NewX or NewY then
Succ, ErrStr = self:Move(NewX, NewY)
end
After Step has called each sprite's Tick method, it returns control to MainLoop, which checks whether a "Stop" event has occurred, and responds appropriately:
if OtherEvent == "Stop" then
-- Screeching halt:
UserSprite:Stop()
end
Then the main loop (and after that, the whole program) is exited if AutoSprite and UserSprite have collided:
-- Are the two sprites overlapping?
if Overlap(UserSprite, AutoSprite) then
io.write("GAME OVER (collision)\n")
break -- EXIT THE MAIN LOOP.
end
If the loop hasn't been exited, then the screen is updated with SDL.SDL_UpdateRect and control goes back to the top of the loop. (The loop's while expression is responsible for ending things if a "Quit" event occurs.)
There are a number of ways you could make this game more interesting. Among other things, you could add the following:
· Some sort of goal. This could be as simple as a literal goal—an area of the screen that must be reached, possibly by navigating around fixed obstacles, to win the game. Scoring could be based on how quickly the goal is reached.
· More computer-controlled sprites, perhaps with more complex movement patterns. These could all be kept in a table, rather than each having its own variable (as AutoSprite does now).
· Animation (such as making AutoSprite's eyes blink).
· Better collision detection so that sprites are not always considered to be shaped like rectangles.
· That old video game standby, shooting things.
You could also improve the interface by making it mouse- or joystick-based, putting it entirely in one window (instead of using io.write for messages), and allowing the game to be restarted from the same window.
If any of these changes slowed the game down too much, you could perform optimizations right in Lua, such as minimizing function calls and runtime table creation, and updating only the parts of the screen that need to be updated. If such optimizations weren't enough, you would need to rewrite parts of the game in a lower-level language.
One of the sample programs included with LuaCheia is Meteor Shower by Thatcher Ulrich. This game bears a family resemblance to the arcade classic Asteroids—it demonstrates mouse control, creation of sprites during gameplay, and gravitational physics. On Unix-like systems, you can run it like this:
cd /usr/local/src/luacheia5-5.0.1a5/examples/meteor_shower
luacheia5 meteor_shower.lua
On Windows, it is one of the choices in the luacheia submenu created in the Start menu by the installer.
Summary
In this chapter, you dipped your toes into the deep water of Lua game programming, and learned about the following:
· Lua's strong suit in game programming, which is writing the more abstract and less speed-intensive portions of a program
· The SDL library
· Game programming concepts such as sprites, events, and ticks
· The basics of implementing physics concepts like velocity and collisions
As a self-directed exercise, you can make the improvements to movearound.lua suggested in the last section at any time. But for now, here's one exercise to tackle before you move on to the next chapter (about Lua on handheld devices), here's one exercise to tackle. The answer is in the appendix.
Exercise
Here's an SDL program that's not very well commented. Without running it, figure out what it does.
assert(cheia.load("SDL"))
local function GetImgs()
local Goodie, Baddie, ErrStr
Goodie = SDL.SDL_LoadBMP("goodie.bmp")
if Goodie then
Baddie = SDL.SDL_LoadBMP("baddie.bmp")
if Baddie then
if Goodie.w ~= Baddie.w or Goodie.h ~= Baddie.h then
Goodie = nil
ErrStr = debug.traceback(
"goodie.bmp and baddie.bmp must have the same shape")
end
end
else
ErrStr = debug.traceback(SDL.SDL_GetError())
end
return Goodie, Baddie, ErrStr
end
local function Tile(Goodie, Baddie, Screen)
math.randomseed(os.time())
local ErrStr
for X = 0, 3 do
for Y = 0, 3 do
local Img = math.random(1, 2) == 1 and Goodie or Baddie
if SDL.SDL_BlitSurface(Img, nil, Screen,
{x = X * Goodie.w, y = Y * Goodie.h}) ~= 0
then
ErrStr = debug.traceback(SDL.SDL_GetError())
break -- BREAK ON ERROR.
end
end
end
return not ErrStr, ErrStr
end
local function WaitForQuit()
local Event = SDL.SDL_Event_new()
while Event do
local Pending = SDL.SDL_PollEvent(Event) == 1
if Pending
and (Event.type == SDL.SDL_QUIT
or Event.type == SDL.SDL_KEYDOWN
and Event.key.keysym.sym == SDL.SDLK_q)
then
Event = false
end
end
end
local ErrStr
if SDL.SDL_Init(SDL.SDL_INIT_VIDEO) == 0 then
local Goodie, Baddie Goodie,
Baddie, ErrStr = GetImgs()
if Goodie then
local Screen = SDL.SDL_SetVideoMode(Goodie.w * 4, Goodie.w * 4, 8,
SDL.SDL_SWSURFACE)
if Screen then
local TileSucc
TileSucc, ErrStr = Tile(Goodie, Baddie, Screen)
if TileSucc then
SDL.SDL_UpdateRect(Screen, 0, 0, 0, 0)
WaitForQuit()
end
else
ErrStr = debug.traceback(SDL.SDL_GetError())
end
else
ErrStr = debug.traceback(SDL.SDL_GetError())
end
else
ErrStr = debug.traceback(SDL.SDL_GetError())
end
if ErrStr then
io.stderr:write(ErrStr, "\n")
end
All materials on the site are licensed Creative Commons Attribution-Sharealike 3.0 Unported CC BY-SA 3.0 & GNU Free Documentation License (GFDL)
If you are the copyright holder of any material contained on our site and intend to remove it, please contact our site administrator for approval.
© 2016-2026 All site design rights belong to S.Y.A.