The Mikado Method (2014)
Part 1. The basics of the Mikado Method
The Mikado Method is a structured way to make significant changes to complex code. In this first part of the book, you’ll be introduced to the Mikado Method and get acquainted with its core workings. You’ll see an example of how to use it and learn how it’s used when changing code. You’ll also learn how to use it when working in different constellations. When you’ve finished this part, you’ll be able to apply the Mikado Method to your own codebase, working alone or as part of a team.
Chapter 1. Meet the Mikado Method
This chapter covers
· A description of the Mikado Method
· The benefits of the method
· Common situations where it works
How many times have you tried to fix something in your codebase, breaking a sweat as the changes spiral out of control? How many times has your development work started not with an empty codebase, but with an inherited system that includes the strange constraints of the previous team? You might hope to look over the documentation left behind, and to run the automatic tests and see if they pass, but what happens if there aren’t any tests left behind, and all that’s left is the source code? How can you understand what’s going on, and how can you make big changes to code without ending up with the entire engine in pieces on the floor?
This is the perfect moment for the Mikado Method to enter the scene. It’s a structured way to make significant changes to complex systems. Rather than getting caught up in the complexity of moving parts, analyzing the entire system in one large chunk, the Mikado Method lets you handle complex code a bit like you’d move furniture around in your home, one piece at a time. In the same way that you might need to move your table to fit in your sofa, and move the easy chair before you can move the table, you need to change and move methods and classes around before you can fit new functionality into your complex codebase. You need to do it one step at a time.
The key to the Mikado Method is removing the fewest obstacles at a time in order to achieve real results, without breaking the code. In this chapter, we’ll introduce you to the method, show you some of the benefits, and walk you through how it works.
Explaining the Mikado Method to non-techies
We’ve all been there, trying to explain programming to people who don’t have a strong technical background. We use all kinds of metaphors like construction, arts, crafts, and more, and they all break down after a while. A metaphor is a model, and, quoting George E.P. Box, “essentially, all models are wrong, but some are useful.”[1]
1 George E.P. Box and Norman R. Draper, Empirical Model-Building and Response Surfaces (Wiley, 1987), p. 424.
The inability to explain simple concepts in an area where you’re an expert is sometimes referred to as the curse of knowledge.
This can happen to you too. After you’ve read this book, you’ll know more about the method than most other people, and you’ll be tempted to tell them everything, all at once, when they ask you what the Mikado Method is. We’ve found the simple “moving furniture” metaphor to be useful for introducing the method.
1.1. What is the Mikado Method?
When a system gets large and complicated, as they often do, there usually comes a time when you want to improve portions of it to meet new functional requirements, new legal requirements, or a new business model. You may also just want to change it to make it more comprehensible.
When you perform small changes, you can keep them in your head, but for larger ones, the chances of getting lost in a jungle of dependencies, or on a sea of broken code, increases dramatically. The Mikado Method can help you visualize, plan, and perform business value–focused improvements over several iterations and increments of work, without ever having a broken codebase during the process.
The framework that the method provides can help individuals and whole teams to morph a system into a new desired shape. The method itself is straightforward and simple, and can be used by anyone at any time. In the following section, we’ll look at the core concepts, the main benefits, and when you can use them.
1.1.1. Basic concepts
There are four basic and well-known concepts that summarize the process of the Mikado Method:
· Set a goal
· Experiment
· Visualize
· Undo
When used together in the Mikado context, these concepts are the core of the method. Without these key pieces, the method can’t help you make changes without breaking the codebase. By no means are these concepts new, but put together in the context of the method, they become very powerful.
Set a goal
To set a goal, think about what you want for the future and about some code that needs to change. Suppose you have a package or module with several web services that’s already responsible for too much. Maybe you’d want the goal to be, “The admin services are in a separate package that can be deployed without the customer web services.” After you’ve clearly stated the goal, write it down. The goal serves two purposes:
· A starting point for change
· The endpoint, or success criteria, of the change
The goal is also the basis of your next experiment.
Experiment
An experiment is a procedure for making a discovery or establishing the validity of a hypothesis. In the Mikado Method, you use experiments to change the code in order to achieve the goal, so that you can see what parts of the system break. Whatever breaks gives you feedback on the prerequisites needed before you can achieve the goal. A typical experiment would be to move a method from one class to another, extract a class, or reduce the scope of a variable. The goal and the prerequisites are what you visualize.
Visualize
Visualization happens when you write down the goal and the prerequisites necessary to achieve it.
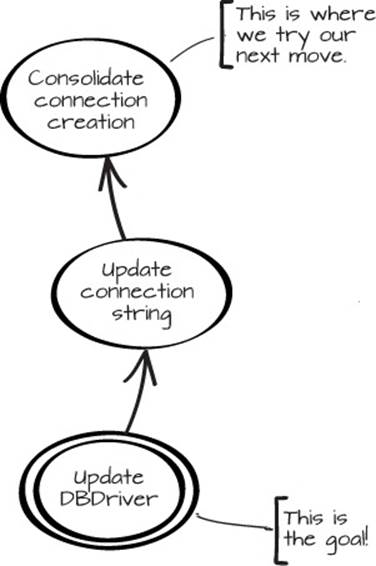
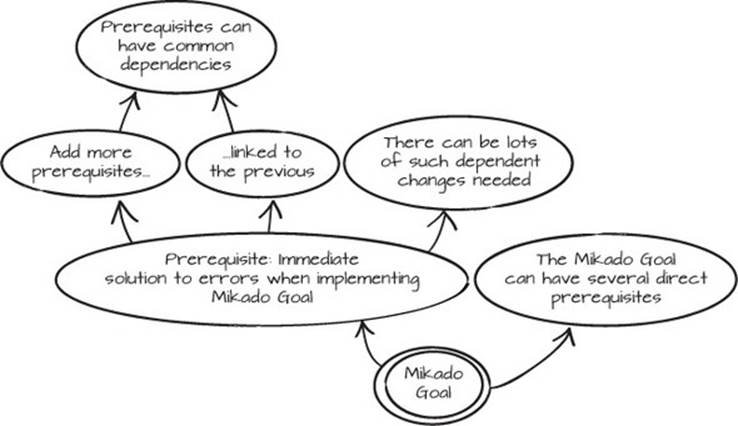
Figure 1.1 shows a small graph. The contents of a Mikado Graph normally come from the experiments. Besides the changes to your system, the graph is the only artifact of the Mikado Method. The Mikado Graph illustrates the goal and all the prerequisites for achieving that goal, and it tells you what your next step is.
Figure 1.1. A Mikado Graph with a goal and two prerequisites
Undo
When an experiment for implementing a goal or a prerequisite has broken your system, and you’ve visualized what you need to change in the system to avoid that outcome, you want to undo your changes to restore a previously working state. In the Mikado Method, you’ll always visualize your prerequisites, and then undo your breaking changes. This process—experiment, visualize, undo—is iterated for each of the prerequisites, for the next layer of prerequisites, and so on. At some point, a prerequisite won’t break the system, and you can unwind the graph of prerequisites.
In order for the experiments and the undoing to be meaningful, the code needs to be in a known working state when the experiments start. When we get to section 1.2, we’ll take you step by step through the method, and then this will make a bit more sense.
Of these four concepts, the undo part is what people struggle with most. At first, undoing feels very unintuitive and wasteful. But it’s not waste; it’s an important part of the learning process, and we’ll continue to stress the undo part as you learn the method.
1.1.2. When to use the Mikado Method
If you want to be a successful software developer, you need to learn how to morph an existing system into a desired new shape. Maybe you’ve tried to implement a new feature, but the system is constantly working against you. Maybe you’ve thought once or twice that it’s time to stop developing new features for a while and clean up a bit. Maybe you’ve worked on a refactoring project, or you’ve tried to do a bigger improvement to your system, but you weren’t able to pull it off, so you just threw it all away. Maybe you constantly feel like the puzzled man in figure 1.2.
Figure 1.2. Being able to change the shape of things is a highly desirable skill

Different development approaches
The Mikado Method is agnostic to the development approach used, as long as there’s room for executing the system and getting feedback from your actions. We’ve found it works very well together with the iterative and feedback-intense approaches of Extreme Programming, Scrum, and Kanban.
It’s likely that you’ve been in at least one of the situations just described, and we know that the Mikado Method and this book could have helped. It doesn’t really matter if the code was yours or someone else’s; it doesn’t matter if the code was old or new. Sooner or later that shiny new greenfield project, where everything can fit in your head and changes are easy to perform, will become more and more complex. As time passes, the code fades just like grass does when it’s heavily used and visited. The greenfield turns brown, and sooner or later you, or your successors, become afraid of changing code. You end up stuck with brownfield development, and you need to be able to morph code you’re afraid of touching, in midflight. Let’s look at a few common scenarios where the Mikado Method can help.
Improve a systems architecture in flight
When you’ve hit a wall and a design doesn’t lend itself easily to change, you can become frustrated. It could be an API that’s hard to understand and your customers are complaining, or maybe your nightly batch jobs barely complete because the data that needs to be processed has increased by a factor of ten. At times like that, the code can seem so complex, and the only way to solve your problems may seem to be stopping development and focusing solely on improving the codebase for a while, or maybe running an improvement effort as a side project.
Improvement projects make stakeholders nervous, and rightfully so, because they see nothing of value coming out. What you want to do is use the Mikado Method to change an architecture in small steps, allowing improvements and continuous delivery of new features to coexist in the same branch.
Brownfield development
Brownfield development is probably the most common situation for developers to be in, and in order for business to continue, an existing application infrastructure is necessary. Whether you’re adding a new feature or improving existing functionality, the Mikado Method helps because it enables you to work with what you’ve got and to improve on it. Brownfields need to change just like any other system, but often you don’t know the whole codebase inside out, so changes become inefficient or downright scary. The Mikado Method provides a way for you to take on a reasonable number of improvements for each feature.
Refactoring projects
Imagine that you want to extract a reusable module from a heavily entangled system, or to replace an external API that’s used all over and deep into your codebase. Improvements like that are really big, and they usually take several weeks, or even months, to complete. They also require a nondestructive way forward, or you won’t be able to ship your product.
The common way to temporarily achieve nondestructiveness is to start a “refactoring project” on a “refactoring branch” to keep it away from the rest of development, but at the price of a nasty and destructive merge at the end. The Mikado Method helps you uncover a nondestructive path in your regular development flow and keeps you on track as you perform each task, even if the effort takes months. If you use the Mikado Method for these kinds of improvements, separate refactoring projects on diverging branches can be avoided entirely, and the changes can be checked in on a day-to-day basis.
The lifespan of a Mikado Graph
It doesn’t matter if you’re using the Mikado Method for in-flight improvements, brownfield development, or instead of refactoring projects. The Mikado Graph will look pretty much the same, and it works equally well.
The lifespan of the graph will differ, however, depending on the change you want to perform. Our experience tells us that big improvements take longer, and they generally benefit from the graph being visible and easy for many to access during that time. Try putting the graph on a whiteboard in a common area. For smaller changes that takes less time to perform, pen and paper is probably more appropriate.
1.1.3. Benefits of the method
You now know that the Mikado Method is a way to improve code without breaking it, and you know what situations would be good candidates for using it. Now let’s look at its benefits.
Stability for the system
Stakeholders will love the Mikado Method because it provides stability to the system while changing it. No more, “We can’t release now; we’re in the middle of a monster merge.” The Mikado Method path to change is a series of small, nondestructive changes instead of the big, nasty integration at the end of a refactoring project.
Increased communication and collaboration
From a team’s perspective, the Mikado Method works really well. Due to its visual nature, interested parties can watch the Mikado Graph evolve, and then follow along as the changes are performed and checked off on the graph. By also communicating through the graph, collaboration becomes easier and a change effort can be spread across the team. This way the whole team’s competencies, abilities, and existing knowledge can be contributed, and the workload can also be distributed throughout the team.
Lightweight and goal focused
Last, but not least, developers find the Mikado Method quick to learn and easy to use. The method has very little ceremony and consists of a lightweight process that requires almost no additional tools—just pen and paper or a whiteboard. Its simplicity helps you keep your eye on the prize. As a bonus, you can use the Mikado Graph you develop from the process to assist you when you reflect on the work done, and this improves learning.
Hopefully we’ve now piqued your interest in the method, and you can see where it could be beneficial in your work. Now you must be wondering how it works.
1.2. The Mikado Method recipe
We believe that code isn’t a piece of art; it’s supposed to do a job. We also believe that if a part of the code doesn’t stop the rest of the system from evolving, we don’t need to understand that part; we leave it as it is. On the other hand, if that code needs to be changed or understood, we want an effective way to do that. At that point, we turn to the Mikado Method, and it helps us deal with difficult situations when the code change gets too complex to fit in our heads.
In this section, we’ll look at how the method actually works. We’ll go through it step by step, so that by the end you’ll be ready to jump into chapter 2, where you’ll see your first example and how to apply the method.
1.2.1. How to work with the Mikado Method
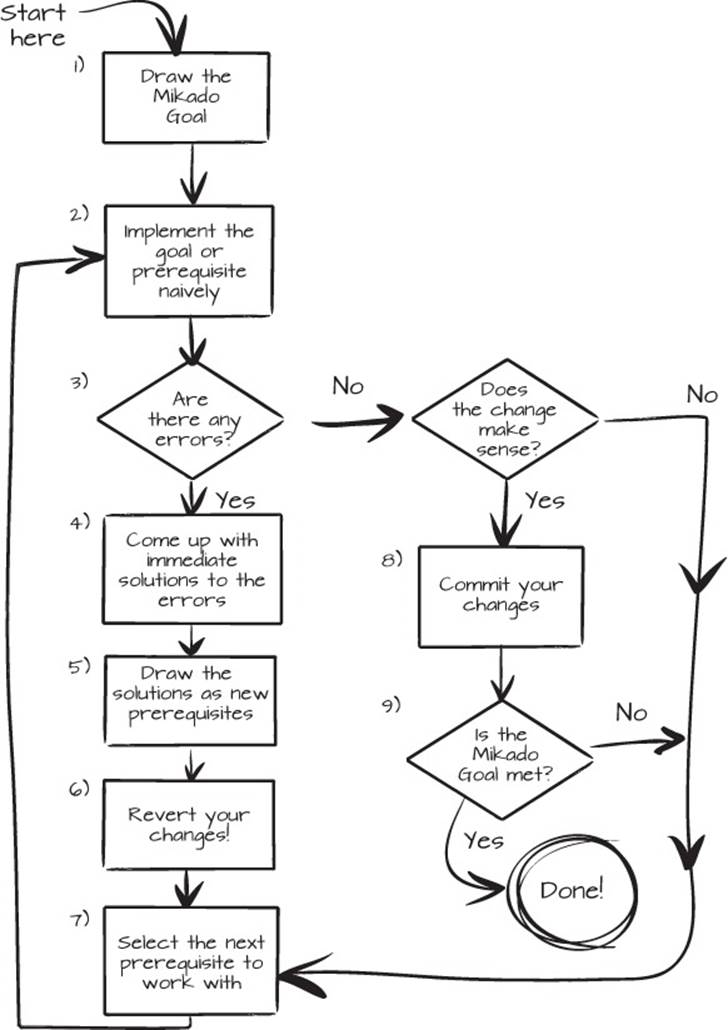
Figure 1.3 shows what the Mikado Method looks like in a compound format. It shows our recommendation for performing changes to a system that’s too large for analyze-then-edit, which means basically any production system in the world. Let’s go through the steps of the process one by one.
Figure 1.3. A process chart describing the Mikado Method
Step 1: Draw the original Mikado Goal
The best place to start is with a concrete task, or maybe a user story. Choose a task that needs to be accomplished. The task will be your original goal: the Mikado Goal.
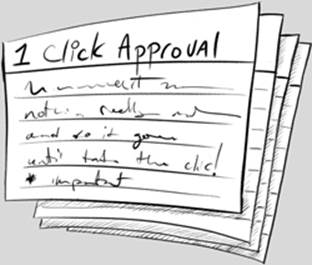
User story
A user story is an informal way of capturing what a user of a system needs or does, by writing a short story on a card, like in figure 1.4. Stories stand in stark contrast to formalized requirement documents as they contain a lot less detail about the prerequisites and implementation. This increases their appeal and makes them popular to use in conjunction with iterative development.
Figure 1.4. A user story
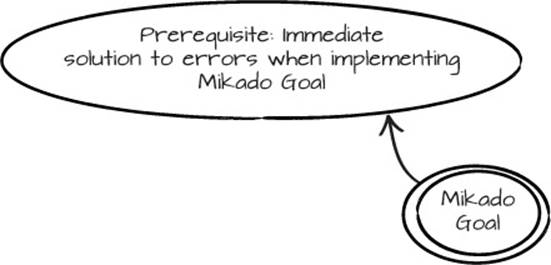
Write the Mikado Goal on a piece of paper, with a double circle around it to mark it as the original goal, as shown in figure 1.5. Replace “Mikado Goal” with a short description of an explicit goal for your application or system, like “Store report as .csv file,” or “Use HTTPS for all API calls.”
Figure 1.5. Start with the goal, replacing “Mikado Goal” with your task or story.

The double circle is there to indicate where it all starts. This goal will be your focus for the moment, and anything you do from now on is to help you reach this goal.
Step 2: Implement the goal naively
Try to implement the goal right away, as this is probably the easiest way to determine what obstacles are in the way. We call this the Naive Approach. The idea is to make an experiment without analyzing the consequences too much. The restrictions or dependencies of your system will usually be surfaced by the compiler or your tests. An example of an actionable goal is “Move user-related classes to project X.”
Sometimes a goal isn’t actionable, and it can’t be naively implemented. For example, “Make algorithm Y twice as fast” isn’t something that’s directly actionable, but you can add prerequisites such as “Write performance test” and “Replace linear array iteration search with hash table.” In those cases, you need to do a minimal bit of analysis of the goal to find some prerequisites that can be tried. Analyzing isn’t wrong, but it’s a bit risky. If you only analyze the situation, you can easily spend several hours on something that you could determine by making a change, recompiling the code, and making a test run.
Step 3: Find any errors
Is there anything that’s stopping you? Are there compiler errors? Are there tests that don’t run, or other obvious problems? All these errors have their origin in the dependencies that restrict you, and they’re the reason you’re having problems reaching your goal. If you don’t have any errors, skip to step 8.
An example of an error could be a compiler message indicating that there are too few arguments to the createUser(..) method, probably due to the newly made change. Other common sources of problems are runtime exceptions and errors, such as null-pointer exceptions. These problems are hard to find by just reading the code, so an automated test suite is helpful. The test suite minimizes your effort and delay when identifying these problems.
Step 4: Come up with immediate solutions to the errors
All errors you find need to be taken care of before you can reach your goal. Come up with immediate solutions to the errors that will make the goal implementation possible. These errors and solutions aren’t limited to the program code, but could be anything you need to fix in your system, like changing a build script, opening a firewall, or adding a new server.
Again, we’d like to point out that you shouldn’t over-analyze the situation and try to predict where the solution will lead you, but try to find solutions that drive the system in a good direction. Quite often, those solutions will have more underlying restrictions or dependencies that need to be taken care of before they can be implemented. This is OK; those dependencies will be discovered and handled in future iterations of the process.
If we continue with the createUser(..) example, an immediate solution could be “Add parameters at all places where createUser(..) is called,” or for a null-pointer exception, “Initialize the null field in method X.”
Step 5: Draw the immediate solutions as new prerequisites
Before you continue, note the solution with an arrow pointing to it from the goal, as in figure 1.6.
Figure 1.6. Note the immediate solution, or prerequisite.
Solutions become prerequisites to your original goal. A single solution can sometimes take care of hundreds of errors with the same root cause. In that case, draw only one prerequisite in the graph for all of those problems.
As you start to build knowledge about the system and the dependencies that stand in the way of making your changes, you’ll also find ways to resolve the dependency problems, one by one.
When you can’t come up with a solution to a problem, write something like “Solve the errors with the missing arguments to createUser(..).” This will work as a placeholder until the time has come to implement that prerequisite.
Step 6: Revert the code to the initial state if there were errors
When there are errors, you should always roll back all changes. This is extremely important! Editing code in an unknown state is very error-prone. Before you start on the next prerequisite, revert to the last known working state. Repeatability and predictability trump activity, so roll back!
Sometimes reverting is perceived as losing all your work, but it’s not. In the Mikado Graph, you’ve accumulated loads of information and have identified all the things you need in order to get back to this state if you want to.
Overcoming the fear of reverting
To some people, reverting the broken code feels like throwing work away and starting all over again, like it never happened. But this is a misconception of what developing systems is about. System development, and especially refactoring or restructuring, focuses mostly on learning about the system, the domain, the language, and the technology in use. Making the changes accounts for just a fragment of the total development time, and the great value of the Naive Approach is what you learn about the system. It enables you to see what actually stands in your way.
The Mikado Graph then holds this information, and you can use it to decide exactly what you want to do at a later time. Hence, nothing much is lost when you revert your changes.
If you still want to keep your changes, you could save a patch, a record of the changes made, using your version control system. When the prerequisites for the current change are in place, you can then reapply that patch, but often so many things have changed that the patch is invalid; with the prerequisites in place, it’s usually easy to make the change anyway.
Step 7: Repeat the process for each of the immediate solutions
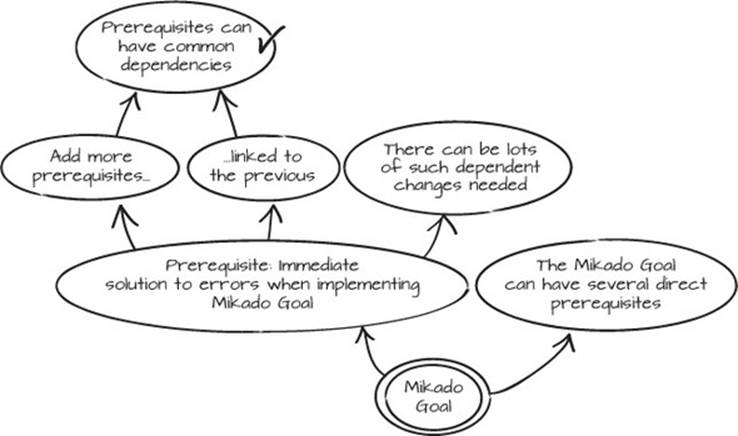
For each of the prerequisites, one at a time, repeat the preceding steps starting with step 2. This means that for each of the prerequisites, start with a clean working system and try to implement the prerequisite naively. As before, find the errors (if any), come up with solutions to the errors, note them as prerequisites, revert the changes, and then continue with the next prerequisite. This will result in a graph that might look something like figure 1.7.
Figure 1.7. Repeat the steps for each prerequisite to build knowledge about the dependencies.
Step 8: Check in if there are no errors
When you don’t find any additional errors during the implementation of a prerequisite, you’ve come across a change that has no further prerequisites. When a prerequisite is implemented, you can note it in the graph with a check mark, as in figure 1.8.
Figure 1.8. Check off the solutions as they are completed.
This is probably a good time to commit code to the main code repository to share it with your fellow developers. In general, commit if all the following are true:
· The code compiles.
· The tests run.
· The product is all good.
· The changes make sense to check in.
If the changes don’t quite make sense, look at the graph and see if they should be accompanied by a few more changes to make a sensible commit. You can delay checking off prerequisites until you check in code.
Continue by selecting a new prerequisite to work with as the next iteration, and repeat the process from step 2.
Step 9: If the Mikado Goal is met, you’re done!
When you’ve finished and checked in all of the prerequisites and the Mikado Goal, you’re done. Pat yourself, or your programming partner, or your team, on the back. Take a moment to reflect on what you’ve just accomplished. Now is probably a great time for some celebration.
1.3. Summary
We and others have used the Mikado Method in different situations and for different problems. In this book, our goal is to help you understand the method and the ecosystem surrounding it and to make use of it. The method will make your change efforts more focused, effective, and successful.
Are you ready for some code? Good, because the upcoming chapters will contain a mix of code, examples, and instructions about how to apply the Mikado Method to actual code.
Try this
· Set a timer for 15 minutes, refactor some code, and then undo! How did it feel?
· Create a branch in your version control system, and then delete it. Reflect on the effort.
· Imagine your smallest room, and then in your imagination try to fit a large bookshelf in the back of the room. Now draw a Mikado Graph of the changes/moves you need to perform. What surprised you?
All materials on the site are licensed Creative Commons Attribution-Sharealike 3.0 Unported CC BY-SA 3.0 & GNU Free Documentation License (GFDL)
If you are the copyright holder of any material contained on our site and intend to remove it, please contact our site administrator for approval.
© 2016-2026 All site design rights belong to S.Y.A.