OpenGL ES 3.0: Programming Guide, Second Edition (2014)
Chapter 16. OpenGL ES Platforms
As of this writing, OpenGL ES 3.0 is available in Android 4.3+, iOS 7 (on the iPhone 5s), Windows, and Linux. We attempted to make the sample code for the book available on as many platforms as possible. We want our readers to be able to choose the OpenGL ES 3.0 platform that is most relevant to them. In this chapter, we cover some specifics of getting up and running while building the sample code with the following platforms:
• Windows (OpenGL ES 3.0 Emulation) with Microsoft Visual Studio
• Ubuntu Linux (OpenGL ES 3.0 Emulation)
• Android 4.3+ NDK (C++)
• Android 4.3+ SDK (Java)
• iOS 7 with Xcode 5
Building for Microsoft Windows with Visual Studio
After downloading the sample code from the book’s website (opengles-book.com) and installing CMake v2.8 (http://cmake.org), the next step to build the sample code for Windows is to download an OpenGL ES 3.0 Emulator. Three choices of emulators are currently available:
• Qualcomm Adreno SDK v3.4+, available from http://developer.qualcomm.com/develop/
• ARM Mali OpenGL ES 3.0 Emulator, available from http://malideveloper.arm.com/develop-for-mali/tools/opengl-es-3-0-emulator/
• PowerVR Insider SDK v3.2+, available from http://imgtec.com/PowerVR/insider/sdkdownloads/index.asp
Any of these emulators is a suitable choice for using the sample code for this book. We leave it up to you to choose which option best fits with your development needs. If you want to use the PVRShaman workspaces from Chapters 10 and 14, the PowerVR Insider SDK is required. For this section, we chose to use the Qualcomm Adreno SDK v3.4. After downloading and installing your choice of OpenGL ES 3.0 emulator, you can use CMake to generate the Microsoft Visual Studio solution and projects.
Open the cmake-gui and point the GUI to the location where you have downloaded the source code, as shown in Figure 16-1. Create a folder to build the binaries underneath that base directory and set it as the location to build the binaries in the GUI. You can then click Configure and choose the version of Microsoft Visual Studio you are using. CMake will now give an error because the EGL and OpenGLES3 library are not found.
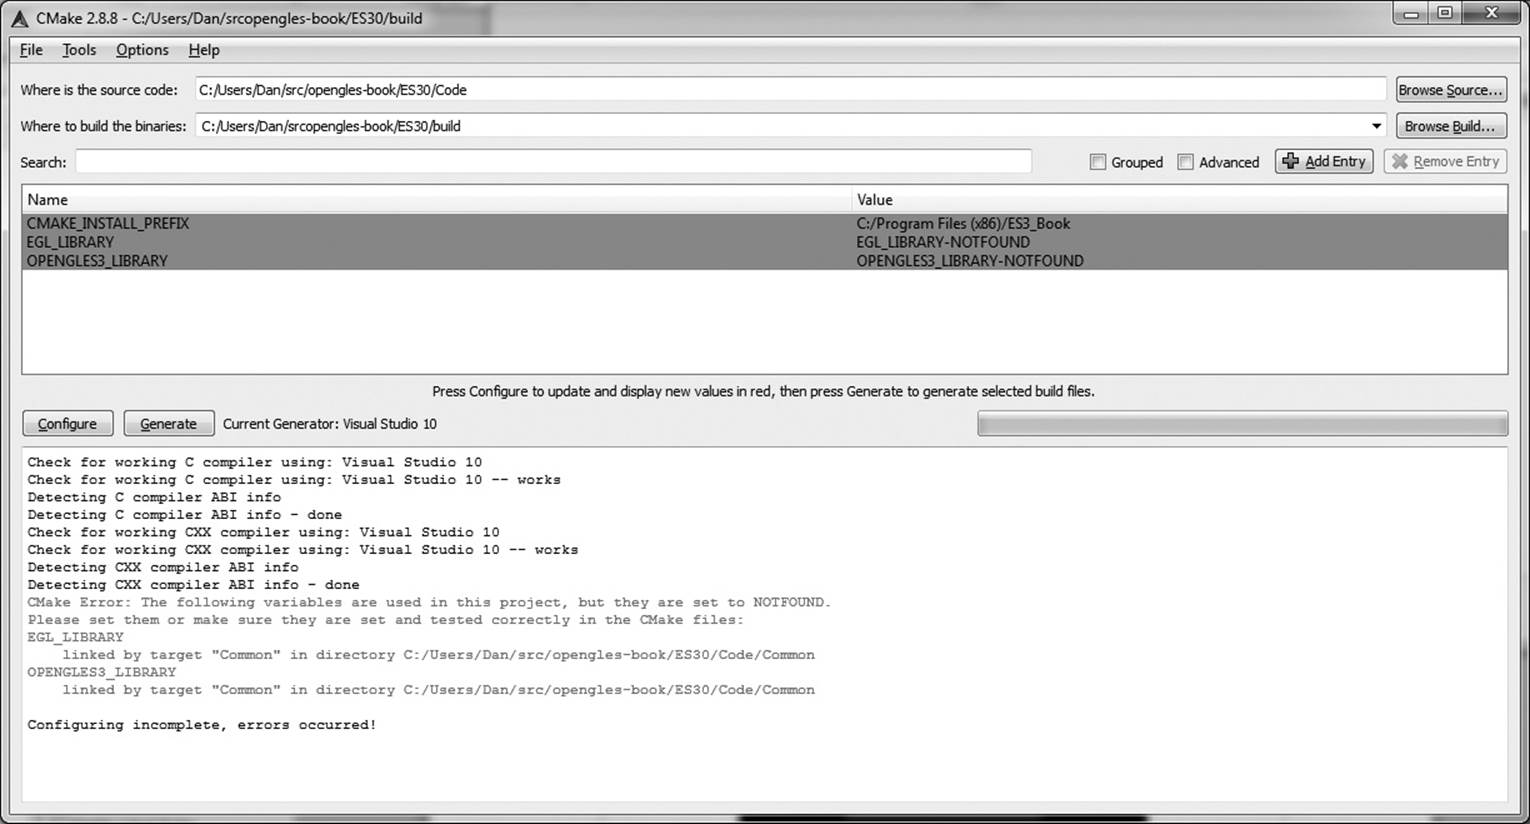
Figure 16-1 Building Samples with CMake GUI on Windows
If you are using the Qualcomm Adreno SDK installed to C:\AdrenoSDK, you must now set the following variables in the cmake-gui:
• EGL_LIBRARY: C:/AdrenoSDK/Lib/Win32/OGLES3/libEGL.lib
• OPENGLES3_LIBRARY: C:/AdrenoSDK/Lib/Win32/OGLES3/libGLESv2.lib
If you are using a different emulator, locate the EGL and OpenGL ES 3.0 libraries for that library and set them to the CMake variables. After setting the EGL and OpenGL ES 3.0 libraries, click Configure again in the cmake-gui and then click Generate. You can now navigate to the folder you chose to build the binaries in CMake and open ES3_Book.sln in Microsoft Visual Studio. From this solution, you can build and run all of the sample code for the book.
If you do not have libEGL.dll and libGLESv2.dll in your path, you will need to copy those files to the directory to which each sample executable is built to be able to run the sample. Also, note that libGLESv2 is the recommended Khronos naming convention for the OpenGL ES 3.0 library. This is the same name as the OpenGL ES 2.0 library. The names match because OpenGL ES 3.0 is backward compatible with OpenGL ES 2.0; thus the same library can be used for both APIs.
Building for Ubuntu Linux
This section describes how to build the sample code using the PowerVR OpenGL ES 3.0 Emulator on Ubuntu Linux (tested on Ubuntu 12.04.1 LTS 64-bit). In addition to installing the PowerVR OpenGL ES 3.0 Emulator (by default, this installs to/opt/Imagination/PowerVR/GraphicsSDK), you will need to make sure you have installed the appropriate packages, including cmake and gcc. A good starting point is to install the following packages:
$ sudo apt-get install build-essential cmake cmake-curses-gui
To build the sample code, first create a build folder at the root of the source project (where CMakeLists.txt is found):
~/src/opengles-book$ mkdir build
~/src/opengles-book/build$ cd build
~/src/opengles-book/build$ cmake ../
If all has gone correctly, you will likely see an error message that the EGL_LIBRARY and OPENGLES3_LIBRARY are not found. To set the libraries, run the following (note that it is “ccmake” and not “cmake”):
~/src/opengles-book/build$ ccmake ../
You will see that the value of EGL_LIBRARY is EGL_LIBRARY-NOTFOUND; similarly, OPENGLES3_LIBRARY is set to OPENGLES3_LIBRARY-NOTFOUND. Assuming you installed the PowerVR SDK to the default location, you can set these variables to the libEGL.so andlibGLESv2.so files, as follows:
• EGL_LIBRARY:
/opt/Imagination/PowerVR/GraphicsSDK/PVRVFrame/EmulationLibs/Linux_x86_64/libEGL.so
• OPENGLES3_LIBRARY:
/opt/Imagination/PowerVR/GraphicsSDK/PVRVFrame/EmulationLibs/Linux_x86_64/libGLESv2.so
Now you can press “c” to configure and “g” to generate and exit ccmake. The code is now ready to build; simply type the following:
~/src/opengles-book/build$ make
This should build libCommon.a along with all of the sample code. You are now ready to run the Hello_Triangle sample:
build$ cd Chapter_2/Hello_Triangle
build$ ./Hello_Triangle
If you find that you are unable to run the program because the libEGL.so and libGLESv2.so are not found, set LD_LIBRARY_PATH to point to the directory location as follows:
$ export
LD_LIBRARY_PATH=/opt/Imagination/PowerVR/GraphicsSDK/PVRVFrame/
EmulationLibs/Linux_x86_64/
Building for Android 4.3+ NDK (C++)
Support for OpenGL ES 3.0 in Android 4.3 was announced in July 2013. There are two ways of accessing OpenGL ES 3.0 on Android: either through the Native Development Kit (NDK) using C/C++ or through the Software Development Kit (SDK) using Java. We have provided the sample code in both C and Java to support development with either language. This section covers how to build and run the C Android 4.3 samples using the NDK. The next section covers how to build and run the Java Android 4.3 samples using the SDK. OpenGL ES 3.0 has been supported in the Android NDK starting with Android NDK r9. OpenGL ES 3.0 is supported on Android devices supporting Android 4.3 (API level 18) or greater.
Prerequisites
Before building the book sample code for Android NDK r9+, you need to install several prerequisites. The Android Developer Tools are cross-platform tools, so you can pick either Windows (Cygwin), Linux, or Mac OS X as a build platform. In this section, we cover building under Windows, but the instructions will be nearly equivalent on the other platforms. The following software is required:
• Java SE Development Kit (JDK) 7 (http://oracle.com/technetwork/java/javase/downloads/index.html)—For Windows x64, you would install jdk-7u45-windows-x64.exe.
• Android SDK (http://developer.android.com/sdk/index.html)—The easiest way is to download and decompress the SDK Android Developer Tools (ADT) bundle. For the purposes of these instructions, the ADT will be installed to C:\Android\adt-bundle-windows-x86_64-20130911.
• Android 4.3 (API 18)—After downloading ADT, run the SDK Manager and install Android 4.3 (API 18).
• Android NDK (http://developer.android.com/tools/sdk/ndk/index.html)—Download and decompress to a directory (e.g., C:\Android\android-ndk-r9-windows-x86_64) the latest Android NDK.
• Cygwin (http://cygwin.com/)—The Android NDK uses Cygwin as an environment for running the build tools on Windows. If you are developing on Mac OS X or Linux, you will not need Cygwin.
• Apache Ant 1.9.2+ (http://ant.apache.org/bindownload.cgi)—Ant is used for building the samples with the NDK. Download and decompress to a folder (e.g., C:\Android\apache-ant-1.9.2).
After installing all of the prerequisites, you need to set up your PATH to include the Android SDK tools/ and platform-tools/ folders, Android NDK root folder, and Ant bin/ folder. You will also need to set your JAVA_HOME variable to point to the folder in which you installed the JDK. For example, the following was added to the end of ~/.bashrc in Cygwin to set up the environment for the installation directories previously used:
export JAVA_HOME="/cygdrive/c/Program Files/Java/jdk1.7.0_40"
export ANDROID_SDK=/cygdrive/c/Android/adt-bundle-windows-
x86_64-20130911/sdk
export ANDROID_NDK=/cygdrive/c/Android/android-ndk-r9-windows
-x86_64/android-ndk-r9
export ANT=/cygdrive/c/Android/apache-ant-1.9.2/bin
export PATH=$PATH:${ANDROID_NDK}
export PATH=$PATH:${ANT}
export PATH=$PATH:${ANDROID_SDK}/tools
export PATH=$PATH:${ANDROID_SDK}/platform-tools
Building the Example Code with Android NDK
Once the prerequisites have been installed, building the samples with the Android NDK is straightforward. From a terminal (Cygwin on Windows), navigate to the Android/ folder for the sample you want to build and enter the following commands:
Hello_Triangle/Android $ android.bat update project -p . -t
android-18
Hello_Triangle/Android/jni $ cd jni
Hello_Triangle/Android/jni $ ndk-build
Hello_Triangle/Android/jni $ cd ..
Hello_Triangle/Android $ ant debug
Hello_Triangle/Android $ adb install -r bin/NativeActivity-debug.apk
Note that on Mac OS X or Linux, you would use the command android instead of android.bat (the build steps are otherwise the same). The android.bat command will generate the project build files for the example. Navigating to the jni/ folder and entering ndk-build will compile the C source code for the project and generate the library file for the sample. Finally, running ant debug will build the final apk file that is installed to the device (done with the final step using the adb tool).
Once the sample is installed on the device, an icon for it will appear in the Apps list on the device. Any log message output from the sample can be viewed using adb logcat.
Building for Android 4.3+ SDK (Java)
The sample code in the book is written in native C, which is why we chose to port it to the Android NDK. While working with the NDK may be useful to Android developers who plan to write cross-platform native code, many Android applications are written in Java using the SDK instead of the NDK. To help developers who wish to work in Java with the SDK instead of the NDK, we also provide the book sample code in Java.
If you have installed the Android ADT bundle (as described in the Prerequisites section of Building for the Android 4.3 NDK [C++]), then you have everything you need to run the Java versions of the applications. The Java samples are located in the Android_Java/ folder at the root of the sample code directory. To build and run the Java examples, simply open Eclipse and in your Workspace choose Import > General > Existing Projects Into Workspace. Point the import dialog to the Android_Java/ folder and you will be able to import all of the sample code from the book. Once you have imported the samples, you will be able to build and run them from Eclipse just as you would any Android application.
In general, the Java samples are equivalent to their native counterparts. The main difference is observed with asset loading, where in some cases the shaders are stored in external assets rather than placed inline with the code. This is generally a better practice and makes editing the shaders more straightforward. The reason this was not done in the C versions of the samples was to reduce platform variability in how files and other assets are loaded and to make the samples self-contained in a single file.
Building for iOS 7
Support for OpenGL ES 3.0 was added to iOS starting with version 7. The iPhone 5s (released in September 2013) is the first iOS device that supports OpenGL ES 3.0. The iOS Simulator that runs on Mac OS X also supports OpenGL ES 3.0, so it is possible to run and debug the book code samples without having an OpenGL ES 3.0–capable iOS device. This section details the steps to get up and running with the code samples on iOS7 using Xcode 5 on Mac OS X 10.8.5.
Prerequisites
The only prerequisite aside from Mac OS X 10.8.5 is to download and install Xcode 5. This version of Xcode contains the SDK for iOS 7 and is capable of building and running the sample code for the book.
Building the Example Code with Xcode 5
Each sample in the book has an iOS/ folder that contains the xcodeproj and related files needed for building on iOS. A screenshot of an example project open in Xcode and running on the iOS 7 Simulator is shown in Figure 16-2.
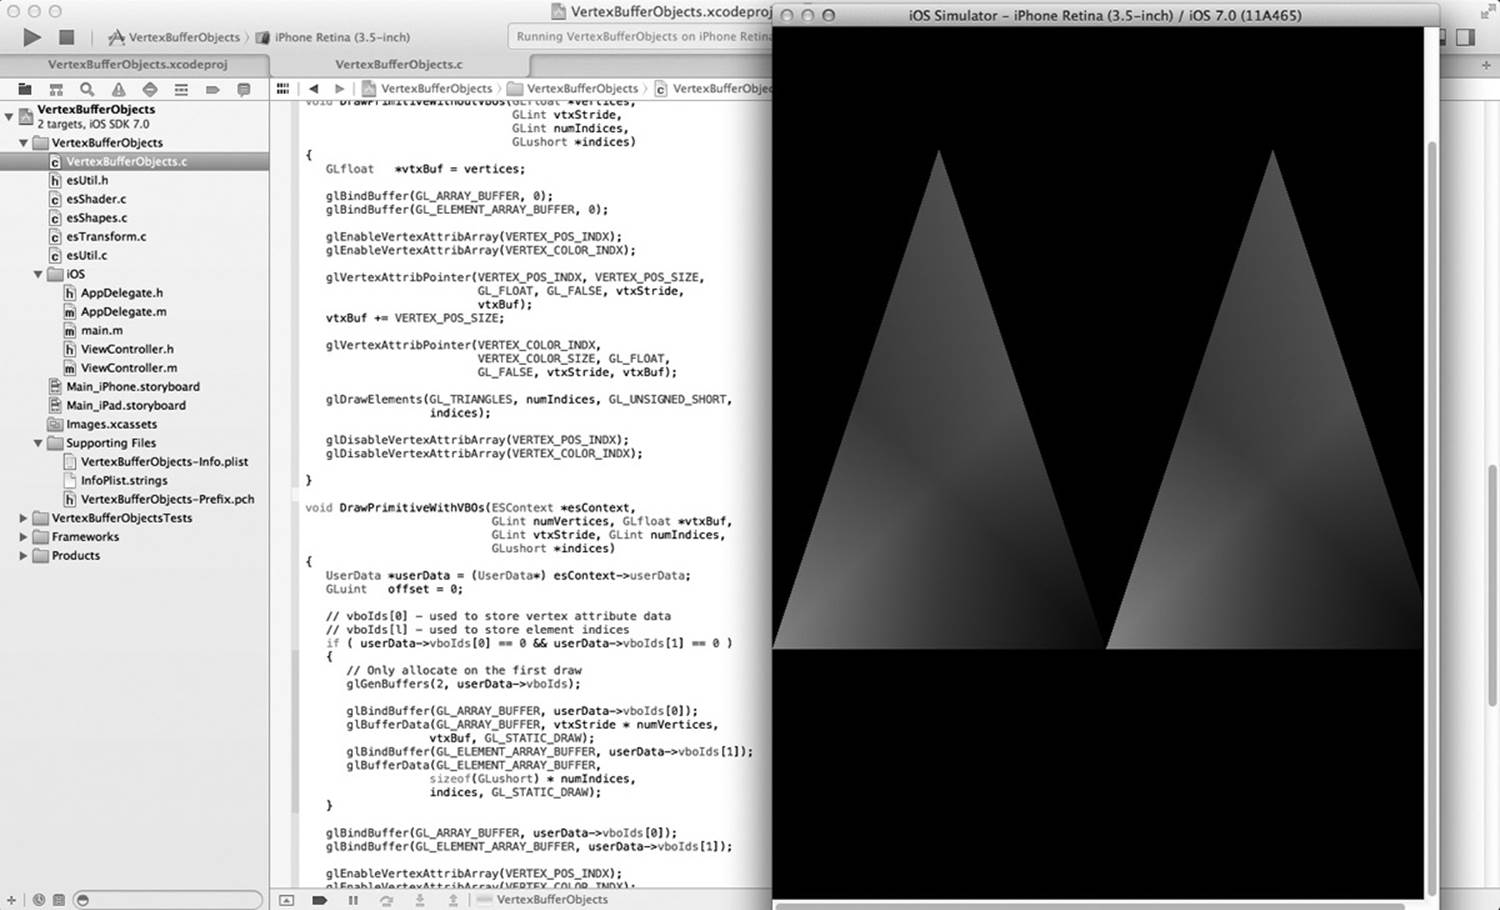
Figure 16-2 VertexArrayObjects Sample in Xcode Running on iOS 7 Simulator
Notice that each sample project builds the framework files (esUtil.c, esTransform.c, esShapes.c, and esShader.c). Additionally, each sample contains Objective-C files from the Common/iOS folder that wrap the interface to the ES framework. The primary file isViewController.m, which implements an iOS GLKViewController and calls back into registered update, draw, and shutdown callback functions of each sample. This abstraction mechanism allows each sample in the book to run unmodified on iOS.
To create your own iOS 7 application using the code framework from the book, in Xcode 5 you can navigate from File > New > Project, and choose an OpenGL Game. Once it creates the new project, remove the generated AppDelegate.h, AppDelegate.m, Shader.vsh, Shader.fsh, ViewController.h, ViewController.m, and main.m files. Next, select “Add files to <project>...” and choose all of the .c files in the Common/Source path along with all of the files in Common/Source/iOS. Finally, in the Build Settings for your project, add the Common/Include path to the Search Paths > User Header Search Paths. You can then create a sample using one of the examples from the book as a template.
You will probably find it much easier to use the iOS GLKit framework than to use the framework in our book if you are developing an iOS-only application. The GLKit provides functionality similar to the book ES code framework, but is much more extensive. The one advantage to our framework is that it is not iOS-specific, so you may find this a useful approach if you are developing cross-platform applications designed to run on many different operating systems.
Summary
In this chapter, we covered how to build the sample code using OpenGL ES 3.0 emulators on Windows and Linux. We also covered how to build the sample code for OpenGL ES 3.0 on Android 4.3+ NDK using C, Android 4.3+ SDK with Java, and iOS7. The platforms supporting OpenGL ES are rapidly evolving. Please check the book website (opengles-book.com) for updated information on building for new platforms and new versions of existing platforms.
All materials on the site are licensed Creative Commons Attribution-Sharealike 3.0 Unported CC BY-SA 3.0 & GNU Free Documentation License (GFDL)
If you are the copyright holder of any material contained on our site and intend to remove it, please contact our site administrator for approval.
© 2016-2026 All site design rights belong to S.Y.A.