Programming the Raspberry Pi: Getting Started with Python (2013)
5. Modules, Classes, and Methods
In this chapter, we discuss how to make and use our own modules, like the random module we used in Chapter 3. We also discuss how Python implements object orientation, which allows programs to be structured into classes, each responsible for its own behavior. This helps to keep a check on the complexity of our programs and generally makes them easier to manage. The main mechanisms for doing this are classes and methods. You have already used built-in classes and methods in earlier chapters without necessarily knowing it.
![]()
Modules
Most computer languages have a concept like modules that allows you to create a group of functions that are in a convenient form for others to use—or even for yourself to use on different projects.
Python does this grouping of functions in a very simple and elegant way. Essentially, any file with Python code in it can be thought of as a module with the same name as the file. However, before we get into writing our own modules, let’s look at how we use the modules already installed with Python.
Using Modules
When we used the random module previously, we did something like this:

The first thing we do here is tell Python that we want to use the random module by using the import command. Somewhere in the Python installation is a file called random.py that contains a randint function as well as some other functions.
With so many modules available to us, there is a real danger that different modules might have functions with the same name. In such a case, how would Python know which one to use? Fortunately, we do not have to worry about this happening because we have imported the module, and none of the functions in the module are visible unless we prepend the module name and then a dot onto the front of the function name. Try omitting the module name, like this:
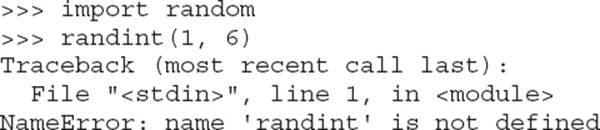
Having to put the module name in front of every call to a function that’s used a lot can get tedious. Fortunately, we can make this a little easier by adding to the import command as follows:

This gives the module a local name within our program of just r rather than random, which saves us a bit of typing.
If you are certain a function you want to use from a library is not going to conflict with anything in your program, you can take things a stage further, as follows:

To go even further, you can import everything from the module in one fell swoop. Unless you know exactly what is in the module, however, this is not normally a good idea, but you can do it. Here’s how:
In this case, the asterisk (*) means “everything.”
Useful Python Libraries
So far we have used the random module, but other modules are included in Python. These modules are often called Python’s standard library. There are too many of these modules to list in full. However, you can always find a complete list of Python modules athttp://docs.python.org/release/3.1.5/library/index.html. Here are some of the most useful modules you should take a look at:
• string String utilities
• datetime For manipulating dates and times
• math Math functions (sin, cos, and so on)
• pickle For saving and restoring data structures on file (see Chapter 6)
• urllib.request For reading web pages (see Chapter 6)
• tkinter For creating graphical user interfaces (see Chapter 7)
Installing New Modules
In addition to the standard library modules, thousands of modules have been contributed by the Python community. One very popular module is pygame, which we will use in Chapter 8. It’s often available as a binary package, so you can install it by typing something like this:
![]()
For many modules, however, this is not the case, and you have to go through a bit more effort to install them.
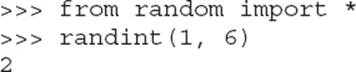
Any module good enough to use will be packaged in the standard Python way. This means that to install it, you need to download a compressed file containing a directory for the module. Let’s use the RPi.GPIO module we will use in Chapter 11 as an example. To install this module, you first go to the module’s website, find the Downloads section, and then fetch the archive file. This is shown in Figure 5-1. The next step is to save the file to a convenient directory (for this example, use the Python directory we created in Chapter 3).
Figure 5-1 Downloading the RPi.GPIO module
Once the file has been saved, open LXTerminal and use cd to get to the Python directory, like so:

Next, you need to extract the directory from the archive by entering the following command:

Now that you have a new folder for the module, you need to “cd” into it and then run the install command. However, it is always worth checking the instructions first to see if there’s anything else you need to do. To see the instructions, type more INSTALL.txt.
Good thing you checked! The instructions state that you need to do the following:
![]()
Finally, you are ready to run the module installer itself:

Once the module is installed, you will be able to import it from the Python Shell.
![]()
Object Orientation
Object orientation has much in common with modules. It shares the same goals of trying to group related items together so that they are easy to maintain and find. As the name suggests, object orientation is about objects. We have been unobtrusively using objects already. A string is an object, for example. Thus, when we type
![]()
We are telling the string 'abc' that we want a copy of it, but in uppercase. In object-oriented terms, abc is an instance of the built-in class str and upper is a method on the class str.
We can actually find out the class of an object, as shown here (note double underscores before and after the word class):

![]()
Defining Classes
That’s enough of other people’s classes; let’s make some of our own. We are going to start by creating a class that does the job of converting measurements from one unit to another by multiplying a value by a scale factor.
We will give the class the catchy name ScaleConverter. Here is the listing for the whole class, plus a few lines of code to test it:
![]()
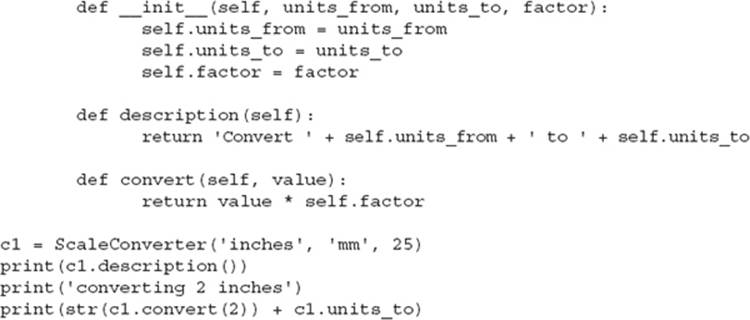
This requires some explanation. The first line is fairly obvious: It states that we are beginning the definition of a class called ScaleConverter. The colon (:) on the end indicates that all that follows is part of the class definition until we get back to an indent level of the left margin again.
Inside the ScaleConverter, we can see what look like three function definitions. These functions belong to the class; they cannot be used except via an instance of the class. These kinds of functions that belong to a class are called methods.
The first method, __init__, looks a bit strange—its name has two underscore characters on either side. When Python is creating a new instance of a class, it automatically calls the method __init__. The number of parameters that __init__ should have depends on how many parameters are supplied when an instance of the class is made. To unravel that, we need to look at this line at the end of the file:
![]()
This line creates a new instance of the ScaleConverter, specifying what the units being converted from and to are, as well as the scaling factor. The __init__ method must have all these parameters, but it must also have a parameter called self as the first parameter:
![]()
The parameter self refers to the object itself. Now, looking at the body of the __init__ method, we see some assignments:

Each of these assignments creates a variable that belongs to the object and has its initial value set from the parameters passed in to __init__.
To recap, when we create a new ScaleConverter by typing something like
![]()
Python creates a new instance of ScaleConverter and assigns the values 'inches', 'mm', and 25 to its three variables: self.units_from, self.units_to, and self.factor.
The term encapsulation is often used in discussions of classes. It is the job of a class to encapsulate everything to do with the class. That means storing data (like the three variables) and things that you might want to do with the data in the form of the description and convert methods.
The first of these (description) takes the information that the Converter knows about its units and creates a string that describes it. As with __init__, all methods must have a first parameter of self. The method will probably need it to access the data of the class to which it belongs.
Try it yourself by running program 05_01_converter.py and then typing the following in the Python Shell:

The convert method has two parameters: the mandatory self parameter and a parameter called value. The method simply returns the result of multiplying the value passed in by self.scale:
![]()
![]()
Inheritance
The ScaleConverter class is okay for units of length and things like that; however, it would not work for something like converting temperature from degrees Celsius (C) to degrees Fahrenheit (F). The formula for this is F = C * 1.8 + 32. There is both a scale factor (1.8) and an offset (32).
Let’s create a class called ScaleAndOffsetConverter that is just like ScaleConverter, but with a factor as well as an offset. One way to do this would simply be to copy the whole of the code for ScaleConverter and change it a bit by adding the extra variable. It might, in fact, look something like this:
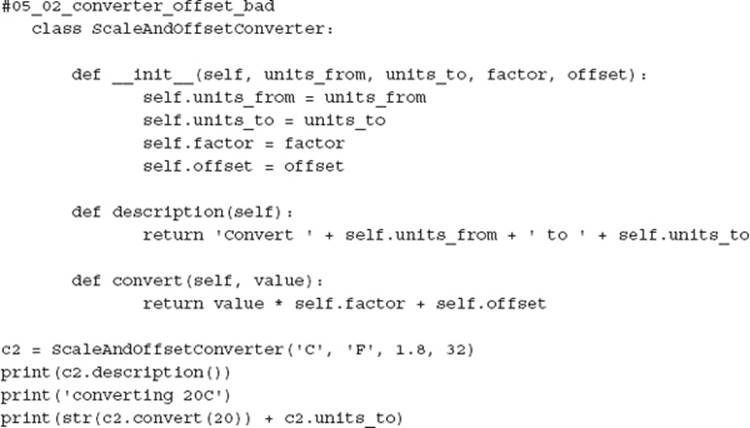
Assuming we want both types of converters in the program we are writing, then this is a bad way of doing it. It’s bad because we are repeating code. The description method is actually identical, and __init__ is almost the same. A much better way is to use something called inheritance.
The idea behind inheritance in classes is that when you want a specialized version of a class that already exists, you inherit all the parent class’s variables and methods and just add new ones or override the ones that are different. Figure 5-2 shows a class diagram for the two classes, indicating how ScaleAndOffsetConverter inherits from ScaleConverter, adds a new variable (offset), and overrides the method convert (because it will work a bit differently).

Figure 5-2 An example of using inheritance
Here is the class definition for ScaleAndOffsetConverter using inheritance:
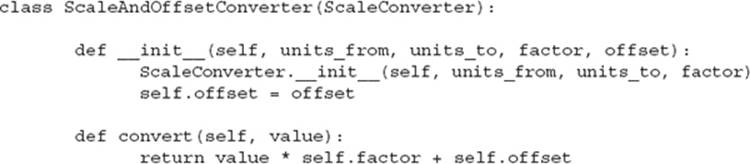
The first thing to notice is that the class definition for ScaleAndOffsetConverter has ScaleConverter in parentheses immediately after it. That is how you specify the parent class for a class.
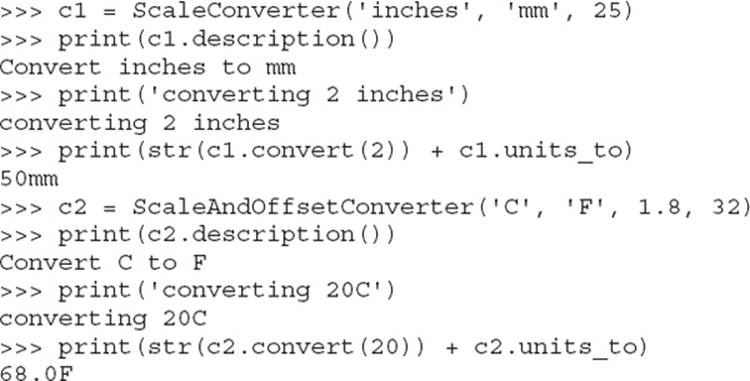
The __init__ method for the new “subclass” of ScaleConverter first invokes the __init__ method of ScaleConverter before defining the new variable offset. The convert method will override the convert method in the parent class because we need to add on the offset for this kind of converter. You can run and experiment with the two classes together by running 05_03_converters_final.py:
It’s a simple matter to convert these two classes into a module that we can use in other programs. In fact, we will use this module in Chapter 7, where we attach a graphical user interface to it.
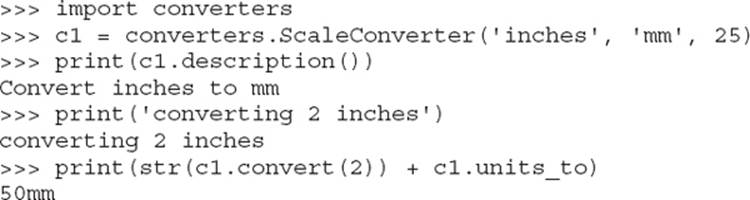
To turn this file into a module, we should first take the test code off the end of it and then give the file a more sensible name. Let’s call it converters.py. You will find this file in the downloads for this book. The module must be in the same directory as any program that wants to use it.
To use the module now, just do this:
![]()
Summary
Lots of modules are available for Python, and some are specifically for the Raspberry Pi, such as the RPi.GPIO library for controlling the GPIO pins. As you work through this book, you will encounter various modules. You will also find that as the programs you write get more complex, the benefits of an object-oriented approach to designing and coding your projects will keep everything more manageable.
In the next chapter, we look at using files and the Internet.
All materials on the site are licensed Creative Commons Attribution-Sharealike 3.0 Unported CC BY-SA 3.0 & GNU Free Documentation License (GFDL)
If you are the copyright holder of any material contained on our site and intend to remove it, please contact our site administrator for approval.
© 2016-2026 All site design rights belong to S.Y.A.