Learn to Program with Scratch: A Visual Introduction to Programming with Games, Art, Science, and Math (2014)
Chapter 9. Lists
The programs we’ve written so far have used ordinary variables to store single pieces of data. Such variables are not as useful, however, when you want to store a bunch of values, such as your friends’ phone numbers, names of books, or a month of temperature readings.
For example, if you wanted your program to remember the phone numbers of 20 of your friends, you’d need 20 variables! Certainly, writing and maintaining a program with 20 variables would be tedious. In this chapter, we’ll explore another built-in data type, called a list, which offers a convenient way to group related values. Here’s what we’ll cover:
§ How to create and manipulate lists
§ Initializing and accessing individual elements in a list
§ Basic sorting and search techniques
§ Using lists to create powerful applications
First, I’ll explain how to make lists in Scratch, demonstrate the commands you can use with them, and show you how to populate lists with data entered by a user. We’ll then discuss numeric lists and common operations performed on them, such as finding the minimum, the maximum, and the average value of their elements. After that, we’ll learn one algorithm for sorting the elements in a list. We’ll end with several example programs that demonstrate some real-world applications of lists.
Lists in Scratch
A list is like a container where you can store and access multiple values. You can think of it as a dresser with many drawers, with each drawer storing a single item. When you create a list, you name it just as you would a variable. You can then access the individual elements of the list using their storage position in the list. Figure 9-1, for example, depicts a list named dayList that stores the names of the seven days of the week.
You can refer to the items contained in a list using their storage index (or position). In Scratch, the first item has an index of 1, the second item is 2, and so on. For example, since Tuesday is third in the list, it has an index of 3. Therefore, you can refer to the third element of our dayListusing a command of the form “item 3 of dayList.”
Let’s jump right in and create some lists in Scratch. We’ll also look at the commands that allow us to manage and manipulate lists in our programs and learn how Scratch responds to invalid list commands.

Figure 9-1. A list that contains the days of the week
Creating Lists
Creating a list is almost identical to creating a variable. Select the Data palette and click Make a List to bring up the dialog in Figure 9-2 (right). Next, enter the name of the list (we’ll use dayList) and specify its scope. Choosing the For all sprites option creates a global list that any sprite in your application can access, while the For this sprite only option creates a local list that belongs to the currently selected sprite. Local lists can only be read (and written to) by the owner sprite.
When you click OK to confirm your input, Scratch creates a new empty list and shows the list-related blocks, as illustrated in Figure 9-3. This is similar to what you’d see when you create a new variable. An empty list is a list that does not contain any items.
You can use these new commands to manipulate the contents of your list while your script is running. You can append new items, insert items at specific positions, delete certain items, or replace the values of existing items.

Figure 9-2. Creating a list in Scratch is similar to creating a variable.

Figure 9-3. Command and function blocks that you can use with lists
When a new list is created, Scratch also shows the list’s monitor on the Stage, as illustrated in Figure 9-4. The list will initially be empty, so its length starts at 0. You can use this monitor block to add entries to your list as you design a program.

Figure 9-4. The monitor of a newly created list is shown on the Stage.
If you know the data that you want to store in the list (as is the case for our dayList), you can add it to the list at this point. Figure 9-5 shows how you can add days to the dayList using its monitor.
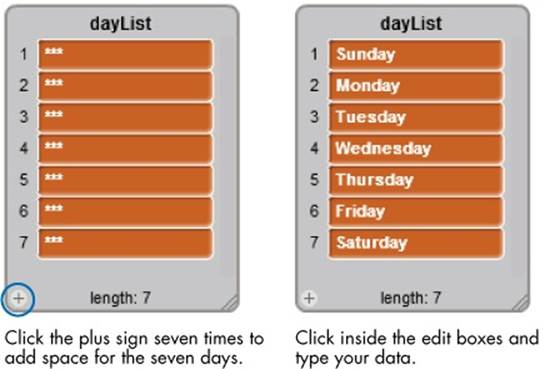
Figure 9-5. Populating the dayList
Click the plus sign at the lower-left corner seven times to create seven entries and then enter a day of the week inside each edit box. Use the TAB key to navigate through the list items. Pressing TAB once highlights the next list item with a yellow border. Pressing TAB another time highlights the editable text of the selected item and removes the yellow border. If you click the plus sign while the currently selected item is surrounded by a yellow border, the new list item will be added after the current item; otherwise, it will be added before the current item. Try navigating the list!
TRY IT OUT 9-1
Populate dayList with the names of the weekdays, as shown in Figure 9-5.
List Commands
Figure 9-3 described all the blocks that Scratch added when we created our dayList. In this section, we’ll look more closely at these blocks to better understand their function.
Add and Delete
The add command places a new item at the end of a list, while the delete command removes an item from a specific position. Figure 9-6 shows these commands in action.
The script first executes the delete command to remove the second item of the list, which is “Orange.” The script then puts “Lemon” at the end of the list using the add command.

Figure 9-6. A list before and after add and delete are used to change its contents
The add command is straightforward, but let’s examine the delete command more closely. You can type the index of the element you want to delete directly into the block’s parameter slot, or you can click the drop-down arrow. The drop-down menu (see Figure 9-6) shows three options: 1, last, and all. Select 1 to delete the first item (“Apple”) from the list, select last to delete the last item (“Mango”), or select all to delete all the items from the list.
Insert and Replace
Let’s say you want to store your friends’ names and phone numbers alphabetically in a list, just like the contacts list in your cell phone. As you make your list, you need to insert each friend’s contact information at the proper position. Later, if one friend gets a new phone number, you’ll need to edit the list to enter it. The insert and replace commands can help you with these tasks. Figure 9-7 shows an example of using the insert and replace commands with our phone list.

Figure 9-7. Using the insert and the replace commands to update a list of telephone numbers
The replace command overwrites the current string at slot number 3 with Kim’s new phone number. The insert command places the phone number of a new friend, Mark, at slot number 4 in the list. Notice that the existing elements moved down one slot to make room for the new entry.
Clicking the item number’s down arrow in both the replace and the insert commands shows a drop-down menu of three options: 1, last, and random (see Figure 9-7). If you select random, the selected command will choose an item number randomly. You’ll see some useful applications of this feature later in this chapter.
Accessing List Elements
As we mentioned earlier, you can access any element in a list using that element’s index. For example, the script in Figure 9-8 demonstrates using the item of block to access the elements of our dayList. The script uses a variable named pos (short for position) to iterate through each item of the list, showing the contents via the say command.

Figure 9-8. This script causes the sprite to display the seven days of our dayList.
The script initializes the value of pos to 1 so it can access the first element in dayList, and then the script enters a loop. The loop’s repeat count is set to 7, the number of elements in our list. On each pass, the loop will say the list item with an index equal to pos and increment the value ofpos to access the next element. In other words, we’re using pos as an index to pinpoint a specific element in the list.
TRY IT OUT 9-2
Replace the literal number 7 in the repeat loop with the length of dayList block. This is what you’d normally do to step through a list if you didn’t know how many items it contained. Also, select random from the first drop-down menu in the item of block. This should cause the script to display an item from the list at random.
The Contains Block
You can check whether a certain string is in a list by using contains, a Boolean block that returns true or false based on whether or not the list contains your string. The script shown in Figure 9-9 illustrates one use of this block. Since dayList contains the string “Friday”, the say command inside the if block will be executed.
NOTE
The contains block is case insensitive. The block dayList contains friDAY, for example, would also evaluate to true.

Figure 9-9. Using the contains block to check whether a string is in a list
Bounds Checking
The four list blocks (delete, insert, replace, and item of) require an input parameter that specifies the index of the item you want to access. For example, to delete the seventh element of our dayList, we use delete 7 of dayList. But what do you think will happen if you use an invalid index with one of these blocks? For example, how would Scratch respond if you asked it to delete the eighth element of our dayList (which only contains seven elements)?
Trying to access an element past the boundaries of a list is, technically, an error. Rather than display an error message or abruptly terminate your program, however, Scratch silently tries to do something sensible with the offending block. For this reason, the absence of error messages does not necessarily mean the absence of errors. Problems may still exist in your code, and when they do, you still need to fix them. Scratch won’t complain about invalid indexes in your blocks, but the outcome usually won’t be what you intended. Table 9-1 shows what can happen when you try to access dayList using an out-of-range index.
Table 9-1. Unexpected Results from Bad List Indexes
|
Command or Function Block |
Result |
|
|
Returns an empty string because dayList has only seven items. The same thing happens if you use an index less than 1. |
|
|
Scratch ignores the .9 and returns the first item of dayList, which is “Sunday”. Similarly, if you asked for item 5.3, Scratch would return the fifth item, “Thursday”. |
|
|
Scratch ignores this command because it attempts to create a gap in the list. The list remains unchanged. |
|
|
This has the same effect as the add command. It adds “Newday” to the end of the list. |
|
|
The command is ignored (because dayList has only seven elements), and the list remains unchanged. |
The examples in Table 9-1 demonstrate that, although Scratch’s blocks try to do something sensible when their inputs are invalid, they won’t necessarily do the right thing. You have to provide your program with the right inputs so it works the way you want it to.
Up to this point, our examples have used simple lists that we created manually using their monitors. The question now is this: What if you don’t know the contents of a list when you write your program? For example, you may need to make a list of user-entered numbers or fill a list with random values each time the program is run. We’ll tackle this problem next.
Dynamic Lists
Lists are powerful because they can grow or shrink dynamically as a program is running. Let’s say, for example, that you are writing a grade book application, in which teachers can enter students’ test scores for further processing. (The teacher might need to find the maximum score, minimum, average, median, and so on for a class.) However, the number of students may be different for every class. The teacher may need to enter 20 scores for Class 1, 25 scores for Class 2, and so on. How can your program know that the teacher has finished entering the scores? This section will answer that question.
First, we’ll introduce two ways to populate lists with data from a user. We’ll then explore numeric lists and look at some of the common operations performed on them. Once you understand the fundamental concepts, you’ll be ready to adapt these techniques to your own applications.
Filling Lists with User Input
There are two common ways to fill a list with data entered by a user. In the first method, your program begins by asking how many entries there will be and then starts a loop to collect the user’s input. A script that demonstrates this technique is shown in Figure 9-10.

Figure 9-10. Asking the user how many scores will be entered
Once the user tells this script how many scores to expect, the script starts a loop with a repetition count equal to the user’s input. Each iteration of the loop then asks the user for a new score and appends that value to the list, called scoreList.
The second way to dynamically populate a list is to have the user enter a special value (known as a sentinel) to mark the end of the list. Of course, you should choose a sentinel that won’t be mistaken for a member of the list. If you’re expecting a list of names or positive numbers, for example, a sentinel of –1 is a good choice. If, on the other hand, the user will enter negative values, then –1 won’t be a good sentinel. Using a sentinel of –1 will work for our scoreList, and the script shown in Figure 9-11 uses this sentinel to know when the user is done entering values.
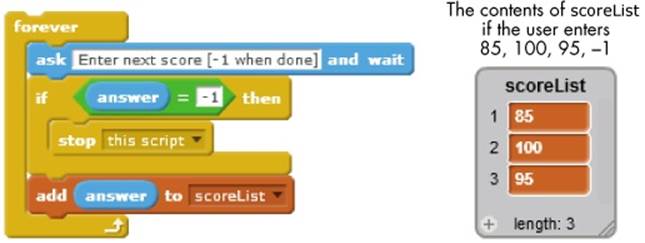
Figure 9-11. Using a sentinel to control list growth
In each iteration of the loop, the script prompts the user to enter a number and compares that value to the sentinel. Note that the script specifies the sentinel (–1 in this case) in its prompt to the user. If the user enters –1, then the script stops because it knows the user is done entering scores. Otherwise, the input value is appended to the list, and the user is prompted for another entry. Figure 9-11 shows how scoreList should look if the user enters three scores followed by the sentinel.
Creating a Bar Chart
As a practical example of collecting user input with lists, let’s write an application that draws a bar chart (also called a histogram) from the user’s numbers. For simplicity, we’ll only accept five numbers between 1 and 40. Once the program has received all five numbers, it will draw five bars with heights proportional to the entered values. The user interface for our chart maker is illustrated in Figure 9-12.
BarChart.sb2
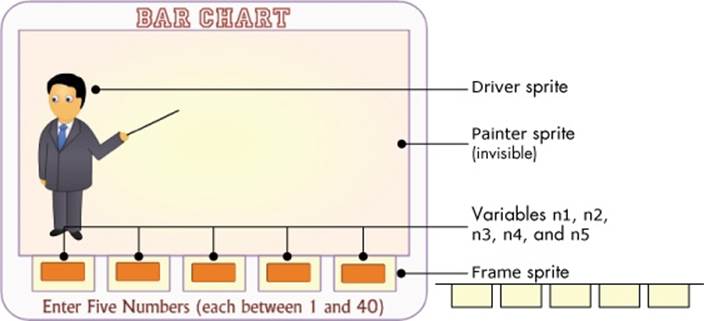
Figure 9-12. The Bar Chart application
This application contains three sprites. The Driver sprite controls the flow of the application; it contains scripts that accept user input, populate the list, and tell the Painter sprite to start drawing. The Painter sprite is an invisible sprite that draws the bar chart. The Frame sprite is purely cosmetic; it hides the bottom of each bar to make it look flat; without it, the bottoms of the vertical bars would have rounded tips. The numerical values for the five bars are shown using five variables, named n1 through n5, whose monitors are located at the right positions on the Stage. When you click the green flag icon to start the application, the Driver sprite runs the script shown in Figure 9-13.
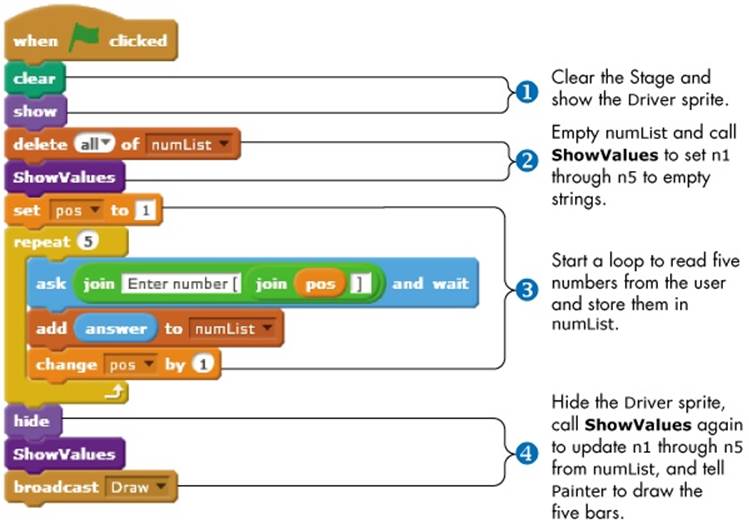
Figure 9-13. The main script for the Driver sprite
First, the Driver sprite appears on the Stage and clears any previous pen marks ①. That way, if there is a bar chart already, it will be cleared before the new one is drawn. The script then clears numList so we can use it to collect new entries from the user and calls ShowValues ② to set n1through n5 so their monitors will be blank.
When the Stage is prepared, the script enters a repeat loop ③, which iterates five times. Inside the loop, the Driver asks the user to enter a number and appends that number to numList. After collecting all five numbers from the user and saving them in numList, the Driver sprite hides itself ④ to make room for the bar chart. It then calls ShowValues again to update n1 through n5 with the user’s new values and broadcasts Draw so the Painter sprite will draw the five bars.
Before examining how the Painter draws the bars, let’s look at the ShowValues procedure shown in Figure 9-14.
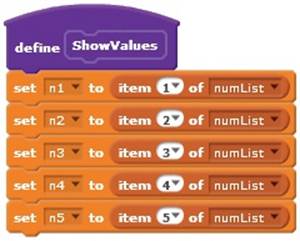
Figure 9-14. The ShowValues procedure
ShowValues simply sets the variables n1 through n5 equal to their corresponding entries in numList. Since the first call to ShowValues is made immediately after clearing numList, all five variables will contain empty strings after this call. This results in clearing the five monitors on the Stage, which is exactly what we want. When numList contains data from the user, calling ShowValues displays the data in those same monitors.
Now let’s explore the Draw procedure, which is executed when the Painter sprite receives the Draw message. You can see this script in Figure 9-15.
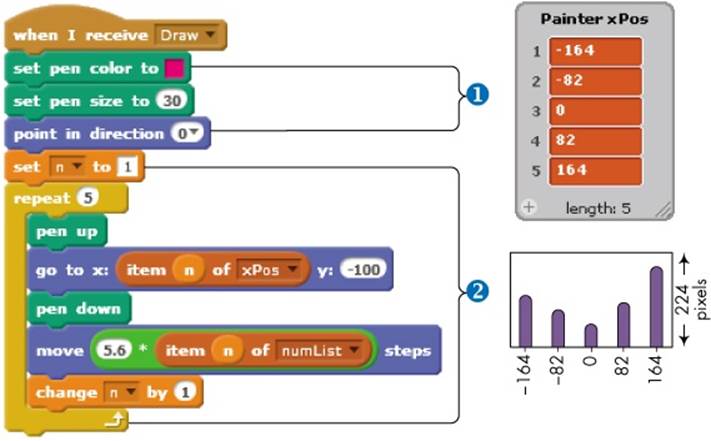
Figure 9-15. The Draw script of the Painter sprite
The sprite first sets the pen color. Then it sets the pen’s size to a large value to draw the thick bars. To prepare for drawing the five vertical bars, the sprite points in the up direction ①.
The script starts a repeat loop to draw the five bars ②. We knew the x-position of each bar in advance, so we created a list named xPos to store those values (also shown in the figure). During each iteration of the loop, the Painter sprite moves to the x-position for the current bar, puts its pen down, and then moves up to draw a vertical line.
The height of each line is proportional to the corresponding value in numList. Our chart area on the Stage is 224 pixels tall, and since 40 is the highest value, an input of 40 should have a bar as tall as the chart. To find the height (in pixels) for any number in numList, we need to multiply that number by 5.6 (that is, 224/40). Figure 9-16 shows the output of the application after getting some data from the user. Note that the Frame sprite covers the rounded tip of the wide drawing pen so the bars look flat at the bottom.

Figure 9-16. A sample output of the Bar Chart application
TRY IT OUT 9-3
Run this application several times to understand how it works. Change the script so that each bar will be drawn in a different color. Hint: Create a new list, named color, for the Painter sprite that stores the color number of the five bars and use the following command before drawing each bar:
![]()
Numerical Lists
Lists of numbers appear in many practical applications. We can have lists of test scores, temperature measurements, product prices, and more. In this section, we’ll explore some common operations you might want to perform on numerical lists. In particular, we’ll write procedures for finding the maximum or minimum value and for finding the average of the numbers stored in a list.
Finding Min and Max
Suppose you’re a teacher and you need to know the highest score from the last exam your class took. You could write a program to compare all of those test scores and find the maximum value. Our first example, shown in Figure 9-17, finds the highest number in a list named score.
FindMax.sb2
The FindMax procedure starts by setting the value of the maxScore variable equal to the first number in the list. It then starts a loop to compare the remaining numbers in the list with the current value of maxScore. Every time it finds a value greater than maxScore, it sets maxScore equal to that value. When the loop terminates, the value stored in maxScore will be the largest value contained in the list.
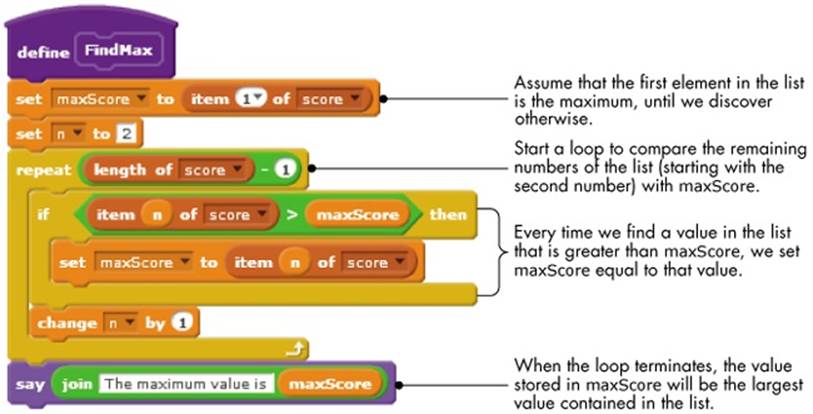
Figure 9-17. Finding the maximum number in a list
Finding the minimum value in a list follows a similar algorithm. We start by assuming that the first element in the list is the smallest element and then use a loop to check the remaining elements. Each time we find a smaller value, we update the variable that holds the minimum value.
TRY IT OUT 9-4
Use what you learned in this section to create a procedure called FindMin that finds the minimum value of the score list.
Finding the Average
In our next example, we’ll write a procedure that computes the average score of the numbers stored in our score list. You can find the average of a sequence of N numbers by first finding their sum and then dividing the total by N. The procedure shown in Figure 9-18 does exactly that.
FindAverage.sb2

Figure 9-18. Finding the average value of a list of numbers
The FindAverage procedure uses a loop to step through the scores stored in the list, add them together, and store the result in a variable named sum. (This variable is initialized to 0 before the start of the loop.) When the loop terminates, the script calculates the average by dividing sum by the number of scores, and it saves the result in a variable named average.
NOTE
Pay special attention to the way we accumulated the sum variable inside the loop. This pattern, known as the accumulator pattern, comes up very often in programming.
In the next section, we’ll explore how to search and sort lists, two common problems in programming. I’ll also walk you through some simple algorithms for performing each operation.
TRY IT OUT 9-5
Combine FindAverage, FindMax, and FindMin into one procedure (called ProcessList) that will display the average, maximum, and minimum values for the score list all at the same time.
Searching and Sorting Lists
Suppose you have a list of contacts that isn’t in any particular order. If you wanted to organize the contacts, you might sort them into alphabetical order based on their names. If you need to know someone’s phone number and you have their last name, you’ll need to search the list to see if it contains that person’s contact information. The goal of this section is to introduce basic programming techniques for searching and sorting lists.
Linear Search
Scratch’s contains block provides an easy way to check whether a list contains a specific item. If, in addition, we’d like to know the position of the item being searched for in a list, then we have to perform the search ourselves.
SearchList.sb2
This section will explain one method for searching lists, called a linear search (or sequential search). The method is easy to understand and implement, and it works on any list, whether it is sorted or not. However, because a linear search compares the target value with every element in the list, it can take a long time if your list is large.
To illustrate, suppose you’re searching for a specific item in a list named fruit. If the list contains the item you are looking for, you also need to know the exact position of that item. The SearchList procedure shown in Figure 9-19 performs a linear search on the fruit list to give us the answers we seek.
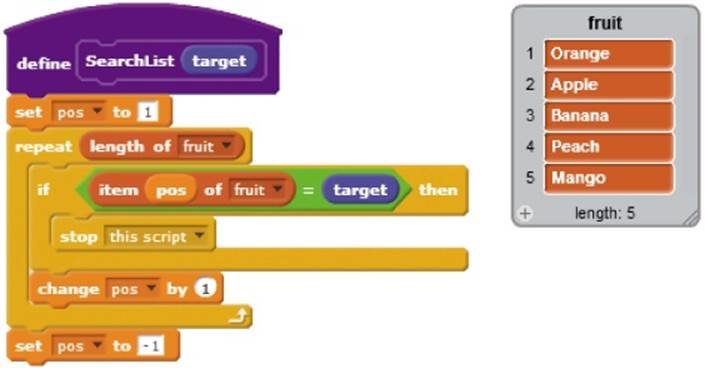
Figure 9-19. The SearchList procedure
Starting with the first element, SearchList compares the fruits in our list, one by one, with the one we’re looking for, which is represented by the target parameter. The procedure stops if it either finds the value or reaches the end of the list. If the script finds the value we want, the posvariable will contain the location where the item was found. Otherwise, the procedure sets pos to an invalid value (–1 in this case) to indicate that the target item was not in the list. Figure 9-20 shows an example of calling this procedure and its corresponding output.

Figure 9-20. Using the SearchList procedure
Examining the value of pos tells the caller two things: (a) whether the item we’re looking for is in the list or not and (b) if the item exists, its exact position. Running this script sets pos to 4, indicating that “Peach” was found in the fourth position of the fruit list.
Frequency of Occurrence
Suppose that your school conducted a survey about the quality of its cafeteria food. Students rated the taste on a 1 to 5 scale (1 = poor, 5 = excellent). All votes have been entered into a list, and you are asked to write a program to process this data. For now, the school only wants to know how many students completely dislike the food (that is, how many gave it a rating of 1). How would you write such a program?
ItemCount.sb2
Clearly, your program needs a procedure that counts how many times the number 1 appears in the list. To simulate the students’ votes, let’s use a list that contains 100 random votes. The procedure that populates the list is shown in Figure 9-21. This procedure adds 100 random numbers between 1 and 5 to a list called survey.
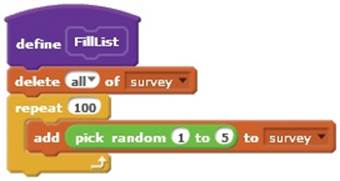
Figure 9-21. The FillList procedure
Now that we have a list of votes, we can count how often a given rating appears in that list. We’ll do this with the GetItemCount procedure, shown in Figure 9-22.

Figure 9-22. Counting how many times an item appears in a list
The target parameter represents the item to search for, while the itemCount variable tracks the number of times the target item is found. The procedure starts by setting itemCount to 0, and then it starts a repeat loop to search the list for the value specified in target. During each iteration of the loop, the procedure checks the list item at the location indexed by the loop counter, n. If that item equals the target, the script increases itemCount by 1.
To give the principal information about disgust with the cafeteria’s food, we just need to call GetItemCount with an argument of 1, as shown in Figure 9-23.
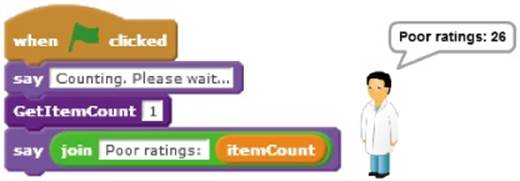
Figure 9-23. Using the GetItemCount procedure
TRY IT OUT 9-6
After you provide the answer to this question, the principal suddenly becomes curious about how many students gave the cafeteria an excellent rating. The principal also wants to know how many students participated in the survey. Modify the program and run it again to give the principal the additional information.
Bubble Sort
If you have a set of names, game scores, or anything else that you want to show in a particular order—alphabetically, from largest to smallest, and so on—you’ll have to sort your list. There are many ways to sort lists, and a bubble sort is one of the simplest algorithms. (The name refers to how values “bubble” up through the list to their correct positions.) In this section, we’ll learn about bubble sort and write a Scratch program to perform this kind of sort for us.
BubbleSort.sb2
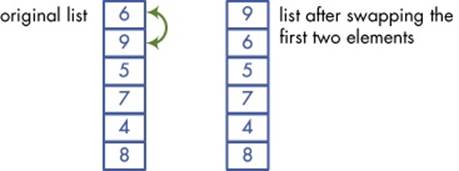
Let’s say that we need to sort the list of numbers [6 9 5 7 4 8] in descending order. The following steps illustrate how the bubble sort algorithm works.
1. We’ll start by comparing the first two elements in the list. Since 9 is larger than 6, we can swap their positions, as shown below.
2. Now we can compare the second and third elements, which are 6 and 5. Since 6 is larger than 5, the two numbers are already in order, and we can move on to the next pair.
3. We’ll repeat this process to compare the third and fourth, fourth and fifth, and finally the fifth and sixth elements. Take a look at the list after these three comparisons, shown below.

4. This pass of the bubble sort is over, but our list still isn’t in the right order. We need to perform a second pass, starting from step one. Once more, we’ll compare each pair of elements and swap them if needed. Here’s the list after a second pass:

5. We’ll repeat the bubble sort process until no numbers are swapped during a pass, meaning that our list is in order. The final three passes of the algorithm are shown below:
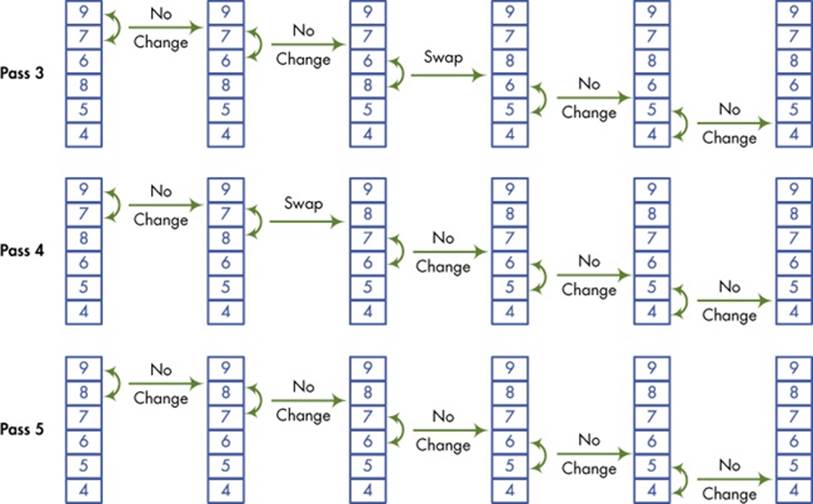
Now that you’ve seen how bubble sort works, let’s implement it in Scratch. The script, shown in Figure 9-24, has two loops. The inner loop cycles through a list, comparing and swapping as needed, and sets a flag (named done) to 0 when another pass is needed. The outer loop repeats as long as the done flag is 0, because that value means we aren’t done sorting. If the inner loop completes one pass without swapping elements, the outer loop will exit, ending the procedure.
Let’s explore this procedure in more detail. Since we haven’t done any sorting yet, it sets done to 0 ①. The outer loop uses a repeat until block to pass through the list until it is sorted (that is, until done becomes 1) ②. At the beginning of every pass, this loop sets done to 1 ③ (that is, it assumes that we won’t make any swaps). It also sets pos to 1 to start the sort with the first number.
The inner loop then compares each pair of elements in the list. The loop needs to perform N – 1 comparisons ④, where N is the number of items in the list.
If the item at index pos+1 is greater than the item at pos ⑤, the two need to be swapped. Otherwise, the procedure adds 1 to pos so it can compare the next pair of items. If we do need to swap, this procedure does so with the aid of a temporary variable named temp ⑥.
Once the current pass through the list ends, the inner loop sets done back to 0 if it swapped numbers or leaves done=1 if it made no changes ⑦. The outer loop will continue until the list is sorted.
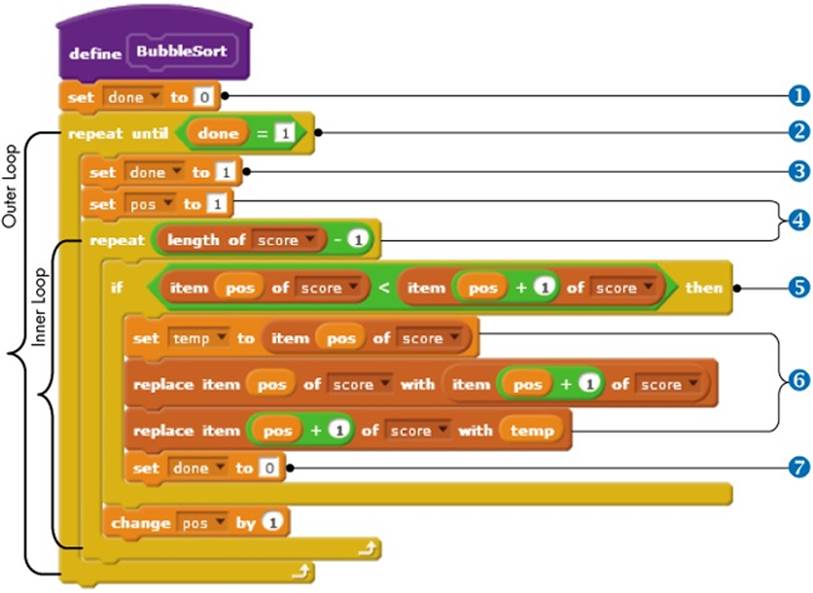
Figure 9-24. The BubbleSort procedure
TRY IT OUT 9-7
Make a list of names instead of numbers and use the bubble sort script to put the list in order. Does the sort still work as it should? Also, what changes do you need to make to the procedure to make it sort in ascending order?
Finding the Median
Median.sb2
Now that we know how to sort a list, we can easily find the median value of any sequence of numbers. Recall that the median is the middle value in a sorted set of numbers. If we have an odd number of items, we can just take the middle number. If we have an even number, the median is the average of the two middle numbers. We can describe the median for a sorted list of N items as follows:

A procedure that performs this calculation is shown in Figure 9-25. It assumes the list is in order.
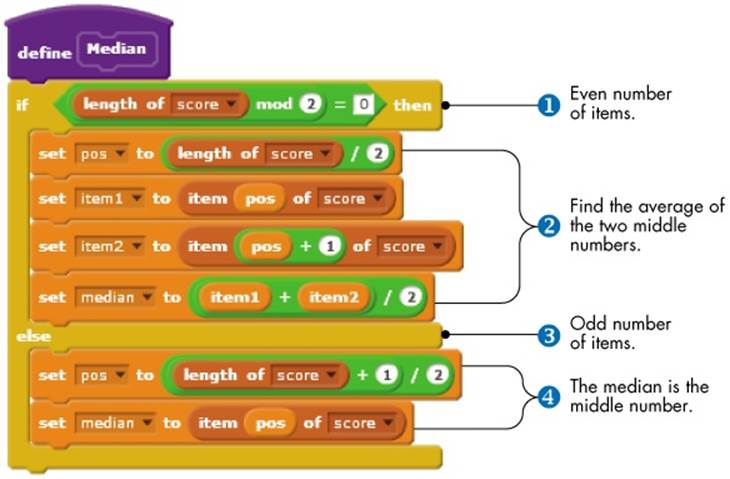
Figure 9-25. Finding the median value of a sorted list of numbers
The procedure uses an if/else block to handle the two cases of even and odd lists. If the number of items in the list divides by 2 with no remainder (that is, the list has an even number of items) ①, the median variable is calculated as the average of the middle two numbers ②. Otherwise, the list has an odd number of items ③, and the median variable is set equal to the number in the middle of the list ④.
We’ve covered a lot of ground so far, so it’s time to apply our newfound knowledge to something more challenging. The rest of this chapter walks through several examples that demonstrate how to use lists in more complex applications.
Scratch Projects
In this section, you’ll explore practical Scratch projects that highlight different aspects of lists. I’ll also introduce some new ideas and techniques that you can use in your own creations.
The Poet
Let’s kick off this chapter’s projects with a poem generator. Our artificial poet selects words randomly from five lists (article, adjective, noun, verb, and preposition) and combines them according to a fixed pattern. To give our poems a central theme, all the words in these lists are somehow related to love and nature. (Of course, we might still end up with some silly poetry, but that’s just as fun!)
Poet.sb2
NOTE
The idea of this program is adapted from Daniel Watt’s Learning with Logo (McGraw-Hill, 1983). You’ll find the full word lists we’re using in the Scratch file for this project, Poet.sb2.
Each poem is composed of three lines that follow these patterns:
§ Line 1: article, adjective, noun
§ Line 2: article, noun, verb, preposition, article, adjective, noun
§ Line 3: adjective, adjective, noun
With those constructions in mind, let’s look at the procedure that builds the first line of the poem, shown in Figure 9-26.
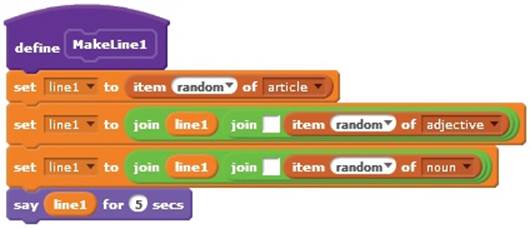
Figure 9-26. “Writing” the first line of a poem
This script selects a random word from the article list and stores it in line1. Then the script appends a white space, a random word from the adjective list, another white space, and a random word from the noun list. Finally, the poet sprite says the complete line. I don’t show the procedures for the other two lines of the poem here because they’re very similar, but you can open up Poet.sb2 to view them.
Here are two poems created by our machine poet:
§ each glamorous road
§ a fish moves behind each white home
§ calm blue pond
§ every icy drop
§ a heart stares under every scary gate
§ shy quiet queen
TRY IT OUT 9-8
Open Poet.sb2 and run it several times to see what this machine poet is capable of authoring. Then change the program so that it uses three sprites, with each sprite responsible for one line of the poem, allowing you to read the whole poem on the Stage at once.
Poet.sb2
Quadrilateral Classification Game
Our next project is a simple game that will help you explore different kinds of quadrilaterals. The game shows one of six shapes (parallelogram, rhombus, rectangle, square, trapezoid, or kite) on the Stage and asks the player to classify that shape by clicking the correct button, as illustrated inFigure 9-27.
QuadClassify.sb2
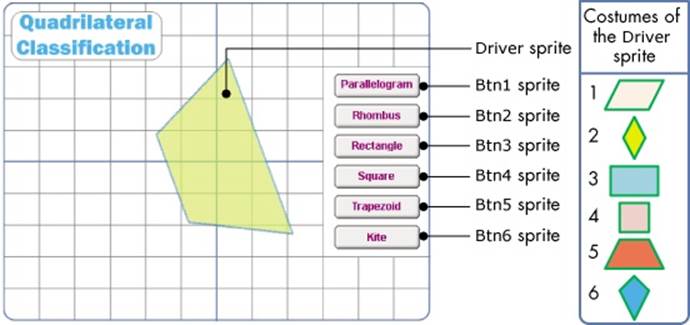
Figure 9-27. The user interface for the quadrilateral classification game
The game contains seven sprites: six for the answer buttons and a seventh (named Driver) that contains the main script. As shown in Figure 9-27, the Driver sprite has six costumes that correspond to the six quadrilaterals in the game. When the green flag icon is clicked, the Driver sprite executes the script shown in Figure 9-28 to start the game.
First, the Driver sprite moves to the top drawing layer ① so that no buttons will obscure it. In the main loop of the game ②, the script shows a random quadrilateral on each pass with ShowShape ③. After showing the quadrilateral, the script sets the global variable choice to 0 to indicate that the user hasn’t answered yet ④.
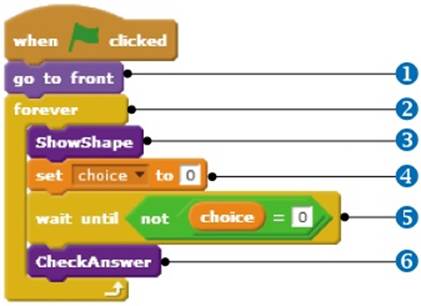
Figure 9-28. The main script of the Driver sprite
The script then waits ⑤ until choice changes to a nonzero number, which will happen when the player clicks one of the six answer buttons. When the player guesses a shape, the script calls CheckAnswer ⑥ to tell the player whether or not that answer was correct.
Now that you know how the main script works, let’s look at the ShowShape procedure, shown in Figure 9-29.
First, ShowShape moves the Driver sprite to the center of the stage and points it in a random direction ①. It assigns the shape variable a random value from 1 through 6 and switches the sprite’s costume ② to show a quadrilateral for the player to identify.
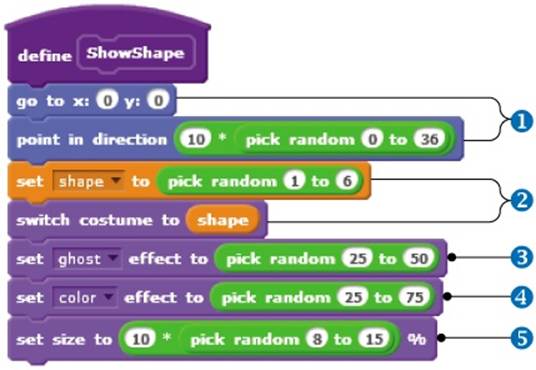
Figure 9-29. The ShowShape procedure of the Driver sprite
To keep the background’s grid visible, ShowShape sets the transparency level ③ to a random value between 25 and 50. To give the illusion that it is coming up with a new shape every round, the procedure also sets the color effect to a random value to change the color of the costume ④ and resizes the sprite to 80%, 90%, ..., or 150% of its original size ⑤.
Next, we’ll look briefly at the scripts for the six button sprites, shown in Figure 9-30. They’re identical except for the value assigned to the choice variable.

Figure 9-30. Scripts for the button sprites
These one-line scripts each set the value of choice to a different number depending on which button the player presses. Once choice contains the player’s answer, the CheckAnswer procedure, illustrated in Figure 9-31, can compare it with the value of shape, which specifies the type of the drawn quadrilateral.
If choice and shape are equal, then the player’s answer is correct. Otherwise, the answer is wrong, and the sprite will say the right shape. CheckAnswer uses the shape variable as an index to a list named quadName, which is also shown in Figure 9-31, to get the correct name of the displayed shape.
TRY IT OUT 9-9
Open QuadClassify.sb2 and run it several times to understand how it works. As written, this game runs forever. Modify the program to add a game-end criterion. Also, keep track of the number of the player’s correct and incorrect answers.
QuadClassify.sb2
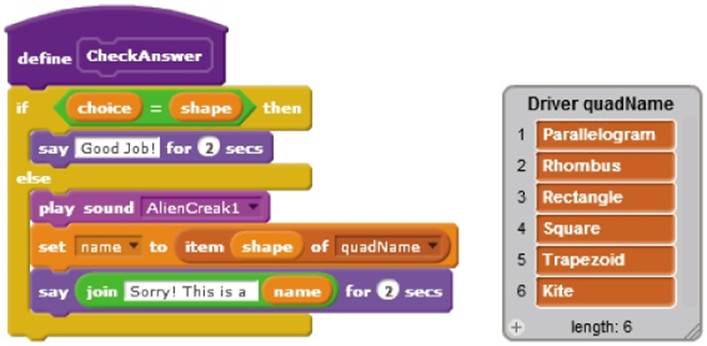
Figure 9-31. The CheckAnswer procedure
Math Wizard
This application demonstrates two ways to make lists even more useful. We’ll explore how to use lists to store nonuniform records (that is, records with different sizes) as well as how to use one list as an index to another. A record is just a collection of related data about a person, place, or thing. In our case, each record consists of a puzzle’s answer along with the instructions for that puzzle. Whereas each puzzle has a single answer, the number of instructions varies from one puzzle to another.
MathWizard.sb2
Our math wizard asks the user to think of a “secret” number and perform a sequence of mathematical operations on it (double the number, subtract 2, divide the answer by 10, and so on). At the end, after the player performs all these calculations, the wizard uses magical powers to tell the user what number he has, even though the wizard does not know the user’s initial number. Table 9-2 illustrates how the game works.
Table 9-2. How the Math Wizard Works
|
Wizard’s Instruction |
Your Number |
|
Think of a number. |
2 |
|
Add 5. |
7 |
|
Multiply by 3. |
21 |
|
Subtract 3. |
18 |
|
Divide by 3. |
6 |
|
Subtract your original number. |
4 |
After the last instruction, the wizard will tell you that following the instructions has given you the number 4, even though the game doesn’t know that you started out with 2. Try this puzzle with different numbers to figure out the wizard’s trick!
The interface of the application is shown in Figure 9-32.
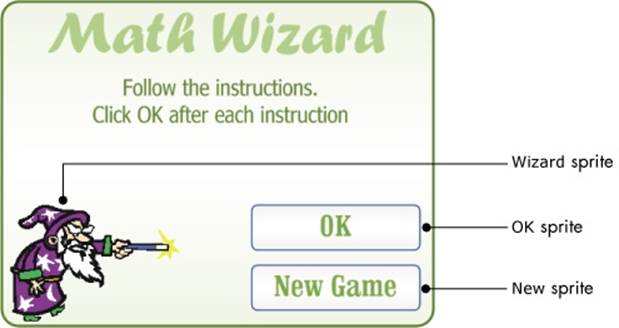
Figure 9-32. The user interface for the Math Wizard application
The application contains three sprites: the Wizard sprite, which gives the instructions to the player, and the OK and New sprites, for the OK and New Game buttons, respectively. It also uses the two lists illustrated in Figure 9-33.
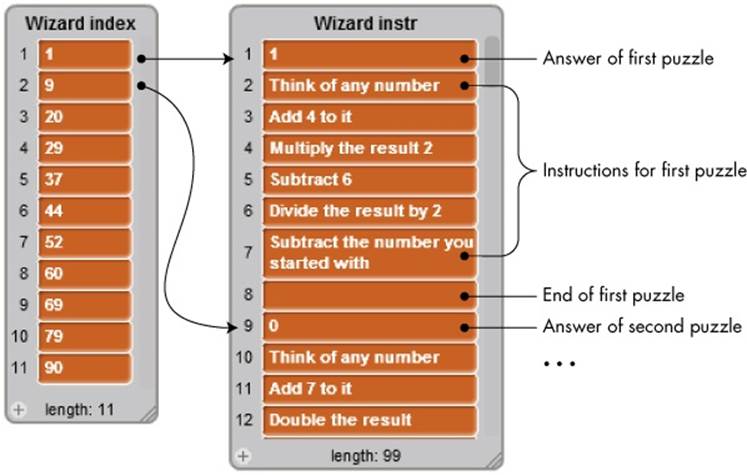
Figure 9-33. The two lists used by the Wizard sprite
The instr list (right) contains 11 puzzle records. Each record includes (a) the answer of the puzzle, (b) the instructions, and (c) an empty element to mark the end of that record. The entries in the list on the left (named index) identify the starting index of each puzzle in the instr list. For example, the second element in the index list is 9, which means the record of the second puzzle starts at the ninth position in the instr list, as illustrated in Figure 9-33. Let’s outline a strategy for developing this game:
1. When the user starts a new game, select a random number between 1 and 11 (because our game currently contains 11 puzzles).
2. Consult the index list for the starting position of the selected puzzle’s record. For example, if the second puzzle is selected, the index list tells us that the record of this puzzle starts at index 9 in the instr list.
3. Access the instr list at the index found in Step 2. The first element at that index is interpreted as the answer of the puzzle. The following elements represent the instructions that the wizard will say.
4. Let the wizard say the puzzle instructions one by one until encountering the empty element, which signifies the last instruction. The wizard should wait for the user to press the OK button before saying a new instruction.
5. Reveal the answer of the puzzle.
Now that we know how the game should work on a high level, let’s look at the scripts for the two buttons, shown in Figure 9-34.

Figure 9-34. The scripts for the two button sprites
The New Game button broadcasts the NewGame message when clicked. When the OK button is clicked in response to an instruction, the sprite sets clicked to 1 to inform the Wizard sprite that the player is done with the instruction she was asked to perform. When the Wizard sprite receives the NewGame message, it executes the script shown in Figure 9-35.
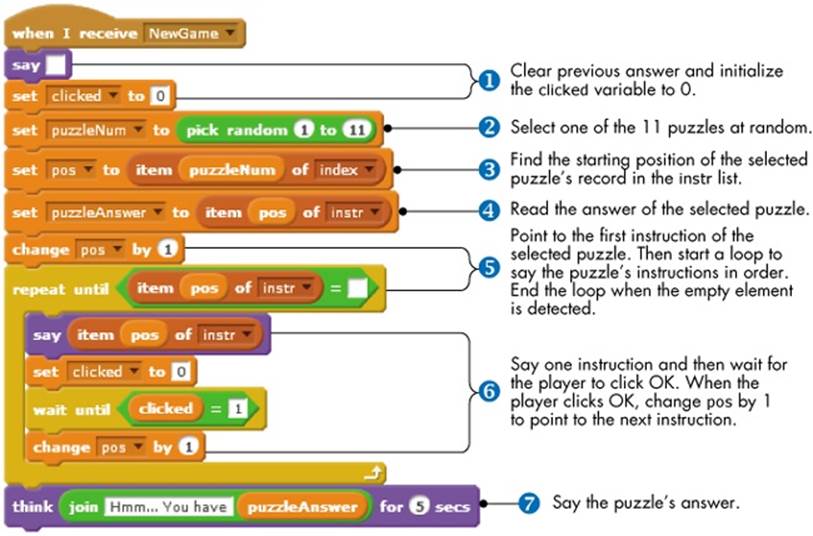
Figure 9-35. The NewGame script of the Wizard sprite
NewGame starts by clearing the speech bubble from the previous puzzle (if any) and initializing the clicked variable to 0 ①. It then saves the number of the randomly selected puzzle in a variable called puzzleNum ②. After that, it reads the starting position of the selected puzzle from theindex list and saves it in the pos variable ③. The script then uses pos to read the answer of that puzzle and saves it in puzzleAnswer ④. Next, the script adds 1 to pos so it points to the first puzzle instruction, and it starts a repeat until loop to say the puzzle’s instructions in order ⑤. After saying each instruction, the script waits for the clicked variable to be set to 1 before moving to the next instruction ⑥. When the loop finds an empty element, it exits, and the script says the puzzle’s answer ⑦.
TRY IT OUT 9-10
If you delete one of the puzzles or change the number of instructions for some puzzles, then you would need to rebuild the index list to match up with the instr list. Write a procedure that automatically populates the index list based on the current contents of the instr list. The key is to search for the empty strings in the instr list, as these indicate the end of one record and the start of the next record.
Flower Anatomy Quiz
In this section, I’ll use a quiz on the parts of a flower to demonstrate how to build simple quizzes in Scratch. Figure 9-36 shows our example application’s interface at the beginning of the quiz and after the program checks the user’s answers. Anyone taking the quiz will enter the letters to match the labeled parts of the flower and then click the Check button to check the answers. The program compares the user’s answers with the correct ones and provides feedback using the green check mark and the red X icons next to each answer.
FlowerAnatomy.sb2
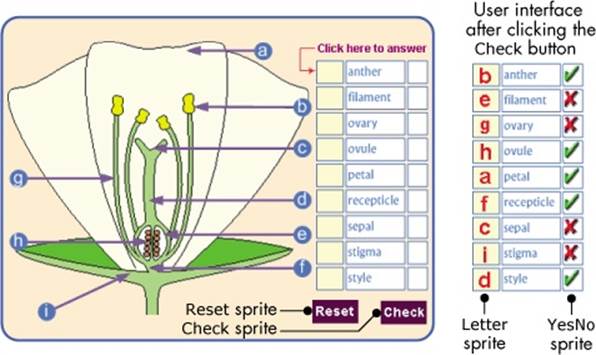
Figure 9-36. The user interface for the flower quiz
This quiz uses three lists. The first (named correctAns) contains the letters that correspond to the right answers for the nine parts of the quiz. The second list (named ans) contains the user’s input, and the third list (named cellYCenter) contains the 11 vertical positions used by theLetter and the YesNo sprites (so they know where they should stamp their costumes). When the user clicks the mouse over any of the answer boxes, the Stage sprite detects the mouse click and asks for an answer. The Stage sprite updates the corresponding element of the ans list to match what the user entered and stamps that letter over the answer box. Open FlowerAnatomy.sb2 to read the scripts that read and display the user’s answers.
When the user clicks the Check button, the YesNo sprite, which has the costumes for the check mark and X images, executes the script shown in Figure 9-37.
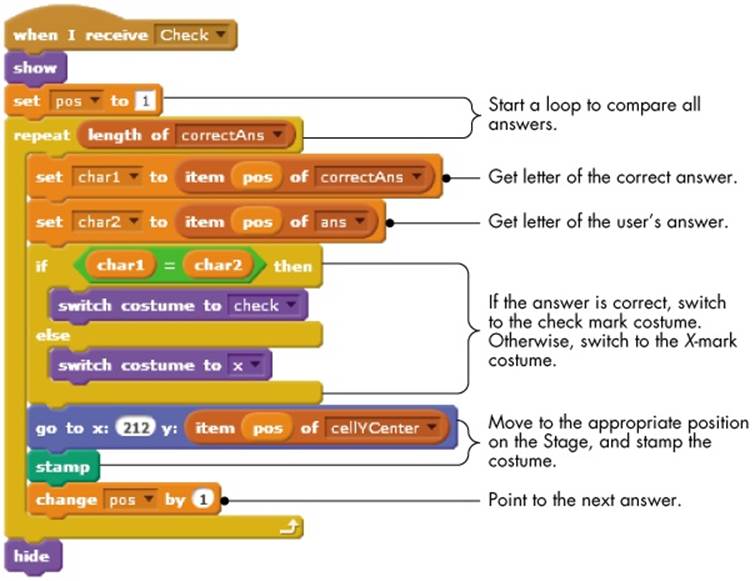
Figure 9-37. The Check procedure of the YesNo sprite
The script compares the elements of the correctAns and the ans lists one by one. If the two values are equal, it stamps a check mark to say the user was correct. Otherwise, it stamps the red X where the user’s answers were wrong. Either way, Check consults the cellYCenter list to get the correct position for stamping the image. See Try It Out 9-11 on the opposite page.
Other Applications
The extra resources you downloaded from the book’s website (http://nostarch.com/learnscratch/) contain three more applications that you can explore on your own, with full explanations. The first application is a two-player game about sorting fractions and decimals. Each player gets 5 random cards from a deck of 31 cards. Each player is then dealt one card from the remaining set. You can either discard the new card or drag it over one of your current five, replacing the old one. Whoever arranges five cards in ascending order first wins the game.
SayThat Number.sb2
TRY IT OUT 9-11
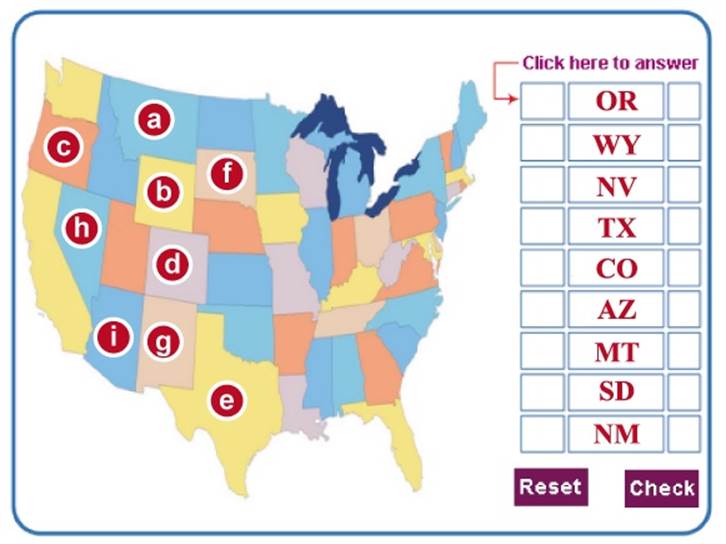
Open this application and test it. Then, think of other quizzes in different subject areas that you can create and implement them. One example, shown below, is provided in the file USMapQuiz.sb2. Open this file and complete the missing parts to make this quiz work.
USMapQuiz.sb2
The second application is a program that spells whole numbers. It prompts the user to input a number and then says that number in words. If the user inputs 3526, for example, the program will say “three thousand five hundred twenty six.” The idea is to break the number, from right to left, into groups of three digits. Each group is then spelled out with a multiplier word (thousand, million, and so on), if needed.
SortEmOut.sb2
The third program demonstrates the sieve of Eratosthenes, an algorithm for finding all prime numbers less than 100.
Sieve.sb2
Summary
Lists are extremely useful in programming, and they provide a convenient way to store multiple elements. In this chapter, we explored creating lists in Scratch, learned the commands we can use to deal with them, and practiced populating lists dynamically with data entered by the user.
We also examined numerical lists and demonstrated how to find the minimum, the maximum, and the average value of their elements. After that, we learned simple algorithms for searching and sorting lists. We concluded the chapter with several programs that demonstrated the use of lists in practical applications.
Problems
|
Q: |
1. Create a list that contains the first 10 prime numbers. Write a script to display these numbers using the say block. |
|
Q: |
2. Create three lists to store personal records. The first list stores names, the second list stores birth dates, and the third list stores phone numbers. Write a program that asks the user the name of the person whose contact information is needed. If the person’s name exists in the first list, the program will say the person’s birth date and phone number. |
|
Q: |
3. Create two lists for storing the items sold in a grocery store and their corresponding prices. Write a program that asks the user to enter an item’s name and then displays that item’s price, if it is found in the list. |
|
Q: |
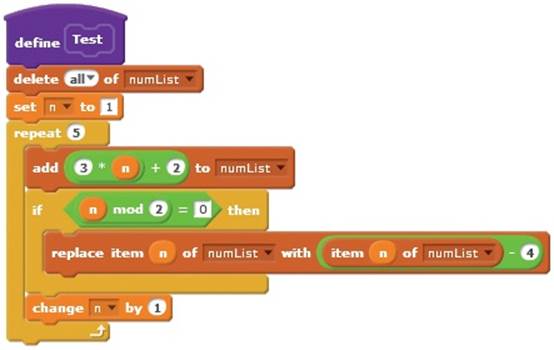
4. What is stored in numList after executing the script shown on the next page? Re-create the procedure and run it to check your answer.
|
|
Q: |
5. Write a program to double each of the elements stored in a numerical list. |
|
Q: |
6. Write a program that prompts the user to enter students’ names and scores and store these inputs in two lists. Stop collecting data when the user enters –1 for a student’s name. |
|
Q: |
7. Write a program that prompts the user to enter the highest and lowest temperatures for the 12 months of a year. Store the input values in two lists. |
|
Q: |
8. Write a program that prompts the user to enter 10 integers. Store each entered number into a list only if it is not a duplicate of a previously entered number. |
|
Q: |
9. Write a program that processes a list of 20 scores on a test with 100 items and finds the number of students who scored between 85 and 90. |
All materials on the site are licensed Creative Commons Attribution-Sharealike 3.0 Unported CC BY-SA 3.0 & GNU Free Documentation License (GFDL)
If you are the copyright holder of any material contained on our site and intend to remove it, please contact our site administrator for approval.
© 2016-2026 All site design rights belong to S.Y.A.
