Learn to Program with Scratch: A Visual Introduction to Programming with Games, Art, Science, and Math (2014)
Chapter 1. Getting Started
Have you ever wanted to create your own computer game, animated story, tutorial, or science simulation? Scratch is a graphical programming language that makes it easy to create those applications and more. In this introductory chapter, you will:
§ Explore Scratch’s programming environment
§ Learn about different types of command blocks
§ Create your first game in Scratch
When you make a Scratch application, you can save it on your computer or upload it to the Scratch website, where others can comment on it and remix it into new projects.
Excited? Then let’s get started!
What Is Scratch?
A computer program is just a set of instructions that tell a computer what to do. You write these instructions using a programming language, and that’s where Scratch comes in.
Most programming languages are text based, which means you have to give the computer commands in what looks like a cryptic form of English. For example, to display “Hello!” on the screen, you might write:
print('Hello!') (in the Python language)
std::cout << "Hello!" << std::endl; (in the C++ language)
System.out.print("Hello!"); (in the Java language)
Learning these languages and understanding their syntax rules can be challenging for beginners. Scratch, on the other hand, is a visual programming language. It was developed in the Massachusetts Institute of Technology (MIT) Media Lab to make programming easier and more fun to learn.
In Scratch, you won’t type any complicated commands. Instead, you’ll connect graphical blocks together to create programs. Confused? Look at the simple program in Figure 1-1, and I’ll explain.
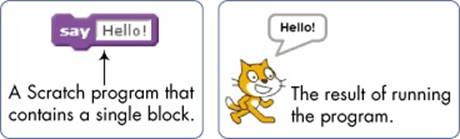
Figure 1-1. When you run this Scratch block, the cat says “Hello!” in a speech bubble.
The cat that you see in Figure 1-1 is called a sprite. Sprites understand and obey sets of instructions that you give them. The purple block on the left tells the cat to display “Hello!” in a speech bubble. Many of the applications you’ll create in this book will contain multiple sprites, and you’ll use blocks to make sprites move, turn, say things, play music, do math, and so on.
You can program in Scratch by snapping those color-coded blocks together as you would puzzle pieces or LEGO bricks. The stacks of blocks that you create are called scripts. For example, Figure 1-2 shows a script that changes a sprite’s color four times.
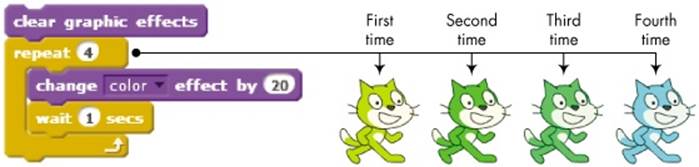
Figure 1-2. Using a script to change the Cat sprite’s color
This script waits for one second between color changes, and the four cats you see here show the sprite’s new color after each change.
TRY IT OUT 1-1
Though we haven’t discussed the blocks in Figure 1-2 yet, read them, look at their shapes, and try to figure out the steps the script took to make the cat teal. (Hint: The first purple block returns the cat to its original color.) What do you think would happen if we removed the wait block from the script?
This book covers Scratch 2, which was released in May 2013. This version allows you to create projects directly in your web browser so you don’t have to install any software on your computer, and we’ll rely on Scratch’s web interface for the material in this book.
Now, that you know a little about this language, it’s time to kick off our programming journey and learn how to use it.
Scratch Programming Environment
To start Scratch, go to the Scratch website (http://scratch.mit.edu/) and click the TRY IT OUT link. This should take you to Scratch’s project editor interface, shown in Figure 1-3.
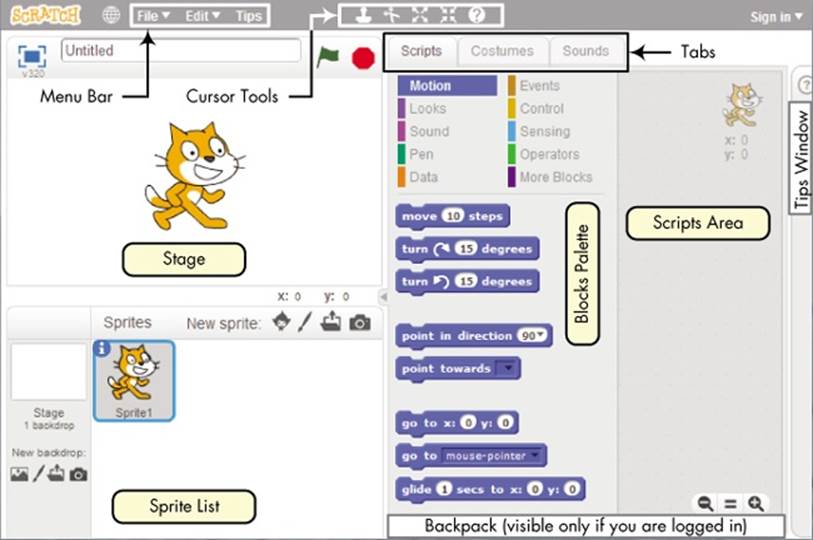
Figure 1-3. The Scratch user interface, where you’ll build your programs
You should see a single window with at least the following three panes: the Stage (top left), the Sprite List (bottom left), and the Scripts tab (right), which contains the Blocks tab and the Scripts Area. The right pane also contains two additional tabs, Costumes and Sounds, which will be discussed later in this section. If you’re logged into an account on the Scratch website, you should also see the Backpack (bottom right), which has buttons that let you share your project and use sprites and scripts from existing projects.
Let’s take a quick look at the three main panes.
The Stage
The Stage is where your sprites move, draw, and interact. The Stage is 480 steps wide and 360 steps tall, as illustrated in Figure 1-4. The center of the Stage has an x-coordinate of 0 and a y-coordinate of 0.
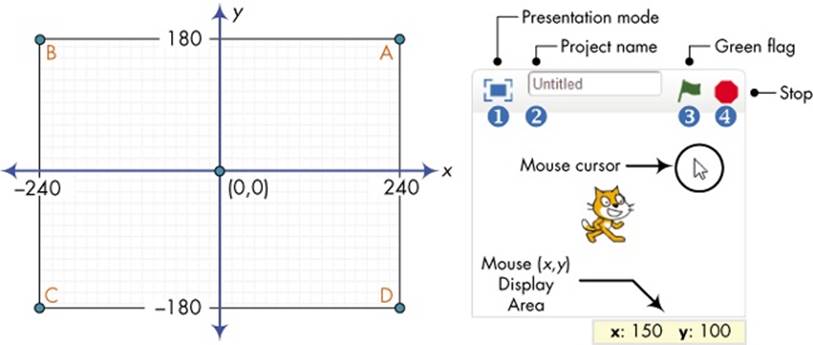
Figure 1-4. The Stage is like a coordinate plane with point (0,0) in the center.
You can find the (x,y) coordinates of any point on the Stage by moving the mouse cursor to that point and watching the numbers in the Mouse (x,y) Display Area, located directly below the Stage.
The small bar located above the Stage has several controls. The Presentation mode icon ① hides all scripts and programming tools and makes the Stage area take up almost your entire monitor. The edit box ② shows the name of the current project. The green flag ③ and stop ④ icons let you start and end your program.
TRY IT OUT 1-2
Move the mouse around the Stage and watch the Mouse Display Area. What happens when you move the mouse outside the Stage area? Now, switch to Presentation mode and watch how the screen changes. Click the ![]() icon in the top left of the screen or press ESC on your keyboard to exit Presentation mode.
icon in the top left of the screen or press ESC on your keyboard to exit Presentation mode.
Sprite List
The Sprite List displays names and thumbnails for all the sprites in your project. New projects begin with a white Stage and a single cat-costumed sprite, as illustrated in Figure 1-5.
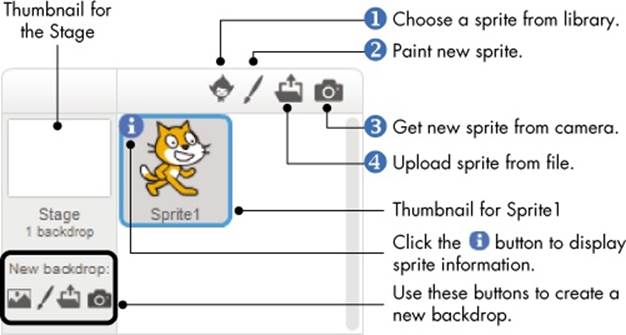
Figure 1-5. The Sprite List for a new project
The buttons above the Sprite List let you add new sprites to your project from one of four places: Scratch’s sprite library ①, the built-in Paint Editor ② (where you can draw your own costume), a camera connected to your computer ③, or your computer ④.
TRY IT OUT 1-3
Add new sprites to your project using some of the buttons located above the Sprite List. Rearrange the sprites in the Sprite List by dragging their corresponding thumbnails.
Each sprite in your project has its own scripts, costumes, and sounds. You can select any sprite to see its belongings. Either (1) click the sprite’s thumbnail in the Sprite List or (2) double-click the sprite itself on the Stage. The currently selected sprite thumbnail is always highlighted and outlined with a blue border. When you select a sprite, you can access its scripts, costumes, and sounds by clicking one of the three tabs located above the Scripts Area. We’ll look at the contents of these tabs later. For now, right-click (or CTRL-click if you’re using a Mac) the Cat sprite’s thumbnail to see the popup menu shown in Figure 1-6.
The duplicate option ① copies the sprite and gives the copy a different name. You can remove a sprite from your project with delete ②, and you can export a sprite to a .sprite2 file on your computer using the save to local file option ③. (To import an exported sprite into another project, just click the Upload sprite from file button shown in Figure 1-5.) The hide/show option ④ allows you to change whether a sprite on the Stage is visible or not.
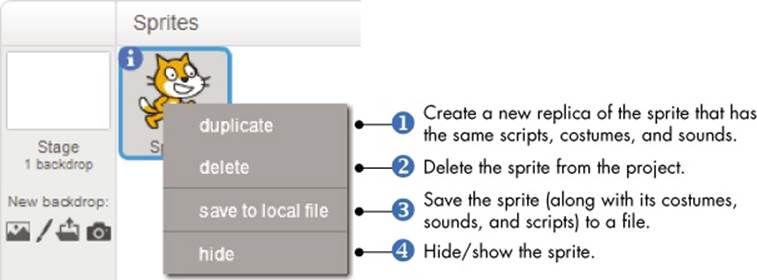
Figure 1-6. Right-clicking a sprite’s thumbnail shows this handy menu.
Along with thumbnails for your sprites, the Sprite List also shows a thumbnail of the Stage to the left (see Figure 1-6). The Stage has its own set of scripts, images, and sounds. The background image you see on the Stage is called a backdrop. When you start a new project, the Stage defaults to a plain, white backdrop, but you can add new backdrop images with any of the four buttons below the Stage’s thumbnail. Click on the Stage icon in the Sprite List to view and edit its associated scripts, backdrops, and sounds.
Blocks Tab
Blocks in Scratch are divided into 10 categories (palettes): Motion, Looks, Sound, Pen, Data, Events, Control, Sensing, Operators, and More Blocks. Blocks are color coded to help you find related blocks easily. Scratch 2 has more than 100 blocks, though some blocks only appear under certain conditions. For example, blocks in the Data palette (discussed in Chapter 5 and Chapter 9) appear only after a variable or a list is created. Let’s look at the various components of the Blocks tab in Figure 1-7.
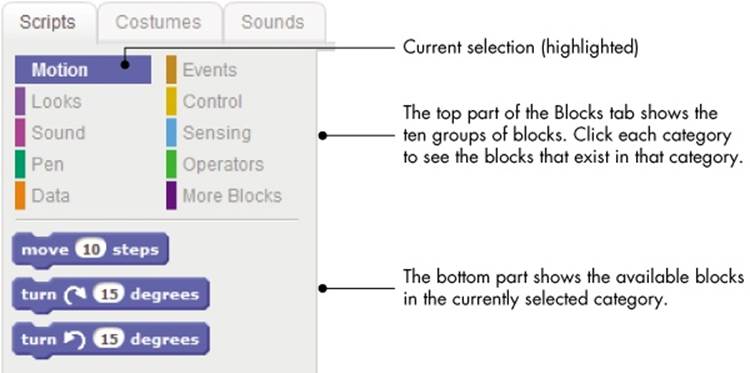
Figure 1-7. An enlarged view of the Blocks tab
Try clicking a block to see what it does. If you click move 10 steps on the Motion palette, for example, the sprite will move 10 steps on the Stage. Click it again, and the sprite moves another 10 steps. Click the say Hello! for 2 secs block (in the Looks palette) to make the sprite display “Hello!” in a speech bubble for two seconds. You can also access the help screen of a block by selecting Block help (the question mark icon) from the toolbar and clicking the block you’re confused about.
Some blocks require one or more inputs (also called arguments) that tell the block what to do. The number 10 in the move 10 steps block is an example of an argument. Look at Figure 1-8 to see the different ways blocks let you change their inputs.
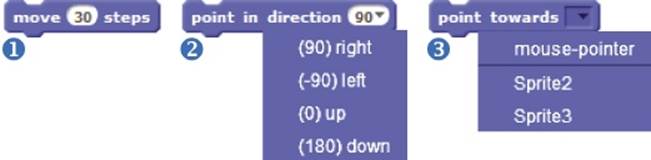
Figure 1-8. Changing the inputs of different types of blocks
You can change the number of steps in move 10 steps by clicking the white area where you see the 10 and entering a new number ①, perhaps 30 as you see in Figure 1-8. Some blocks, like point in direction 90, also have pull-down menus for their inputs ②. You can click the down arrow to see a list of available options and select one. This particular command has a white editable area, so you could also just type a value inside the white box. Other blocks, like point towards ③, will force you to choose a value from the drop-down menu.
TRY IT OUT 1-4
Go to the Looks palette, change the values of block inputs, and click the blocks to see what they do. For example, experiment with the set color effect to block. Try numbers like 10, 20, 30, and so on until the cat returns to its original color. Try the options in the drop-down menu with different numbers. You can click the clear graphic effects block (also in the Looks palette) to remove your changes.
Scripts Area
To make a sprite do interesting things, you need to program it by dragging blocks from the Blocks tab to the Scripts Area and snapping them together. When you drag a block around the Scripts Area, a white highlight indicates where you can drop that block to form a valid connection with another block (Figure 1-9). Scratch blocks only snap together in certain ways, eliminating the typing errors that tend to occur when people use text-based programming languages.
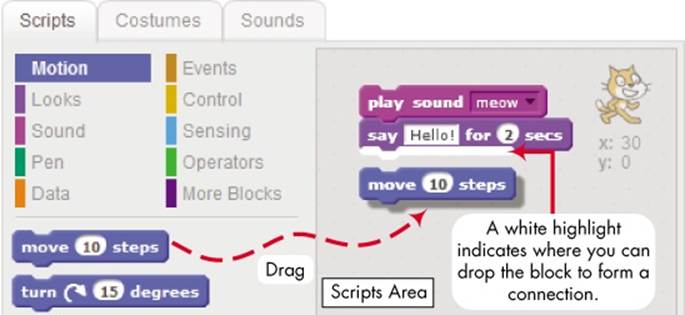
Figure 1-9. Drag blocks into the Scripts Area and snap them together to create scripts.
You don’t need to complete scripts to run them, which means that you can test your script as you build it. Clicking anywhere on a script, complete or partial, runs the entire script, from top to bottom.
TRY IT OUT 1-5
Start a new Scratch project and create the script below for the Cat sprite. (The forever block is in the Control palette, and the other blocks are in the Motion palette.)
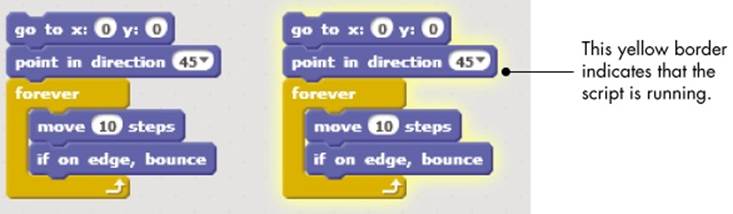
You’ll learn about most of these blocks in Chapter 2. For now, click your new script to run it. (Scratch should highlight the running script with a glowing yellow border, as shown in the right side of the image.) You can even change a block’s inputs and add new blocks to a script while it runs! For example, change the number in the move block and watch how the cat’s motion changes. Click the script one more time to stop it.
You can also easily disassemble a stack of blocks and test each individually. This will be an invaluable strategy when you’re trying to understand long scripts. To move an entire stack of blocks, grab the top block of the stack. To detach a block in the middle of a stack and all the blocks below it, grab it and drag it. Go ahead and try this out.
This feature also allows you to build your project one piece at a time. You can connect small chunks of blocks, test them to make sure they work as intended, and then combine them into larger scripts.
You can even copy a stack of blocks from one sprite to another. Just drag the stack from the Scripts Area of the source sprite to the thumbnail of the destination sprite in the Sprite List.
TRY IT OUT 1-6
Add another sprite to your project. Drag the script from the Cat sprite and drop it over the thumbnail of the new sprite. Your mouse arrow must be on top of the new sprite’s thumbnail for the drop to succeed. Check the Scripts tab of the new sprite to make sure that it has an identical copy of the script.
Costumes Tab
You can change what a sprite looks like by changing its costume, which is just an image. The Costumes tab contains everything you need to organize your sprite’s costumes; you could think of it like a clothes closet. The closet can have many costumes, but a sprite can wear only one at a time.
Let’s try changing the Cat sprite’s costume now. Click the thumbnail of the Cat sprite and select the Costumes tab. As illustrated in Figure 1-10, the Cat has two costumes: costume1 and costume2. The highlighted costume (costume1 in this case) represents the sprite’s current costume.
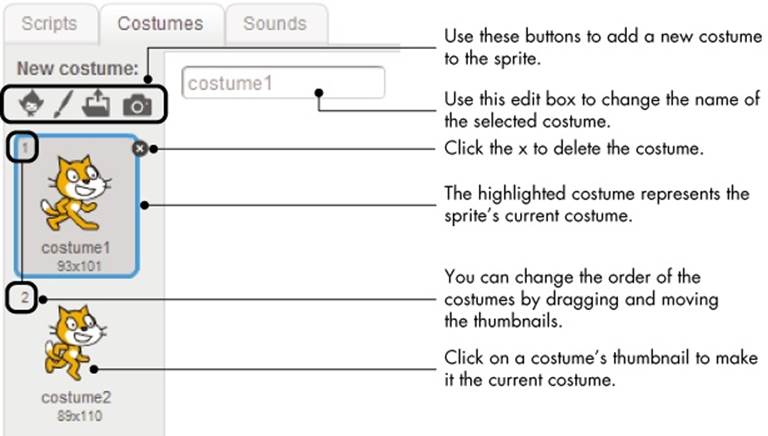
Figure 1-10. You can organize all the costumes for a sprite from the Costumes tab.
If you right-click on a costume’s thumbnail, you’ll see a pop-up menu with three options: (1) duplicate, (2) delete, and (3) save to local file. The first option adds a new costume with an image identical to that of the costume you duplicated. The delete option deletes the selected costume. The last option allows you to save the costume to a file. You can import that costume and use it in a different project using the Upload costume from file button (the third button in Figure 1-10). Go ahead and try these options out.
TRY IT OUT 1-7
Click the first button above the cat’s image in Figure 1-10 to choose a new costume from Scratch’s library. Then select any image you like from the window that appears. Apply some of the tips in Figure 1-10 to become more familiar with the costume options.
Sounds Tab
Sprites can also play sounds, which liven up your programs. You can, for example, give a sprite different sounds to use when it’s happy or sad. If your game contains a sprite that looks like a missile, you could make the missile generate different sounds when it hits or misses a target.
The buttons in the Sounds tab will help you organize the different sounds your sprites can play. As shown in Figure 1-11, Scratch even provides a tool you can use to edit sound files. I won’t discuss the details of this tool in this book, but I encourage you to experiment with it on your own.
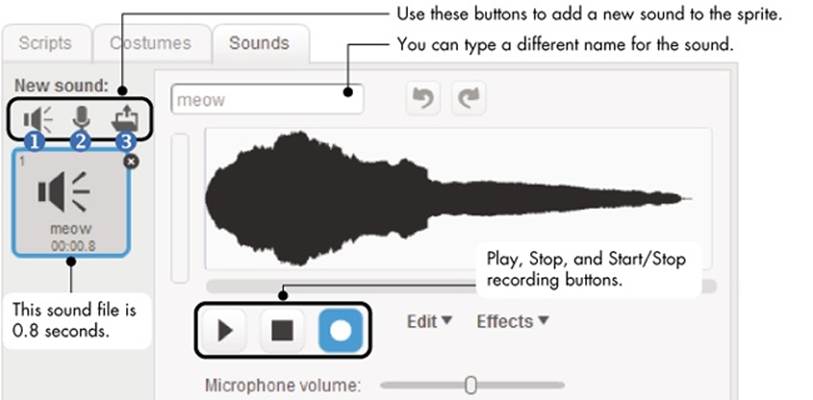
Figure 1-11. The Sounds tab allows you to organize the sounds of a sprite.
Most of the time, you’ll need only the three buttons at the top of the Sounds tab. They allow you to choose a sound from Scratch’s sound library ①, record a new sound ② (if you have a microphone), or import an existing sound file from your computer ③. Scratch can read only MP3 and WAV sound files.
TRY IT OUT 1-8
Select the Sounds tab and click the Choose sound from library button. Listen to the various sounds that are available in Scratch to get some ideas for your future projects.
Backdrops Tab
When you select the thumbnail of the Stage in the Sprite List, the name of the middle tab changes from Costumes to Backdrops. Use this tab to organize the Stage’s background images, which you can change with your scripts. For example, if you’re creating a game, you might show one backdrop with instructions to begin and then switch to another when the user starts the game. The Backdrops tab is identical to the Costumes tab.
TRY IT OUT 1-9
Click the Choose backdrop from library button below the thumbnail of the Stage in the Sprite List. Select the xy-grid backdrop from the window that appears and click OK. Scratch will add the xy-grid to your project and make it the default backdrop. (The xy-grid shows a 2-D Cartesian plane, which is useful when you’re working with the Motion command blocks.) Repeat these steps and select any other backdrop that you like.
Sprite Info
You can view the sprite info area by clicking the small ![]() icon at the top-left edge of a sprite’s thumbnail, as illustrated in Figure 1-12. This area shows the sprite’s name, its current (x,y) position and direction, its rotation style and visibility state, and whether it can be dragged in Presentation mode. Let’s briefly talk about each of these options.
icon at the top-left edge of a sprite’s thumbnail, as illustrated in Figure 1-12. This area shows the sprite’s name, its current (x,y) position and direction, its rotation style and visibility state, and whether it can be dragged in Presentation mode. Let’s briefly talk about each of these options.
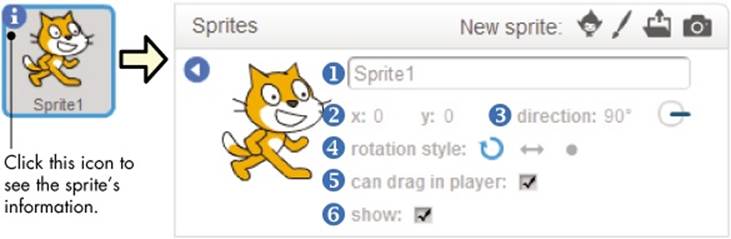
Figure 1-12. Sprite info area
The edit box ① at the top of this area allows you to change the sprite’s name. You’ll use this box many times in this book.
The x and y values ② show the sprite’s current position on the Stage. Drag the sprite onto the Stage and watch what happens to these numbers.
The sprite’s direction ③ indicates which direction the sprite will move in response to a movement block. Drag the blue line emanating from the center of the circle icon to rotate the sprite.
The three rotation-style buttons ④ (named Rotate, Left-right flip, and No rotate) control how the costume appears as the sprite changes its direction. To understand the effect of these buttons, create the script shown in Figure 1-13 and then click each of these buttons while the script is running. You can find the wait block in the Control palette.
The Can drag in player checkbox ⑤ indicates whether or not the sprite can be dragged (using the mouse) in Presentation mode. Switch to Presentation mode with this box checked/ unchecked and try to drag the sprite across the Stage to understand the effect of this checkbox.
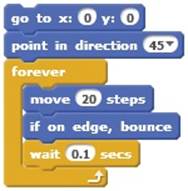
Figure 1-13. Script for demonstrating rotation styles
The Show checkbox ⑥ allows you to show/hide the sprite at program design time. Try it out and see what happens. You’ll see several examples of hidden sprites that do useful work behind the scenes in many examples throughout this book.
Toolbar
Let’s take a quick look at Scratch’s toolbar in Figure 1-14, starting with some of the buttons. (The toolbar will look slightly different if you are signed in, as covered in Appendix A.) Use the Duplicate and Delete buttons to copy and remove sprites, costumes, sounds, blocks, or scripts. The Grow button makes sprites bigger, while the Shrink button makes them smaller. Just click the button you want to use and then click on a sprite (or a script) to apply that action. To return to the arrow cursor, click on any blank area of the screen. You can use the Language menu to change the language of the user interface.
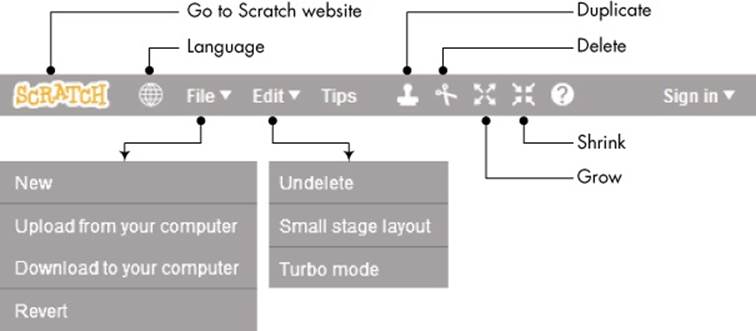
Figure 1-14. Scratch’s toolbar
From the File menu, you can create new projects, upload (open) an existing project from your computer, download (save) the current project to your computer, or revert (undo) all your changes to the current project. Scratch 2 projects have an .sb2 file extension to distinguish them from projects created in the previous version of Scratch (.sb).
In the Edit menu, Undelete will bring back the last block, script, sprite, costume, or sound you deleted. The Small stage layout option shrinks the Stage and gives the Scripts Area more room. Selecting Turbo mode increases the speed of some blocks. For example, executing a move block 1,000 times may take about 70 seconds in normal mode and about 0.2 seconds in Turbo mode.
Now that you’ve seen the essentials of the Scratch toolbar, we’ll talk briefly about Scratch’s built-in Paint Editor.
Paint Editor
You can use the Paint Editor (Figure 1-15) to create or edit costumes and backdrops. (Of course, you’re free to use your favorite image-editing program, too.) If you want to learn more about Scratch’s Paint Editor, check out ScratchPaintEditor.pdf (located in the online resources, which can be downloaded from http://nostarch.com/learnscratch/).
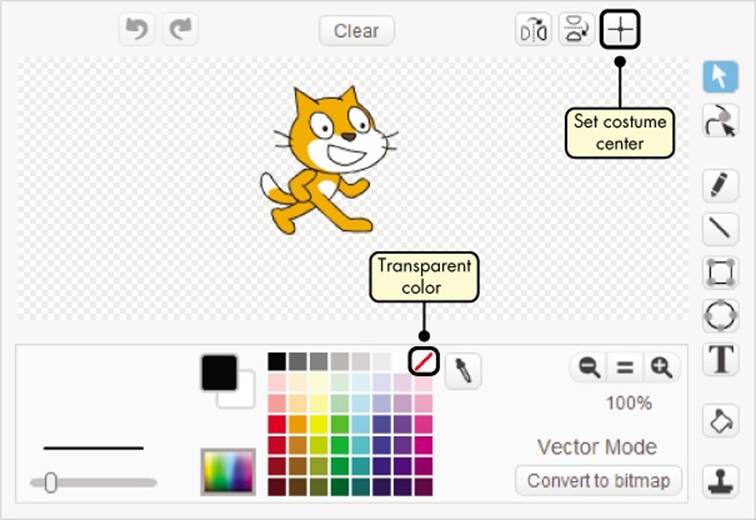
Figure 1-15. Scratch’s Paint Editor
For now, there are two important features you’ll need to know about: setting the center of an image and setting the transparent color. I’ll explain these features in the following sections.
Setting the Center of an Image
When you command a sprite to turn (left or right), it will turn with respect to a reference point—the center of its costume. The Set costume center button (in the upper-right corner of the Paint Editor) allows you to choose that center. When you click this button, you’ll see crosshairs on the drawing area, as shown in Figure 1-16. The center point is determined by the intersection of these two axes, so to shift a costume’s center, just drag them to a new position. To hide the axes, click the same button again.
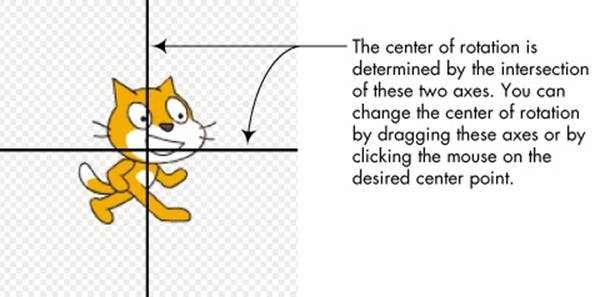
Figure 1-16. Changing a costume’s center after clicking the Set costume center button
TRY IT OUT 1-10
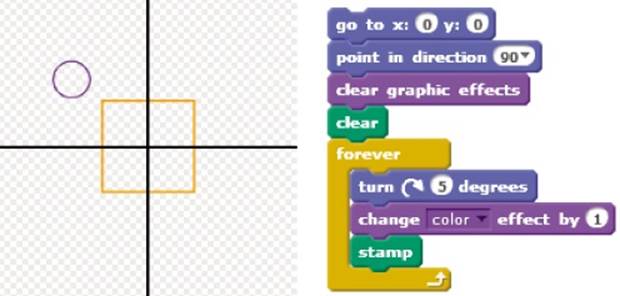
RotationCenter.sb2
Open RotationCenter.sb2 and run it. This application contains a single sprite with the costume and script shown below. The costume center is set in the middle of the square. Run the script and notice the pattern. Then edit the costume to set its center in the middle of the circle and run the script again to see how the picture changes.
Setting Transparent Color
When two images overlap, the top image will cover some part of the bottom image. Similarly, sprites cover parts of the Stage. If you want to see what the Stage looks like behind an image, you need to use the Paint Editor to make at least part of that image transparent, as the penguin on the right is in Figure 1-17.
In the Color palette, just click the square with a diagonal red line and paint with that “transparent” color to make something invisible. You can think of this icon as a “No Color” sign, similar to a “No Smoking” sign with a red bar across a cigarette.
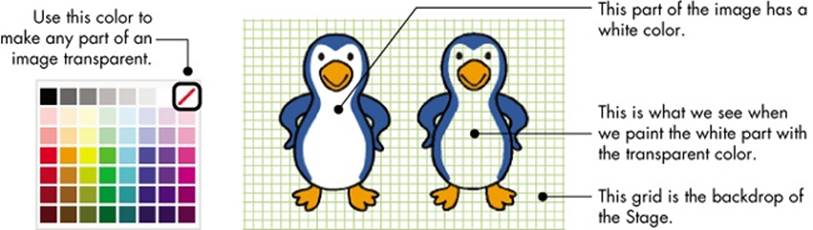
Figure 1-17. You can make any part of an image transparent by filling it with the “transparent” color.
Now that you know your way around the Scratch interface, we’ll put that knowledge to good use and make something fun. Roll up your sleeves and get ready: We’re making a game!
Your First Scratch Game
Pong.sb2
Pong_NoCode.sb2
In this section, you’ll create a single-player game in which players will move a paddle to keep a bouncing tennis ball from hitting the floor, based on the classic arcade game Pong. The user interface for our game is illustrated in Figure 1-18.
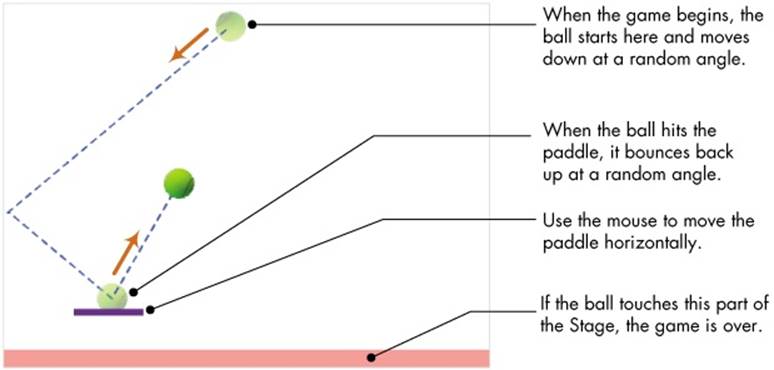
Figure 1-18. Our game screen
As shown in the figure, the ball starts at the top of the Stage and moves down at some random angle, bouncing off the edges of the Stage. The player moves the paddle horizontally (using the mouse) to send the ball back up. If the ball touches the bottom of the Stage, it’s game over.
We’ll build this game one step at a time, but first we need to open a fresh project. Select File▸New to start a new Scratch project. Then delete the Cat sprite by right-clicking it and selecting delete from the pop-up menu.
Step 1: Prepare the Backdrop
To detect when the ball misses the paddle, we’ll mark the bottom of the Stage with a certain color and use the touching color ? block (from the Sensing palette) to tell us when the ball touches that color. Our current backdrop is white, so we can just draw a thin, colored rectangle at the bottom, as shown in Figure 1-19.
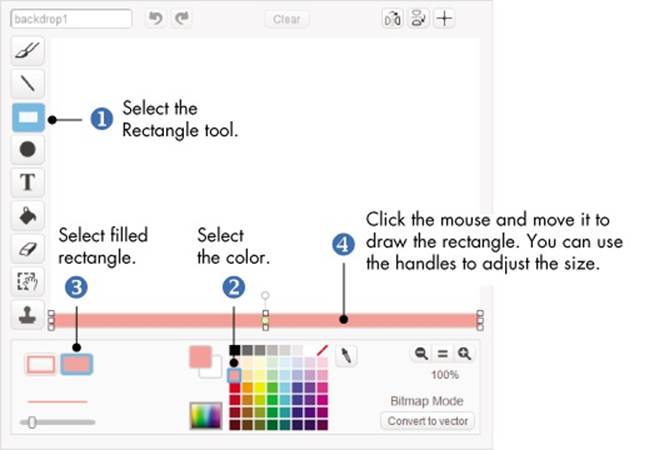
Figure 1-19. The steps for drawing a rectangle at the bottom of the backdrop image
Click the thumbnail of the Stage to select it and then go to the Backdrops tab. Follow the steps in Figure 1-19 to draw a thin rectangle at the bottom of the Stage’s backdrop.
Step 2: Add the Paddle and Ball
Click the Paint new sprite button above the Sprite List to add the Paddle sprite to your project. Since the paddle is just a thin, short rectangle, repeat what you did in Step 1 to draw a paddle like the one in Figure 1-18. Color the paddle any way you want and set the center approximately in the middle of the rectangle.
Next, name the sprite something that explains what it is; I called it Paddle. Also, click the paddle image on the Stage and move it so that its y-coordinate is about –120.
Our game has a paddle now, but we still need a ball to bounce around, so click Choose sprite from library above the Sprite List to import one. In the dialog that appears, click the Things category and select the Tennis Ball image to add that sprite to your project. Rename the sprite as Ball.
Before you start working on scripts for the game, select File ▸ Download to your computer to save what you’ve done so far to your computer. In the dialog that appears, select the folder where you want to save your work, name the file Pong.sb2, and click Save. If you are currently signed in, you can also save your work on the cloud (that is, on a Scratch server). Whether you decide to save your files locally (on your computer) or on the cloud, make sure to save your work often.
With the Paddle and Ball sprites, the Stage should look similar to Figure 1-18. If you encounter any difficulties at this time, you can open the file Pong_NoCode.sb2, which contains everything we just created. You’ll add the scripts to run the game next, but don’t worry too much about the details of the blocks. We’ll explore all of them later in the book, so for now, let’s focus on learning to put a complete project together.
Step 3: Start the Game and Get Your Sprites Moving
As the designer for this game, you’ll decide how players can start a new round. For example, the game could begin when you press a key, click a sprite on the Stage, or even clap or wave your hands (if you have a webcam). The green flag icon (located above the Stage) is another popular option, which we’ll use here.
The idea is simple. Any scripts that start with the when green flag clicked trigger block start running when you press that button. The flag turns bright green and stays that way until the scripts finish. To see this in action, create the script shown in Figure 1-20 for the Paddle sprite.

Figure 1-20. The script for the Paddle sprite
When the green flag is clicked ①, the go to x: y: block ② sets the paddle’s vertical position to –120, just in case you previously moved it with the mouse. The paddle should hover just above the pink rectangle at the bottom of the Stage, so if your rectangle is thicker, change its position number to something that works for your design.
The script then uses a forever block ③ to constantly check the mouse position. We’ll move the paddle back and forth by matching the paddle’s x-position to that of the mouse ④. Run the script (by clicking the green flag icon) and try moving your mouse horizontally; the paddle should follow. Click the stop icon next to the green flag to stop the script.
The script for the Ball sprite is a little longer than the previous one, so I’ll break it down into simple chunks. The ball should start moving when we click the green flag, so first, add the script in Figure 1-21 to the Ball sprite.
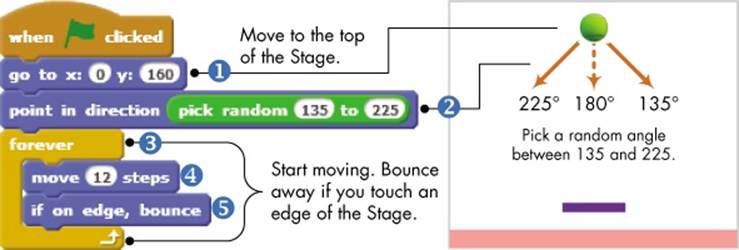
Figure 1-21. The first part of the Ball sprite script
First, we move the ball to the top of the stage ① and make it point down at a random angle using the pick random block ② (from the Operators palette). The script then uses a forever block ③ to move the ball ④ across the Stage and bounce ⑤ off the edges. Click the green flag to test what you’ve written so far. The ball should move in a zigzag pattern, and the paddle should still follow your mouse.
TRY IT OUT 1-11
Replace the 12 inside the move block with different values, run the script, and watch what happens. This should give you an idea of how to make the game easier or harder to play. Click the stop icon when you’re done.
Now, it’s time to add the fun part—the blocks that make the ball bounce off the paddle. We can modify the forever block we just created so the ball travels upward when it hits the paddle, as shown in Figure 1-22.
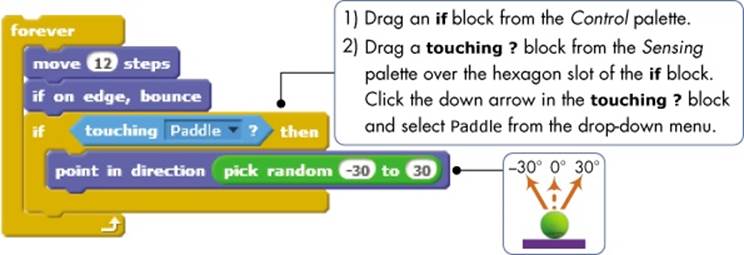
Figure 1-22. Adding code to kick the ball up
When the ball and paddle touch, we command the ball to point in a random direction between –30 and 30. When the forever block goes for the next round, it will execute the move block, which will now cause the ball to go up. Click the green flag again to test this part of the game. Click the stop icon when you are sure the ball is bouncing off of the paddle as it’s supposed to.
The only piece we’re missing now is some code to stop the game when the ball touches the bottom of the Stage. Add the script shown in Figure 1-23 to the Ball sprite, either right before or after the if block in Figure 1-22. You’ll find the touching color ? block in the Sensing palette and thestop block in the Control palette.
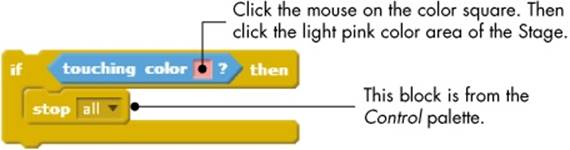
Figure 1-23. The blocks for ending the game
When you click the mouse over the colored square inside the touching color? block, the cursor will change to a hand cursor. When you move that cursor and click over the light pink rectangle at the bottom of the Stage, the colored square inside the block should match the rectangle’s color. The stop all block does exactly what its name says: It stops all running scripts in all sprites, and the Paddle and the Ball sprites are no exception.
This basic pong game is now fully functional. Click the green flag and play it a couple of times to test it out. After seeing that you can create a whole game with such a small amount of code, I hope you agree with me that Scratch is amazing!
Step 4: Spice It Up with Sound
Of course, games are more fun when they have sound, so let’s add one final touch to play a noise every time we hit the ball.
Double-click the ball on the Stage to select it and then select the Sounds tab. Click the Choose sound from library button to add a sound to the Ball sprite. In the dialog that appears, select the Effects category, choose the pop sound, and click OK to add it to the Sounds tab. After that, go back to the Scripts tab and insert a play sound block (from the Sound palette), as shown in Figure 1-24.
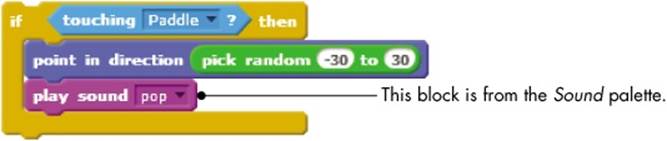
Figure 1-24. Playing a sound when the ball touches the paddle
Test the game once more, and this time, you should hear a short “pop” every time the ball touches the paddle.
Congratulations! Your game is now complete (unless, of course, you want to add more features to it), and you just wrote your first Scratch program. If you’d like to experiment some more, try duplicating the Ball sprite to have two (or more) balls in your game and see how that changes the way you play!
In the next section, I’ll introduce the different types of blocks available in Scratch. As you continue through this book, you’ll really dig into how those blocks work, but for now, we’ll just go over them briefly.
Scratch Blocks: An Overview
In this section, you’ll learn about the different blocks available in Scratch, their names, and their intended usage. The goal is to define some of the terms that you’ll read in the next chapters. You can come back to this section as you progress if you need to refresh your memory.
As shown in Figure 1-25, Scratch has four kinds of blocks: command blocks, function blocks, trigger blocks, and control blocks. Command blocks and control blocks (also called stack blocks) have bumps on the bottom and/or notches on the top. You can snap these blocks together into stacks.Trigger blocks, also called hats, have rounded tops because they are placed at the top of a stack. Trigger blocks connect events to scripts. They wait for an event—such as a key press or mouse click—and run the blocks underneath them when that event happens. For example, all scripts that start with the when green flag clicked block will run when the user clicks the green flag icon.
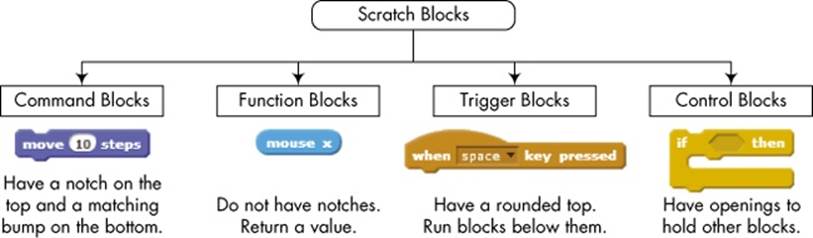
Figure 1-25. The four types of blocks available in Scratch
Function blocks (also called reporters) don’t have notches or bumps. They can’t form a layer of a script alone; instead, they’re used as inputs to other blocks. The shapes of these blocks indicate the type of data they return. For example, blocks with rounded ends report numbers or strings, whereas blocks with pointed ends report whether something is true or false. This is illustrated in Figure 1-26.

Figure 1-26. The shape of a function block indicates the type of data it returns.
Some function blocks have a checkbox next to them. If you check the box, a monitor appears on the Stage to display the current value of the reporter. Select a sprite and check the box on the x position block (in the Motion palette). Then drag the sprite around the Stage and watch that monitor. It should change as you move the sprite back and forth.
Arithmetic Operators and Functions
Now, let’s take a quick look at the arithmetic operators and functions supported in Scratch. If you’ve lost your calculator, then your worries are over! You could make your own calculator in Scratch with the blocks from the Operators palette, which you’ll explore in this section.
Arithmetic Operators
Scratch supports the four basic arithmetic operations of addition (+), subtraction (-), multiplication (*), and division (/). The blocks used to perform these operations, called operators, are shown in Figure 1-27. Since these blocks produce a number, you can use them as inputs to any block that accepts numbers, as demonstrated in this figure.
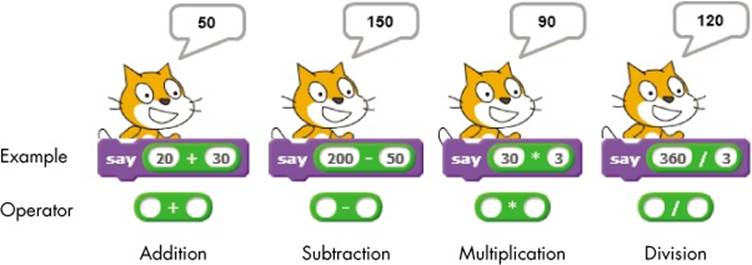
Figure 1-27. Arithmetic operators in Scratch
Scratch also supports the modulus (mod) operator, which returns the remainder of the division of two numbers. For example, 10 mod 3 returns 1 because the remainder of dividing 10 by 3 is 1. A common use of the modulus operator is to test the divisibility of one integer (whole number) by another (smaller) integer. A modulus of 0 indicates that the larger number is divisible by the smaller number. Does this give you an idea for checking whether a number is even or odd?
Another useful operator supported by Scratch is the round operator, which rounds decimal numbers to the nearest whole number. For example, round(3.1) = 3, round(3.5) = 4, and round(3.6) = 4.
Random Numbers
As you program more often, you’ll probably need to generate random numbers at some point, especially if you create games and simulations. Scratch provides the pick random block specifically for this purpose.
This block outputs a random number each time you use it. Its two editable white boxes allow you to enter a range for that number, and Scratch will only choose values between the two limits (inclusive). Table 1-1 shows some examples of using this block.
Table 1-1. Examples of Using the Pick Random Block
|
Example |
Possible Outcome |
|
|
{0, 1} |
|
|
{0, 1, 2, 3, ..., 10} |
|
|
{–2, –1, 0, 1, 2} |
|
|
{0, 10, 20, 30, ..., 100} |
|
|
{0, 0 .1, 0 .15, 0 .267, 0 .3894, ..., 1 .0} |
|
|
{0, 0 .01, 0 .12, 0 .34, 0 .58, ..., 1 .0} |
NOTE
The outputs of pick random 0 to 1 and pick random 0 to 1.0 are different. The first case will give you either a 1 or a 0, but the second gives a decimal value between 0 and 1. If any input to the pick random block contains a decimal point, the output will also be a decimal value.
Mathematical Functions
Scratch also supports a large number of mathematical functions. The sqrt of block groups together 14 math functions that can be selected from the drop-down menu, including square root, trigonometric, logarithmic, and exponential functions. Refer to MathematicalFunctions.pdf for an extensive coverage of these functions.
Summary
This chapter provided a high-level overview of Scratch and its programming environment. You learned about the various elements of the user interface and even created a game! We also explored Scratch’s mathematical operators and functions.
At this point, you’ve seen the most basic information you need to create some powerful scripts in Scratch, but that’s only one step on the road to writing awesome programs. In the chapters that follow, you’ll dig deeper into how you can use Scratch to develop your programming skills.
Problems
|
Q: |
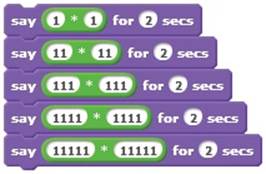
1. Write down the result of each block in the script below. Is there a pattern in these products?
|
||||||||||||||||||||||
|
Q: |
2. Is there a pattern in the products 9 × 9, 99 × 99, 999 × 999, ..., etc.? Use the say command to find the result of these products and check your answer. |
||||||||||||||||||||||
|
Q: |
3. Complete the following table by writing the value of each expression.
Now, use the say command and the appropriate operator blocks to check your answers. |
||||||||||||||||||||||
|
Q: |
4. Evaluate the following Scratch expressions using a pencil and paper. Let x = 2 and y = 4. 1. 2. 3. 4. 5. |
||||||||||||||||||||||
|
Q: |
5. Use the say command and the appropriate blocks from the Operators palette to calculate the following: 1. The square root of 32 2. The sine of 30° 3. The cosine of 60° 4. The result of rounding 99.459 |
||||||||||||||||||||||
|
Q: |
6. Create a function block that calculates the average of the following three numbers: 90, 95, and 98. Display the result using the say block. |
||||||||||||||||||||||
|
Q: |
7. Create a function block that converts 60°F to Celsius. (Hint: C = (5/9) × (F – 32).) |
||||||||||||||||||||||
|
Q: |
8. Create a function block that calculates the area of a trapezoid with a height of 4/6 foot and bases of lengths 5/9 foot and 22/9 foot. (Hint: A = 0.5 × (b1 + b2) × h, where h is the height and b1 and b2 are the lengths of the two bases.) |
||||||||||||||||||||||
|
Q: |
9. Create a function block that calculates the force needed to accelerate a 2,000 kg car 3 m/s2. (Hint: Force = mass × acceleration.) |
||||||||||||||||||||||
|
Q: |
10. The cost of electricity is $0.06 per kilowatt-hour. Create a function block that calculates the cost of using a 1,500-watt air conditioner for 2 hours. (Hint: Energy = power × time.) |
||||||||||||||||||||||
|
Q: |
11. With a simple mathematical trick, you can use the round operator to round a number to a specific decimal place. For example, you can round the number 5.3567 to the nearest tenth (that is, the first position to the right of the decimal point) using these three steps:
What changes would you need to make to the above steps to round to the nearest hundredth (i.e., the second position to the right of the decimal point)? Create a function block that rounds 5.3567 to the nearest tenth (or hundredth) and display its output using the say block. |
All materials on the site are licensed Creative Commons Attribution-Sharealike 3.0 Unported CC BY-SA 3.0 & GNU Free Documentation License (GFDL)
If you are the copyright holder of any material contained on our site and intend to remove it, please contact our site administrator for approval.
© 2016-2026 All site design rights belong to S.Y.A.