Learn to Program with Scratch: A Visual Introduction to Programming with Games, Art, Science, and Math (2014)
Chapter 2. Motion and Drawing
Now that you know your way around the interface, you’re ready to use more of Scratch’s programming tools. In this chapter, you’ll do the following:
§ Explore Scratch’s motion and pen commands
§ Animate sprites and move them around the Stage
§ Draw artistic, geometric patterns and create games
§ Learn why sprite cloning is a valuable tool
It’s time to put on your creative hat and jump into the world of computer graphics!
Using Motion Commands
If you want to make games or other animated programs, you’ll need to use blocks from the Motion palette to move sprites around. Furthermore, you’ll need to command sprites to move to a particular spot on the Stage or turn in a certain direction. You’ll find out how in this section.
Absolute Motion
Remember, as you saw in Figure 1-4, the Stage is like a 480 × 360 rectangular grid whose center is point (0,0). Scratch has four absolute motion commands (go to, glide to, set x to, and set y to) that let you tell your sprite exactly where to go on that grid.
NOTE
If you want more details about these and other blocks, use the Scratch Tips window on the right side of the Scripts panel. If you don’t see the Tips window, just click the question mark near the top-right corner of Scratch’s Project Editor.
To demonstrate these commands, let’s say that you want to make the Rocket sprite in Figure 2-1 hit the star-shaped Target sprite at position (200,150). The most obvious way to do this is to use the go to block, as illustrated in the right side of the figure. The x-coordinate tells the sprite how far to move horizontally across the Stage, whereas the y-coordinate tells it how far to move vertically.
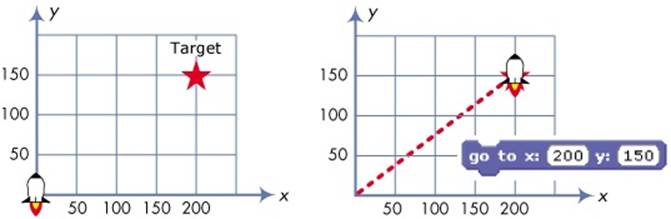
Figure 2-1. You can move a sprite to any point on the Stage using the go to block.
The Rocket won’t turn to face the target, but it will move along an invisible line connecting its current position, point (0,0), to point (200,150). You can make the Rocket slow down by using the glide to command instead. It’s nearly identical to the go to command, but it lets you set how long the Rocket will take to reach the target.
Another way to hit the target is to change the x- and y-positions of the Rocket sprite independently with the set x to and set y to blocks, as illustrated in Figure 2-2. Do you remember how you used the set x to block in the Pong game in Chapter 1? (See Figure 1-20 for a review.)
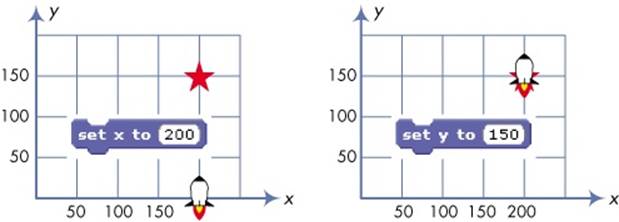
Figure 2-2. You can set the x- and y-coordinates of a sprite independently.
You can always see a sprite’s current x- and y-position in the upper-right corner of the Scripts Area. If you want to display this information on the Stage, you can use the x position and y position reporter blocks. Click the checkboxes next to these blocks to see their values on the Stage.
NOTE
Motion commands work with reference to a sprite’s center, which you can set in the Paint Editor. For example, sending a sprite to point (100,100) moves the sprite so that its center is at (100,100), as illustrated in Figure 2-3. Therefore, when you draw or import a costume for a sprite you plan to move around, pay special attention to its center!
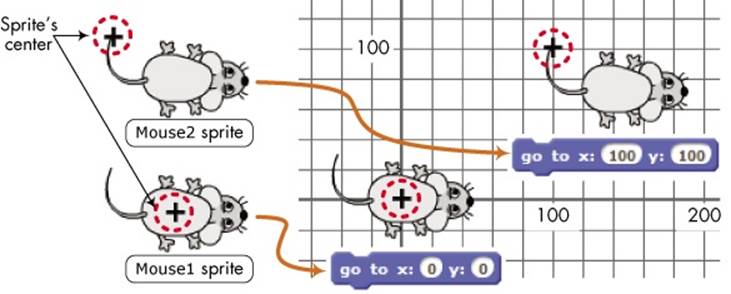
Figure 2-3. Motion commands reference a sprite’s center.
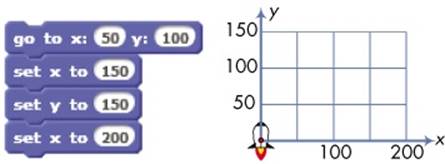
TRY IT OUT 2-1
List the coordinates of the Rocket sprite after executing each command in the script shown below.
Relative Motion
Now consider the grid depicted in Figure 2-4, which shows another Rocket sprite and target. You can’t see the coordinates this time, so you don’t know the sprites’ exact position. If you had to tell the Rocket how to hit the target, you might say: “Move three steps, then turn right, then move two steps.”
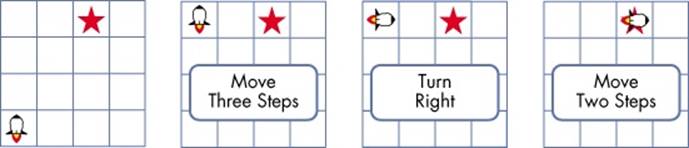
Figure 2-4. You can move a sprite on the Stage using relative motion commands.
Commands like move and turn are relative motion commands. The first “move” command above, for example, caused the Rocket to move up, while the second “move” command sent it right. The motion depends on (or is relative to) the sprite’s current direction. The direction convention used in Scratch is illustrated in Figure 2-5.
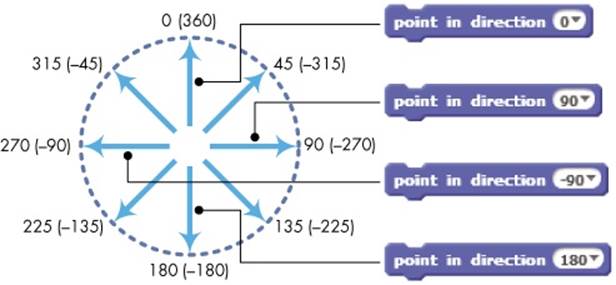
Figure 2-5. In Scratch, 0 is up, 90 is right, 180 is down, and –90 is left.
You can turn a sprite toward a particular direction (or heading) with the point in direction command. To choose up, right, down, or left, just click the down arrow and select one of these options from the drop-down menu. For other directions, type the value you want in the white edit box. You can even use negative values! (For example, typing 45 or –315 will both point the sprite northeast.)
NOTE
You’ll find the sprite’s current direction in the sprite info area. You can also click the checkbox next to the direction block (in the Motion palette) to see the direction on the Stage.
Now that you know how directions work in Scratch, let’s see how the relative motion commands (move, change x by, change y by, and turn) work. We’ll start with the move and turn commands, which work with respect to the sprite’s current direction, as shown in Figure 2-6.
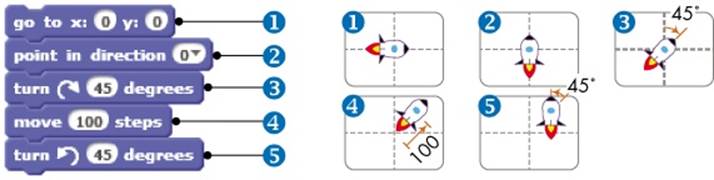
Figure 2-6. A simple script that illustrates using the move and turn commands
First, the go to block ① moves the Rocket so that its center is aligned with the center of the Stage. The second command block ② points the sprite up, and the third ③ turns it 45° clockwise. Then, the sprite moves 100 steps④ in its current direction before turning 45° counterclockwise ⑤ to stop in the up position.
DIRECTION AND COSTUMES
The point in direction command knows nothing about the sprite’s costume. For example, consider the two sprites shown below.
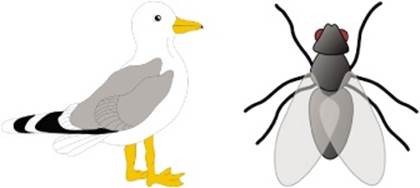
Using the Paint Editor, we drew the bird’s costume to face right and the insect’s costume to face up. What do think will happen if you use the point in direction 90 command (that is, point right) on each sprite?
You might guess that the insect will turn to face right, but actually, neither sprite will turn. Although 90° is labeled “right,” that direction really refers to the costume’s original orientation in the Paint Editor. So because the insect looks like it’s facing up in the Paint Editor, it will still face up when you tell it to point to 90°. If you want your sprite to respond to the point in direction command as shown in Figure 2-5, you need to draw the sprite’s costume so that it faces right in the Paint Editor (as the bird costume does in the above figure).
Sometimes you might only want to move your sprite horizontally or vertically from its current position, and that’s where the change x by and change y by blocks come in. The script in Figure 2-7 illustrates the use of these blocks.
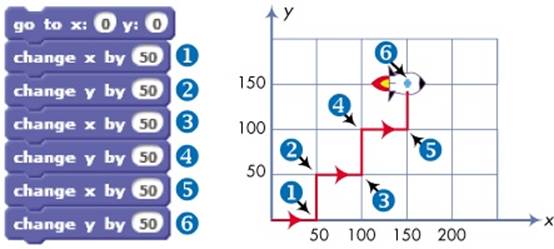
Figure 2-7. Navigate a winding path with change x by and change y by.
After the Rocket sprite moves to the center of the Stage, the first change x by 50 command ① adds 50 to its x-coordinate to send it 50 steps to the right. The next command ②, change y by 50, makes the y-coordinate 50, causing the sprite to move up 50 steps. The other commands work in a similar way. Try to trace the sprite’s motion, illustrated in Figure 2-7, to find the sprite’s final destination.
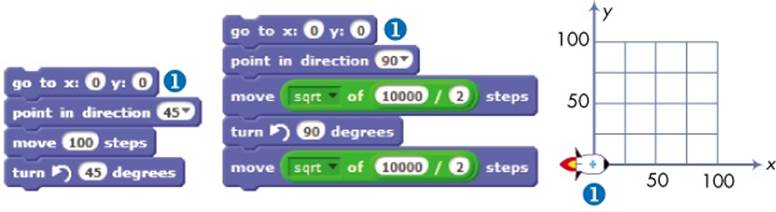
TRY IT OUT 2-2
Find the rocket’s final (x, y) position when it executes each of the two scripts shown below. What mathematical theorem can you use to prove that the two scripts are equivalent?
Other Motion Commands
There are just four motion commands left to explore: point towards; a second type of go to block; if on edge, bounce; and set rotation style.
TennisBallChaser.sb2
You’ve already learned about rotation styles, and you saw the if on edge, bounce command in action in Chapter 1 (see Figure 1-13). To see the other two commands in action, let’s create a simple application of a cat chasing a tennis ball, as illustrated in Figure 2-8.
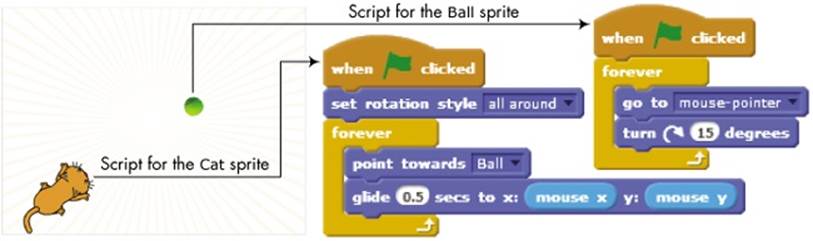
Figure 2-8. Programming a cat to run after a tennis ball
As shown, the application contains two sprites, named Cat and Ball, and two scripts. When you click the green flag icon, the Ball sprite follows the mouse pointer. The Cat sprite continuously points towards the Ball and moves toward it using the glide command. Go ahead and build this application to see how it works. You can find the forever block in the Control palette and the mouse x and mouse y blocks in the Sensing palette. You can find the complete application in the file TennisBallChaser.sb2.
In the next section, we’ll look at the Pen palette and learn how to make a sprite leave a visual trace of its motion.
Pen Commands and Easy Draw
EasyDraw.sb2
The motion commands you used in the previous section allow you to move the sprite to any point on the Stage. Now wouldn’t it be nice to see the actual path your sprite travels? Scratch’s pen can help.
Each sprite has an invisible pen, which can be either up or down. If the pen is down, the sprite will draw as it moves. Otherwise, the sprite moves without leaving any trace. The commands in the Pen palette allow you to control the pen’s size, color, and shade.
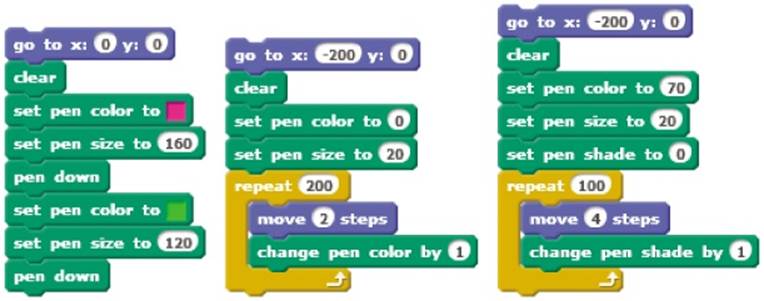
TRY IT OUT 2-3
Open the Tips window in Scratch, click the house icon, and click Pen for a brief description of each Pen command. The scripts below demonstrate most of those commands. Re-create these scripts, run them, and describe the output of each. Don’t forget to set the sprite’s pen down before running these scripts. (You can find the repeat block in the Control palette.)
Let’s explore some of the pen commands in detail and create a simple program to draw pictures by moving and turning a sprite on the Stage with the arrow keys. One press of the up arrow (↑) will move the sprite forward 10 steps. Pressing the down arrow (↓) will move the sprite backward 10 steps. Each press of the right arrow (→) will turn the sprite to the right 10°, and each press of the left arrow (←) will turn the sprite to the left 10°. So, for example, to make the sprite turn 90°, as shown in Figure 2-9, you would press the left or right arrow key nine times.
First, start a new Scratch project. Replace the Cat’s costume with something that clearly shows if the sprite is pointing left, right, up, or down. The beetle or the cat2 costumes (from the Animals folder) are good choices, but feel free to pick any other costume you like. In the Costumes tab, click the Choose costume from library button and select an appropriate costume.
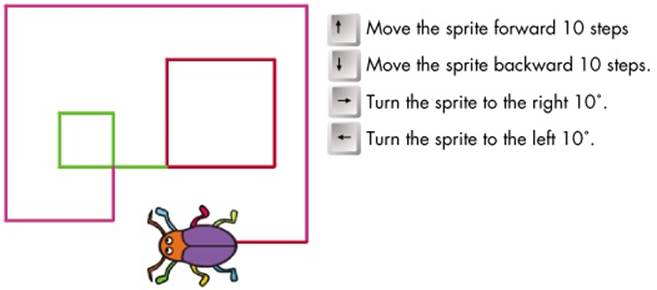
Figure 2-9. The Easy Draw application in action
Now, add the scripts shown in Figure 2-10 to your sprite. You can create the four when key pressed blocks from the when space key pressed block in the Events palette. Just click the down arrow and choose the arrow key you need.
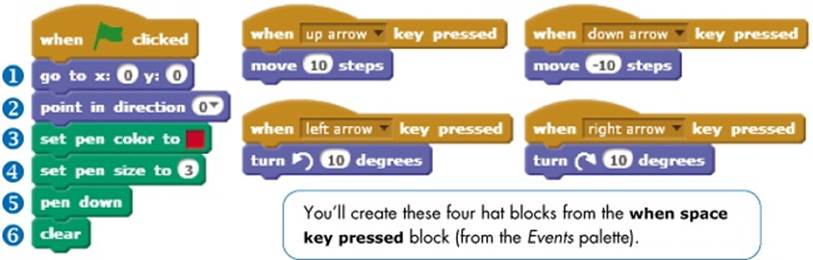
Figure 2-10. Scripts for the Easy Draw application
When you click the green flag, the sprite will move to the center of the Stage ① and point up ②. Then the pen’s color ③ and size ④ will be set, and the script puts the pen down ⑤ to get ready for drawing. After that, the program clears any previous drawings from the Stage ⑥.
All you have to do to clear the Stage and start a new drawing is click the green flag. Use the keyboard arrows to draw any shape you like. What shape do you think the sequence ↑→↑→ ↑→... would create?
TRY IT OUT 2-4
Add an option to make the drawing pen wider when the letter W is pressed and narrower when the letter N is pressed. Think of other ways to enhance the application and try to implement them.
The Power of Repeat
Our programs have been relatively simple so far, but as you start writing longer scripts, you’ll often need to replicate the same stack of blocks several times in a row. Duplicating scripts can make your program longer, harder to understand, and tougher to experiment with. If you need to change one number, for example, you’ll have to make the same change in each copy of the block. The repeat command from the Control palette can help you avoid this problem.
DrawSquare.sb2
For example, let’s say that you want to draw the square shown in Figure 2-11 (left). You could command the sprite to follow these repetitive instructions:
1. Move some distance and turn 90° counterclockwise.
2. Move the same distance and turn 90° counterclockwise.
3. Move the same distance and turn 90° counterclockwise.
4. Move the same distance and turn 90° counterclockwise.
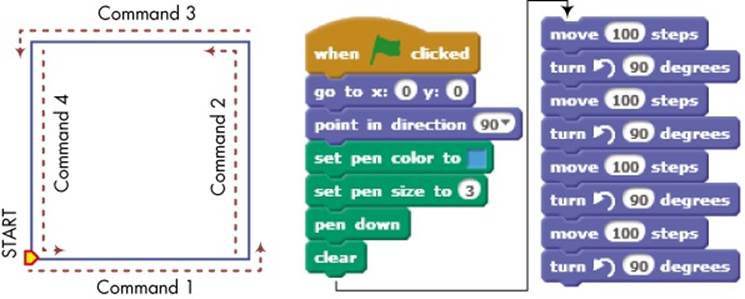
Figure 2-11. A square (left) and a script to draw it (right) using a sequence of move and turn commands
Figure 2-11 also shows a script that implements these instructions. Notice that it repeats the commands move 100 steps and turn 90 degrees four times. In contrast, we can avoid using the same two blocks over and over with the repeat block, which runs the commands inside it as many times as you tell it to, as shown in Figure 2-12. Using a repeat block can also make the instructions much easier to understand.
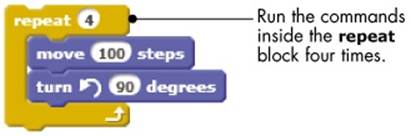
Figure 2-12. Using the repeat block to draw a square
The square you draw with the script in Figure 2-11 depends on the direction your sprite faces when you start. This concept is illustrated in Figure 2-13. Note that after drawing the square, the sprite will return to its starting point and face the same direction it did before it began to move.
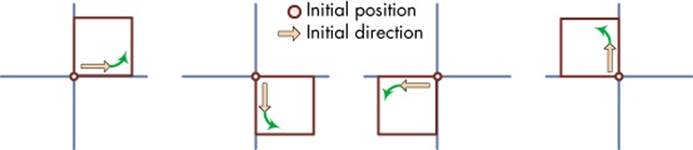
Figure 2-13. The sprite’s initial direction changes the square’s location.
TRY IT OUT 2-5
Polygon.sb2
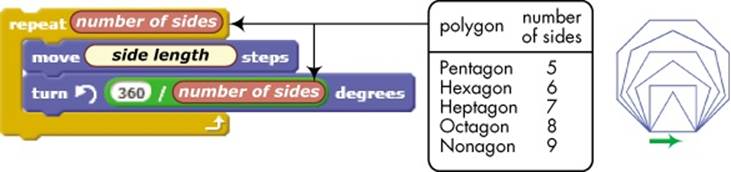
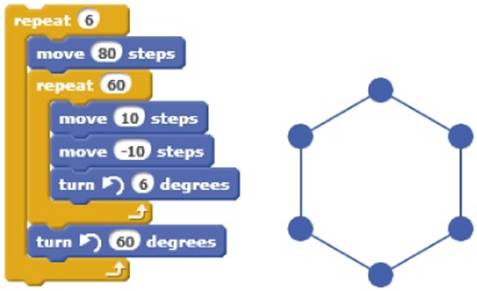
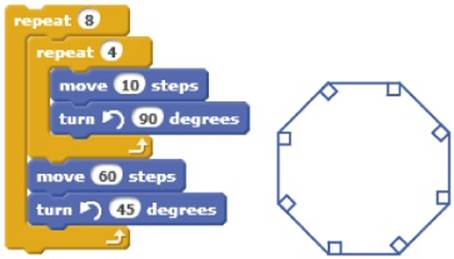
You can easily modify the square-drawing script of Figure 2-12 to draw other regular polygons. The modified script has the form shown below. You can substitute any whole number for “number of sides” to specify the desired polygon and any value for “side length” to control the polygon’s size. The figure also shows six polygons of the same side length that were drawn using this script. The sprite started at the position and heading indicated by the green arrow in the figure. Open the file Polygon.sb2 and run it using different values for “number of sides.” What happens when this number becomes large? This should give you an idea of how to draw circles.
Rotated Squares
RotatedSquares.sb2
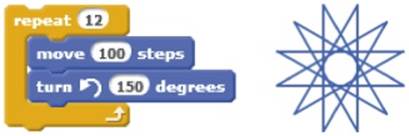
You can create amazing art by repeating a pattern in a certain sequence. For example, the script shown in Figure 2-14 creates an attractive pattern by rotating and drawing a square 12 times. (The blocks for initializing the pen and putting it down are not shown for the sake of brevity.)

Figure 2-14. Drawing a rotated square
The outer repeat block ① executes 12 times. Each time inside the loop, it draws one square ② and then makes a 30° left turn ③ to prepare to draw the next one.
TRY IT OUT 2-6
Notice that (12 repeats) × (30° for each repeat) = 360°. What do you think would happen if you changed the numbers in the program to 4 repeats and 90°? What about 5 and 72°? Experiment with different values for the repeat count and the turn angle to see what happens.
Exploring with Stamp
Windmill.sb2
In the previous section, you learned to use the turn and repeat blocks to transform simple shapes into complex patterns. But what if you want to rotate more challenging shapes? Instead of drawing the basic shape with move and turn commands, you can make a new costume in the Paint Editor and use the stamp block to draw multiple copies of it on the Stage. To illustrate this technique, let’s write a program to draw the windmill shown in Figure 2-15.
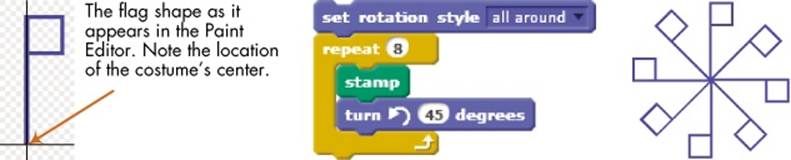
Figure 2-15. The stamp command allows you to create complex geometric patterns with ease.
We drew the flag shape using the Paint Editor (see Figure 2-15, left) and used it as the costume of our sprite. We set the costume’s center at the lower tip of the flag so we could rotate the flag around this point.
The script for drawing the windmill is shown in Figure 2-15 (middle). The repeat block executes eight times; each time, it stamps a copy of the costume on the Stage before rotating the sprite 45° to the left. Note that for this script to work, you must use the set rotation style block with the sprite’s rotation style set to all around to allow the flag to flip as it rotates.
NOTE
DrawingGeometricShapes.pdf in the extra resources package (which you can download from http://nostarch.com/learnscratch/) provides comprehensive coverage of drawing geometric shapes such as rectangles, parallelograms, rhombuses, trapezoids, kites, and polygons, and teaches you how to create attractive polygon art.
TRY IT OUT 2-7
The change color effect by block (from the Looks palette) allows you to apply graphic effects like color, whirl, and fisheye. Open the file Windmill.sb2 and add this command inside the repeat block. Experiment with other graphic effects to make some more cool patterns. Note that for the change color effect by block to work, the flag’s color in the Paint Editor can’t be black.
Scratch Projects
In this section, we’ll develop two short programs that should further your understanding of the Motion and Pen blocks you’ve learned so far. You can find the backdrops and sprites in the project files for this chapter, so we’ll focus on writing the scripts we need to make these applications work. An explanation of an additional bonus game, called Survival Jump, is available in the extra resources. You’ll find details in BonusApplications.pdf (http://nostarch.com/learnscratch/).
Some of these scripts will use command blocks that you haven’t seen, but don’t worry if you don’t completely understand some things. You’ll learn all about them in the coming chapters.
Get the Money
Money_NoCode.sb2
Our first application is a simple game in which the player needs to move the sprite by using the keyboard arrows to collect as many bags of gold as possible. As illustrated in Figure 2-16, the bag of gold appears at a random location on the grid. If the player doesn’t grab the bag in three seconds, it moves somewhere else.

Figure 2-16. Help the cat grab as many bags of gold as possible!
Open the file Money_NoCode.sb2. The scripts are missing, but you’ll create them now, and the file contains everything else you’ll need.
NOTE
The coordinate axes shown in Figure 2-16 were added to help you understand the numbers used in these scripts. Come back to this figure as needed to refresh your mental picture of how the sprites are moving.
Let’s start by writing the scripts for the Player sprite, as shown in Figure 2-17.

Figure 2-17. The scripts for the Player sprite
When the player clicks the green flag, this sprite moves to (–30,–30) ① and points to the right ②. The other four scripts respond to the arrow keys. When an arrow key is pressed, the corresponding script changes the sprite’s direction ③, plays a short sound (using the play sound block ④ from the Sound palette), and moves the sprite 60 steps ⑤. The sprite bounces off the Stage’s edge ⑥ if needed. Because 60 steps correspond to 1 square on the grid of Figure 2-16, each time you press an arrow key, the Player sprite moves 1 square.
NOTE
Have you noticed that the four arrow-handling scripts in Figure 2-17 are almost identical? In Chapter 4, you’ll learn how to avoid duplicating code this way.
Go ahead and test this part of the game. You should be able to move the Player sprite around the Stage using the arrow keys on your keyboard. Once you have that working, we’ll move on to the Gold sprite, whose script is shown in Figure 2-18.
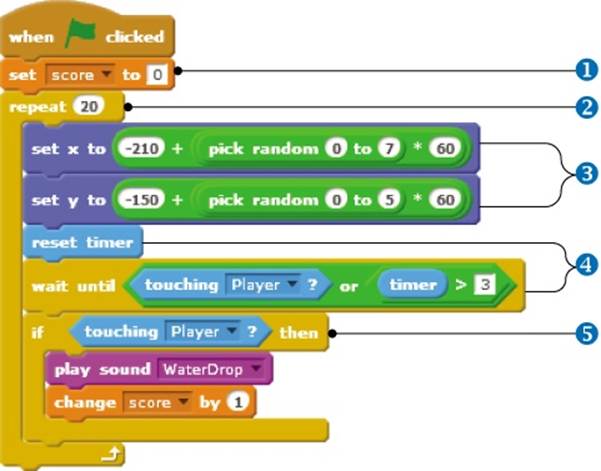
Figure 2-18. The script for the Gold sprite
Like the Player script, this script also starts when the green flag is clicked. It moves the bag of gold around. It also tracks how many bags have been collected with a variable named score, which I’ve created for you in the Data palette.
NOTE
Labels like score are called variables. They let us save information to use later in our programs. You’ll learn everything about variables in Chapter 5.
Since the game just started and we don’t have any bags yet, we set score to 0 ①. Next, we start a loop that will repeat 20 times ② to show a total of 20 bags to the player. (If you don’t want 20 bags, feel free to use your favorite number instead.) Each time the loop runs, the bag of gold will appear at some random location ③, give the player some time to grab it ④, and increment score if the player is successful ⑤.
We need the bag to appear randomly on one of the Stage’s 48 squares. As you saw in Figure 2-16, the bag’s x-position can be any of the following values: –210, –150, –90, ..., 210. These numbers are spaced 60 steps apart, so you can find each x-position starting with –210 by calculating
|
x = –210 + (0 × 60) |
|
x = –210 + (1 × 60) |
|
x = –210 + (2 × 60) |
|
x = –210 + (3 × 60) |
and so on. A similar expression applies to the y-position.
We can set the bag’s x-position by generating a random number between 0 and 7, multiplying it by 60, and adding the result to –210. Figure 2-19 shows the detailed steps for creating the set x to block in our script; the set y to block is constructed in a similar manner.
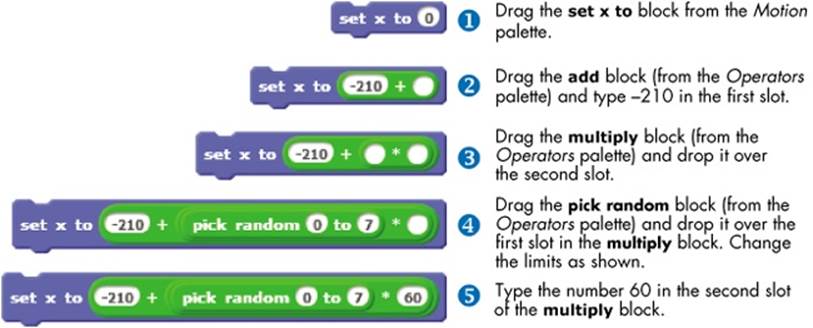
Figure 2-19. Building the set x to block from Figure 2-18
After appearing at a random location, the bag of gold will give the player three seconds to grab it. (You can change this duration to make the game harder or easier to play.) To track the time, the script first resets Scratch’s built-in timer to 0. It then waits until either the player grabs the bag by touching it or the timer exceeds three seconds. When either condition happens, the wait until block will let the script move on to execute the if/then block. The details for creating the wait until block are illustrated in Figure 2-20.
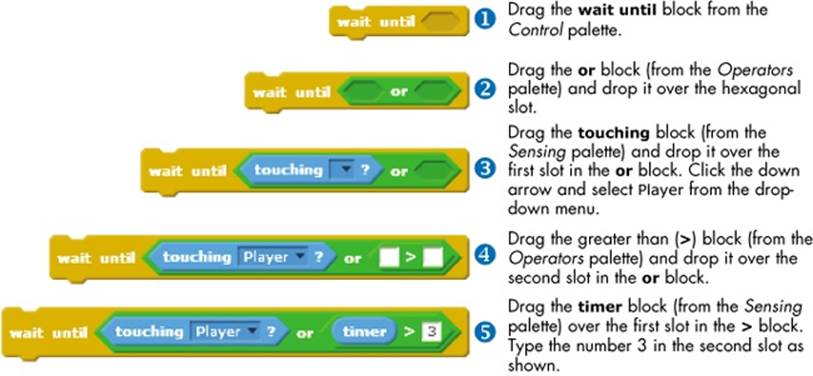
Figure 2-20. Building the wait until block in the script of Figure 2-18
NOTE
Blocks inside the if/then block will only run if the condition you specify in the header of the if/then block is true. Chapter 6 explains this block in detail, but for now, you know enough to use it to add your own touches to a program.
If the player touches the bag, the commands inside the if/then block will run. In that case, the play sound block will make a WaterDrop noise, and the change score by 1 block (in the Data palette) will add 1 to the score.
The game is now complete. Click the green flag to test your creation!
SCRATCH’S TIMER
Scratch maintains a timer that records how much time has passed since Scratch was started. When you start Scratch in a Web browser, the timer will be set to 0, and it will count up by tenths of a second as long as you keep Scratch open. The timer block (in the Sensing palette) holds the current value of the timer. The checkbox next to the block allows you to show/hide the block’s monitor on the Stage. The reset timer block resets the timer to 0, and the time starts ticking up again immediately. The timer continues to run even when the project stops running.
Catching Apples
CatchApples_NoCode.sb2
Consider the Catching Apples game shown in Figure 2-21. In this game, apples appear at random horizontal positions at the top of the Stage at random times and fall to the ground. The player has to move the cart to catch the apples before they touch the ground, and each apple is worth 1 point.
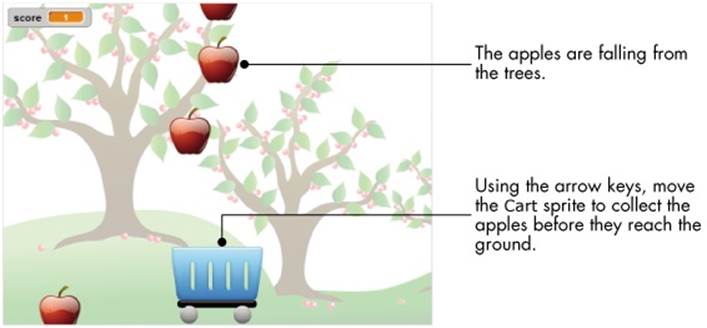
Figure 2-21. The Catching Apples game
At first, you might think such a game requires many sprites with nearly identical scripts. After all, there are a lot of apples. As of Scratch 2, however, that’s not the case. With the cloning feature, you can easily create a bunch of copies of a sprite. In our Catching Apples game, we’ll use a single apple sprite and create as many clones as we desire.
Open the file CatchApples_NoCode.sb2, which contains the setup for our game without scripts. To make things a little more exciting, the setup also includes a variable named score (created for you in the Data palette), which we’ll use to keep track of the caught apples. First, however, you’ll make the script for the Cart sprite as illustrated in Figure 2-22.
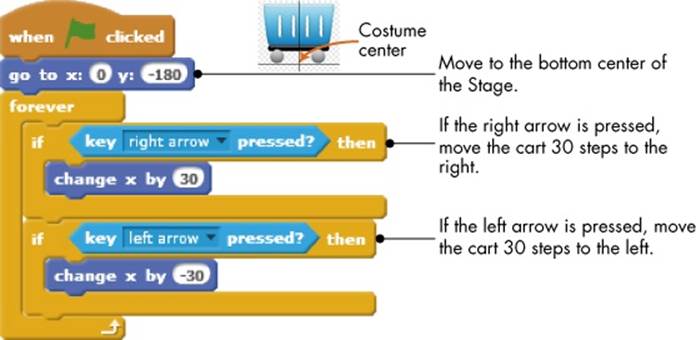
Figure 2-22. The script for the Cart sprite
When the green flag is clicked, we move the cart to the bottom center of the Stage. The script then continuously checks the state of the right and left arrows and moves the cart accordingly. I picked the number 30 based on trial and error, so feel free to change it based on your own experimentation.
Now comes the cloning business. Start by adding the script of Figure 2-23 to the Apple sprite. This script also starts running when the green flag is clicked.
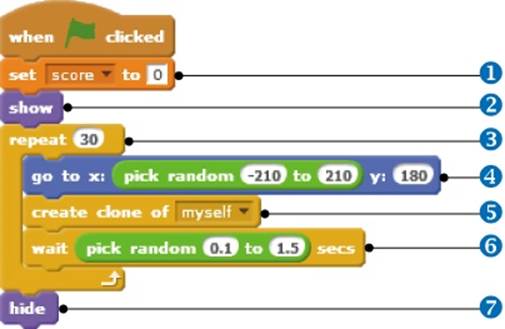
Figure 2-23. The first script of the Apple sprite
Since we haven’t caught any apples yet, the script sets the score variable to 0 ①. Next, it makes the sprite visible with the show block from the Looks palette ②. It then starts a repeat block that will loop for 30 times ③ to have 30 apples fall.
During each pass of the loop, the Apple sprite will move to a random horizontal position at the top part of the Stage ④. It then calls the create clone of block (from the Control palette) to clone itself ⑤, waits for a short random time ⑥, and starts the next round of the repeat block. After completing the 30 rounds of the repeat block, the script hides the Apple sprite using the hide block ⑦ from the Looks palette.
If you run the game now by clicking the green flag, 30 apples will pop up randomly at the top of the Stage and stay there—because we haven’t told the cloned apples what to do. This is where the next script for the Apple sprite (Figure 2-24) comes in.
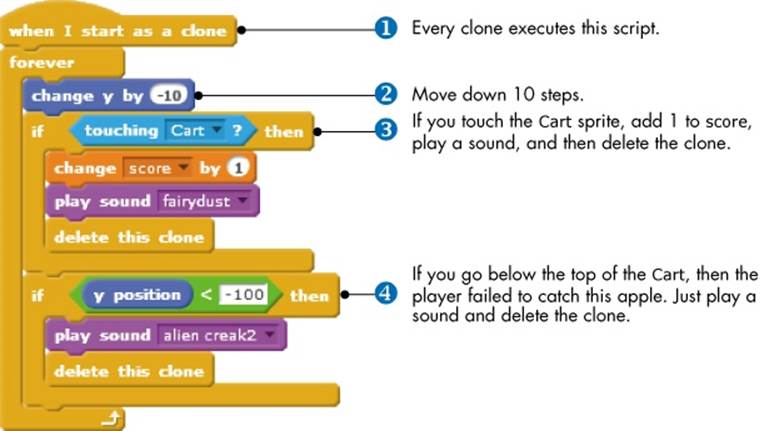
Figure 2-24. The second script for the Apple sprite
Thanks to the when I start as a clone block ① (from the Control palette), each clone will execute the script shown in this figure. Each Apple moves down 10 steps ② and checks whether it was caught or missed by the cart. If the clone detects that it is touching the cart ③, that means it was caught. Therefore, it increases the score, plays a sound, and deletes itself (because it has no more work to do). If the clone falls below the cart ④, then the player missed; in this case, the clone plays a different sound before deleting itself. If the clone is neither caught nor missed, then it’s still falling, and the forever block goes around again.
Now that our apples know how to fall, the game is complete! Go ahead and test it out by clicking the green flag. If you want to experiment, try changing the wait time between cloning the different apples and the speed of moving the cart. Does that give you some ideas for changing the game’s difficulty?
More on Cloned Sprites
Any sprite can copy itself or another sprite using the create clone of block. (The Stage can also clone sprites using the same block.) A cloned sprite inherits the original’s state at the time it is cloned—that is, the original’s current position and direction, costume, visibility status, pen color, pen size, graphic effects, and so on. This idea is illustrated in Figure 2-25.
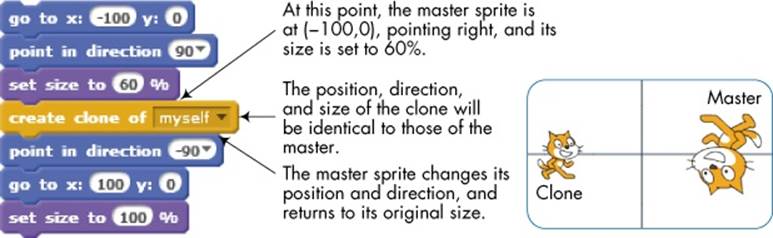
Figure 2-25. A clone inherits the attributes of its master.
Clones also inherit the scripts of the master sprite, as shown in Figure 2-26. Here, the master sprite creates two clones. When you press the spacebar, all three sprites (the master and the two clones) turn 15° to the right because they all execute the when space key pressed script.
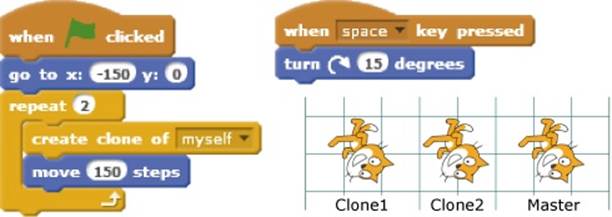
Figure 2-26. Clones inherit the scripts of their master.
Always pay special attention when using the create clone of block in a script that doesn’t start with the green flag trigger, or you could end up with more sprites than you intended. Consider the program shown in Figure 2-27. The first time you press the spacebar, a clone will be created, and the application will have two sprites (the master and the clone).
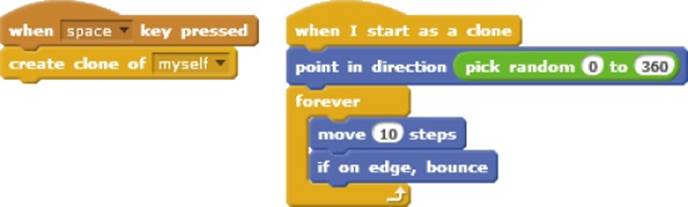
Figure 2-27. Cloning in response to a key press event
Now, if you press the spacebar a second time, you’ll have four sprites in your application. Why? The master sprite will respond to the key press and create a clone, but the first clone will also respond and create another clone (that is, a clone of the clone). Press the spacebar a third time, and you’ll have eight sprites in your application. The number of clones will grow exponentially!
You can solve this by only cloning sprites in scripts that start with the when green flag clicked block. These scripts are run only by the master sprite.
Summary
In this chapter, you learned how to move sprites to specific points on the Stage using absolute motion commands. You then used relative motion commands to move sprites with reference to their own position and direction. After that, you created some nifty drawings with the pen commands.
As you drew different shapes, you discovered the power of the repeat block, which allows you to create shorter and more efficient scripts. You also learned about the stamp command and used it with the repeat block to design complex patterns with ease.
At the end of the chapter, you created two games and learned about Scratch’s clone feature. In the next chapter, you’ll use the Looks and Sound palettes to create even more engaging programs.
Problems
|
Q: |
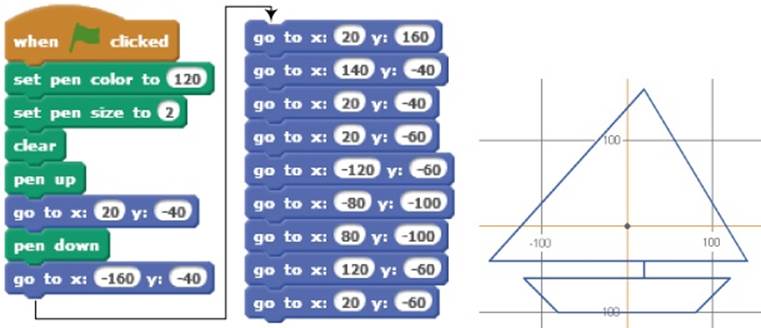
1. Explain how the following script works. Write the (x,y) coordinates for all corners of the figure.
|
|
Q: |
2. Write a script to connect each of the following sets of points in order and reveal the final shape: 1. (30,20), (80,20), (80,30), (90,30), (90,80), (80,80), (80,90), (30,90), (30,80), (20,80), (20,30), (30,30), (30,20) 2. (–10,10), (–30,10), (–30,70), (–70,70), (–70,30), (–60,30), (–60,60), (–40,60), (–40,10), (–90,10), (–90,90), (–10,90), (–10,10) |
|
Q: |
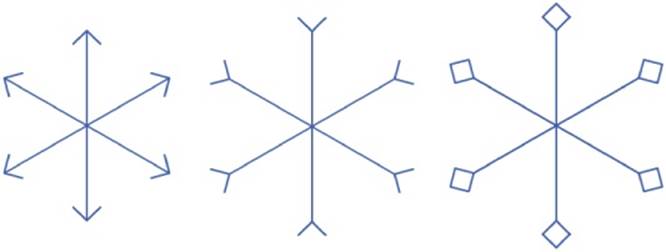
3. Write a script to draw each of the patterns shown below.
|
|
Q: |
4. Consider the following script and its output. Re-create the script, add the necessary pen setup commands, run it, and explain how it works.
|
|
Q: |
5. Consider the following script and its output. Re-create the script, add the necessary pen setup commands, run it, and explain how it works.
|
|
Q: |
6. Consider the following script and its output. Re-create the script, add the necessary pen commands, run it, and explain how it works.
|
|
Q: |
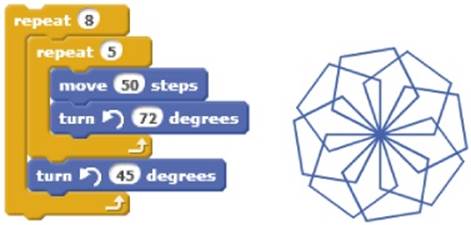
7. Create the script shown below, add the necessary pen commands, and run it. Explain how the script works.
|
|
Q: |
8. Write a program that produces the output shown below.
|
|
Q: |
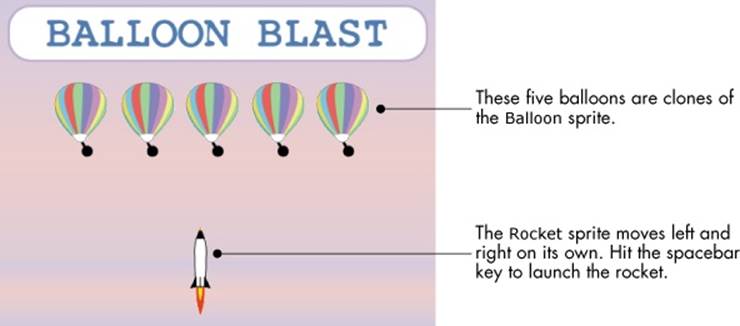
9. In this problem, you’ll write the scripts needed to complete the Balloon Blast game shown below. BalloonBlast_NoCode.sb2
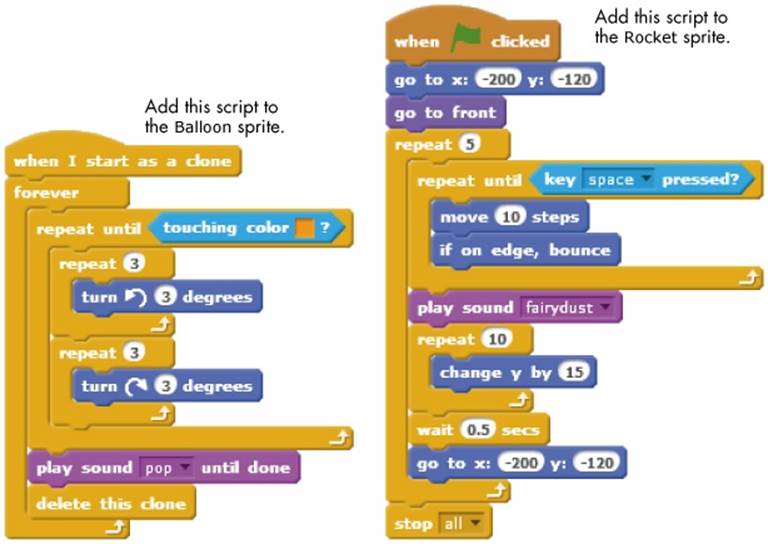
This game contains two sprites, named Balloon and Rocket. When you click the green flag, the Balloon sprite creates the five clones in the interface shown above. The Rocket sprite moves left and right on its own, bouncing off the edges of the Stage. You need to press the spacebar at the right moment to launch the rocket and pop the balloons. Open the file BalloonBlast_NoCode.sb2. This file contains the code for creating the five clones when the game starts. Your task is to complete the game by adding the following two scripts.
|
All materials on the site are licensed Creative Commons Attribution-Sharealike 3.0 Unported CC BY-SA 3.0 & GNU Free Documentation License (GFDL)
If you are the copyright holder of any material contained on our site and intend to remove it, please contact our site administrator for approval.
© 2016-2026 All site design rights belong to S.Y.A.