Learn to Program with Scratch: A Visual Introduction to Programming with Games, Art, Science, and Math (2014)
Chapter 3. Looks and Sound
In the last chapter, you learned to move sprites on the Stage using the motion commands and how to use the pen to draw patterns. In this chapter, you’ll learn about the various commands in the Looks and Sounds palettes. Along the way, you’ll do the following:
§ Create animations and image effects
§ Learn how layers work in Scratch
§ Play sound files and compose music
§ Make complete animated scenes of your own
The commands in the Looks palette will let you create animations and apply graphic effects like whirl, fisheye, ghost, and so on to costumes and backgrounds. The commands in the Sounds palette are handy when you want to add sounds, voices, or music to your applications. Let’s jump right in with some animation!
The Looks Palette
You can draw images directly on the Stage using the pen commands, but costumes provide another powerful, and sometimes much easier, way to add graphics to your programs. The commands in the Looks palette will let you manipulate costumes to create animations, add thought bubbles, apply graphic effects, and change a sprite’s visibility. We’ll explore those command blocks in this section.
Changing Costumes to Animate
Animation.sb2
You know how to send a sprite from one point to another on the Stage, but static sprites don’t look very lifelike as they jump around. If you use different costumes and switch between them fast enough, you can make a sprite appear as if it were really moving! Open the file Animation.sb2 to try out the animation in Figure 3-1.
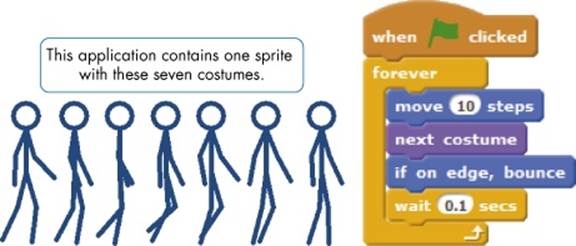
Figure 3-1. You can create the illusion of animation by switching among different costumes.
This application contains one sprite with seven costumes along with one script. You can see the seven costumes in the Costumes tab and the script in the Scripts tab of the sprite. When you run the application by clicking the green flag, the stick figure will appear to walk on the Stage. The key to its motion is the next costume command, which tells the sprite to put on the next costume in its list. If the sprite is wearing the last costume in the list, it will roll over to its first costume.
When the green flag is clicked, the script starts a forever loop with a wait block at the end to create a delay of 0.1 seconds after each costume change. If you remove this delay from the script, the stick figure will appear to run instead of walk. Experiment with different values for the moveand the wait blocks and see how they affect the animation.
Although you could draw this walking stick figure with the pen commands, you would need to write a long script. On the other hand, once you draw these costumes, programming the animation is a breeze. Remember that you can create images using your favorite paint program or with Scratch’s Paint Editor.
ClickOnFace.sb2
If you want people to interact with a sprite, you could change its costume in response to a mouse click, as in the Click on Face application. This application contains a single sprite, named Face, which has the five costumes shown in Figure 3-2. It uses the when this sprite clicked block (from the Events palette) to tell the sprite when to switch costumes.
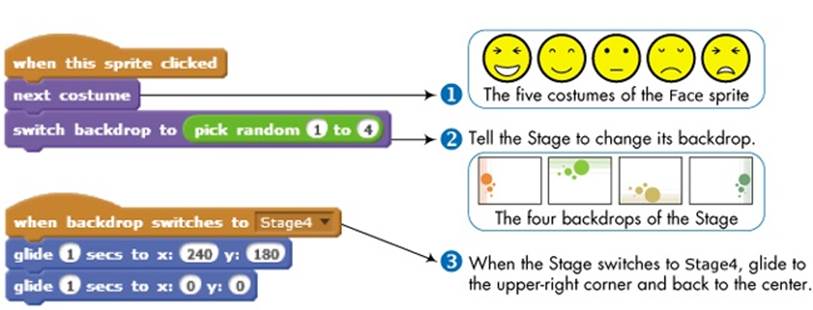
Figure 3-2. The smiley face and the backdrop change whenever the sprite is clicked.
When you run this application, every time you click the mouse on the face image, the image will change to the next one in the list. The script also uses the switch backdrop to block to command the Stage to switch randomly to one of its four backdrops. When the Stage switches to itsStage4 image, the Face sprite detects this event (using the when backdrop switches to trigger block from the Events palette). In this case, the face makes a trip to the upper-right corner of the Stage and then returns to the center.
TRY IT OUT 3-1
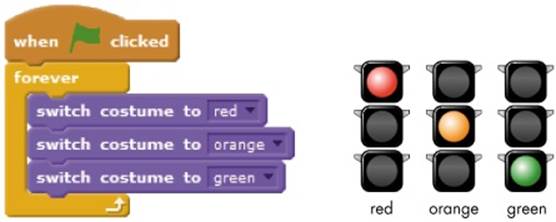
TrafficLight.sb2
The file TrafficLight.sb2 contains one sprite that has three costumes (named red, orange, and green) and an incomplete script, as shown below. Complete the application by adding the necessary wait blocks to create a realistic traffic light animation.
NOTE
You can use the switch backdrop to command to change scenes in a story, switch levels in a game, and so on. Any sprite in your project can use the when backdrop switches to block to detect when the Stage has switched to a certain costume and act accordingly. See the Tips window in the Scratch interface for more details.
Sprites That Speak and Think
You can use the say and think commands to make your sprite speak or think like a character in a comic strip, as illustrated in Figure 3-3 (left).
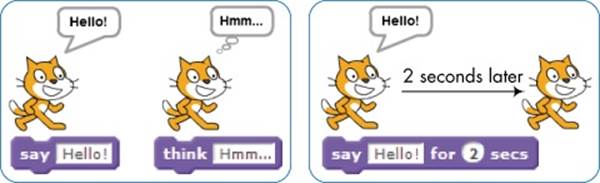
Figure 3-3. Use the say or think commands to show a message in a speech or a thought bubble.
Any phrase you type into these commands will appear above the sprite, and the message is displayed permanently. If you want to clear the message, use a say or think block with no text. You could also display a message for a fixed time instead with the say for secs (or the think for secs) command, as illustrated in Figure 3-3 (right).
TRY IT OUT 3-2
Argue.sb2
To see the Say and Think commands in action, open the file Argue.sb2 and run it. This application simulates an endless argument between two characters, as illustrated below. Study the scripts to understand how they use accurate timing to synchronize the actions of the two characters.
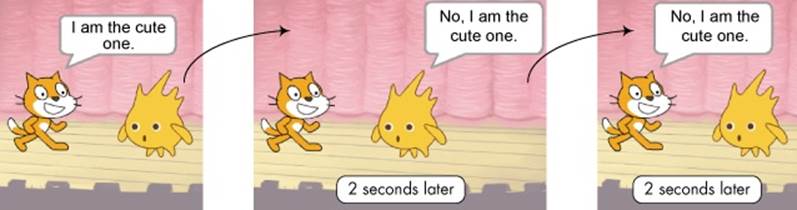
Image Effects
GraphicEffects.sb2
The set effect to command allows you to apply different graphic effects to costumes and backdrops. Scratch gives these effects names like fisheye, whirl, mosaic, and so on. Figure 3-4 shows exactly what they do.
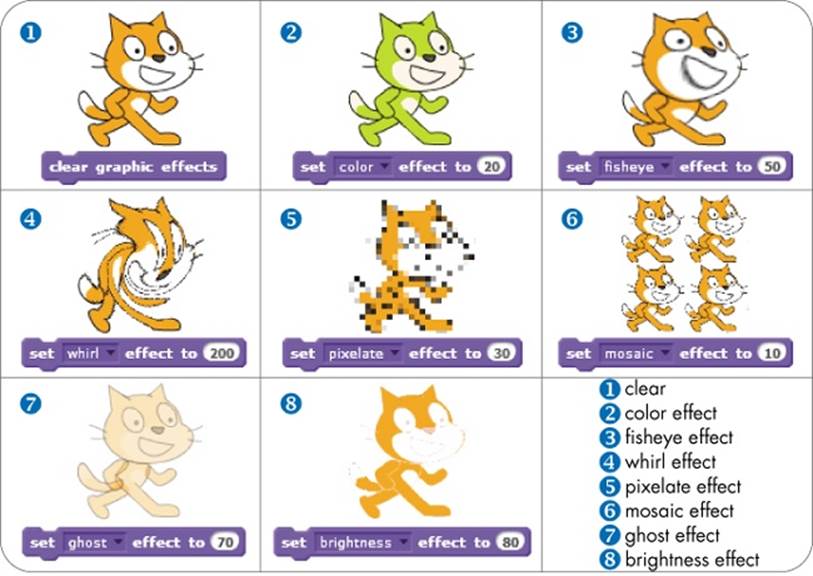
Figure 3-4. This figure shows what happens to the cat when you apply Scratch’s graphic effects.
Click the down arrow in the set effect to block to choose the effect you want from the drop-down menu. You can also use the change effect by command to adjust an effect instead of setting it directly. For example, if the current ghost effect is set to 40, changing it by 60 would set the ghost effect to 100, causing the sprite to disappear (like a ghost). When you want to return an image to its original state, use the clear graphic effects block.
NOTE
You can apply multiple effects to a sprite at once by using several graphic effect commands in sequence.
Size and Visibility
SneezingCat.sb2
Sometimes you may need to change the size of a sprite or control when it appears in your program. For example, you may want to have closer objects in a scene look larger, or you may want to show an “instructions” sprite only at the beginning of a game.
If you need to shrink or grow a sprite, the set size to % and change size by commands can help. The first sets a sprite’s size to a percentage of its original size, and the second modifies a sprite’s size by a specified amount relative to its current size. When you need to make a sprite appear or disappear, use the show block or the hide block, respectively.
To see these commands in action, open SneezingCat.sb2. In this application, we’ll have the cat sneeze like a cartoon character by changing its size, as shown in Figure 3-5.
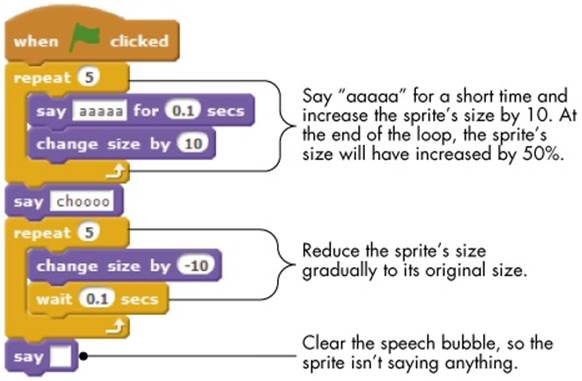
Figure 3-5. This script makes the Cat sprite sneeze.
The size of the sprite increases as it gets ready to sneeze, and after it sneezes, it returns slowly to its original size. Run the program and watch what happens to get a feel for these commands.
TRY IT OUT 3-3
Add a block to the end of the script in Figure 3-5 to have the Cat sprite finish its dramatic sneeze by vanishing afterward. Add another block to show the sprite at the beginning of the script.
Layers
The last two commands in the Looks palette affect the order in which sprites are drawn on the Stage. This order determines which sprites are visible when they overlap. For example, let’s say that you want to create a scene of a girl standing behind a big rock. There are two layering possibilities, shown in Figure 3-6 (left).
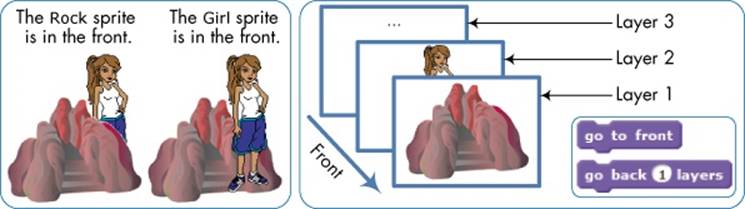
Figure 3-6. The sprite in the front layer is completely visible and can cover parts of overlapping sprites.
If you want the girl to be behind the rock, you must bring the rock to the front drawing layer or send the girl to the back drawing layer. Scratch provides two commands that allow you to reorder the drawing layers, go to front and go back layers (also shown in the figure). The first tells Scratch to always draw a sprite on top, while the second sends a sprite back as many layers as you specify.
TRY IT OUT 3-4
Layers.sb2
The Layers.sb2 application has four objects that move on the Stage. You can bring an object to the top by pressing the first letter of its color. Run the application to explore the effect of the go to front command.
We’ve covered animation with the Looks palette, but there’s another thing that can liven up our applications. In the next section, we’ll explore the Sound palette and its rich set of commands.
The Sound Palette
Games and other applications use sound effects and background music to add excitement. In this section, you’ll learn to use Scratch’s sound-related blocks, starting with how to incorporate audio files and control their playback. You’ll then look at command blocks for playing drums and other musical instruments. After that, you’ll find out how to control the volume and change the speed (or tempo) at which musical notes and drums are played.
Playing Audio Files
You can save audio files on your computer in many formats, but Scratch only recognizes two: WAV and MP3. There are three command blocks that allow you to use these sound files in your applications: play sound, play sound until done, and stop all sounds. Both of the first two blocks play a given sound. The play sound command lets the next command start before the sound finishes playing, while play sound until done won’t move on to the next command until the end of the sound. The stop all sounds command immediately turns off any sound that is playing.
You can add background music to your application by playing an audio file repeatedly. The easiest way to do this is to use play sound until done to let the file to play completely, and then restart it, as shown in Figure 3-7 (left).

Figure 3-7. Two ways to create background music: Repeat the sound after it finishes (left) or start the sound over after playing it for a certain amount of time (right).
Depending on the audio file, this approach may produce a very short, but sometimes noticeable, pause between the consecutive restarts. You could also use the play sound command with a wait command to give yourself more control over the play duration, as shown in Figure 3-7 (right). By experimenting with the wait time, you may be able to shorten the pause to produce a smoother transition between the end of the current playback and the beginning of the next.
Playing Drums and Other Sounds
BeatsDemo.sb2
If you’re developing games, you’ll probably want to play a short sound effect when the player hits a target, finishes a level, and so on. It’s easy to create these sounds with the play drum for beats command, which plays your choice of 18 drum sounds for a certain number of beats. You can also add pauses with the rest for beats command. The BeatsDemo.sb2 application, shown in Figure 3-8, demonstrates the effect of the beats parameter.
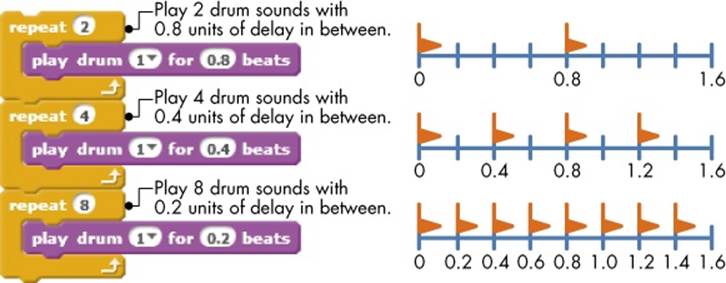
Figure 3-8. An illustration of beats in Scratch
The script contains three repeat blocks with repeat counts of two, four, and eight, respectively. Each repeat block plays the same drum sound using a different number of beats. If you think of the time axis as being divided into intervals of 0.2 units, the first loop will play two drum sounds that are 0.8 units of time apart. The second loop will play four drum sounds that are 0.4 units apart, and the third loop plays eight drum sounds that are 0.2 units apart. Each loop takes the same amount of time to complete; we’re just hitting the drum a different number of times in the same time interval.
I said “units of time” instead of seconds because the actual time to finish each loop depends on the tempo, which you can set with the set tempo to command. Using the default tempo of 60 beats per minute (bpm), each loop in the above example will take 1.6 seconds to complete. If you set the tempo to 120 bpm, each loop will take 0.8 seconds to complete, while at 30 bpm, each takes 3.2 seconds, and so on.
Composing Music
FrereJacques.sb2
Scratch also contains two commands that allow you to play musical notes and compose your own music. The play note for beats command plays the note you choose, from 0 to 127, for a number of beats you specify. The set instrument to block tells Scratch which instrument the note should sound like. Let’s use these commands to create a complete song. The script shown in Figure 3-9 plays the French children’s song “Frère Jacques.”
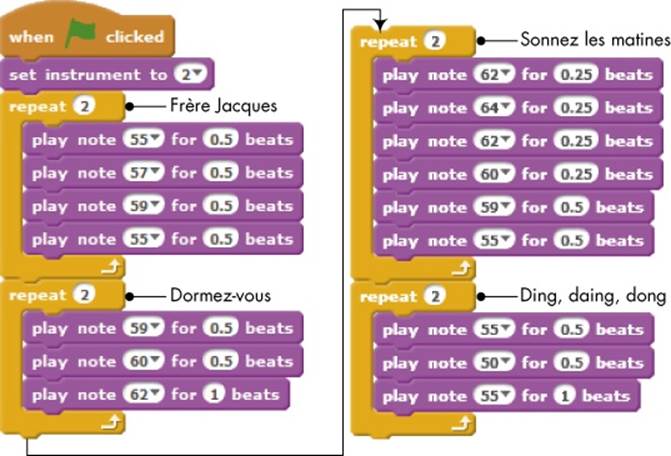
Figure 3-9. A script that plays “Frère Jacques”
Open this application, named FrereJacques.sb2, and experiment with different values for the set instrument to command to change the instrument that plays this song.
Controlling Sound Volume
Let’s say that you want to make a sound fade in response to some event in your application. If you are launching a rocket into space, for example, you might want the rocket to sound loud when it takes off and become quieter as it moves farther away.
Scratch contains a set of commands to control the volume, or loudness, of audio files, drum sounds, and musical notes. The set volume to % command sets a sprite’s loudness to a percentage of the speaker’s volume. However, it affects only the sprite that uses it (or the Stage), so if you want sounds to play at the same time with different volumes, you’ll have to use multiple sprites. The change volume by block reduces or increases the volume by the number you enter. Negative numbers make sounds softer, while positive numbers make them louder. You can even show a sprite’s volume on the Stage by checking the box next to the volume block. These blocks are handy if you want to change the volume based on how close a sprite is to a target (as in a treasure-hunt game) or make parts of a song louder than others. You can also use these blocks to simulate an orchestra by playing different instruments (with different loudness levels) simultaneously.
TRY IT OUT 3-5
VolumeDemo.sb2
The file VolumeDemo.sb2 simulates a cat walking into a forest. The application uses the change volume by command to make the cat’s sound fade away as it goes deeper into the woods. Come up with some ideas to make this simulation more real and try to implement them.
Setting the Tempo
The last three blocks in the Sound palette are related to the tempo, or speed, at which drums and notes are played. Tempo is measured in beats per minute (bpm). The higher the tempo, the faster the notes and drums will play.
Scratch lets you choose a specific tempo with the set tempo to bpm command. You can also tell a sprite to speed up or slow down the tempo by a certain amount with the change tempo by command. If you want to see a sprite’s tempo on the Stage, check the box next to the tempo block.
TRY IT OUT 3-6
TempoDemo.sb2
Open the file TempoDemo.sb2 and run it to see the set tempo to bpm and change tempo by commands in action.
Scratch Projects
The commands in the Looks and Sound palettes will help you add lots of nifty effects to your applications. In this section, we’ll put everything we’ve learned so far in this chapter together to create animated scenes of a person dancing and some fireworks. This should help you review some of the new command blocks and give you more practice with creating a complete Scratch project.
Dancing on Stage
DanceOnStage.sb2
In this section, you’ll animate a Dancer sprite on the Stage. This application is illustrated in Figure 3-10, and the complete script is saved as DanceOnStage.sb2. We’ll build the whole scene right here—follow along to see how it works!

Figure 3-10. The Dance Party application in action.
First, start a new project. If Scratch is not already running, all you have to do is start it—this will automatically create a new project for you. Otherwise, select New from the File menu. In both cases, you’ll have a new project that contains the default Cat sprite.
The backdrop that you’ll use in this application is the party room from the Indoors category. Import this backdrop and delete the default white backdrop, which you won’t need. The Stage should now look like Figure 3-11.
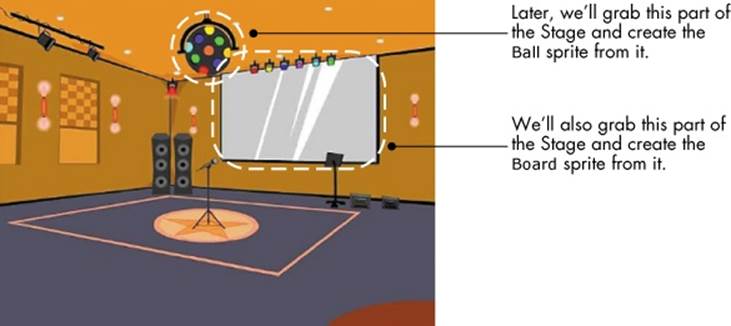
Figure 3-11. We’ll turn some sections of the party-room backdrop into sprites later.
Examine Figure 3-10 and Figure 3-11 carefully and notice how the Ball and Board sprites look like parts of the backdrop. As you’ll see in a moment, these two sprites were actually created from that image and placed on the Stage to cover the sections they came from. Creating the two sprites this way lets us change their color and make the Stage more realistic.
Now we need some background music. Let’s use the medieval1 file from the Music Loops category. Import this file to the Stage and then delete the default “pop” sound. Next, add the script in Figure 3-12 to the Stage. It uses the play sound command along with a wait time that lets the audio file restart smoothly. The wait time of 9.5 seconds was selected by experimentation.
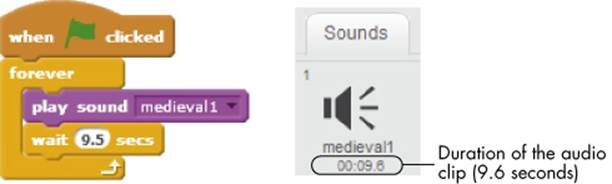
Figure 3-12. The Stage plays our background music.
Click the green flag to test what you’ve created so far. You should hear an audio clip repeating continuously. Stop the script when you’re ready, and we’ll add our dancer.
Replace the costumes of the Cat sprite with those of the Dancer. Import the dan-a and dan-b costumes from the People category, delete the two Cat costumes, and change the Cat sprite’s name to Dancer. The script for the Dancer is shown in Figure 3-13.
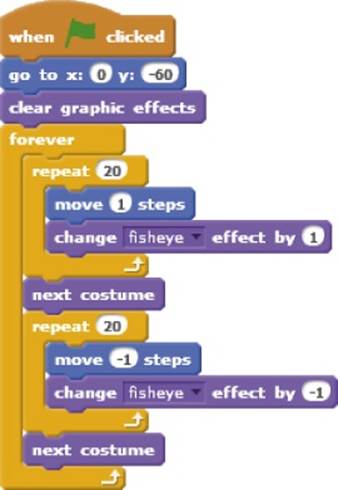
Figure 3-13. This script tells the Dancer sprite how to boogie.
The Dancer moves 20 steps to the right, changes its costume, moves 20 steps to the left, and changes its costume again. These steps are repeated forever to make him look like he’s really dancing. The script also changes the fisheye effect slightly with every step for some variety. Click the green flag to test this new addition to the program. You should hear the background music and see the Dancer moving left and right on the Stage.
Now that you have a dancer for your party, let’s add some colorful lights with the Ball, Board, and SpotLight sprites. To create the Ball sprite, click the thumbnail of the Stage to select it and then select the Backdrops tab. Right-click the thumbnail of the party room backdrop and select save to local file from the pop-up menu. This brings up a dialog that allows you to save the backdrop image locally. Remember where you saved this image because you’ll import it back in a moment.
Click the Upload sprite from file button (above the Sprite List) and select the image you just saved. This creates a new sprite whose costume is the same as the backdrop image. Name this sprite Ball and edit its costume in the Paint Editor to remove everything but the colorful ball depicted in Figure 3-14 (left). Be sure to paint the space around the ball with transparent color. Next, place the Ball sprite on the Stage exactly over the spot in the backdrop where you took it from so that it looks like part of the image (see Figure 3-11).
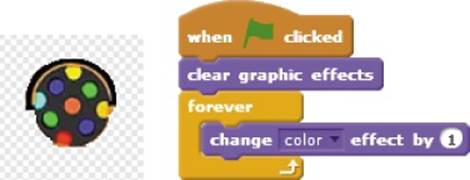
Figure 3-14. The costume for the Ball sprite as it appears in the Paint Editor and its script
Figure 3-14 also shows the script you should add to the Ball sprite. It changes the sprite’s color effect continuously to give the illusion that the small circles are actually changing color.
Create the Board sprite the same way you created the Ball sprite. Figure 3-15 shows how this sprite should appear in the Paint Editor (left) and the script you’ll need to animate it (right). I’ve added some colors to the costume (compare to Figure 3-11) to make the change color effectcommand effective.
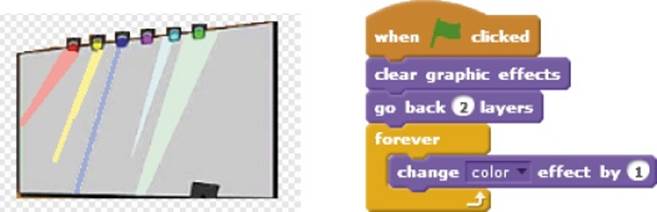
Figure 3-15. The Board sprite and its script
Because the Board sprite overlaps with the Dancer, the script sends the Board two layers to the back so the Dancer will always be in the front. You can do the same thing by selecting the Dancer sprite and clicking the go to front block from the Looks palette.
The last sprite in this application is the SpotLight sprite. Figure 3-16 shows how this sprite appears in the Paint Editor, as well as the script you need to create. The center of the image is at the tip of the cone shape, which represents a light beam.
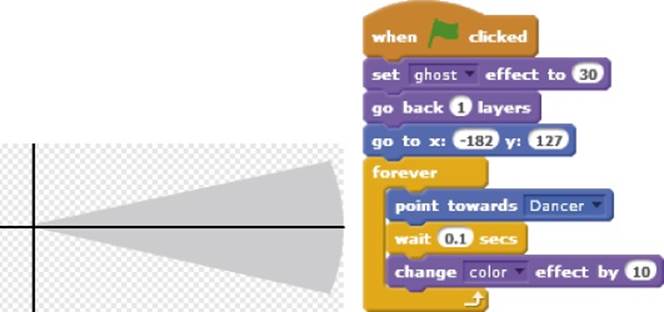
Figure 3-16. The SpotLight sprite and its script
The script first sets the sprite’s ghost effect to 30 to make it transparent so that it won’t obscure the backdrop. The script then sends this sprite one layer back, which places the light beam behind the dancer. The sprite is then positioned so that the light beam appears to be emanating from the spotlight (see Figure 3-10). You’ll have to choose the x- and y-coordinates based on your drawing. After that, the script commands the light beam to follow the dancer (using the point towards command) and change its color forever.
Once you’re done adding the spotlight, the application should be complete. Click the green flag to watch your dance party in action! In addition to the music and the dancing, you should also see the Ball, Board, and SpotLight sprites changing color as though real disco lights are in action.
In the next section, we’ll look at a different application that highlights many of the graphic effects we studied in this chapter.
Fireworks
Fireworks_NoCode.sb2
Another application that lends itself naturally to the graphics blocks and other concepts discussed in this chapter is an animated fireworks scene. In this section, you’ll make a simple firework animation that floods the sky with colorful sparks. The firework rockets will explode at random times, producing sparks that fall as though acted upon by gravity and fade slowly with time, as illustrated in Figure 3-17.
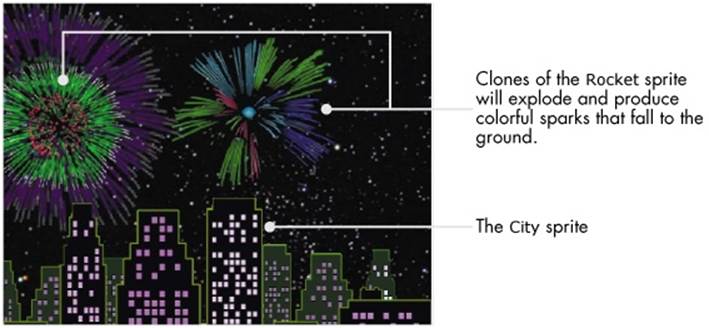
Figure 3-17. The fireworks animation in action
Start by opening the file Fireworks_NoCode.sb2, which contains the initial setup of the application without any scripts. As shown in Figure 3-17, the application contains two sprites: the City sprite and the Rocket sprite. The City sprite shows an image of tall buildings that you can animate in any way you like. The Rocket sprite will continuously create clones that explode in the dark sky, producing the fireworks.
The Rocket sprite has the eight costumes shown in Figure 3-18. The first costume, C1, is just a small dot that we’ll launch into the sky. When this dot reaches its destination, which is selected at random, it will switch to one of the other costumes (also at random) to simulate the initial explosion. We’ll then use an appropriate graphic effect to make this explosion look more realistic.
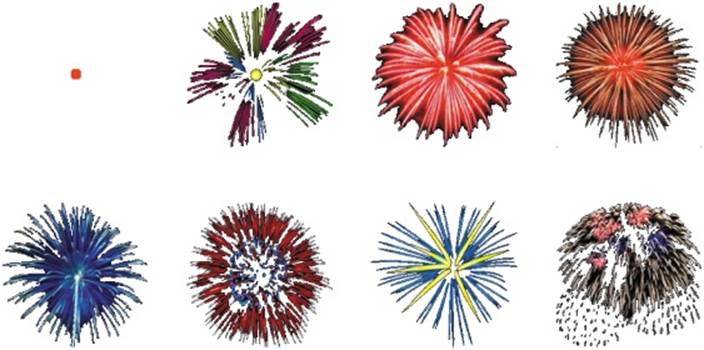
Figure 3-18. The eight costumes of the Rocket sprite.
With this plan in mind, add the script shown in Figure 3-19 to the Rocket sprite. The script runs when the user clicks the green flag. After hiding the Rocket sprite, it starts a forever loop to create clones of itself at random times. Since the clones inherit the visibility state of the Rocketsprite, all created clones will be hidden at first.
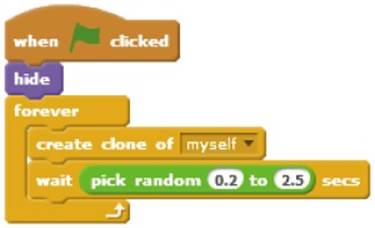
Figure 3-19. The first script of the Rocket sprite
We now need to tell the cloned rockets what to do. This script is shown in Figure 3-20.
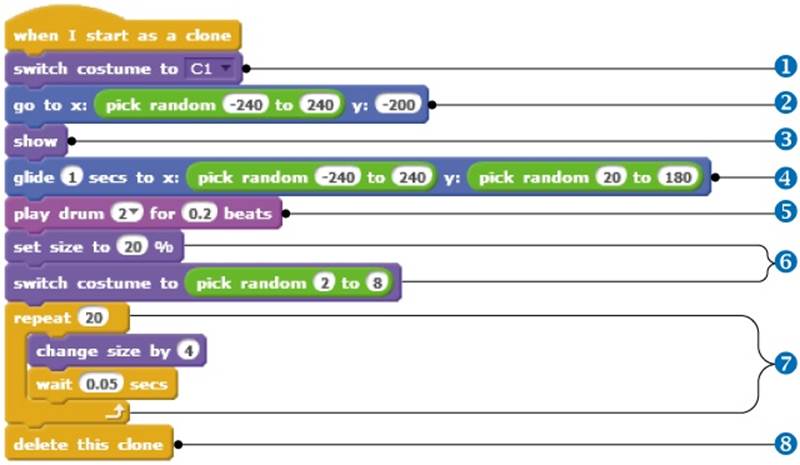
Figure 3-20. The start-up script of the cloned sprites
The cloned rocket starts by putting on its first costume ① (the small red dot). It then moves to a random horizontal position at the bottom of the Stage ②, shows itself ③, and glides to a random position ④ in the upper part of the Stage (somewhere above the buildings). This part of the script simulates the launch of the rocket, and if you run it, you will see a red dot moving from the ground to the sky. When the dot reaches its final point in the sky, it explodes due to instructions in the second part of the script. First, the clone plays a short drum sound ⑤ (to simulate the sound of an explosion). Fireworks explosions start small and expand, so the clone sets its initial size to 20%and picks one of its other costumes randomly ⑥. It then starts a repeat loop ⑦ to grow the firework. Every pass through the loop, the clone increases its size by 4. At the end of the loop, the clone deletes itself ⑧.
That wraps up this fireworks festival! You should now be able to run the animation and show off the scene you created. With just a couple of scripts, we made a relatively complex animation.
Summary
In this chapter, we introduced many new programming blocks that can be used to add some pizzazz to our applications. With these blocks, we can add color, animation, graphic effects, music, and more.
We explained the blocks in the Looks palette and gave several examples of how to use them. You animated sprites by switching costumes, learned about drawing layers, and saw how layers affect the appearance of overlapping sprites.
We then covered the commands in the Sound palette and explained how to play audio files, drum sounds, and musical notes. You created a complete dance scene with commands from both the Looks and the Sound palettes, and you finished with a bang by making a fireworks animation application.
In the next chapter, you’ll learn how to coordinate the work among different sprites using message broadcasting and receiving. You’ll also learn how to break up a large program into smaller and more manageable pieces, called procedures. This concept is the key to writing more complex applications.
Problems
|
Q: |
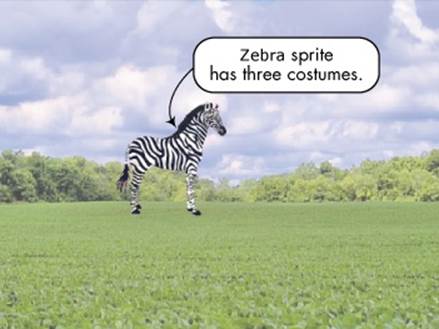
1. Open the application Zebra.sb2, shown below. The application contains a single sprite (the Zebra), which has three costumes. Write a script that makes the Zebra move across the Stage and switch among its costumes to create the illusion of running. Zebra.sb2
|
|
Q: |
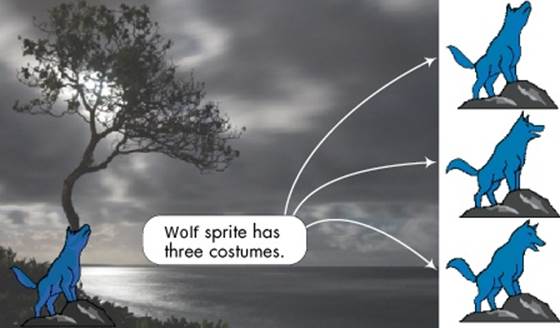
2. Open the application Wolf.sb2, shown below. When you click the green flag, the Wolf will play the WolfHowl sound, which takes about 4 seconds. Create a script that changes the Wolf’s costumes in sync with the sound. (Hint: Insert a wait block with an appropriate time delay after each costume switch.) Wolf.sb2
|
|
Q: |
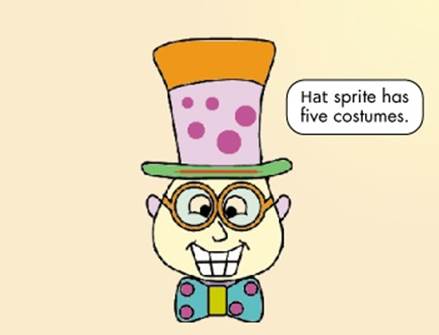
3. Open the application ChangingHat.sb2, shown below. The hat in this application is a sprite that has five costumes. Create a script to switch the Hat’s costume when it is clicked. Then create a game in which the player dresses characters by clicking on different pieces of clothing. ChangingHat.sb2
|
|
Q: |
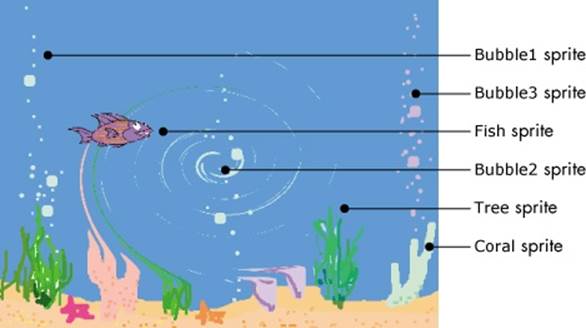
4. Open Aquarium.sb2. The application contains six sprites, as illustrated below. Try out different graphic effects to animate the aquarium. Here are some suggestions: Aquarium.sb2 1. Use the whirl effect on the Stage. Start with a large number like 1,000 to give the figure a wavy appearance. 2. Change the costumes for the Bubble1 and Bubble2 sprites at an appropriate rate. 3. Move the Fish across the Stage while changing its costume. 4. Apply the ghost effect to the Tree sprite. 5. Use the color effect on the Coral and Bubble3 sprites.
|
|
Q: |
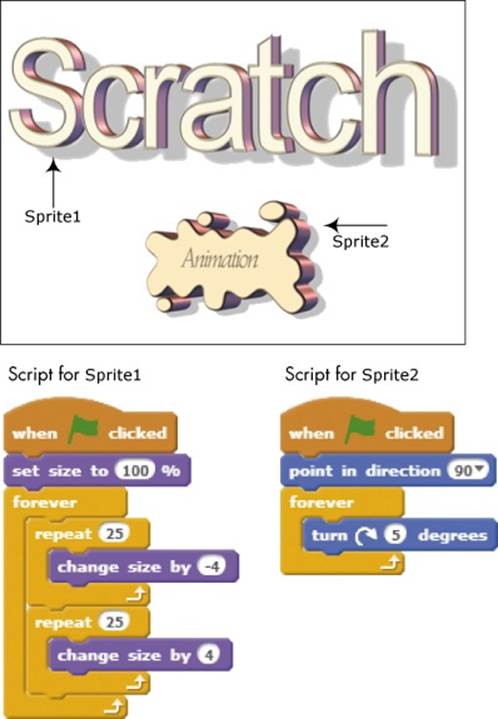
5. Open the application Words.sb2 (shown on the next page) and animate the words using size and rotation. Create the two scripts shown in the figure and run the application to see the result. Words.sb2
|
|
Q: |
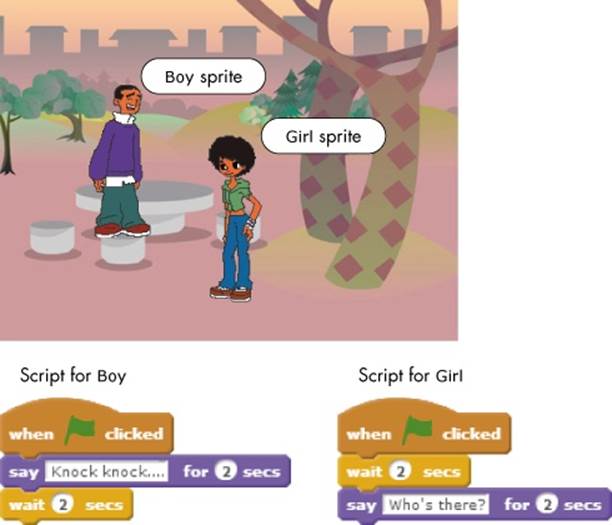
6. Open the application Joke.sb2, shown below. Finish the scripts for the Boy and the Girl sprites to tell any joke you want. Joke.sb2
|
|
Q: |
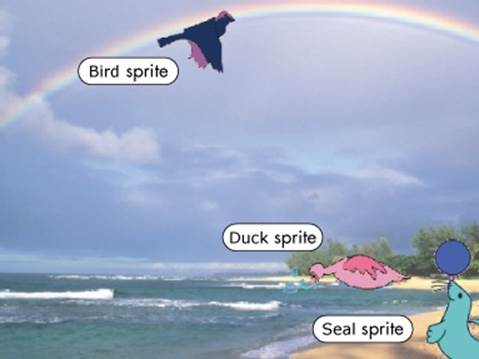
7. Open Nature.sb2. The application contains three sprites, as illustrated below. Animate the scene using both motion and sound. Here are some suggestions: Nature.sb2 1. The Bird sprite has two costumes that create a flying effect. Create a script to fly the Bird across the Stage and play the Bird sound at random times. 2. The Duck sprite has 12 costumes that show the Duck plucking a fish out of the water and eating it. Create a script to move the Duck across the Stage and play the Duck sound at random times. 3. The Seal sprite has four costumes that show the Seal playing with the ball. Create a script to have the Seal play around and make the SeaLion sound at random times.
|
All materials on the site are licensed Creative Commons Attribution-Sharealike 3.0 Unported CC BY-SA 3.0 & GNU Free Documentation License (GFDL)
If you are the copyright holder of any material contained on our site and intend to remove it, please contact our site administrator for approval.
© 2016-2026 All site design rights belong to S.Y.A.