Learn to Program with Scratch: A Visual Introduction to Programming with Games, Art, Science, and Math (2014)
Chapter 5. Variables
This chapter explains how to create scripts that can read in and remember values. When you use variables, you can write applications that interact with users and respond to their input. Here’s what we’ll cover in this chapter:
§ The data types supported by Scratch
§ How to create variables and manipulate them
§ How to obtain input from users and write interactive programs
Though the scripts you wrote in the last four chapters helped you learn important Scratch programming skills, they lacked many key elements of a large-scale application. More complex programs can remember values and decide to take an action based on certain conditions. This chapter will address the first of these two deficiencies, and decision making will be covered in the next chapter.
As you may have learned by now, scripts process and manipulate different types of data during their execution. These data can be input to command blocks (for example, the number 10 in the move 10 steps command and the “Hello!” string in the say Hello! command) or output from function blocks (like mouse x, y position and pick random), or data can be entered by the user in response to the ask and wait command. For more complex programs, you’ll often need to store and modify data to accomplish certain tasks. Data management in Scratch can be done usingvariables and lists. This chapter will explore variables in detail. Lists will be explored in Chapter 9.
This chapter begins with an overview of the data types supported in Scratch. It continues with an introduction to variables and a discussion of how to create and use them in your programs. Variable monitors will then be explained and used in several interesting applications. After mastering the basic concepts, you’ll learn how to use the ask and wait command to get inputs from the user.
Data Types in Scratch
Many computer programs manipulate different kinds of data, including numbers, text, images, and so on, to produce useful information. This is an important programming task, so you’ll need to know the data types and operations supported in Scratch. Scratch has built-in support for three data types that you can use in blocks: Booleans, numbers, and strings.
A Boolean can have only one of two values: true or false. You can use this data type to test one or more conditions and, based on the result, have your program choose a different execution path. We’ll discuss Booleans in detail in the next chapter.
A number variable can hold both integers and decimal values. Scratch doesn’t distinguish between the two; they’re both classified as “numbers.” You can round decimal numbers to the nearest whole number using the round block from the Operators palette. You can also use the floor of (orceiling of) functions, available from the sqrt of block in the Operators palette, to get an integer from a specified decimal number. For example, floor of 3.9 is 3 and ceiling of 3.1 is 4.
A string is a sequence of characters, which can include letters (both upper- and lowercase), numbers (0 to 9), and other symbols that you can type on your keyboard (+, –, &, @, and so on). You’d use a string data type to store names, addresses, book titles, and so on.
What’s in the Shape?
Have you noticed that Scratch blocks and their parameter slots each have particular geometric shapes? For example, the parameter slot in the move 10 steps block is a rectangle with rounded corners, while the one in the say Hello! block is a rectangle with sharp corners. The shape of theparameter slot is related to the data type it accepts. Try entering your name (or any other text) in the move 10 steps block; you’ll find that Scratch allows you to enter only numbers into the rounded-rectangle slot.
Similarly, the shape of a function block indicates the data type it returns. The meanings of the different shapes are illustrated in Figure 5-1.
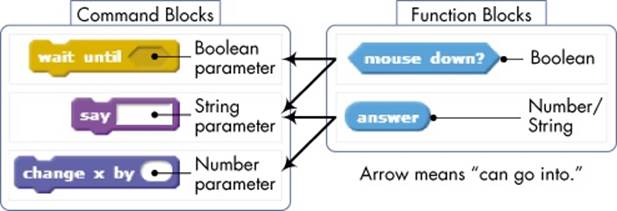
Figure 5-1. What the shapes of command and function blocks mean
Parameter slots have three shapes (hexagon, rectangle, and rounded rectangle), while function blocks have only two shapes (hexagon and rounded rectangle). Each shape is associated with a particular data type, though you should note that a rounded-rectangle function block can report either a number or a string.
Hexagon and rounded-rectangle slots take only function blocks of the same shape, while a rectangular slot will accept any function block. The good news is that Scratch prevents you from mismatching types, so you don’t have to memorize this rule. Try dragging a hexagon-shaped block into a rounded-rectangle slot; you won’t be able to drop it there because the types are incompatible.
Automatic Data Type Conversion
As I mentioned above, a number parameter slot only accepts a rounded-rectangle function block. All of the rounded-rectangle function blocks you’ve dealt with so far—including x position, y position, direction, costume #, size, volume, tempo, and so on—report numbers. Therefore, using them inside a number slot (like the move 10 steps block) isn’t a problem. However, some rounded-rectangle function blocks, such as the answer block from the Sensing palette or the join block from the Operators palette, can hold either a number or a string. This brings up an important question: What happens if we, for example, insert an answer block containing a string into a number slot? Fortunately, Scratch automatically tries to convert between data types as needed, as illustrated in Figure 5-2.
In this example, the user enters 125 in response to the Enter a number prompt. The user’s input is saved in the answer function block. When this input is passed to the say command, it is automatically converted to a string. When the same answer is passed to the addition operation (which expects a number), it is converted to the number 125. When the addition operation is performed, the result (25 + 125 = 150) is converted back to a string, and “150” is passed to the say block. Scratch automatically attempts to take care of these conversions for you.
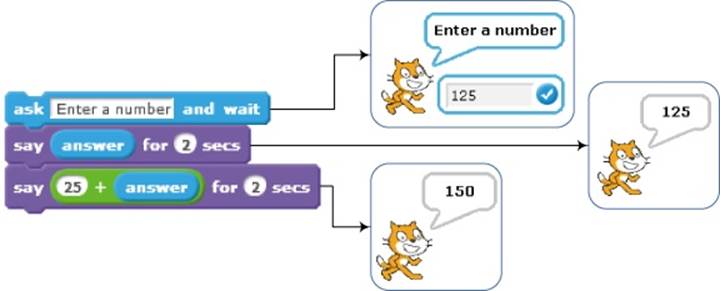
Figure 5-2. Scratch automatically converts between data types based on context.
Understanding the data types available in Scratch, the operations permitted on these types, and how Scratch converts between them will help you understand why things work the way they do. In the next section, you’ll learn about variables and how to use them to store and manipulate data in your programs.
Introduction to Variables
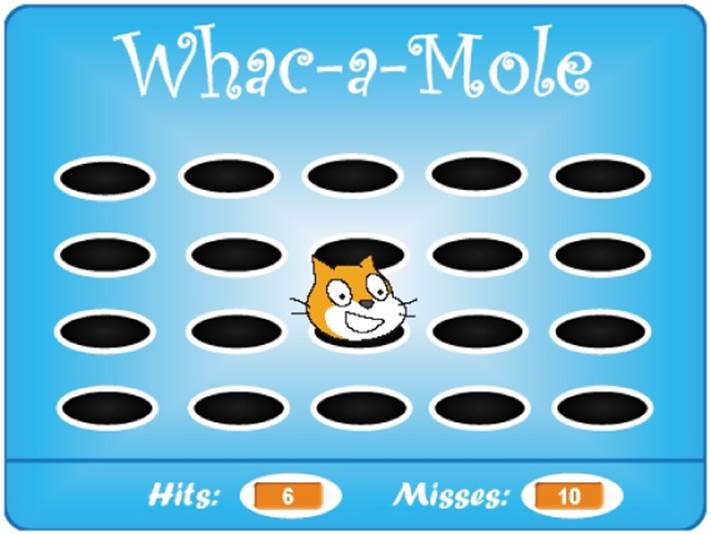
Let’s say we want to create a software version of the game Whac-a-Mole. The original game has a flat surface with several holes. The player uses a mallet to smack moles as they pop out of these holes. In our version, a sprite appears at a random location on the Stage, stays visible for a short time, and disappears. It waits a bit, and then appears again at a different location. The player needs to click on the sprite as soon as it appears. Every time he clicks on the sprite, he gains one point. The question for you as a programmer is, how do you keep track of the player’s score? Welcome to the world of variables!
In this section, I’ll introduce variables, one of the most important elements of any programming language. You’ll learn how to create variables in Scratch and how to use them to remember (or store) different types of data. You’ll also explore the available blocks for setting and changing the values of variables in your programs.
What Is a Variable?
A variable is a named area of computer memory. You can think of it as a box that stores data, including numbers and text, for a program to access as needed. In Figure 5-3, for example, we depict a variable named side whose current value is 50.
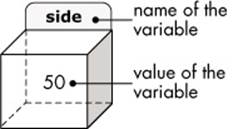
Figure 5-3. A variable is like a named box that contains some value.
When you create a variable, your program sets aside enough memory to hold the value of the variable and tags the allocated memory with that variable’s name. After creating a variable, you can use its name in your program to refer to the value it represents. For example, if we have a box (that is, a variable) named side that contains the number 50, we can construct a command such as move (3*side) steps. When Scratch executes this command, it will locate the box named side in computer memory, grab its contents (in this case, the number 50), and use that value to replace the side label inside the move (3*side) steps block. As a result, the sprite will move 150 (that is, 3 × 50) steps.
In our Whac-a-Mole game, we need a way to remember the player’s score. To do that, we can reserve some space in the computer’s memory (like a box) to store the score. We also need to give that box a unique label, let’s say score, which will let us find it whenever we need to know or change what’s inside.
When the game starts, we’ll tell Scratch to “set score to 0,” and Scratch will look for the box labeled score and put the value 0 inside it. We’ll also tell Scratch to “increase score by 1” any time the player clicks on the sprite. In response to the first click, Scratch will look inside the scorebox again, find our 0, add 1 to it, and put the result (which is 1) back in the box. The next time the player clicks on the sprite, Scratch will again follow our “increase score by 1” command to increment score and store the resulting value of 2 in the box.
You’ll see the actual Scratch blocks for these operations in a moment. For now, notice that the value of score changes throughout the program. This is why we call it a variable—its value varies.
One important use of variables is to store the intermediary results of evaluating an algebraic expression. This is similar to the way you do mental math. For example, if you were asked to find 2 + 4 + 5 + 7, you might start by adding 2 + 4 and memorizing the answer (6). You’d then add 5 to the previous answer (which is stored in your memory) and memorize the new answer, which is 11. Finally, you’d add 7 to the previous result to get the final answer of 18.
To illustrate how variables can be used for temporary storage, let’s say that you want to write a program to compute the following expression:
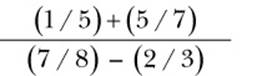
You could evaluate the whole thing with one command, but cramming everything into one statement makes it hard to read, as shown below:
![]()
Another way to write the program is to evaluate the numerator and denominator individually and then use the say block to display the result of their division. We can do that by creating two variables called num (for numerator) and den (for denominator) and setting their values as shown inFigure 5-4.

Figure 5-4. Two variables (num and den) hold the value of the expression’s numerator and denominator, respectively.
Take a look at how our variables are arranged in computer memory. Here, num is like a tag referring to the location in memory where the result of evaluating (1 / 5 + 5 / 7) is stored. Similarly, den refers to where (7 / 8 – 2 / 3) is stored. When the say command is executed, Scratch grabs the contents of memory labeled num and den. It then divides the two numbers and passes the result to the say command for display.
We could break this expression down even further by evaluating each fraction individually before displaying the result of the total expression, as shown in Figure 5-5.
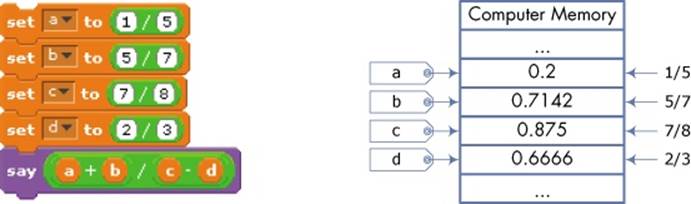
Figure 5-5. Using four variables (a, b, c, and d) to hold the four fractions in the expression
Here, we use four variables (named a, b, c, and d) to hold the four fractions in our mathematical expression. The figure also depicts the memory allocation; this time, you can see four variables and their contents.
Although these three programs give the same answer, each implementation follows a different style. The first program puts everything in one statement, which is tough to read. The third program breaks things down to a greater level of detail, but that can be hard to read, too. The second solution breaks the expression down to a reasonable level and uses variables to both make the program easier to understand and clearly show the major parts of the expression (the numerator and the denominator). As Goldilocks would say, this one is just right.
This simple example demonstrates how a problem can have multiple solutions. Sometimes you might be concerned about a program’s speed or size, and other times your goal might be readability. Since this is an introductory programming book, the scripts in this book are written to emphasize readability.
Now that you understand what variables are and why you’d want to use them, let’s make some variables and take our Scratch applications a step further.
Creating and Using Variables
DiceSimulator_NoCode.sb2
In this section, we’ll explore how to create and use variables through a simple application that simulates rolling a pair of dice and displays their sum, as illustrated in Figure 5-6.
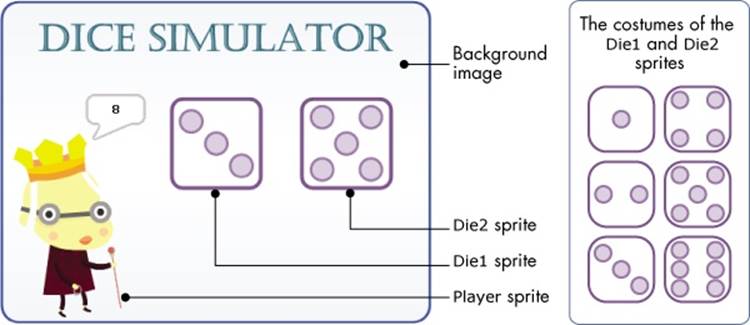
Figure 5-6. The user interface of the dice simulator
Our dice simulator contains three sprites: Player, Die1, and Die2. The Player sprite manages the simulation. When the green flag icon is pressed, this sprite generates two random numbers between 1 and 6 and saves those values in two variables named rand1 and rand2, respectively. It then broadcasts a message to the other two sprites (Die1 and Die2) to show the randomly generated values; Die1 will show the value of rand1, and Die2 will show rand2. After that, the Player sprite adds rand1 to rand2 and displays the sum using the say block.
Let’s build this application from the ground up. Open the file DiceSimulator_NoCode.sb2. This file contains the background image for the Stage as well as the three sprites used in the application. We’ll create all the scripts we need one at a time.
First, click the thumbnail of the Player sprite to select it. Select the Data palette and click Make a Variable, as shown in Figure 5-7 (left). In the dialog that appears, as shown in Figure 5-7 (right), type the name of the variable and select its scope. A variable’s scope determines which sprites can write to (or change the value of) that variable, as I will explain in more detail in the next section. For this example, enter rand1 for the variable’s name and select the For all sprites option for the variable’s scope. Click OK when done.
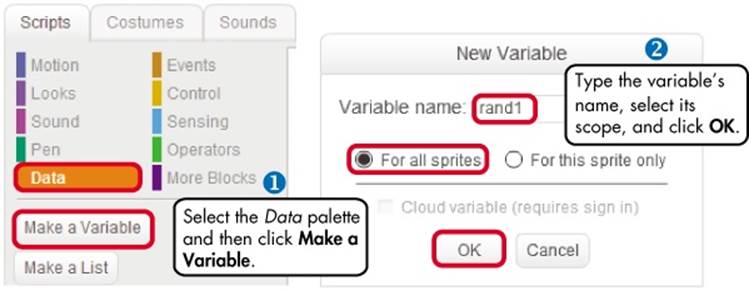
Figure 5-7. Creating a variable, naming it, and specifying its scope
After you create the variable, several new blocks related to it will appear in the Data palette, as illustrated in Figure 5-8.
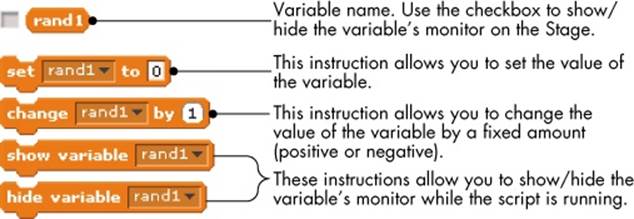
Figure 5-8. The new blocks that appear when you create the rand1 variable
You can use these blocks to set a variable to a specific value, change it by a fixed amount, and show (or hide) its monitor on the Stage. A variable’s monitor, as you’ll learn in Displaying Variable Monitors, displays the current value stored in that variable.
NAMING VARIABLES
Over the years, people have come up with different ways to name the variables in their programs. One popular convention is to start the name with a lowercase letter and capitalize the first letter of each additional word, such as in sideLength, firstName, and interestRate.
Although Scratch allows variable names to start with numbers and contain white spaces (for example, 123Side or side length), most programming languages don’t, so I recommend that you avoid these unusual names for your variables. And while you can name a variable anything you want, I highly recommend using descriptive and meaningful names. Single-letter variables like wand z should be kept to a minimum unless their meaning is very clear. On the other hand, names that are too long can make your script harder to read.
Also, note that variable names in Scratch are case sensitive, meaning that side, SIDE, and siDE are all unique variables. To avoid confusion, try not to use variables in the same script whose names differ only in case.
Repeat the procedure I outlined above to create another variable, named rand2. The Data palette should now contain a second variable block (named rand2), and the down arrows on the blocks of Figure 5-8 should let you choose between rand1 and rand2. Now that we’ve created the two variables, we can build the script for the Player sprite. The complete script is shown in Figure 5-9.
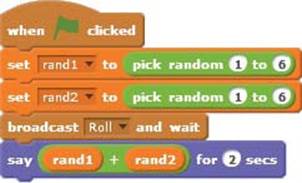
Figure 5-9. The script for the Player sprite
The first command sets rand1 to a random number between 1 and 6. Think back to our box analogy: This command causes the sprite to find the box labeled rand1 and put the generated random number inside it. The second command assigns rand2 another random value between 1 and 6. Next, the script broadcasts a message called Roll to the other two sprites (Die1 and Die2) to notify them that they need to switch their costumes as specified by rand1 and rand2. Once the Die1 and Die2 sprites have finished their job, the script resumes and displays the sum of the numbers on the faces of the dice using the say block. Let’s look at the Roll message handler for the Die1 sprite, shown in Figure 5-10.
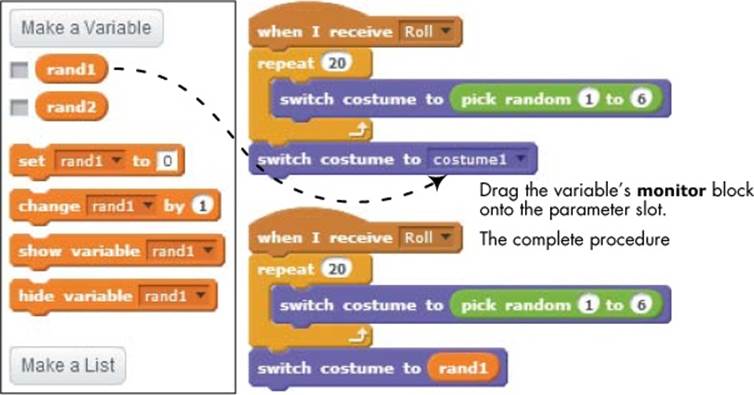
Figure 5-10. To use a variable in a command block, just drag that variable over the parameter slot of that block.
After creating the script shown at the top right of the figure, drag the rand1 block from the Data palette to the parameter slot of the switch to costume block to form the complete script (bottom right). In this script, the repeat block changes the costume of the die randomly 20 times to simulate rolling the die (you can change this number if you want). After that, the die sets its costume to the number specified by rand1. Recall that each die has six costumes that correspond to numbers 1 through 6 in order. That means if rand1 were 5, the last switch to costume command would display the costume that has five dots in it.
Now, we can create the script for the Die2 sprite, which should be nearly identical to the one we made for Die1. Since Die2 changes its costume based on rand2, all you need to do is duplicate the Die1 script for Die2 and replace rand1 with rand2.
Our dice simulator is now complete, so let’s test it out. Click the green flag icon to see the simulation in action. If the application doesn’t work, examine the file DiceSimulator.sb2, which contains the correct implementation of the program.
TRY IT OUT 5-1
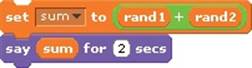
Select the Player sprite and create a new variable called sum. Set the scope for this variable to For this sprite only. Modify the last block of the Player script to use this new variable, like this:
Now select the Die1 (or Die2) sprite and look under the Data palette. Can you explain why you don’t see the sum variable there?
The Scope of Variables
Another important concept related to variables is scope. The scope of a variable determines which sprites can write to (or change the value of) that variable.
ScopeDemo.sb2
You can specify the scope of a variable when you create it by selecting one of the two options you saw in Figure 5-7. Choosing For this sprite only creates a variable that can be changed only by the sprite that owns it. Other sprites can still read and use the variable’s value, but they can’t write to it. The example shown in Figure 5-11 illustrates this point.
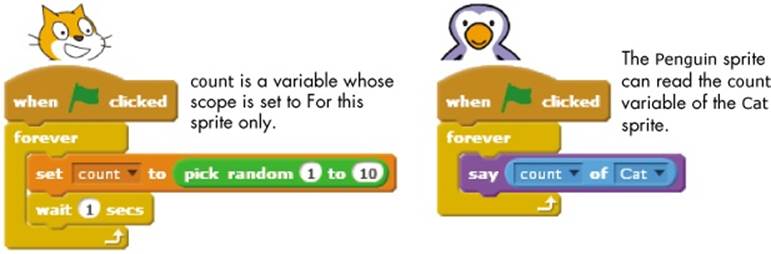
Figure 5-11. Only the Cat sprite can write to count.
In this figure, the Cat sprite has a variable, named count, with the scope For this sprite only. The Penguin sprite can read count with the x position of Penguin block from the Sensing palette. When you select Cat as the second parameter of this block, the first parameter will let you choose an attribute of the Cat sprite, including one of its variables.
Scratch, however, doesn’t provide a block that allows the Penguin sprite to change the count variable. This way, the Penguin sprite can’t tamper with count and cause undesirable effects for scripts run by the Cat sprite. It’s good practice to use the For this sprite only scope for variables that should only be updated by a single sprite.
Variables created with the For this sprite only scope are said to have local scope, and they can be called local variables. Different sprites can use the same name for their local variables without any conflict. For example, if you have two car sprites in a racing game, each might have a local variable named speed that determines the car’s speed of motion on the Stage. Each car sprite can change its speed variable independently of the other. This means that if you set the speed of the first car to 10 and the speed of the second to 20, the second car should move faster than the first.
DATA TYPE OF A VARIABLE
At this point, you might wonder, “How does Scratch know the data type of a variable?” The answer is, it doesn’t! When you create a variable, Scratch has no idea whether you intend to use that variable to store to a number, a string, or a Boolean. Any variable can hold a value of any data type. For example, all of the following commands are valid in Scratch.
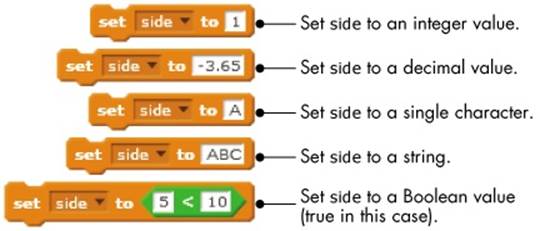
It’s up to you to store the correct values in your variables. As I described earlier in this chapter, however, Scratch will try to convert between data types depending on the context. To see what happens when you store an incorrect data type in a variable, consider these two examples:

Since the move command expects a number parameter, Scratch will automatically try to convert the value stored in the side variable to a number before passing it to the move command. In the first script (left), Scratch can’t convert the string “Nonsense” to a number. Rather than showing an error message, Scratch will silently set the result of the conversion to 0 and pass this value to themove command. As a result, the sprite won’t move. On the other hand, in the second script (right), Scratch ignores the whitespace in the string and passes the resulting number to the move block, so the sprite moves 100 steps forward. Note that if the target block had expected a string instead of a number, Scratch would have passed the string as it was, whitespace included.
Variables with the scope For all sprites, on the other hand, can be read and changed by any sprite in your application. These variables, often called global variables, are useful for intersprite communication and synchronization. For example, if a game has three buttons that allow the user to select a level to play, you can create a global variable named gameLevel and have each button sprite set this variable to a different number when clicked. Then you can easily find out the user’s choice by examining gameLevel.
Selecting the For all sprites option also enables the Cloud variable check-box in Figure 5-7. This feature allows you to store your variables on Scratch’s server (in the cloud). Blocks for cloud variables have a small square in front of them to distinguish them from regular variables, like this:
![]()
Anyone who views a project you’ve shared on the Scratch website can read the cloud variables in the project. For example, if you share a game, you can use a cloud variable to track the highest score recorded among all the players. The score cloud variable should update almost immediately for everyone interacting with your game. Because these variables are stored on Scratch servers, they keep their value even if you exit your browser. Cloud variables make it easy to create surveys and other projects that store numbers over time.
Now that you understand scope, it’s time to learn about updating variables—and then use that knowledge to create more interesting programs.
Changing Variables
Scratch provides two command blocks that allow you to alter variables. The set to command directly assigns a new value to a variable, regardless of its current contents. The change by command, on the other hand, is used to change the value of a variable by a specified amount relative to its current value. The three scripts in Figure 5-12 demonstrate how you could use these commands in different ways to achieve the same outcome.
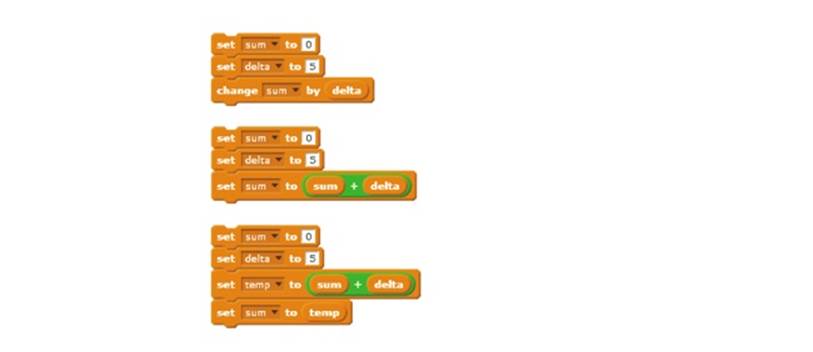
Figure 5-12. Three methods for changing the value of a variable
All three scripts in the figure start by setting the values of two variables, sum and delta, to 0 and 5, respectively. The first script uses the change command to change the value of sum by the value of delta (that is, from 0 to 5). The second script uses the set command to add the current value of sum to the value of delta (0 + 5) and store the result (5) back into sum. The third script achieves the same result with the aid of a temporary variable named temp. It adds the value of sum to delta, stores the result in temp, and finally copies the value of temp into sum.
After executing any of the scripts in Figure 5-12, sum will contain the number 5, making these scripts functionally equivalent. Note that the method used in the second script is a common programming practice, and I recommend that you study it for a moment to become comfortable with it. Now let’s see the change command in action.
Spider Web
SpiderWeb.sb2
We can create a spider web by drawing several hexagons of increasing size, as shown in Figure 5-13. The Triangle procedure draws an equilateral triangle with a variable side length, while the Hexagon procedure calls Triangle six times with a 60° (that is, 360° / 6) right turn after each call. The figure clearly shows how the hexagon is made up of the six triangles.
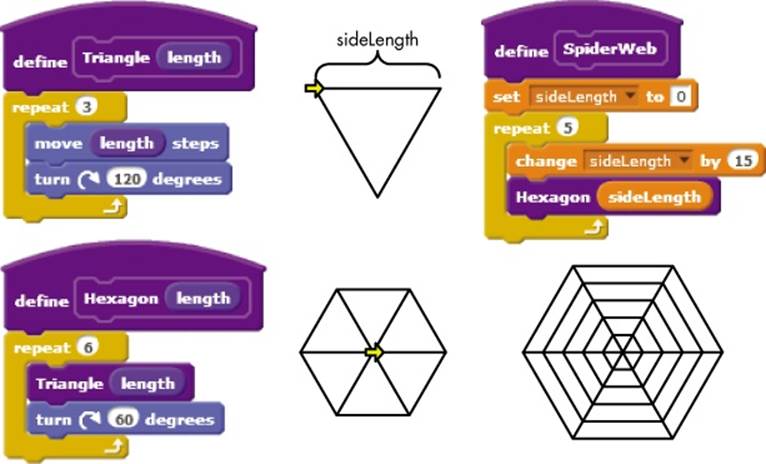
Figure 5-13. Creating a spider web by drawing several hexagons of increasing size
The SpiderWeb procedure simply calls Hexagon repeatedly with a different value of the sideLength variable each time. This results in the concentric (that is, having the same center) hexagons you see in the figure. Note how the change command is used to set the value of sideLengthinside the repeat loop. Reproduce the SpiderWeb procedure, run it, and see how it works.
Pinwheel
Pinwheel.sb2
This example is similar to the previous one except that this time, we’ll use a variable to control the number of triangular repetitions. The resulting procedure (called Pins) is shown in Figure 5-14. The Pinwheel procedure in the same figure works like the SpiderWeb procedure above, but we also change the pen’s color each time through the loop for a fun rainbow effect. Some outputs of the Pinwheel procedure for different pin counts are shown in the figure. Experiment with this procedure to see what else you can create.
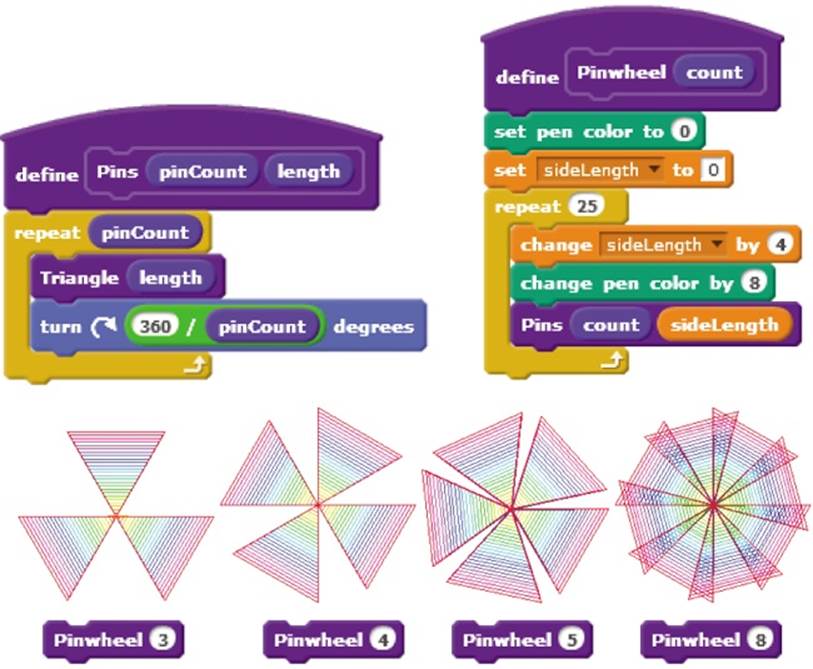
Figure 5-14. Creating a pinwheel by rotating an equilateral triangle several times
Now that we’ve explored the fundamentals of variables, you might wonder what happens to variables when you duplicate a sprite. Does the duplicate share the parent sprite’s variables, or does it have its own copies? Do clones have access to global variables? We’ll answer these questions in the next section.
TRY IT OUT 5-2
Alter the Pinwheel program to hide the sprite. This should make it easier for you to watch the drawing without the sprite getting in the way.
Variables in Clones
Every sprite has a list of properties associated with it, including its current x-position, y-position, direction, and so on. You can imagine that list as a backpack holding the current values of the sprite’s attributes, as illustrated in Figure 5-15. When you create a variable for a sprite with a scope of For this sprite only, that variable gets added to the sprite’s backpack.
When you clone a sprite, the clone inherits copies of the parent sprite’s attributes, including its variables. An inherited property starts out identical to the parent’s property at the time the clone is created. But after that, if the clone’s attributes and variables change, those changes don’t affect the parent. Subsequent changes to the parent sprite don’t affect the clone’s properties, either.
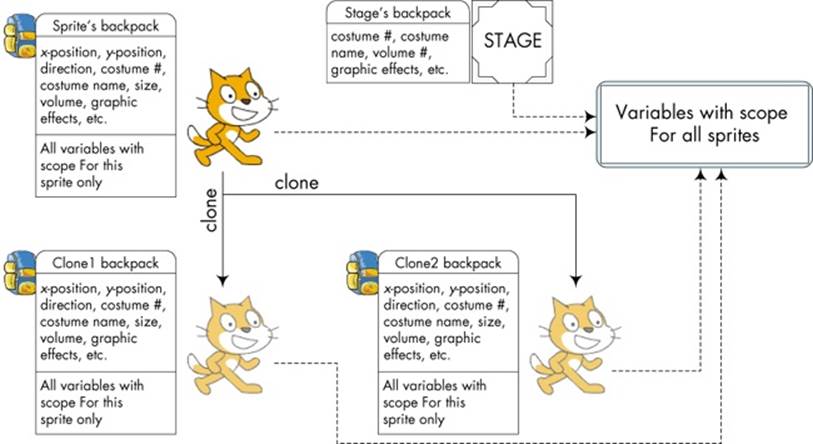
Figure 5-15. Clones inherit copies of their parent’s variables
To illustrate, let’s say the parent sprite owns a variable named speed whose current value is 10. When you clone the parent, the new sprite will also have a variable named speed with the value 10. After that, if the parent sprite changes speed to 20, the value of speed in the clone will stay at 10.
CloneIDs.sb2
You can use this concept to distinguish between clones in your applications. For example, let’s look at the program in Figure 5-16.
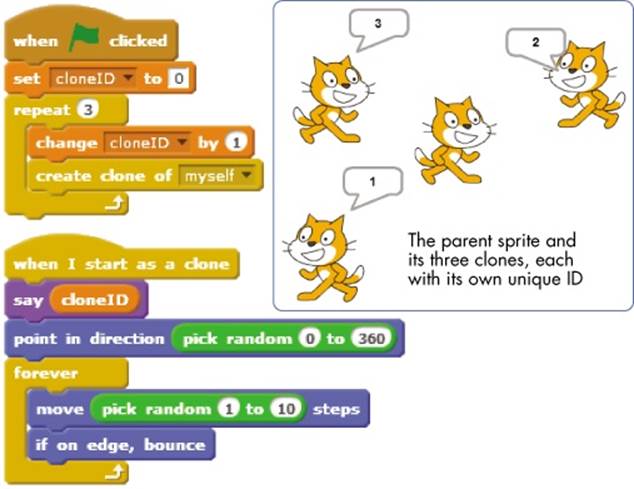
Figure 5-16. Using variables to distinguish between clones
The parent sprite in this example owns a variable named cloneID. When the green flag is clicked, it starts a loop to create three clones, and it sets cloneID to a different value (1, 2, or 3 in this case) before creating a clone. Each clone comes to life with its own copy of cloneID initialized to a different value. You could now use an if block, which we’ll study in depth in the next chapter, to check for the clone’s ID and have it perform a corresponding action.
ClonesAndGlobalVars.sb2
Now, let’s discuss how clones can interact with global variables. Recall from Figure 5-15 that variables with scope For all sprites can be read and written by the Stage and all sprites, including clones. As an example, the program in Figure 5-17 uses this fact to detect when all clones of the parent sprite have disappeared.
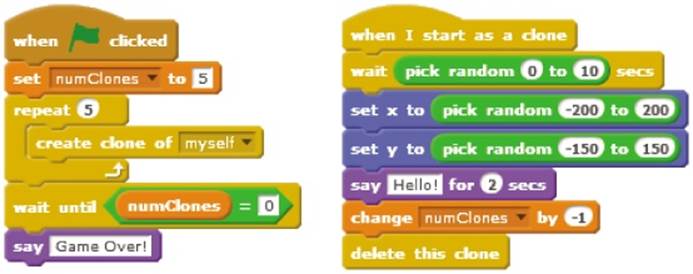
Figure 5-17. Using a global variable to track when clones are deleted
In this script, the parent sprite sets the global variable numClones to 5 and creates five clones. It then waits for numClones to become 0 before announcing the end of the game. The clones appear at random times and locations on the Stage, say “Hello!” for two seconds, and then disappear. Before a clone is deleted, it decreases numClones by 1. When all five clones are gone, numClones reaches 0, the main script stops waiting, and the original sprite says “Game Over!”
In the following section, you’ll learn about variables’ monitors, which allow you to see, and even change, the current values stored in variables. The ability to view and change a variable on the Stage will open the door to creating totally new kinds of applications.
Displaying Variable Monitors
You’ll often find yourself wanting to see the current value stored in a variable. For example, when one of your scripts doesn’t work as expected, you might want to track some of its variables to see if they change correctly. Using variable monitors can help you with this debugging task.
You can display a Scratch variable on the Stage as a variable monitor. Checking or unchecking the box next to a variable’s name allows you to show or hide a variable’s monitor on the Stage, as illustrated in Figure 5-18. You can also control a monitor’s visibility from within your script with the show variable and hide variable commands.
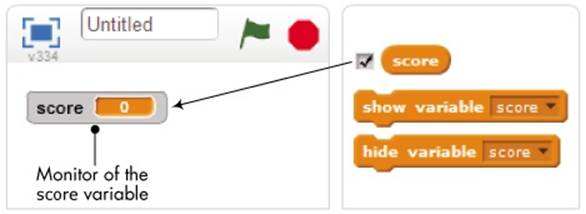
Figure 5-18. Show a variable’s monitor by checking the box next to its name.
Monitors can be used as readouts or controls, which display or allow you to change a variable’s contents, respectively. Double-click the monitor’s box on the Stage to choose a normal readout (the default state), large readout, or slider control. When you choose to display a slider, you can set its range by right-clicking the slider and selecting the set slider min and max option from the pop-up menu, as shown in Figure 5-19.
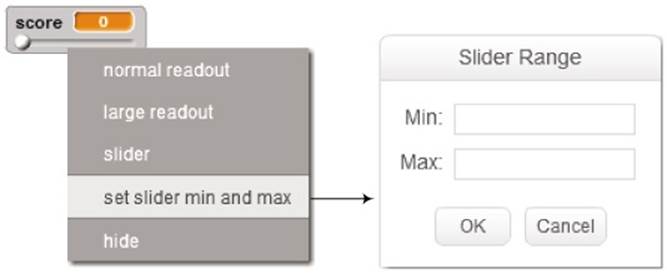
Figure 5-19. Setting the minimum and maximum values for a monitor in slider mode
StageColor.sb2
Using a slider allows you to change the value of a variable while a script is running, which is a convenient way for users to interact with your application. You can see a simple example of using the slider control in Figure 5-20.
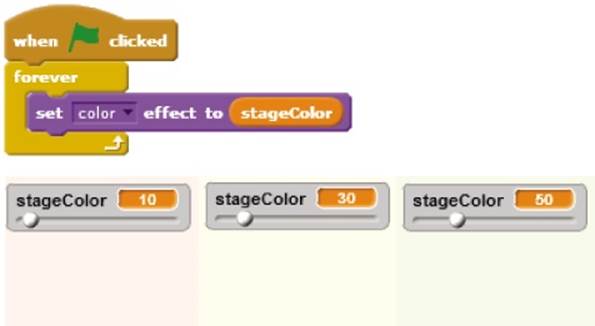
Figure 5-20. Adjusting Stage color with a slider
In this example, dragging the slider’s handle changes the value of the stageColor variable, which is a parameter in the set color effect to command. Assuming this script belongs to the Stage, dragging the slider should change the Stage’s background color.
NOTE
A variable’s monitor also indicates its scope. If a variable belongs to one sprite, its monitor should show the sprite name before the variable name. For example, the monitor Cat speed 0 indicates that speed belongs to Cat. If the speed variable were a global variable, its monitor would only say speed 0. The difference between the two cases is illustrated in the following figure.

Using Variable Monitors in Applications
Now that you know the basics behind variable monitors, I’ll show you some ways you could use them to add some extra functionality to your Scratch applications.
The ability to use monitors as both displays and controls opens the door for a wide range of applications, including games, simulations, and interactive programs. Let’s explore some examples that make use of monitors in the following subsections.
Simulating Ohm’s Law
OhmsLaw.sb2
Our first example is a simulation of Ohm’s law. When a voltage (V) is applied across a resistor (R), a current (I) will flow through that resistor. According to Ohm’s law, the amount of current is given by this equation:
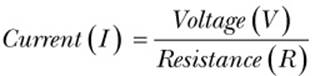
Our application allows the user to change the values of V and R using slider controls. Then it calculates and displays the corresponding value of the current, I. The user interface for this application is shown in Figure 5-21.
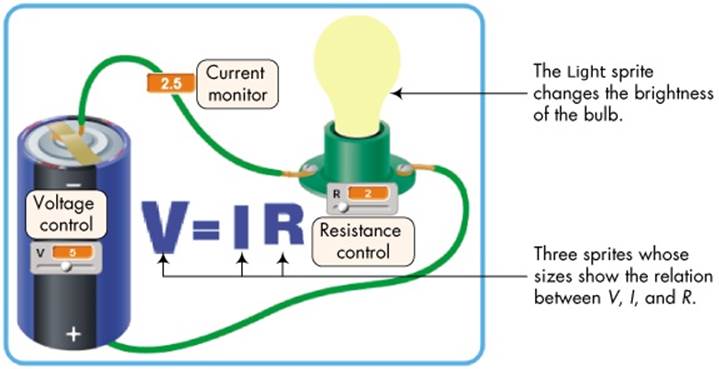
Figure 5-21. User interface for the Ohm’s law application
The slider for the battery voltage (V) has a range of [0, 10], and the slider for the resistor (R) has a range of [1, 10]. When the user changes V or R with the sliders, the application calculates the corresponding value of the current (I) that flows in the circuit. The brightness of the bulb changes in proportion to the value of the current passing through it: The higher the current, the brighter the light bulb. The sizes of the V, I, and R letters in the figure also change to indicate the relative values of these quantities.
In total, the application has five sprites (named Volt, Current, Resistance, Equal, and Light) and three variables (named V, I, and R). Everything else you see in Figure 5-21 (the battery, wires, socket, and so on) is part of the Stage’s backdrop image. The main script that drives the application, which belongs to the Stage, is shown Figure 5-22.
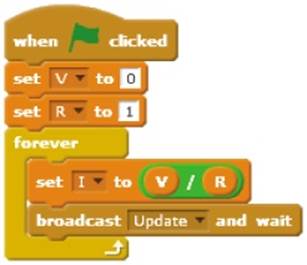
Figure 5-22. Main script of Ohm’s law application
The script initializes the values of V and R and then enters an infinite loop. On each pass through the loop, it calculates I using the present values of V and R, which are set by the user through the slider controls. It then broadcasts a message to the other sprites in the application to update their appearance in relation to the calculated values. Figure 5-23 shows the response of the Volt, Current, Resistance, and Light sprites (which show the letters V, I, R, and the light bulb, respectively) when they receive the Update message.
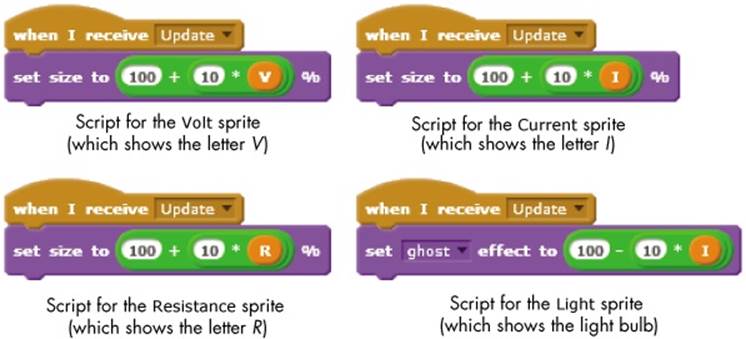
Figure 5-23. Scripts triggered in response to the Update message
When the Update broadcast is received, the Volt, Current, and Resistance sprites change their size (from 100 percent to 200 percent of their original size) in relation to the current values of their respective variables. The Light sprite executes the set ghost effect to command to change its transparency level in proportion to the value of I. This gives the light bulb a realistic visual effect that simulates an actual bulb.
TRY IT OUT 5-3
Open the Ohm’s law simulator to run it, and study the scripts to understand how it works. What do you think would happen if you added the command change color effect by 25 at the end of the script for the Light sprite? Implement this change to check your answer. What are some ways you could enhance this application?
Demonstrating a Series Circuit
SeriesCircuit.sb2
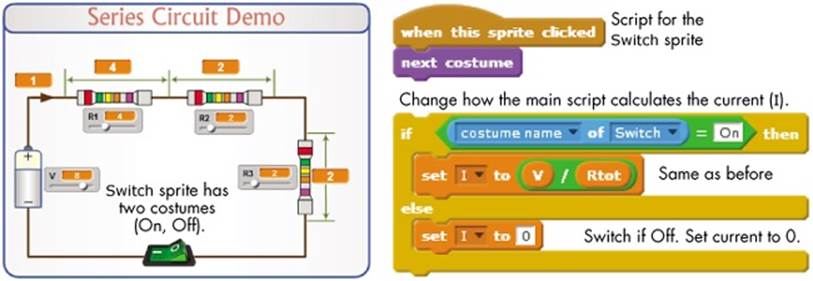
Our second example simulates a circuit that contains a battery and three resistors connected in series. The user can change the battery voltage as well as the resistor values using the sliders. The current that flows through the resistors and the voltages across the three resistors are shown using large display readouts. You can see the interface for the application in Figure 5-24. (Note that the color bands on the resistors do not represent the actual values of the resistors.)
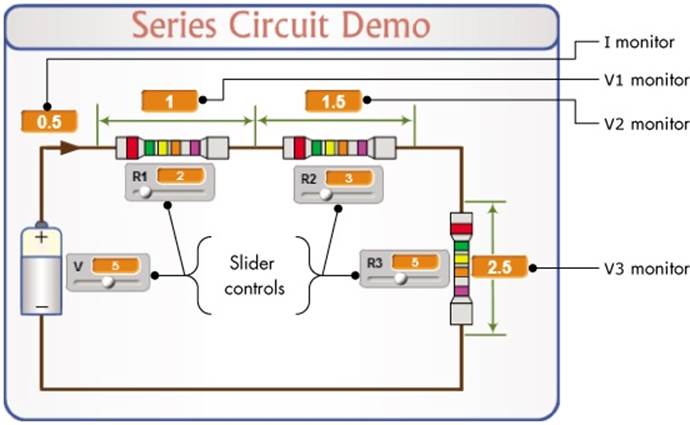
Figure 5-24. An application that demonstrates a series circuit
The equations that govern the operation of this circuit are shown below. We can calculate the current that flows in the circuit by dividing the battery voltage, V, by the sum of the three resistances. After that, the voltage across each resistor is calculated by multiplying the current by the value of that resistor:
|
Total Resistance: Rtot = R1 + R2 + R3 |
|
Current through the circuit: I = V ÷ Rtot |
|
Voltage across R1: V1 = I × R1 |
|
Voltage across R2: V2 = I × R2 |
|
Voltage across R3: V3 = I × R3 |
This application has no sprites, but when the green flag is clicked, the script shown in Figure 5-25, which belongs to the Stage, is executed.
This script takes care of the math for us and displays the results in the readouts on the Stage. Note that while the slider controls for resistors R2 and R3 can change from 0 to 10, the minimum value for R1 was intentionally set to 1. This ensures that Rtot is always greater than 0 and lets us avoid dividing by 0 when calculating the value of the current.
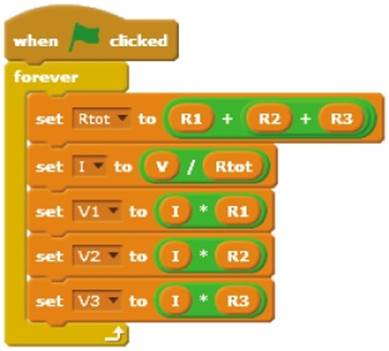
Figure 5-25. Script that runs when the green flag is clicked
Most of the work for this application went into designing the interface (that is, the background of the Stage). After that, all we had to do was to position the displays and sliders at the right locations on the Stage.
TRY IT OUT 5-4
SeriesCircuitWithSwitch.sb2
Open the series circuit simulator application and run it. Experiment with different values of R1, R2, R3, and V. Watch the calculated values of V1, V2, and V3 as you drag the slider controls. What is the relationship between the voltage sum (V1 + V2 + V3) and the battery voltage? What does this tell you about the voltage relation in series circuits? You can make an interesting enhancement to the application by adding an image of a switch that opens or closes the circuit, as shown below. When the switch is open, no current will flow in the circuit. Try to implement this change using the hints given below.
Visualizing a Sphere’s Volume and Surface Area
Sphere.sb2
Our third example is an interactive application for calculating the volume and surface area of a sphere. The user changes the sphere’s diameter by clicking some buttons on the user interface, and the application automatically calculates and displays the corresponding volume and surface area.To make the application more appealing, the size of the sphere displayed on the Stage is also changed in proportion to the selected diameter. The user interface for the application is illustrated in Figure 5-26.
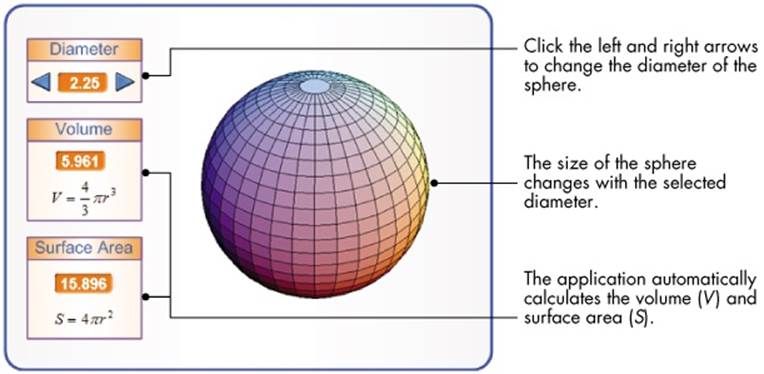
Figure 5-26. User interface for the sphere application
The application contains three sprites: the two arrow buttons (named Up and Down) and the sphere image (named Sphere). The scripts associated with the two buttons broadcast a message to indicate that they have been clicked, as shown in Figure 5-27.
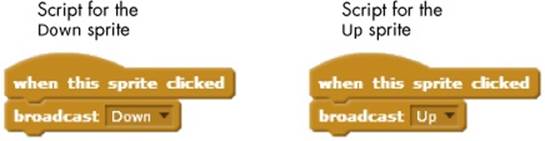
Figure 5-27. Scripts for the Up and Down sprites
The Sphere sprite has nine costumes that represent spheres with diameters 1, 1.25, 1.5, 1.75, ..., 3. When this sprite receives the Up or Down broad-cast messages, it executes the scripts shown in Figure 5-28.
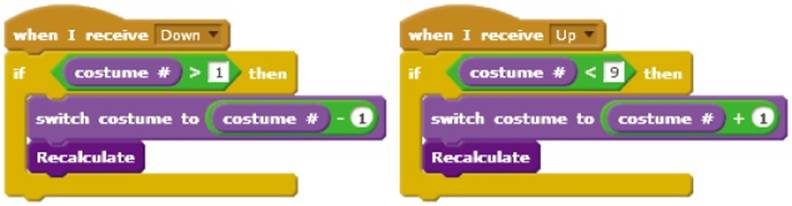
Figure 5-28. Scripts triggered by the Up and Down messages
The sprite switches its costume and then calls the Recalculate procedure to update the volume and surface area calculations. Note that these scripts use the value of the current costume to determine whether the sphere has reached its highest or lowest size, thus ensuring valid responses to theUp and Down buttons. I’ll say more about the if block in the next chapter, but for now, let’s discuss the sphere’s Recalculate procedure, shown in Figure 5-29.

Figure 5-29. Recalculate procedure
First, the value of the diameter variable is set according to this formula:
diameter = 1 + 0.25 × (costume number – 1)
Since the costume number ranges from 1 to 9, the corresponding values of the diameter variable will be 1, 1.25, 1.50, ..., 2.75, 3, which is what we intended.
The script finds the radius, r, by dividing the diameter by 2. It then calculates the volume and the surface area of the sphere using the formulas shown in Figure 5-26. The computed values will show up automatically on the corresponding monitors on the Stage.
TRY IT OUT 5-5
Open the application and run it. Study the scripts to understand how the application works. Add a script to the Sphere sprite so it rotates and changes color as the application runs. As another exercise, modify the original program to use a single costume for the Sphere sprite and use the change size by block to change the sphere’s size. The scaled image won’t look as nice, but otherwise, the application should perform identically.
Drawing an n-Leaved Rose
N-LeavedRose.sb2
In this example, we’ll create an application that draws a rose with multiple leaves on the Stage. The rose-drawing process can be broken down into the following steps:
1. Start at the origin of the Stage.
2. Point the sprite in some direction. By convention, the Greek letter θ (pronounced theta) represents an angle, so we’ll name the variable for the sprite’s direction theta.
3. Move the sprite r steps and draw a single point on the Stage. After that, lift the pen up and return to the origin.
4. Change the angle theta by some amount (we’ll use 1°) and repeat steps 2–4.
The relation between the distance r and the angle theta is given by
r = a × cos(n × θ)
where a is a real number and n is an integer. This equation produces a rose whose size and number of leaves are controlled by a and n, respectively. This equation also involves the cosine trigonometric function (cos), which you’ll find as a reporter block in the Operators palette (check thesqrt block). Given the values of a and n, all we have to do is choose different values for theta, calculate the corresponding values of r, and mark the resulting points on the Stage. The user interface for this example is shown in Figure 5-30.
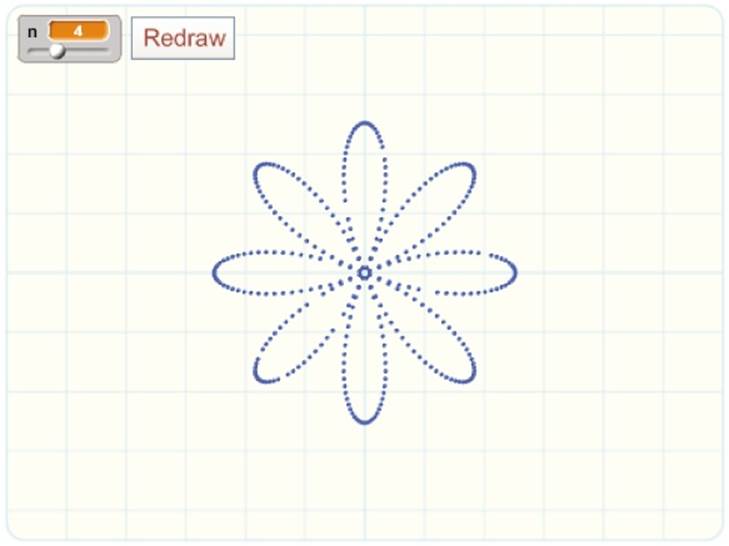
Figure 5-30. User interface for the n-leaved rose application
The application contains two sprites: The first sprite has the Redraw button costume, and the second sprite (called Painter) is a hidden sprite that draws the rose. The user controls the number of desired leaves by changing n with the slider control and then clicks the Redraw button to draw the rose. When the user clicks that button, the button sprite simply broadcasts a Redraw message. When the Painter sprite receives this message, it executes the script shown in Figure 5-31.
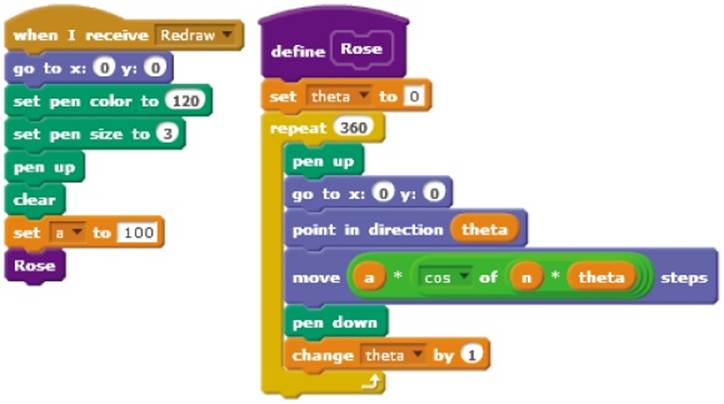
Figure 5-31. The Redraw procedure for drawing an n-leaved rose on the Stage
The script first sets the pen’s color and size and clears the previous pen marks from the Stage. It then sets the variable a to 100 and calls the Rose procedure, which will run through a loop 360 times to draw the rose on the Stage. On each pass of the loop, the procedure points in the directiontheta, moves r steps, and draws a pen mark at that location. It then increments theta by 1° to prepare for the next pass of the repeat loop.
Figure 5-32 shows some of the roses created for different values of n. Can you figure out the relation between the value of n and the number of leaves?
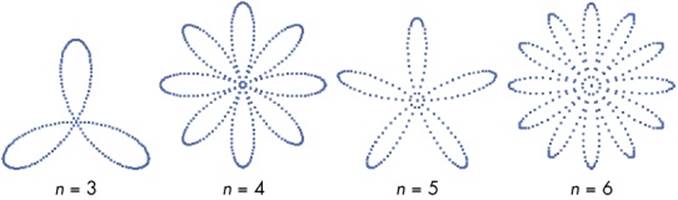
Figure 5-32. Some roses created by the Rose procedure
TRY IT OUT 5-6
Open the application and run it. Change the value of n to see what else you can create with the Rose procedure. Add another slider to the application to allow the user to change the value of a and modify the scripts as needed. You can also modify the Rose procedure to take a as a parameter. (See Passing Parameters to Custom Blocks for a refresher on how to add parameters to procedures.)
Modeling Sunflower Seed Distribution
Sunflower.sb2
Biologists and mathematicians have studied the arrangement of leaves on the stems of plants extensively. Let’s delve into botany a bit ourselves by examining a geometric model for representing flowers with spiral seed patterns. In particular, we’ll program two equations that model the distribution of seeds in a sunflower. To draw the nth seed of the sunflower, we’ll follow these steps:
1. Point the sprite in the direction of n × 137.5°.
2. Move a distance ![]() , where c is a constant scaling factor (set to 5 in our example).
, where c is a constant scaling factor (set to 5 in our example).
3. Draw a point on the Stage at the final location.
We’ll repeat these steps for each seed we want to draw. For the first seed, we set n = 1; for the second seed, we set n = 2; and so on. Using angles other than 137.5° in the first step will result in different arrangements of seeds. If you’re curious about these equations and want to learn more about sunflower seed patterns, check out The Algorithmic Beauty of Plants by Przemyslaw Prusinkiewicz and Aristid Lindenmayer (Springer-Verlag, 2004), specifically Chapter 4, which you’ll find on the book’s website, http://algorithmicbotany.org/papers/#abop.
Our application will generate patterns similar to the ones described in that work, and you can see some of those patterns in Figure 5-33.
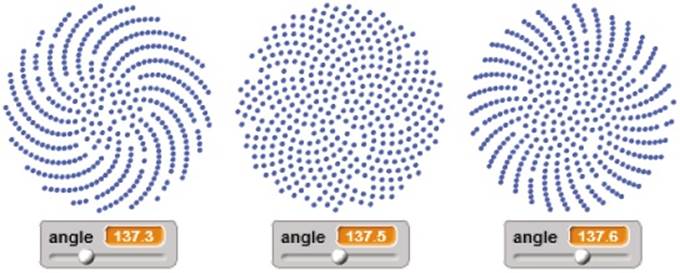
Figure 5-33. Some sunflower patterns generated using different angles
The interface for this example contains a slider control to change the value of the angle from 137° to 138° in increments of 0.01° and a button labeled Redraw. When the user clicks that button, it broadcasts a message to the Painter sprite, which executes the scripts shown in Figure 5-34.
The Sunflower procedure executes a loop that draws 420 seeds, though you can change this number if you like. On every iteration of the loop, the procedure goes to the location of the nth seed (by calculating the seed’s angle ①and moving ![]() ② steps) and draws a pen mark at that location. The procedure then increments n, which represents the seed number, to prepare to draw the next seed.
② steps) and draws a pen mark at that location. The procedure then increments n, which represents the seed number, to prepare to draw the next seed.
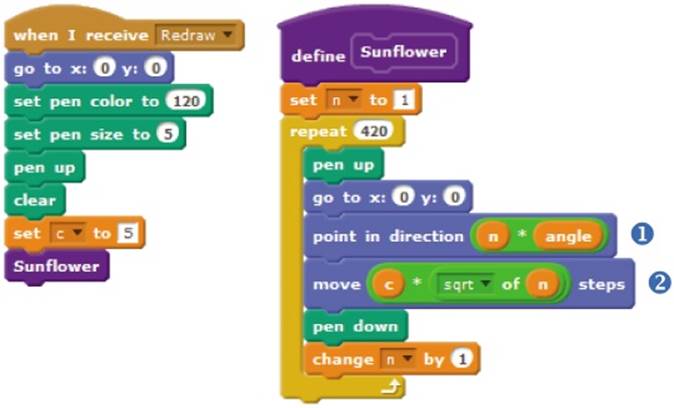
Figure 5-34. The scripts for the Painter sprite
The scripts I’ve presented in this section are just a few samples of the amazing applications we can create by using variables and monitors. Letting the user interact with our applications through the slider control is just the start of a new breed of interactive applications. In the following section, you’ll learn to create scripts that directly prompt users for input.
TRY IT OUT 5-7
Open the application and run it. Change the value of the angle to see what else you can create with the Sunflower procedure. Study the procedure to understand how it works and then come up with some ways to enhance it.
Getting Input from Users
GettingUserInput.sb2
Imagine that you want to create a game that tutors children in basic arithmetic. Your game would probably have a sprite that displays an addition problem and asks the player to enter an answer. How would you read the player’s input to see whether the answer was correct?
Scratch’s Sensing palette provides one command block, ask and wait, that you can use to read user input. This block takes a single parameter that specifies a string to show to the user, usually in the form of a question. As illustrated in Figure 5-35, the execution of this block produces slightly different outputs depending on the visibility state of the sprite (that is, whether the sprite is shown or hidden). The output shown in Figure 5-35 (right) also appears when the ask and wait command is called from a script that is owned by the Stage.
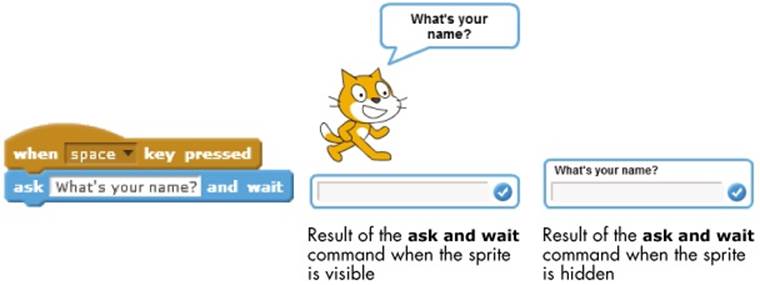
Figure 5-35. The ask and wait block may produce different outputs depending on whether the sprite that executes it is shown or hidden.
After executing the ask and wait command, the calling script waits for the user to press the ENTER key or click the check mark at the right side of the input box. When this happens, Scratch stores the user’s input in the answer block and continues execution at the command immediately after the ask and wait block. To see this command block in action, take a look at the following examples illustrating how to use it.
Reading a Number
AskAndWait.sb2
The script of Figure 5-36 asks the user for her age, waits for an answer, and tells the user how old she will be in 10 years.
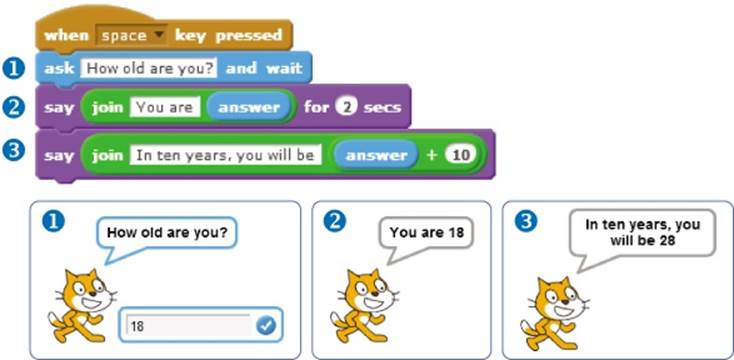
Figure 5-36. A script that accepts the user’s age as input
The figure shows the output of the program when the user types 18 and presses ENTER on the keyboard. Notice that the program uses the join block (from the Operators palette) to concatenate (that is, connect) two strings.
Reading Characters
AskAndWait2.sb2
The script of Figure 5-37 asks the user for his initials and then constructs and displays a greeting based on the user’s response.
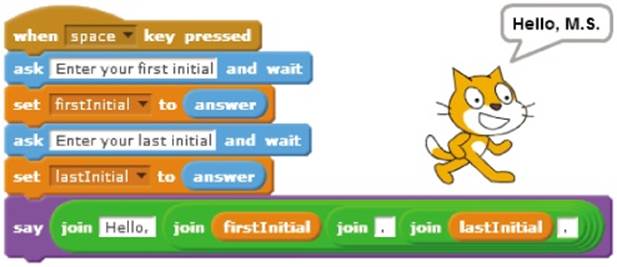
Figure 5-37. A script that uses two variables to read in and store the user’s initials
The program uses two variables (firstInitial and lastInitial) to save the values entered by the user. You can see the final output of the program when the user enters the letters M and S at the two prompts, respectively. Notice that the program uses nested join blocks to construct the greeting. You can use this technique to create all sorts of strings and display customized messages in your applications.
Performing Arithmetic Operations
AskAndWait3.sb2
The script of Figure 5-38 asks the user to input two numbers. It then computes the product of these two numbers and shows the answer in a voice bubble using the say command. As in the previous example, the script uses two variables (num1 and num2) to store the values entered by the user.
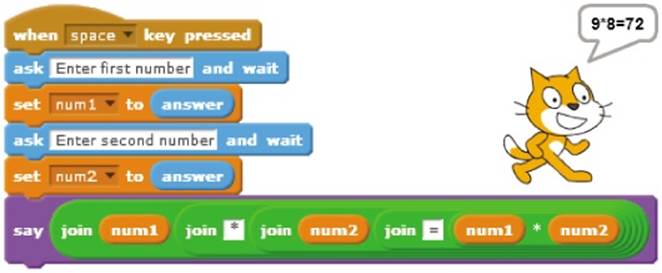
Figure 5-38. Computing a value based on user input
The figure shows the output when the user enters 9 and 8, respectively, in response to the two prompts. Again, notice that I’ve nested the join blocks to construct the output string.
The examples I’ve presented in this section demonstrate several ways to use the ask and wait block to write scripts that take in user input and solve a variety of problems. You can, for example, write a program to find the roots of a quadratic equation of the form ax2 + bx + c = 0 for any values of a, b, and c entered by the user. You could then use this program to check your own answer to the equation. I hope this will give you some ideas of how to use this powerful block to solve any math problem that may arise.
Summary
Variables are one of the most important concepts in programming. A variable is the name of an area in computer memory where we can store a single value, such as a number or a string.
In this chapter, you learned the basic data types supported in Scratch and the operations permitted on these types. You then learned how to create variables and use them to store a piece of data.
You also implemented several practical applications that used variables to demonstrate different features. You explored variables’ monitors and used them to create different kinds of interactive programs. Finally, you learned how to use the ask and wait block to prompt the user for some input and process the user’s responses in your program.
In the next chapter, you’ll learn more about the Boolean data type and the fundamental role it plays in decision making. You’ll also learn about the if and the if/else blocks and use them to add another level of intelligence to your Scratch programs. So roll up your sleeves and get ready for another exciting chapter!
Problems
|
Q: |
1. Create a script that implements the following instructions: § Set the speed variable to 60 (mph). § Set the time variable to 2.5 (hours). § Calculate the distance traveled and save the answer in the distance variable. § Display the calculated distance, with an appropriate message, to the user |
|
Q: |
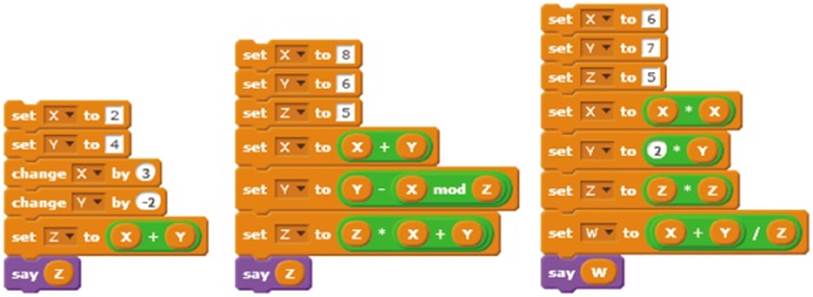
2. What is the output of each of the scripts shown below? Reproduce these scripts and run them to test your answer.
|
|
Q: |
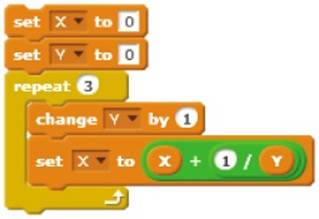
3. What are the values of X and Y at the end of each iteration of the repeat loop in the script to the right? Reproduce the script and run it to check your answer.
|
|
Q: |
4. Let x and y be two variables. Create function blocks equivalent to the following statements: § Add 5 to x and store the result in y. § Multiply x by 3 and store the result in y. § Divide x by 10 and store the result in y. § Subtract 4 from x and store the result in y. § Square x, add y to the result, and store the result back in x. § Set x equal to twice the value of y plus three times the cube of y. § Set x equal to minus the square of y. § Set x equal to the result of dividing the sum of x and y by the product of x and y. |
|
Q: |
5. Write a program that asks that user to enter an article, a noun, and a verb. The program then creates a sentence of the form article noun verb. |
|
Q: |
6. Write a program that asks the user to enter a temperature in degrees Celsius. The program will convert the temperature to degrees Fahrenheit and display the result to the user with an appropriate message. (Hint: F° = (1.8 × C°) + 32.) |
|
Q: |
7. When a current I flows through a resistance R, the power P dissipated by the resistance is I 2 × R. Write a program that reads I and R and calculates P. |
|
Q: |
8. Write a program that reads the lengths of the two sides of a right triangle and calculates the length of the hypotenuse. |
|
Q: |
9. Write a program that prompts the user to enter the length (L), width (W), and height (H) of a box. The program will then compute and display the volume and surface area of the box. (Hint: Volume = L × W × H; Surface area = 2×[(L × W) + (L × H) + (H × W)].) |
|
Q: |
10. The equivalent resistance R of three resistors (R1, R2, and R3) connected in parallel is given by this equation: 1/R = 1/R1 + 1/R2 + 1/R3 Write a program that reads the values of R1, R2, and R3 and calculates R. |
|
Q: |
11. Complete the Whac-a-Mole game introduced earlier in the chapter. The file Whac-a-Mole.sb2 contains a partial implementation of this program. When the green flag is clicked, the provided script starts a loop that moves the Cat sprite randomly over the holes. Add two scripts (one for the Cat and the other for the Stage) to change the values of the two variables (hitsand misses) appropriately. Try adding some sound effects to make the game more fun! You could also add a condition that ends the game after a timer or the number of misses reaches a certain value.
|
All materials on the site are licensed Creative Commons Attribution-Sharealike 3.0 Unported CC BY-SA 3.0 & GNU Free Documentation License (GFDL)
If you are the copyright holder of any material contained on our site and intend to remove it, please contact our site administrator for approval.
© 2016-2026 All site design rights belong to S.Y.A.