Learn to Program with Scratch: A Visual Introduction to Programming with Games, Art, Science, and Math (2014)
Chapter 6. Making Decisions
This chapter will teach you the Scratch tools you need to write programs that can compare values, evaluate logical expressions, and make decisions based on the results. We’ll also go through several useful example applications. Here’s what you’ll learn along the way:
§ Basic problem-solving techniques
§ How to use the if and if/else blocks to choose among alternative actions
§ How to construct logical expressions to evaluate given conditions
§ The flow of control in branching statements
The programs we have written so far follow a simple execution model. They start with the first instruction, execute it, move on to the next instruction, and so on until they reach the end of the program. The command blocks of these programs are executed in sequence, without any skipping or jumping.
In many programming situations, however, you may want to alter this sequential flow of program execution. If you were writing an application to tutor children in basic arithmetic, you’d want to execute certain blocks to reward correct answers and a completely different set of blocks for wrong answers (to reveal the right answer or offer another chance, for example). Your script can decide what to do next by comparing the student’s input with the correct answer. This is the basis of all decision-making tasks.
In this chapter, we’ll explore the decision-making commands available in Scratch and write several programs that use these commands to test inputs and perform different actions.
First, I’ll introduce you to Scratch’s comparison operators and show how you can use them to compare numbers, letters, and strings. Then, I’ll introduce the if and if/else blocks and explain their key role in decision making. You’ll also learn how to test multiple conditions using nested if andif/else blocks and write a menu-driven program to put these blocks into action. After that, I’ll introduce logical operators as an alternative way to test multiple conditions. In the last section, we’ll write several interesting programs based on all of the concepts you’ve learned so far.
Comparison Operators
You make decisions every day, and each decision normally leads you to perform certain actions. You may think, for example, “If that car is less than $2,000, I’ll buy it.” You then ask about the car’s price and decide whether or not you want to buy it.
You can make decisions in Scratch, too. Using comparison operators, you can compare the values of two variables or expressions to determine whether one is greater than, less than, or equal to the other. Comparison operators are also called relational operators because they test the relationship between two values. The three relational operators supported in Scratch are shown in Table 6-1.
Table 6-1. Relational Operators in Scratch
|
Operator |
Meaning |
Example |
|
|
greater than |
Is price greater than 2,000? |
|
|
less than |
Is price less than 2,000? |
|
|
equal to |
Is price equal to 2,000? |
BOOLEANS IN THE REAL WORLD
The word Boolean is used in honor of George Boole, a 19th-century British mathematician who invented a system of logic based on just two values: 1 and 0 (or True and False). Boolean algebra eventually became the basis for modern-day computer science.
In real life, we use Boolean expressions all the time to make decisions. Computers also use them to determine which branch of a program to follow. A robotic arm may be programmed to inspect moving parts on an assembly line and move each part to Bin 1 if goodQuality = true, or Bin 2 if goodQuality = false. Home security systems are usually programmed to sound an alarm if the wrong code is entered (correctCode = false) or deactivate when we enter the correct code (correctCode = true). A remote server may grant or deny access when you swipe your credit card at a department store based on whether your card was valid (true) or invalid (false). One computer in your vehicle will automatically deploy the air airbags when it decides that a collision has occurred (collision = true). Your cell phone may display a warning icon when the battery is low (batteryLow = true) and remove the icon when the battery’s charge is acceptable (batteryLow = false).
These are just few examples of how computers cause different actions to be taken by checking the results of Boolean conditions.
Note that the blocks in Table 6-1 all have a hexagonal shape. As you might recall from Chapter 5, that means the result of evaluating one of these blocks is a Boolean value, which can be either true or false. For this reason, these expressions are also called Boolean expressions.
For example, the expression price < 2000 tests whether the value of the variable price is less than 2,000. If price is less than 2,000, the block returns (or evaluates to) true; otherwise, it returns false. You can use this expression to construct your decision condition in the form, “If (price < 2000), then buy the car.”
Before we look at the if block, which allows you to implement such a test, let’s go over a simple example that illustrates how Boolean expressions are evaluated in Scratch.
Evaluating Boolean Expressions
Let’s say that we set two variables, x and y, as follows: x = 5, and y = 10. Table 6-2 shows some examples that use Scratch’s relational blocks.
These examples reveal several important points about relational operators. First, we can use them to compare both individual variables (such as x, y) and complete expressions (such as 2 * x and x + 6). Second, the result of a comparison is always true or false (that is, a Boolean value). Third, the x = y block doesn’t mean “Set x equal to y.” Instead, it asks, “Is x equal to y?” So when the statement set z to (x = y) is executed, the value of x is still 5.
Table 6-2. Sample Relational Block Uses
|
Statement |
Meaning |
z (output) |
Explanation |
|
|
z = is(5 < 10)? |
z = true |
because 5 is less than 10 |
|
|
z = is(5 > 10)? |
z = false |
because 5 is not more than 10 |
|
|
z = is(5 = 10)? |
z = false |
because 5 is not equal to 10 |
|
|
z = is(10 > 2*5)? |
z = false |
because 10 is not more than 10 |
|
|
z = is(5 = 5)? |
z = true |
because 5 is equal to 5 |
|
|
z = is(10 < 5 + 6)? |
z = true |
because 10 is less than 11 |
Comparing Letters and Strings
Let’s think about a game in which the player tries to guess a one-letter secret code between A and Z. The game reads the player’s guess, compares it with the secret code, and instructs the player to refine his guess based on the alphabetical order of letters. If the secret letter were G, for example, and the player entered a B, the game should say something like “After B” to tell the player that the secret code comes after the letter B in the alphabet. How can you compare the correct letter with the player’s input to decide what message to display?
Fortunately, the relational operators in Scratch can also compare letters. As illustrated in Figure 6-1, Scratch compares letters based on their alphabetical order. Since the letter A comes before the letter B in the alphabet, the expression A < B returns true. It is important to note, however, that these comparisons are not case sensitive; capital letter A is the same as small letter a. Thus, the expression A = a also returns true.
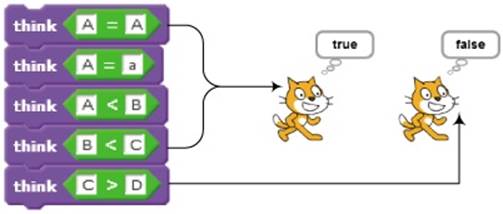
Figure 6-1. Using relational operators to compare letters
Knowing this information, you can test the player’s guess using the following set of conditionals:
IF (answer = secretCode), then say Correct
IF (answer > secretCode), then say Before <answer>
IF (answer < secretCode), then say After <answer>
A conditional is a statement of the form, “If the condition is true, then take this action.” In the next section, I’ll teach you how to implement conditionals in Scratch, but let’s explore relational operators a bit further with our code-guessing game first.
What if the secret code contains more than one letter? For example, the player might need to guess the name of an animal. Can you still use Scratch’s relational operators to do the comparison? Luckily, the short answer is yes: You can use Scratch’s relational operators to compare strings. But how does Scratch process a comparison like elephant > mouse? The examples in Figure 6-2 illustrate the result of comparing strings.
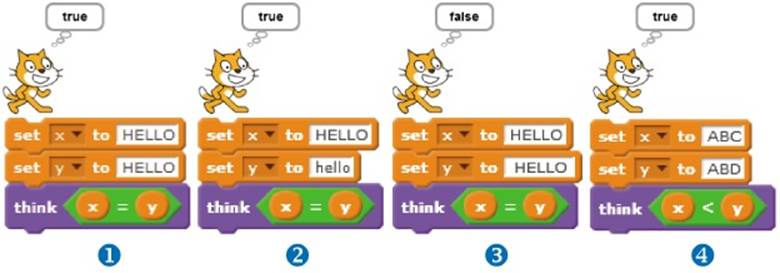
Figure 6-2. Using relational operators to compare ① identical strings, ② strings that differ only in case, ③ one string to another that contains extra spaces, and ④ strings that vary according to the dictionary order of their letters
A careful study of Figure 6-2 shows the following:
§ Scratch compares strings irrespective of their case. The strings “HELLO” and “hello” in ②, for example, are considered equal.
§ Scratch counts white spaces in its comparison. The string “HELLO”, which starts and ends with a single space, is not the same as the string “HELLO” ③.
§ When comparing the strings “ABC” and “ABD”, as in ④, Scratch first considers the first character in the two strings. Since they are the same (the letter A in this case), Scratch examines the second character in both strings. Since this character is also the same in the two strings, Scratch moves on to examining the third character. Since the letter C is less than the letter D (that is, C comes before D in the alphabet), Scratch considers the first string to be less than the second string.
Knowing this, it shouldn’t surprise you when the expression elephant > mouse evaluates to false, even though actual elephants are much larger than mice. According to Scratch’s string comparison rules, the string “elephant” is less than the string “mouse” because the letter e (the first letter in elephant) comes before the letter m (the first letter in mouse) in the alphabet.
Comparing and sorting strings based on the alphabetical order of their characters is used in many real-life situations, including ordering directory listings, books on bookshelves, words in dictionaries, and so on. The word elephant comes before the word mouse in the dictionary, and string comparison in Scratch gives an answer based on this order.
Now that you understand what relational operators are and how Scratch uses these operators to compare numbers and strings, it’s time to learn about conditional blocks.
Decision Structures
Scratch’s Control palette contains two blocks that allow you to make decisions and control actions in your programs: the if block and the if/else block. Using these blocks, you can ask a question and take a course of action based on the answer. In this section, we’ll discuss these two blocks in detail, talk about flags, and learn to test multiple conditions with nested if blocks. I’ll then introduce menu-driven applications and explain how nested if blocks can aid in their implementation.
The if Block
The if block is a decision structure that gives you the ability to specify whether a set of commands should (or should not) be executed based on the result of a test condition. The structure of the if block and its corresponding flowchart are shown in Figure 6-3.
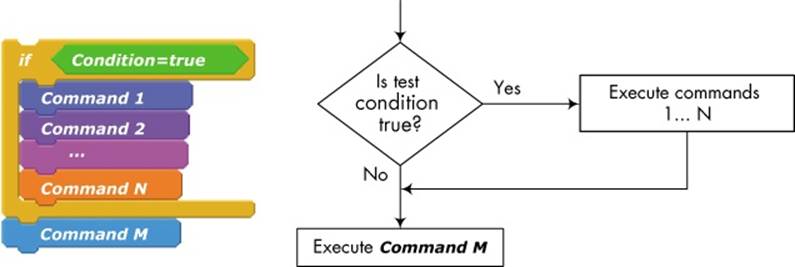
Figure 6-3. Structure of the if block
In Figure 6-3, the diamond shape represents a decision block that gives a yes/no (or true/false) answer to a question. If the test condition in the header of the if block is true, the program executes the commands listed inside the body before moving on to the command that follows the if block (Command M in the figure). If the test condition is false, the program skips those commands and moves directly to Command M.
To see the if block in action, create the script shown in Figure 6-4 and run it. The script runs a forever loop that moves a sprite around the stage, changes its color, and makes it bounce off the edges of the Stage.
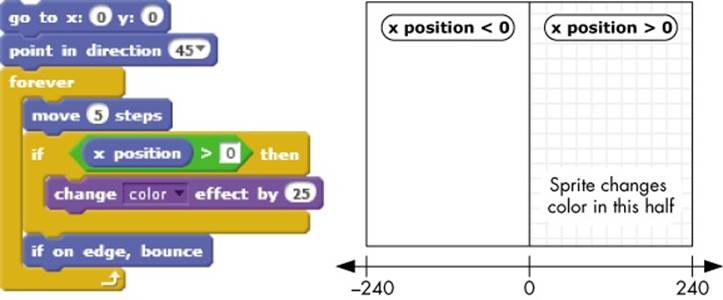
Figure 6-4. This script causes the sprite to change its color only when it is moving in the right half of the Stage.
The forever loop in our script contains an if block that checks the sprite’s x-position after every move command. If the x-position is greater than zero, the sprite should change its color. When you run this script, you’ll notice that the sprite changes its color only when it is moving in the right half of the Stage. This is because the change color effect by 25 block is executed only when the x position > 0 condition is true.
Using Variables as Flags
Let’s say that you are developing a space adventure game where the goal is to destroy a fleet of attacking warships. The player, who is the captain, maneuvers a starship with the arrow keys on the keyboard and fires missiles by pressing the spacebar. If the player’s starship gets hit by enemy fire a certain number of times, the ship loses its ability to attack. At this point, pressing the spacebar should not fire any more missiles, and the captain has to adopt a defense strategy to avoid taking any more hits. Clearly, when the spacebar is pressed, your program needs to check the state of the starship’s attack system to decide whether or not the player can fire.
Checks of this nature are normally performed using flags, which are variables you use to indicate whether or not an event of interest has happened. You could use any two values to describe the event’s status, but it’s common practice to use 0 (or false) to indicate that the event hasn’t occurred and 1 (or true) to indicate that it has.
In your space shooter game, you can use a flag named canFire to indicate the state of the starship. A value of 1 means that the starship can fire missiles, and a value of 0 means that it can’t. Based on this, your spacebar event handler may be coded as shown in Figure 6-5.
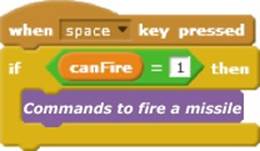
Figure 6-5. Using a flag for condition execution
At the start of the game, you’d initialize the value of the canFire flag to 1 to indicate that the starship is capable of firing missiles. When the starship gets hit by a certain amount of enemy fire, you’d set the canFire flag to 0 to indicate that the attack system has become dysfunctional; at that point, pressing the spacebar won’t fire any more missiles.
Although you can name your flags anything you want, I recommend using names that reflect their true/false nature. Table 6-3 shows some examples of flags you might use in the space shooter game.
Table 6-3. Some Examples of Using Flags
|
Example |
Meaning and Possible Course of Action |
|
|
Game has not started yet. Ignore all keyboard inputs. |
|
|
Game has started. Start processing user input. |
|
|
Game is not over yet. Show remaining time. |
|
|
Game is over. Hide the remaining time display. |
|
|
The starship is not hit by enemy’s fire. Alarm sound is off. |
|
|
The starship has been hit by a missile. Play the alarm sound. |
Now that you know how to use the if block and flags, let’s talk about another conditional block, one that will let you execute one block of code when a certain condition is true and another if that condition is false.
The if/else Block
Imagine that you are creating a game to teach basic math to elementary students. The game presents an addition problem and then asks the student to enter an answer. The student should receive one point for a correct answer and lose one point for an incorrect answer. You can perform this task using two if statements:
If the answer is correct, add one point to score
If the answer is incorrect, subtract one point from score
You could also simplify this logic—and make the code more efficient—by combining the two if statements into one if/else statement as follows:
If the answer is correct
add one point to score
Else
subtract one point from score
The specified condition is tested. If the condition is true, the commands in the if part of the block are executed. If the condition is false, however, the commands under else will execute instead. The program will only execute one of the two groups of commands in the if/else block. Those alternative paths through the program are also called branches. The structure of the if/else block and its corresponding flowchart are shown in Figure 6-6.
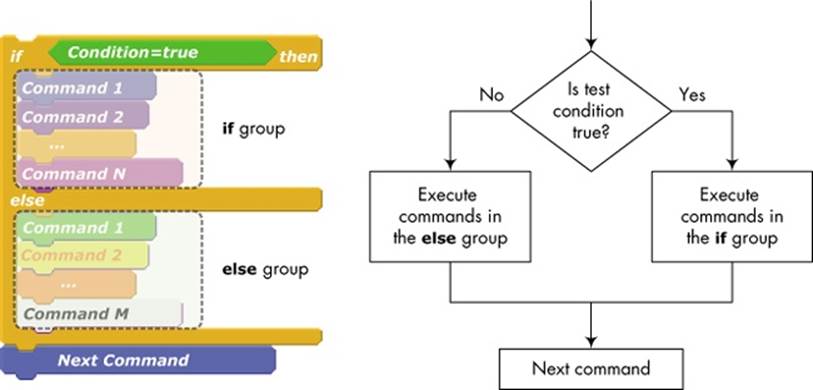
Figure 6-6. Structure of the if/else block
You might use the if/else structure when you want to decide where to eat lunch. If you have enough money, you’ll go to a fancy restaurant; otherwise, you’ll settle for more casual food. Let’s call the money in your wallet availableCash. When you open your wallet, you’re checking the condition availableCash > $20. If the result is true (you have more than $20), you’ll go to a place with white tablecloths, and if not, you’ll head to the nearest burger joint.
One simple script that illustrates using the if/else block is shown in Figure 6-7. This example uses the modulus operator (mod), which returns the remainder of a division operation, to determine whether a number entered by the user is even or odd. (Remember that an even number has a remainder of zero when divided by two.)
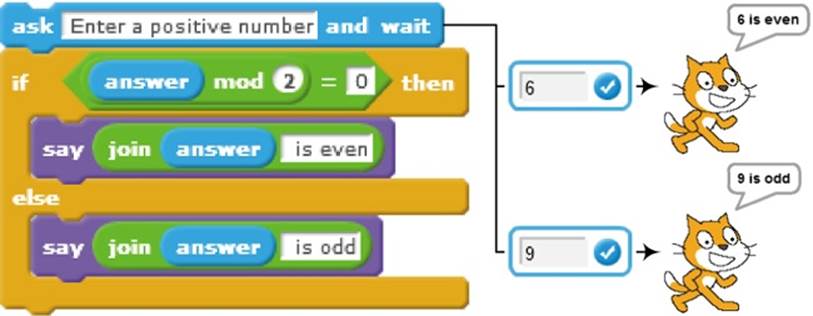
Figure 6-7. This script finds out whether the number the user entered is even or odd.
Figure 6-7 shows two sample outputs for when the user enters 6 and 9, respectively, in response to the ask command. Can you explain how this script works?
Nested if and if/else Blocks
If you want to test more than one condition before taking an action, you can nest multiple if (or if/else) blocks inside each other to perform the required test. Consider for example the script shown in Figure 6-8, which determines whether a student should receive a scholarship. To qualify, the student must have: (1) a grade point average (GPA) higher than 3.8 and (2) a grade above 92 percent in math.
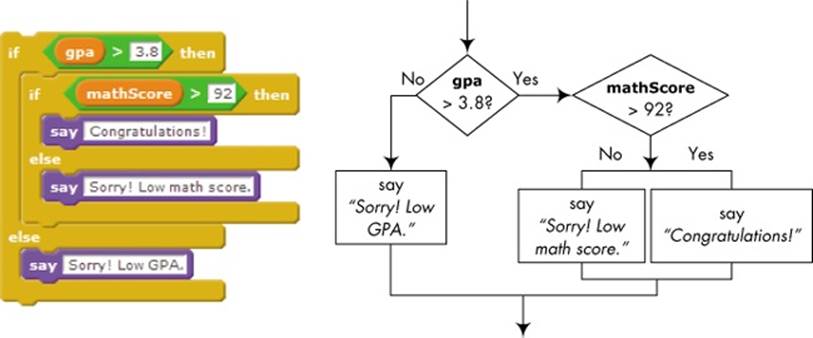
Figure 6-8. You can use nested if/else blocks to test multiple conditions.
First, the expression gpa > 3.8 is tested. If this expression is false, we don’t need to check the other condition because the student doesn’t meet the scholarship criteria. If the expression gpa > 3.8 is true, however, we need to test the second condition. This is done with the nested if/else block, which tests the condition mathScore > 92. If this second condition is also true, the student gets the scholarship. Otherwise, the student does not qualify, and an appropriate message explaining the reason is displayed.
Menu-Driven Programs
AreaCalculator.sb2
Next, we’ll explore a typical use of nested if blocks. In particular, you’ll learn how to write programs that present the user with choices and act on the user’s selection.
When you start up some programs, they display a list (or menu) of available options and wait for you to make a selection. Sometimes, you’ll interact with these programs by entering a number that corresponds to your desired option. Such programs may use a sequence of nested if/else blocks to determine the user’s selection and act appropriately. To see how nested if/else blocks work, we’ll discuss an application, shown in Figure 6-9, that calculates the area of different geometric shapes.
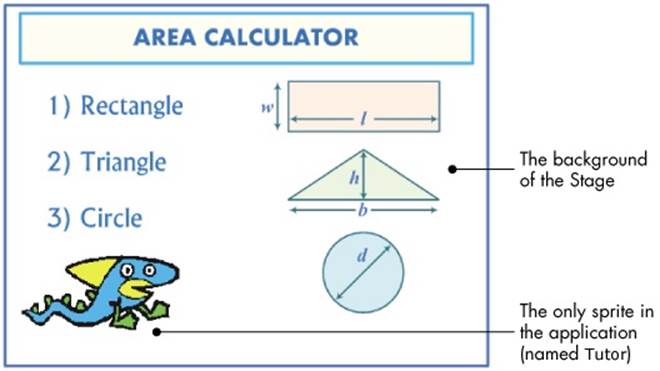
Figure 6-9. User interface for the area calculator program
The user interface for this application contains the Stage’s background image, which shows the available options (the numbers 1, 2, or 3), and the Tutor sprite, which asks the user for a choice, performs the calculation, and displays the result. The main script, shown in Figure 6-10, starts when the green flag icon is clicked.
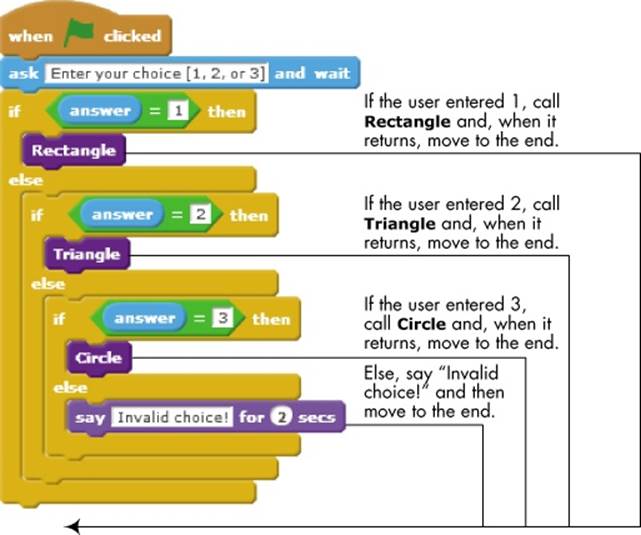
Figure 6-10. The main script of the Tutor sprite
After asking the user to enter a choice, the Tutor sprite waits for the user’s input and uses three if/else blocks to process it. If the user entered a valid choice (that is, 1, 2, or 3), the script calls the appropriate procedure to calculate the area of the indicated shape. Otherwise, the script invokes the say command to inform the user that the choice entered is invalid. The procedures for calculating the areas of the three shapes are shown in Figure 6-11.
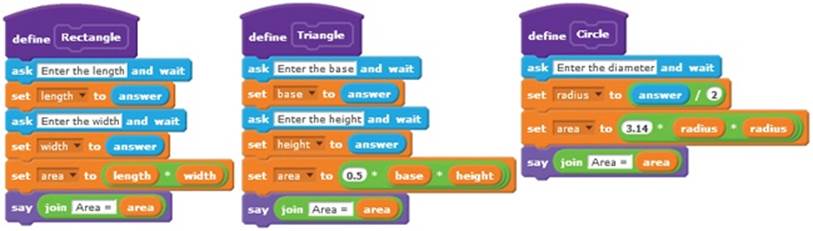
Figure 6-11. Procedures for the area calculator program
Each procedure asks the user to enter the dimensions for its corresponding shape, calculates the area, and displays the result. For example, the Rectangle procedure asks the user to enter the length and width of the rectangle and saves the answers in the length and width variables, respectively. It then computes the area by multiplying the length by the width and displays the answer. The other two procedures work similarly.
Logical Operators
In the previous section, you learned how to use nested if and if/else blocks to test multiple conditions, but you can also do that with logical operators. Using logical operators, you can combine two or more relational expressions to produce a single true/false result. For example, the logical expression (x > 5) and (x < 10) is made up of two logical expressions (x > 5 and x < 10) that are combined using the logical operator and. We can think of x > 5 and x < 10 as the two operands of the and operator; the result of this operator is true only if both operands are true.Table 6-4 lists the three logical operators available in Scratch with a brief explanation of their meaning.
Table 6-4. Logical Operators
|
Operator |
Meaning |
|
|
The result is true only if the two expressions are true. |
|
|
The result is true if either of the two expressions is true. |
|
|
The result is true if the expression is false. |
Now that you’ve seen a brief overview of each operator, let’s explore how they work in more detail, one at a time.
The and Operator
The and operator takes two expressions as parameters. If both expressions are true, the and operator returns true; otherwise, it returns false. The truth table for and, which lists the output of the operator for all possible combinations of inputs, is shown in Table 6-5.
Table 6-5. Truth Table for the and Operator
|
X |
Y |
|
|
true |
true |
true |
|
true |
false |
false |
|
false |
true |
false |
|
false |
false |
false |
As an example of using the and operator, let’s say we’re creating a game in which the player gets 200 bonus points when the score reaches 100 in the first level. The game level is tracked by a variable named level, and the score is tracked using a variable named score. Figure 6-12 shows how these conditions can be tested using nested if blocks ① or with the and operator ②.

Figure 6-12. Checking multiple conditions using nested if blocks and the and operator
In both cases, the bonus points are added only when both conditions are true. As you can see, the and operator provides a more concise way for performing the same test. The command(s) inside the if block in Figure 6-12 ②will be executed only if level equals 1 and score equals 100. If either condition is false, the entire test evaluates to false, and the change score by 200 block will not be executed.
The or Operator
The or operator also takes two expressions as parameters. If either expression is true, the or operator returns true. It returns false only when the two expressions are both false. The truth table for the or operator is given in Table 6-6.
Table 6-6. Truth Table for the or Operator
|
X |
Y |
|
|
true |
true |
true |
|
true |
false |
true |
|
false |
true |
true |
|
false |
false |
false |
To demonstrate the use of the or operator, let’s assume that players of a certain game have a limited time to reach the next level. They also start with a given amount of energy that depletes as they navigate the current level. The game ends if the player fails to reach the next level in the allowable time or if the player depletes all the allotted energy before reaching the next level. The remaining time is tracked by a variable named timeLeft, and the player’s current energy level is tracked by a variable named energyLevel. Figure 6-13 shows how the game end condition can be tested using nested if/else blocks ① and the or operator ②.
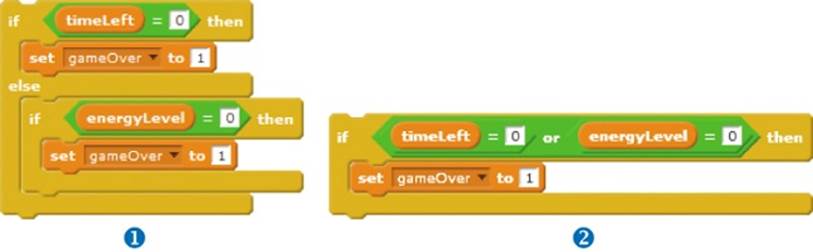
Figure 6-13. Checking multiple conditions using nested if blocks and with the or operator
Note again that the or operator provides a more concise way to test multiple conditions. The command(s) inside the if block in Figure 6-13 ② will be executed if timeLeft or energyLevel is 0. If both of these two conditions are false, the entire test evaluates to false, and the gameOverflag will not be set to 1.
The not Operator
The not operator takes only one expression as input. The result of the operator is true if the expression is false and false if the expression is true. The truth table for this operator is given in Table 6-7.
Table 6-7. Truth Table for the not Operator
|
X |
|
|
true |
false |
|
false |
true |
Going back to our hypothetical game from earlier, let’s say the player can’t progress to the next level if the score isn’t more than 100 points. This would be a good place to use the not operator, as shown in Figure 6-14. You can read this block of code as, “If score is not greater than 100, do the command(s) inside the if block.”
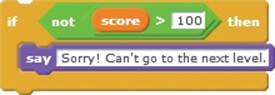
Figure 6-14. Example of using the not operator
In effect, if the value of the score variable is 100 or lower, the test expression evaluates to true, and the say command will execute. Note that the expression not (score > 100) is equivalent to (score ≤ 100).
Using Logical Operators to Check Numeric Ranges
When you need to validate data entered by a user or filter out bad inputs, you can use logical operators to determine whether a number is inside (or outside) a numeric range. Table 6-8 shows some examples of numerical ranges.
Table 6-8. Expressing Numerical Ranges
|
Expression |
Value |
|
(x > 10) and (x < 20) |
Evaluates to true if the value of x is greater than 10 and less than 20. |
|
(x < 10) or (x > 20) |
Evaluates to true if the value of x is less than 10 or greater than 20. |
|
(x < 10) and (x > 20) |
Always false. x can’t be both less than 10 and greater than 20. |
Although Scratch does not have built-in support for ≥ (greater than or equal to) and ≤ (less than or equal to) operators, you can use logical operators to implement these tests. Let’s say, for example, that you need to test the condition x ≥ 10 in your program. The solution set for this inequality is shown in Figure 6-15 ①. The filled circle in the figure means that the number 10 is included in the solution set.
One way to test this condition is shown in Figure 6-15 ②. The figure shows the solution set for x < 10, where the nonfilled circle means that the corresponding point is not in the solution set. As you can see from the figure, the complementary solution (that is, “x is not less than 10”) is equivalent to x ≥ 10. Another way to perform the inequality test is shown in Figure 6-15 ③. Clearly, if x ≥ 10, then either x is greater than 10 or x is equal to 10.
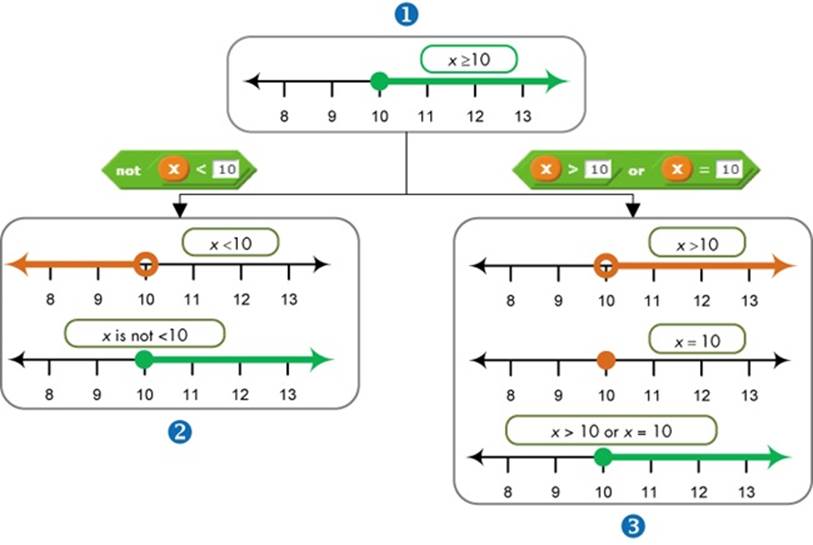
Figure 6-15. Two ways to implement the inequality x ≥ 10
The examples provided in Table 6-9 demonstrate how to use Scratch’s relational and logical operators to express inequalities that contain the ≥ and the ≤ operators.
Table 6-9. Examples of Testing Inequalities
|
Expression |
Implementation Using Logical Operators |
|
x ≥ 10 |
|
|
x ≥ 10 |
|
|
x ≤ 10 |
|
|
x ≤ 10 |
|
|
10 ≤ x ≤20 |
|
|
10 ≤ x ≤20 |
|
We’ve explored several Scratch concepts in this chapter so far, including comparisons, conditional statements, and logical operators. Now, let’s use that knowledge to create some fun and useful applications.
COMPARING DECIMAL NUMBERS
Special care must be taken when using the equal operator to compare decimal numbers. Because of the way these numbers are stored inside the computer, the comparison may sometimes be imprecise. Consider the command blocks shown here:
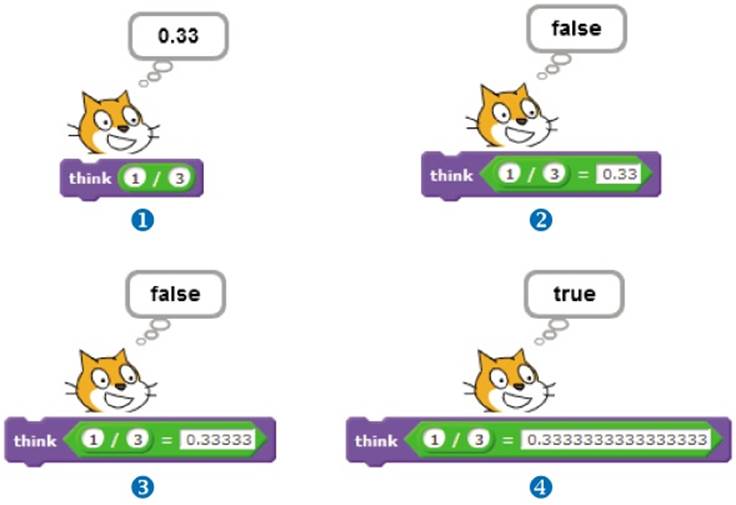
The result of dividing 1 by 3 is 0 .3333... with the sequence of 3s repeating forever. Since the computer uses a fixed amount of space to store the result, the fraction 1/3 cannot be exactly stored by the computer. Although Scratch tells you that the result of the division is 0 .33 at ①, the actual result is saved internally with much higher precision. Therefore, the results of the first two comparisons in the figure (② and ③) evaluate to false.
Depending on your programming situation, you may be able to prevent this type of error by using one of the following approaches:
§ Use the less than (<) and greater than (>) operators instead of the equals operator (=) when possible.
§ Use the round block to round the two numbers you need to compare, and then compare the rounded numbers for equality.
§ Test the absolute difference between the two values you are comparing. For example, instead of testing if x equals y, we can check to see if the absolute difference between x and y is within an acceptable tolerance by using a block similar to this one:
![]()
Depending on the accuracy of the numbers and the method of calculating these numbers, this method may be sufficient for your purpose.
Scratch Projects
The new commands you’ve learned in this chapter should allow you to create a wide range of useful Scratch applications, and hopefully the projects I present in this section will give you some ideas for your own projects. I encourage you try out these applications, understand how they work, and then think of ways to enhance them.
Guess My Coordinates
GuessMyCoordinates.sb2
In this section, we’ll develop an interactive game that can be used to test anyone’s knowledge of the Cartesian coordinate system. The game contains a single sprite (called Star) that represents a random point on the Stage (see Figure 6-16).
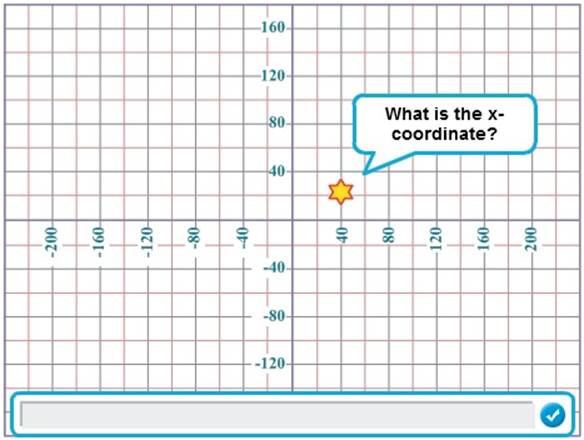
Figure 6-16. The Guess My Coordinates interface
Each time you run the game, the sprite moves to a different location on the Stage and asks the user to guess its x- and y-coordinates. The game checks the user’s answers and provides an appropriate feedback message. The main script for the Star sprite is shown in Figure 6-17.
This script uses two variables, X and Y, to hold the random coordinates of the sprite. I’ll explain how each numbered section from Figure 6-17 works below.
1. The X variable is assigned a random value from the set {–220, –200, –180, ..., 220}. This is achieved by first selecting a random integer between –11 and 11 and multiplying the result by 20. Similarly, the Y variable is assigned a random value from the set {–160, –140, –120, ..., 160}. The selected X and Y values ensure that the resulting point is located on one of the grid intersection points of Figure 6-16. The sprite is then moved to the location specified by X and Y.
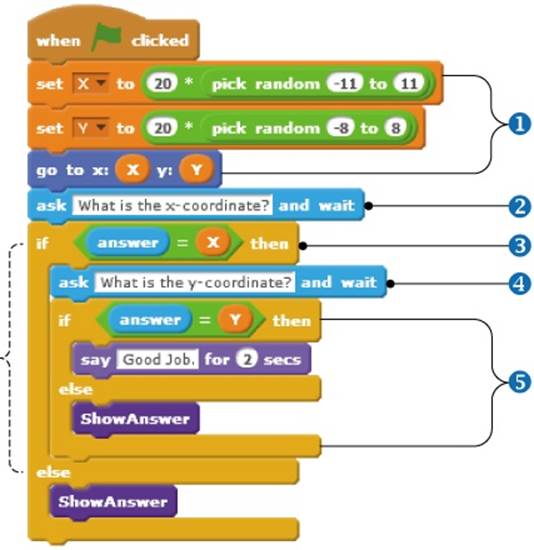
Figure 6-17. Script for the Guess My Coordinates game
2. The script asks the user to enter the x-coordinate of the sprite and waits for an answer.
3. If the answer is correct, the script moves to step 4. Otherwise, it will call the ShowAnswer procedure to display the correct coordinates of the point.
4. When the user enters the correct value for the x-coordinate, the script prompts the user to enter the y-coordinate of the sprite and waits for an answer.
5. If the user answers correctly, the script displays the message “Good Job.” Otherwise, it calls ShowAnswer to display the correct coordinates.
The ShowAnswer procedure is shown in Figure 6-18. The point variable is first constructed to have a string of the form (X,Y) using the join operator. The procedure then uses the say command to show the correct answer to the user.
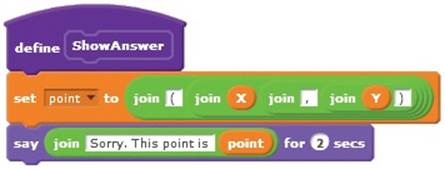
Figure 6-18. The ShowAnswer procedure
TRY IT OUT 6-1
Enhance this guessing game with some fun modifications. For example, you could make the game play music when someone wins, trigger a buzz for a wrong answer, run automatically (without having to press the green flag each time), or keep track of the number of correct answers to display the player’s score.
Triangle Classification Game
TriangleClassification.sb2
As Figure 6-19 illustrates, a triangle can be classified as scalene, isosceles, or equilateral based on the lengths of its sides. In this section, you’ll explore a game that quizzes players on these concepts.
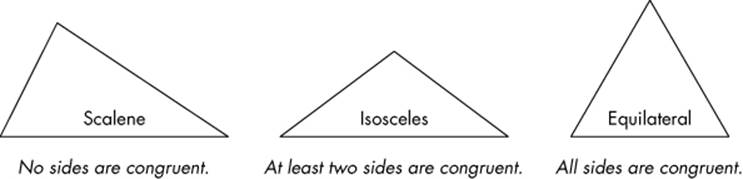
Figure 6-19. Classifying a triangle based on its sides
The game draws a triangle on the Stage and asks the player to classify that triangle as one of the three types. The user interface for this game is illustrated in Figure 6-20.

Figure 6-20. User interface for the triangle classification game
Figure 6-20 shows that this game contains five sprites. Three sprites (named Scalene, Isosceles, and Equilateral) represent the buttons the user clicks to select an answer, and the invisible Painter sprite draws the triangle on the Stage.
NOTE
I made the Painter sprite invisible by unchecking its Show checkbox in the sprite info area. If you prefer to control the sprite’s visibility from the script, you can add a hide block to explicitly hide the sprite when the game starts.
The Tutor sprite is the game’s main driver; it determines the type of triangle to draw for each run and checks the user’s answer. The scripts for the Tutor sprite are shown in Figure 6-21.
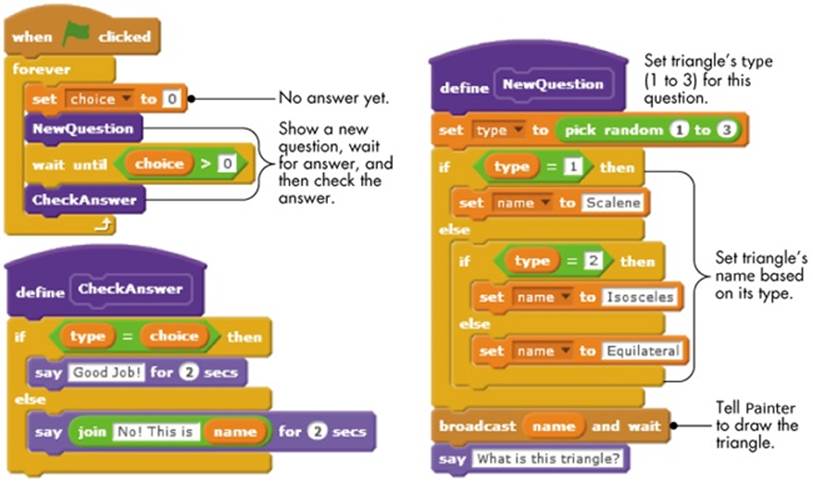
Figure 6-21. Scripts for the Tutor sprite. The main driver script (top left) calls NewQuestion (right) and CheckAnswer (bottom left).
When the green flag icon is clicked to start the game, the main script enters an infinite loop. On each pass of the loop, the script sets choice to 0 (to indicate that the player hasn’t answered yet), draws a different triangle, and waits for an answer. The choice variable should change when the user clicks any of the three answer buttons. When the user clicks a button to classify the triangle, the script checks the answer and provides appropriate feedback. Let’s look at each step in more detail.
The NewQuestion procedure starts by randomly setting type—which determines the type of the triangle to be drawn on the Stage—to 1, 2, or 3. The script then uses two if/else blocks to set the value of the name variable based on the value of type. The name variable serves two purposes: (1) it specifies which broadcast message to send so the Painter sprite knows what to draw (note how the broadcast and wait block uses name), and (2) it is used in the CheckAnswer procedure to create the user’s feedback message. When the Painter sprite finishes drawing, theNewQuestion procedure prompts the user for an answer with the say command.
When the Painter sprite receives the broadcast message, it draws the corresponding triangle on the Stage. To make the game more exciting, the Painter sprite uses random values for the triangle’s size, orientation, and color, as shown in Figure 6-22.
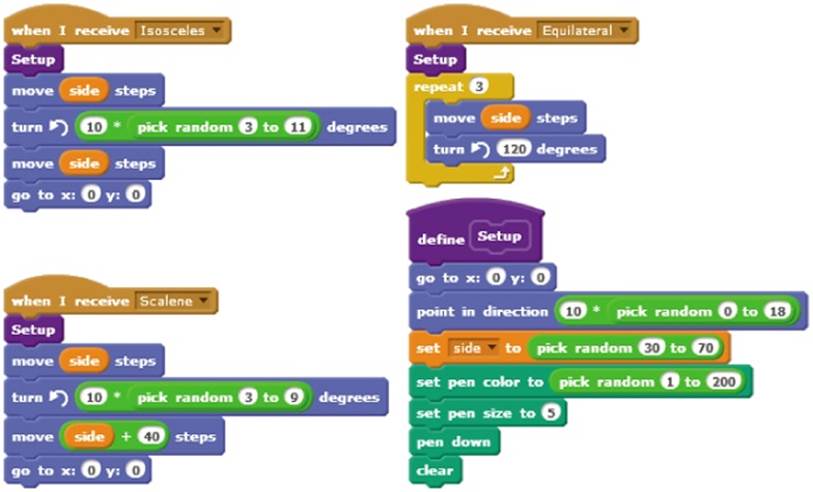
Figure 6-22. Scripts for the Painter sprite
After asking the user to classify the drawn triangle, the main script uses the wait until block (from the Control Palette) to pause until choice > 0 becomes true. The three button sprites will change choice when they are clicked. The Scalene button sets choice to 1, the Isosceles button sets choice to 2, and the Equilateral button sets choice to 3 (see Figure 6-23).
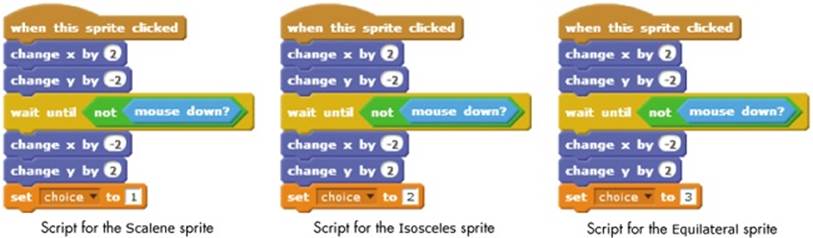
Figure 6-23. Scripts for the three button sprites
When a button is pressed, its sprite moves a little bit down and to the right to give the visual effect of a button press. When the mouse is released, the sprite returns to its original position and sets the value of the variable choice to indicate that the user clicked that button. Note that each sprite sets choice to a different number. The blocks for moving the buttons in these scripts are not strictly necessary and can be removed if desired.
Once the user chooses a triangle type, choice becomes greater than zero, and the main script calls the CheckAnswer procedure. This procedure compares the type variable (which specified the type of the drawn triangle) with the value of the choice variable. If the two variables have the same value, then the user’s answer was correct. Otherwise, the user’s answer was wrong, and the script will say the correct classification.
TRY IT OUT 6-2
Open this game and play it a few times. Once you understand how it works, try adding some extra functions. Here are a few ideas:
§ Make the game keep score. It could add a point for each correct answer and deduct a point for each incorrect answer.
§ Give the user an option to quit the game.
§ Define a criterion for ending the game. For example, you could set the main repeat loop to run 20 times instead of forever. You could also stop the game after five incorrect answers.
§ Have something exciting happen while the game is running. For example, you might create a variable named specialNumber and assign it a random value at the start of the game. When the number of correct answers matches specialNumber, the game could give the user bonus points, play music, or even tell a joke.
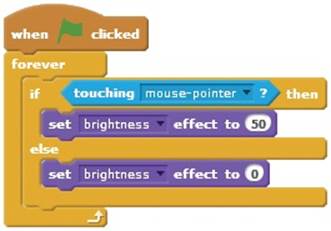
§ Bring the buttons to life with graphics effects. For example, if you add the script shown below to each button, the buttons will change color when the mouse hovers over them.
Line Follower
LineFollower.sb2
Can we make a sprite follow (or trace) a path on the Stage, like the one shown in Figure 6-24, all by itself? The answer is yes, and in this section, we’ll write a program to do it. If you look closely at the sprite in the figure, you’ll notice that we painted the nose and the two ears of the cat with different colors. The figure also shows an enlarged view of the cat’s head.
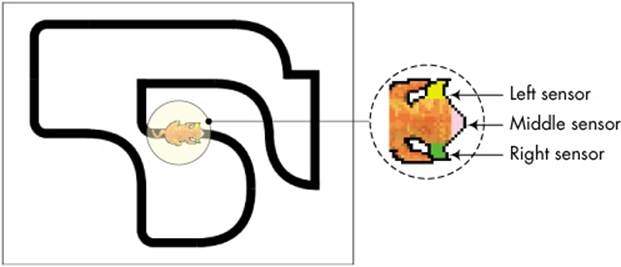
Figure 6-24. Sample path for a sprite to follow
The plan is to use the cat’s nose and ears as color sensors for detecting the black line underneath. Our algorithm for tracing the black line uses the following heuristics (rules based primarily on logical reasoning and trial-and-error experimentation):
§ If the nose of the cat (pink color) is touching the line, move forward.
§ If the left ear of the cat (yellow color) is touching the line, turn counterclockwise and move forward at a reduced speed.
§ If the right ear of the cat (green color) is touching the line, turn clockwise and move forward at a reduced speed.
Of course, the exact speed (movement steps) and turning angles can be different for different routes and have to be determined by experimentation. A script that implements the above algorithm and causes the sprite to follow the line is shown in Figure 6-25.
The script in Figure 6-25 uses a new block: color is touching? (from the Sensing palette). This block checks whether a color on the sprite (specified in the first color square) is touching another color (specified in the second color square). If the specified color on the sprite is touching the other color, the block returns true; otherwise, it returns false. The color in a color square can be chosen by clicking on the color square and then clicking anywhere in the Scratch project to pick the desired color.
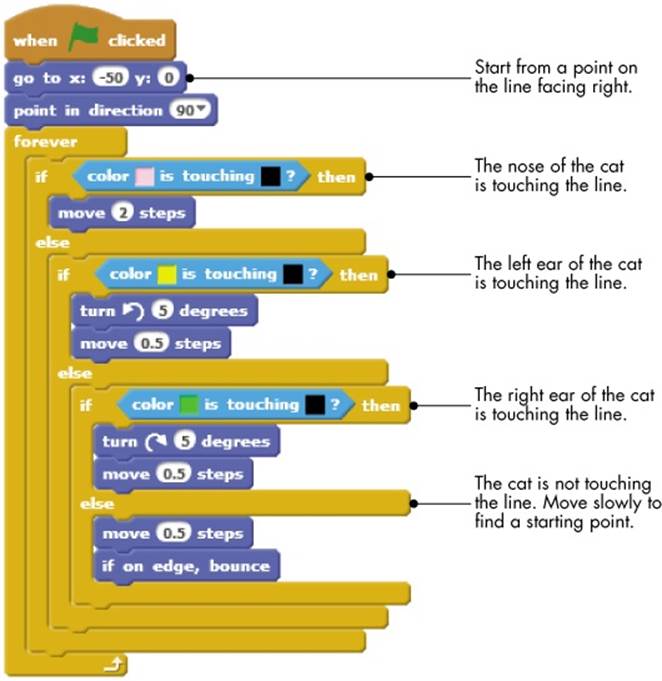
Figure 6-25. Line-following algorithm
TRY IT OUT 6-3
Open the application and run it to see how it works. Experiment with the given values to make the sprite finish the track in the fastest possible time. One reviewer completed the track in 11 seconds. Can you beat the record? Create other tracks and see if this simple algorithm still works.
Equation of a Line
EquationOfALine
The equation of a line joining two points P = (x1, y1) and Q = (x2, y2) is y = mx + b, where m = (y2 – y1) / (x2 – x1) is the slope of the line and b is the y-intercept. A vertical line has an equation of the form x = k, and a horizontal line has an equation of the form y = k, where k is a constant. In this section, we’ll develop an application that finds the equation of the line that joins two points in the Cartesian plane. The user interface for the application is shown in Figure 6-26.
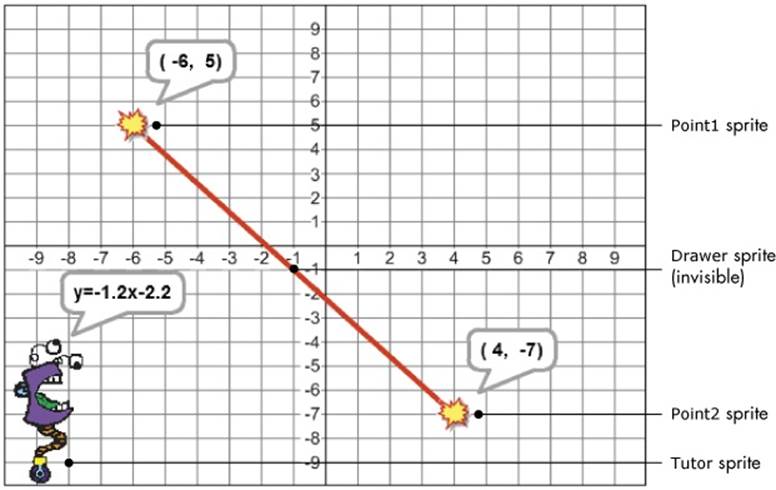
Figure 6-26. User interface for the equation-finder application
The user drags the two sprites representing the end points of the line onto the Stage, and the application automatically displays the equation of the resulting line. The application contains four sprites: Point1 and Point2 are used to mark the two end points of the line; Drawer is a hidden sprite that draws a straight line between the two points; and Tutor is responsible for computing and displaying the equation of the line.
The scripts for Point1 and Point2 are very similar. They contain some logic (not shown here) that restricts the sprites’ locations to the intersection points of the grid. Essentially, when the user drags the Point1 sprite, it updates the variables that hold its coordinates (named X1 and Y1) and broadcasts Redraw. Similarly, when the user drags the Point2 sprite, it updates the variables that hold its coordinates (named X2 and Y2) and broadcasts the same message. All four variables (X1, X2, Y1, and Y2) can only take integer values in the range –9 to 9. You can find the details of these scripts in the file EquationOfALine.sb2. Let’s now take a look at the scripts for the Drawer sprite, shown in Figure 6-27.
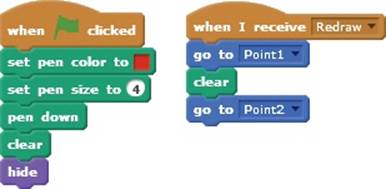
Figure 6-27. Scripts for the Drawer sprite
When the game starts, this sprite sets its pen’s size and color and gets ready to draw. When it receives the Redraw message, it moves to the Point1 sprite, clears the Stage, and then moves to the Point2 sprite. The result is a straight line that connects Point1 and Point2.
The Tutor sprite also executes a script when it receives the Redraw message, as shown in Figure 6-28.
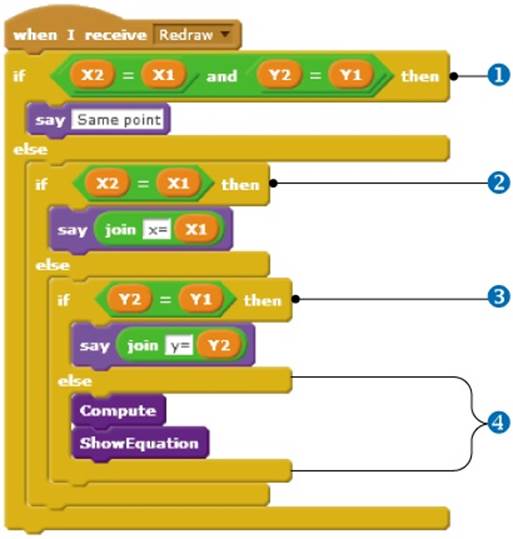
Figure 6-28. Redraw message handler for the Tutor sprite
The script performs the following checks:
§ If the coordinates of Point1 and Point2 are the same, there is no line to process. The script simply says “Same point.”
§ If the two points are different but their x-coordinates are the same, then we have a vertical line. The script displays an equation of the form x = constant.
§ If the two points are different but their y-coordinates are the same, then we have a horizontal line. The script displays an equation of the form y = constant.
§ Otherwise, the two points form a straight line whose equation has the form y = mx + b. The script first calls the Compute procedure to find the slope and the y-intercept of the line. Then it calls ShowEquation to put the equation in a proper format and show it to the user.
The Compute procedure is shown in Figure 6-29. It computes the slope (m) and the y-intercept (b) and then rounds these values to the nearest hundredth.
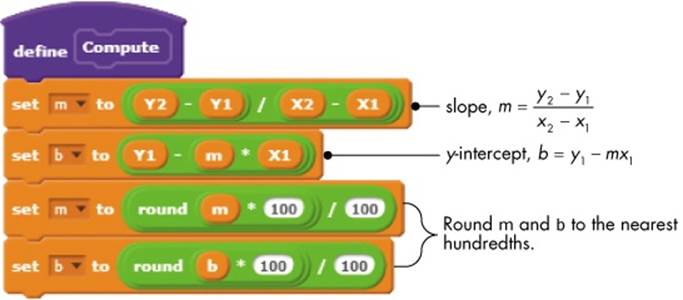
Figure 6-29. The Compute procedure
The ShowEquation procedure is shown in Figure 6-30. It uses two variables (term1 and term2) and two subprocedures to properly format the equation for display.
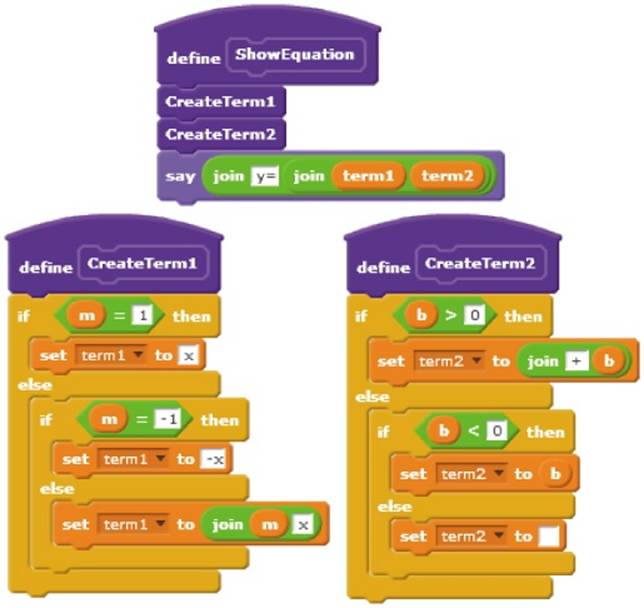
Figure 6-30. The ShowEquation procedure
The ShowEquation procedure considers the following special cases while formatting the line equation:
§ If the slope is 1, term1 will be set to x (instead of 1x).
§ If the slope is –1, term1 will be set to –x (instead of –1x).
§ term2 is formed using the proper sign (plus or minus) of the y-intercept.
§ If the y-intercept is 0, the equation will have the form y = mx.
TRY IT OUT 6-4
Open the application and run it. Drag the two points to different locations on the Stage and check the displayed equation. To enhance this application, try adding a script to move Tutor sprite out of the way if it overlaps with the coordinates displayed by the Point1 and Point2 sprites.
Other Applications
GuessMyNumber.sb2
Now let’s discuss some games you’ll find in the extra resources for this book (download the extra resources from http://nostarch.com/learnscratch/). The supplementary material contains two classic games that you can explore on your own. The first is a “guess my number” game. The application secretly selects an integer at random between 1 and 100 and prompts the player to guess that number. The application then tells the player whether the guess was higher or lower than the secret number by displaying “too high” or “too low,” respectively. The player has six chances to guess the secret number. A correct guess wins the game; otherwise, it’s a loss.
RockPaper.sb2
The second game allows the user to play Rock, Paper, Scissors against the computer. The player makes a selection by clicking one of three buttons that represent rock, paper, or scissors. The computer makes a random selection. The winner is selected according to the following rules: Paper beats (wraps) rock, rock beats (breaks) scissors, and scissors beat (cut) paper.
Summary
In this chapter, you learned about the comparison operators in Scratch and used them to compare numbers, characters, and strings. After that, you learned about the if and if/else blocks and used them to make decisions and control actions in several programs. You also learned how to use nested if and if/else blocks for testing multiple conditions and applied this technique to develop a menu-driven application. You also learned about logical operators as an alternative, and more concise, way to test multiple conditions. Finally, you explored several complete applications that demonstrated decision-making structures in action.
The next chapter will take you deeper into the Control palette, showing you the various repetition structures available in Scratch and teaching you how to use them to write even more powerful programs.
Problems
|
Q: |
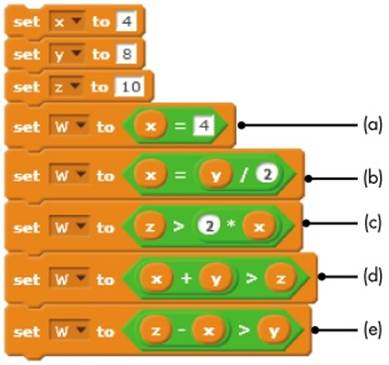
1. What is the value of W after executing each command in this script?
|
||||||||||||
|
Q: |
2. Express each of the following statements using an if block: 1. If x divided by y is 5, then set x to 100. 2. If x times y is 5, then set x to 1. 3. If x is less than y, then double the value of x. 4. If x is greater than y, then increment the value of x by 1. |
||||||||||||
|
Q: |
3. Write a program that prompts the user to enter five test scores between 1 and 10. The program will then count the number of scores that are greater than 7. |
||||||||||||
|
Q: |
4. Express each of the following statements using an if/else block: 1. If x times y is 8, then set x to 1; otherwise, set x to 2. 2. If x is less than y, then double the value of x; otherwise, increment x by 1. 3. If x is greater than y, then increment both by 1; otherwise, decrement both by 1. |
||||||||||||
|
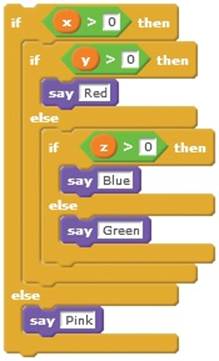
Q: |
5. Trace through the script on the right for each of the following cases to find the output of each: 1. x = –1, y = –1, z = –1 2. x = 1, y = 1, z = 0 3. x = 1, y = –1, z = 1 4. x = 1, y = –1, z = –1
|
||||||||||||
|
Q: |
6. Write a program that asks the user to enter three numbers. The program will then determine and print the largest of the three numbers. |
||||||||||||
|
Q: |
7. A company sells five different products whose retail prices are shown in the following table. Write a program that asks the user to enter the product number and the quantity sold. The program will then calculate and display the total retail value.
|
||||||||||||
|
Q: |
8. Construct a logical expression to represent each of the following conditions: 1. score is greater than 90 and less than 95. 2. answer is either y or yes. 3. answer is an even number between 1 and 10. 4. answer is an odd number between 1 and 10. 5. answer is between 1 and 5 but not equal to 4. 6. answer is between 1 and 100 and divisible by 3. |
||||||||||||
|
Q: |
9. The triangle inequality theorem states that the sum of the lengths of any two sides of a triangle is greater than the length of the third side. Write a program that gets three numbers from the user and determines whether they could represent the sides of a triangle. |
||||||||||||
|
Q: |
10. The Pythagorean theorem states that if a and b are the lengths of the legs of a right triangle and c is the length of the hypotenuse (the longest side), then a2 + b2 = c2. Write a program that gets three numbers from the user and determines whether they could represent the sides of a right triangle. |
All materials on the site are licensed Creative Commons Attribution-Sharealike 3.0 Unported CC BY-SA 3.0 & GNU Free Documentation License (GFDL)
If you are the copyright holder of any material contained on our site and intend to remove it, please contact our site administrator for approval.
© 2016-2026 All site design rights belong to S.Y.A.