SketchUp For Dummies (2017)
Part 2
Modeling in SketchUp
Chapter 5
Falling in Love with Components
IN THIS CHAPTER
![]() Organizing geometry into groups
Organizing geometry into groups
![]() Discovering the wonder and majesty of components
Discovering the wonder and majesty of components
![]() Getting familiar with Dynamic Components
Getting familiar with Dynamic Components
![]() Using components to make symmetrical models
Using components to make symmetrical models
![]() Building stairs with component instances
Building stairs with component instances
If we had our way, this chapter would begin with the word COMPONENTS printed 4 inches high and colored neon green. Components are that important.
Making a component or a group is like gluing together geometry in your model. Edges and faces that are grouped together act like mini-models inside your main model. You use components and groups to more easily select, move, hide, and otherwise work with parts of your model that need to be kept separate. For example, if the roof of a house model is a component or group, you can easily hide or move the roof so that you can peer inside the house from above.
Now that you know how components and groups are alike, here’s how they’re different:
· Groups are simple conglomerations of edges and faces.
· Components are basically groups with an all-important, added benefit: Changes you make to one instance (copy) of a component automatically apply to all the other component instances in your model. So change one window component, and you change all instances where that window component appears in your model.
 Learning to use groups and components is the single biggest thing you can do to get better at SketchUp.
This chapter is about creating and using SketchUp groups and components to make your life a whole lot simpler. We begin by talking about groups (which have a lot in common with components). After that, we jump into components — finding them, managing them, and making your own.
In the last section of this chapter, you learn a couple of modeling techniques that take advantage of component behavior. They’re guaranteed to save you time and effort, and using them will make you feel like a rock star — one who makes 3D models, at least.
Grouping Things Together
SketchUp geometry (the edges and faces that make up your model) is sticky. In other words, stuff in your model wants to stick to other stuff. The people who invented SketchUp built it this way on purpose, but also knew you’d sometimes need to separate geometry, too. Suffice it to say, making and using groups are the keys to keeping the stuff in your model from sticking together. Here are a few reasons for you to make groups:
· Grouped geometry doesn’t stick to anything. Perhaps you’ve modeled a building, and you want to add a roof. You want to move the roof out of the way with the Move tool, but every time you try, you pull the top part of the house along with it (like the middle image in Figure 5-1 ). Making the roof a separate group enables the roof to sit on top of your house without sticking to the walls, as shown in the right image in Figure 5-1 .
· Using groups makes working with your model easier. You can select all the geometry in a group by clicking it once with the Select tool. You can move groups and make copies with the Move tool.
· You can name groups. If you turn a selection of geometry into a group, you can give it a name. In the Outliner (covered in Chapter 7 ), you can see a list of the groups (and components) in your model, and if you’ve given them names, you can see what you have.
· Groups can be solids. Basically, a solid is any group (or component) whose geometry can be thought of as watertight — continuous, with no holes. Solids are important for two reasons:
o If an object is a solid, SketchUp can calculate its volume. You can see a solid’s volume in the Entity Info panel.
o The Solid Tools let you perform nifty modeling tricks using two or more solids. You can read all about the Solid Tools toward the end of Chapter 6 .
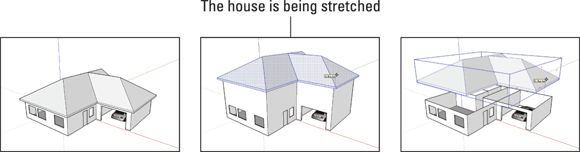
FIGURE 5-1: Making the roof into a group means that it won’t stick to the rest of your building.
Follow these steps to create a group:
1. Select the geometry (edges and faces) you want to turn into a group.
For help with making selections, check out Chapter 3 .
2. Choose Edit ⇒ Make Group.
You can also context-click and choose Make Group from the context menu that pops up.
To ungroup the geometry in a group, you need to explode it. Context-click the group and choose Explode from the context menu. The edges and faces that were grouped together aren’t grouped together anymore.
 To edit the geometry inside a group, double-click it with the Select tool. In edit mode, the rest of your model appears to fade back, and the box around the group (also known as the group’s context ) changes from solid lines to dashed lines. To close the group’s context when you’re done editing, click outside it, somewhere else in your modeling window.
Working with Components
Components make 3D modeling fast, fun, and easy, and this section explains all their special capabilities. After you discover components’ special magic, you might actually get excited about diving into the nitty-gritty of how components work: using the features in the Components panel, keeping your components organized, making your own components, and finding dynamic components that move when you click them.
What makes components so great?
If components were a sports team, we’d hold season tickets in the front row and attend every game wearing fan jerseys and carrying homemade posters to cheer on our favorites. (Go Architecture Collection!) Here’s why we’re big fans of using components whenever you can:
· Everything that’s true about groups is true about components. That’s right: Components do everything that groups do. Components don’t stick to the rest of your model, you can give them meaningful names, and you can select them, move them, copy them, and edit them easily — just like you can with groups.
· Components update automatically. Unlike with groups, when you use multiple copies (called instances ) of the same component in your model, they’re all spookily linked. Changing one makes them all change, which saves loads of time. For example, in Figure 5-2 , when Aidan adds something (in this case, shutters) to one instance of his window component, all the instances are updated. After Aidan changes one component, all three windows have shutters.
· The Components panel has special component-management features. You can use the Components panel to count, select, substitute, and otherwise manage all the component instances in your model. (Groups don’t appear in the Components panel at all.) Figure 5-3 shows a basic building with a window component. In the lower left corner of the Component panel’s Statistics tab, you can see there are 18 instances of the window. On the Component panel’s Select tab, you can context-click to select all instances of the window and replace it with another component with only a few clicks. We chose a white sedan.
· Components can cut an opening automatically. Perhaps you’ve made a window, and you want that window to poke a hole through whatever surface you stick it to. On the Edit tab, explained a little later in this section, you can set up SketchUp components to cut their own openings in faces. Even better, these openings depend on the existence of the component; if you delete the component, the hole disappears.
Components that cut openings can do so only through a single face. If your wall is two faces thick, your components cut through only one of them.
· You can use your components in other models. It’s simple to make any component you build available for use whenever you work in SketchUp, no matter what model you’re working on. If you have a group of parts or other things you always use, making your own component collection can save you a lot of time and effort. For more information about creating your own component collections, see the upcoming section, “The Select tab .”
· Components are great for making symmetrical models. Because you can flip a component instance and keep working on it, and because component instances automatically update when you change one of them, using components is a great way to model anything that’s symmetrical. If you look around, you’ll notice that most things people use are symmetrical. The “Modeling symmetrically: Good news for lazy people ” section near the end of this chapter dives headlong into modeling symmetrical things like couches and hatchbacks; Figure 5-4 shows examples.
· Components keep file sizes down. When you use several instances of a single component, SketchUp has to remember the information for only one of them. This means that your files are smaller, which in turn means you have an easier time e-mailing, uploading, and opening them on your computer.
· Components show in the Outliner. If you’re at all interested in not wasting time hunting for things you’ve misplaced, create lots of components. Doing so means that you can see, hide, unhide, and rearrange them in the Outliner, which is covered in Chapter 7 .
· Components can save your sanity. Hooray! You’ve finished a model of the new airport — and it took only three weeks! Too bad the daylighting consultant wants you to add a sunshade detail to every one of the 1,300 windows in the project. If you made that window a component, you’re golden. If, on the other hand, that window isn’t a component, you’re going to spend a very long night holding hands with your computer mouse.
· Components can be dynamic. Dynamic Components are components with special abilities. They can be set up with multiple configurations, taught to scale intelligently, programmed to perform simple animations, and more. Anyone can use existing DCs, but only people with SketchUp Pro can create new ones. Check out “Discovering Dynamic Components ” later in this chapter for the whole story.
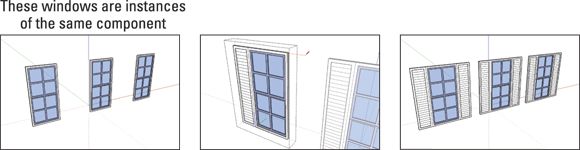
FIGURE 5-2: Changing one instance of a component changes all the other instances, too.
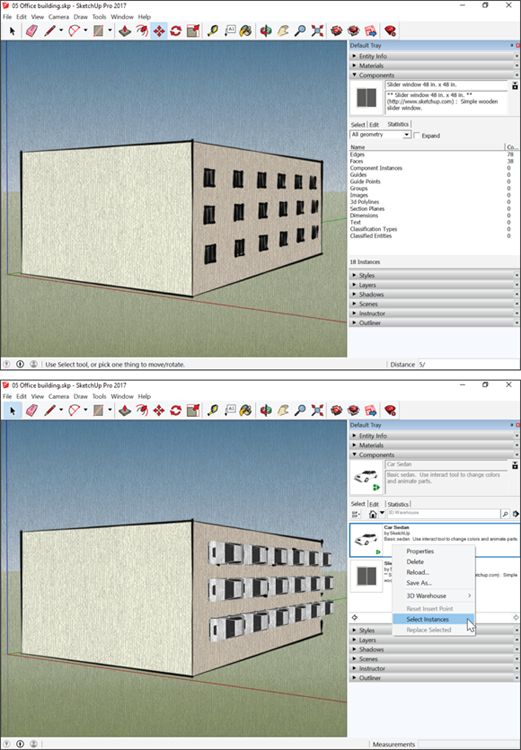
FIGURE 5-3: Quickly count all the window instances in your model (top), or even swap them out for another component.
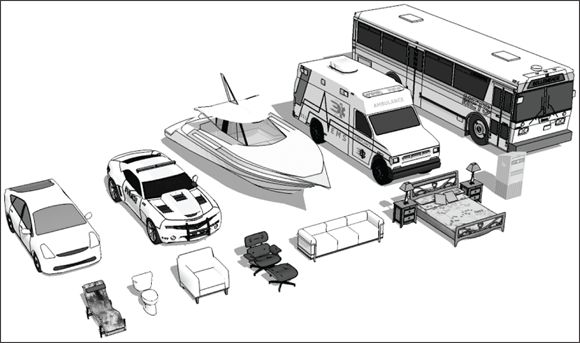
FIGURE 5-4: What do all these things have in common? They’re symmetrical.
THE SketchUp 3D WAREHOUSE
Imagine a place online where everyone in the world can share SketchUp models for free. That’s the 3D Warehouse in a nutshell. It’s hosted by Trimble (SketchUp’s parent company), it’s available in several languages, and it’s searchable — which is a very good thing because it’s jam-packed with models. Millions of ’em.
You can get to the 3D Warehouse in a couple ways:
· On the web: Just type http://3dwarehouse.sketchup.com into your web browser.
· Through SketchUp: The Components panel is hooked up directly to the 3D Warehouse as long as you’re online. You can also open the 3D Warehouse in a separate window by choosing File ⇒ 3D Warehouse ⇒ Get Models.
Anything in the 3D Warehouse is available for you to download and use in your own models. You can also upload anything you make so that other people can use it. Find out more about sharing your work on the 3D Warehouse in Chapter 12 .
Exploring the Components panel
The Components panel gives you a place to keep any components you make. You can also search for components that other people have made, which is a great way to spiff up your model without building everything yourself.
You can bring any SketchUp model on your computer into your current file as a component. That’s because components are really just SketchUp files embedded in other SketchUp files. When you create a component in your model, you’re effectively creating a new, nested SketchUp file. Neat, huh?
The Components panel is made up of four major areas, each covered in the following sections.
Info and buttons
We don’t really know what to call this part of the Components panel, so we call it like it is: It’s for information and buttons. Figure 5-5 points out its elements, and here’s what everything does:
· Name: The name of the component you select appears here. If your component is in your model, it’s editable. If the component is in one of the default collections, it’s not. A component is considered to be in your model if it appears in your In Model collection, which you can read about in the next section, “The Select tab .”
· Description: Some, but not all, components have descriptions associated with them. You can write one when you create a new component, or you can add one to an existing component in your model. Just like the name, you can edit descriptions for models only in your In Model collection.
· Display Secondary Selection Pane button: Clicking this button opens a second view of your collections at the bottom of the Components panel. Use this view to manage the components on your computer.
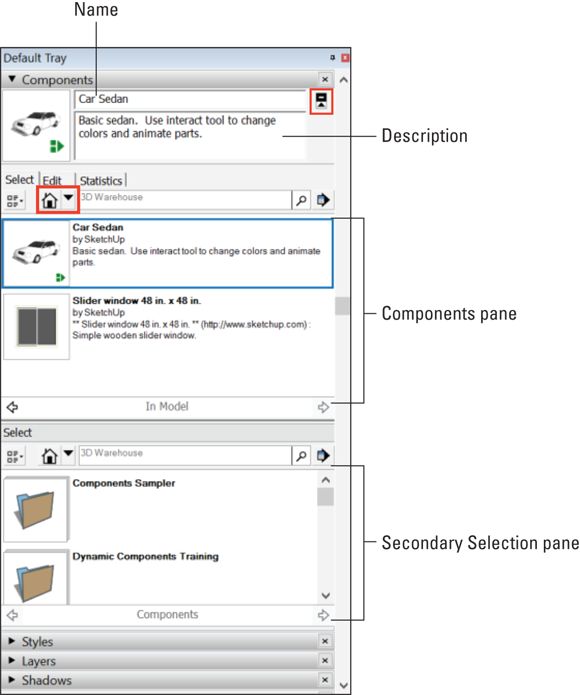
FIGURE 5-5: The Components panel is chock-full o’ goodness.
The Select tab
This tab is where your components live (if they can be said to live anywhere). Use the Select tab to view, organize, and choose components. Refer to Figure 5-5 to see the Select tab in all its glory.
· In Model button: SketchUp automatically keeps track of the components you’ve used in your model and puts a copy of each of them in your In Model collection. Each SketchUp file you create has its own In Model collection, which contains the components that exist in that model. Clicking the In Model button displays the components in your In Model collection, if you have any.
· Collections drop-down menu: You open this menu by clicking the down arrow next to the In Model button. The components listed in the Favorites area of this menu are a mix of two collection types:
o Local collections are folders of components that live on your hard drive. You can access them anytime because they refer to files on your computer.
o Online collections are groupings of components that live in the 3D Warehouse (see the nearby sidebar). Unlike local collections, you can access online collections only when you’re — you guessed it — online.
Unfortunately, the Collections drop-down menu doesn’t indicate which collections are local and which are online. If you click the name of a collection and see a progress bar before you see any models, that collection is online.
· 3D Warehouse search box: It works just like any regular search box: Type what you’re looking for and press Enter. Models in the 3D Warehouse that match your search terms appear in the Components pane. Naturally, you need to be online for this feature to work.
· Components pane: This pane displays the components in the currently selected component collection, or the results of a 3D Warehouse search you’ve just performed. Click a component to use it in your model.
Components that have a little green arrow icon next to them are special; they’re Dynamic Components. They have special abilities. You can read about DCs later in this chapter, in the “Discovering Dynamic Components ” section.
· View Options button: Pretty simple, really. This is where you decide how to view the components (or subcollections) in the Components pane. You can choose different thumbnail image sizes or a list view.
· Collection Details menu: Here’s where you manage your component collections. Here’s a brief introduction to your options:
o Open a Local Collection: Lets you choose a folder on your computer system to use as a component collection. Any SketchUp models in that folder show up in the Components pane, ready to be used as components in your models.
o Create a New Collection: Allows you to create a folder somewhere on your computer system that you can use as a component collection. A collection is handy if you have a number of components that you use all the time; putting them all in one place makes them easier to find.
o Save as a Local Collection: When you choose this option, SketchUp lets you save the components that currently appear in your Components pane as a brand-new local collection. If the components you’re viewing are online, copies of them are downloaded to your computer. If you’re viewing your In Model collection, the contents are copied and included in a new folder. If you’re already viewing a local collection, this option isn’t available.
o View in 3D Warehouse: If you’re viewing an online collection, this option opens that collection in a separate window that displays the 3D Warehouse in much more detail.
o 3D Warehouse Terms of Service: Choose this option if you’re having trouble sleeping. If you’re wondering who owns the stuff on the 3D Warehouse, this is where it’s at.
o Add to Favorites: Choosing this option adds whatever you’re viewing in the Components pane to the Favorites section of the Collections list. That goes for local collections (folders on your computer); online collections (from the 3D Warehouse); and 3D Warehouse searches. That’s right — you can save a search as a favorite collection. The models in a Favorite Search collection are always different, depending on what’s in the 3D Warehouse.
The next two options appear only when you’re viewing your In Model collection:
o Expand: Because components can be made up of other, nested components, a component you use in your model may really be lots of components. Choosing Expand displays all the components in your model whether or not they’re nested inside other components. Most of the time, you probably want to leave Expand deselected.
o Purge Unused: Choose this option to get rid of any components in your In Model collection that aren’t in your model anymore. Be sure to use this before you send your SketchUp file to someone else; it significantly reduces your file size and makes the file a whole lot neater.
SELECT AND REPLACE ALL YOUR TROUBLES AWAY
On top of all the buttons, menus, and windows you can immediately see in the Select tab of the Components panel, you can also find hidden options tucked away on a context menu. The menu pops up when you context-click an In Model collection component:
· Select Instances: Perhaps you have 15 instances (copies) of the same component in your model, and you want to select them all. Just make sure that you’re viewing your In Model collection and then context-click the component (in the Components pane) whose instances you want to select all. Choose Select Instances, and your work’s done. This trick can save you tons of time, particularly if you have component instances all over the place. The feature even selects hidden instances and ones on layers that are turned off.
· Replace Selected: You may want to swap in a different component for one that’s in your model. Simply select the component instances (in your modeling window) that you want to replace and then context-click the component (in the Components pane) that you want to use instead. Choose Replace Selected from the context menu to perform the swap.
Ready for an even better tip? Use Select Instances and Replace Selected together to help you work more efficiently. Instead of placing 20 big, heavy tree components in your model (which can slow down your work), use a smaller, simpler component instead (such as a stick). When you’re finished modeling, use Select Instances to select all the stand-in components at once and then use Replace Selected to swap in the real component. Figure 5-3 (earlier in this chapter) shows the mechanics of this operation, albeit using windows and cars.
The Edit tab
Because the options in this part of the Components panel are similar to the ones you get when you make a new component, check out the section “Creating your own components ,” later in this chapter, for the whole scoop.
You can use the options in the Edit tab only on components in your In Model collection — everything is grayed out for components that live in any other place.
The Statistics tab
Can you remember who won the 1975 Super Bowl? How many home runs did Hank Aaron hit in his career? Do you always check the nutrition information panel on food packaging? You may be a sucker for statistics, and if so, welcome home… .
Even if you’re not, the Statistics tab is a useful place for keeping track of all the details related to whatever component you have selected in the Components panel. (See Figure 5-6 .) This tab is especially useful for doing the following things:
· Checking the size of your components: The information in the Edges and Faces areas of this tab lets you know how much geometry is in a component. If you’re worried about file size or your computer’s performance, try to use small components — ones with low numbers of faces and edges.
· Seeing what components are inside your components: The Component Instances line lists how many component instances are in your selected component. If you switch from All Geometry to Components in the drop-down list at the top of the tab, you can see a list of all the constituent components: subcomponents within your main component.
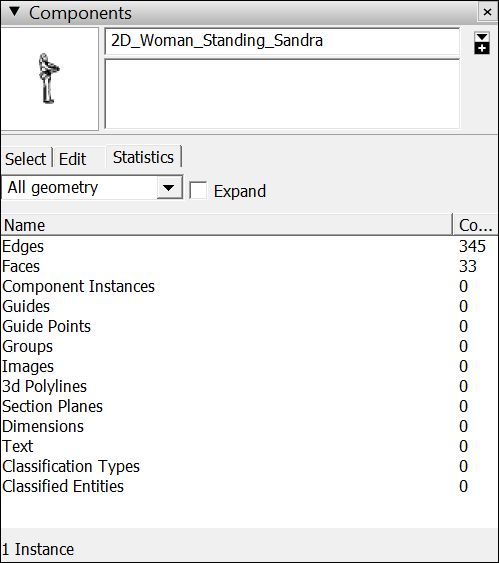
FIGURE 5-6: The Statistics tab of the Components panel: Geek out on numbers.
The Statistics tab doesn’t show details for components you have selected in your actual model; it shows only information about the component that’s selected in the Select tab of the Components pane. To see information about whatever component (or other kind of object) you have selected in your modeling window, use the Entity Info panel (in the Default Tray).
SAVE TIME — GO SHOPPING
Why spend hours modeling an oak tree when you can buy a fantastic one for a reasonable price? If you can’t find what you need among the zillions of components that you can download for free from the 3D Warehouse, try Aidan's favorite paid option. Form Fonts ( www.formfonts.com ) is a website that sells components “all you can eat, buffet-style.” You pay a (surprisingly low) monthly fee, and you have access to thousands of high-quality models of just about anything. Form Fonts’s international team of modelers even takes requests — if you need something that they don’t have, they can probably make it if you ask nicely. Even if you’re not interested in signing up, it’s worth checking out the website just to see the beautiful models Form Fonts makes.
Creating your own components
Creating simple components is a pretty easy process, but making more complicated ones — components that automatically cut openings, stick to surfaces, and always face the viewer — can be a little trickier. Follow these steps no matter what kind of component you’re trying to make:
1. Select one or more entities you want to turn into a component.
You can select edges, faces, images, guides, section planes — even other groups and components. For more information on making selections, see Chapter 3 .
2. Choose Edit ⇒ Make Component.
The Create Component dialog box opens. (See Figure 5-7 .)
3. Give your new component a name and description.
Of these two, the name is by far the most important. Choose a name that will enable you to understand what the component is in the Outliner or when you open your model a year from now.
4. Set the alignment options for your new component.
Wondering what the heck all this stuff means? Check out Table 5-1 .
5. Select the Replace Selection with Component check box if it isn’t already selected.
This step drops your new component into your model right where your selected geometry was, saving you from inserting it from the Components panel.
6. Click the Create button to create your new component.
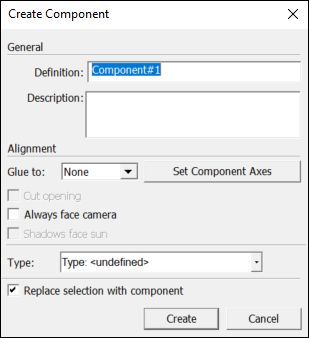
FIGURE 5-7: The Create Component dialog box. So many options… .
TABLE 5-1 Component Alignment Options
|
Option |
What It Does |
Tips and Tricks |
|
Glue To |
Makes a component automatically stick to a specific plane. For example, a chair will almost always sit on a floor. It will almost never be stuck to a wall, turned sideways. When a component is glued to a surface, using the Move tool moves it only on that surface — never perpendicular to it (up and down, if the surface is a floor). |
Use this feature for objects that you want to remain on the surface you put them on, especially objects you want to rearrange: Furniture, windows, and doors are prime examples. If you want to unstick a glued component from a particular surface, context-click it and choose Unglue from the context menu. |
|
Set Component Axes |
Sets a component’s axis origin and orientation. This option is important primarily if you have SketchUp Pro and plan to make this component into a Dynamic Component. If that isn’t your plan, you can safely leave this option alone. |
Click the Set Component Axes button to choose where you want your component’s axis origin to be (where the red, green, and blue axes meet). Click once to center your axes, again to establish the red direction, and again to establish the green and blue directions. If you’re creating a Dynamic Component, this is something you absolutely must know how to do. |
|
Cut Opening |
For components “in” a surface, such as a window, select this check box to automatically cut an opening in surfaces to which you stick the component. |
As with premade components, this opening is dependent on the component’s existence: If you delete the component instance, the opening disappears. If you move the component instance, the opening moves, too. |
|
Always Face Camera |
Makes a component always face you no matter how you orbit around. To make your 2D Face-Me components (that’s what they’re called) work correctly, rotate your component-to-be so that it’s perpendicular to your model’s green axis before you choose Make Component. |
Using flat 2D components instead of complex 3D ones is a great way to have lots of people and trees in your model without bogging down your computer. |
|
Shadows Face Sun |
Available only when the Always Face Camera check box is selected. It is selected by default. |
Leave this check box selected unless your Face-Me component meets the ground in two or more separate places, as shown in Figure 5-8 . |
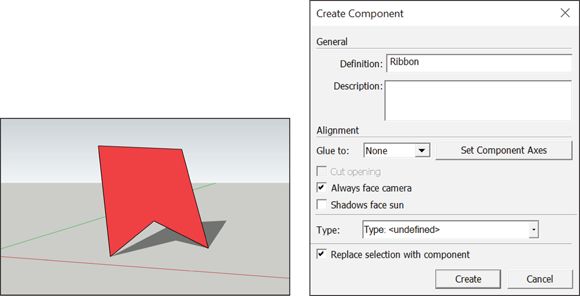
FIGURE 5-8: Deselect the Shadows Face Sun check box if your component touches the ground in more than one place.
INTRODUCING THE CLASSIFIER
If you’re wondering what to do with the Type section of the Create Component dialog box, you’re not alone. This harmless-looking little drop-down menu is actually a portal into SketchUp’s deepest, darkest, nerdiest metadata soul.
Here’s the short version: SketchUp Pro 2014 introduced a new tool called the Classifier. If you’re using Pro, you can label groups and components (which are now collectively referred to as objects ) with information about what they are. When you share your model with people who use sophisticated BIM (Building Information Modeling) software, they can more easily integrate it into their workflows. You can also use SketchUp Pro to generate a report (a tabular list) of all the objects in your model, including their associated labels.
Type is just another word for label. If there were a classification system (the technical word is schema ) for fruit, apple, orange, and banana might be three of the types available in that system. SketchUp Pro only comes preloaded with one schema: IFC 2X3. If you want to use a different one (or even create your own), you can, but you’ll have to load it first using the Classifications panel of the Model Info dialog box.
Details about the Classifier are beyond the scope of this book because how you use the Classifier depends heavily on what you’re using SketchUp to do.
Components can cut through only one face at a time. If your model’s walls are two faces thick, you have to cut your window and door openings manually.
Editing, exploding, and locking component instances
Context-clicking a component instance in your modeling window opens a context menu that offers lots of useful choices. Here’s what some of them let you do:
· Edit Component: To edit all instances of a component at once, context-click any instance and choose Edit Component from the context menu. The rest of your model fades back, and you see a dashed bounding box around your component. When you’re done, click somewhere outside the bounding box to finish editing; your changes have been made in every instance of that component in your model.
· Make Unique: Sometimes you want to make changes to only one or a few of the instances of a component in your model. In this case, select the instance(s) you want to edit, context-click one of them, and choose Make Unique from the context menu. This option turns the instances you selected into a separate component. Now edit any of them; only those instances you made unique reflect your changes.
· Explode: When you explode a component instance, you’re effectively turning it back into regular ol’ geometry. Explode is a lot like Ungroup in other software programs (in SketchUp, you use Explode to disassemble both components and groups).
· Lock: Locking a group or a component instance means that nobody — including you — can mess with it until it’s unlocked. Lock parts of your model that you don’t want to change accidentally. To unlock something, context-click it and choose Unlock.
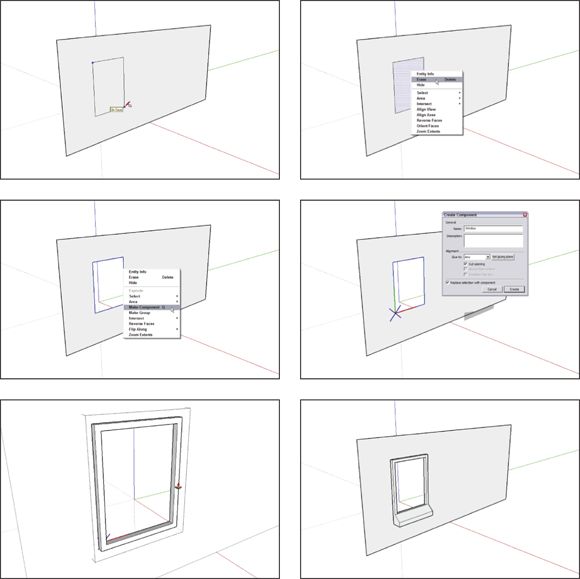
MAKING YOUR OWN DOORS AND WINDOWS
If you’re kind of nerdy like Aidan is, nothing beats making your own window and door components. Here’s what you need to know (check out the illustration in this sidebar for visual instructions):
1. Draw a rectangle on a vertical surface, such as a wall.
2. Delete the face you just created to make a hole in your vertical surface.
3. Select all four edges of the hole you just created; then context-click one of the edges and choose Make Component from the context menu.
4. Make sure that Glue to Any, Cut Opening, and Replace Selection with Component are all selected; then click the Create button to create your new component.
5. With the Select tool, double-click your new component (in the modeling window) to edit it.
The rest of your model appears to fade back a bit.
6. Use the modeling tools just like you always would; keep building your door or window how you want.
7. When you’re done, click outside your component to stop editing it.
If the opening you create ever closes, one of two things probably happened:
· A new surface was created. Try deleting the offending surface to see whether that fixes things; it usually does.
· The cutting boundary was messed up. The cutting boundary consists of the edges that define the hole your component is cutting. If you take away those edges, SketchUp doesn’t know where to cut the hole anymore. Drawing them back in usually sets things straight.
Discovering Dynamic Components
Once upon a time, the smartest thing a component could do was cut its own hole in a surface. “Wow!” all SketchUp aficionados thought, “Components are geniuses! ” And so they were — until Dynamic Components came along in version 7.
Until version 7, SketchUp components were basically dumb. If you wanted to make a staircase longer, you had to make copies of the steps and place them in the right spot. If you needed to change the color of a car, you had to dig out the Paint Bucket and dive in to the geometry. The problem was that components didn’t know what they were supposed to represent; they were just groupings of faces and edges in the shape of an object.
Dynamic Components (DCs) are models that have an idea of what they are; they know what to do when you interact with them. This section outlines what DCs represent for SketchUp modelers and how to use them.
Before you start working with Dynamic Components, here’s what you need to know:
· DCs can do all sorts of things. Describing what DCs do is tricky because they’re all different. The simple (but totally unsatisfying) answer is that they do what they’ve been programmed to do. Figure 5-9 shows some examples, which are explained in the following list:
o A dynamic door component may be set up to swing open when you click it with the Interact tool, which you find on the Dynamic Components toolbar.
o The same dynamic door may also be configured into different sizes, styles, and finishes by using simple drop-down lists in the Component Options dialog box.
o A dynamic chair may be scaled into a sofa but without stretching the arms. The dynamic programming would also add cushions as you make the component longer.
o ![]() A dynamic stair component may automatically add or remove steps as you use the Scale tool to make the staircase taller or shorter.
A dynamic stair component may automatically add or remove steps as you use the Scale tool to make the staircase taller or shorter.
o The little person who appears by default when you start a new SketchUp file is also dynamic: Click the person’s shirt with the Interact tool to cycle through various colors. You can replace the default person with another character, too, and his or her shirt also changes color.
· Anyone can use DCs. Both the free and Pro versions of SketchUp can read and use Dynamic Components. The SketchUp team invented them (at least partially) to make SketchUp easier for new modelers to learn.
· You need Pro to make your own DCs. If you need to build your own Dynamic Components (or modify ones that other folks have made), you need a copy of SketchUp Pro.
· DCs are free. People are adding new DCs to the 3D Warehouse every day. As you can imagine, companies that make things like furniture and building products (windows, kitchen cabinets, and flooring) are really excited about the possibilities that DCs offer. Many of them are in the process of producing DCs of everything in their catalogues and posting them to the 3D Warehouse. That’s good news for you; soon you can download and use a configurable model of almost anything you need.
· They have a special icon. When you download SketchUp, you find a few sample DCs in the Components panel. They’re the ones with the little green dynamic icon next to them (that looks kind of like an arrow).
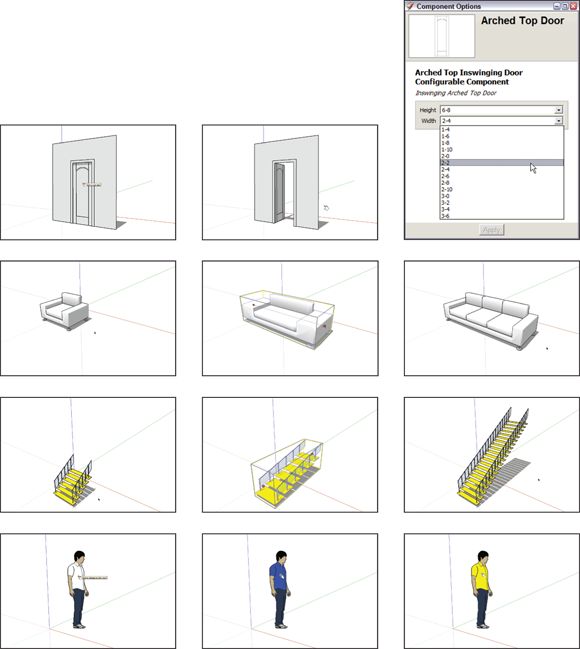
FIGURE 5-9: Dynamic Components can do all kinds of things.
Using Dynamic Components
In SketchUp, you can interact with Dynamic Components in three basic ways. Depending on what a particular DC has been set up to do, it may respond to one, two, or all three of the following interactions.
SMART SCALING
DCs designed to react intelligently to the Scale tool are the closest things to true magic that SketchUp offers. Instead of stretching and getting all distorted when you scale them, the parts that are supposed to change dimensions, do; the other parts don’t.
Take a look at Figure 5-10 . The center image shows what happens when you scale a nondynamic window component to make it wider. See how the frame stretches? Yuck. The image on the far right shows the dynamic version of the same window. It gets wider when you scale it, but the frame stays the same thickness. The component is smart enough to know that only some parts of it should get wider when you scale it.
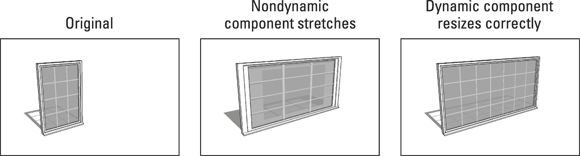
FIGURE 5-10: Scaling a nondynamic window (center) stretches the whole thing. The DC version scales properly.
There’s another way that DCs can scale smartly: by adding or subtracting pieces as they get bigger or smaller. Dynamic stairs are a perfect example of this, as shown in Figure 5-11 . When you use the Scale tool to make the staircase taller, the staircase adds steps instead of stretching.
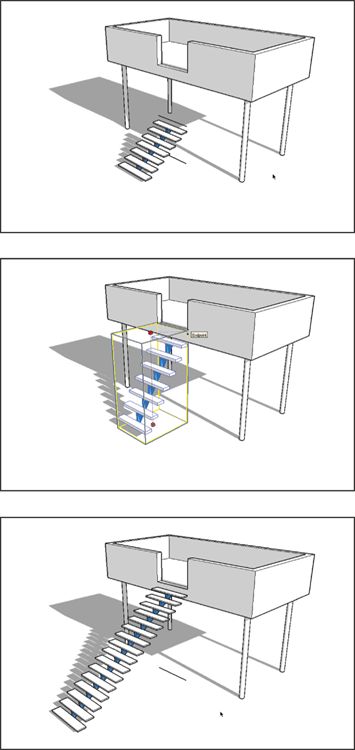
FIGURE 5-11: When you make the staircase taller, this dynamic staircase adds steps instead of stretching.
You can turn on the Dynamic Components toolbar, which is a quicker way to work with DCs than constantly using the menu bar. Just choose View ⇒ Toolbars ⇒ Dynamic Components, and you’re all set.
COMPONENT OPTIONS
In the Component Options dialog box, you can configure DCs that have been hooked up to this dialog box by choosing options from drop-down lists, typing dimensions, and performing other simple tasks. To open the dialog box, choose Window ⇒ Component Options. When you change a setting in Component Options, the DC you’ve selected updates to reflect the change, kind of like modeling by remote control.
The Component Options dialog box looks different for every DC.
Figure 5-12 shows a simple drop-down list for selecting a color. However, a straight staircase might enable you to choose a riser height and a tread depth from preprogrammed lists.
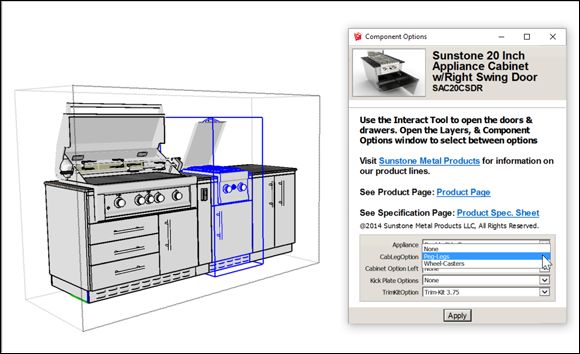
FIGURE 5-12: The Component Options dialog box looks different for every Dynamic Component.
THE INTERACT TOOL
Activate the Interact tool by choosing it from the Tools menu or displaying the Dynamic Components toolbar (View ⇒ Toolbars). Using this tool couldn’t be simpler: When a DC is set up to react to the Interact tool, it does stuff when you click it. Its actions depend on what you’ve programmed it to do.
Check out the truck in Figure 5-13 ; it’s been designed to react to the Interact tool in a few ways:
· Clicking the back of the truck cycles through the following options: box, flatbed, or flatbed with rails.
· Clicking the front wheels turns them from side to side.
· Clicking the doors makes them open and close.
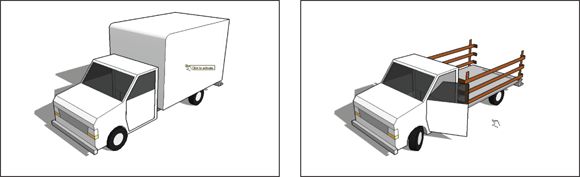
FIGURE 5-13: Clicking stuff with the Interact tool makes things happen.
When you’re hovering over a DC that’s been connected to the Interact tool, your cursor (it was originally called the Magic Finger) glows a little yellow at the end.
Poking around to see what happens
You can’t know which interactions you can use with any particular DC just by looking at it. If you know you’re dealing with a DC, the best way to figure out what it does is to experiment:
· Select it and open Component Options to see whether anything’s there.
· Hover over it with the Interact tool to see whether a glow appears at the end of your cursor.
· Click it with the Select tool to show its scale grips (little green boxes). If any show up, grab one and scale to see what happens. If none show up, your DC can’t be scaled with the Scale tool.
 Although developing your own dynamic components is beyond the scope of this book, SketchUp provides great online resources to help you get started. Check out the introduction to developing dynamic components in the SketchUp Help Center ( http://help.sketchup.com/en/article/3000123 ) and the SketchUp team’s DC Function Examples collection in the 3D Warehouse ( https://3dwarehouse.sketchup.com ).
Taking Advantage of Components to Build Better Models
A huge amount of the stuff in the galaxy is made of some kind of repeated element. In the case of bilaterally symmetrical objects (like most furniture), that element is a mirrored half. For things like staircases, it’s a step or tread. The whole is composed of two or more instances of a single part. This makes modeling a heck of a lot easier because you don’t often have to model things in their entirety — especially if you use components.
In the following sections, you discover two methods for modeling with components. The first method involves symmetrical objects, and it covers about 50 percent of the things you might ever want to model. The second technique applies to things like stairs and fences, which are both perfect examples of why components were invented in the first place.
Modeling symmetrically: Good news for lazy people
And smart people, too! First off, take a hard look at the shape of the things you may want to model. Then think about all the objects in the universe. We’ll wait a couple of minutes while you do that. Done so soon? Good. Everything in the world can be categorized as either of the following formal types:
· Symmetrical: Objects that exhibit bilateral symmetry are made of mirrored halves. You’re (more or less) bilaterally symmetrical, and so is your car. Another kind of symmetry is radial symmetry. Radially symmetrical objects can be (conceptually, anyway) cut into identical wedges that all radiate from a central axis. Starfish are good examples of this, as are umbrellas and apple pies. If you were going to build a model of something that exhibits some form of symmetry, building one part and making copies would be a smarter way to do it.
· Asymmetrical: Some things — puddles, oak trees, and many houses — aren’t symmetrical. There’s no real trick to making these things; you just have to get some coffee, settle in, and get to work.
You can take advantage of both bilateral and radial symmetry with SketchUp components. To do so, assemble those components as follows, depending on what type of symmetry your object has (also take a look at Figure 5-14 ):
· Bilateral symmetry: To make a model of something that’s bilaterally symmetrical, build half, make it into a component, and flip over a copy.
· Radial symmetry: You can use components to model radially symmetric things, such as car wheels and turrets, by building a single wedge and rotating a bunch of copies around a central point.
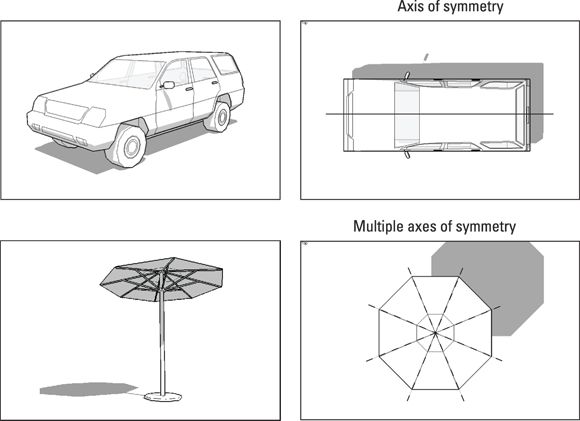
FIGURE 5-14: Bilateral symmetry (top) and radial symmetry (bottom) make your SketchUp life a lot easier.
Working smarter by building only half
Bilaterally symmetrical forms are everywhere. Most animals you can name, the majority of the furniture in your house, and your personal helicopter — they can all be modeled by building half, creating a component, and flipping over a copy.
Follow these steps to get the general idea of how to build a bilaterally symmetrical model in SketchUp (see Figure 5-15 ):
1. Make a simple box.
You can do this however you want, but the easiest way is to draw a rectangle and push/pull it into 3D.
2. Draw a diagonal edge on the corner of your box.
The point of this step is to mark one side of your box so that when you flip it over, you don’t get confused about which side is which.
3. Turn your box into a component.
See “Creating your own components ,” earlier in this chapter, if you wonder how to do this.
4. Make a copy of your new component instance.
Chapter 3 has information about moving and copying objects in SketchUp.
o Make sure that you move in either the red or the green direction; it makes things easier in the next step.
5. Flip over the copy.
To do this, context-click the copy and choose Flip Along from the context menu. If you moved your copy in the red direction in the preceding step, choose Flip Along ⇒ Component’s Red. Choose Component’s Green if you moved in the green direction.
6. Stick the two halves back together.
Using the Move tool (this time without Copy toggled on), pick up your copy from the corner and move it over, dropping it on the corresponding corner of the original. Take a look at the last image in Figure 5-15 . Doing this precisely is important if you want your model to look right.
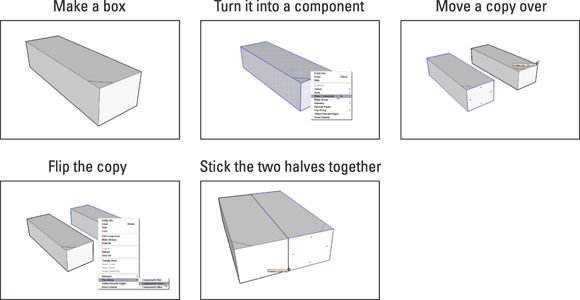
FIGURE 5-15: Getting set up to build a bilaterally symmetrical model.
Now you’re set up to start building symmetrically. If you want, you can do a test to make sure things went smoothly. (See Figure 5-16 .) Follow these steps:
1. With the Select tool, double-click one of the halves of your model to edit it.
2. Draw a circle on the top surface and push/pull it into a cylinder.

FIGURE 5-16: Test your setup to make sure that everything works.
If the same thing happens on the other side, you’re good to go. If the same thing doesn’t happen on the other side, it’s possible that:
· You’re not really editing one of your component instances. If you aren’t, you’re drawing on top of your component instead of in it. You know you’re in edit mode if the rest of your model looks grayed out.
· You never made a component in the first place. If your halves don’t have blue boxes around them when you select them, they’re not component instances. Start a new file and try again, paying particular attention to Step 3 in the previous steps.
 MAKING TWO HALVES LOOK LIKE ONE WHOLE
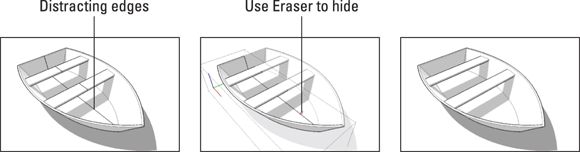
Looking carefully at the little boat in the figure that follows, notice how the edges in the middle clearly show that it’s made out of two halves? If you were to erase those edges, the whole model would disappear because those edges are defining faces, and without edges, faces can’t exist.
Instead of erasing those unwanted edges, you can hide them by using the Eraser while pressing the Shift key. See the second and third images of the boat? When you hold down Shift while dragging over the edges that you want to hide with the Eraser, they disappear.
Keep in mind these two important details about hidden edges:
· Hidden edges aren’t gone forever. Actually, this applies to any hidden geometry in your model. To see what’s hidden, choose View ⇒ Hidden Geometry. To hide it again, just choose the same thing.
· To edit hidden edges, you have to make them visible. If you need to make changes to your model that involve edges you’ve already hidden, you can either view your hidden geometry (see the preceding point) or unhide them altogether. Just show your hidden geometry, select the edges you want to unhide, and choose Edit ⇒ Unhide ⇒ Selected.
The coolest things since radially sliced bread
You can model objects that exhibit radial symmetry just as easily as those with bilateral symmetry. You just start slightly differently. Before you start, the only thing you have to decide is how many wedges — that is, how many identical parts — you need to make the whole object.
To model something with radial symmetry, start with one wedge, make it into a component, and then rotate copies around the center. Follow these steps to get the hang of it:
1. ![]() With the Polygon tool, draw a polygon with as many sides as the number of segments you need for the object you’re modeling.
With the Polygon tool, draw a polygon with as many sides as the number of segments you need for the object you’re modeling.
Here’s the easiest way to draw a polygon in SketchUp, as shown in Figure 5-17 :
1. Choose Tools ⇒ Polygon to select the Polygon tool. You can also select it from the Shapes menu on the toolbar.
2. Click once to establish the center (Aidan likes to place the center on the axis origin), move your cursor, and then click again to establish the radius.
Don’t worry about being accurate right now.
3. Before you do anything else, type the number of sides you want your polygon to have and press Enter.
2. Draw edges from the center of your polygon to two adjacent vertices (endpoints) on the perimeter, creating a wedge.
To find the center of a polygon (or a circle), hover your cursor over the outline for a couple seconds and move the cursor toward the middle; a center inference point appears.
3. Erase the rest of your polygon, leaving only the wedge.
The first three steps in this list are all about making sure that your wedge is the correct angle; if it isn’t, this technique won’t work.
4. Turn your wedge into a component.
Check out “Creating your own components ,” earlier in this chapter, if you’re unsure of how to do this.
5. ![]() Make copies of your wedge component instance with the Rotate tool. (See Figure 5-18 .)
Make copies of your wedge component instance with the Rotate tool. (See Figure 5-18 .)
As with the Move tool, you can use the Rotate tool to make copies. You can even make an array (more than one copy at a time). Here’s how:
1. Select your wedge’s edges (heh, heh) and select the face, too.
2. Choose Tools ⇒ Rotate to select the Rotate tool.
3. Press the Ctrl key (Option on a Mac) to tell SketchUp you want to make a copy.
A plus sign (+) appears next to your cursor.
4. Click the pointy end of your wedge to set your center of rotation.
5. Click one of the opposite corners of your wedge to set your rotation start point.
6. Click the other corner to make a rotated copy of your wedge.
7. Type the number of additional wedges you want, followed by the letter x , and then press Enter.
6. (Optional) Test your setup.
Follow the steps associated with Figure 5-16 to test whether updates to a single component in your new object updates all instances of the component.
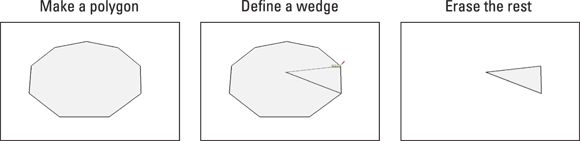
FIGURE 5-17: Draw a polygon to start, draw two edges to create a wedge, and erase the rest of your polygon.
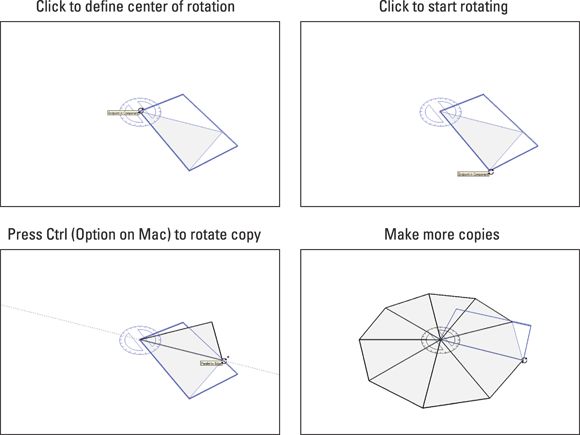
FIGURE 5-18: Use the Rotate tool to make copies of your wedge component instance.
Hiding the edges in your component instances makes your finished model look a whole lot better. Take a look at the sidebar “Making two halves look like one whole ,” earlier in this chapter, to discover how.
Modeling with repeated elements
A staircase is a perfect example of an object that’s composed of several identical elements. If, when you hear the phrase “several identical elements,” a big, flashing neon sign that screams “COMPONENTS!” doesn’t appear in your head, you’re not using SketchUp enough. On the other hand, maybe we need to get out more often… .
The following example demonstrates two handy SketchUp modeling tricks:
· Using components to model more efficiently
· Building a set of stairs the smartest way (for readers of Chapter 4 )
The Treads Are Components method involves (you guessed it) making each tread (step) in your staircase into an instance of the same component. Basically, you build one simple tread that’s the right depth, make it into a component, and copy a bunch of instances into a full flight of stairs. Because every step is linked, anything you do to one automatically happens to them all. If you don’t know the first thing about components, now would be a terrific time to start from the beginning of this chapter.
Go through these steps to build a staircase using the Treads Are Components method:
1. Model a single step, including the tread and the riser.
You can make the step very simple at this stage if you want to; all that matters is that the tread depth and the riser height are correct. You can fiddle with everything else later. See Figure 5-19 .
2. Make a component out of the step you just built.
Take a look at “Creating your own components ,” earlier in this chapter, if you need help.
3. Move a copy of your step into position, above the first one, as shown in Figure 5-20 .
4. Type the total number of steps you want, type an x, and then press Enter.
You’re creating a linear array, meaning that you’re making several copies at regular intervals, in the same direction you moved the first one. Typing 12x generates 12 steps the same distance apart as the first step and its copy. See the last image in Figure 5-20 .
5. With the Select tool, double-click any one of your steps to edit all instances of your component.
Everything besides the component instance you’re editing fades out a little.
6. Go nuts.
This really is the fun part. Having your staircase made up of multiple component instances means that you have all the flexibility to make drastic changes to the whole thing without ever having to repeat yourself. Add a nosing (a bump at the leading edge of each tread), a stringer (a diagonal piece of structure that supports all your steps), or even a handrail by getting creative with how you modify a single component instance. Figure 5-21 shows some of what you can do.

FIGURE 5-19: Model a single step, making sure that the depth and height are accurate.
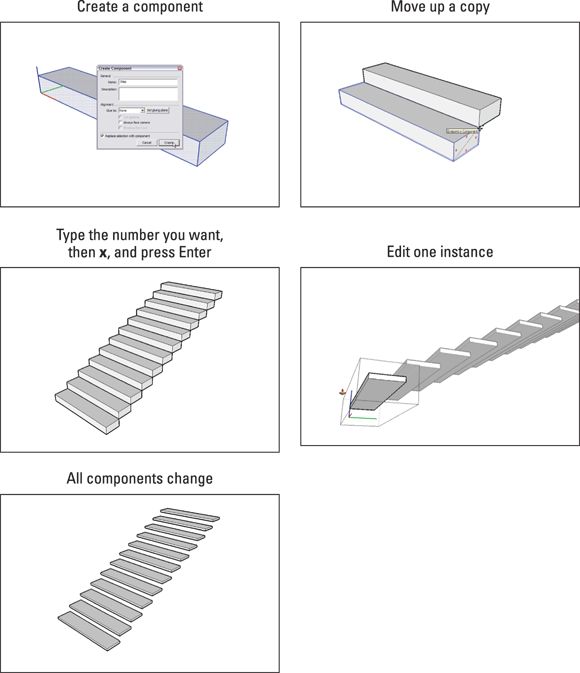
FIGURE 5-20: Make your step into a component instance, move a copy into position above the original, and then create an array.

FIGURE 5-21: A flight of stairs with side stringers and a handrail. On the right, a single component instance.
All materials on the site are licensed Creative Commons Attribution-Sharealike 3.0 Unported CC BY-SA 3.0 & GNU Free Documentation License (GFDL)
If you are the copyright holder of any material contained on our site and intend to remove it, please contact our site administrator for approval.
© 2016-2026 All site design rights belong to S.Y.A.