Excel VBA 24-Hour Trainer (2015)
Part III
Beyond the Macro Recorder: Writing Your Own Code
Lesson 10: Repeating Actions with Loops
Lesson 11: Programming Formulas
Lesson 12: Working with Arrays
Lesson 13: Automating Procedures with Worksheet Events
Lesson 14: Automating Procedures with Workbook Events
Lesson 15: Handling Duplicate Items and Records
Lesson 16: Using Embedded Controls
Lesson 17: Programming Charts
Lesson 18: Programming PivotTables and PivotCharts
Lesson 19: User-Defi ned Functions
Lesson 20: Debugging Your Code
Lesson 10
Repeating Actions with Loops
Suppose you need to perform the same action, or the same sequence of several actions, many times in your macro. For example, you may need to unhide all worksheets that are hidden, or you need to add 12 worksheets to your workbook and name them for each month of the year.
The fact is, you'll encounter many circumstances for which a repetition of similar commands is a necessary part of the job. In most cases it will be impractical, and sometimes downright impossible, to write an individual command for each performance of the action. The need for handling a repetitive set of commands efficiently is exactly what loops are made for.
What is a Loop?
A loop is a method of performing a task more than once. You may need to copy each worksheet in your workbook and save it as the only worksheet in its own separate workbook. Or, you may have a list of thousands of records and you want to insert an empty row where the value of a cell in column A is different than the value of the cell below it. Maybe your worksheet has dozens of cells that contain comments, and you want to add the same preceding text to every comment's existing text without having to edit every comment one at a time.
Instead of doing these kinds of tasks manually, or recording an impractical (and sometimes impossible) macro to handle the repetition, you can use loops to get the job done with less code while keeping more flexible control over the number of necessary repetitions. In VBA, a loop is a structure that executes one or more commands, and then cycles through the process again within the structure, for as many times as you specify. Each cycle of executing the loop structure's command(s) is called an iteration.
NOTE Loops are great, but you're not obligated to use one just because you need to repeat an action two or three times. You'll come across situations that you know will always require the same commands to be repeated the same way, for the same number of times. If you feel like coding each action separately, and you can live with the longer code, go ahead and hard-code the separate commands if that's what works for you. Beyond three potential iterations, however, you really should go the loop route. It'll save you a lot of work, and the code will be easier to maintain.
The number of a loop's iterations depends on the nature of the task at hand. All loops fall into one of two categories. A fixed-iteration loop executes a specified number of times that you hard-code directly as a numeric expression. An indefinite loop executes a flexible number of times that is usually defined by a logical expression.
For example, a fixed iteration loop dealing with a year's worth of data might need to cycle through 12 iterations, one for each month. An indefinite loop might need to cycle through every worksheet in your workbook, taking into consideration that because worksheets can be added or deleted at any time, the exact count of worksheets can never be known in advance.
Types of Loops
VBA provides several different looping structures, and at least one of them will be suited for any looping requirement you'll encounter. Table 10.1 shows an overview of the types of loops in VBA.
Table 10.1 Types of Loops in VBA
|
LOOP STRUCTURE |
CATEGORY |
EXPLANATION |
|
For…Next |
Fixed |
Repeats an action for a specified number of times. |
|
For Each…Next |
Fixed |
Repeats an action upon an object in a Collection. For example, you can perform a task for each worksheet in the workbook. |
|
Do While |
Indefinite |
Executes an action if the condition is True, and repeats the action until the condition is False. |
|
Do Until |
Indefinite |
Executes an action if the condition is False, and repeats the action until the condition is True. |
|
Do…Loop While |
Indefinite |
Executes an action once, and repeats the action while the condition is True, until it is False. |
|
Do…Loop Until |
Indefinite |
Executes an action once, and repeats the action while the condition is False, until it is True. |
|
While…Wend |
Indefinite |
Same as the Do While loop structure, still supported by VBA but obsolete. |
For…Next
The For…Next loop structure is a simple and effective way to repeat an action for a specified number of times. For example, if you want to add five new worksheets to your workbook, you could declare an Integertype variable and repeat the action five times, like this:
Sub AddFiveWorksheets()
'Declare your Integer or Long variable.
Dim intCounter As Integer
'Open the For loop structure.
For intCounter = 1 To 5
'Enter the command(s)that will be repeated.
Worksheets.Add
'Loop to the next iteration.
Next intCounter
End Sub
NOTE Although it is technically correct that the Next statement can stand alone, do yourself a favor by getting into the good habit of including the variable in the Next statement. For example, writing your code as Next intCounter instead of just as Next makes it easier for you to read and for other people to understand.
When VBA executes a For…Next loop, by default it increments by 1 the value of the declared Integer or Long type variable. Because the objective was to add five worksheets, the easiest way to keep a running count of the process is to iterate five times, just as if you were counting the occurrence of each action from 1 to 5.
You can take advantage of the fixed nature of a For…Next loop by asking for the number of worksheets that are to be added. In the following example, an InputBox engages the user by asking for a number that represents how many worksheets will be added:
Sub ForNextExample2()
'Declare your Integer or Long variables.
Dim MoreSheets As Integer, intCounter As Integer
'Define the MoreSheets variable with an InputBox.
MoreSheets = InputBox( _
"How many worksheets do you want to add?", _
"Enter a number")
'Open the For loop structure.
For intCounter = 1 To MoreSheets
'Enter the command(s)that will be repeated.
Worksheets.Add
'Loop to the next iteration.
Next intCounter
End Sub
You don't always need to start counting from the number 1 in a For…Next loop; you can pretty much count from any number to any number. Suppose you want to hide rows 6, 7, and 8. A For…Next loop to accomplish that task could look like this:
Sub ForNextExample3()
'Declare your Integer or Long variable.
Dim intCounter As Integer
'Open the For loop structure.
For intCounter = 6 To 8
'Enter the command(s)that will be repeated.
Rows(intCounter).Hidden = True
'Loop to the next iteration.
Next intCounter
End Sub
For Each…Next
The For Each…Next loop executes an action for a fixed number of times just as the For…Next construct does, but unlike For…Next, For Each…Next does not keep a count along the way of how many iterations it performs. The count of iterations is not important with For Each…Next because the objective is to execute an action for however many objects exist in a specified VBA collection. Maybe there will be hundreds of iterations to occur; maybe there will be none.
Suppose that as part of your workbook project's design, a particularly lengthy macro will run faster and less confusingly for the user if all other Excel workbooks are closed. Naturally, you can never know in advance whether the user will have 10 other workbooks open in addition to yours, or whether your workbook is the only open workbook. A For Each…Next loop would be the perfect way to save and close all other workbooks that might be open, such as with this example:
Sub CloseWorkbooks()
'Declare your object variable.
Dim wb As Workbook
'Open the For loop structure.
For Each wb In Workbooks
'Enter the command(s)that will be repeated.
If wb.Name <> ThisWorkbook.Name Then
wb.Save
wb.Close
End If
'Loop to the next iteration.
Next wb
End Sub
Notice that an object variable is declared for Workbook, and the Workbooks collection is being evaluated with an If structure for the presence of any and all workbooks that are named differently than your workbook. The code will complete its mission with the same result of your workbook being the only one that's open, regardless of whether it was the only one open from the start, or whether 50 other workbooks had also been open at the time.
One of Excel's oddities is that you can hide any number of worksheets at the same time, but if you have multiple worksheets that are hidden, you can unhide only one worksheet at a time. With this macro as another example of a For Each…Next loop, you can quickly unhide all worksheets at once:
Sub UnhideSheets()
'Declare your object variable.
Dim ws As Worksheet
'Open a For Each…Next loop.
For Each ws In Worksheets
'Command(s) to be executed.
ws.Visible = xlSheetVisible
'Loop to the next iteration.
Next ws
End Sub
Exiting a For…Loop
Suppose your macro requires that you determine whether a particular workbook named Test.xlsx happens to be open, and if so, you must close it. You might compose a macro with a loop that looks like this:
Sub CloseOneWorkbook()
'Declare your object variable.
Dim wb As Workbook
'Open a For Each loop.
For Each wb In Workbooks
'Command(s) to be executed.
If wb.Name = "Test.xlsx" Then
wb.Save
wb.Close
End If
'Loop to the next iteration.
Next wb
End Sub
Strictly speaking, the macro works. But think for a moment—what if a few dozen workbooks are open? In this case, you'd want the loop to do its job only up to the point of encountering the Test.xlsx workbook.
In the preceding CloseOneWorkbook example, even if the Test.xlsx workbook is found to be open and then closed, the loop still continues its appointed rounds after that by unnecessarily evaluating each open workbook. This would be a waste of time and system resources. Instead, you should insert the Exit For statement to stop the looping process in a For…Next or For Each…Next loop when a condition has been met and dealt with, and cannot be met thereafter.
Here is an example of how that macro should look, with the Exit For statement placed immediately before the End If statement:
Sub CloseOneWorkbookFaster()
'Declare your object variable.
Dim wb As Workbook
For Each wb In Workbooks
'Command(s) to be executed.
If wb.Name = "Test.xlsx" Then
wb.Save
wb.Close
'Exit For statement to avoid needless iterations if the condition is met.
Exit For
End If
'Loop to the next iteration.
Next wb
End Sub
Looping in Reverse with Step
A common request that Excel users have is to insert an empty row when the value of a cell in some particular column does not equal the value of the cell below it. In Figure 10.1, the table of data is sorted by Region in column A, and the request is to visually separate the regions with an empty row at each change in Region name.
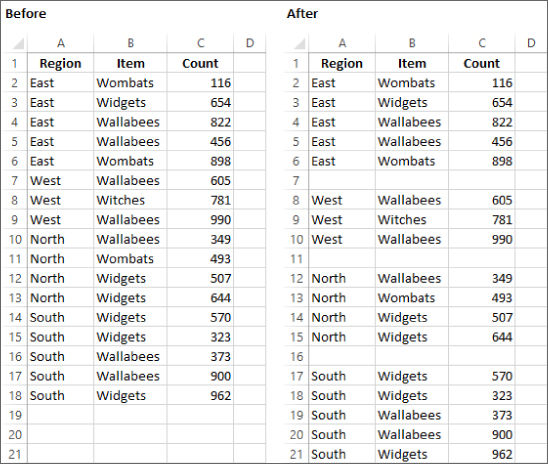
Figure 10.1
When inserting a series of rows like this, it's best to start looping from the bottom of the table, and work your way up to the top. That means your numeric row reference in the loop will be decreasing and not increasing, because your starting point is row 18 (the last row of data) and your ending point is row 2 (the first row of data).
Recall that when VBA executes a For Next loop, by default it increments by 1 the value of your declared Integer or Long type variable. With For…Next loops, you can specify an alternative increment or decrement value by using the optional Step keyword. You can step forward or backward by as large a numeric value as you like.
In this example, each cell in column A is being evaluated one by one, from row 18 to row 2, so the loop will step by a numeric factor of negative 1. Here is a macro that makes the “Before” image look like the “After” image in Figure 10.1:
Sub InsertRows()
'Declare your Integer or Long variable.
Dim xRow As Long
'Open a For Each loop.
For xRow = 18 To 3 Step -1
'Command(s) to be executed.
If Range("A" & xRow).Value <> Range("A" & xRow - 1) Then
Rows(xRow).Resize(1).Insert
End If
'Loop to the next iteration.
Next xRow
End Sub
Do While
The Do statement is an extremely powerful tool with which to gain more flexibility in your looping structures. In a Do While loop, you test for a condition that must be True before the loop will execute. When the condition is True, the command(s) within the loop are executed.
As a simple example, the DoWhileExample macro produces five message boxes because the Do While loop tests for the condition that an Integer variable (named iCounter) has not exceeded the number 5. Notice that the iCounter variable starts at 1 outside the loop and is increased by 1 inside the loop:
Sub DoWhileExample()
Dim iCounter As Integer
iCounter = 1
Do While iCounter <= 5
MsgBox "Hello world!", , iCounter
iCounter = iCounter + 1
Loop
End Sub
Let's apply this concept to a more practical activity; suppose you want to open all Excel workbooks that are in a particular file path. The macro named OpenAllFiles does that using a Do Loop structure. The Dirfunction returns the first filename that matches the combination of the specified pathname and an Excel workbook extension containing .xls. Calling the Dir function again opens additional filenames until a filename is encountered that does not match the combination:
Sub OpenAllFiles()
Dim myFile As String, myPath As String
myPath = "C:\Your File Path\"
myFile = Dir(myPath & "*.xls*")
Do While myFile <> ""
Workbooks.Open myPath & myFile
myFile = Dir()
Loop
End Sub
Do Until
When VBA runs a Do Until loop, it tests the logical condition you supply and executes the commands within the loop as long as the condition evaluates to False. When VBA reaches the Loop statement, it re-evaluates the condition and executes the looping commands only if the condition is still False.
This example demonstrates Do Until by selecting the next worksheet based on the index number from whatever current worksheet you are on. The wrinkle that is taken into consideration by the loop is that the next highest index number worksheet might be hidden, and because you cannot select a hidden worksheet, the loop selects the next highest index number of a worksheet that is also visible:
Sub SelectSheet()
'Declare an Integer type variable to handle the Index number property
'of whichever worksheet(s) are being evaluated in the current iteration.
Dim intWS As Integer
'Because you want to activate the next visible worksheet,
'as a starting point you need to know the next highest Index position
'from whatever worksheet is active at the time.
intWS = ActiveSheet.Index + 1
'If you are on the last worksheet, you'll have reached the end of the line,
'so define the intWS as the first Index worksheet.
If intWS>Worksheets.Count Then intWS = 1
'Open a Do Until loop that determines the next Index number,
'only considering visible worksheets.
Do Until Worksheets(intWS).Visible = True
'Add a 1 to the intWS variable as you iterate to the next highest Index number.
intWS = intWS + 1
'If it turns out that the intWS Index variable reaches a number
'that is greater than the count of worksheets in the workbook,
'the intWS number is set back to 1, which is the first Index position
If intWS > Worksheets.Count Then intWS = 1
'Loop to start evaluation again, until the proper Index number is found.
Loop
'Select the worksheet whose Index property matches the index number
'that has met all the criteria.
Worksheets(intWS).Select
End Sub
For another example, suppose you want to update your AutoCorrect list easily and quickly. Say you have a two-column table on your worksheet that occupies columns A and B. In column A, you have listed frequently misspelled words, and in column B are the corrected words that you want Excel to automatically display if you misspell any of those words. For example, in cell A1 you have entered teh and in cell B1 you have entered the correction of the. The following macro uses a Do Until loop to handle each entry in column A and continues to do so until the first empty cell is encountered, indicating the end of the list:
Sub AddCorrection()
'Declare a Long type variable to help looping through rows
'of the two-column list.
Dim i As Long
'Declare two String type variables:
'one for thr original entry, and the other for the text string replacement.
Dim myMistake As String, myCorrection As String
'Establish the number 1 for the Long Variable, representing row 1
'which is the first row in the example list.
i = 1
'Open a Do Until loop, telling VBA to stop looping when an empty cell
'is encountered in column A, indicating the end of the list.
Do Until IsEmpty(Cells(i, 1))
'Define the myMistake variable as the text contents of the cell in column A
myMistake = Cells(i, 1).Value
'Define the myCorrection variable as the text contents of the cell in column B.
myCorrection = Cells(i, 2).Value
'VBA tells the Excel Application's AutoCorrect property to update itself with
'the two strings from columns A and B.
Application.AutoCorrect.AddReplacement What:=myMistake, Replacement:=myCorrection
'Add a 1 to the i variable in preparation for evaluating the next row in the list.
i = i + 1
'The Loop statement starts the process again for the next row in the list.
Loop
End Sub
NOTE This example utilizes the Cells range method, which to some VBA newcomers can take a little getting used to. If you need a reminder for the use of Cells, an explanation is in Lesson 8, in the section “Using the Cells Property.” You'll be seeing an increased use of the Cells method in this book because it is such an easier and more efficient method of referring to dynamic ranges in VBA.
Do…Loop While
To have VBA test the conditional statement after executing the commands within the loop, you simply place the conditional statement after the Loop keyword. The Do…Loop While syntax is
Do
Command statements to be executed within the loop.
Loop While condition
When VBA executes the command(s) in a Do…Loop While structure, it does so first, and then at the Loop While line, it tests the logical condition. If the condition is True at that point, the loop iterates again, and so on, until the condition evaluates to False.
A common request is to locate all cells in a worksheet that contain a particular value, similar to clicking the Find Next button on the Find dialog box, and then do something to that cell or to the cells around it. Suppose you have a worksheet filled with data and you want to find all cells that contain the word “Hello.” These cells can be in any row or column.
For each of those cells where “Hello” is found, you want to place the word “Goodbye” in the cell of the column to the immediate right. The following macro does just that using a Do…Loop While construction that finds every cell containing “Hello” and identifies its address, so the loop can perform only as many iterations as there are cells containing “Hello”:
Sub FindHello()
Dim HelloCell As Range, BeginningAddress As String
Set HelloCell = ActiveSheet.UsedRange.Find("Hello", LookIn:=xlValues)
If Not HelloCell Is Nothing Then
BeginningAddress = HelloCell.Address
Do
HelloCell.Offset(0, 1).Value = "Goodbye"
Set HelloCell = ActiveSheet.UsedRange.FindNext(HelloCell)
Loop While Not HelloCell Is Nothing And HelloCell.Address<>BeginningAddress
End If
End Sub
Do…Loop Until
Similar in approach to the Do…Loop While construct, the Do…Loop Until loop tests its condition after executing the loop's statements. The Until keyword tells VBA that the statements within the loop will be executed again for as long as the logical condition evaluates to False. After VBA tests the condition as True, the loop's iterations stop, and the macro resumes with the line of code following the Loop keyword.
This macro shows an example of a Do…Loop Until structure, which creates 365 new worksheets, all named with dates starting from the day you run the macro:
Sub YearSheets()
Dim i As Integer
i = 0
Do
Sheets.Add(After:=Sheets(Sheets.Count)).Name = Format(VBA.Date + i, "MM-DD-YYYY")
i = i + 1
Loop Until i = 365
End Sub
While…Wend
While…Wend loops have become obsolete and are rarely used because they are not as robust as Do and For loops. VBA still supports While…Wend loops for backward compatibility with prior versions of Excel, and I am not aware of any plans by Microsoft to stop supporting While…Wend.
So, though I recommend you not bother learning how to build a While…Wend loop, the fact is, they are rather uncomplicated constructs and you should have some familiarity with how they look if you should see them in code written by others. Here is an example of While…Wend that uses an InputBox that asks for a password, and keeps asking until the correct password is entered, or the message box is canceled:
Sub InputPassword()
While InputBox("Please enter password:", "Password required") < > "MyPassword"
If MsgBox( _
"Sorry, that is not correct.", _
vbOKCancel, _
"Wrong password") _
= vbCancel Then End
Wend
MsgBox "Yes!! You entered the correct password!", vbOKOnly, "Thank you!"
End Sub
Nesting Loops
Your macros will eventually require that you enclose one loop structure inside another loop structure, referred to as nesting loops. For example, you may need to loop through a set of rows in a data table, and each completed set of looped-through rows will represent a single iteration for a larger loop construct for the columns in the table.
When you nest loops, you need to be aware of a few important points:
· When you nest For…Next loops, each loop must have its own uniquely named counter variable.
· When you nest For Each…Next loops, each loop must have its own uniquely named object (or element) variable.
· If you use an Exit For or Exit Do statement, only the loop that is currently executing will terminate. If that loop is nested within a larger loop, the larger loop still continues to execute its iterations.
· I mentioned it earlier in this lesson, but it especially holds true with nested loops: I strongly recommend you include the variable name in your Next statements.
Here is an example of a macro with a Do loop nested inside a For Each…Next loop. The following macro produces a list of six unique random numbers between 1 and 54, similar to a lottery drawing:
Sub PickSixLottery()
'Declare the Range variables for the entire six-cell range,
'and for each individual cell in the six-cell range.
Dim RandomRange As Range, RandomCell As Range
'Identify the six-cell range where the randomly selected numbers will be listed.
Set RandomRange = Range("A1:A6")
'Before populating the six-cell list range, make sure all its cells are empty.
RandomRange.Clear
'Open a For…Each loop to cycle through each cell in range A1:A6.
For Each RandomCell In RandomRange
'Open a Do…Loop that enters a unique random number between 1 and 54
Do
RandomCell.Value = Int(54 * Rnd + 1)
Loop Until WorksheetFunction.CountIf(RandomRange, RandomCell.Value) = 1
'Iterate to the next cell until all six cells have been populated.
Next RandomCell
End Sub
Try It
For this lesson, you write a macro that uses a For…Next loop with an Integer type variable that adds 12 worksheets to your workbook, names each worksheet by calendar month (“January,” “February,” and so on), and places the worksheets' tabs in order of calendar month from left to right.
Lesson Requirements
To get the sample workbook file you can download Lesson 10 from the book's website at www.wrox.com/go/excelvba24hour.
Hints
In Step 6, the DateSerial function requires three arguments, in the sequence of the year, the month, and the day. When the task at hand is to list the 12 calendar months, any year number will do. The day should be a basic number every month has, making the number 1 a good choice.
This macro adds new worksheets with month names. Running the macro again without deleting the same worksheets it created would cause the macro to error because a workbook cannot contain duplicate worksheet names. Lesson 20 shows how to handle errors.
Step-by-Step
1. Open a new workbook and press Alt+F11 to go to the Visual Basic Editor.
2. From the menu bar at the top of the VBE, select Insert![]() Module.
Module.
3. In the module you just created, type Sub LoopTwelveMonths and press Enter. VBA automatically places a pair of empty parentheses at the end of the Sub line, followed by an empty line, and the End Subline below that. Your macro looks like this so far:
4. Sub LoopTwelveMonths ()
End Sub
4. Declare an Integer type variable that iterates 12 times, one for each month of the year:
Dim intMonth As Integer
5. Open a For…Next loop that starts from 1 and ends at 12:
For intMonth = 1 To 12
6. With a one-line command, you can add each of the 12 worksheets in turn, while placing their tabs one after another from left to right, and naming each tab by calendar month. The DateSerial function is a good way to cycle through month names because it requires integer values for the arguments of Year, Month, and Day, just like the DATE worksheet function. You can use any year, and any day that is not a number greater than 28. For the Month argument, the intMonth variable is a perfect fit because it was declared as an Integer type:
7. Sheets.Add(After:=Sheets(Sheets.Count)).Name = _
Format(DateSerial(2011, intMonth, 1), "MMMM")
7. Enter the Next statement for the intMonth variable that produces and names the next month's worksheet up to and including December:
Next intMonth
8. When completed, the macro looks like this, with comments that have been added to explain each step:
9. Sub LoopTwelveMonths()
10. 'Declare an Integer type variable to iterate twelve times,
11. 'one for each month of the year.
12. Dim intMonth As Integer
13. 'Open a For…Next loop that starts from one and ends at twelve.
14. For intMonth = 1 To 12
15. 'With a one-line command, you can add each of the twelve worksheets in turn,
16. 'while placing their tabs one after another from left to right.
17. Sheets.Add(After:=Sheets(Sheets.Count)).Name = _
18. Format(DateSerial(2011, intMonth, 1), "MMMM")
19. 'The Next statement for the intMonth variable
20. 'produces and names the next month worksheet.
21. Next intMonth
End Sub
REFERENCE Please select the video for Lesson 10 online at www.wrox.com/go/excelvba24hour. You will also be able to download the code and resources for this lesson from the website.
All materials on the site are licensed Creative Commons Attribution-Sharealike 3.0 Unported CC BY-SA 3.0 & GNU Free Documentation License (GFDL)
If you are the copyright holder of any material contained on our site and intend to remove it, please contact our site administrator for approval.
© 2016-2026 All site design rights belong to S.Y.A.