Excel VBA 24-Hour Trainer (2015)
Part III
Beyond the Macro Recorder: Writing Your Own Code
Lesson 13
Automating Procedures with Worksheet Events
For the most part, you have run the macros you have seen in this book by pressing a set of shortcut keys, or by going to the Macro dialog box, selecting the macro name, and clicking the Run button. You can take several other actions to run a macro, as you learn in future lessons. The common theme of all these actions is that you have to manually do something, whatever it may be, to run a macro.
The question becomes, can a VBA procedure simply know on its own when to run itself, and then just go ahead and do so automatically, without you needing to “do something” to make it run? The answer is yes, and it leads to the subject of event programming, which can greatly enhance the customization and control of your workbooks.
NOTE So far, this book has used the term “macro” to refer to VBA subroutines. When referring to event code, the term “procedure” is used to differentiate it from macro code.
What Is an Event?
In the Excel object model, an event is something that happens to an object and is recognized by the computer so an appropriate action can be taken. Recall that the Excel application is made up of objects, such as workbooks, worksheets, cells, charts, pivot tables, and so on. Even the entire Excel application is an object.
Virtually everything you do in Excel is in some way invoking an event upon an object. A few examples of events are as follows:
· Double-clicking a cell
· Adding a worksheet
· Changing a cell value
· Clicking a hyperlink
· Right-clicking a cell
· Calculating a formula
With VBA's event programming capabilities, you can tap into Excel's recognition of when an event occurs and what kind of event it is. This enables you to write VBA code that will execute based on whichever event(s) occur that you want to monitor. This book primarily concentrates on events at two levels:
· Worksheet-level events, which are introduced in this lesson.
· Workbook-level events, which are introduced in the next lesson.
Worksheet Events: An Overview
Worksheet-level events occur for a particular worksheet. As you might imagine, events occur when something happens to a worksheet, such as entry of new data into a cell, or a formula being calculated, or the worksheet being activated or deactivated. Event code that is associated with any particular worksheet has no direct effect on events that take place on other worksheets in that or any other workbook.
Where Does the Worksheet Event Code Go?
You've become familiar with the concept of modules as being containers for the macros that you or the Macro Recorder create. You'll be pleased to know that each worksheet already comes with its own built-in module, so you never need to create a module for any worksheet- or workbook-level procedure code.
Worksheet event code always goes into the module of the worksheet for which you are monitoring the event(s). Regardless of the Excel version you are using, the quickest and easiest way to go straight to a worksheet's module is to right-click its sheet tab and select View Code, as shown in Figure 13.1.
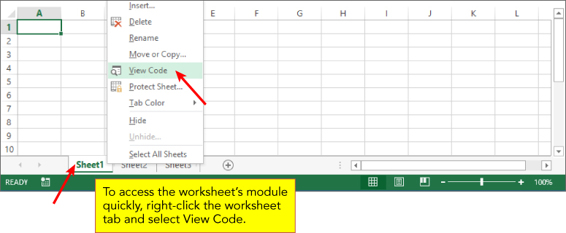
Figure 13.1
Immediately after you select View Code, you are taken directly into the Visual Basic Editor, as shown in Figure 13.2. Your mouse cursor will be blinking in the worksheet module's Code window, ready for you to start entering your event procedure code.
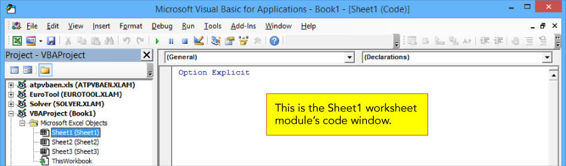
Figure 13.2
Immediately above the Code window are two fields with drop-down arrows. The field on the left is the Object field, and when you click its drop-down arrow, you select the Worksheet object item, as shown in Figure 13.3.
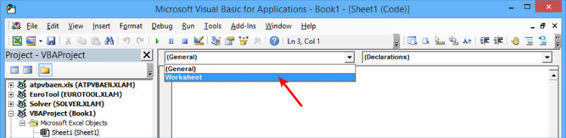
Figure 13.3
The field above the worksheet module's Code window, and to the right of the Object field, is the Procedure field. Click the Procedure field's drop-down arrow for a list of the worksheet-level events available to you, as shown in Figure 13.4.
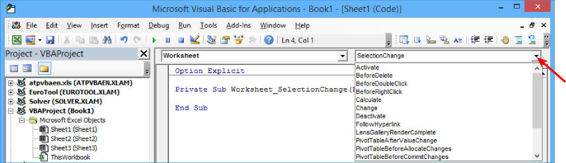
Figure 13.4
NOTE When you select an event from the Procedure field's drop-down list, VBA performs the valuable service of entering the procedure statement, with all its argument parameters and an associated End Sub statement, right there in the worksheet module for you.
Enabling and Disabling Events
The Excel Application object has an EnableEvents property that is enabled by default. In some cases you will need to temporarily disable events in your event procedure code, and then re-enable them before the end of the procedure. This may sound strange at first, but the reason is that some events can trigger themselves, and an infinite loop can occur if that happens.
For example, if you are monitoring data entry in a cell and you only want a number to be entered, but a non-numeric entry is attempted, you would use the Worksheet_Change event to undo that wrong entry by clearing the cell's contents. However, VBA regards a cell's contents being cleared as a change having occurred to that cell, which would trigger another round of the same Worksheet_Change event procedure that was already running. To avoid this, you sandwich the relevant code in between statements that disable and enable events, as shown in the following syntax example:
Application.EnableEvents = False
'your relevant code
Application.EnableEvents = True
NOTE Check out the Try It section at the end of this lesson; it includes two specific examples of disabling and enabling events!
NOTE In the preceding syntax example, the EnableEvents property of the Application object was temporarily set to False with the statement
Application.EnableEvents = False
and then set back to True at the end of the macro with the statement
Application.EnableEvents = True
Keep in mind that the Application object covers all of Excel. For example, while a macro is running with the EnableEvents property of the Application object set to False, EnableEvents is disabled for all open workbooks in that instance of Excel, not just for the workbook where the VBA code is being executed. Whatever properties of the Application object you temporarily change, remember to reset those properties to their original settings before you exit your macro or procedure.
Examples of Common Worksheet Events
At the worksheet level, Excel version 2003 has 9 events, and 5 more than that (associated with pivot tables) for a total of 14 in versions 2007 and 2010. Version 2013 has 3 more events still, for a total of 17.
The additional event procedures in newer versions might be useful for you to learn down the road, but they involve a wider and more specialized instruction of VBA development than the intended introductory scope of VBA in this book. The most commonly used worksheet events are the following nine that are common to all versions of Excel from 2000 to 2013:
· Worksheet_Change
· Worksheet_SelectionChange
· Worksheet_BeforeDoubleClick
· Worksheet_BeforeRightClick
· Worksheet_FollowHyperlink
· Worksheet_Activate
· Worksheet_Deactivate
· Worksheet_Calculate
· Worksheet_PivotTableUpdate
Worksheet_Change Event
The Worksheet_Change event occurs when cells on the worksheet are changed by the user or by an external link, such as a new value being entered into a cell, or the cell's value being deleted. The following example places the current date in column C next to a changed cell in column B:
Private Sub Worksheet_Change(ByVal Target As Range)
If Target.Column <> 2 Then Exit Sub
Target.Offset(0, 1).Value = Format(VBA.Date, "MM/DD/YYYY")
End Sub
NOTE The Worksheet_Change event is not triggered by a calculation change, such as a formula returning a different value. Use the Worksheet_Calculate event to capture the changes to values in cells that contain formulas.
Worksheet_SelectionChange Event
The Worksheet_SelectionChange event occurs when a cell is selected. The following code highlights the active cell with a yellow color every time a different cell is selected:
Private Sub Worksheet_SelectionChange(ByVal Target As Range)
Cells.Interior.ColorIndex = 0
Target.Interior.Color = vbYellow
End Sub
NOTE A word to the wise! This kind of code is fun and has its uses, but with each change in cell selection, the Undo stack will be eliminated, negating the Undo feature.
Worksheet_BeforeDoubleClick Event
The Worksheet_BeforeDoubleClick event is triggered by double-clicking a worksheet cell. The Cancel argument is optional and halts the ability to go into Edit mode for that cell from a double-click.
In this example, if you double-click a cell in range A1:C8, and the cell already contains a number or is empty, the numeric value of that cell increases by 1. All other cells in the worksheet are unaffected:
Private Sub Worksheet_BeforeDoubleClick(ByVal Target As Range, _
Cancel As Boolean)
If Intersect(Target, Range("A1:C8")) Is Nothing Then Exit Sub
If IsNumeric(Target.Value) = True Then
Cancel = True
Target.Value = Target.Value + 1
End If
End Sub
NOTE This event does not occur if you double-click the active cell's edge, or its fill handle.
Worksheet_Before RightClick Event
The Worksheet_BeforeRightClick event occurs when you right-click a worksheet cell. The optional Cancel argument halts the right-click pop-up menu from appearing. In the following example, when you right-click a cell in column E, the current date and time are entered into that cell and column E's width is autofitted:
Private Sub Worksheet_BeforeRightClick(ByVal Target As Range, _
Cancel As Boolean)
If Target.Column <> 5 Then Exit Sub
Cancel = True
Target.Value = Format(VBA.Now, "MMM DD, YYYY, hh:mm AM/PM")
Columns(Target.Column).AutoFit
End Sub
Worksheet_FollowHyperlink Event
The Worksheet_FollowHyperlink event occurs when you click any hyperlink on the worksheet. You learn more about command buttons in later lessons, but as a sneak preview, Figure 13.5 shows a command button embedded onto a worksheet. The button is captioned with a website address but the caption itself is plain text, not actually a hyperlink. With the following code, when you click the command button, you are taken to that caption's website:
Private Sub CommandButton1_Click()
CommandButton1.Parent.Parent.FollowHyperlink CommandButton1.Caption
End Sub
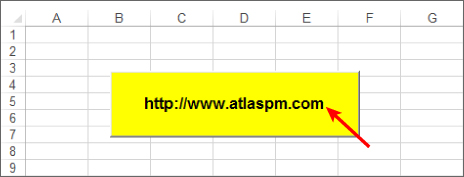
Figure 13.5
NOTE The Worksheet_FollowHyperlink event is available as a worksheet-level event, but in reality, it is more of a function of the entire workbook. Notice the first three items in the statement: CommandButton1.Parent.Parent. The parent of the CommandButton is the worksheet upon which it resides, and the parent of that worksheet is the workbook itself.
A CommandButton as it is referenced in this section is an ActiveX object created from the control toolbox. Another type of button is a Form Button, created from the Form toolbar. ActiveX objects are more complex than Form objects, whereas Form objects are simpler to use and are directly integrated with Excel. ActiveX and Form objects are covered in Lesson 16.
Worksheet_Activate Event
The Worksheet_Activate event occurs when you go to a particular worksheet, typically by clicking the worksheet's tab, although any of the other methods of arriving at a worksheet will trigger the Worksheet_Activateevent. Suppose you have a worksheet with one or more pivot tables on it, and every time you go to that worksheet, you want to know that the pivot tables are all refreshed and up to date. The following event code accomplishes that task:
Private Sub Worksheet_Activate()
Dim intCounter As Integer
For intCounter = 1 To ActiveSheet.PivotTables.Count
ActiveSheet.PivotTables(intCounter).PivotCache.Refresh
Next intCounter
End Sub
Worksheet_Deactivate Event
The Worksheet_Deactivate event occurs when you activate a different worksheet than the one you were on. Suppose there is a particular cell in a worksheet that you strongly prefer to have some value entered into it before the users exit that worksheet. The following Worksheet_Deactivate event code checks to see if cell A1 contains a value. If it does not, a message box alerts the users as a reminder of that fact when they deactivate the worksheet:
Private Sub Worksheet_Deactivate()
If Len(Me.Range("A1").Value) = 0 Then _
MsgBox "FYI and reminder: you did not enter a value in cell A1" _
& vbCrLf & _
"in the worksheet named " & Me.Name & ".", _
vbExclamation, _
"Cell A1 should have some value in it!"
End Sub
Worksheet_Calculate Event
The Worksheet_Calculate event occurs when the worksheet is recalculated. Suppose you have a budget model and you want to monitor the bottom-line number for profit and loss, which is derived by a formula in cell Z135. You could conditionally format the cell when its returned value is outside an acceptable range, but chances are no one will see the formatting due to the location of the cell.
To give the budget model's bottom-line Profit/Loss number a boost in awareness, utilize the Worksheet_Calculate event to make a message box pop up as a warning when the number in cell Z135 becomes lower than $1,000. Also, to make it fun, have a congratulatory message appear if the profit number is greater than or equal to $5,000:
Private Sub Worksheet_Calculate()
If Range("Z135").Value < 1000 Then
MsgBox "Profits are too low!!", vbExclamation, "Warning!!"
ElseIf Range("Z135").Value >= 5000 Then
MsgBox "Profits are TERRIFIC!!", vbExclamation, "Wow, good news!!"
End If
End Sub
Worksheet_PivotTableUpdate Event
The Worksheet_PivotTableUpdate event occurs after a pivot table is updated on a worksheet, such as after a refresh. The following procedure is a simple example of the syntax for this event:
Private Sub Worksheet_PivotTableUpdate(ByVal Target As PivotTable)
MsgBox "The pivot table on this worksheet was just updated.", vbInformation, "FYI"
End Sub
Try It
In this lesson, you write a Worksheet_Change event that enables you to sum numbers as they are entered into the same cell. Your Worksheet_Change event enables any cell in column A, except for cell A1, to accept a number you enter, add it to whatever number was already in that cell, and display the resulting sum. For example, if cell A9 currently holds the number 2 and you enter the number 3 in that cell, the resulting value of cell A9 will be 5.
Lesson Requirements
To get the sample workbook you can download Lesson 13 from the book's website at www.wrox.com/go/excelvba24hour.
Step-by-Step
1. Open a new workbook, right-click the Sheet1 tab, and select View Code.
2. Your cursor will be blinking in the Sheet1 worksheet module. Directly above that, click the down arrow belonging to the Object list, and select Worksheet. This produces the following default lines of code in your worksheet module:
3. Private Sub Worksheet_SelectionChange(ByVal Target As Range)
End Sub
3. It is really the Change event you are interested in composing, so take one of two actions: either manually edit the Private Sub Worksheet_SelectionChange(ByVal TargetAs Range) statement by deleting the word Selection, or click the down arrow above the module for the Procedures list, select the Change item, and delete the default Private Sub Worksheet_SelectionChange(ByVal Target As Range) statement and its accompanying End Sub statement. At this point, the only procedure code you see in your worksheet module is this:
4. Private Sub Worksheet_Change(ByVal Target As Range)
End Sub
4. The event code monitors column A but you want the ability to enter some kind of header label into cell A1. Begin the procedure by writing a line of code to exclude cell A1 from the Change event:
If Target.Address = "$A$1" Then Exit Sub
5. Your next consideration is to limit the Change event to column A, to avoid imposing the Change event onto the entire worksheet. Also, you want the Change event to be in effect for only one cell at a time in column A. One statement can handle both considerations:
If Target.Column <> 1 Or Target.Cells.Count > 1 Then Exit Sub
NOTE Note that column A is the first (leftmost) column on the worksheet grid and is easily referred to in VBA as Columns(1). If you had been working with column H, which is the eighth column from the left on the worksheet grid, you would have written this step's line of code as
If Target.Column <> 8 Or Target.Cells.Count > 1 Then Exit Sub
6. Pressing the Delete key triggers the Change event. You might want to delete a cell's contents and start entering a new set of numbers in an empty cell, so allow yourself the luxury of exiting the Change event if the Delete key is pressed:
If IsEmpty(Target) Then Exit Sub
7. Even though a number is supposed to be entered into column A, never assume that it will always happen that way, because people make mistakes. Provide for the attempt at a non-numeric entry and disallow it:
If IsNumeric(Target.Value) = False Then
8. Disable events because you are about to undo the non-numeric value; the Undo command also triggers the Change event:
Application.EnableEvents = False
9. Execute the Undo action so the non-numeric entry is deleted:
Application.Undo
10.Enable events again:
Application.EnableEvents = True
11.Remind the user with a message box that only numbers are allowed, and exit the Change event procedure with the Exit Sub statement:
12. MsgBox "You entered a non-numeric value.", _
13. vbExclamation, _
14. "Please: numbers only in column A!"
15. Exit Sub
End If
12.Now that all the reasonable safeguards have been met, declare two Double type variables: one named OldVal for the numeric value that was in the cell before it was changed, and the other named NewVal for the numeric value that was just entered that triggered this Change event:
Dim OldVal As Double, NewVal As Double
13.Define the NewVal variable first because it is the number that was just entered into the cell:
NewVal = Target.Value
14.Undo the entry to display the old (preceding) value. Again, this requires that you disable events so you do not re-trigger the Change event while you are already in a Change event:
Application.EnableEvents = False
15.Execute Undo so the previous value is re-established:
Application.Undo
16.Define the OldVal variable, which is possible to do now that the previous value has been restored:
OldVal = Target.Value
17.Programmatically enter into the cell the sum of the previous value, plus the new last-entered value, by referring to those two variables in an arithmetic equation just as you would if they were numbers:
Target.Value = OldVal + NewVal
18.Enable events now that all the changes to the cell have been made:
Application.EnableEvents = True
19.When completed, the entire procedure looks like this, with comments that have been added to explain each step:
20. Private Sub Worksheet_Change(ByVal Target As Range)
21. 'Allow for a header label to be placed in cell A1.
22. If Target.Address = "$A$1" Then Exit Sub
23. 'Only apply this effect to column A (column 1 in VBA-Speak).
24. 'At the same time, only allow one cell at a time to be changed.
25. If Target.Column <> 1 Or Target.Cells.Count > 1 Then Exit Sub
26. 'Pressing the Delete key triggers the Change event.
27. 'You might want to delete the cell's contents and start with
28. 'an empty cell, so exit the Change event if the Delete key is pressed.
29. If IsEmpty(Target) Then Exit Sub
30. 'Even though a number is *supposed* to be entered into column A,
31. 'never assume that will always happen because users do make mistakes.
32. 'Provide for the attempt at a non-numeric entry and disallow it.
33. If IsNumeric(Target.Value) = False Then
34. 'Disable events because you are about to undo the non-numeric value,
35. 'and Undo also triggers the Change event.
36. Application.EnableEvents = False
37. 'Execute the Undo so the non-numeric entry is deleted.
38. Application.Undo
39. 'Enable events again.
40. Application.EnableEvents = True
41. 'Remind the user with a Message Box that only numbers are allowed,
42. 'and exit the Change event procedure with the Exit Sub statement.
43. MsgBox "You entered a non-numeric value.", _
44. vbExclamation, _
45. "Please: numbers only in column A!"
46. Exit Sub
47. End If
48. 'Now that all the reasonable safeguards have been met,
49. 'Declare two Double type variables:
50. 'one named OldVal for the numeric value that was in the cell
51. 'before it got changed,
52. 'and the other variable named NewVal for the numeric value
53. 'that was just entered that triggered this Change event.
54. Dim OldVal As Double, NewVal As Double
55. 'Define the NewVal variable first, as it is the number that
56. 'was just entered into the cell.
57. NewVal = Target.Value
58. 'Undo the entry in order to display the old (preceding) value.
59. 'Again, this requires that you disable events in order to not
60. 're-trigger the Change event while you are already in a Change event.
61. Application.EnableEvents = False
62. 'Execute Undo so the previous value is re-established.
63. Application.Undo
64. 'Define the OldVal variable which is possible to do now that
65. 'the previous value has been restored.
66. OldVal = Target.Value
67. 'Programmatically enter into the cell the sum of the old previous value,
68. 'plus the new last-entered value, by referring to those two variables
69. 'in an arithmetic equation just as you would if they were numbers.
70. Target.Value = OldVal + NewVal
71. 'Enable events now that all the changes to the cell have been made.
72. Application.EnableEvents = True
End Sub
20.Press Alt+Q to return to the worksheet. Test the code by entering a series of numbers in any single cell in column A other than cell A1.
REFERENCE Please select the video for Lesson 13 at www.wrox.com/go/excelvba24hour. You will also be able to download the code and resources for this lesson from the website.
All materials on the site are licensed Creative Commons Attribution-Sharealike 3.0 Unported CC BY-SA 3.0 & GNU Free Documentation License (GFDL)
If you are the copyright holder of any material contained on our site and intend to remove it, please contact our site administrator for approval.
© 2016-2026 All site design rights belong to S.Y.A.