Excel VBA 24-Hour Trainer (2015)
Part III
Beyond the Macro Recorder: Writing Your Own Code
Lesson 14
Automating Procedures with Workbook Events
In Lesson 13, you learned about worksheet-level events and how they are triggered by actions relating to individual worksheets. Workbooks themselves can also recognize and respond to a number of events that take place at the workbook level. This lesson describes how you can further customize your workbooks with VBA procedures for the most commonly used workbook events.
Workbook Events: An Overview
Workbook events occur within a particular workbook. Many workbook events occur because something happened to an object in the workbook, such as a worksheet—any worksheet—that was activated, or a cell—any cell—that was changed. Other workbook events occur because the workbook was imposed upon to do something, such as to open or close, or to be saved or printed.
NOTE Unless the VBA code itself purposely refers to other workbooks, event procedures at the workbook level affect only the workbook within which the code resides.
Where Does the Workbook Event Code Go?
You saw in Lesson 13 that each individual worksheet has its own module. Workbooks are similar to worksheets in this respect because a workbook is also an Excel object, and it has its own module already present and accounted for when the workbook is created.
NOTE Workbook-level event code always goes into the workbook module. You never need to create a workbook module or a worksheet module; Excel creates those modules automatically with every new workbook. If a workbook-level event procedure is not in the workbook module (same as if a worksheet-level event procedure is not in a worksheet module), VBA will not be able to execute the event code.
To arrive at the Code window for your workbook's module, with whatever version of Excel you are using, you can press Alt+F11 to get into the Visual Basic Editor. If you are using a version of Excel prior to 2007, such as version 2003, you can also access the workbook module quickly by right-clicking the Excel workbook icon near the top-left corner of the workbook window and selecting View Code. This option is shown in Figure 14.1.
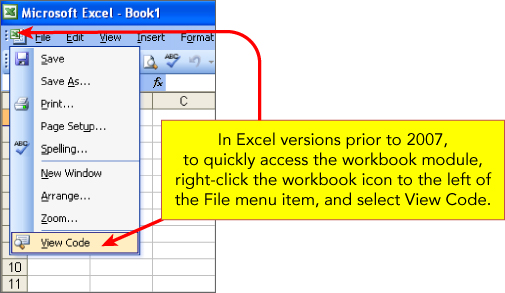
Figure 14.1
In the VBE, if you do not see the Project Explorer window, go ahead and make it visible by pressing Ctrl+R. In the Project Explorer, find your workbook name; it is in bold font, with the text VBAProject (YourWorkbookName.xlsm). Directly below that will be a yellow folder named Microsoft Excel Objects. When you expand that folder, the last item at the bottom of the list is your workbook object, identified by its default name of ThisWorkbook.
NOTE You saw in Lesson 4 how to change the name of a module. You can change the name of the workbook module, but do yourself a favor and leave the workbook module's default name alone. The ThisWorkbook module name is consistent with 99.99 percent of VBA workbook projects you'll likely encounter. There's almost never a benefit to be gained by changing the workbook module's name.
As shown in Figure 14.2, to get into the Code window of the workbook module, either double-click the ThisWorkbook object, or right-click it and select View Code. As soon as you do that, your mouse cursor will be blinking in the workbook module's Code window, ready for you to start entering your workbook-level event procedure code.
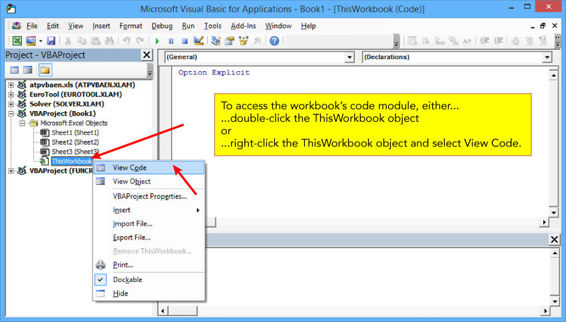
Figure 14.2
Entering Workbook Event Code
Similar to the worksheet module Code window you saw in Lesson 13, two fields with drop-down arrows are located above the workbook module's Code window. The field on the left is the Object field, and when you click its drop-down arrow, you select the Workbook object item, as shown in Figure 14.3.
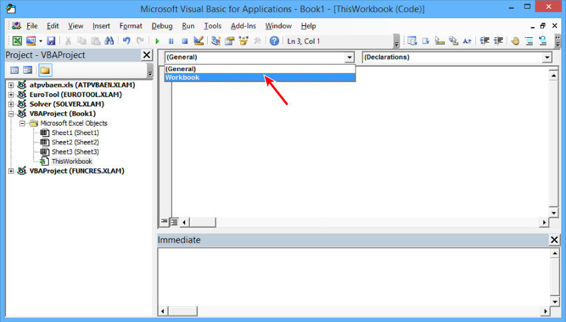
Figure 14.3
The field above the workbook module's Code window, and to the right of the Object field, is the Procedure field. Click the Procedure field's drop-down arrow for a list of the workbook-level events available to you, as shown in Figure 14.4.
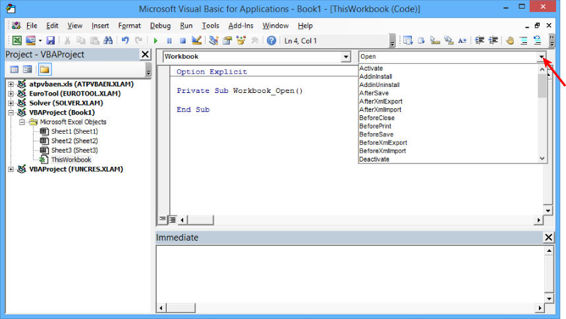
Figure 14.4
NOTE For convenience, just as with selecting worksheet-level event names, VBA places the complete workbook-level event statement, with all its arguments and the accompanying End Substatement, when you select a workbook-level event name from the Procedure field.
Examples of Common Workbook Events
At the workbook level, Excel version 2003 has 28 events, and 8 more than that (mostly associated with pivot tables) for a total of 36 in versions 2007 and 2010. Microsoft added 4 more events to version 2013 for a total of 40. The most commonly used workbook-level events across all versions of Excel are listed here, with examples of each on the following pages:
· Workbook_Open
· Workbook_BeforeClose
· Workbook_Activate
· Workbook_Deactivate
· Workbook_SheetChange
· Workbook_SheetSelectionChange
· Workbook_SheetBeforeDoubleClick
· Workbook_SheetBeforeRightClick
· Workbook_SheetPivotTableUpdate
· Workbook_NewSheet
· Workbook_BeforePrint
· Workbook_SheetActivate
· Workbook_SheetDeactivate
· Workbook_BeforeSave
Workbook_Open Event
The Workbook_Open event is triggered when the workbook opens, and is among the most popular and useful of all workbook-level events. The Workbook_Open event is perfect for such tasks as informing users about important features of your workbook, or generating a running list of users who have accessed the workbook, or establishing a particular format setting that would be reset to its original state with the Workbook_BeforeClose event.
In the Try It section of Lesson 13, you saw an example of how to enter a number in a cell and have that number be added to whatever number was previously in that cell. The users of this workbook might appreciate knowing about, or being reminded of, that capability when they open the workbook. You can use the Workbook_Open event, such as with the following procedure, for example, to show a message box that informs the users of that workbook's special capability:
Private Sub Workbook_Open()
MsgBox _
"FYI, when you enter a number in a cell in column A" & vbCrLf & _
"of Sheet3, it will automatically be added to the" & vbCrLf & _
"number previously in that cell, and display the sum.", _
vbInformation, _
"Welcome! Here's a tip for this workbook:"
End Sub
Workbook_BeforeClose Event
The Workbook_BeforeClose event is triggered just before the workbook closes. This event is often used in conjunction with the Workbook_Open event, to set a workbook back to its original state if the Workbook_Openevent temporarily changed the user's Excel settings.
The following example is one way to apply the Workbook_BeforeClose event's usefulness. You can tell Excel to save your workbook automatically when you close it, to avoid Excel's prompt that asks you if you want to save your changes (and losing your work if you mistakenly were to click No!):
Private Sub Workbook_BeforeClose(Cancel As Boolean)
ThisWorkbook.Save
End Sub
Workbook_Activate Event
The Workbook_Activate event is triggered when the workbook is activated, such as when the workbook is opened, or when you switch between that workbook and other open workbooks. In this example, the following procedure maximizes the Excel window when you activate the workbook:
Private Sub Workbook_Activate()
ActiveWindow.WindowState = xlMaximized
End Sub
Workbook_Deactivate Event
The Workbook_Deactivate event is triggered when the workbook loses focus, such as when a different Excel workbook is activated or when the workbook is closed. The following example prompts a message box to alert you when the workbook is deactivated:
Private Sub Workbook_Deactivate()
MsgBox "You are leaving " & Me.Name & "!!", _
vbInformation, _
"Just saying…"
End Sub
Workbook_SheetChange Event
The Workbook_SheetChange event is triggered when any cell's contents are changed on any worksheet in the workbook. If you would like to keep a log of the date, time, sheet name, and address of any cell that gets changed, this procedure accomplishes that by listing information on a worksheet named Log:
Private Sub Workbook_SheetChange(ByVal Sh As Object, ByVal Target As Range)
'The log sheet will hold the record of each sheet change,
'so halt the event if a cell is changed on the Log sheet.
If Sh.Name = "Log" Then Exit Sub
'Declare a Long variable for the next available row on the Log sheet.
Dim NextRow As Long
'Assign the row number to the next empty row below that last row of data
'in column A.
NextRow = Worksheets("Log").Cells(Rows.Count, 1).End(xlUp).Row + 1
'In column A, enter the date of the changed cell.
Worksheets("Log").Cells(NextRow, 1).Value = VBA.Date
'In column B, enter the time of the changed cell.
Worksheets("Log").Cells(NextRow, 2).Value = VBA.Time
'In column C, enter the name of the worksheet holding the changed cell.
Worksheets("Log").Cells(NextRow, 3).Value = Sh.Name
'In column D, enter the address of the changed cell.
Worksheets("Log").Cells(NextRow, 4).Value = Target.Address
'Autofit the columns on the Log sheet, to make the information readable.
Worksheets("Log").Columns.AutoFit
End Sub
Workbook_SheetSelectionChange Event
The Workbook_SheetSelectionChange event is triggered when a different cell is selected on any worksheet in the workbook. In Lesson 13, you saw an example of the Worksheet_SelectionChange event whereby the active cell was continuously highlighted. If you are navigating through large ranges of data on your worksheets, such as budgets or financial reports, you might find it useful to visually identify more than just the active cell. The following procedure highlights the entire row and column at each new cell selection:
Private Sub Workbook_SheetSelectionChange(ByVal Sh As Object, _
ByVal Target As Range)
Dim myRow As Long, myColumn As Long
myRow = Target.Row
myColumn = Target.Column
Sh.Cells.Interior.ColorIndex = 0
Sh.Rows(myRow).Interior.Color = vbGreen
Sh.Columns(myColumn).Interior.Color = vbGreen
End Sub
Workbook_SheetBeforeDoubleClick Event
The Workbook_SheetBeforeDoubleClick event is triggered when a cell on any worksheet is about to be double-clicked. The double-click effect (usually getting into Edit mode) can be canceled with the Cancelparameter.
Suppose you have a workbook wherein column A of every worksheet is reserved for the purpose of placing check marks in cells. You do not want to deal with embedding possibly hundreds of real check box objects, so a check mark–looking character in a cell would suffice.
You can utilize the Workbook_DoubleClick event that would apply only to column A for any worksheet. The following procedure toggles the effect of placing a check mark in column A. If the cell is empty, a check mark is entered, and if a check mark is present when the cell is double-clicked again, the check mark is removed. As you can see in the code, the “check mark” is really a lowercase letter “a” formatted in Marlett font:
Private Sub Workbook_SheetBeforeDoubleClick(ByVal Sh As Object, _
ByVal Target As Range, Cancel As Boolean)
If Target.Column <> 1 Then Exit Sub
Cancel = True
Target.Font.Name = "Marlett"
Target.HorizontalAlignment = xlCenter
If IsEmpty(Target) = True Then
Target.Value = "a"
Else
Target.Clear
End If
End Sub
Workbook_SheetBeforeRightClick Event
The Workbook_SheetBeforeRightClick event is triggered when a cell on any worksheet is about to be right-clicked. You can cancel the right-click effect of the pop-up menu with the Cancel parameter.
Suppose you want to add a utility to your workbook that would enable you to quickly and easily insert a row above any cell you right-click. A message box could ask if you want to insert a row, and if you answer yes, a row would be inserted. The following procedure is an example of how you can handle that:
Private Sub Workbook_SheetBeforeRightClick(ByVal Sh As Object, _
ByVal Target As Range, Cancel As Boolean)
If MsgBox("Do you want to insert a row here?", _
vbQuestion + vbYesNo, _
"Please confirm…") = vbYes Then
Cancel = True
ActiveCell.EntireRow.Insert
End If
End Sub
Workbook_SheetPivotTableUpdate Event
The SheetPivotTableUpdate event monitors all worksheets in the workbook that hold pivot tables. In the following event code, when a pivot table is updated, the name of its worksheet appears in a message box.
Private Sub Workbook_SheetPivotTableUpdate(ByVal Sh As Object, _
ByVal Target As PivotTable)
MsgBox "The pivot table on sheet " & Sh.Name & " was updated.", , "FYI"
End Sub
Workbook_NewSheet Event
The Workbook_NewSheet event is triggered when a new sheet is added to the workbook. To see this event in action, suppose you do not want to formally protect the workbook, but you want to disallow the addition of any new worksheets. This event procedure promptly deletes a new sheet as soon as it is added, with a message box informing the user that adding new sheets is not permitted:
Private Sub Workbook_NewSheet(ByVal Sh As Object)
Dim asn As String
asn = ActiveSheet.Name
Application.EnableEvents = False
Application.DisplayAlerts = False
Sheets(ActiveSheet.Name).Delete
MsgBox "Sorry, new sheets are not allowed to be added.", vbCritical, " FYI"
Application.DisplayAlerts = True
Application.EnableEvents = True
End Sub
Workbook_BeforePrint Event
The Workbook_BeforePrint event is triggered before a user attempts to print any portion of the workbook. You can cancel the print job by setting the Cancel parameter to True. If you want to ensure that anything printed from that workbook will have the workbook's full name in the footer of every printed page, the following procedure accomplishes that:
Private Sub Workbook_BeforePrint(Cancel As Boolean)
Dim sht As Worksheet
For Each sht In ThisWorkbook.Sheets
sht.PageSetup.CenterFooter = ThisWorkbook.FullName
Next sht
End Sub
Workbook_SheetActivate Event
The Workbook_SheetActivate event is triggered when a sheet is activated in the workbook. Suppose you want to always return to cell A1 whenever you activate any worksheet, regardless of what cell you had selected the last time you were in that worksheet. The following procedure using the Application.GoTo statement does just that:
Private Sub Workbook_SheetActivate(ByVal Sh As Object)
If TypeName(Sh) = "Worksheet" Then Application.Goto Range("A1"), True
End Sub
NOTE This example illustrates the distinction between a Sheet object and a Worksheet object—they are not necessarily the same things. Excel has several types of Sheet objects: worksheets, chart sheets, outdated dialog sheets, and the obsolete macro sheets. In this example, a chart sheet would create confusion for VBA because chart sheets do not contain cells. Only worksheets contain cells, which is why the TypeName of Worksheet is the only Sheet object at which this procedure's code is directed.
Workbook_SheetDeactivate Event
The Workbook_SheetDeactivate event is triggered when a sheet loses focus, such as when a different sheet in the workbook is activated. If you have a workbook with tables of data on every worksheet, and you want the tables to be sorted automatically by column A whenever you leave the worksheet, this procedure does that:
Private Sub Workbook_SheetDeActivate(ByVal Sh As Object)
If TypeName(Sh) = "Worksheet" Then
Sh.Range("A1").CurrentRegion.Sort Key1:=Sh.Range("A2"), _
Order1:=xlAscending, Header:=xlYes
End If
End Sub
Workbook_BeforeSave Event
The Workbook_BeforeSave event is triggered just before the workbook is saved. You can set the Cancel parameter to True to stop the workbook from being saved.
Suppose you want to limit the time period for a workbook to be saved. The following procedure allows the workbook to be saved only between 9:00 AM and 5:00 PM:
Private Sub Workbook_BeforeSave(ByVal SaveAsUI As Boolean, Cancel As Boolean)
If VBA.Time < TimeValue("09:00") _
Or VBA.Time > TimeValue("17:00") Then Cancel = True
End Sub
Try It
In this lesson you write a Workbook_BeforePrint workbook-level event that instructs Excel not to print a particular range of confidential data that resides on a particular worksheet.
Lesson Requirements
To get the sample database files you can download Lesson 14 from the book's website at www.wrox.com/go/excelvba24hour.
Step-by-Step
1. Open a new workbook and activate Sheet3. To prepare the worksheet for this demonstration, populate range A1:E20 with some sample data by selecting the range, typing the word Hello, and pressing Ctrl+Enter.
2. On your keyboard, press Alt+F11 to go to the Visual Basic Editor, and then press Ctrl+R to ensure that the Project Explorer window is visible.
3. Find the name of your workbook in the Project Explorer, and expand the folder named Microsoft Excel Objects.
4. The last item at the bottom of the list of Microsoft Excel Objects is the workbook object, and it is called ThisWorkbook. You'll want to access the Code window for the ThisWorkbook module, and to do that, you can either double-click the ThisWorkbook object name or right-click it and select View Code.
5. The cursor will be blinking in the Code window of your workbook module. Directly above that, click the down arrow belonging to the Object list, and select Workbook, which produces the following default lines of code in your workbook module:
6. Private Sub Workbook_Open()
End Sub
6. In this example you write a BeforePrint procedure, so click the other down arrow above the Code window for the Procedure field, and select BeforePrint. VBA produces these lines of code, which is just what you want:
7. Private Sub Workbook_BeforePrint(Cancel As Boolean)
End Sub
7. Though not imperative, unless you are planning to employ the Workbook_Open event, there's no reason to keep the default Private Sub Workbook_Open() and End Sub statements, so go ahead and delete them if you like.
8. In this example, you have confidential data on Sheet3 only, so instruct Excel that it's okay to print anything on any worksheet other than Sheet3:
If ActiveSheet.Name <> "Sheet3" Then Exit Sub
9. Invoke the Cancel argument to halt the print process when an attempt is made to print Sheet3:
Cancel = True
10.Disable events because you actually will be printing something, but you don't want to re-trigger the BeforePrint event while you are already in it:
Application.EnableEvents = False
11.Your confidential data resides in range B5:D12. Temporarily format that range with three semicolons to make those cells unable to display their contents:
Range("B5:D12").NumberFormat = ";;;"
12.Print the worksheet:
ActiveSheet.PrintOut
NOTE When you test the Workbook_BeforePrint procedure, you can use the PrintPreview method instead of the PrintOut method, which can save you costs in paper and printer toner.
13.Restore the General format to the confidential range so the cells will be able to show their contents after the print job:
Range("B5:D12").NumberFormat = "General"
14.Enable events again, now that the print job has been executed:
Application.EnableEvents = True
15.When completed, the entire procedure looks like this, with comments that have been added to explain each step:
16. Private Sub Workbook_BeforePrint(Cancel As Boolean)
17. 'You have confidential data on Sheet3 only,
18. 'so any other sheet is OK to print anything.
19. If ActiveSheet.Name <> "Sheet3" Then Exit Sub
20. 'Invoke the Cancel argument to halt the print process.
21. Cancel = True
22. 'Disable events because you actually will print something
23. 'but you don't want the BeforePrint event to kick in.
24. Application.EnableEvents = False
25. 'Your confidential data resides in range B5:D12.
26. 'Temporarily format that range with three semicolons
27. 'to make those cells unable to display their contents.
28. Range("B5:D12").NumberFormat = ";;;"
29. 'Print the worksheet.
30. ActiveSheet.PrintOut 'demo with PrintPreview
31. 'Restore the General format to the confidential range
32. 'so the cells will be able to show their contents
33. 'after the print job.
34. Range("B5:D12").NumberFormat = "General"
35. 'Enable events again, now that the print job has been executed.
36. Application.EnableEvents = True
End Sub
16.Press Alt+Q to return to the worksheet. Test the code by printing Sheet3, noting that the printout shows an empty range of cells, representing the range of confidential data that did not get printed.
REFERENCE Please select the video for Lesson 14 online at www.wrox.com/go/excelvba24hour. You will also be able to download the code and resources for this lesson from the website.
All materials on the site are licensed Creative Commons Attribution-Sharealike 3.0 Unported CC BY-SA 3.0 & GNU Free Documentation License (GFDL)
If you are the copyright holder of any material contained on our site and intend to remove it, please contact our site administrator for approval.
© 2016-2026 All site design rights belong to S.Y.A.