Excel VBA 24-Hour Trainer (2015)
Part III
Beyond the Macro Recorder: Writing Your Own Code
Lesson 19
User-Defined Functions
Most Excel users who are not absolute beginners use worksheet functions in their formulas. The most common worksheet function is the SUM function, and hundreds more exist.
Basically, a function performs a calculation or evaluation and then returns a value. Functions used in your VBA expressions act the same way; they do what they are programmed to do and then return a result.
With VBA, you can write (“define”) your own custom function (a user-defined function or UDF) that looks, acts, and feels like a built-in function, but with a lot more power and versatility. After you get the hang of UDFs, you'll wonder how you ever got along without them.
What Is a User-Defined Function?
You are already familiar with many of Excel's built-in worksheet functions such as SUM, AVERAGE, and VLOOKUP, but sometimes you need to perform calculations or get information that none of Excel's built-in functions can accomplish. A user-defined function (UDF) is a function in VBA that you create with arguments you specify. You use it as a worksheet function or as part of a macro procedure when a task is otherwise impossible or too cumbersome to achieve with Excel's built-in formulas and functions.
For example, you may need a formula to sum a range of numbers depending on a cell's interior color; to extract only numbers or letters from an alphanumeric string; to place an unchanging random number in a cell; or to test whether a particular worksheet exists or another workbook is open. UDFs are an excellent option for handling tasks when regular worksheet functions cannot or should not be used.
Characteristics of User-Defined Functions
When used as a worksheet function, the purpose of a UDF is to return a number, string, array, or boolean (true or false) value to the cell it occupies. UDFs cannot change the Excel environment in any way, meaning they cannot place a value in another cell, change the interior color of any cell including the cell they are in, rename a worksheet, or do anything other than return a value to their own cell.
That said, it's important to note that a UDF can be called by a macro. This allows the calling procedure (the macro) to take advantage of the UDF while still retaining the ability to change the Excel environment. This makes your UDF a versatile tool when integrated with macros.
UDFs cannot be composed by the Macro Recorder. Although in some cases you can record a macro and turn it into a UDF by editing the code, most of the time you create a UDF by writing the code yourself directly into a standard module.
NOTE UDFs are always located in a standard module, though they can neither appear in, nor be run from, the Macro dialog box. UDFs do not work if placed in any other type of module, such as a worksheet, workbook, UserForm, or class module.
NOTE Whichever way the UDF is called, be aware that it always compiles slower than built-in functions. Honestly, you would barely notice the difference yourself, but Excel notices and spends an extra moment to think things over when compiling code of any kind, including user-defined functions. Avoid reinventing the wheel by using worksheet functions wherever practical and using UDFs only for things worksheet functions cannot or should not do.
Anatomy of a UDF
When designing a UDF, it helps to consider three questions:
· What is the function's purpose; that is, what do you want it to accomplish?
· What arguments, if any, does the function need?
· What will the function return as a formula or provide to its caller in a macro?
A UDF always begins with the Function statement and ends with the End Function statement. Unless you want your function to be visible only to other code in the same module, it's best to declare the function as Public, or omit the Public/Private qualifier altogether, which defaults the function's scope to Public. When you declare a UDF as Public, it appears in the list of functions in the Insert Function dialog box.
Here is an example of the general syntax of a UDF:
Function name([argument list]) as type
'VBA statements that make up the Function
[name = returned expression]
End Function
NOTE Function names must begin with a letter, and cannot contain spaces or illegal naming characters such as the slash, colon, comma, bracket, or any arithmetic operator symbols. It's always a good practice to give your UDF a simple, meaningful name, just as you would for a macro.
After the function's name is the argument list, which is enclosed by parentheses. If you have two or more arguments, each is separated by a comma and a space. Not every UDF requires arguments, but the parentheses are still required immediately after the function name. Following the argument list is the optional (but strongly recommended) specification of the data type, depending on the function's purpose.
Here's an example of a UDF that does not require any arguments. It returns the complete path of the Microsoft Excel application on your computer:
Function xlPath() As String
xlPath = Application.Path
End Function
On my computer, using Microsoft Office 2013 and entering the formula =xlPath() into a worksheet cell, this UDF returns the path C:\ProgramFiles\Microsoft Office 15\root\office15.
UDF Examples That Solve Common Tasks
User-defined functions can simplify your work by enabling you to use shorter and more readable formulas. After you create the UDF, all the user needs to know is the function name and its arguments. User-defined functions are very useful for handling everyday tasks that you might have thought—or are known to be impossible to solve with a native worksheet formula. Following are a few examples of UDFs that can solve such tasks.
Summing Numbers in Colored Cells
A question that frequently arises is how to add up the numbers that are only in colored cells of a certain range. If the cells were colored by conditional formatting, the solution could be to sum that range of cells based on the condition, such as by using the SUMIF function. However, evaluating the property of a cell—in this case its actual interior color—is more of a challenge because no built-in worksheet function is able to do that.
As an example, Figure 19.1 shows a list of numbers in range A2:A15, where some cells are colored gray and some are not. The task is to sum the numbers in gray-colored cells.
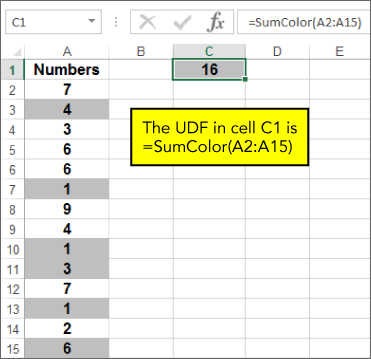
Figure 19.1
Outside the range, cell C1 serves the dual purpose of receiving the UDF, and also displaying the color you need to sum by. With this approach, the UDF only needs one argument to specify the range to sum:
Function SumColor(RangeToSum As Range) As Long
'Declare the necessary variables.
Dim ColorID As Integer, ColorCell As Range, mySum As Long
'Identify the ColorID variable so you know what color to look for.
ColorID = Range(Application.Caller.Address).Interior.ColorIndex
'Loop through each cell in the range.
For Each ColorCell In RangeToSum
'If the cell's color matches the color you are looking for,
'keep a running subtotal by adding the cell's number value
'to the mySum variable.
If ColorCell.Interior.ColorIndex = ColorID Then mySum = mySum + ColorCell.Value
Next ColorCell
'The cells have all been evaluated, so you can define the SumColor function
'by setting it equal to the mySum variable.
SumColor = mySum
End Function
The entry in cell C1 is =SumColor(A2:A15). The UDF loops through each cell in range A2:A15, and along the way keeps a running total with the mySum variable when a gray cell is encountered. At the end of the UDF code, the function's name of SumColor is set to equal the mySum variable, and that enables the UDF to return 16 as the sum of gray-colored cells. Notice that because you were expecting the result to be a whole number, the Long variable type was specified for the function's name.
NOTE This example also demonstrates another useful way to employ the Application.Caller statement that's introduced in Lesson 16. Here, the object calling the function is cell C1, which was colored gray before the UDF was entered.
Extracting Numbers or Letters from an Alphanumeric String
Another common question is how to extract numbers or letters from a string that contains a mixture of alphanumeric characters. If the numbers or letters are all in predictable places or consistently grouped in some way, built-in formulas might do the job. But it gets dicey if the string has an unpredictable mishmash of characters similar to what is in column A in Figure 19.2.
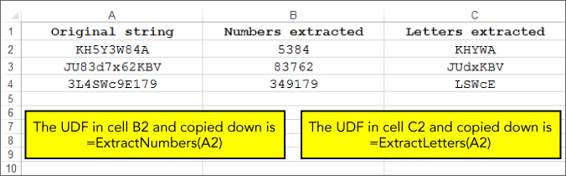
Figure 19.2
Following are two similar UDFs: one that extracts just the numbers from an alphanumeric string and one that extracts just the letters. Figure 19.2 shows how the formulas should be entered.
NOTE Remember that you can copy and paste a UDF just as you can a built-in formula or function. You can also use the fill handle to copy the UDF down or across.
Function ExtractNumbers(strText As String)
'Declare the necessary variables.
Dim i As Integer, strDbl As String
'Loop through each character in the cell.
For i = 1 To Len(strText)
'If the character is a digit, append it to the strDbl variable.
If IsNumeric(Mid(strText, i, 1)) Then
strDbl = strDbl & Mid(strText, i, 1)
End If
Next i
'Each character in the cell has been evaluated, so you can define the
'ExtractNumbers function by setting it equal to the strDbl variable.
'The purpose of the CDbl function is to coerce the strDbl expression
'into a numeric Double data type.
ExtractNumbers = CDbl(strDbl)
End Function
Function ExtractLetters(strText As String)
'Declare the necessary variables.
Dim x As Integer, strTemp As String
'Loop through each character in the cell.
For x = 1 To Len(strText)
'If the character is not numeric, it must be a letter,
'so append it to the strTemp variable.
If Not IsNumeric(Mid(strText, x, 1)) Then
strTemp = strTemp & Mid(strText, x, 1)
End If
Next x
'Each character in the cell has been evaluated, so you can define the
'ExtractLetters function by setting it equal to the strTemp variable.
ExtractLetters = strTemp
End Function
Extracting the Address from a Hyperlink
Here is an example of how to return the actual underlying address of a hyperlink. In Figure 19.3, hyperlinks are in column A but the display text in those cells describes the link's destination. This UDF returns the actual hyperlink address; the "mailto" portion of the code deals with the possibility of a link being an e-mail address:
Function Link(HyperlinkCell As Range)
Link = Replace(HyperlinkCell.Hyperlinks(1).Address, "mailto:", "")
End Function
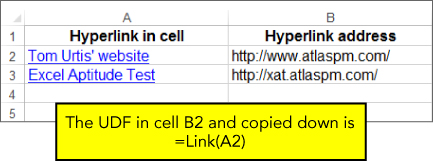
Figure 19.3
USER-DEFINED FUNCTIONS AND ERRORS
You might wonder what happens if an error occurs with a UDF. For example, what if the SumColor function is entered into a cell with an illogical range argument address such as =SUMCOLOR(A2:WXYZ)? Or, what if a UDF attempts to divide a number by zero?
When a UDF attempts to do what it cannot do, the cell displays a #VALUE! error. Whereas a failed macro results in a runtime error with an imposing message box to announce the error and a debug option to identify the offending code line, such is not the case with a failed UDF. Even though it is a VBA item, a failed UDF only returns the #VALUE! error. With larger UDFs, finding the cause of the error can be a real chore. Therefore, it's a good idea to test each code line in the Immediate window as you write your larger UDFs.
Volatile Functions
Sometimes, you want a UDF to return a value and then do nothing else until you purposely cause it to recalculate. An example is if you want to produce a random number in a cell but keep that number constant until you decide to change it again, if ever. The worksheet function RAND() returns a random number, but it recalculates whenever the worksheet recalculates or any cell in that worksheet is edited. This UDF returns an unchanging (static) random number between 1 and 100:
Function StaticRandom() As Double
StaticRandom = Int(Rnd() * 100)
End Function
The function entry for the cell is =StaticRandom().
NOTE Notice that the StaticRandom UDF does not require an argument. Even so, the empty parentheses must immediately follow the function's name in the first code line. Also, when you enter a non-argument UDF in a cell, the parentheses must be included, as you see in this example.
Now with the StaticRand UDF in its current state, its returned random number does not change unless you purposely call the UDF, such as if you select the cell, press the F2 key, and press Enter, or if you press Ctrl+Alt+F9 to force a calculation on all cells.
If you prefer to have the UDF act as the built-in RAND function would, that is, to recalculate whenever another worksheet formula is recalculated or a cell is edited, you can insert the statement Application.Volatilelike so:
Function StaticRandom() As Double
Application.Volatile
StaticRandom = Int(Rnd() * 100)
End Function
NOTE Be aware that if the UDF is used in a lot of cells, Application.Volatile adds to the workbook's overall calculation effort, possibly resulting in longer recalculation times.
Returning the Name of the Active Worksheet and Workbook
A very common request is for a formula to return the name of the active worksheet or workbook. This is a case where a UDF is still a worthy alternative even though formulas can handle this request, and the Application.Volatile statement would be included.
For the worksheet name, this formula is an option but it's not easy to memorize or to enter correctly:
=MID(CELL("filename",A1),FIND("]",CELL("filename",A1))+1,32)
Although the formula automatically updates itself when a sheet tab name changes, the workbook must be named (saved at least once) or the formula returns a #VALUE! error.
The following code shows a UDF with the Application.Volatile statement that covers all the bases. It updates itself when the worksheet tab changes, and the workbook does not need to be named or saved for the UDF to work. Another advantage is that the formula =SheetName() is easy to remember and to enter:
Function SheetName() As String
Application.Volatile
SheetName = ActiveSheet.Name
End Function
For the formula that returns the active workbook's name, the following is a lengthier and more difficult one to enter properly:
=MID(CELL("filename",A1),FIND("[",CELL("filename",A1))+1,FIND("]", CELL("filename",A1))-FIND("[",CELL("filename",A1))-1)
The workbook needs to be saved at least once for this formula to work.
The NameWB() function is much easier to remember and enter, and it'll also do the job whether or not the workbook has been saved:
=NameWB()
Its UDF is the following:
Function NameWB() As String
Application.Volatile
NameWB = ActiveWorkbook.Name
End Function
UDFs with Conditional Formatting
One of the less-utilized but powerful applications of a UDF is to combine it with conditional formatting. Let's say you want to identify cells that contain a comment in a workbook where the option to show comment indicators is turned off. It's true that cells containing comments fall into the category of SpecialCells and you can select them through the Go To Special dialog box; you can maybe format the selected comment-containing cells from there. However, you'd need to repeat those steps anytime a cell obtains or deletes a comment, and there's no telling if or when that might happen.
A better way to go is with a UDF as the formula rule with conditional formatting, to format the comment-containing cells in real time as comments are added or deleted. For example, place this UDF into a standard module:
Public Function TestComment(rng As Range) As Boolean
TestComment = Not rng.Comment Is Nothing
End Function
Back on your worksheet, select the range of interest—in this example starting from cell A1. In the New Formatting Rule dialog box for Excel versions starting with 2007, or the Conditional Formatting dialog box for versions prior to 2007, enter this formula:
=TestComment(A1)
Choose your formatting style, click OK, and all comment-containing cells in that range are formatted.
Calling Your UDF from a Macro
As mentioned earlier, functions that you create need not only serve as worksheet formulas. A function can also be called by a macro, which does not limit the macro's ability to do whatever needs to be done. In the following code, the OpenTest function is set apart from the OpenOrClosed macro, which gives you the best of both worlds for testing whether a particular workbook is open or closed.
To test by formula if a workbook named YourWorkbookName.xlsm is open or closed, you can enter the following in a worksheet cell, which returns TRUE (the workbook is open) or FALSE (the workbook is closed):
=OpenTest("YourWorkbookName.xlsm")
To test by macro, you can expand the functionality by asking with a Yes/No message box if you'd like to open that workbook if it is not already open, and open it if Yes is selected, or keep the workbook closed if No is selected. Here's the code:
Function OpenTest(wb) As Boolean
'Declare a Workbook variable.
Dim wkb As Workbook
'Employ the On Error Resume Next statement to check for, and bypass,
'a run time error in case the workbook is not open.
On Error Resume Next
Set wkb = Workbooks(wb)
'If there is no error, the workbook is open.
If Err = 0 Then
Err.Clear
OpenTest = True
Else
'An error was raised, meaning the workbook is not open.
OpenTest = False
End If
End Function
Sub OpenOrClosed()
'Declare a String type variable that will be the workbook name.
Dim strFileName As String
strFileName = "YourWorkbookName.xlsm"
'Call the OpenTest UDF to evaluate whether or not the workbook is open.
If OpenTest(strFileName) = True Then
'For demo purposes, this message box informs you if the workbook is open.
MsgBox strFileName & " is open.", vbInformation, "FYI…"
Else
'The OpenTest UDF determines that the workbook is closed.
'A message box asks if you want to open that workbook.
Dim OpenQuestion As Integer
OpenQuestion = _
MsgBox(strFileName & " is not open, do you want to open it?", _
vbYesNo, _
"Your choice")
'Example code if you answer No, meaning you want to keep the workbook closed.
If OpenQuestion = vbNo Then
MsgBox "No problem, it'll stay closed.", , "You clicked No."
Else
'Example code if you answer Yes, meaning you want to open the workbook.
'You need to tell the macro what the full path is for this workbook,
'so another String type variable is declared for the path.
Dim strFileFullName As String
strFileFullName = "C:\Your\File\Path\" & strFileName
'Open the workbook.
Workbooks.Open Filename:=strFileFullName
End If
End If
End Sub
Adding a Description to the Insert Function Dialog Box
Chances are, the more VBA you learn, the more popular you'll be at your workplace as the Excel go-to person. Soon if not already, you'll be building workbooks for other people to use, and it's a nice touch to add a helpful description to your UDFs for the benefit of those other users. The Insert Function dialog box is a good place to help people understand how to enter your UDFs, especially because this dialog box is how some users enter functions, and each UDF has its own unique entry requirements.
Figure 19.4 shows a typical Insert Function dialog box, where your publicly declared or non-declared UDFs appear in the Select a Function pane when the User Defined category is selected. I've selected the ExtractNumbers function, but no help is available for someone who has never seen this UDF and would not know how to properly enter the function.
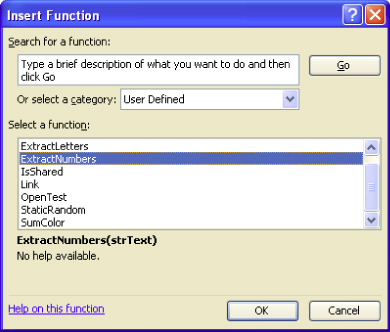
Figure 19.4
In two easy steps, here's how you can provide a helpful tip for entering a UDF from the Insert Function dialog box:
1. Press Alt+F8 to call the Macro dialog box. In the Macro Name field, enter the function name; for example, ExtractNumbers, as shown in Figure 19.5. Click the Options button.
2. In the Description field of the Macro Options dialog box, enter a brief description of how to enter this UDF. As partially shown in Figure 19.6, I entered Example UDF entry: =ExtractNumbers(A2), where cell A2 contains the original alphanumeric string. as the description and confirmed it by clicking OK and exiting the Macro dialog box.
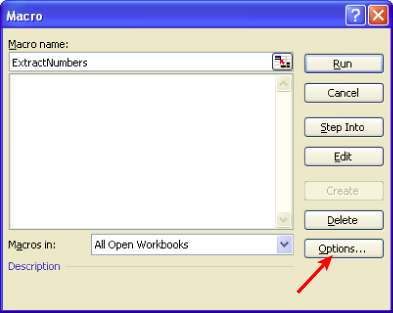
Figure 19.5

Figure 19.6
And that's all there is to it. Now if you go back to the Insert Function dialog box and select the ExtractNumbers UDF, a description appears, as shown in Figure 19.7, providing the users with a useful tip for how to enter the UDF.
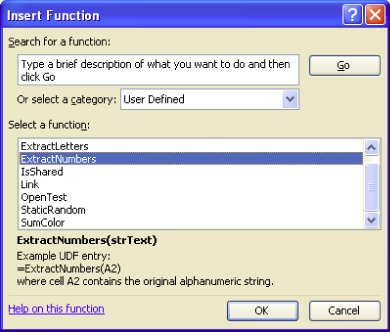
Figure 19.7
Try It
In this lesson you practice creating a user-defined function that tests whether a particular cell contains a comment. If so, the UDF returns the text of that comment; if not, the UDF returns "No comment".
Lesson Requirements
To get the sample workbook, you can download Lesson 19 from the book's website at www.wrox.com/go/excelvba24hour.
Step-by-Step
1. From your keyboard press Alt+F11 to get into the VBE, and from the menu bar click Insert![]() Module.
Module.
2. Enter the function name, declare an argument variable for a Range type because a cell will be evaluated, and declare the Function type as String because the UDF returns text of some kind. For example:
Function GetComment(rng As Range) As String
3. Declare a String type variable to handle either the comment text or the "No comment" statement:
Dim strText As String
4. Using an If structure, evaluate the target cell for the existence of a comment. If there is no comment, define the strText variable as "No comment":
5. If rng.Comment Is Nothing Then
strText = "No comment"
5. Complete the If structure for the condition of the target cell containing a comment:
6. Else
7. strText = rng.Comment.Text
End If
6. Set the name of the function equal to the strText string expression:
GetComment = strText
7. Close the function with the End Function statement. The entire UDF looks like this:
8. Function GetComment(rng As Range) As String
9. Dim strText As String
10. If rng.Comment Is Nothing Then
11. strText = "No comment"
12. Else
13. strText = rng.Comment.Text
14. End If
15. GetComment = strText
End Function
8. Press Alt+Q to return to the worksheet. Test your UDF to evaluate the existence of a comment in cell A1 and return the conditional string with this formula in a worksheet cell:
=GetComment(A1)
REFERENCE Please select the video for Lesson 19 online at www.wrox.com/go/excelvba24hour. You will also be able to download the code and resources for this lesson from the website.
All materials on the site are licensed Creative Commons Attribution-Sharealike 3.0 Unported CC BY-SA 3.0 & GNU Free Documentation License (GFDL)
If you are the copyright holder of any material contained on our site and intend to remove it, please contact our site administrator for approval.
© 2016-2026 All site design rights belong to S.Y.A.