Excel VBA 24-Hour Trainer (2015)
Part I
Understanding the BASICs
Lesson 2
Getting Started with Macros
In Lesson 1, you read that VBA is the programming language of Microsoft Excel and that a macro is a sequence of VBA commands to run a task automatically instead of manually. In this lesson, you find out how to create a simple macro, what its code looks like, and a few options for how you can run the macro.
Composing Your First Macro
This lesson leads you through the process of composing a macro to sort and format a range of data. But even before the first line of programming code is written, you need to set up shop by giving yourself easy access to the VBA-related tools you'll be using. The following housekeeping items usually need to be done only once, and it's worth taking the time to do them now if you haven't already done so.
Accessing the VBA Environment
At the time of this writing, Excel is at a unique stage in its ongoing evolution because four of its versions are being used with significant popularity in the Microsoft Office suite of applications. Version 2003 (also known as version 11) was the final Excel version with the traditional menu bar interface of File, Edit, View, and so on. Then came version 2007 (also known as version 12), blazing the trail for Office's new Ribbon interface. Three years later, version 2010 (also known as version 14) was the next release from Redmond. Most recently, version 2013 (also known as version 15) has taken its place among the community of Excel versions that are being used around the world.
As with other tasks you typically do in Excel, the actions you take to create, view, edit, or run VBA code usually start by clicking the on-screen icon relating to that task. Exactly what those VBA-related icons look like, and what you need to do to make them easily accessible to you, depends on the particular version of Excel you are working with.
WHY IS THERE NO VERSION 13?
You probably noticed that the version numbers went from 12 in 2007 to 14 in 2010, making the number 13 conspicuously absent as a version number. This was not an accident; Microsoft purposely skipped the number 13. You'll often notice in elevators of high-rise office buildings and hotels that the floor buttons go from 12 to 14, without a floor number 13. Microsoft recognizes that its Office applications are used globally, and in some cultures, 13 is thought to be an unlucky number. It made good business sense to avoid issues of possible reluctance from consumers upgrading to “Office 13,” or blame for inevitable version bugs by people who believe that 13 is an unlucky number.
To save yourself time and extra mouse clicks, start by making sure that the VBA-related icons you'll be using most frequently are already displayed whenever you open Excel. The following steps are shown for each of today's four most popular versions.
Version 2003 continues to be used by a measurable percentage of individuals and employers worldwide. For versions of Excel up to and including 2003, from your worksheet menu, click View![]() Toolbars
Toolbars![]() Visual Basic, as shown in Figure 2.1. This displays the Visual Basic toolbar, as shown in Figure 2.2, which you can dock just as you do with your other toolbars.
Visual Basic, as shown in Figure 2.1. This displays the Visual Basic toolbar, as shown in Figure 2.2, which you can dock just as you do with your other toolbars.
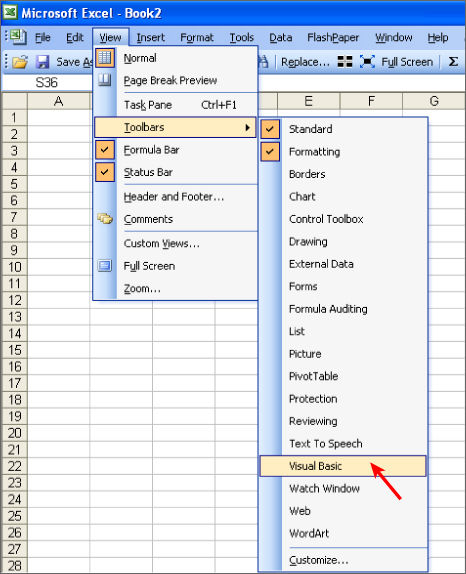
Figure 2.1
![]()
Figure 2.2
For versions of Excel after 2003 (that is, starting with Excel 2007), the Ribbon user interface has replaced the menu interface, resulting in a different look to the VBA-related icons and a different set of steps required to see them.
In versions 2007, 2010, and 2013, these VBA icons are located on the Developer tab. By default, the Developer tab is not automatically displayed along with the other Ribbon tabs. You need to complete a set of one-time steps to show the Developer tab and to keep it visible whenever you open Excel. Although the steps to do this are easy, they are different for each version.
In Excel 2007, do the following:
1. Click the round Office button near the top-left corner of your screen.
2. Click the Excel Options button located at the bottom of that menu, as shown in Figure 2.3.
3. In the Excel Options dialog box, click the Popular item at the upper left, and select the Show Developer tab in the Ribbon option, as shown in Figure 2.4.
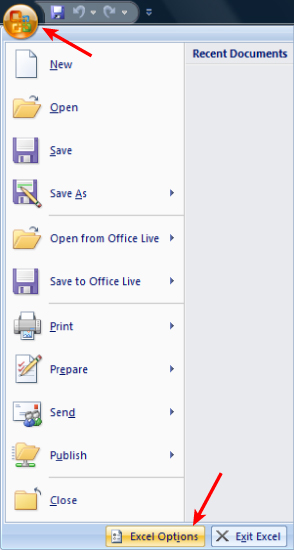
Figure 2.3
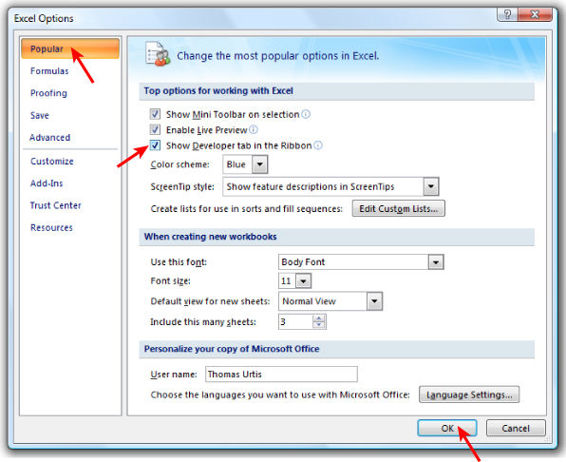
Figure 2.4
In Excel versions 2010 and 2013, showing the Developer tab is a bit different. A new Ribbon tab named File has supplanted the Office button. Use the following steps to make the Developer tab visible:
1. Click the File tab and then click the Options button, as shown in Figure 2.5. The Options dialog box opens.
2. Click the Customize Ribbon item at the left, which displays two vertical lists, as shown in Figure 2.6. Notice that the list on the right has a drop-down menu above it called Customize the Ribbon.
3. Select the Main Tabs item from the Customize the Ribbon drop-down.
4. In the list of Main Tabs, select Developer and click OK. You will see the Developer tab in your Ribbon, as shown in Figure 2.7.
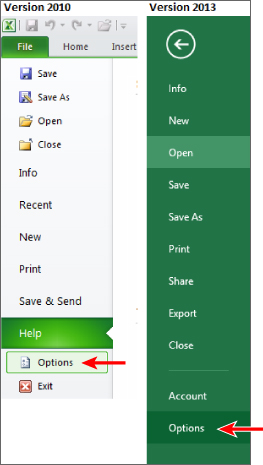
Figure 2.5

Figure 2.6
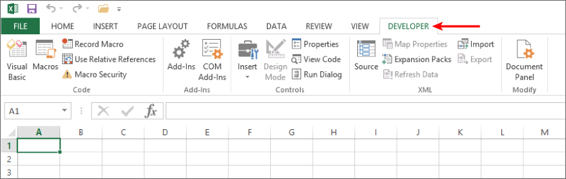
Figure 2.7
Using the Macro Recorder
The easiest way to create a macro is to record your worksheet actions using a valuable tool called the Macro Recorder. All you need to do is turn on the Macro Recorder, perform the actions that comprise the task you want to automate, and then turn off the Macro Recorder when you have finished your task. While the Macro Recorder is turned on, every action you do—selecting a cell, entering a number, formatting a range, pretty much everything—is recorded and represented as VBA code in a new macro. As you see later, when you run the macro created by the Macro Recorder, your task is completed automatically, just as if you had done it manually.
The Macro Recorder comes in handy for repetitive (and sometimes mundane) common tasks that you'd rather not have to keep manually doing over and over. For example, say you manage a table of data every day, such as the one shown in Figure 2.8, that shows how many items your company sold in its East, West, North, and South regions.
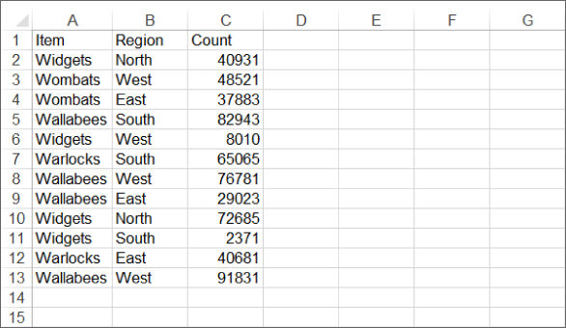
Figure 2.8
The everyday task at hand is to sort the table primarily by Region, then by Item, then by Count. Your boss wants the Item and Region columns to switch places, so that Region occupies column A and Item occupies column B. To improve readability, the numbers in the Count column must be formatted with the thousands comma separator, and the headers for Region, Item, and Count must be bolded. Figure 2.9shows the finished table, the way your boss wants it.

Figure 2.9
This is normally a six-step process, which is quite boring, but it's part of your job responsibilities.
To complete the task you might do this:
1. Insert a new column at column A.
2. Select the Region column, cut it, and paste it to empty column A, to the left of the Item column.
3. Delete the now-empty column from where the Region column was cut.
4. Select range A1:C13 and sort in ascending order by Region, Item, and Count.
5. Select range C2:C13 and format the numbers with the thousands comma separator.
6. Select range A1:C1 and format those cells as Bold.
Not only are these steps monotonous, but also a risk for making honest mistakes due to eventual human error. The good news is that if you perform the necessary steps perfectly for the Macro Recorder, the task can be reduced to a simple mouse click or keyboard shortcut, with VBA doing the grunt work for you.
NOTE Anytime you create a macro, it's wise to plan ahead about why you are creating the macro, and what you want the macro to do. This is especially important with complex macros, because you want your macros to operate efficiently and accurately, with just the code that's necessary to get the job done properly. By avoiding excessive code, your macros will run faster and be easier to edit or troubleshoot. For example, get your workbook ready beforehand to avoid unnecessary coded actions. Have the worksheet that you'll be working on active, with the range of interest already visible. Mistakes are recorded too! Practice the steps first, so your macro's recorded code is not lengthier than it needs to be.
Because you know what manual steps are required for this daily task, you are ready to create your macro. The first thing to do is turn on the Macro Recorder. In Excel versions 2003 or before, click the Record Macro button on the Visual Basic toolbar, as shown in Figure 2.10. For later Excel versions, click the Record Macro button in the Code section of the Developer tab on the Ribbon, as shown in Figure 2.11.
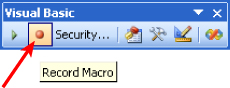
Figure 2.10
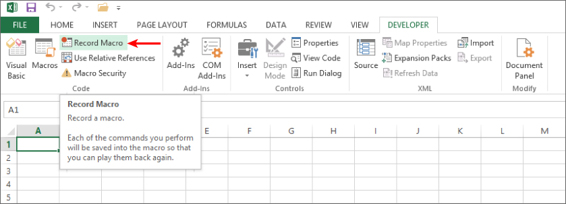
Figure 2.11
What you see next looks much like Figure 2.12. A small Record Macro dialog box displays, with default information that only needs your approval by clicking OK to start recording your macro. Resist the temptation to accept the defaults, because now's the time to get into a few good habits.
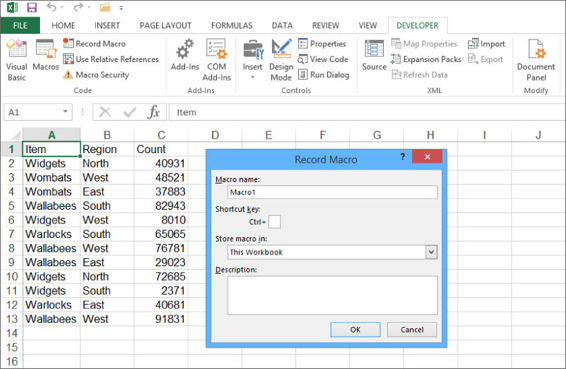
Figure 2.12
The Macro Recorder is an excellent teaching tool, and hardly a day goes by when I do not use it in some way. VBA is just too voluminous a programming language to memorize its every keyword and nuance. Often as not, I'll record a macro just to look at the code it produces to learn the proper syntax of a task dealing with some larger macro I am working on. You will find yourself using the Macro Recorder in the same way; it's a terrific source for learning VBA code, as Excel developers of any skill level will attest.
For this example, the macro you are creating is one you will want to keep and use often. A little customization is strongly recommended to help you down the road, when you'll want to remember what the macro does, why you created it, and what optional keyboard shortcut you assigned to run it.
In the Record Macro dialog box, give the macro a meaningful name. Macro names cannot contain spaces, and they cannot begin with a numeral. Because you are the person doing the sorting, and you don't want to make the macro name too long, naming it mySort gives the macro more meaning than the default name of Macro1.
In Figure 2.12, notice the small box to the right of Ctrl+ in the Shortcut Key section. You can place any letter of the alphabet in that field, which, when pressed with the Ctrl key, will be one method (and a convenient one at that) by which you can run the macro.
NOTE A shortcut key is not mandatory; in fact, most of your macros will not have one or need one. But if you do want to assign a shortcut key, get into the good habit of assigning it with the Ctrl+Shift combination rather than with just the Ctrl key. Excel has assigned all 26 letters of the alphabet to serve as built-in shortcuts with the Ctrl key for various tasks, and you will do well to avoid overriding that native functionality. For example, Ctrl+C is the key combination to copy text. However, if you assign the shortcut key Ctrl+C to your macro, you will override the default for that key combination, and will not be able to use Ctrl+C to copy text in the workbook containing the macro.
To take advantage of the Shortcut Key option, click in the Shortcut Key field, press the Shift key, and also press an alphabet key such as the letter S. You will have created the keyboard shortcut Ctrl+Shift+S, which will not interfere with any of Excel's significant built-in keyboard shortcuts.
Most macros you record are stored in the workbook you are working with. For now, you can keep the default selection of This Workbook in the Store Macro In field.
Finally, in the Description field, enter a brief but meaningful explanation of what the macro does. When you are finished making these minor changes to the Record Macro dialog box, it looks similar to Figure 2.13. Go ahead and click OK, which turns on the Macro Recorder, and you can proceed to manually perform the steps you want to automate.
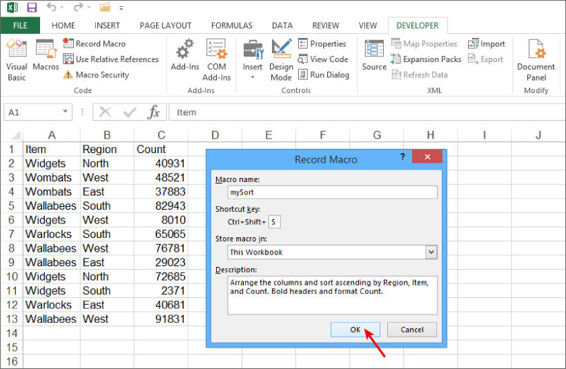
Figure 2.13
In versions 2003 and earlier, you will see a tiny floating toolbar while the Macro Recorder is on. That is the Stop Recording toolbar, with a Stop Recording button you click when you are finished recording your actions. When you have completed the steps to your task, turn off the Macro Recorder in version 2003 by clicking the Stop Recording button, as shown in Figure 2.14.
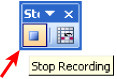
Figure 2.14
If you are working in a later version of Excel, click the Stop Recording button on the Developer tab in the Ribbon, as shown in Figure 2.15. Clicking the Stop Recording button ends the recording session, and you have created your macro.
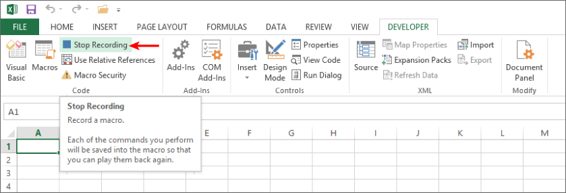
Figure 2.15
HEY, MY STOP RECORDING BUTTON DISAPPEARED!
If you are using Excel version 2003 or earlier, the Stop Recording toolbar might seem to suddenly disappear from time to time. This is almost always due to unwittingly closing that toolbar by clicking the X close button on its title bar instead of the Stop Recording button. It has happened to the best of us. To show the Stop Recording toolbar again, start to record a new macro, then from the worksheet menu click View![]() Toolbars
Toolbars![]() Stop Recording. Click the Stop Recording button to end the macro, and the next time you record a macro, the Stop Recording toolbar will be its normal visible self.
Stop Recording. Click the Stop Recording button to end the macro, and the next time you record a macro, the Stop Recording toolbar will be its normal visible self.
If you are working in version 2007 or later, no worries. The Stop Recording button on the Ribbon does not disappear; it only reverts to Record Macro when clicked.
Running A Macro
You have many ways to run a macro, most of which are demonstrated in later lessons. As you will see, the method(s) you choose for running your macros may depend on complex reasons such as the workbook design, or may be based on a simpler factor such as what feels most intuitive and convenient for you. To wrap up this lesson, following are a couple of commonly used options for running your macros.
The Macro Dialog Box
When you create recorded macros, their names will appear listed in a dialog box called, appropriately enough, the Macro dialog box. To show the Macro dialog box in version 2003 or earlier, click the Run Macro button on the Visual Basic toolbar, as shown in Figure 2.16. The title of that button, Run Macro, is something of a misnomer because you are not actually running a macro when you've clicked the button. All you're doing is displaying the Macro dialog box, from which you can run a macro but also edit and examine macros.
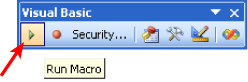
Figure 2.16
In versions later than 2003, the button to click is more logically labeled Macros, as shown in Figure 2.17.
NOTE Regardless of the Excel version, pressing Alt+F8 displays the Macro dialog box—no mouse clicks needed.
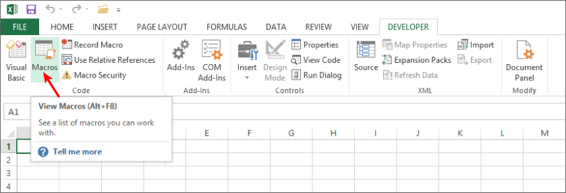
Figure 2.17
Figure 2.18 shows the Macro dialog box with the one and only mySort macro listed. As you create more macros in this workbook, their names are listed in the Macro dialog box in alphabetical order. To run your macro, select its name in the list and click the Run button, as indicated by the arrows. You could also run the macro by double-clicking its name in the list.
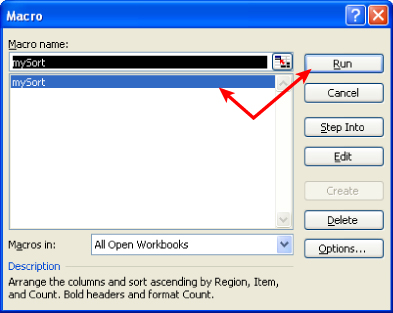
Figure 2.18
Shortcut Key
Recall that you assigned the shortcut key Ctrl+Shift+S to this macro at the start of the macro recording process. Because you did that, you do not need to bother with the Macro dialog box if you don't want to; you can run the mySort macro simply by pressing Ctrl+Shift+S.
Try It
In this lesson, you practice creating a recorded macro.
Lesson Requirements
To get the sample workbook file, you can download Lesson 2 from the book's website at www.wrox.com/go/excelvba24hour.
Hints
Name your macros with a word or concise phrase that is easy to read and gives an idea about what the macro does. For example, a macro named Print_Expense_Report is more descriptive than Macro5.
Step-by-Step
Start with a worksheet on which some cells contain numbers that were manually entered, and other cells contain numbers produced by formulas, such as in the downloadable budget workbook shown in the video for this lesson. I have a number of steps in this “Try It” lesson to help demonstrate the value of a macro that can automatically perform tedious, recurring manual tasks with a simple keyboard shortcut or click of a button.
Create a macro that fills the manually entered numeric cells with one color, and the formula-containing numeric cells with another color:
1. Click the Record Macro button to turn on the Macro Recorder.
2. In the Record Macro dialog box, name the macro My_Macro and assign it the shortcut Ctrl+Shift+W.
3. Click OK to start recording your My_Macro macro.
4. Click the button above row 1 and to the left of column A to select the all the worksheet cells.
5. Show the Format Cells dialog box. Right-click any selected cell and select Format Cells from the menu, or press the Alt+O+E keyboard shortcut.
6. In the Format Cells dialog box, click the Fill tab. Click the No Color button and click OK to remove the fill colors from all cells.
7. With all the worksheet cells still selected, press the F5 key to show the Go To dialog box. Click the Special button.
8. In the Go To Special dialog box, select the option button for Constants, leave the Numbers check box selected, and deselect the check boxes for Text, Logicals, and Errors. Click OK.
9. Repeat Step 5 to show the Format Cells dialog box.
10.In the Format Cells dialog box, click the Fill tab, select a color from the palette, and click OK.
11.Repeat Step 4 to select all the worksheet cells.
12.Repeat Step 7 to show the Go To Special dialog box.
13.In the Go To Special dialog box, select the option button for Formulas, leave the Numbers check box selected, and deselect the check boxes for Text, Logicals, and Errors. Click OK.
14.Repeat Step 5 to show the Format Cells dialog box.
15.In the Format Cells dialog box, click the Fill tab, select a color from the palette that is different from the color you selected for Constants in Step 10, and click OK.
16.Select any cell on the worksheet to deselect all the selected special cells.
17.Turn off the Macro Recorder by clicking the Stop Recording button.
18.Before running your new macro to see it in action, repeat Steps 4, 5, and 6 to remove the fill color from all cells.
19.Show the Macro dialog box to run your macro. You can either click the Developer tab on the Ribbon and then click the Macros icon in the Code panel, or you can press the Alt+F8 keyboard shortcut.
20.To run your My_Macro macro from the Macro dialog box, select its name in the list box and click the Run button, or double-click its name in the list box.
21.To run your My_Macro macro using your keyboard, press the Ctrl+Shift+W shortcut keys you assigned in Step 2.
REFERENCE Please select the video for Lesson 2 online at www.wrox.com/go/excelvba24hour. You will also be able to download the code and resources for this lesson from the website.
All materials on the site are licensed Creative Commons Attribution-Sharealike 3.0 Unported CC BY-SA 3.0 & GNU Free Documentation License (GFDL)
If you are the copyright holder of any material contained on our site and intend to remove it, please contact our site administrator for approval.
© 2016-2026 All site design rights belong to S.Y.A.