Excel VBA 24-Hour Trainer (2015)
Part IV
Advanced Programming Techniques
Lesson 21: Creating UserForms
Lesson 22: UserForm Controls and Their Functions
Lesson 23: Advanced UserForms
Lesson 24: Class Modules
Lesson 25: Add-Ins
Lesson 26: Managing External Data
Lesson 27: Data Access with ActiveX Data Objects
Lesson 28: Impressing Your Boss (or at Least Your Friends)
Lesson 21
Creating UserForms
In previous lessons, you have seen examples of how your workbook can interact with its users to make decisions by employing such methods as InputBoxes and Message Boxes. Although these interactive tools are very useful for the situations they are meant to serve, they have limited usefulness in more complex applications.
Some of your projects will require a more versatile approach to asking for and gathering many kinds of information from users, all within a dedicated interface that's convenient and easy to use. Perhaps you have seen attempts to accomplish this on a neatly arranged worksheet where certain cells are color-shaded or unprotected for data input, maybe with drop-down lists and embedded check boxes or option buttons. A UserForm in VBA is a more efficient method for collecting and recording such information.
What Is a UserForm?
A UserForm is essentially a custom-built dialog box, but that description does not do justice to the immense complexity and diversity with which UserForms can be built and be made to function. A UserForm is created in the Visual Basic Editor, with controls and associated VBA code, usually meant for the end user to be advised of some information or to enter data, generate reports, or perform some action.
NOTE Think of UserForms as electronic versions of the different forms you fill out on your computer, such as when you make an online purchase, or with paper and pen in a business office. Some information on most forms is required and some information is optional. A UserForm is a dynamic object, with VBA code working behind the scenes to guide your users toward telling your workbook what it needs to know.
Creating a UserForm
The first step in creating a new UserForm is to insert one into the Visual Basic Editor. To do that, press Alt+F11 to get into the VBE, and select your workbook name in the Project Explorer as shown in Figure 21.1.
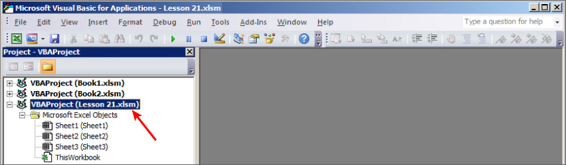
Figure 21.1
NOTE Be careful to select the workbook you have in mind before adding a UserForm to it! In Figure 21.1, a couple other workbooks are open to help make the point that the workbook of interest (Lesson21.xlsm in this example) is the workbook selected in the Project Explorer.
With the workbook name selected, from the menu bar click Insert![]() UserForm as shown in Figure 21.2.
UserForm as shown in Figure 21.2.
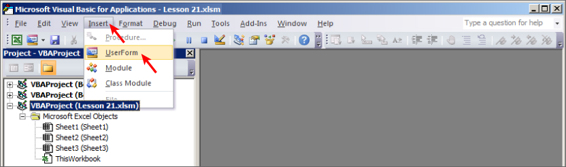
Figure 21.2
A new UserForm opens in its design window as shown in Figure 21.3.
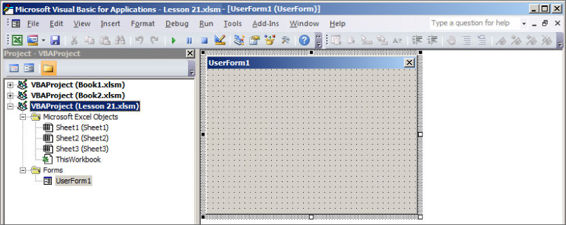
Figure 21.3
Designing a UserForm
UserForms have a variety of properties. You can show the Properties window for the UserForm itself, or for any of its controls, by selecting the object and clicking its Properties icon, or clicking View![]() Properties Window as shown in Figure 21.4.
Properties Window as shown in Figure 21.4.
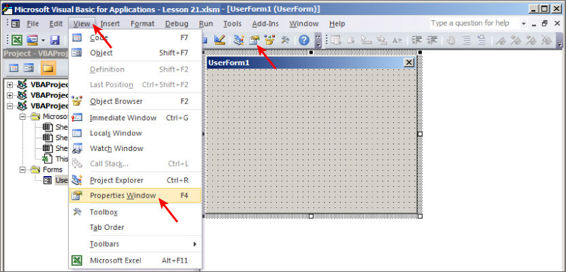
Figure 21.4
Below the Project Explorer is where you'll see the Properties window, partially visible in Figure 21.5.
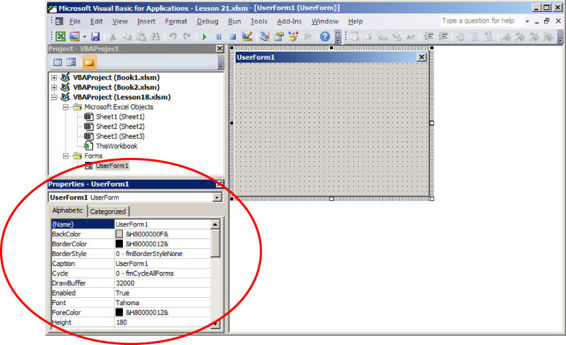
Figure 21.5
For the workbook's first UserForm, VBA assigns a default value of UserForm1 to its Name and Caption properties, as you can see in Figure 21.5. If you were to create a second UserForm, its default Name and Captionproperties would be UserForm2, and so on. To help distinguish between the Name and Caption properties, Figure 21.6 shows where the Name property has been changed to frmEmployees, and the Caption property, which is displayed in the UserForm's title bar, has been changed to Employee Information.
NOTE When naming UserForms, or any object for that matter, it's best to assign a name that is relevant to the theme of the object. When I name a UserForm, I use the prefix frm (for UserForm) followed by a simple, intuitive term (such as Employees in this example) that represents the basic idea of the UserForm object.
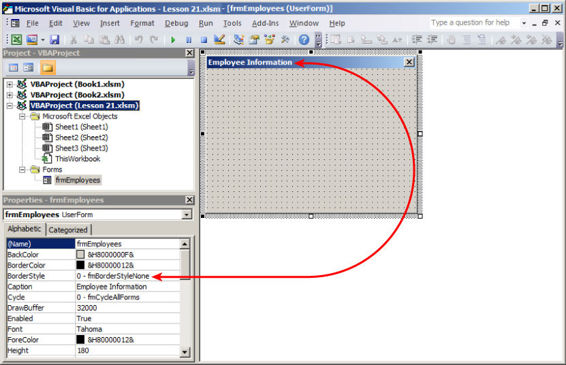
Figure 21.6
Adding Controls to a UserForm
A control is an object such as a Label, TextBox, OptionButton, or CheckBox in a UserForm or embedded onto a worksheet that allows users to view or manipulate information. VBA supports these and more controls, which are accessible to you from the VBE Toolbox. To show the Toolbox so you can easily grab whatever controls you want from it, you can click the Toolbox icon, or click View![]() Toolbox as shown in Figure 21.7.
Toolbox as shown in Figure 21.7.
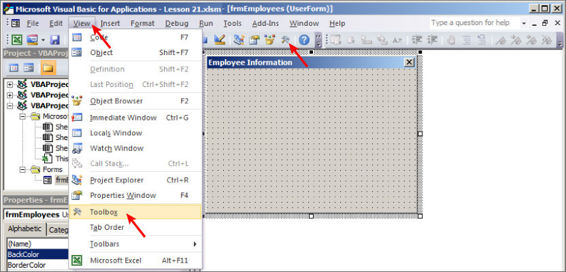
Figure 21.7
The control(s) you place onto your UserForm depend on its purpose. If you want to design a simple form to gather employee information for your company, you'd at least want to know the employees' names and their titles. It would be useful to display a TextBox to enter the employee name, and then a list of the company's position titles so the user can effortlessly select one. Figure 21.8 shows the Toolbox with the mouse hovering over the Label control icon.

Figure 21.8
You place a control onto your UserForm by drawing the control onto your UserForm's design area. All you need to do is click whatever Toolbox control icon you're interested in adding to the UserForm, and draw it as you would draw a Shape object onto a worksheet. Figure 21.9 shows a Label control that was just drawn, showing its default caption of Label1.
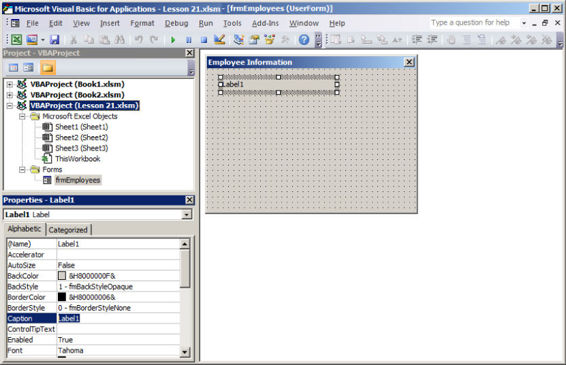
Figure 21.9
Notice in Figure 21.9 that the Label's Caption property is selected in the Properties window, so a more meaningful caption can be added to the Label. Because the Label will be directly above the TextBox, and the purpose of the TextBox is to enter an employee name, the Label's caption is changed to Employee name as shown in Figure 21.10. Notice further in Figure 21.10 that the TextBox icon is about to be selected in the Toolbox, as you get ready to draw a TextBox control onto the UserForm below the Label.
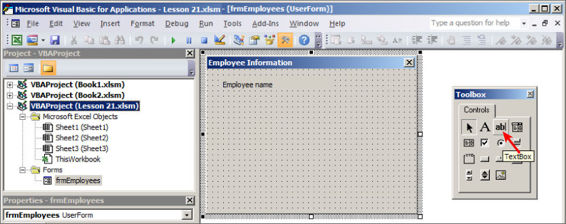
Figure 21.10
After you click the Toolbox's TextBox icon, you add a TextBox control by drawing it onto the UserForm's design area, just as you did when you added the Label control. Figure 21.11 shows the drawn TextBox, positioned below the Label, and having a reasonably sufficient width to accept and display a person's name. Meanwhile, as you can see in Figure 21.11, the Frame icon is about to be selected in preparation for placing a Frame control onto your UserForm.
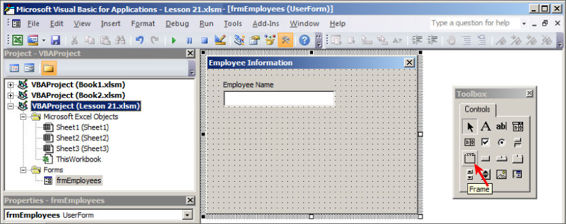
Figure 21.11
Figure 21.12 shows your just-drawn Frame control with its default caption of Frame1. Frames are a good way to group other controls visually by containment, usually with an underlying theme. In the case of this UserForm example, the company's position titles will be contained in such a way that the user can select only one.

Figure 21.12
The caption of a Frame control is an efficient way to describe the purpose of the Frame, just as the Label's caption of Employee Name describes the purpose of the TextBox. In Figure 21.12, the Caption property of your new Frame is selected so you can change the meaningless default caption of Frame1 to a more useful description.
In Figure 21.13, the Frame's default caption of Frame1 has been changed to Position Title. Now that the Frame's caption is taken care of, Figure 21.13 also shows that the OptionButton icon in the Toolbox is about to be selected. Because an employee would hold only one particular job position title at a time, you can arrange a series of OptionButtons inside the Frame to represent the company's various position titles, where only one can be selected.
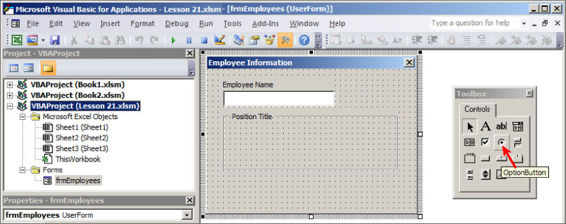
Figure 21.13
In this basic UserForm example, Figure 21.14 shows four position titles from which to choose, each as a caption among the four OptionButton controls that were placed inside the Frame. The OptionButtons were added and captioned one at a time. Planning ahead, Figure 21.14 also shows the CommandButton icon in the Toolbox, which is about to be selected so you can add a couple of buttons as the last step in building the UserForm's front-end design.
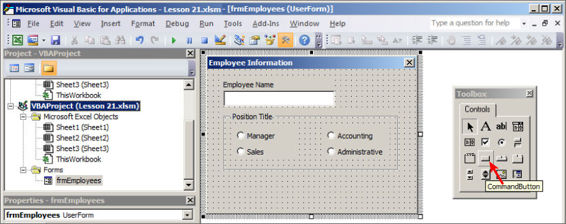
Figure 21.14
In Figure 21.15, two CommandButtons have been added, which completes the UserForm's interface design. One of the CommandButtons is captioned OK, which is a common and intuitive caption for users to click their confirmation of data entries. The other CommandButton is a Cancel button to allow users to quit the UserForm altogether, if they so choose.
NOTE A standard of proper UserForm design is to always allow your users an escape route out of the UserForm. This is commonly done with a Cancel or Exit button that users can click when they want to leave the form.
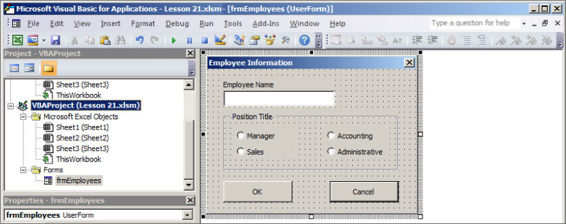
Figure 21.15
Showing a UserForm
To show a UserForm, you execute the VBA Show command in a statement with the syntax UserFormName Show. For example, if you had performed the same steps as you've seen in this lesson to create the frmEmployees UserForm, you may have a simple macro like this to call the UserForm:
Sub EmployeeForm()
frmEmployees.Show
End Sub
If you'd like to see how the UserForm looks when it is called in the actual worksheet environment, without having to write a formal macro for yourself, you can type frmEmployees.Show into the Immediate window and press Enter. Figure 21.16 shows how you and your users see the example UserForm.
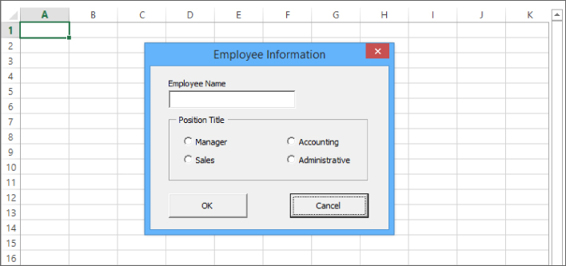
Figure 21.16
Where Does the UserForm's Code Go?
This lesson introduced UserForms and led you through the steps to create a basic form that contains various controls. In Lessons 22 and 23 you see examples of how those and other UserForm controls are programmable with event-driven VBA code.
A UserForm is a class of VBA objects that has its own module. Similar to the notion that each worksheet has its own module, each UserForm you add to your workbook is automatically created with its own module. Accessing a UserForm's module is easy: In the VBE, you can double-click the UserForm itself in the design pane; or in the Project Explorer, you can right-click the UserForm name and select View Code, as shown in Figure 21.17.
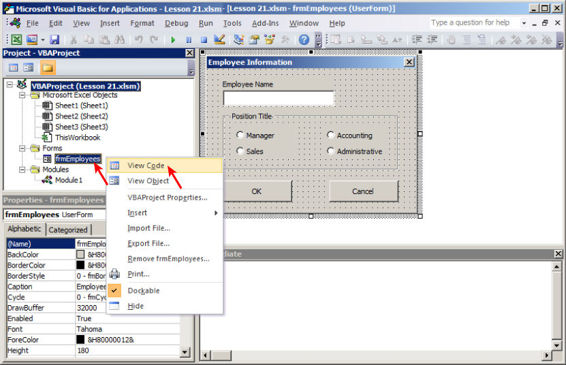
Figure 21.17
Closing a UserForm
You have two ways to close a UserForm. One way is with the Unload method and the other way is with the Hide method. Though both methods make the UserForm look as if it has gone away, they each carry out different instructions. This can be a point of confusion for beginning programmers, so it's important to understand the distinction between Unload and Hide.
Unloading a UserForm
When you unload a UserForm, the form closes and its entries are cleared from memory. In most cases, that is what you want—for the data that was entered to be recorded in some way, or passed to Publicvariables, and then closed. The statement that unloads a UserForm is simply Unload Me, and it is commonly associated with a CommandButton for that purpose, such as the Cancel button that was placed on this lesson's example UserForm.
Suppose you want to unload the UserForm when the Cancel button is clicked. A quick and easy way to do that is to double-click the CommandButton in the UserForm's design, as shown in Figure 21.18.
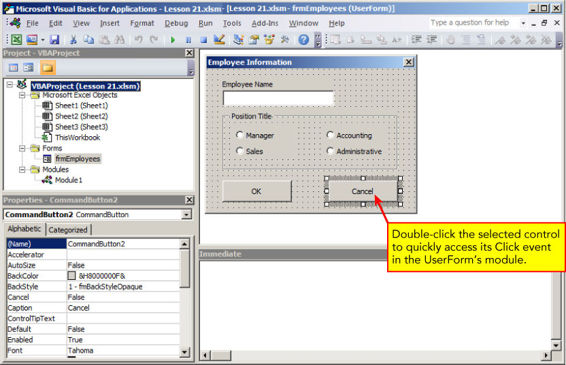
Figure 21.18
When you double-click the CommandButton, you see these lines of code in the UserForm's module:
Private Sub CommandButton2_Click()
End Sub
To complete the Click procedure, type Unload Me. When the Cancel button is clicked, the UserForm unloads—that is, it closes and releases from memory the data that was entered—with this Click event for that button:
Private Sub CommandButton2_Click()
Unload Me
End Sub
Hiding a UserForm
The Hide method makes the UserForm invisible, but the data that was in the UserForm is still there, remaining in memory and able to be viewed when the form is shown again. In some situations you will want this to be the case, such as if you are interacting with two or more UserForms and you want the user to focus on only one form at a time. The statement to hide a UserForm is Me.Hide.
NOTE To summarize the difference between Unload and Hide, the method you choose depends on why you don't want the UserForm to be seen. Most of the time, you'll want the form cleared from memory, but sometimes, information that was entered into the form needs to be referred to the next time you show the form while the workbook has remained open. Closing the workbook automatically unloads a UserForm only if it was hidden.
Try It
In this lesson, you design a simple UserForm with a Label control, a TextBox control, a CheckBox control, and two CommandButton controls.
Lesson Requirements
To get the sample workbook, you can download Lesson 21 from the book's website at www.wrox.com/go/excelvba24hour.
Step-by-Step
1. Press Alt+F11 to go to the Visual Basic Editor.
2. Select the workbook name in the Project Explorer window, and from the menu bar at the top of the VBE click Insert![]() UserForm.
UserForm.
3. Select the UserForm in its design window, and press the F4 key (or click View![]() Properties Window) to show the Properties window.
Properties Window) to show the Properties window.
4. Change the Name property to frmClients and change the Caption property to Clients.
5. Size the UserForm by setting its Height property to 240 and its Width property to 190.
6. From the menu bar at the top of the VBE, click View![]() Toolbox.
Toolbox.
7. From the Toolbox, click the Label control icon and draw a Label across the top of the UserForm. With the Label control selected, change its Caption property to Company Name.
8. From the Toolbox, click the TextBox control icon and draw a TextBox directly below the Label.
9. From the Toolbox, click the Label control icon again, and draw a Label a little bit below the TextBox. With that Label control selected, change its Caption property to Client's business — check all that apply:.
10.Directly below the Label from Step 9, from the Toolbox, click the CheckBox control icon and draw a CheckBox that is wide enough for you to have its Caption property be Agriculture.
11.Repeat Step 10 four more times, meaning you'll draw a total of five CheckBoxes that are stacked one above the other in a vertical fashion. Change the Caption labels on the four other CheckBoxes to Manufacturing, Medical, Retail, and Technology.
12.From the Toolbox, click the CommandButton icon control and draw a CommandButton in the lower-left corner of your UserForm. Change its Caption property to OK.
13.Draw a second CommandButton in the lower-right corner of your UserForm. Change its Caption property to Cancel.
14.Take a look at your completed UserForm as it would appear when called. While you are still in the VBE, press Ctrl+G to get into the Immediate window. Type frmClients.Show and press Enter. Your UserForm should look like the one shown in Figure 21.19.There is no code behind the CommandButtons, so to close this UserForm, click the X Close button at the top-right corner.
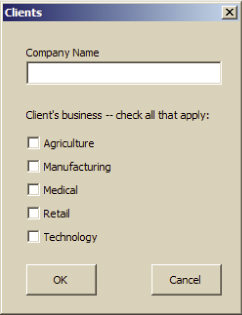
Figure 21.19
REFERENCE Please select the video for Lesson 21 online at www.wrox.com/go/excelvba24hour. You will also be able to download the code and resources for this lesson from the website.
All materials on the site are licensed Creative Commons Attribution-Sharealike 3.0 Unported CC BY-SA 3.0 & GNU Free Documentation License (GFDL)
If you are the copyright holder of any material contained on our site and intend to remove it, please contact our site administrator for approval.
© 2016-2026 All site design rights belong to S.Y.A.