Excel VBA 24-Hour Trainer (2015)
Part IV
Advanced Programming Techniques
Lesson 22
UserForm Controls and Their Functions
UserForms enable you to interact with your users in ways that you can't when using standard Message Boxes, InputBoxes, or controls embedded onto your worksheet. With UserForms, you can control the input of information by validating the kind of data that gets entered, the order in which it is entered, and, if your workbook requires it, the exact location where the information should be stored and how it should be recalled. This lesson leads you through the design of various UserForms, with examples of how to program an assortment of controls that you'll utilize most frequently.
Understanding the Frequently Used UserForm Controls
As demonstrated in Lesson 21, when you add a UserForm to your workbook, the first thing you see is the empty UserForm in its design window, not unlike a blank canvas upon which you'll strategically place your controls. The controls you utilize depend upon the task at hand, and you'll come across countless sets of circumstances for which a UserForm is the right tool for the job.
Still, you'll find that a core group of frequently used controls can handle most of your UserForm requirements. The fun part is tapping into the events each control supports to create a customizable UserForm that's user-friendly and, most importantly, gets the job done.
NOTE As you see in Lesson 23, you are not limited to the relatively few controls shown by default on the Toolbox. Dozens more Toolbox controls are available to you, many of which you'll probably never use, but some you eventually will.
CommandButtons
The CommandButton is a basic staple of just about any UserForm. The combination of a Caption property and Click event make CommandButtons an efficient way to convey an objective and then carry it out with a mouse click. And if for no other reason, a Cancel or Exit button is about as basic a need as any form will have.
Suppose you want to provide your users with a quick way to print a worksheet in either portrait or landscape orientation. You can make it easy for your users to click a button to indicate their decision, and then just go ahead and execute the print job. Figure 22.1 shows an example of how you can do this, followed by the code behind each of the CommandButtons.
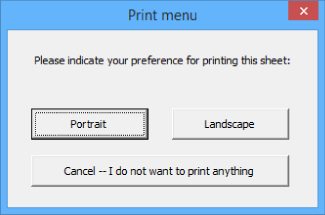
Figure 22.1
Private Sub cmdPortrait_Click()
With ActiveSheet
.PageSetup.Orientation = xlPortrait
.PrintPreview
End With
End Sub
Private Sub cmdLandscape_Click()
With ActiveSheet
.PageSetup.Orientation = Landscape
.PrintPreview
End With
End Sub
Private Sub cmdCancel_Click()
Unload Me
End Sub
NOTE As you can see in the preceding code, each of the CommandButtons has been named using the prefix cmd followed by a notation that gives a clue as to the purpose of the button (seecmdPortrait_Click(), cmdLandscape_Click(), and cmdCancel_Click()). There is nothing sacred about the cmd prefix for CommandButtons, or about the lbl prefix when naming Labels, or about any naming prefix for that matter. Still, it's wise to name your controls in some intuitive and consistent way so you and others recognize the control and its purpose when reviewing your VBA code.
Labels
You've seen Label controls, such as the examples in Lesson 21, where the Label's Caption property is set to always display the same text. Sometimes, a Label can serve to display dynamic information that is not a static piece of text, and in that case, you'd leave the Caption property empty.
UserForms have an Initialize event that is triggered when you call the UserForm, which can help you take action on your UserForm or workbook. Suppose you want to enhance the customized look of your form with a welcome greeting that changes to reflect the time of day. For example, if the UserForm were to be opened in the morning, the message would include the text Good morning, and so on for the afternoon and evening. The following code achieves the effect shown in Figure 22.2:
Private Sub UserForm_Initialize()
Dim TymeOfDay As String
If Time < 0.5 Then
TymeOfDay = "Good Morning ! "
ElseIf Time >= 0.5 And Time < 0.75 Then
TymeOfDay = "Good Afternoon ! "
Else
TymeOfDay = "Good Evening ! "
End If
Label1.Caption = TymeOfDay & "Welcome to the company workbook."
End Sub
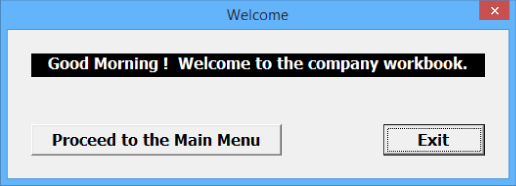
Figure 22.2
TIMES IN VBA
Even after studying the preceding code, you might wonder why a number less than .5 translates to morning, why a number greater than or equal to .5 and less than .75 translates to afternoon, and why a number greater than or equal to .75 translates to evening. The reason is that VBA regards a time of day as a completed percentage of the calendar day. For example, 12:00 noon is the halfway mark of a calendar day, and one-half of something can be mathematically represented by the expression .5. The Time function in VBA interprets a number less than .5 as morning because by definition, half the day would not yet have completed. Afternoon is between .5 (12:00 noon) and up to just before 6:00 PM, which the Time function interprets as .75, being at the three-fourths mark of the 24-hour calendar day. A Time number greater than or equal to .75 is evening because it is at or past 6:00 PM and before the Time number of 0, which is 12:00 midnight of the next day.
You can also populate a Label's caption from another control's event procedure. Suppose your UserForm provides a CommandButton that when clicked, toggles column C as being visible or hidden, such as with this line of code in the CommandButton's Click event:
Columns(3).Hidden = Not Columns(3).Hidden
NOTE Columns(3) is another way of expressing Columns("C:C"). The 3 refers to C being the third letter in the alphabet, which corresponds to the third column from the left in the worksheet grid. If it were column D, the syntax notation would be Columns(4) and so on. There is no schematic advantage to using one style of expression over the other, but I included the numeric expression here so you can be aware of it, and use it in your macros if it feels more intuitive for you to do so.
It's a good practice when constructing UserForms to give the users an indication that confirms what they've just done. In this example, a Label control can be near the CommandButton that confirms the visible or hidden status of column C, with the following code:
Private Sub CommandButton1_Click()
Columns(3).Hidden = Not Columns(3).Hidden
Label1.Caption = "Column C is " & _
IIf(Columns(3).Hidden = True, "hidden", "visible")
End Sub
TextBoxes
A TextBox is most commonly used to display information that is entered by a user, or is associated with a cell through the TextBox's ControlSource property, or is entered programmatically, such as to display a calculation result or a piece of data from a worksheet table. You have probably seen TextBoxes when you've entered information on electronic forms, such as when you've entered your name, address, and credit card number when making a purchase online.
Figure 22.3 shows a UserForm with three TextBox controls. In this example, I've entered my first and last name, and a password that is represented in the figure as a series of asterisks. UserForms are a good way to greet your user and ask for a password with a TextBox, and with the TextBox's PasswordChar property, you can set any character (in this case an asterisk) to appear instead of the password, so no one else sees the password as it is being typed.
NOTE Formatting of TextBoxes is limited to the entire TextBox entry. For example, if you want any portion of the TextBox's contents to be bold, the entire contents must be bold.
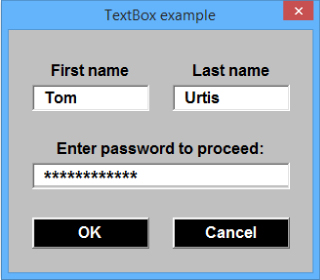
Figure 22.3
Sometimes you will want a TextBox to accept only numeric entries, such as a dollar figure, a calendar year, or a person's age in years. The following code monitors each keystroke entry into TextBox1, and disallows any character that is not a number. As a courtesy to the user, a message appears to immediately inform the user that an improper character was attempted and disallowed:
Private Sub TextBox1_KeyPress(ByVal KeyAscii As MSForms.ReturnInteger)
Select Case KeyAscii
Case 48 To 57
Case Else
KeyAscii = 0
MsgBox "You typed a non-numeric character", _
vbExclamation, _
"Numbers only, please!"
End Select
End Sub
NOTE In the preceding code example, you might not be familiar with the term “ASCII” (pronounced “askee”), which is an acronym for American Standard Code for Information Interchange. Computers can only understand numbers, so a numerical representation is needed for alphanumeric characters and other symbols such as # and @. In the preceding code, numbers 0–9 are recognized by virtue of their ASCII representation of 48–57. If you'd like to see a list of all 255 ASCII and Extended ASCII characters, you can produce it yourself on an Excel worksheet by entering the formula =CHAR(ROW()) in cell A1, and copying it down to cell A255. Each cell holds a character (some characters will not be visible) whose ASCII number corresponds to the cell's row number.
TextBoxes can display calculated results, and when using numbers for mathematical operations, you need to use the Val function, which returns the numbers contained in a TextBox string as a numeric value. Suppose your UserForm contains seven TextBoxes into which you enter the sales dollars for each day of the week. As shown in Figure 22.4, an eighth TextBox can display the sum of those seven numbers when a CommandButton is clicked, with the following code:
Private Sub CommandButton1_Click()
Dim intTextBox As Integer, dblSum As Double
dblSum = 0
For intTextBox = 1 To 7
dblSum = dblSum + Val(Controls("TextBox" & intTextBox).Value)
Next intTextBox
TextBox8.Value = Format(dblSum, "#,###")
End Sub
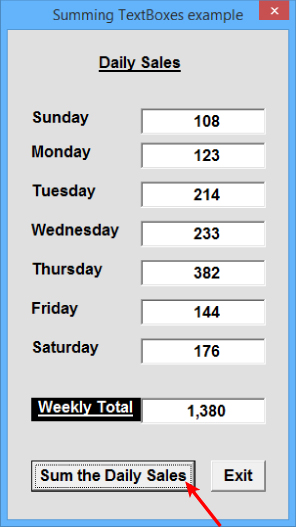
Figure 22.4
ListBoxes
A ListBox displays a list of items and lets you select one or more. ListBoxes are fairly versatile in their display of information and their options for allowing you to select one, many, or all listed items.
Suppose you want to list all 12 months of the year, so any particular month can be selected to perhaps run a report for income and expenses during that month. You might also want the flexibility to run a single report that includes activity for any combinations of months. The ListBox control is an excellent choice because you can set its MultiSelect property to allow just one item, or multiple items, to be selected. Figure 22.5 shows an example of how you can control the way the items appear with the ListStyle property, and selection options for your ListBox (allow only one or more than one item to be selected) with the MultiSelect property.
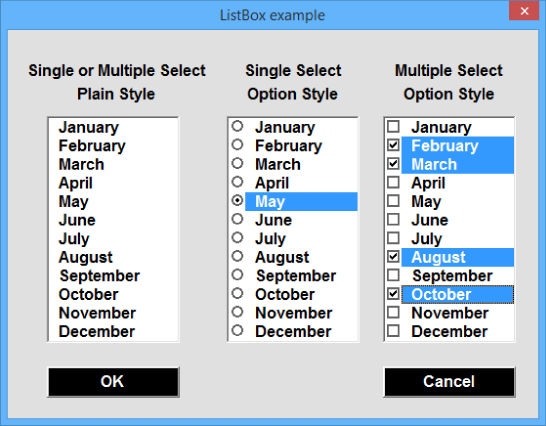
Figure 22.5
You can use two common methods to populate a ListBox with items. In the preceding example, the 12 months of the year could be listed on a worksheet, say on Sheet2 in range A1:A12. To have the ListBox display the list of months, you can enter Sheet2!A1:A12 as the RowSource property for that ListBox.
In many cases, however, you'll want to populate your ListBox without having to store the items on a worksheet. The UserForm's Initialize event is perfect for populating your ListBox with a dynamic or static list of items. Suppose you want to list the names of various countries. The following code does that using the AddItem method in the UserForm's Initialize event, which you can easily append when you want to add or omit a country name:
Private Sub UserForm_Initialize()
With ListBox1
.RowSource = ""
.AddItem "England"
.AddItem "Spain"
.AddItem "France"
.AddItem "Japan"
.AddItem "Australia"
.AddItem "United States"
End With
End Sub
NOTE When you populate a ListBox programmatically (or, as you see later, a ComboBox), be sure to clear the control's RowSource property or you will get a runtime error when you call (initialize) the UserForm. This was done in the preceding code by setting RowSource equal to an empty string.
The following code lists all the visible worksheets in your workbook, and excludes the worksheets that are hidden:
Private Sub UserForm_Initialize()
With ListBox1
.Clear
Dim wks As Worksheet
For Each wks In Worksheets
If wks.Visible = xlSheetVisible Then .AddItem wks.Name
Next wks
End With
End Sub
ListBoxes support many events, and using the Click event, for example, this code activates the worksheet whose name you click, with the ListBox's MultiSelect property set to 0-fmMultiSelectSingle:
Private Sub ListBox1_Click()
Worksheets(ListBox1.Value).Activate
End Sub
ComboBoxes
A ComboBox combines the features of a ListBox and a TextBox, in that you can select an item from its drop-down list, or you can type an item into the ComboBox that is not included in its list. Most of the time, you'll use the ComboBox the same way you'd use data validation, where a drop-down arrow is visible for revealing the list of items that are available for selection.
NOTE If you want to limit the ComboBox to only accept items from the drop-down list, set its Style property to 2 - fmStyleDropDownList.
ComboBoxes allow only one item to be selected; you cannot select multiple items in a ComboBox the way you can with a ListBox. However, ComboBoxes are populated much the same way as ListBoxes, with a RowSource property and an AddItem method.
Suppose you want to guide the users of your workbook to select a year that is within three years—past or future—of the current year. The following code could accomplish that, with Figure 22.6 showing the ComboBox's list after the drop-down arrow was clicked, assuming the current year is 2015:
Private Sub UserForm_Initialize()
With ComboBox1
.Clear
Dim iYear As Integer, jYear As Integer
jYear = Format(Date, "YYYY")
For iYear = 1 To 7
ComboBox1.AddItem jYear - 3
jYear = jYear + 1
Next iYear
End With
End Sub
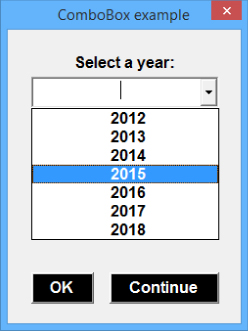
Figure 22.6
As with a ListBox, if the items needed to populate the ComboBox are listed on a worksheet, it does not mean you must refer to them with the RowSource property. You can leave the RowSource property empty, and populate the ComboBox (same concept applies to a ListBox) with the following code example, assuming the values are listed in range A1:A8 with no blank cells in that range:
Private Sub UserForm_Initialize()
ComboBox1.List = Range("A1:A8").Value
End Sub
NOTE If you want the first item in the drop-down list to be automatically visible in your ComboBox, you can add the following line before the End Sub line, assuming the ComboBox is namedComboBox1:
ComboBox1.ListIndex = 0
Sometimes you need to populate the ComboBox (or ListBox) with items listed in a range that also contains blank cells. Figure 22.7 shows how horrible that makes the drop-down list look if you attempted to populate the ComboBox with the line of code ComboBox1.List = Range("A1:A8").Value.
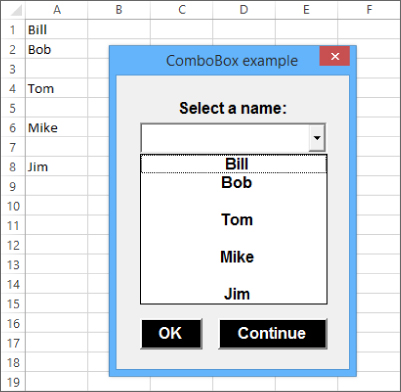
Figure 22.7
Much nicer looking is Figure 22.8, which does not show empty spaces in its drop-down list even though empty cells exist among the list of names. The code to do that is shown here, which uses the LEN function to disregard cells that have no value in them:
Private Sub UserForm_Initialize()
Dim LastRow As Long, cboCell As Range
LastRow = Cells(Rows.Count, 1).End(xlUp).Row
For Each cboCell In Range("A1:A" & LastRow)
If Len(cboCell) > 0 Then ComboBox1.AddItem cboCell.Value
Next cboCell
End Sub
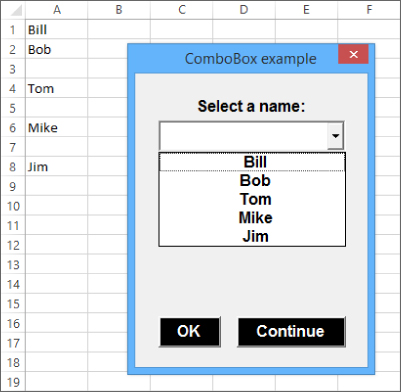
Figure 22.8
CheckBoxes
A CheckBox on your UserForm can serve one of two purposes: to provide users with an option that is of the Yes/No variety, without a superfluous message box to present the option, or to provide a pair of OptionButtons (covered in the next section). Simply, a single CheckBox is inferred to mean Yes or OK if it is checked, and No if it is not checked.
As you develop more complex UserForms, you will want to provide your users with convenient options for viewing—or not viewing—interface objects that might be useful to them in some cases, and irrelevant in others. For example, Figure 22.9 shows the same UserForm in two situations, where the user can check or uncheck the CheckBox captioned Show List of Months. If the CheckBox is unchecked, neither the ListBox nor the Label above it will be visible, but if the CheckBox is checked, those controls do appear. The code associated with the CheckBox follows:
Private Sub CheckBox1_Click()
With CheckBox1
If .Value = True Then
Label1.Visible = True
ListBox1.Visible = True
Else
Label1.Visible = False
ListBox1.Visible = False
End If
End With
End Sub
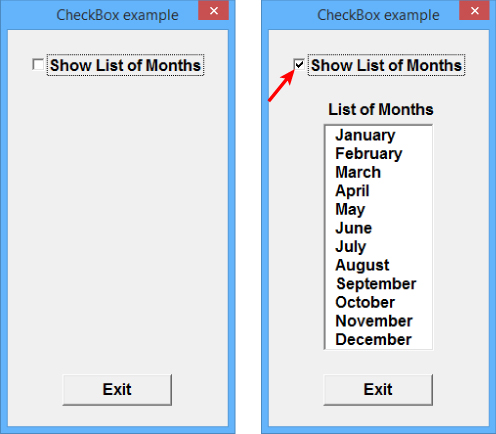
Figure 22.9
NOTE Users appreciate having a say as to what they see on a form, which helps give them some control over the form's navigation process. However, as the workbook's developer, your primary objective is to design a smart form. In this example, if the selection of a month name is a mandatory action in the UserForm's overall process, you would not consider building in the option of hiding a ListBox of month names. You'll often see a single CheckBox on a UserForm when a simple preference is to be indicated, such as including a header on all printed pages, or performing the same action on all worksheets.
Another popular use of CheckBoxes is to provide the user with several options at the same time. Figure 22.10 shows a UserForm that asks for users to indicate which regions a company report should include. When the OK button is clicked, you can assign variables to each CheckBox that was checked, and incorporate those variables later in a VBA decision process that recognizes only the checked regions. One way to accomplish that is to loop through each CheckBox and identify the selected CheckBox(es), as shown in the following code:
Private Sub cmdOK_Click()
'Declare an Integer type variable for the five CheckBoxes.
Dim intCheckBox As Integer
'Declare a String type variable for the list of selected Checkboxes.
Dim strCheckBoxNames As String
'Open a For next loop to examine each of the 5 CheckBoxes.
For intCheckBox = 1 To 5
'If the CheckBox is selected, meaning its value is True,
'build the strCheckBoxNames string with the caption of the
'selected CheckBox, followed by a Chr(10) new line character
'for readability in the confirming MsgBox.
If Controls("CheckBox" & intCheckBox).Value = True Then
strCheckBoxNames = strCheckBoxNames & _
Controls("CheckBox" & intCheckBox).Caption & Chr(10)
End If
'Continue the loop until all 5 CheckBoxes have been examined.
Next intCheckBox
'Display a Message Box to advise the users what they selected.
MsgBox strCheckBoxNames, , "Regions that were checked:"
End Sub

Figure 22.10
OptionButtons
An OptionButton is used when you want the user to select one choice from a group of optional choices. You would use a group of OptionButtons to show the single item that was selected among the group's set of choices. For example, on a college application form, in the gender section, an applicant could select only Male or Female.
In Figure 22.11, a menu for running a financial report might ask the user to select the month of activity upon which the report should be based. A group of 12 OptionButtons limits the user to only one selection. Each OptionButton's Caption property was filled in with the name of a month.
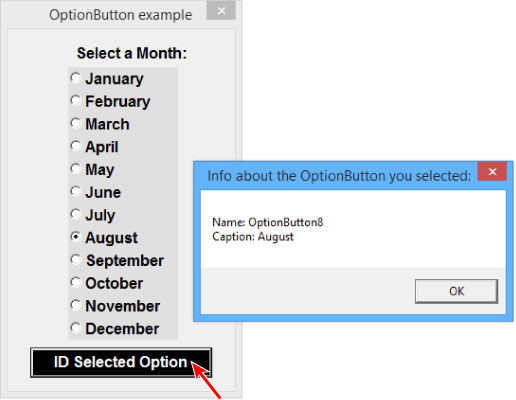
Figure 22.11
Figure 22.11 shows that the month of August was selected, and in real practice, you'd identify that selection in your code with a variable that refers to the selected month name, and produces the report for that month. One way to do that is to loop through each of the OptionButtons and stop when you encounter the selected OptionButton whose value would be True.
To help make the point, there is a button on the form with the caption ID Selected Option, and when you click the button, a message box appears, telling you the name of the selected OptionButton and its caption. The following code examines the status of the OptionButtons and then produces the message box:
Private Sub CommandButton1_Click()
Dim intOption As Integer, optName As String, optCaption As String
For intOption = 1 To 12
If Controls("OptionButton" & intOption) = True Then
optName = Controls("OptionButton" & intOption).Name
optCaption = Controls("OptionButton" & intOption).Caption
MsgBox _
"Name: " & optName & vbCrLf & _
"Caption: " & optCaption, , _
"Info about the OptionButton you selected:"
Exit For
End If
Next intOption
End Sub
OptionButtons have a useful property called GroupName that you should be aware of. In Figure 22.11, a simple UserForm lists 12 OptionButtons, all with the same objective of eliciting a selection for a particular month. But what if your UserForm has other sections for user options that require OptionButtons, such as to select a day of the week, or a print orientation preference of Landscape or Portrait? You'll find many reasons to apply OptionButtons to your UserForms, and you need each set of options to be a mutually exclusive group.
You have two ways to create a group of mutually exclusive OptionButton controls. You can place the group inside a Frame (a control that is covered in the next section), or you can use the GroupName property of the related OptionButtons to group them together. In Figure 22.12, the OptionButtons have been selected in the UserForm's design window, and the GroupName property has been defined with the name Months.
NOTE Whether organized by GroupName or a Frame control, clicking an OptionButton sets its value to True and automatically sets the other OptionButtons in the group (or in the Frame) to False.
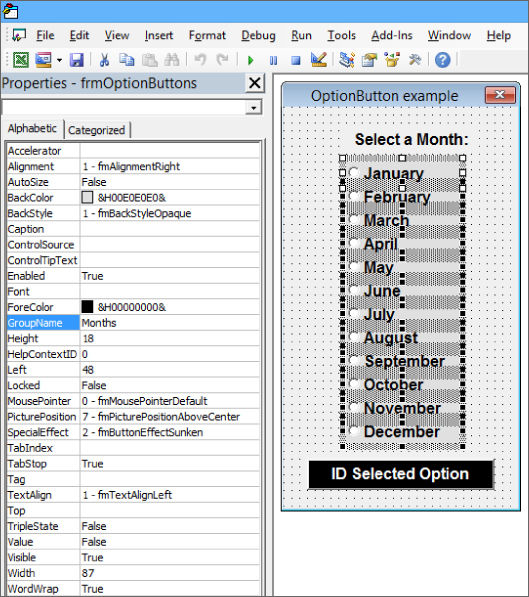
Figure 22.12
Frames
Frame controls group related controls together to provide an organized look and feel when the UserForm calls for many controls. Figure 22.13 illustrates an example of employing a Frame.
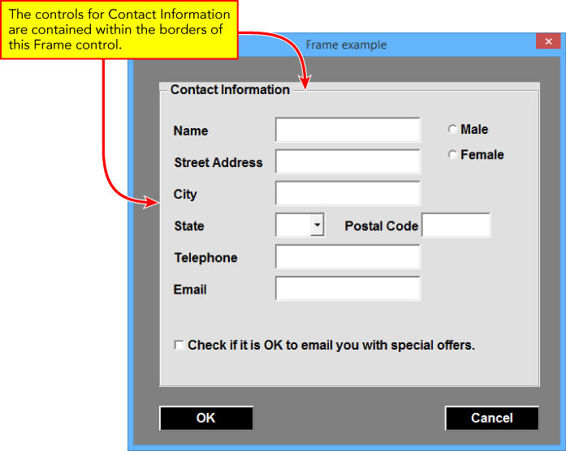
Figure 22.13
When you place controls within a Frame control, manipulating the Frame's properties can affect all the controls inside the Frame. For example, assuming the Frame control shown in Figure 22.13 is named Frame1, this line of code would hide that frame along with all the controls inside it:
Frame1.Visible= False
Sometimes you want your Frame to be visible, but you want all the controls inside the Frame to be temporarily disabled. You can disable the Frame and render its controls unusable with the following line of code:
Frame1.Enabled = False
If you test that, you see a curious result, which is the controls inside the Frame are not “grayed out” but are essentially disabled because they are rendered useless by virtue of the Frame being disabled. The controls themselves appear to be enabled, which can fool your users into wondering what's wrong with perfectly normal-looking controls that do not respond to any keystrokes or mouse clicks.
If you want to disable the actual controls inside the Frame and make them look disabled, you must loop through each of the controls inside the Frame with the following example code. Note that this code does not disable Frame1, only the controls inside it:
Dim FrmControl As Control
For Each FrmControl In Frame1.Controls
FrmControl.Enabled = False
Next FrmControl
Naturally, to enable a control that's been disabled, change the False statement to True, which you can handle in a separate procedure, or in one single procedure with a line of code that toggles the Enabled property using the Not statement. The following example shows how to do this:
Private Sub CommandButton4_Click()
Dim FrmControl As Control
For Each FrmControl In Frame1.Controls
FrmControl.Enabled = Not FrmControl.Enabled
Next FrmControl
End Sub
MultiPages
A MultiPage control is like having a set of tabbed folders that each contain information and controls that would be too voluminous to fit comfortably within the UserForm's interface. Figure 22.14 shows an example of how a MultiPage control can come in handy when a lot of information is being sought from the workbook's users about their viewing preferences.
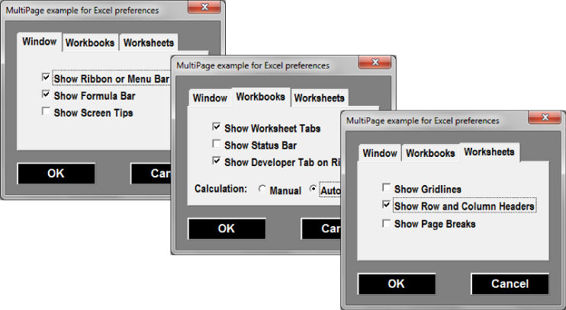
Figure 22.14
The MultiPage control has a collection of Page objects that are each dedicated to a theme. You can right-click a tab to add a new page, delete the page you right-clicked, rename the page's caption, or move the page. MultiPage controls are a terrific way to maximize the space on your UserForm with a smart, organized look and feel.
Try It
In this lesson, you design a UserForm with several controls, including a ListBox that is populated dynamically with the ability to select multiple items.
Lesson Requirements
To get the sample workbook, you can download Lesson 22 from the book's website at www.wrox.com/go/excelvba24hour.
Step-by-Step
1. Open a new workbook and activate Sheet1.
2. In column A, enter the items in the cells as you see them displayed in Figure 22.15.
3. Press Alt+F11 to get into the Visual Basic Editor.
4. Select your workbook name in the Project Explorer, and from the menu bar click Insert ![]() UserForm and accept its default name of UserForm1.
UserForm and accept its default name of UserForm1.
5. Change the UserForm's Caption property to Shopping List.
6. Select the UserForm in its design window, and if the Toolbox is not visible, click View ![]() Toolbox.
Toolbox.
7. Draw a ListBox on the UserForm and accept its default name of ListBox1. Set its MultiSelect property to 1 - fmMultiSelectMulti.
8. Draw a CommandButton on the UserForm below the ListBox and accept its default name of CommandButton1. Change its Caption property to Transfer selected items to Sheet2 column E.
9. Draw another CommandButton on the UserForm below the first CommandButton, and change its Caption property to Exit. That completes the design of the UserForm, which should resemble Figure 22.16when it is called.
10.Double-click the UserForm to go to its module. Type the code under the UserForm's Initialize event that populates the ListBox with items in column A of Sheet1, ignoring the empty cells:
11. Private Sub UserForm_Initialize()
12. Dim LastRow As Long, ShoppingListCell As Range
13. With Worksheets("Sheet1")
14. LastRow = .Cells(Rows.Count, 1).End(xlUp).Row
15. For Each ShoppingListCell In .Range("A1:A" & LastRow)
16. If Len(ShoppingListCell) > 0 Then ListBox1.AddItem ShoppingList
17. Cell.Value
18. Next ShoppingListCell
19. End With
End Sub
11.While in the UserForm's module, type the code for CommandButton2 that is the Exit button:
12. Private Sub CommandButton2_Click()
13. Unload Me
End Sub
12.Immediately above the Code window are two drop-down lists. Click the drop-down arrow at the left belonging to the Object field, and select CommandButton1 to place these two statements in the UserForm's module:
13. Private Sub CommandButton1_Click()
End Sub
13.For the first line of code in the CommandButton1 Click event, open a With structure for Sheet2, which is the destination sheet for selected items:
With Worksheets("Sheet2")
14.Declare variables for the ListBox's items and NextRow:
Dim intItem As Integer, NextRow As Long
15.Clear column E of Sheet2 to start your shopping list with a clean slate:
.Columns(5).Clear
16.Put a header in cell E1 of Sheet2, to start the list:
.Range("E1").Value = "Shopping List"
17.Define the NextRow variable as 2, because column E was just cleared and the Shopping List header is in cell E1 with nothing below it:
NextRow = 2
18.Loop through all items in ListBox1 and if any are selected, list them in turn in column E of Sheet2:
19. For intItem = 0 To ListBox1.ListCount - 1
20. If ListBox1.Selected(intItem) = True Then
.Range("E" & NextRow).Value = ListBox1.List(intItem)
19.Add 1 to the NextRow variable to prepare for the next selected item:
20. NextRow = NextRow + 1
End If
20.Continue the loop until all ListBox items have been examined:
Next intItem
21.Close the With structure for Sheet2:
End With
22.Your final CommandButton1 code looks like this:
23. Private Sub CommandButton1_Click()
24. 'Open a With structure for Sheet2
25. With Worksheets("Sheet2")
26. 'Declare variables for ListBox items and NextRow
27. Dim intItem As Integer, NextRow As Long
28. 'Clear column E of Sheet2
29. .Columns(5).Clear
30. 'Put a header in cell E1
31. .Range("E1").Value = "Shopping List"
32. 'Define the NextRow variable as 2
33. 'because column E was just cleared and the Shopping List
34. 'header is in cell E1 with nothing below it.
35. NextRow = 2
36. 'Loop through all items in ListBox 1 and if any are selected,
37. 'list them in turn in column E of Sheet2.
38. For intItem = 0 To ListBox1.ListCount - 1
39. If ListBox1.Selected(intItem) = True Then
40. .Range("E" & NextRow).Value = ListBox1.List(intItem)
41. 'Add 1 to the NextRow variable to prepare for the next selected item.
42. NextRow = NextRow + 1
43. End If
44. 'Continue the loop until all ListBox items have been examined.
45. Next intItem
46. 'Close the With structure for Sheet2.
47. End With
End Sub
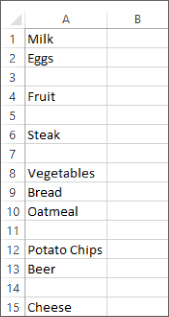
Figure 22.15
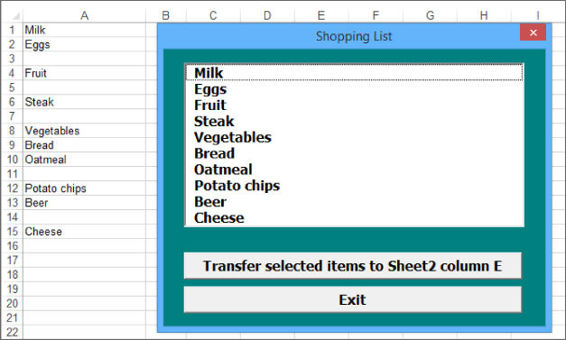
Figure 22.16
REFERENCE Please select the video for Lesson 22 online at www.wrox.com/go/excelvba24hour. You will also be able to download the code and resources for this lesson from the website
All materials on the site are licensed Creative Commons Attribution-Sharealike 3.0 Unported CC BY-SA 3.0 & GNU Free Documentation License (GFDL)
If you are the copyright holder of any material contained on our site and intend to remove it, please contact our site administrator for approval.
© 2016-2026 All site design rights belong to S.Y.A.