Excel VBA 24-Hour Trainer (2015)
Part IV
Advanced Programming Techniques
Lesson 23
Advanced UserForms
Lesson 21 introduces UserForms and shows you how to add controls to your form. Lesson 22 provides several examples of UserForms with frequently used controls to help you gather and store information. This lesson takes an expanded look at how you can get more out of UserForms by tapping into their capacity for supporting some interesting and useful operations.
The UserForm Toolbar
The Visual Basic Editor has a handy toolbar for working with UserForms, aptly named the UserForm toolbar, shown in Figure 23.1. To display it in the VBE, from the menu bar click View![]() Toolbars
Toolbars![]() UserForm.
UserForm.
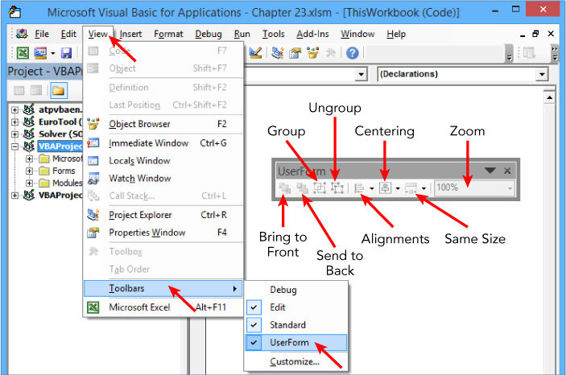
Figure 23.1
The UserForm toolbar has eight buttons:
· Bring to Front: Brings the selected control to the front of the other controls.
· Send to Back: Sends the selected control to the back of the other controls.
· Group: Groups the selected controls.
· Ungroup: Ungroups the selected grouped controls.
· Alignments: The small drop-down arrow to the right of the Alignments icon provides options for aligning the selected controls by their Rights, Lefts, Centers, Tops, Middles, Bottoms, and To Grid.
· Centering: Centers the selected controls horizontally or vertically on the UserForm.
· Same Size: Sizes the selected controls to be of the same Height, Width, or Both.
· Zoom: Displays the UserForm as a zoomed percentage of its normal size.
NOTE If you're working in a UserForm module and you forget the names of controls and you've selected the Require Variable Declaration option (on the Editor tab when you click Tools![]() Options in the VBE), type Me followed by a dot. You see a list of all the methods and properties for the UserForm, including the list of control names belonging to the UserForm.
Options in the VBE), type Me followed by a dot. You see a list of all the methods and properties for the UserForm, including the list of control names belonging to the UserForm.
Modal versus Modeless
Beginning with Excel version 2000, UserForms became equipped with a new property called ShowModal. When a UserForm's ShowModal property is set to True—that is, when it is shown as Modal—it means that while the UserForm is visible, you cannot select a worksheet cell, another worksheet tab, or any of the Ribbon or menu icons until you close the UserForm. Most of the time, this is what you want—for the UserForm to command all focus and attention while it is visible.
At times the users of your project will benefit from the ability to select cells and generally to navigate worksheets while a UserForm is visible. When that's what you need, call the UserForm by specifying the ShowModal property as False. For example:
Sub ShowUserForm1()
UserForm1.Show vbModeless
End Sub
You can also write the preceding code line as UserForm1.Show 0. The default setting for the ShowModal property is vbModal (or the numeral 1), which you don't need to specify when calling a UserForm if you want it to be modal. The code line UserForm1.Show vbModal, UserForm1.Show 1, or (which you have typically been using all along) UserForm1.Show shows the UserForm as modal.
NOTE Here's a neat trick that might interest you. When you call a UserForm as modeless, the UserForm is the active object and an extra mouse click is required to actually activate the worksheet. If you want the worksheet itself to be the active object without manual intervention, add the line AppActivate ("Microsoft Excel") below the Show line; here is a full macro example:
Sub ShowUserForm2()
UserForm2.Show vbModeless
AppActivate ("Microsoft Excel")
End Sub
Disabling the UserForm's Close Button
Some of your UserForms might require input before the user can proceed further. To enforce user input, you can disable the Close button, usually located at the far right of the UserForm's title bar. This is not an everyday happenstance but when your project requires input at a critical point in a process, you need a way to keep the UserForm active until the required information is input.
UserForms have a QueryClose event that can help you control such situations. In Figure 23.2, a message box appears if the “X” Close button is clicked in an attempt to close the UserForm without selecting a name from the drop-down list. The code associated with that follows Figure 23.2.
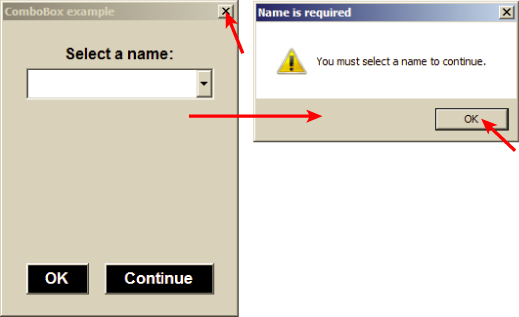
Figure 23.2
Private Sub UserForm_QueryClose(Cancel As Integer, CloseMode As Integer)
'Prevents use of the Close button if a name has not been selected.
If CloseMode = vbFormControlMenu And Len(ComboBox1.Value) = 0 Then
Cancel = True
MsgBox "You must select a name to continue.", , "Name is required"
'Set Focus to the ComboBox for the user.
ComboBox1.SetFocus
End If
End Sub
Keep in mind that you want to monitor the input requirement through the other controls on the UserForm as well. The following example is associated with the Continue button:
Private Sub cmdContinue_Click()
If Len(ComboBox1.Value) = 0 Then
MsgBox "You must select a name to continue.", , "Name is required"
'Set Focus to the ComboBox for the user.
ComboBox1.SetFocus
Exit Sub
Else
Unload Me
End If
End Sub
Maximizing Your UserForm's Size
If you want to fill the screen with just your UserForm and nothing else, the following code in the Initialize event can help you do that. Be aware that some adjustment to the code might be needed with the Zoomproperty, in case the UserForm is so small to begin with that its fully expanded size exceeds the window's Zoom capacity.
Private Sub UserForm_Initialize()
With Application
.WindowState = xlMaximized
Zoom = Int(.Width / Me.Width * 100)
Width = .Width
Height = .Height
End With
End Sub
NOTE You don't need to settle for the UserForm loading in the center of your screen. You can specify the location, such as with the following example that shows the UserForm in the top-left corner of the screen:
Private Sub UserForm_Initialize()
Me.StartUpPosition = 0
Me.Top = Application.Top
Me.Left = Application.Left
End Sub
Selecting and Displaying Photographs on a UserForm
An Image control helps you display a graphic object, such as a picture, on a UserForm. You have three ways to place a picture onto an Image control—two are manual methods and one is a VBA method.
Suppose you have a picture file on your computer, such as your company's logo, that you want to show for a customized look on your UserForm. You can use VBA's LoadPicture method to load the picture file onto the Image control when you call the UserForm, with the following example:
Private Sub UserForm_Initialize()
Image1.Picture = LoadPicture("C:\CompanyPictures\CompanyLogo.jpg")
End Sub
This method works great, so long as the picture file exists in that folder path for every computer on which the UserForm will ever be opened, which is not likely. As you develop UserForms for others' use outside a shared network environment, you want to load a picture onto an Image control manually, and forego the VBA route.
You can load an Image control manually in two ways. In the UserForm's design window, place the Image control where you want it on the UserForm. Activate the Image control's Properties window and locate the Picture property. Placing your cursor inside the Picture property exposes a small ellipsis button, as shown in Figure 23.3. Click that button to show the Load Picture dialog box. From the Load Picture dialog box, navigate to the picture file you want to load, select it, and click Open.

Figure 23.3
The other manual alternative is even simpler. After you've added your Image control, select your picture object and press Ctrl+C to place it on the clipboard. Select the Image control on the UserForm, select its Picture property in the Properties window, click inside the Picture property, and press Ctrl+V to paste the picture into the Image control.
Unloading a UserForm Automatically
Have you ever wanted to show a UserForm for a limited period of time, and then unload it without user intervention? UserForms need not serve the sole purpose of user input. Sometimes they can be opportunistically employed as a mechanism for a specialized greeting, or, if tastefully designed, an informative splash screen.
Personally, I do not appreciate most of the splash screens I see when opening various software applications; many look like cheap advertisements that waste the user's time. However, a nice opening welcome message to customize the look and feel of your workbook can be a good thing if designed well, but do keep the visible time to a maximum of five seconds; any longer than that is an annoyance.
Call the UserForm as you normally would. The following code goes into the UserForm module, in this example for a five-second appearance:
Private Sub UserForm_Activate()
Application.Wait (Now + TimeValue("0:00:05"))
Unload Me
End Sub
Pre-sorting the ListBox and ComboBox Items
Suppose you want to import a list of items into your ListBox (or ComboBox) such as a list of cities in range A1:A20 as shown in Figure 23.4. You can do that easily with this event code for a ListBox:
Private Sub UserForm_Initialize()
ListBox1.List = Range("A1:A20").Value
End Sub
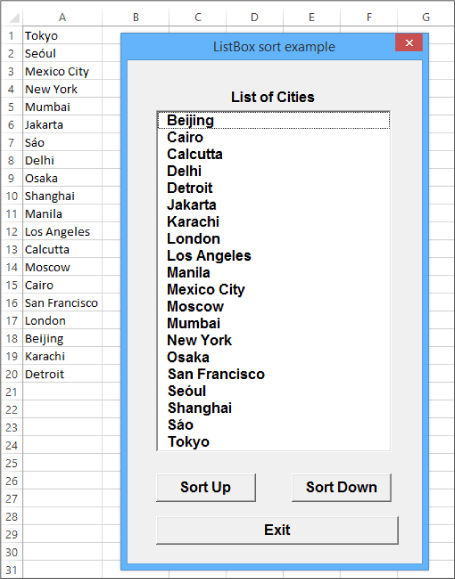
Figure 23.4
Lists tend to be easier to work with when they are alphabetized. To handle that seamlessly for the user, the following amendment to the preceding code is a series of loops with variables that examine each element in the ListBox, and sorts it in ascending alphabetical order. The result is shown in Figure 23.4.
Private Sub UserForm_Initialize()
ListBox1.List = Range("A1:A20").Value
Dim x As Integer, y As Integer, z As String
With ListBox1
For x = 0 To .ListCount - 2
For y = x + 1 To .ListCount - 1
If .List(x) > .List(y) Then
z = .List(y)
.List(y) = .List(x)
.List(x) = z
End If
Next y
Next x
End With
End Sub
Notice two additional CommandButtons near the bottom of the UserForm. One is captioned Sort Up and the other is captioned Sort Down. Users appreciate the ability to customize the look of their interface. If it is easier for some people to read a list from Z to A, and others from A to Z, so be it. The following code shows an example of how each button, when clicked, sorts the ListBox. First, ascending:
Private Sub cmdSortUp_Click()
Dim x As Integer, y As Integer, z As String
'Sort ascending
With ListBox1
For x = 0 To .ListCount - 2
For y = x + 1 To .ListCount - 1
If .List(x) > .List(y) Then
z = .List(y)
.List(y) = .List(x)
.List(x) = z
End If
Next y
Next x
End With
End Sub
Then, descending:
Private Sub cmdSortDown_Click()
Dim x As Integer, y As Integer, z As String
'Sort descending
With ListBox1
For x = 0 To .ListCount - 2
For y = x + 1 To .ListCount - 1
If .List(x) < .List(y) Then
z = .List(y)
.List(y) = .List(x)
.List(x) = z
End If
Next y
Next x
End With
End Sub
NOTE If you were to do this in real practice, you'd eliminate the redundancy of declaring the same variables for each event, and instead publicly declare them once.
Populating ListBoxes and ComboBoxes with Unique Items
As often as not, when you load a ListBox or ComboBox with a source list of items from a worksheet, the range is dynamic, meaning the length of the list varies. Also, chances are pretty good that the source list contains duplicate entries, and there is no need to place more than one unique item in a ListBox or ComboBox.
In Figure 23.5, column A contains a list of clothing items that were sold in a department store. A unique list of these items was compiled in a ComboBox as shown in Figure 23.5, with the following code to demonstrate how to populate the ComboBox in this manner when the length of the source list is not known, and some cells in the source list might have no entry.
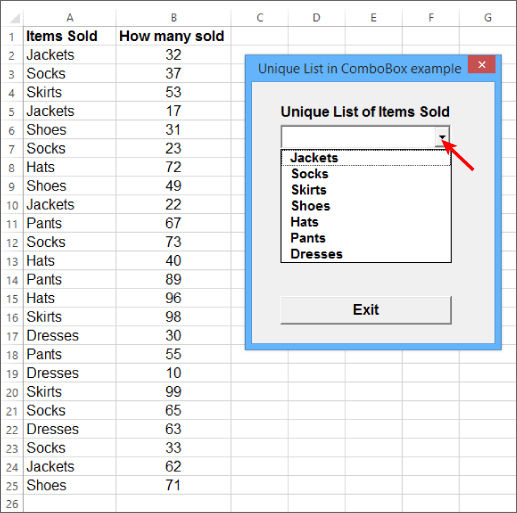
Figure 23.5
Private Sub UserForm_Initialize()
'Declare variables for a Collection and cell range.
Dim myCollection As Collection, cell As Range
'Error bypass to set a new collection.
On Error Resume Next
Set myCollection = New Collection
'Open a With structure for the ComboBox
With ComboBox1
'Clear the ComboBox
.Clear
'Open a For Next loop to examine every cell starting with A2
'and down to the last used cell in column A.
For Each cell In Range("A2:A" & Cells(Rows.Count, 1).End(xlUp).Row)
'If the cell is not blank…
If Len(cell) <> 0 Then
'Clear the possible error for a Collection
'possibly not having been established yet.
Err.Clear
'Add the cell's value to the Collection.
myCollection.Add cell.Value, cell.Value
'If there is no error, that is, if the value does not
'already exist in the Collection, add the item to the ComboBox.
If Err.Number = 0 Then .AddItem cell.Value
End If
'Loop to the next cell.
Next cell
'Close the With structure for the ComboBox.
End With
End Sub
NOTE If you want the first item in the ComboBox's list to be visible when the UserForm is called, add this line before the End Sub line:
ComboBox1.ListIndex = 0
To expand a bit on the possible usefulness of listing unique items in a ComboBox, see the example in Figure 23.6, where two Label controls were added (named Label2 and Label3) to the right of the ComboBox. When the ComboBox value is changed with the following code, Label2's caption reflects the value item, and Label3's caption sums the items sold in column B for the item that was selected in the ComboBox.
Private Sub ComboBox1_Change()
Label2.Caption = _
"Total " & ComboBox1.Value & " Sold:"
Label3.Caption = _
WorksheetFunction.SumIf(Columns(1), ComboBox1.Value, Columns(2))
End Sub
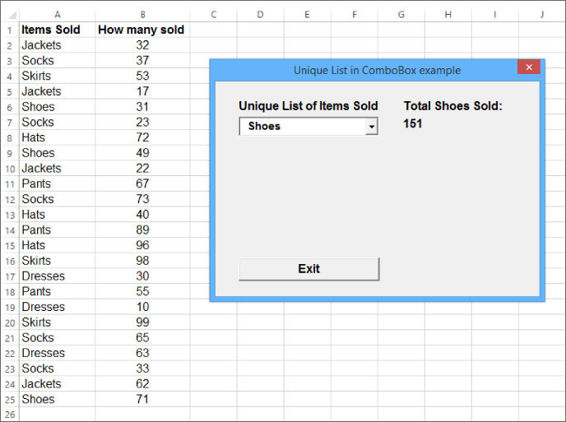
Figure 23.6
Displaying a Real-Time Chart in a UserForm
Earlier in this lesson you saw how to load a picture into an Image control. You can also create a temporary graphic file on the fly, load that file into a UserForm's Image control, and delete the temporary graphic file, all with the user being none the wiser.
Figure 23.7 shows a list of cities, ranked by their approximate population. Elsewhere in the workbook is a chart sheet named Chart1 with a bar chart of this city population data. You can represent the Chart1 sheet's chart in real time by exporting its image as a .gif file and loading it onto an Image control when the UserForm is called. Figure 23.7 shows the result and following that is the Initialize event code that handles this task.
Private Sub UserForm_Initialize()
ActiveWorkbook.Charts("Chart1").Export "CityPopulation.gif"
Image1.Picture = LoadPicture("CityPopulation.gif")
Image1.PictureSizeMode = fmPictureSizeModeZoom
Kill "CityPopulation.gif"
End Sub
NOTE You can print a UserForm, even if it is not open, with the following line:
UserForm1.PrintForm

Figure 23.7
Try It
For this lesson, you design a UserForm to have the basic functionality of a web browser, including the ability to navigate to the websites of your choice, go backward and forward to websites, and set the initial website when the UserForm is initialized.
Lesson Requirements
To get the workbook, you can download Lesson 23 from the book's website at www.wrox.com/go/excelvba24hour.
Step-by-Step
1. Open a new workbook and press Alt+F11 to get into the Visual Basic Editor.
2. If the Project Explorer window is not visible, press Ctrl+R, and if the Properties window is not visible, press the F4 key.
3. In the Project Explorer window, select your workbook name, and from the menu bar click Insert![]() UserForm.
UserForm.
4. In the Properties window for that UserForm, accept the default Name property of UserForm1, set the Height property to 540 and the Width property to 852.
5. Click the Toolbox icon, or from the menu bar click View![]() Toolbox.
Toolbox.
6. Draw a TextBox near the upper-left corner of the UserForm. Accept the default Name property of TextBox1, set its Height property to 24, and its Width property to 252.
7. Draw four CommandButtons along the top of the UserForm to the right of the TextBox. Each CommandButton should be the same size, with its Height property set at 24 and its Width property set at 120.
8. Name the first CommandButton cmdNavigate and label its Caption property as Navigate. Set its Default property to True.
9. Name the second CommandButton cmdBack and label its Caption property as Back.
10.Name the third CommandButton cmdForward and label its Caption property as Forward.
11.Name the fourth CommandButton cmdExit and label its Caption property as Exit.
12.The final control is a WebBrowser, and chances are its icon is not on your Toolbox's Cover tab. If that's the case, right-click the Cover tab and select Additional Controls as shown in Figure 23.8.
13.Scroll down the list of available controls and select Microsoft Web Browser as shown in Figure 23.9. Click OK to place the WebBrowser icon on your Toolbox's Cover tab as shown in the lower-left corner of Figure 23.10.
14.Click to select the WebBrowser icon on the Toolbox just as you would with any control, and draw a WebBrowser control onto the open area of the UserForm. Accept the default Name property of WebBrowser1, and then set its Height property to 450 and its Width property to 816. This completes the design of the UserForm, which in the VBE looks like Figure 23.11.
15.The code associated with this UserForm is surprisingly simple. Double-click the UserForm to access its module. In the Object drop-down list, select UserForm and in the Procedure drop-down list select Initialize. The Initialize event is a single line of code that tells the WebBrowser which website to navigate to when the UserForm initializes, similar to the homepage setting on your web browser. In this example, I entered the website for Microsoft, at www.microsoft.com. Here is the entire Initialize event with that navigation command:
16. Private Sub UserForm_Initialize()
17. WebBrowser1.Navigate "http://www.microsoft.com"
End Sub
16.You have an Exit button named cmdExit, so use the Unload Me command for that:
17. Private Sub cmdExit_Click()
18. Unload Me
End Sub
17.Regarding the CommandButton for navigation, the process starts by the user entering a website address in the TextBox. The user can then either click the cmdNavigate button, or press the Enter key because you set the Default property to True for the cmdNavigate button in Step 8. Thinking ahead for more convenience, you can structure the cmdNavigate's Click event to assume that all web addresses start with “http://www.” which saves the user time and effort by just entering the web address's domain name. For example, instead of entering http://www.somwhere.com in the TextBox, a user need only enter somewhere.com with this code for the cmdNavigate button:
18. Private Sub cmdNavigate_Click()
19. WebBrowser1.Navigate "http://www." & TextBox1.Text
End Sub
18.All that's left are the two buttons for Back and Forward, easily handled with the WebBrowser control's GoBack and GoForward methods. For both methods, On Error Resume Next is utilized to avoid a possible runtime error if the browsing session is at its starting or ending point when the cmdBack or cmdForward button is clicked. Here is the code for the Back CommandButton:
19. Private Sub cmdBack_Click()
20. On Error Resume Next
21. WebBrowser1.GoBack
22. Err.Clear
End Sub
Here is the code for the Forward CommandButton:
Private Sub cmdForward_Click()
On Error Resume Next
WebBrowser1.GoForward
Err.Clear
End Sub
19.When you call the UserForm, Figure 23.12 shows an example that is similar to what you see.
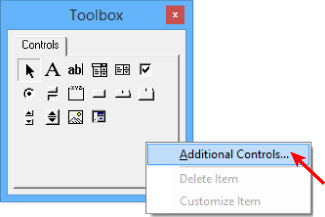
Figure 23.8
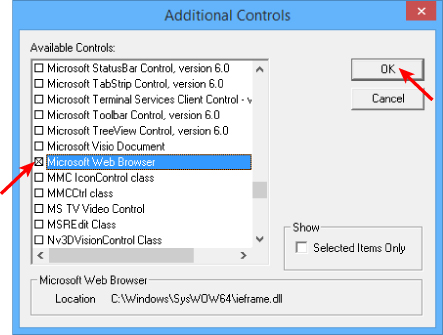
Figure 23.9
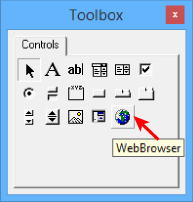
Figure 23.10
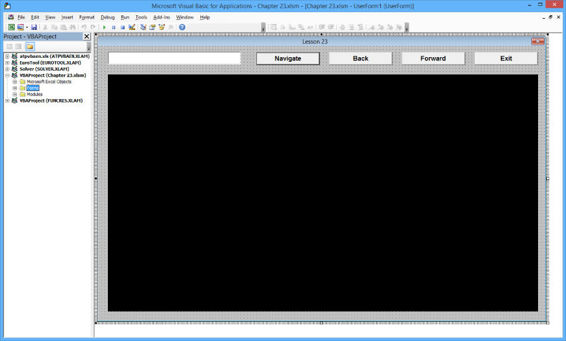
Figure 23.11
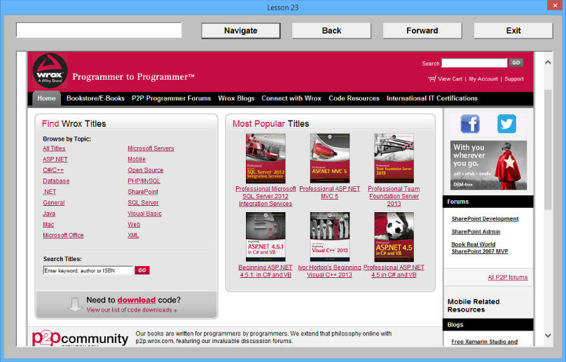
Figure 23.12
REFERENCE Please select the video for Lesson 23 online at www.wrox.com/go/excelvba24hour. You will also be able to download the code and resources for this lesson from the website.
All materials on the site are licensed Creative Commons Attribution-Sharealike 3.0 Unported CC BY-SA 3.0 & GNU Free Documentation License (GFDL)
If you are the copyright holder of any material contained on our site and intend to remove it, please contact our site administrator for approval.
© 2016-2026 All site design rights belong to S.Y.A.