Excel VBA 24-Hour Trainer (2015)
Part IV
Advanced Programming Techniques
Lesson 24
Class Modules
Class modules—the very name has caused many a burgeoning Excel VBA programmer to turn toward other areas of VBA study. For some reason, the use of class modules is not a skill held by many otherwise knowledgeable VBA programmers, despite the power and flexibility class modules can provide to your workbook projects.
Class modules are not rocket science, but they are a different kind of VBA animal that takes some extra attention to grasp. I want to express three objectives in this lesson:
· Explain what classes and class modules are.
· Describe what class modules can do for you.
· Provide examples of class modules applied to UserForm and embedded worksheet controls.
Here is an opportunity for you to set yourself apart from the VBA crowd and learn a valuable skill that has actually been available in Excel since Office 97. Though you won't need class modules for most of your projects, this lesson helps you recognize when the time is right to use class modules, and most importantly, how to program them.
What Is a Class?
A class is the formalized definition of an object that you create. Your first reaction might be to wonder why you'd ever need to create yet another object in Excel, which seemingly has no shortage of objects. Actually, you normally don't need to, but there will be times when your workbook will be better off if you do.
A new class (as in classification) is like a blueprint for your created object and its properties, methods, and events. In Lesson 19 you learned about user-defined functions; where class modules are concerned, you can think of a class as a user-defined model for an object that you create. You see examples later in the lesson that help clarify the theory.
NOTE It's easy to get lost on any new topic if the emphasis on learning it is based on definitions and theory. That is why most of this lesson relies on real-world examples to show what class modules are all about. Though kept to a minimum, the definitions and theory in this lesson are useful for you to gain a perspective on class modules. If you don't fully comprehend all definitions the first time around, don't worry—the VBA examples will be your biggest ally in helping you understand the process of developing class modules.
What Is a Class Module?
A class module is a special module in the Visual Basic Editor whose purpose is to hold VBA code that defines classes. A class module looks like any other kind of module you have seen, and in its own way acts like one, too. For example, whereas the code for worksheet event procedures goes into worksheet modules, the code for creating and defining classes goes into class modules.
You create a class module in the VBE by choosing Insert![]() Class Module from the menu bar as shown in Figure 24.1. A class module is created with the default name of Class1 as shown in Figure 24.2.
Class Module from the menu bar as shown in Figure 24.1. A class module is created with the default name of Class1 as shown in Figure 24.2.
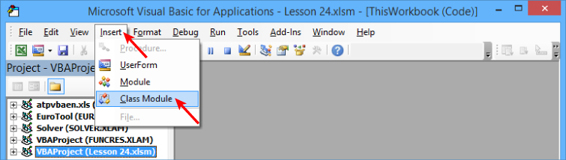
Figure 24.1
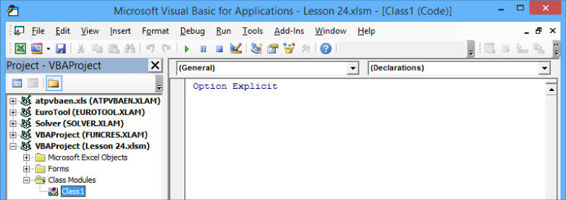
Figure 24.2
NOTE There is a one-to-one relationship between a class and a class module. A class module provides for only one class to be defined. If you need to define three classes in your workbook, you need three class modules, one for each class. For example, suppose you have several CheckBox controls on your UserForm, and you want to color the CheckBoxes green when they are checked and red when they are unchecked. Instead of coding this functionality for every CheckBox's Click event, you can use a class module that groups all the CheckBoxes as a single collection object. That way, all CheckBoxes respond to the same Click event, with one VBA class procedure. If you also want some (or all) of the CommandButtons on a UserForm in that same workbook to respond to, say, aMouseMove event, you'd create another class module for that.
Creating Your Own Objects
I started this lesson saying that many VBA programmers have avoided the topic of class modules, and it wouldn't surprise me if a primary culprit is VBA's intentionally vague concept of class objects. Seeing actual VBA examples of class modules in everyday situations is the best way to pick up the concept of class objects.
Here's the theoretical synopsis: A class is defined in a class module, and you can think of a class as a blueprint or template for an object. In the context of class modules, the term object can be almost any object in Excel whose functionality you want to expand. This concept becomes clearer with VBA examples in this lesson that deal with controls that are embedded in a worksheet or are placed onto UserForms. You can have those controls all respond to one single event, instead of needing to write numerous redundant procedures for each control.
A class module only serves the purpose of holding the code that defines (but does not create) a class object. In some other module that is not a class module, such as a UserForm module or workbook module (depending on the task you are solving), you can declare a variable of the class type and create an instance of that class (known as instantiating the class) with the New keyword. Upon instantiation, your declared variable becomes an object whose events, properties, and methods are defined by your code in the class module.
An Important Benefit of Class Modules
Suppose you have a UserForm with 12 TextBoxes, into which a dollar figure for budgeted expenses is to be entered for each month of the year, as in the example shown in Figure 24.3.
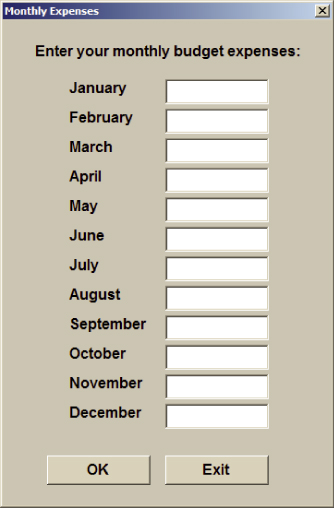
Figure 24.3
It's important that only numbers are entered, so you want to validate every TextBox entry to be numeric, while disallowing entry of an alphabetic letter, symbol, or any character other than a number. The following example can handle that for TextBox1 in the UserForm module:
Private Sub TextBox1_KeyPress(ByVal KeyAscii As MSForms.ReturnInteger)
Select Case KeyAscii
Case 48 To 57 'numbers 0-9
Case Else
KeyAscii = 0
MsgBox "You made a non-numeric entry.", vbCritical, "Numbers only please."
End Select
End Sub
You can maybe get away with the redundancy of writing 12 separate events to monitor the entries in each TextBox. But what happens if your project requires 100 TextBoxes, or if the numeric validation process expands to allow decimals or negative numbers? You'd have to do a lot of updates for each TextBox, and the volume of redundant code creates a bad design that's destined for human error and runtime failure.
If you insert a class module instead, you can define an object that would be a group of 12 TextBoxes. You can name your group object TxtGroup and indicate that the objects in that group are TextBoxes. There is nothing special about the name TxtGroup. I chose it because the idea is to group TextBoxes, but whatever object name makes sense to you works just as well.
The following VBA declaration statement is a common example that is placed at the top of your class module. It defines the class object and includes the WithEvents keyword, which exposes the events associated with TextBoxes:
Public WithEvents TxtGroup As MSForms.TextBox
Now that you have established the TxtGroup object as a group of TextBoxes, you can invoke it to handle the same KeyPress event that you might have written individually for all 12 TextBoxes. As shown in the following code, you now make the TxtGroup object recognize the KeyPress event triggered by keyboard data entry upon any one of its 12 TextBoxes. The code to handle an event for all 12 TextBoxes is the same for TxtGroup as it is for TextBox1, except for the name of the object:
Private Sub TxtGroup_KeyPress(ByVal KeyAscii As MSForms.ReturnInteger)
Select Case KeyAscii
Case 48 To 57 'numbers 0-9
Case Else
KeyAscii = 0
MsgBox "You made a non-numeric entry.", vbCritical, "Numbers only please."
End Select
End Sub
Keep in mind that, so far, all you have done is define the object, but it still exists only as a concept. The next step is to create your defined object (formally known as instantiating it) to make it a working object that responds to events, and becomes associated with methods and properties. At this moment, with the UserForm created and the class module selected with the preceding code in it, your work in the class module is complete. Your VBE window should look similar to Figure 24.4.

Figure 24.4
The final step is to go into the UserForm module and instantiate the TxtGroup object that is a group of 12 TextBoxes. At the top of the UserForm module, declare a variable for 12 TextBoxes to instantiate the TxtGroup class object, with the New keyword for the Class1 module name:
Dim txtBoxes(1 To 12) As New Class1
Using the Initialize event, declare an Integer type variable that assists in looping through the 12 TextBoxes. Set each TextBox as a member of the TxtGroup class:
Private Sub UserForm_Initialize()
Dim intCounterTextBox As Integer
For intCounterTextBox = 1 To 12
Set txtBoxes(intCounterTextBox).TxtGroup = _
Controls("TextBox" & intCounterTextBox)
Next intCounterTextBox
End Sub
Your entire coding process relating to the class module is complete, and it is quite a bit shorter than all the code you'd have amassed if you coded the KeyPress event for every TextBox! If you were to open the UserForm and attempt a non-numeric character in any of the 12 TextBoxes, that character would be disallowed and the message box would appear, looking like Figure 24.5.
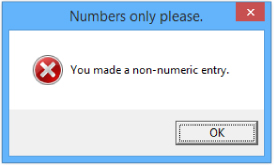
Figure 24.5
Creating Collections
In the preceding example, you created a class for 12 TextBoxes. You knew ahead of time the number of TextBoxes was 12 because there was a TextBox for each of the 12 calendar months. The question becomes, what do you do if the count of inclusive TextBoxes is not known? What if your project is so wide in scope that TextBoxes are being frequently added and subtracted from the UserForm, and you don't want to keep modifying the code with every change in TextBox count?
The answer is to create a collection of TextBoxes by looping through all the controls in the UserForm. Then, when a TextBox is encountered in the loop, it is automatically added to the collection, which is then transferred to the class object. Assuming the event code you placed in the class module has not changed, all you need to adjust is the code in the UserForm module using the previous example. The first item of business is to prepare a declaration statement at the top of the module that does not specify a count of TextBox names, such as the following example:
Dim TxtGroup() As New Class1
Next, the following code in the UserForm's Initialize event wraps up all the TextBoxes into one array package using the ReDim Preserve keywords. This method does not depend on how many TextBoxes are present on the UserForm it simply collects all the ones into the TxtGroup object that it finds:
Private Sub UserForm_Initialize()
Dim intCounterTextBox As Integer, ctl As Control
intCounterTextBox = 0
For Each ctl In Controls
If TypeName(ctl) = "TextBox" Then
intCounterTextBox = intCounterTextBox + 1
ReDim Preserve TxtGroup(1 To intCounterTextBox)
Set TxtGroup(intCounterTextBox).TxtGroup = ctl
End If
Next ctl
End Sub
Class Modules for Embedded Objects
So far, UserForms have been the backdrop for objects in a class module. You can also create a class of objects embedded on worksheets, such as charts, pivot tables, and ActiveX controls. In the case of ActiveX controls, it's worth mentioning a syntax difference when referring to them.
Suppose you have an unknown number of CommandButtons on Sheet1 and you want to create a class module to determine which button was clicked, without having to program every CommandButton's Clickevent. This example of code in a class module named Class1 demonstrates how to extract the name, caption, and address of the cell being touched by the top-left corner of the CommandButton object. Figure 24.6shows the message box that appears when you click one of the CommandButtons.
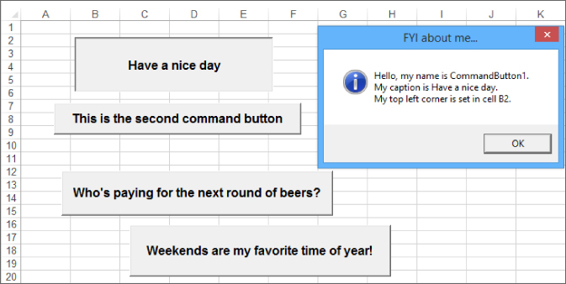
Figure 24.6
Public WithEvents cmdButtonGroup As CommandButton
Private Sub cmdButtonGroup_Click()
MsgBox _
"Hello, my name is ''" & _
cmdButtonGroup.Name & "''." & vbCrLf & _
"My caption is ''" & _
cmdButtonGroup.Caption & "''." & vbCrLf & _
"My top left corner is set in cell " & _
cmdButtonGroup.TopLeftCell.Address(0, 0) & ".", _
64, "You just clicked me, here's my info :"
End Sub
You can also tap into other events in the same class module. All that's required is that you use the same class object (cmdButtonGroup in this example), and that the event is supported by the object. With CommandButtons, the MouseOver event can help you identify which button you are hovering your mouse over by shading it orange, while all other CommandButtons on the sheet are colored gray.
NOTE I used hex codes in this example for the buttons' BackColor property, to show how you'd use hex in code to refer to colors. These hex values are always shown in the Properties window of ActiveX controls for BackColor and ForeColor properties, and I personally find them very reliable in VBA code with any version of Excel.
Private Sub cmdButtonGroup_MouseMove(ByVal Button As Integer, _
ByVal Shift As Integer, ByVal X As Single, ByVal Y As Single)
Dim myBtn As Object
For Each myBtn In ActiveSheet.OLEObjects
If TypeName(myBtn.Object) = "CommandButton" Then _
myBtn.Object.BackColor = &HC0C0C0 'turn all to gray
Next myBtn
cmdButtonGroup.BackColor = &H80FF& 'orange
End Sub
NOTE As you can probably tell, despite the appearance of differently shaped CommandButtons with comical captions, the larger point of this example is that you can capture various properties of class objects, assign them to a variable, and utilize that variable information in other macros, or even as part of the class module's event code. For example, in real practice, you don't need or want a message box to pop up and tell you which button you just clicked; you already know that. If, for example, your project is such that the CommandButtons' captions have a word or phrase to be used as a criterion for automatically filtering a table of data, this application of flexible class module coding will save you a lot of work.
For embedded ActiveX controls, you can instantiate the collection of OLE objects, in this example for CommandButtons, with the following code that goes into the ThisWorkbook module. Be sure to place this example declaration statement at the top of the ThisWorkbook module:
Dim cmdButtonHandler() As New Class1
Finally, utilize the Open event to collect the CommandButtons that are only on Sheet1. Notice the references to the OLEObject and OLEObjects keywords when dealing with embedded ActiveX controls:
Private Sub Workbook_Open()
Dim cmdButtonQuantity As Integer, MYcmdButton As OLEObject
cmdButtonQuantity = 0
With ThisWorkbook
For Each MYcmdButton In .Worksheets("Sheet1").OLEObjects
If TypeName(MYcmdButton.Object) = "CommandButton" Then
cmdButtonQuantity = cmdButtonQuantity + 1
ReDim Preserve cmdButtonHandler(1 To cmdButtonQuantity)
Set cmdButtonHandler(cmdButtonQuantity).cmdButtonGroup _
= MYcmdButton.Object
End If
Next MYcmdButton
End With
End Sub
Not all controls recognize the same event types, though, so you'd need to set a class event that the object type can recognize.
There is another technique using the Collection keyword for grouping the same types of objects into a class. In this example, Sheet1 has a number of embedded CheckBox controls, and you want to write one small piece of VBA code that applies to all CheckBoxes.
The visual effect you want is for any CheckBox on Sheet1 to be shaded black if it is checked, and white if it is unchecked. Figure 24.7 shows the differences in color shading depending on the status of the CheckBoxes.
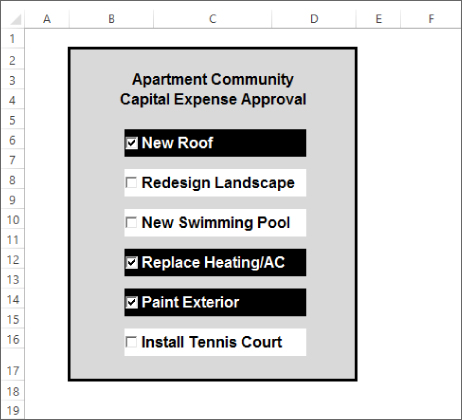
Figure 24.7
The code to do this is surprisingly minimal. Insert a new class module, and assuming it is named Class2 because you already have a Class1 module established, this code goes into the Class2 module:
Public WithEvents grpCBX As MSForms.CheckBox
Private Sub grpCBX_Click()
With grpCBX
If .Value = True Then
.BackColor = &H0& 'Black background
.ForeColor = &HFFFFFF 'White font
Else
.BackColor = &HFFFFFF 'White background
.ForeColor = &H0& 'Black font
End If
End With
End Sub
The rest of the code goes into the ThisWorkbook module. It instantiates the grpCBX object and is refreshed each time the workbook opens by utilizing the Workbook_Open event:
Public myControls As Collection
Private Sub Workbook_Open()
Dim oleCtl As OLEObject, ctl As Class2
Set myControls = New Collection
For Each oleCtl In Worksheets("Sheet1").OLEObjects
If TypeOf oleCtl.Object Is MSForms.CheckBox Then
Set ctl = New Class1
Set ctl.grpCBX = oleCtl.Object
myControls.Add ctl
End If
Next
End Sub
Try It
For this lesson, you create a class module to handle the Click event of some of the OptionButtons on a UserForm. You design a simple UserForm with eight OptionButtons, of which only five are a part of the class module that identifies by name which OptionButton and caption was clicked.
Lesson Requirements
To get the sample workbook, you can download Lesson 24 from the book's website at www.wrox.com/go/excelvba24hour.
Step-by-Step
1. Open a new workbook.
2. Press Alt+F11 to get into the Visual Basic Editor.
3. From the menu bar, click Insert![]() UserForm, and size the UserForm to a Height of 200 and a Width of 400.
UserForm, and size the UserForm to a Height of 200 and a Width of 400.
4. Draw a Label control near the top-left corner of your UserForm, and caption it as OptionButtons In Class Module.
5. Draw a Label control near the top-right corner of your UserForm and caption it as Other OptionButtons. Figure 24.8 shows how your UserForm should look so far.
6. Under the first Label control, draw a vertical column of five OptionButtons. A fast way to do this is to draw one OptionButton and then copy and paste it four times. Change the captions of those five OptionButtons to Apples, Bananas, Peaches, Grapes, and Oranges, as shown in Figure 24.9.
7. Paste three more OptionButtons below the second Label control. Change the captions of those three OptionButtons to Plums, Pears, and Tangerines. You now have eight OptionButtons on your UserForm, all with different captions that are the names of fruits. The actual VBA names of the eight OptionButtons have not changed; they all are still named by default as OptionButton1, OptionButton2, and so on, to OptionButton8. For example, if you were to select the OptionButton that is captioned Oranges, you would see in its Properties window that it is named OptionButton5. Figure 24.10 shows how your UserForm looks at this point.
8. Draw a CommandButton in the lower-right corner of the UserForm. Name it cmdExit and caption it as Exit.
9. Double-click the cmdExit button, which takes you into the UserForm's module, with the cmdExit button's Click event ready for your code. Type Unload Me, and your UserForm module in the VBE looks like Figure 24.11.
10.Insert a class module. From the menu bar, click Insert![]() Class Module and accept the default name of Class1. Your cursor is blinking in the Class1 module's Code window.
Class Module and accept the default name of Class1. Your cursor is blinking in the Class1 module's Code window.
11.The purpose of this particular class module is to capture an event that is associated with OptionButton controls. At the top of the Class1 module, publicly declare a variable that refers to the group of OptionButtons you will involve in the class module code. In that same statement, expose the events associated with OptionButtons using the WithEvents keyword. The following statement accomplishes this task:
Public WithEvents OptGroup As msforms.OptionButton
NOTE There is nothing special about the OptGroup variable name; you can give your class module variable whatever name makes sense to you. What makes sense to me is that I am grouping some OptionButton controls for a demonstration, so OptGroup is an intuitive name.
12.To demonstrate the point of this lesson, you can use the Click event for your OptGroup class. A message box displays the name and caption of the OptionButton that was clicked if that OptionButton is included in the class. Figure 24.12 shows how the VBE looks after inputting the following class module code.
13. Private Sub OptGroup_Click()
14. MsgBox "Hello, my name is " & OptGroup.Name & "." & vbCrLf & _
15. "My caption is " & OptGroup.Caption & ".", vbInformation, _
16. "You just clicked me, here is my info:"
End Sub
NOTE If this were an actual workbook project, you would not need a message box to tell you which OptionButton was just clicked. More realistically, you might assign a String type variable to the selected OptGroup.Caption if that caption string is needed as part of an operation elsewhere in your project.
13.Return to the UserForm module. At the top of the module, identify which OptionButtons you want to be grouped into the OptGroup class. For this example, the first five OptionButtons are grouped, so create an instance of the OptGroup class with the New keyword for the Class1 module name:
Dim optButtons(1 To 5) As New Class1
14.The UserForm's Initialize event is a good opportunity to do the actual grouping of the five OptionButtons. From the Object drop-down list select UserForm, and in the Procedure drop-down list select Initialize. VBA enters the UserForm_Initialize and End Sub statements with an empty space between the two lines, as follows:
15. Private Sub UserForm_Initialize()
End Sub
15.Declare an Integer type variable that helps loop through the five OptionButtons that become a part of the class module:
Dim intCounterOptionButton As Integer
16.Open a For Next loop to loop through the five OptionButtons:
For intCounterOptionButton = 1 To 5
17.Set each of the five OptionButtons as members of the OptGroup class:
18. Set optButtons(intCounterOptionButton).OptGroup = _
Controls("OptionButton" & intCounterOptionButton)
18.Continue and close the For Next loop with the Next statement:
Next intCounterOptionButton
19.All of your coding is complete. The entire UserForm module contains the following VBA code:
20. Option Explicit
21. Dim optButtons(1 To 5) As New Class1
22. Private Sub UserForm_Initialize()
23. Dim intCounterOptionButton As Integer
24. For intCounterOptionButton = 1 To 5
25. Set optButtons(intCounterOptionButton).OptGroup = _
26. Controls("OptionButton" & intCounterOptionButton)
27. Next intCounterOptionButton
28. End Sub
29. Private Sub cmdExit_Click()
30. Unload Me
End Sub
20.Test your class module by showing the UserForm. Press Ctrl+G to open the Immediate window, type the statement UserForm1.Show, and then press Enter.
21.Click any of the five OptionButtons on the left to display the message box that identifies the name and caption of the OptionButton you click. In Figure 24.13 I clicked OptionButton4, which has the caption Grapes. The OptionButtons on the right side of the UserForm are not included in the class, and if clicked do not invoke a message box.
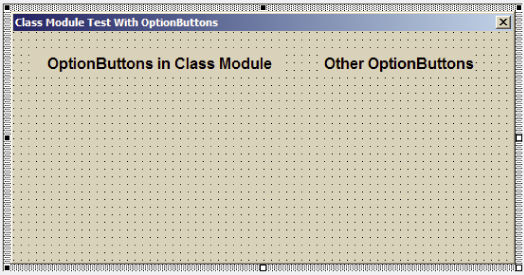
Figure 24.8
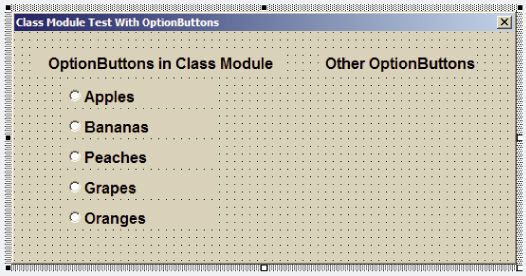
Figure 24.9
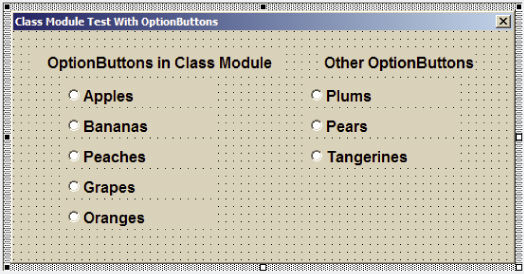
Figure 24.10
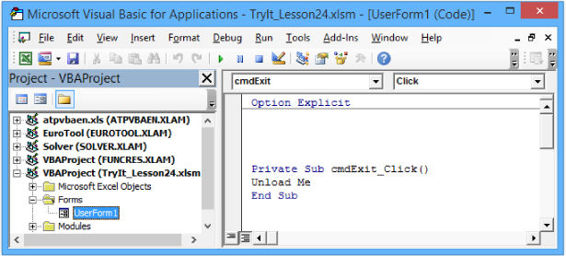
Figure 24.11

Figure 24.12
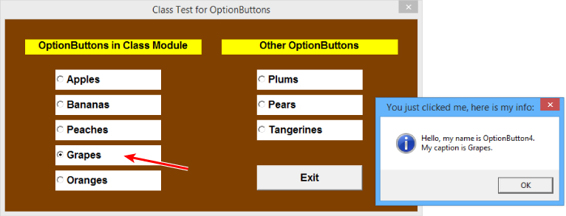
Figure 24.13
REFERENCE Please select the video for Lesson 24 online at www.wrox.com/go/excelvba24hour. You will also be able to download the code and resources for this lesson from the website.
All materials on the site are licensed Creative Commons Attribution-Sharealike 3.0 Unported CC BY-SA 3.0 & GNU Free Documentation License (GFDL)
If you are the copyright holder of any material contained on our site and intend to remove it, please contact our site administrator for approval.
© 2016-2026 All site design rights belong to S.Y.A.