Excel VBA 24-Hour Trainer (2015)
Part IV
Advanced Programming Techniques
Lesson 25
Add-Ins
Add-ins are a useful feature in Excel, considered by many Excel developers to be an indispensable tool when distributing their custom projects to a wider audience. Anyone can create an add-in—it's the kind of thing that's easy to do once you know how. This lesson discusses the concept of add-ins and how to incorporate them into your Excel projects.
NOTE This lesson discusses standard Excel add-ins. Two other types of add-ins exist that are not developed with VBA and are not discussed in this lesson. One of the other types is called COM add-ins, developed with languages such as Visual Basic, C++, and J++ that support component object model components. The other type is DLL add-ins, which are Windows files known as Dynamic Link Library files.
What Is an Excel Add-In?
An Excel add-in is a special type of Excel workbook that has been converted to an add-in file. There is no magic to the add-in conversion process, but after you create an add-in file, you'll notice its unique characteristics:
· The file extension is .xla for Excel versions prior to 2007, and .xlam for Excel versions 2007 through 2013.
· are always hidden; you do not open and view them as you would an Excel workbook.
· You cannot show sheets of any kind belonging to the add-in file.
· The add-in file is not recognized as an open workbook in the Workbooks collection.
WHY CREATE AN EXCEL ADD-IN?
Add-ins commonly use VBA macros, event procedures, user-defined functions, and UserForms to make everyday tasks faster and easier to accomplish. Many Excel users don't find the need to create an add-in, but here are some reasons why you might want to:
· Add-in files are hidden and therefore provide seamless integration to open Excel workbooks. Novice Excel users don't need to worry about opening an add-in after it's been loaded, and they won't wonder about an extra open Excel file because add-ins cannot be seen or unhidden.
· Even if the macro security is set to its most restrictive level, the VBA programming for an installed add-in can still run.
· Add-ins open automatically when Excel starts.
· The custom feature(s) contained within the add-in file are usually available to any of the open workbooks.
· The programming code is contained in the add-in file itself, and does not travel with the workbooks that use it. This gives you more control over how the file is distributed and who can access its code.
· Add ins-really shine in their ability to perform actions on several objects, such as cells or sheets, that if done manually would be cumbersome, time-consuming, and require some knowledge of Excel for the user to complete. Novice Excel users will especially appreciate the ease of clicking a button to do tasks that they might not know how to do manually, or might not know the most efficient methods by which to handle those tasks quickly.
Creating an Add-In
You create an Excel add-in file manually, but you make its features available by using VBA. To create an add-in, the first thing you do is open a new workbook. Because you add VBA code that becomes the add-in's functionality, you should test and retest your code before releasing the add-in for others to use. I mention this obvious point because if your add-in deals with manipulating worksheets in the active file, you need to observe the code's effect on those worksheets to make sure everything is working properly. After you convert the workbook to an add-in, you're no longer able to view the worksheets, so you want to construct and test all your code before converting your workbook as an add-in.
Suppose you want to create an add-in that offers the options to hide, unhide, protect, or unprotect multiple worksheets. A novice Excel user might perform these tasks one sheet at a time—quite an undertaking if the workbook contains dozens or hundreds of worksheets and the tasks are a frequent chore.
PLAN AHEAD FOR BEST RESULTS
You can convert any workbook to an add-in file, but not every workbook is a good candidate as an add-in. When I create an add-in, I know in advance what features I want the add-in to have, and what kind of code to avoid. This is important, because the add-in file is a hidden workbook that cannot contain code for activating a sheet or a range of cells.
You can write data to your add-in file, but you cannot activate the add-in file at any time. If you want to keep any data you've written to the add-in file, you need to save the file in the Workbook_BeforeClose event, because when an add-in closes, it does not prompt the user to save unsaved changes.
In your new workbook that is destined to become an add-in, press Alt+F11 to go to the Visual Basic Editor. From the VBE menu bar, click Insert![]() UserForm. If the Properties window is not visible, press the F4 key. Follow these steps to create the add-in:
UserForm. If the Properties window is not visible, press the F4 key. Follow these steps to create the add-in:
1. Select your new UserForm in its design area. In the Properties window, name the UserForm frmSheetManager, enter its caption as Sheet Manager, and set its Height property to 210 and its Width property to 276.
2. Place the following controls on your UserForm:
· A Label control near the top, setting its Width property to 228 and its Caption property to Please select your action:.
· An OptionButton control below the Label control, keeping the default name OptionButton1, setting its BackColor property to white, its Width property to 228, and its Caption property to Unhide all sheets.
· A second OptionButton control below OptionButton1, keeping the default name OptionButton2, setting its BackColor property to white, its Width property to 228, and its Caption property to Hide all sheets except active sheet.
· A third OptionButton control below OptionButton2, keeping the default name OptionButton3, setting its BackColor property to white, its Width property to 228, and its Caption property to Protect all sheets.
· A fourth OptionButton control below OptionButton3, keeping the default name OptionButton3, setting its BackColor property to white, its Width property to 228, and its Caption property to Unprotect all sheets.
· A CommandButton near the bottom-left corner of the UserForm, setting its Name property to cmdOK, and its Caption property to OK.
· A CommandButton near the bottom-right corner of the UserForm, setting its Name property to cmdExit, and its Caption property to Exit.
Your UserForm ends up looking like Figure 25.1.
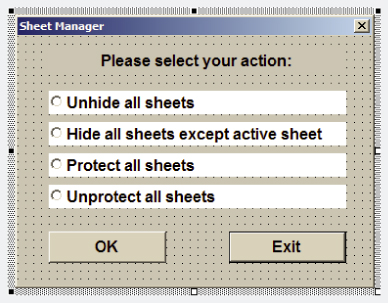
Figure 25.1
The design work is complete for your UserForm. In the UserForm module, enter the following code, which is mostly triggered by the cmdOK button's Click event. The requested task is performed depending on which OptionButton was selected:
Private Sub cmdOK_Click()
'Declare an Integer type variable to help loop through the worksheets.
Dim intSheet As Integer
'Open a Select Case structure to evaluate each OptionButton.
Select Case True
'If OptionButton1 was selected to unhide all sheets:
Case OptionButton1.Value = True
For intSheet = 1 To Sheets.Count
Sheets(intSheet).Visible = xlSheetVisible
Next intSheet
'If OptionButton2 was selected to hide all sheets except active sheet:
Case OptionButton2.Value = True
For intSheet = 1 To Sheets.Count
If Sheets(intSheet).Name <> ActiveSheet.Name Then
Sheets(intSheet).Visible = xlSheetHidden
End If
Next intSheet
'If OptionButton3 was selected to protect all sheets.
Case OptionButton3.Value = True
For intSheet = 1 To Sheets.Count
Sheets(intSheet).Protect
Next intSheet
'If OptionButton4 was selected to unprotect all sheets.
Case OptionButton4.Value = True
For intSheet = 1 To Sheets.Count
Sheets(intSheet).Unprotect
Next intSheet
'If no OptionButton was selected:
Case Else
MsgBox "No Action option was selected", , "Please select an option"
'Close the Select Case structure.
End Select
End Sub
Private Sub cmdExit_Click()
Unload Me
End Sub
Create a small macro to call the UserForm. From the VBE menu bar, click Insert![]() Module and enter the following macro:
Module and enter the following macro:
Private Sub SheetManager()
frmSheetmanager.Show
End Sub
After completing the VBA functionality that your add-in provides to its users, it's almost time to convert the workbook to an add-in. There is an additional step you can take to add a description to the file's Properties information. It's purely optional that you do this, but it's a good habit to get into because it helps the add-in's users know what the add-in does.
The process for accessing the file's Properties information depends on your version of Excel. To access the Properties dialog box in Excel versions prior to 2007, click File![]() Properties from the worksheet menu bar as shown in Figure 25.2. In the Properties dialog box, some fields may already be entered for you by default. As you see later in this lesson, the most useful information to enter is the Title and Comments fields, as indicated in Figure 25.3.
Properties from the worksheet menu bar as shown in Figure 25.2. In the Properties dialog box, some fields may already be entered for you by default. As you see later in this lesson, the most useful information to enter is the Title and Comments fields, as indicated in Figure 25.3.
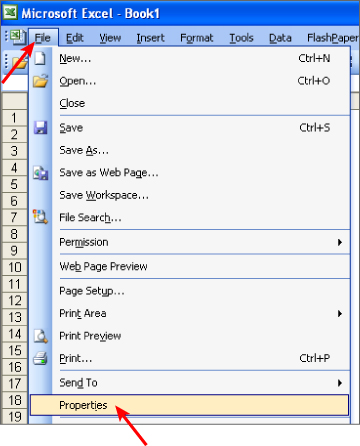
Figure 25.2
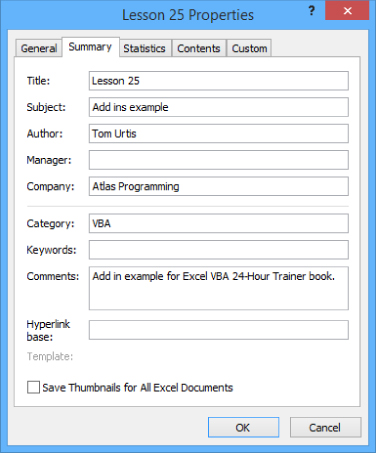
Figure 25.3
To reach the Properties information in Excel version 2007, click the round Office button near the top-left corner of your window. You see a vertical pane on the left side of the window. Click Prepare, and then in the pane on the right, click Properties, as shown in Figure 25.4.
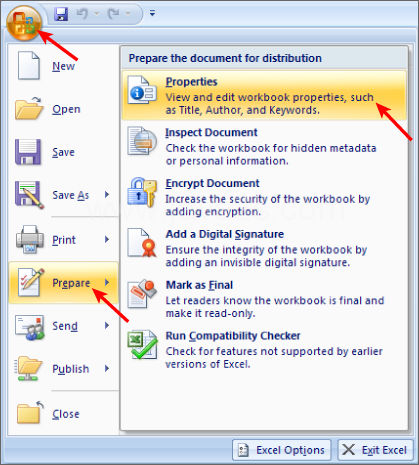
Figure 25.4
To reach the Properties information in Excel version 2010 and 2013, click the File tab on the Ribbon, and in the vertical pane at the left, click Info. At the far right, you see a Properties label with a drop-down arrow. As indicated in Figure 25.5, selecting the Advanced Properties item in the drop-down list displays the Properties dialog box.
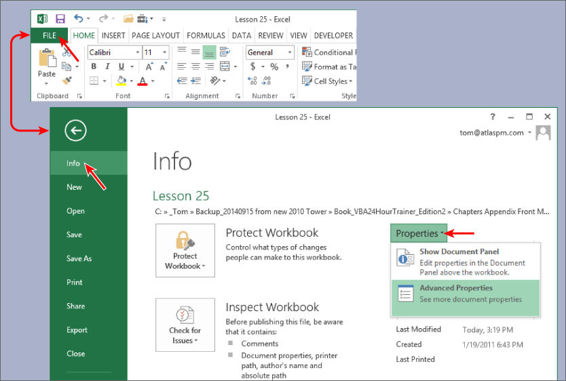
Figure 25.5
Converting a File to an Add-In
The easiest way to convert a file to an add-in is to save the file as an Excel Add-in type. In versions of Excel prior to 2007, from the worksheet menu click File![]() Save As. In the Save As dialog box, navigate to the folder where you want the add-in to reside. In Figure 25.6, I named the file SheetManager, and I created a subfolder named My Addins. From the Save As Type field's drop-down list, select Microsoft Office Excel Add-In as shown in Figure 25.6, and click Save.
Save As. In the Save As dialog box, navigate to the folder where you want the add-in to reside. In Figure 25.6, I named the file SheetManager, and I created a subfolder named My Addins. From the Save As Type field's drop-down list, select Microsoft Office Excel Add-In as shown in Figure 25.6, and click Save.
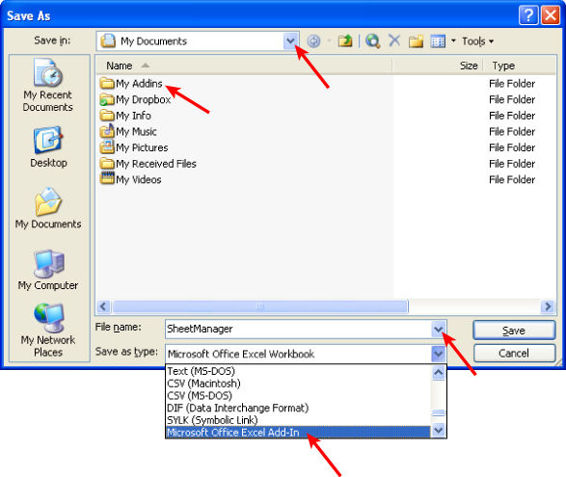
Figure 25.6
For version 2007, click the Office button and select Save As. For versions 2010 and 2013, click the File tab and select Save As. In the Save As dialog box, navigate to the folder where you want the add-in to reside and give the file a name. As shown in Figure 25.7, select Excel Add-In from the Save As Type drop-down list and click Save.
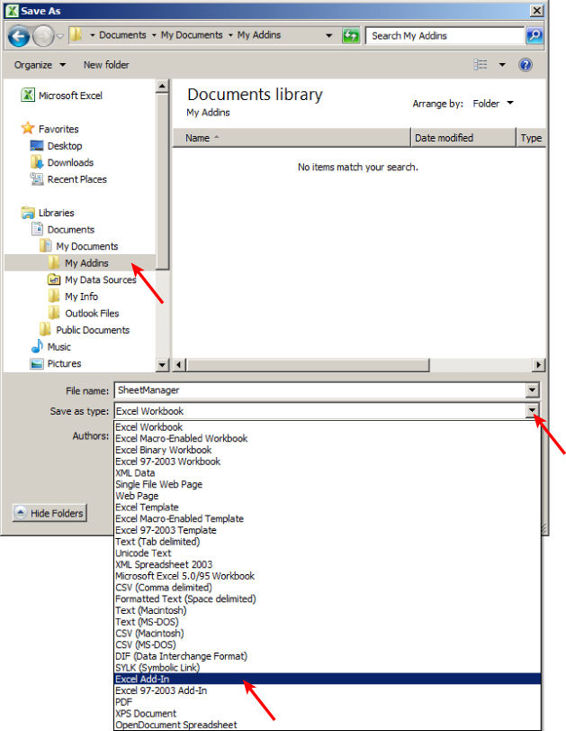
Figure 25.7
NOTE While saving a file as an add-in, you must have a worksheet be the active sheet. If by chance you have a chart sheet in your file and it is the active sheet, the Save As Type drop-down list won't include an Add-in file type.
Installing an Add-In
If your add-in is being distributed to other users, the first thing you do is to deliver the add-in file to them in some way, such as by e-mail, or on a flash drive if by hand delivery. In any case, your users would save the add-in file to whatever folder they prefer, similar to how you saved your add-in file into a folder on your computer.
The easiest way to install an add-in is to use the Add-Ins dialog box, which you can do from any open workbook. In versions of Excel prior to 2007, from the worksheet menu click Tools![]() Add-Ins as shown in Figure 25.8. In versions 2007 to 2013, click the Developer tab on the Ribbon, and select the Add-Ins icon as shown in Figure 25.9. An example of the Add-Ins dialog box is shown in Figure 25.10.
Add-Ins as shown in Figure 25.8. In versions 2007 to 2013, click the Developer tab on the Ribbon, and select the Add-Ins icon as shown in Figure 25.9. An example of the Add-Ins dialog box is shown in Figure 25.10.
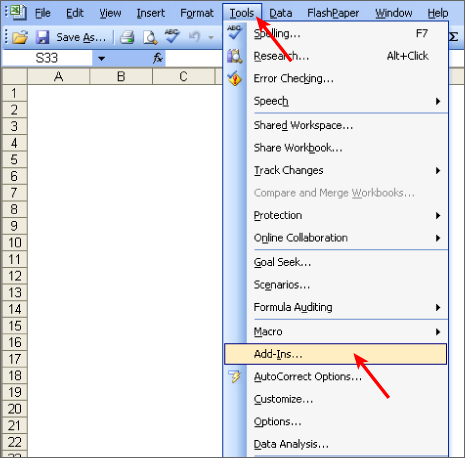
Figure 25.8
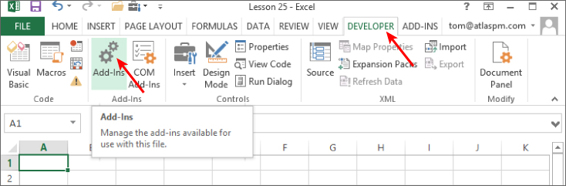
Figure 25.9
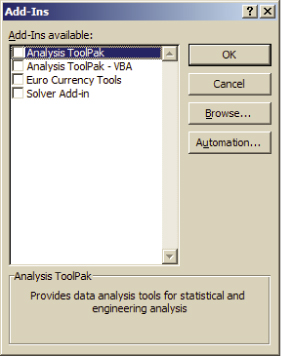
Figure 25.10
The Add-Ins dialog box shows a list of all the add-ins that Excel is aware of. An add-in is open if a check mark is next to its name in the list. Notice in Figure 25.10 that no add-ins are selected, and that the SheetManager add-in is not listed in the Add-Ins dialog box.
When a new add-in is created, it does not automatically appear in the Add-Ins dialog box. To install a new add-in, you first need to list it in the Add-Ins dialog box, and then select it in the list.
NOTE The Developer tab is a very useful item to place on your Ribbon. See the section named “Accessing the VBA Environment” in Lesson 2 for the steps to display the Developer tab.
NOTE A quick way to open the Add-Ins dialog box from any version of Excel is to press Alt+T+I—that is, hold down the Alt key and with your other hand press the T key and the I key. If you prefer to work with a mouse instead of the keyboard, and you prefer not to show the Developer tab, you can access the Add-Ins dialog box another way. In Excel version 2007, click the Office button, then click the Excel Options button. In Excel versions 2010 and 2013, click the File tab, click the Options menu item, and select the Add-Ins menu item. At the bottom of the window, select Excel Add-Ins from the Manage drop-down list, and click Go.
To include an add-in on the Add-Ins list, click the Browse button on the Add-Ins dialog box. Navigate to the folder where you saved the add-in file, select the filename, and click OK to exit the Browse dialog box as indicated in Figure 25.11.
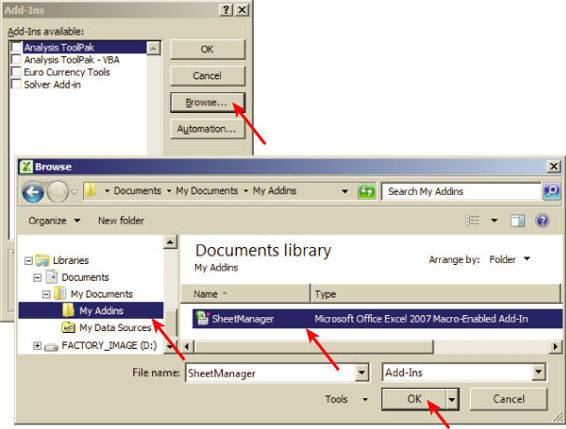
Figure 25.11
You now see your selected file listed in the Add-Ins dialog box. By default, Excel places a check mark next to the selected add-in's name. If you don't want the add-in to be open—that is, for its features to be available to you—simply deselect the add-in by unchecking the box next to its name.
If and when you do select your new add-in, you and the users of that add-in will appreciate the extra time you spent in the Properties window before you converted the original file to an add-in. Notice that the selected add-in's filename and comments appear at the bottom of the Add-Ins dialog box, informing the user what the add-in does. In any case, now that you've listed the add-in file, click OK to exit the Add-Ins dialog box as indicated in Figure 25.12.
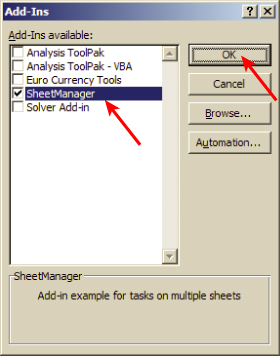
Figure 25.12
WHERE DID THOSE OTHER ADD-INS COME FROM?
Even before you created your first add-in, you saw some add-ins already listed in the Add-Ins dialog box. Excel ships with four available add-ins, which are not open until you select them in the Add-Ins dialog box:
· The Analysis ToolPak add-in, which provides an expanded set of analysis tools not available in standard worksheet functions and features
· The Analysis ToolPak VBA add-in, which provides an expanded set of functions for your VBA programming code
· The Euro Currency Tools add-in, which is a tool for converting and formatting the euro currency
· The Solver add-in, which is a what-if analysis tool that attempts to find an optimal value for a formula in one cell while considering constraints placed on the values in other cells
Creating a User Interface for Your Add-In
Now that the add-in has been created and installed, you need to provide your users with the ability to access the functionality. As it stands right now, all that's happened is the add-in is available behind the scenes. However, because the SheetManager add-in's functionality is tied to a UserForm, you need to establish a way for users to click a link of some kind that calls the UserForm.
Before the Ribbon came along, a custom worksheet menu item was created using the CommandBar object. For this example, I named the menu item SheetManager, and it appears on the Tools menu. The good news is, Excel versions 2007 through 2013 still support CommandBars, and you can use the same code to achieve a user-friendly custom menu interface that is compatible with every version of Excel starting with Excel 97.
For versions of Excel prior to 2007, a menu item named Sheet Manager is in the Tools menu, as shown in Figure 25.13. For versions 2007, 2010, and 2013, the menu item named Sheet Manager is in the Menu Commands section of a new tab on the Ribbon named Add-Ins. The Add-Ins tab appears when you apply custom add-in code. In any case, clicking the Sheet Manager menu item executes the macro that calls the UserForm, as shown in Figure 25.14.
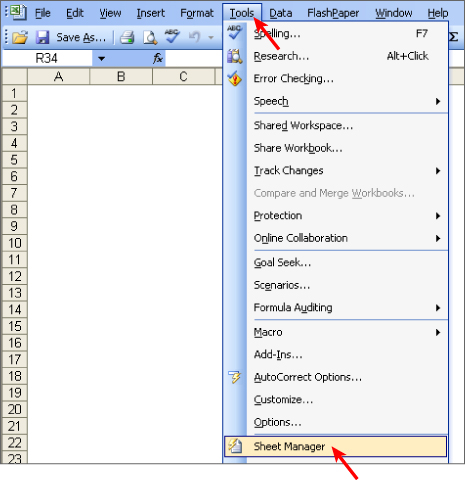
Figure 25.13
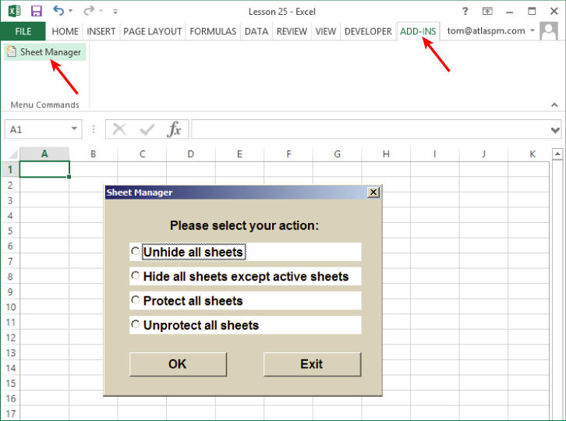
Figure 25.14
The following event code, found in the ThisWorkbook module of the add-in file, establishes the custom user interface:
Private Sub Workbook_Open()
'Declare a CBC variable for the custom menu item.
Dim objCmdControl As CommandBarControl
'The custom menu item will be named "Sheet Manager"
'and it will go onto the Tools menu for versions before 2007.
Set objCmdControl = _
Application.CommandBars("Worksheet Menu Bar") _
.Controls("Tools").Controls.Add
'For the new menu item, give it a meaningful caption,
'help it to clearly stand out by starting a BeginGroup.
'The OnAction method will call the UserForm.
'The Face ID is a small icon next to the menu item
'that is optional, but adds a feeling of customization.
With objCmdControl
.Caption = "Sheet Manager"
.BeginGroup = True
.OnAction = "SheetManager"
.FaceId = 144
End With
End Sub
Private Sub Workbook_BeforeClose(Cancel As Boolean)
'Delete the custom menu item from the Tools menu.
'The error bypass is for cases when the "Sheet Manager"
'item is not listed on the Tools menu.
On Error Resume Next
Application.CommandBars("Worksheet Menu Bar") _
.Controls("Tools").Controls("Sheet Manager").Delete
Err.Clear
End Sub
Changing the Add-In's Code
You'll find that some of your add-ins are a work in progress. Users will enjoy the ease of performing add-in tasks, and you'll be requested to make enhancements to the add-in for more functionality. As you pick up more VBA programming skills, you'll want to improve your original code by making edits for speed and efficiency.
You make any changes to your add-in file in the Visual Basic Editor. Open your add-in file, and all you see is an empty-looking Excel file because all the sheets in an add-in are hidden and cannot be viewed. Press Alt+F11 to go to the VBE, and just as if it were any Excel workbook, make whatever changes to the code you need to make. When you are done, save your changes in the VBE and close the add-in file.
NOTE For add-ins that you distribute to other users, you want to protect the code from being inadvertently changed or viewed by others. The process for protecting your add-in code is the same as with any Excel workbook, and that is to lock and protect the project in the Visual Basic Editor. The steps to do this are discussed in Lesson 4, in the section “Locking and Protecting the VBE.”
Closing Add-Ins
As you saw in the section “Changing the Add-In's Code,” you can open an add-in file, but you might like to know how to close an add-in file because it cannot be closed the same way you close a workbook. You have three ways to close an add-in file:
1. Deselect (uncheck) the add-in's name in the Add-Ins dialog box.
2. Go into the VBE and press Ctrl+G to ensure that the Immediate window is open. In the Immediate window, enter a line of code that closes the add-in file and press Enter. An example of such code for the SheetManager add-in is as follows:
Workbooks("SheetManager.xlam").Close
3. Close Excel, which closes all files, including add-ins.
Removing an Add-In from the Add-Ins List
At some point in the future, you might want to remove the add-in from the list of available add-ins in the Add-Ins dialog box, if the add-in is outdated or you just don't need it anymore. To accomplish this is an example of how science meets art, because Excel does not have a built-in way to remove an add-in's name from the list. Here are the steps to make this happen:
1. Close Excel.
2. Open Windows Explorer and navigate to the folder that holds your add-in file.
3. Select the add-in filename, and without opening the file, either change its name, drag the file to a different folder, or, if you really no longer need the add-in, delete the file altogether.
4. Open Excel, and when you do, you receive a message telling you that the add-in file cannot be found. Click OK as indicated in Figure 25.15.
5. Open the Add-Ins dialog box and uncheck the name of the add-in you want to remove. Excel reminds you that the file cannot be found, and asks for confirmation that you want to delete the file from the list of available add-ins. Click Yes as indicated in Figure 25.16.
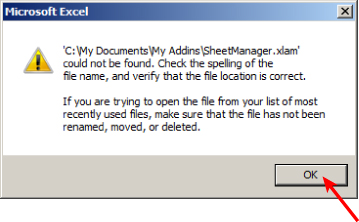
Figure 25.15
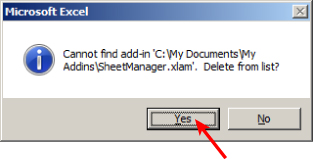
Figure 25.16
Try It
For this lesson, you create, install, and test an add-in that contains a user-defined function to return the text of another cell's comment.
Lesson Requirements
To get the sample workbook, you can download Lesson 25 from the book's website at www.wrox.com/go/excelvba24hour.
Step-by-Step
1. Open a new workbook.
2. Go to the Properties window. In the Title field enter Comment Text and in the Comments field enter Return text of comments in other cells.
3. Exit the Properties window and press Alt+F11 to go into the Visual Basic Editor.
4. From the menu bar in the VBE, click Insert![]() Module. Copy the following user-defined function into the module:
Module. Copy the following user-defined function into the module:
5. Function GetComment(rng As Range) As String
6. Dim strText As String
7. If rng.Comment Is Nothing Then
8. strText = "No comment"
9. Else
10. strText = rng.Comment.Text
11. End If
12. GetComment = strText
End Function
5. Press Ctrl+S to display the Save As dialog box. Navigate to the folder into which you want to save this file. Name the file CommentText and select Excel Add-In in the Save As Type field, as indicated in Figure 25.17. Click Save, which converts this workbook as a new add-in file named CommentText.xlam.
6. Close Excel.
7. Restart Excel and open a new workbook.
8. Right-click cell B2 of the active worksheet, and select Insert Comment. Enter some text in your comment.
9. Select cell G1.
10.Press Alt+T+I to show the Add-Ins dialog box.
11.Click Browse and navigate to the folder where you saved the CommentText add-in file. Select the CommentText file and click OK. Your Add-Ins dialog box looks like Figure 25.18, with the CommentText add-in loaded. Recall that the file is named CommentText but the Add-Ins dialog box shows it as Comment Text, and also shows the description of the add-in, because that is the information you entered in Step 2 about the add-in file in its Properties dialog box. Click OK to exit the Add-Ins dialog box.
12.In cell G1, enter the user-defined function =GetComment(B1) and press Enter. Copy the formula down to cell G2. You see that the UDF returned No comment in cell G1 because no comment exists in cell B1. However, you did enter a comment into cell B2 in Step 8, so the UDF in cell G2 returns the text of the comment from cell B2. Your worksheet looks similar to Figure 25.19.
13.Note that the workbook you are looking at does not contain the GetComment UDF code. You can utilize that UDF because its code belongs to the CommentText add-in file that you installed for the active workbook.
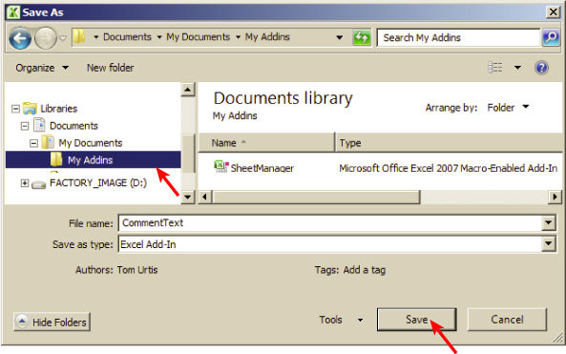
Figure 25.17
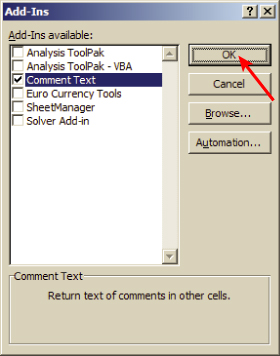
Figure 25.18
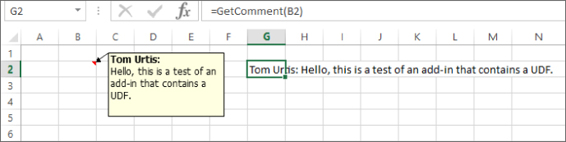
Figure 25.19
REFERENCE Please select the video for Lesson 25 at www.wrox.com/go/excelvba24hour. You will also be able to download the code and resources for this lesson from the website.
All materials on the site are licensed Creative Commons Attribution-Sharealike 3.0 Unported CC BY-SA 3.0 & GNU Free Documentation License (GFDL)
If you are the copyright holder of any material contained on our site and intend to remove it, please contact our site administrator for approval.
© 2016-2026 All site design rights belong to S.Y.A.