Excel VBA 24-Hour Trainer (2015)
Part V
Understanding the BASICs
Lesson 29: Overview of Office Automation from Excel
Lesson 30: Working with Word from Excel
Lesson 29
Overview of Office Automation from Excel
As you may recall from Lesson 1, Visual Basic for Applications is a programming language created by Microsoft to automate operations in applications that support it, such as Excel. VBA is also the language that manipulates Microsoft Office applications in Access, Word, PowerPoint, and Outlook. So far, the focus of this book has been on running VBA from Excel, for the purpose of acting directly upon Excel in some way.
This section shows how to control other Office applications from Excel, using the same VBA programming language with which you are now familiar, but using a different set of methods and statements with which those other Office applications are familiar. The reasons for interacting with other Office applications might not be for the purpose of changing your Excel workbook application, but they will always be for the purpose of making your workbook projects more robust, versatile, and easier to use when the situation calls for it.
Why Automate Another Application?
In the dawn of this modern era of personal computers, it was rare that two or more separate applications were able to communicate with each other. For two applications to share the same information, you usually had to retype the information manually into the other application that needed it. Today, thanks to the advances of drag and drop, and copy and paste, it has become a simple matter to share data across many applications.
The business of Excel is to perform calculations and analyze data. You can enter and edit text in Excel, but it is not a word processor. You can build data tables and compare their information, but Excel is not a relational database application. You can create charts and graphics in Excel but they cannot be presented in a sophisticated slideshow format. You can send a workbook through e-mail but Excel cannot manage your calendar or incoming e-mails the way an e-mail client can.
You get the idea—sooner or later you'll need to perform some kind of operation that another application was specially made to handle. This lesson lays the groundwork for you to understand Office automation from Excel, and the theory behind some best practices in doing so.
Understanding Office Automation
Where VBA is concerned, the only difference between Excel, Word, Access, PowerPoint, and Outlook lies in their object models. Each of these applications can access another's object model, so long as the target application has been properly installed on the host computer. Controlling one Office application from another becomes a simple matter of knowing how to link to the object model of the Office application you want to control.
The term “automation” is an Office programmer's way of referring to the VBA technology that provides the ability to manipulate another application's objects. Though VBA is the common language among Office applications, the respective object models differ in their objects' names, methods, and properties. Both Excel and Word have a Range object but with different properties. Excel has a Workbooks object, which is the counterpart to PowerPoint's Presentations object.
For Excel to access another Office application's object model, a connection needs to be established to that target application. Two options for doing this exist: One option is called early binding, and the other option is called late binding. The term “binding” refers to the verification that an object exists, and that the command to manipulate that object's methods and properties is valid.
Early Binding
With early binding, you establish a reference with the target application's object library before you write your macro, so that the application's objects, methods, and properties can be accessed in your code. For example, if you are using Office 2013 and you want to write a macro to open Word and edit a document, you would first need to establish a reference to the Microsoft Word 15.0 Object Library. To do that, you can go to the Visual Basic Editor, and from the menu bar click Tools![]() References. Scroll to select the reference and click OK, as shown in Figure 29.1.
References. Scroll to select the reference and click OK, as shown in Figure 29.1.
NOTE VBA sees versions of Microsoft Office as numbers, not names. For example, VBA knows Office 2003 as version 11, Office 2007 as version 12, Office 2010 as version 14 (Microsoft knowingly skipped unlucky number 13), and Office 2013 as version 15. Therefore, if you are working with Office 2010 at home, you'd have Word 14 listed in your VBA References, but if you are using Office 2013 at work, you'd see Word 15 listed.

Figure 29.1
After you have established the proper reference, you can write a macro using early binding that will, for example, open a Word document in Office 2013. Suppose you already have a Word document named myWordDoc.docx that you keep in the path C:\Your\File\Path\. The following macro opens that document, using early binding:
Sub EarlyBindingTest()
Dim wdapp As Word.Application, wddoc As Word.Document
Set wdapp = New Word.Application
wdapp.Visible = True
Set wddoc = wdapp.Documents.Open(Filename:="C:\Your\File\Path\myWordDoc.docx")
End Sub
When you attempt to run this macro, you would immediately know if you did not properly establish the Word 15.0 library reference because you would be prompted by a compile error message, as shown in Figure 29.2.
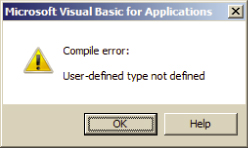
Figure 29.2
As you compose a macro using early binding, you will have the benefit of VBA's IntelliSense feature, where objects and properties pop up as you type your code's object references. And macros with early binding run faster than macros performing the same task with late binding, because a reference has already been established to the target application's objects, methods, and properties.
NOTE If your macro runs without errors but you don't see a Word document, or you don't even see Word on your taskbar, it could be that you really did create a new instance of Word, but it is not visible. In the Immediate window, type Word.Application.Visible = True and press Enter.
So then, why would you ever not want to use early binding? Actually, there is a very good reason why not: The referenced object (Word 15.0 in this example) must exist on the computer. If it does not exist, an error occurs such as the one shown in Figure 29.2.
The concern is, unless you are composing your Office automation macros to be run on a system that you know for a fact will (a) be installed with the target application and (b) have the proper object library reference established in advance, chances are pretty good the macro will fail using early binding. And with new Office versions being released every few years, when you upgrade your Office version you need to edit all the macros in which you utilized early binding so that they don't refer to an outdated earlier version.
Late Binding
With late binding, you declare an object variable that refers to the target application, just as you would with early binding. However, instead of setting the variable to a specific (in this case) Word object, you create an object called a Word application.
If you use late binding, you do not use Tools![]() References to set a reference (as is required for early binding) because you do not know which Word object library version will be on a user's machine. Instead, you use code to create the object. The following macro named LateBindingTest accomplishes the same task as the EarlyBindingTest by opening a specific Word document:
References to set a reference (as is required for early binding) because you do not know which Word object library version will be on a user's machine. Instead, you use code to create the object. The following macro named LateBindingTest accomplishes the same task as the EarlyBindingTest by opening a specific Word document:
Sub LateBindingTest()
Dim WdApp As Object, wddoc As Object
Set WdApp = CreateObject("Word.Application")
WdApp.Visible = True
Set wddoc = WdApp.Documents.Open(Filename:="C:\Your\File\Path\myWordDoc.docx")
End Sub
In a nutshell, when you declare a variable As Object and set it as CreateObject, VBA doesn't know whether the object is a cell, a worksheet, a Word application, or any other object. The code goes through a series of tests behind the scenes until it finds the correct application for the use intended by your code. That's the essential reason why late binding takes longer to execute.
Which One Is Better?
For my money, even with moderately sized macros, the extra seconds of run time due to late binding make up for the headaches of trying to accommodate every version of your target Office application, from 2000 through 2013. You will find that the VBA skills you are acquiring will lead to composing macros that others will use, and you'll never know what Office versions are installed on users' systems. People have varying opinions on the merits of early versus late binding, so consider the pros and cons of both methods to decide which approach is best for you.
NOTE I said that late binding code “takes longer” to execute than early binding. Depending on the task at hand, this should not dissuade you from using late binding. In fact, I use late binding exclusively in all my cross-application Office programming because of the benefits I mentioned.
As you become more involved with programming, you'll find yourself identifying opportunities for efficiency in code execution. In the case of early versus late binding, or any set of programmable alternatives when the difference of execution is only a second or two, keep in mind that the project and its users are best served by code that gets the job done with minimal risk for error. No one notices an extra second or two of macro execution. Everyone notices runtime or performance errors.
Try It
In this lesson, you compose a macro using late binding that opens a presentation file in PowerPoint.
Lesson Requirements
For this lesson, you first create a PowerPoint presentation, name that file PowerPointExample1, and save it into the folder path C:\Your\File\Path\.
To get the sample Excel workbook and PowerPoint presentation files, you can download Lesson 29 from the book's website at www.wrox.com/go/excelvba24hour.
Hints
Late binding is a useful approach in cases like this, when the Office version is unknown.
If you want to refer to a sample PowerPoint presentation with a different name than PowerPointExample1, or a folder path other than C:\Your\File\Path\, be sure to modify those references in the following code.
Step-by-Step
1. Open a new workbook and press Alt+F11 to go to the Visual Basic Editor.
2. From the menu at the top of the VBE, click Insert![]() Module.
Module.
3. In the module you just created, type Sub OpenPowerPoint and press Enter. VBA automatically places a pair of empty parentheses at the end of the Sub line, followed by an empty line, and the End Sub line below that. Your macro looks like this so far:
4. Sub OpenPowerPoint()
End Sub
4. Declare variables for the file path, the PowerPoint filename, and the file extension. The reason for the variable extension is that starting with Office version 2007, PowerPoint file extensions are commonly .pptx or .pptm. Prior to 2007, the extension for PowerPoint files was simply .ppt.
Dim myPath As String, myFileName As String, myExtension As String
5. Define the variables for myPath and myFileName:
6. myPath = "C:\Your\File\Path\"
myFileName = "PowerPointExample1"
6. Use an If structure to define the extension String variable. Note the Val statement, which ensures the Office application version is regarded as a number for the logical evaluation of being less than or equal to version 11, which is Office 2003:
7. If Val(Application.Version) <= 11 Then
8. myExtension = ".ppt"
9. Else
10. myExtension = ".pptx"
End If
7. Declare the PowerPoint application object and set it using the CreateObject method for late binding:
8. Dim appPPT As Object
Set appPPT = CreateObject("PowerPoint.Application")
8. When opening other applications, don't forget to make them visible:
appPPT.Visible = True
9. Compose the Open statement for PowerPoint that combines the myPath, myFileName, and myExtension variables:
appPPT.Presentations.Open Filename:=myPath & myFileName & myExtension
10.When completed, the macro looks like this, with comments that have been added to explain each step:
11. Sub OpenPowerPoint()
12. 'Declare variables for path, file name and file extension.
13. Dim myPath As String, myFileName As String, myExtension As String
14. 'Define the myPath and myFileName variables.
15. myPath = "C:\Your\File\Path\"
16. myFileName = "PowerPointExample1"
17. 'Using an If structure and depending on the host computer's Office version,
18. 'define the extension of the PowerPoint file.
19. If Val(Application.Version) = 11 Then
20. myExtension = ".ppt"
21. Else
22. myExtension = ".pptx"
23. End If
24. 'Declare a variable for what will be the PowerPoint object.
25. 'Set the object to late binding by using the CreateObject method.
26. Dim appPPT As Object
27. Set appPPT = CreateObject("PowerPoint.Application")
28. 'Make sure you include the command to make the application visible.
29. appPPT.Visible = True
30. 'Open the PowerPoint file.
31. appPPT.Presentations.Open Filename:=myPath & myFileName & myExtension
End Sub
11.Press Alt+Q to return to the worksheet. Press Alt+F8 to show the Macro dialog box, and test the macro by selecting the macro name and clicking the Run button.
REFERENCE Please select the video for Lesson 29 online at www.wrox.com/go/excelvba24hour. You will also be able to download the code and resources for this lesson from the website.
All materials on the site are licensed Creative Commons Attribution-Sharealike 3.0 Unported CC BY-SA 3.0 & GNU Free Documentation License (GFDL)
If you are the copyright holder of any material contained on our site and intend to remove it, please contact our site administrator for approval.
© 2016-2026 All site design rights belong to S.Y.A.