Excel VBA 24-Hour Trainer (2015)
Part I
Understanding the BASICs
Lesson 3
Introducing the Visual Basic Editor
Lesson 2 explains how to create a macro, and you saw a couple of easy ways to run the macro you created. Now it's time to view your macro and have a look at the environment called the Visual Basic Editor(VBE), within which all macros and VBA procedures are stored. Seeing where macros live and breathe improves your understanding of the VBA programming process, especially when you start to edit existing macros or create new macros without the Macro Recorder.
What is the VBE?
It's fair to say that for many users of Excel, the worksheets, pivot tables, charts, and hundreds of formula functions are all the tools they need to satisfactorily handle their spreadsheet activities. For them, the familiar workbook environment is the only side of Excel they see, and understandably the only side of Excel they are probably aware of.
But Excel has a separate, less visible environment working behind the scenes—the Visual Basic Editor—which is interconnected with the workbook environment even if no programming code exists in the workbook. Both environments are constantly but quietly working together, sharing information back and forth about the entire workbook. The Visual Basic Editor is a user-friendly development environment where programmed instructions are maintained in order to make your spreadsheet applications work.
How to Get Into the VBE
With Excel open, a fast and easy way to get into the Visual Basic Editor is to press Alt+F11 on your keyboard. You can do this from any worksheet. It's just as quick with your mouse, too; you click the Visual Basic Editor icon on the Visual Basic toolbar in versions up to 2003, as shown in Figure 3.1, or the Visual Basic button from the Developer tab on the Ribbon in later versions, as shown in Figure 3.2.
NOTE If you don't see the Developer tab on your Ribbon, see the steps to show it in Lesson 2, in the section “Accessing the VBA Environment.”
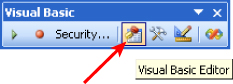
Figure 3.1
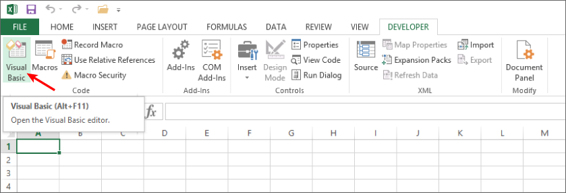
Figure 3.2
CAREFUL, THAT WAS ALT+F11!
The Ctrl key is commonly used in conjunction with other keys for keyboard shortcuts. By force of habit, you might mistakenly press Ctrl+F11 instead of Alt+F11 when attempting to go to the VBE. However, pressing Ctrl+F11 has a curious result: Instead of being taken to the VBE, you will have created an outdated type of sheet called a macro sheet, with the strange tab name of Macro1. Prior to Excel version 97, macros were stored on macro sheets, which you can still create, though they have no practical use with today's Excel, and they no longer hold any programming code. It's OK to just delete the macro sheet if you create one, and take another stab at the Alt key with F11 to get into the VBE.
Understanding the VBE
The Visual Basic Editor can show a number of different windows, depending on what you want to see or do. For the majority of work you do with the help of this book, you want to eventually become familiar with four windows: the Project Explorer window, the Code window, the Properties window, and the Immediate window. Figure 3.3 shows what the VBE looks like with these four windows.

Figure 3.3
The Project Explorer Window
The Project Explorer is a vertical pane on the left side of the VBE. It behaves similarly to Windows Explorer, with folder icons that expand and collapse when clicked. If you do not see the Project Explorer window in your VBE, press Ctrl+R, or from the VBE menu bar, click View![]() Project Explorer. As indicated by the first item at the top of the Project Explorer window in Figure 3.3, the name of the workbook I am using (in Excel terms, the VBAProject) is MacroExamples.xlsm.
Project Explorer. As indicated by the first item at the top of the Project Explorer window in Figure 3.3, the name of the workbook I am using (in Excel terms, the VBAProject) is MacroExamples.xlsm.
VBA code is kept in objects known as modules, which are discussed later in further detail. Figure 3.3 shows one module called Module1. Double-clicking a module name in the Project Explorer displays that module's VBA code contents in the Code window, as you see in Figure 3.3.
The Code Window
The Code window is where the code for macros and VBA procedures are located. The VBE provides separate code windows for each module. A good way to think of this is, for every object (worksheet, module, and so on) you see listed in the Project Explorer, the VBE has provided a Code window. Note that the drop-down in the upper right-hand corner of Figure 3.3 displays the name of the macro that is currently showing in the Code window (mySort). As you create multiple macros, you can use this drop-down to quickly move from one macro to another.
The Properties Window
The Properties window is located in the left vertical pane near the bottom of the VBE. If you do not see the Properties window in your VBE, press F4, or from the VBE menu bar click View![]() Properties Window. This window displays a list of the properties and their assigned values of whatever object is selected in the Project Explorer window. For example, in Figure 3.3, Sheet1 has been selected and the Properties window shows you, among other details, that the Name property for the selected object is Sheet1.
Properties Window. This window displays a list of the properties and their assigned values of whatever object is selected in the Project Explorer window. For example, in Figure 3.3, Sheet1 has been selected and the Properties window shows you, among other details, that the Name property for the selected object is Sheet1.
The Immediate Window
The Immediate window is located at the bottom of the VBE, usually below the Code window, as shown in Figure 3.3. If you do not see the Immediate window in your VBE, press Ctrl+G, or from the VBE menu bar click View![]() Immediate Window. The name “Immediate” has nothing to do with urgency, but rather with the notion that you can query a line of code and immediately obtain its returned result, without having to run a macro to see what that code line does. This comes in handy for code debugging tactics in Lesson 20, but for now I just wanted to point out the Immediate window to familiarize you with its name and location.
Immediate Window. The name “Immediate” has nothing to do with urgency, but rather with the notion that you can query a line of code and immediately obtain its returned result, without having to run a macro to see what that code line does. This comes in handy for code debugging tactics in Lesson 20, but for now I just wanted to point out the Immediate window to familiarize you with its name and location.
Understanding Modules
I touched on modules earlier, but they are worth another mention. A module is a container for your code. A single module may hold one or many macros, depending on the workbook and your preference for how you manage your code. For smaller projects with maybe two or three macros, just one module is sufficient. If you develop larger projects with dozens of macros, it's a good idea to organize them among several modules by theme or purpose.
Several types of modules exist:
· Standard modules: These are the kind you have seen already, which hold macros you create from scratch on your own or from the Macro Recorder.
· UserForm modules: These belong to a custom user interface object called a UserForm, which is covered in Lessons 21, 22, and 23.
· Class modules: These contain the kind of VBA code that enables you to create your own objects programmatically. Creating your own classes is very cool, and you learn about that in Lesson 24.
· Worksheet modules: These hold VBA code that looks and acts like macros, but to make things interesting Microsoft refers to that code as a procedure instead of as a macro. Worksheet-level procedures are tied to various actions called events, such as selecting a range or entering a value in a cell.
· Workbook module: Not to be outdone, the workbook itself has its own module, named by default as ThisWorkbook, where code is maintained for handling workbook-level events.
The point is, several types of modules exist, but the concept is the same—modules hold code for the object(s) they serve.
Using the Object Browser
One useful tool the VBE offers is the Object Browser. This section gives some background on the Object Browser and how you can use it to familiarize yourself with locating objects and their associated properties and methods.
The ability to program Excel is based on tapping into any of several libraries of objects in the Microsoft Office objects model. For example, there is an Office library, a VBA library, and of course, an Excel library. Some libraries have hundreds of objects, and each object has many properties, methods, and, in some cases, associated events. The interwoven collection of object libraries and their keyword kin is enormous. Fortunately, there is the Object Browser to guide your search for information about objects and their properties for whatever library you are interested in.
To see the Object Browser in the VBE, press the F2 key or click View![]() Object Browser. Figure 3.4 shows the Object Browser—it covers the area normally occupied by the Code window.
Object Browser. Figure 3.4 shows the Object Browser—it covers the area normally occupied by the Code window.
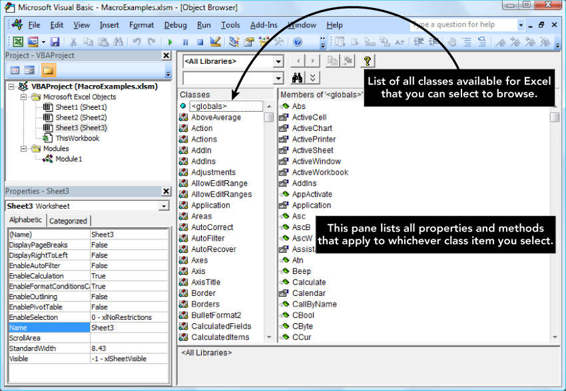
Figure 3.4
To get a feel for the Object Browser, click the drop-down arrow next to <All Libraries> and select Excel. When you do that, in the Classes pane you see the classes belonging to Excel. Click the Application class and you see the larger Members pane display the properties and methods relating to the Application object. Click the ActiveWorkbook member and look at the bottom of the Object Browser. You see that ActiveWorkbook is a property that itself is a Workbook object.
After you follow the preceding steps, the Object Browser looks like Figure 3.5; the arrows point to what you clicked. If you click the green Workbook link at the bottom, the Object Browser takes you to the Workbook class and displays the properties and methods for Workbook.
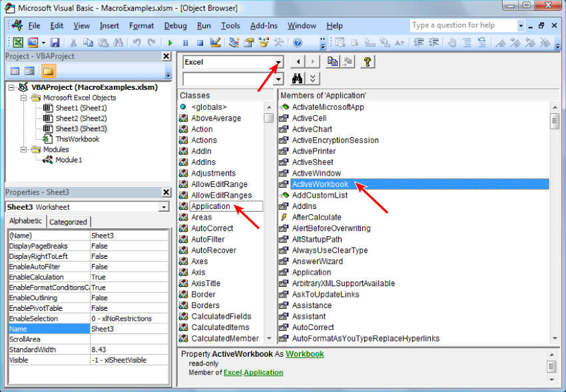
Figure 3.5
With a class or member item selected, you can click the yellow question mark icon at the top of the Object Browser to be taken to the Help file for that selected item.
The Object Browser has a Search feature in the drop-down field to the left of the binoculars icon. If you type a term you are interested in and click the binoculars icon, the associated members of that term will be displayed for the selected library.
To exit the Object Browser, click the lower of the two X close buttons near the top-right corner of the VBE.
Exiting the VBE
To exit the VBE and return to the worksheets, you can either press Alt+Q, or click the topmost X close button at the top-right corner of the VBE.
Try It
Because this lesson is an introduction to the Visual Basic Editor environment, there are no programming techniques to try, but you can get a jump on your familiarity with the VBE by considering these items:
· You have several ways to get into the VBE, but which way works best for you? As you've seen, Alt+F11 works on all Excel versions, but if you are more of a mouse user than a keyboard user, you have several options depending on what's easiest for you:
· In version 2003 you can click Tools![]() Macro
Macro![]() Visual Basic Editor, or you can keep the Visual Basic toolbar visible, and click the Visual Basic Editor icon. You can also right-click the workbook icon near the upper-left corner of the Excel window (just to the left of the File menu item), and select View Code, which takes you to that workbook's module in the VBE.
Visual Basic Editor, or you can keep the Visual Basic toolbar visible, and click the Visual Basic Editor icon. You can also right-click the workbook icon near the upper-left corner of the Excel window (just to the left of the File menu item), and select View Code, which takes you to that workbook's module in the VBE.
· In versions 2007, 2010, and 2013, you can click the Visual Basic Editor icon on the Developer tab.
· In any version of Excel, you can right-click a worksheet tab and select View Code, which takes you to that worksheet's module in the VBE.
· Take another look at the Object Browser and click around its classes and members. The VBA object model is a vast library of information that no one would attempt to memorize, but the idea here is to get a feel for the interwoven relationships among objects' classes, properties, and methods.
· In the Project Explorer window, if you double-click an object such as a worksheet, workbook, or module name, you go directly to that object's Code window. But also notice the pop-up menu when you right-click an object's name in the Project Explorer. Go ahead and click any of those menu items to get the gist of where they lead you and what purpose they serve.
· Get a bit of practice in with the Immediate window. If you were to enter some value into cell A1, and then format cell A1 in bold font, you can enter these expressions in the Immediate window and press Enter for each one:
· ? Range(“A1”).Value returns whatever value you entered into A1.
· ? Range(“A1”).Font.Bold returns True if you bolded A1, or False if you did not.
· ? Range(“A1”).ClearContents returns True and clears the contents of cell A1.
REFERENCE There is no video or code download to accompany this lesson.
All materials on the site are licensed Creative Commons Attribution-Sharealike 3.0 Unported CC BY-SA 3.0 & GNU Free Documentation License (GFDL)
If you are the copyright holder of any material contained on our site and intend to remove it, please contact our site administrator for approval.
© 2016-2026 All site design rights belong to S.Y.A.