Excel VBA 24-Hour Trainer (2015)
Part I
Understanding the BASICs
Lesson 4
Working in the VBE
In Lesson 3, you took a bird's eye view of the Visual Basic Editor, and you became familiar with the names and locations of its most frequently used windows. In this lesson, you navigate through those VBE windows for the purpose of demonstrating how to handle the kinds of maintenance tasks you will often encounter in the VBE.
Toolbars in the VBE
The first thing you may have noticed about the VBE interface is that there is no Ribbon. The traditional VBE menu bar is pretty much the same interface for all versions of Excel since 1997.
Because you will be spending more time in the VBE, you'll want convenient access to the toolbar icons relating to the work you'll be doing. If you have not already done so, press Alt+F11 to get into the VBE, and show the Edit and Standard toolbars whose icons will soon come in handy. From the menu bar at the top of the VBE, click View![]() Toolbars
Toolbars![]() Edit and again View
Edit and again View![]() Toolbars
Toolbars![]() Standard, as depicted in Figure 4.1.
Standard, as depicted in Figure 4.1.
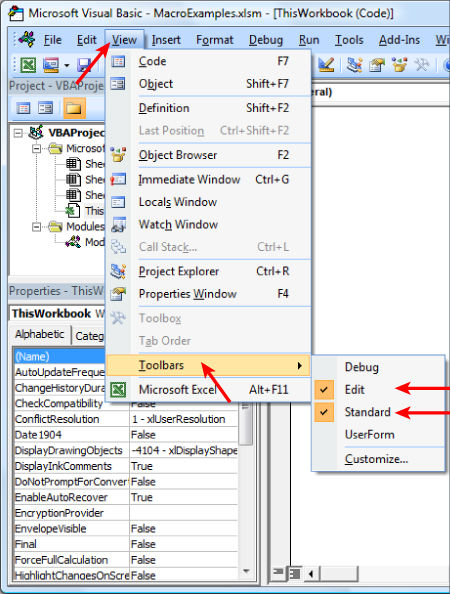
Figure 4.1
Macros and Modules
In Lesson 2, you used the Macro Recorder to create a macro named mySort. You learned how to assign a shortcut key to the macro, and how to enter a brief description of what the macro does. You also learned about a couple of ways to run the macro, by using either the shortcut key or the Macro dialog box. One thing you have not been shown yet is the macro itself, or even how to find it.
Locating Your Macros
When the Macro Recorder created the mySort macro in Lesson 2, it also created a module in which to store the macro. If this module happens to be the first module of the workbook, as was the case for mySort, the Macro Recorder names the new module Module1 by default. If the Macro Recorder creates another module after that and the workbook still holds a module named Module1, the Macro Recorder assigns the default name of Module2, and so on.
In the Project Explorer window, expand the bolded VBAProject title (my Project workbook name is MacroExamples.xlsm) and expand the yellow Modules folder to show the module named Module1. To see the VBA code in that module, you can double-click the module name, or you can right-click the module name and choose View Code, as shown in Figure 4.2.
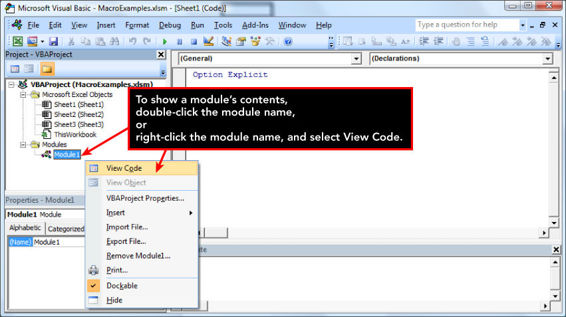
Figure 4.2
The mySort macro appears in the Code window for Module1. Based on the steps you took while recording the mySort macro in Lesson 2, Figure 4.3 shows the exact code that was produced by the Macro Recorder in Excel version 2003.
NOTE If you record (or manually compose, as you see in later lessons) a macro in a version of Excel after 2003, and you run that macro in a 2003 version, you might experience an error in that code's execution, depending on what the code is trying to do. VBA code plays well together among versions after 2003, but those later versions of Excel contain newer features, such as Sparklines and an updated object model for charts and pivot tables, that a 2003 version would not recognize. VBA code produced by the Macro Recorder in version 2003 usually works just fine in later versions, but be aware that backward compatibility has its limitations when running code in a 2003 version that was produced in a later version.
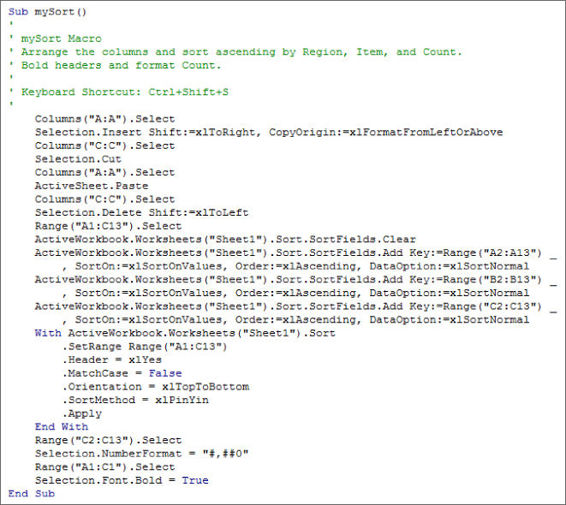
Figure 4.3
Understanding the Code
All macros start with a Sub statement (Sub is short for Subroutine, commonly referred to as a macro) that includes the name of the macro, followed by a pair of parentheses. For the example macro you see in Figures 4.3 and 4.4, the Sub statement is simply Sub mySort().
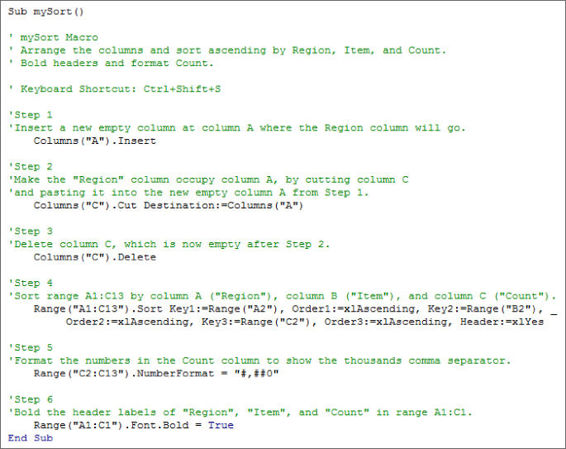
Figure 4.4
Because this macro was recorded, there is a series of comment lines below the Sub statement that the Macro Recorder wants you to know about. For example, you see the macro name, the description of the macro you entered into the Record Macro dialog box, and the notation that the shortcut Ctrl+Shift+S has been assigned to this macro.
Comment lines start with an apostrophe, are green in color to help you identify them, and are not executed as VBA code, as opposed to the other lines of VBA code that actually do something when the macro is running.
NOTE The comments you see in a recorded macro directly reflect the information entered in the Record Macro dialog box. For example, if you assign a shortcut key, or you enter text in the Description field of the Record Macro dialog box as shown in Lesson 2, Figure 2.13, that information will be seen as comments in your recorded macro's code, as shown in Figure 4.3.
The remaining lines in the macro are VBA statements, and they represent every action that was taken while the Macro Recorder was on:
1. The first thing you did was select column A.
2. Next, you inserted a new column at column A.
3. Next, you selected column C, cut that column, and pasted it to column A.
4. Next, you went back to select column C because it was empty, and you deleted it.
5. Next, you selected range A1:C13 where the table of data was.
6. Next, you sorted the selected range.
7. Next, you selected range C2:C13, which contained numbers you wanted to format.
8. Next, you formatted the selected cells with the thousands comma separator and no decimal places.
9. Next, you selected range A1:C1 where the column labels were.
10.Next, you formatted the selected range in order to Bold the font of those label cells.
11.Finally, you turned off the Macro Recorder, which produced the End Sub line. All macros end with the End Sub statement.
That's quite a few “Nexts” in the explanation for what is going on! Fortunately, you can edit a macro by typing your own descriptive comments, and you can consolidate a lot of the code so it runs faster and looks cleaner.
Editing a Macro with Comments and Improvements to the Code
As good as the Macro Recorder is at teaching VBA code, it is woefully lacking in the efficiency department with the volume of code it produces. To be fair, the Macro Recorder was never meant to be a lean, mean coding machine. Its primary function, which it performs flawlessly, is to produce VBA code that represents your every on-screen action.
It should be said that there is no law in the universe dictating that you must modify your every recorded macro. Sometimes, for simple macros that do the job, leaving them in their original recorded state is fine—if they work the way you want them to, you've won that round.
However, for the majority of VBA code that gets produced by the Macro Recorder, the superfluous and inefficient nature of its excessive code will be impossible to ignore. Besides, when you send your VBA workbook masterpieces to other users, you'll want your code to look and act beyond the beginner stage of recorded code.
NOTE You will find that editing a macro in the Code window is very similar to editing a Word document. Of course, rules exist for proper syntax of VBA code lines, but the principles of typing text, selecting words and deleting them with the Delete key, pressing Enter to go to the next line down—all these word-processor kinds of behaviors with which you are familiar—will help make the macro edit process an intuitive one.
A rule of thumb in VBA development is, don't select or activate objects unless you need to. The methods of Select and Activate are among the biggest culprits of slow, meandering macro execution. For example, the first two lines of code in the recorded macro are:
Columns("A:A").Select
Selection.Insert Shift:=xlToRight
Those two lines can and should be consolidated into one line, bypassing the Selection activity:
Columns("A").Insert Shift:=xlToRight
Same with the next two statements:
Columns("C:C").Select
Selection.Cut Destination:=Columns("A:A")
which can be expressed more succinctly as:
Columns("C").Cut Destination:=Columns("A")
You can see where I am going with this. In VBA, you can act directly upon most objects, most of the time, without needing to select them. When you deleted column C, you never needed to touch it in order for VBA to do the work for you, because the following statement:
Columns("C:C").Select
Selection.Delete Shift:=xlToLeft
can become this:
Columns("C").Delete Shift:=xlToLeft
Figure 4.4 shows how the original 13 lines of code in the mySort macro have been reduced to a much more readable and highly efficient six lines. Also notice how comments can be added for the purpose of enhancing the organized look of the macro. Your comments will help you, and anyone reading the macro, to understand what the code lines are doing, and why they are doing it.
NOTE You've now seen plenty of comments in the example macros, and how useful comments can be in your VBA code. To enter a comment line of text, simply type the apostrophe character, and everything you type after that, on that same line, will be regarded as a comment and not executed as VBA code. Usually, comments are written as standalone lines of text, meaning the very first character on that line is the apostrophe. However, some programmers prefer to place comments on the same line as actual VBA code. For example:
Range("A1").Clear 'Make cell A1 be empty for the next user.
In any case, comments will be green in color by default, and will not be executed as VBA code.
Another way you can speed up your macros is to use the With statement when you are performing multiple actions to the same object, such as to a range of cells. Suppose as part of your macro you need to clear a range of cells and format the range for the next user. If you use the Macro Recorder to do this, here is the code you might get:
Range("A1:D8").Select
Selection.Clear
Selection.Locked = False
Selection.FormulaHidden = False
Selection.Font.Bold = True
Selection.Font.Italic = True
Notice there are five lines of code that all start with the Selection object, which refers to the selected range of A1:D8. If this code were to run as the Macro Recorder produced it, VBA would need to resolve the Selection object for each line of code.
You can do two key edits to these lines of code by avoiding the Select method altogether and referring to the range object only once at the beginning of a With structure. Between the With and End With statements, every line of code that starts with a dot is evaluated by VBA as belonging to the same range object, meaning the range reference need only be resolved once. Here is the condensed code using a With structure for greater efficiency:
With Range("A1:D8")
.Clear
.Locked = False
.FormulaHidden = False
.Font.Bold = True
.Font.Italic = True
End With
Deleting a Macro
There will be many times when you have recorded or composed a macro that you don't need any more. Instead of having a useless macro hanging around doing no good, it's better to delete it. To delete a macro, you can select its entire code in the Code window (be sure you only select from and including the Sub line to and including the End Sub line) and press the Delete key.
NOTE You can delete a macro from outside the VBE. While on any worksheet, if you press Alt+F8 to call the Macro dialog box, you can select the macro name in the list and click the Delete button.
Inserting a Module
With larger VBA projects, you'll want to distribute your macros among two or more modules. With large projects, you'll be organizing your macros by some kind of theme or purpose. For example, the macros in your company's budget workbook that deal with reports might be placed in their own module. Sometimes you will have no choice in the matter, because modules do have a limit as to how much code they can individually support. To insert a new module, from the VBE menu bar, select Insert![]() Module, as shown in Figure 4.5.
Module, as shown in Figure 4.5.
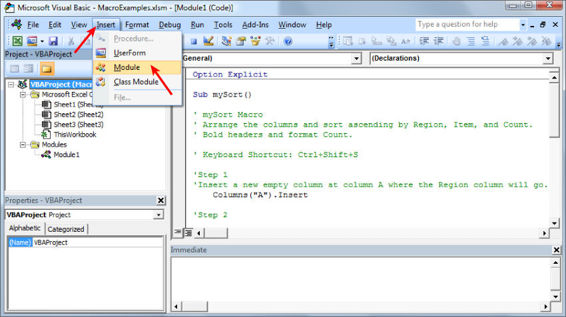
Figure 4.5
You'll see that your new module appears in the Project Explorer window. The entry cursor will be blinking in the new Code window, all primed and ready for you to enter VBA code into your new module, as depicted in Figure 4.6.
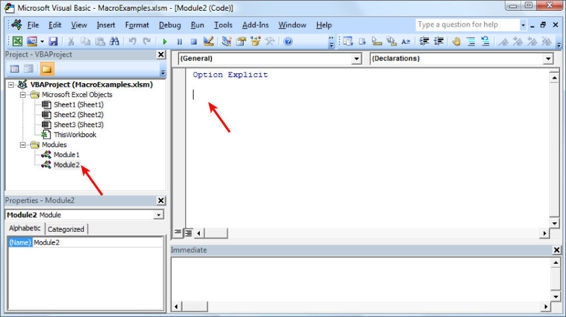
Figure 4.6
Renaming a Module
You've noticed that the Macro Recorder assigned the default name of Module1 to the module it created, and just now with Module2 you see how Excel continues to assign a sequential default name to subsequent modules you insert. Yep, definitely a pattern going on here with the module names, but it doesn't mean those names need to stay that way.
You can change a module name, and it makes a lot of sense to do so. This is especially true when you have a complex workbook containing many macros that are organized in several modules, and you want the module names to describe the themes of the macros they contain.
To change a module name, select it by clicking its original name in the Project Explorer. Notice in the Properties window that the Name property of the selected module object is, as you would expect, Module2. In the Properties window, use your mouse to select the entire module name property, such as you see in Figure 4.7.
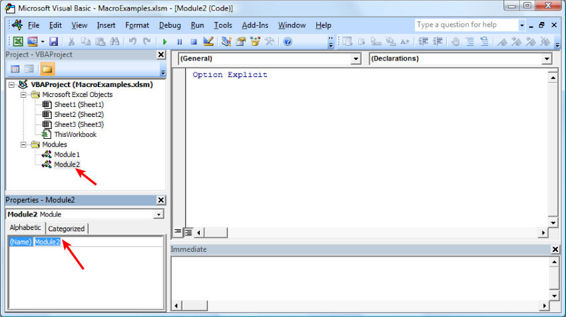
Figure 4.7
Now, it's a simple task of typing over the selected Module2 text in the Properties window as you enter whatever new name you want to give to that module. For this demonstration, name the module Test. Just type the word Test and press Enter. The successful result is shown in Figure 4.8.
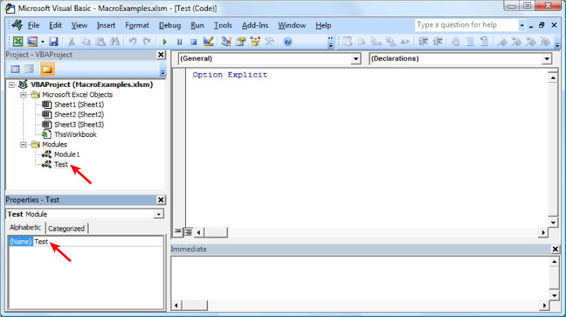
Figure 4.8
Deleting a Module
You can delete an entire module, and it's wise to keep your projects uncluttered of unused module objects if they have served their purpose and will no longer hold any macros. To delete a module, right-click the module name in the Project Explorer, and from the pop-up menu, click Remove [module name], as shown in Figure 4.9.
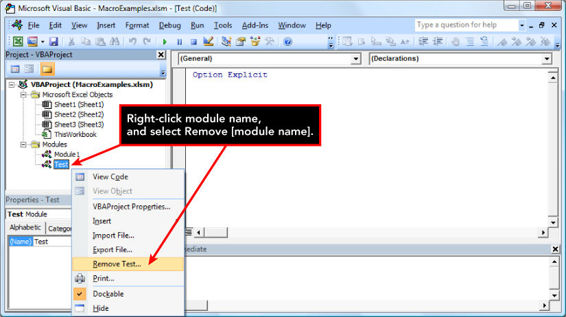
Figure 4.9
You're prompted with a message to confirm your intentions, along with a question as to whether you want to export your module elsewhere. In very remote instances you will need to export a module, but I have never come across a need to do that. Although the default button on the message is Yes, you will usually click the No button, as shown in Figure 4.10, to confirm the deletion of that module.
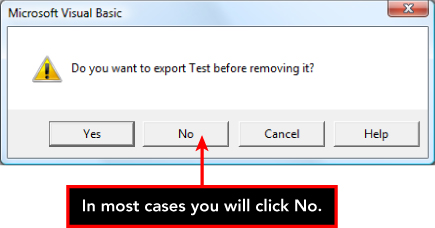
Figure 4.10
Locking and Protecting the VBE
The beauty of macros is that when they are properly constructed, you can count on them to do their job. The last thing you want is for another user of your workbook to wander into the Visual Basic Editor and make any kind of keystroke in a Code window. Especially when other people are using your workbook, you will want to protect your code from uninvited guests.
To limit access to the VBE, click Tools![]() VBAProject Properties, which calls the VBAProject - Project Properties dialog box. Click to select the Protection tab. Place a checkmark in the box next to Lock Project for Viewing. Enter a password you will remember, and confirm it, as shown in Figure 4.11.
VBAProject Properties, which calls the VBAProject - Project Properties dialog box. Click to select the Protection tab. Place a checkmark in the box next to Lock Project for Viewing. Enter a password you will remember, and confirm it, as shown in Figure 4.11.
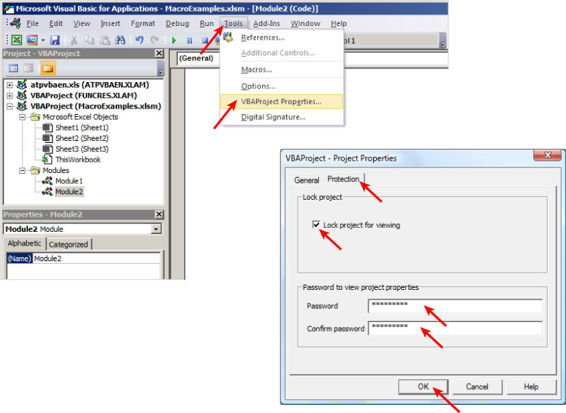
Figure 4.11
Click OK to exit the dialog box. For the locked protection to take effect, you need to save the workbook and close it. Now, each time the workbook is reopened, the Visual Basic Editor will require your password if you or anyone tries to gain access to the VBE.
WARNING Excel passwords are case sensitive. If your password attempt to access a locked VBE is rejected, the reason might be due to an incorrect upper- or lowercase entry.
Try It
In this lesson, you practice inserting a new module into the VBE, and pasting a macro that you copy from a website into the new module.
Lesson Requirements
For this lesson, you need access to the Internet.
To get the sample workbook file, you can download Lesson 4 from the book's website at www.wrox.com/go/excelvba24hour.
Hints
In Step 2, and in the video that accompanies this lesson, I use my website as the source for the macro that gets copied. There are many excellent websites with more VBA examples, some of which I list on my Links page at www.atlaspm.com/excel/#Links.
Step-by-Step
Place a macro from an external source into a new Excel module. In this exercise, a website is being used as the external source of the macro you want to copy and put into your workbook.
1. Open Excel, and open the workbook that will hold the macro you'll be importing.
2. Open your web browser and go to the website holding the macro you want to copy. In this example, my website at www.atlaspm.com is the source for the macro being copied for import. Enter the search keyword(s) in the Search field to reveal the link(s) that show a macro example that handles the task you want to solve.
3. Copy the macro from that source page onto your clipboard.
4. Return to your workbook.
5. Go to the Visual Basic Editor by pressing your keyboard's Alt+F11 keys, or by clicking the Developer tab on the Ribbon and selecting the Visual Basic icon.
6. From the menu bar in the VBE, click Insert![]() Module
Module
7. In your new module, you can paste the macro you copied in Step 3 by pressing Ctrl+V on your keyboard, or you can right-click anywhere in your new module and select Paste.
8. Return to your worksheet by pressing the Alt+Q keys or by clicking the Close button in the top-right corner of the VBE.
9. To run your macro from the Macro dialog box, press the Alt+F8 keys or click the Macros icon on the Developer tab.
REFERENCE Please select the video for Lesson 4 online at www.wrox.com/go/excelvba24hour. You will also be able to download the code and resources for this lesson from the website.
All materials on the site are licensed Creative Commons Attribution-Sharealike 3.0 Unported CC BY-SA 3.0 & GNU Free Documentation License (GFDL)
If you are the copyright holder of any material contained on our site and intend to remove it, please contact our site administrator for approval.
© 2016-2026 All site design rights belong to S.Y.A.