Excel VBA 24-Hour Trainer (2015)
Part II
Diving Deeper into VBA
<Lesson 7
Understanding Objects and Collections
Lesson 5 introduced the topic of collections, which are objects that contain a group of like objects. This lesson adds some detail to the topic and goes over some programming techniques to deal with the most common types of object collections you will encounter: workbooks, worksheets, cells, and ranges.
Workbooks
An Excel file is a Workbook object. You might wonder how workbooks have a collection, seeing as you can only work in one workbook at a time, and even then you are usually manipulating objects at a lower level, such as worksheets or cells.
NOTE Do not confuse the Application object with the Workbook object. In VBA, the Application object is at the very top of the food chain; there is nothing higher than Application in the Excel object model. Application represents the entire Excel program, whereas Workbook represents an individual Excel file.
The Workbooks collection contains the references to every Workbook object that is open in the same instance of Excel. You need to call upon the Workbooks collection when you want to do some task in every open workbook, or when you want to activate a particular workbook whose name is not known.
Here is an example. In VBA, the following command adds a new workbook:
Workbooks.Add
When this code line is executed, the active workbook becomes the new workbook you added, same as the effect of manually adding a new workbook from your existing one, when the workbook you added becomes the active workbook.
What if your project calls for you to add two workbooks to the existing one, and you want to end the macro with the first added workbook being the active one, instead of the last added workbook being the active one? In your Workbooks collection, how do you specify which Workbook object you want to do something with when you don't know the names of any open workbooks?
VBA offers several methods to solve this problem, one being an ability to assign a variable to each workbook you add, and then to activate the workbook whose variable you care about. For example, the following macro adds two workbooks and ends with the first added workbook being the active one:
Sub AddWorkbooks()
Dim WorkbookAdd1 As Workbook
Dim WorkbookAdd2 As Workbook
Set WorkbookAdd1 = Workbooks.Add
Set WorkbookAdd2 = Workbooks.Add
WorkbookAdd1.Activate
End Sub
Workbook objects have a number of methods, such as Open, Save, and Close. Lesson 10 delves into the practice of repeating actions with loops, but here's a sneak peek at a loop that saves and closes every workbook that is currently open in your instance of Excel, except for the workbook you are working in. Notice what you don't see, which is a concern about how many workbooks are open, or what their names are. You only need to tell VBA to look for Workbook objects in the Workbooks collection:
Sub CloseAllOtherWorkbooks()
Dim wkb As Workbook
For Each wkb In Workbooks
If wkb.Name <> ThisWorkbook.Name Then
wkb.Close SaveChanges:=True
End If
Next wkb
End Sub
The Worksheets collection enables you to refer to the Worksheet objects' names or index numbers, which is the numerical position of worksheets as you see their tabs in order from left to right. Referring to names tends to be a safer practice, but as you saw with workbooks, and as you will learn with looping techniques, a variable can be assigned to each Worksheet object to access all worksheets without caring where they are in the workbook or what their tab names are.
Say you want to add a new worksheet, and give it the name Test1. No problem there, but now you are asked to add the new worksheet such that its placement will be the last (rightmost) worksheet in the workbook. You have no idea how many sheets exist already. You don't know the name of the last worksheet in order to reference its location but even if you did know that today, there could easily be a differently named worksheet in that index position tomorrow.
The following one-line macro adds a new worksheet, names it as you specify, and places it at the far right end of the worksheets, which is the highest worksheet index number based on the count of existing worksheets:
Sub WorksheetTest1()
Worksheets.Add(After:=Worksheets(Worksheets.Count)).Name = "Test1"
End Sub
You can place a worksheet relative to another worksheet's name, this time adding a worksheet, and placing it before Sheet2:
Sub WorksheetTest2()
Worksheets.Add(Before:=Worksheets("Sheet2")).Name = "Test2"
End Sub
NOTE The preceding examples work without any problem as long as the workbook does not already contain a worksheet with the name Test1 or Test2. Excel does not allow worksheets to be given duplicate names in the same workbook, and attempting to do so will result in an error. You learn about handling VBA errors in Lesson 20.
You may want to relocate an existing worksheet from its current position to a particular index position for the convenience of your workbook's users. Suppose that during the course of your macro, you want the active worksheet to occupy the number two worksheet index position—that is, to be the worksheet that is located second from the left as you see the worksheet tabs. To accomplish this, you can place the active worksheet after the first index worksheet, as shown in the following example:
ActiveSheet.Move After:=Sheets(1)
NOTE A word of caution about the Worksheets collection: There is a difference between the Sheets collection and the Worksheets collection. You probably know about chart sheets, and if your workbook has one, you need to be mindful to cycle through the Worksheets collection only if you are interested in manipulating worksheets. If you cycle through the Sheets collection, all sheets, including a chart sheet (or outmoded dialog sheets or macro sheets) are included in the procedure. If you only want to act on worksheets, specify the Worksheets collection.
Cells and Ranges
The Range object is probably the most utilized object in VBA. A range can be a single cell or a range of cells that spans any size area. A Range object, then, is a cell or block of cells that is contained on a Worksheetobject. Though a Range object can be a union of several noncontiguous blocks of cells, it is always the case that a VBA Range object is contained on a single parent worksheet. That parent worksheet can be the active worksheet or some other worksheet, but there is no such thing as a Range object that includes cells on different worksheets.
A single cell is a range as far as VBA is concerned, and ActiveCell is the object name in VBA of the single active cell on the active worksheet. There is no such object as ActiveRange, but many ways exist to identify particular ranges, one of the most common being the Selection object.
If you were to select any range of cells, and execute this line of code, all cells in that selected range would immediately contain the word “Hello”:
Selection.Value = "Hello"
You may be interested to know that named ranges are fair game for VBA to refer to and manipulate, just like any other range. In fact there is a Names collection object for named ranges.
As an example, say you have previously named a range myRange. This line of code in a VBA macro would place the word “Hello” in all cells in your named range:
Range("myRange").Value = "Hello"
As you have seen, you do not need to select your range in order to work with it. For most operations on cells or ranges, you can refer to the range and its parent worksheet. You can execute the following line of code from any worksheet in your workbook, as an example of establishing a bold format for a range of cells on Sheet1:
Worksheets("Sheet1").Range("A1:D25").Font.Bold = True
At times you will want to refer to all the cells on a worksheet instead of limiting your operation to a particular range. For example, suppose as part of your macro you want to clear the contents of every cell on the worksheet. Starting with version 2007, clearing the contents of the entire grid of worksheet cells can be expressed as Range("A1:XFD1048576").ClearContents. However, if the workbook is being used in a version of Excel prior to 2007, that same operation could be expressed as Range("A1:IV65536").ClearContents. Fortunately, you can avoid errors and confusion by using the Cells object as shown in the following example, which refers to all worksheet cells in whichever version of Excel is being used at the moment:
Cells.ClearContents
You can do some useful operations using the Cells object when you want to involve the entire worksheet. Suppose you have set up Sheet1 as a template with formatted ranges, labels, values, and formulas, and you want Sheet2 to be established the same way. The following line of code copies the Sheet1 cells and pastes them to Sheet2:
Worksheets("Sheet1").Cells.Copy Worksheets("Sheet2").Cells
SpecialCells
An interesting brand of range objects is Excel's group of SpecialCells, which I touched upon in the Try It section and video for Lesson 2. Press the F5 key to show the Go To dialog box. Click the Special button, and you see more than a dozen types of SpecialCells.
SpecialCells is the name of the method in VBA that returns a range object of a specific cell type. For example, cells on your worksheet that contain comments are regarded by VBA as SpecialCells. So are cells containing data validation, or cells that contain formulas, or cells that contain constants, such as text or data you have manually entered. With the combinations of SpecialCells, the possibilities are enormous for identifying various kinds of ranges based on all sorts of criteria.
Say in range A1:A10 you have some cells that contain formulas, some cells that contain numbers you have manually entered, and some cells that contain nothing. If you want to select all individual cells in range A1:A10 that contain formulas, and not include in your selection any of the other cells in that range, this macro would do that:
Sub FindFormulas()
Range("A1:A10").SpecialCells(xlCellTypeFormulas).Select
End Sub
Try It
In this lesson you practice with the useful IntelliSense tool to help you become familiar with VBA syntax. Using IntelliSense can help improve your efficiency and accuracy, with its drop-down list of properties and methods when writing code.
Lesson Requirements
None
Step-by-Step
VBA's IntelliSense feature is an incredibly useful tool that helps you write your macros faster and smarter. I use it all the time to help me write code in the proper VBA syntax. As mentioned, VBA has hundreds of objects and each object can have dozens of methods and properties. IntelliSense can display a list of an object's methods and properties while you are typing your code, and it can quickly call the Help feature for a topic you select.
1. Open Excel and press Alt+F11 to go to the Visual Basic Editor.
2. If you have not already done so, from the VBE menu bar, click Tools![]() Options as shown in Figure 7.1.
Options as shown in Figure 7.1.
3. In the Options dialog box on the Editor tab, make sure there is a check mark in the box next to Auto List Members as shown in Figure 7.2, and click OK.
4. Press Ctrl+G to be taken into the Immediate window.
5. Type in the question mark character, then press the spacebar, type the word Application, and press the dot key on your keyboard. A list of the Application object's members, properties, and methods is displayed, as shown in Figure 7.3.
6. Now, practice using IntelliSense. Press the N key and you are taken to the first item in the Application object's list of members that begins with the letter N. In this case, that member happens to be the Nameproperty, which will be highlighted by selection as shown in Figure 7.4.
7. With the Name property item selected, either double-click it or press the Alt key to accept and enter the Name property for the Application object, and then press the Enter key. The Immediate window returns the result Microsoft Excel as shown in Figure 7.5.
8. Continue to explore on your own. Press the Enter key in the Immediate window to start a new line, enter the question mark character and press the spacebar, and scroll through the member list of other objects such as ActiveWorkbook or Range. Keep in mind that many objects are parents of other objects, so you can go two or more members deep to gather some information. For example, the ActiveWorkbookobject has a Worksheets collection, and the Worksheets collection has a Count property. Therefore, if you type the line ? activeworkbook.Worksheets.Count into the Immediate window, VBA returns the number of worksheets the active workbook contains.
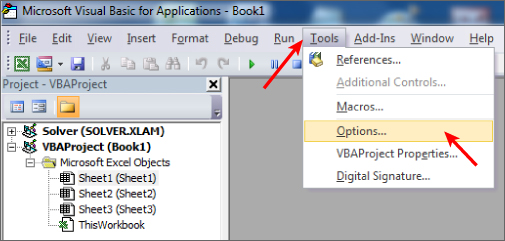
Figure 7.1
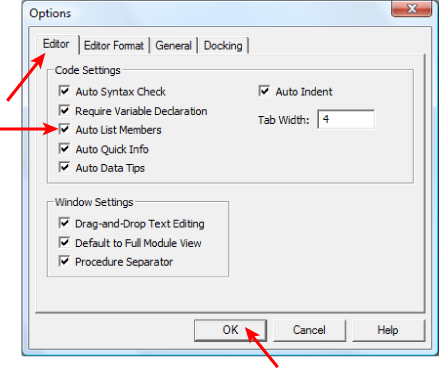
Figure 7.2
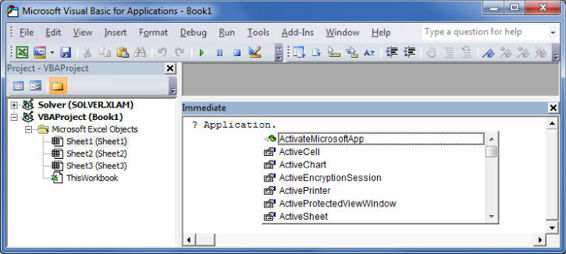
Figure 7.3
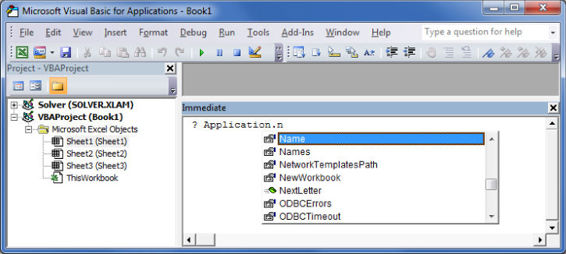
Figure 7.4
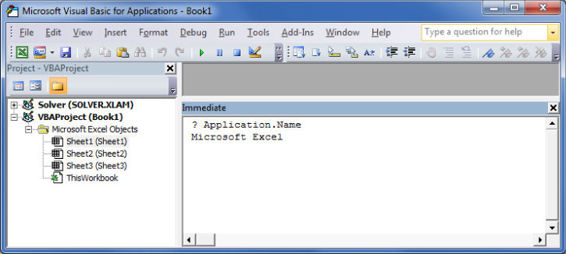
Figure 7.5
REFERENCE Please select the videos for Lesson 7 online at www.wrox.com/go/excelvba24hour. You will also be able to download the code and resources for this lesson from the website.
All materials on the site are licensed Creative Commons Attribution-Sharealike 3.0 Unported CC BY-SA 3.0 & GNU Free Documentation License (GFDL)
If you are the copyright holder of any material contained on our site and intend to remove it, please contact our site administrator for approval.
© 2016-2026 All site design rights belong to S.Y.A.