Excel VBA 24-Hour Trainer (2015)
Part II
Diving Deeper into VBA
Lesson 8
Working with Ranges
The Range object is probably the most frequently used object in VBA. Almost anything you do in a worksheet where VBA is concerned involves either a cell (or range of cells), or a reference of some kind to a range location that helps to direct whatever action your macro is undertaking. When you programmatically create a chart, modify a pivot table's source data, or insert picture files or comments, you are working with ranges.
Because ranges are so commonly referred to in code, this lesson introduces you to various syntaxes you will soon become familiar with, and in fact depend on, to refer to or manipulate Range objects. My approach with this lesson is to demonstrate basic code lines with pictures to show how ranges can be identified or selected.
As you'll hear over and over in VBA programming circles, you need not, and normally will not, actually select a range in order to work with it. You can refer to and manipulate (such as by editing or formatting) ranges of cells on other worksheets or other workbooks without leaving your active worksheet. The pictures in this lesson show the selection of ranges for visual confirmation of the code at work, but after this lesson, you will rarely see code that selects or activates an object.
Working with Contiguously Populated Ranges
The simplest ranges to deal with are those that have all cells filled with data or formulas, and no empty cells within that range. Figure 8.1 shows a typical-looking list of data for which you can easily identify its last row, its last column, and its address. Based on Figure 8.1, the variables in the following macro yield 6 for the LastRow variable, and 3 (column C, the third column in the spreadsheet grid) for the LastColumnvariable:
Sub Find_LastRow_LastColumn()
Dim LastRow As Long, LastColumn As Long
LastRow = Cells(Rows.Count, 1).End(xlUp).Row
LastColumn = Cells(2, Columns.Count).End(xlToLeft).Column
MsgBox _
"The last row is: " & LastRow & vbCrLf & _
"The last column is: " & LastColumn
End Sub

Figure 8.1
Using the Cells Property
You have seen with the previous example and in other VBA expressions that the Cells property can select or refer to a range. The Cells range syntax is Cells(RowIndex, ColumnIndex). Therefore, the expression Cells(2, 5) refers to cell E2 because that is the same as row 2 of column 5. For the Cells property, the row component must be a numeral, but the column can be a letter that must be in quotes, for example Cells(2, "E"). Therefore, in practice, either of these expressions bold cell E2:
Cells(2, 5).Font.Bold = True
Cells(2, "E").Font.Bold = True
You can incorporate two Cells properties within the Range statement to refer to a range larger than just one cell. Using the example variables for LastRow and LastColumn, the following line of code tells you the range address of the list shown in Figure 8.1:
MsgBox Range(cells(1, 1), Cells(LastRow, LastColumn)).Address
As a final example, you can use Cells to select a particular range of cells, such as D3:F5 in Figure 8.2:
Range(cells(3, 4), cells(5, 6)).select
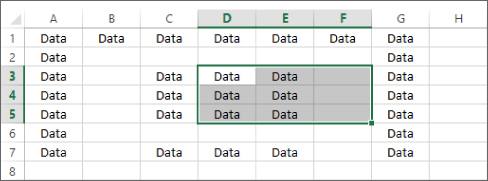
Figure 8.2
Using CurrentRegion
The CurrentRegion property refers to a localized range of contiguous data that may exist among other ranges on that worksheet containing a mix of filled and empty cells. Suppose you have disjointed data on your worksheet, as depicted in Figure 8.3. With the active cell in the local (CurrentRegion) area of the range of data you want to work with, the following line of code will select that active cell's CurrentRegion, as shown in Figure 8.4.
ActiveCell.CurrentRegion.Select
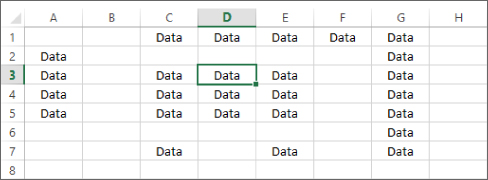
Figure 8.3
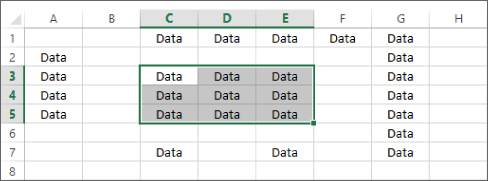
Figure 8.4
Working with Noncontiguously Populated Ranges
You will often need to locate or refer to ranges that are broken up by empty cells, usually referred to as noncontiguous ranges. VBA offers some clever options for taming the noncontiguous range beast.
Using Range with Several Cells
As shown in Figure 8.5, you can select various cells in a union with this example code line:
Range("B2, D5, F1:F4").Select
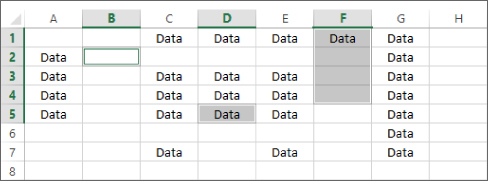
Figure 8.5
Notice the construction has cell addresses, or ranges, separated by a comma and a space, enclosed in quotes.
Using OFFSET
The OFFSET property refers to a range by adding or subtracting (offsetting) row and column numbers from a relative reference to refer to a new range. In Figure 8.6, the active cell is B4.
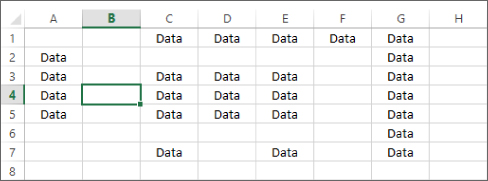
Figure 8.6
If you want to select a range that is relative to the active cell by extending the range upward 2 rows and outward 4 columns, you can use the following code line. The result is shown in Figure 8.7.
Range(activecell, activecell.Offset(-2, 4)).Select
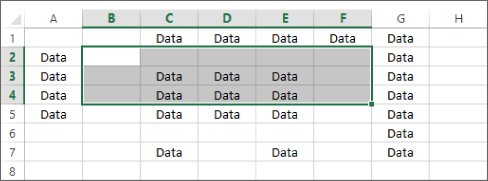
Figure 8.7
Using RESIZE
The RESIZE property changes the size of a range, based on a cell of interest as the reference point. In this example, range B3 is resized by 4 rows and 5 columns, thereby selecting range B3:F6. (See Figure 8.8.) The code line that is used in this example is
Range("B3").Resize(4, 5).Select
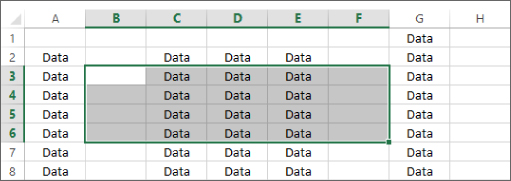
Figure 8.8
Identifying a Data Range
In some cases you will only want to identify a range of cells that contain data or formulas, but not formatting. In Figure 8.9, cell H3 is a lonely soul, apart from the data range but formatted with red fill color for demonstration purposes.
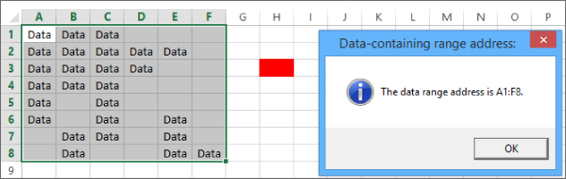
Figure 8.9
This example shows how to select a data range on the current sheet, starting at cell A1, and display the address of the range to the user. The data range does not include cells that are formatted that do not contain data. To get the data range, this example finds the last row and the last column that contain actual data by using the Find method of the Range object:
Sub SelectDataRange()
Dim LastRow As Long, LastColumn As Long
LastRow = Cells.Find(What:="*", SearchDirection:=xlPrevious, _
SearchOrder:=xlByRows).Row
LastColumn = Cells.Find(What:="*", SearchDirection:=xlPrevious, _
SearchOrder:=xlByColumns).Column
Range("A1").Resize(LastRow, LastColumn).Select
MsgBox "The data range address is " & Selection.Address(0, 0) & ".", _
vbInformation, "Data-containing range address:"
End Sub
Identifying the UsedRange
The UsedRange property represents cells on a worksheet that are currently being used or have been used. This includes formatted cells that do not contain data, such as what's shown in Figure 8.10.
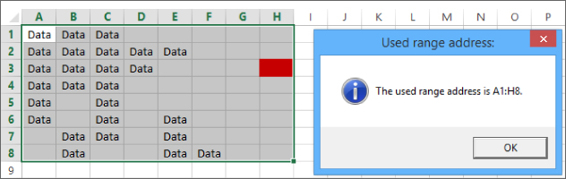
Figure 8.10
This example shows how to select the UsedRange on the current worksheet by using the UsedRange property of the Worksheet object and the Select method of the Range object. The selected address of the worksheet's UsedRange is displayed in a message box:
Sub SelectUsedRange()
ActiveSheet.UsedRange.Select
MsgBox "The used range address is " & _
ActiveSheet.UsedRange.Address(0, 0) & ".", 64, "Used range address:"
End Sub
Finding the Dynamic Last Rows and Columns
This section includes a collection of several dynamic row and column locations wrapped into one macro example. You may need to not only find the last row of data, but limit your search to a particular set of columns. The same goes for the last used column, based on one row, all rows, or a specific range of rows. Figure 8.11 shows the versatility of the following macro for handling all these scenarios:
Sub DataRangeLastRowsColumns()
'Declare variables for last rows and columns
Dim LastRow As Long, LastColumn As Long
Dim LastRowSingleColumn As Long, LastRowSomeColumns As Long
Dim LastColumnSingleRow As Long, LastColumnSomeRows As Long
'Last row of data considering all columns.
LastRow = Cells.Find(What:="*", After:=Range("A1"), _
SearchOrder:=xlByRows, SearchDirection:=xlPrevious).Row
'Last row of data considering just column D.
LastRowSingleColumn = Cells(Rows.Count, 4).End(xlUp).Row
'Last row of data considering just columns B, C, and D.
LastRowSomeColumns = Range("B:D").Find(What:="*", After:=Range("B1"), _
SearchOrder:=xlByRows, SearchDirection:=xlPrevious).Row
'Last column of data considering all rows.
LastColumn = Cells.Find(What:="*", After:=Range("A1"), _
SearchOrder:=xlByColumns, SearchDirection:=xlPrevious).Column
'Last column of data considering just row 3.
LastColumnSingleRow = Cells(3, Cells.Columns.Count).End(xlToLeft).Column
'Last column of data considering just rows 1, 2, and 3.
LastColumnSomeRows = Rows("1:3").Find(What:="*", _
After:=Cells(1, Cells.Columns.Count), _
SearchOrder:=xlByColumns, SearchDirection:=xlPrevious).Column
'Advise the user of last row and column information.
MsgBox _
"Last row of data anywhere: " & LastRow & vbCrLf & _
"Last row of data in column D: " & LastRowSingleColumn & vbCrLf & _
"Last row of data among columns B, C, and D: " & _
LastRowSomeColumns & vbCrLf & vbCrLf & _
"Last column of data anywhere: " & LastColumn & vbCrLf & _
"Last column of data in row 3: " & LastColumnSingleRow & vbCrLf & _
"Last column of data among rows 1, 2, and 3: " & LastColumnSomeRows, , _
"Last row and last column information:"
End Sub
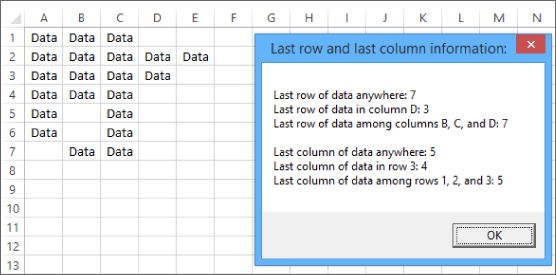
Figure 8.11
Identifying Where the Range Starts and Ends When No Start or End Point Is Known
It probably seems that cell A1 is where data starts on a worksheet. Row 1 is popular for header labels in a list, and column A is the leftmost column on the spreadsheet grid, prominently visible. But sometimes data finds itself on a worksheet in areas you would not expect, and the next day, that same worksheet can hold data somewhere totally different. You need a catch-all macro to find the range of data, from wherever it starts to wherever it ends.
This example shows how to select a data range on the current sheet when you do not know the starting or ending location and display the range address in a message box. The data range does not include cells that are formatted. This example finds the first and last row and column that contain actual data by using the Find method of the Range object. The result is shown in Figure 8.12.
Sub UnknownRange()
Dim FirstRow As Long, FirstCol As Long, LastRow As Long, LastCol As Long
Dim myUsedRange As Range
FirstRow = _
Cells.Find(What:="*", SearchDirection:=xlNext, SearchOrder:=xlByRows).Row
FirstCol = _
Cells.Find(What:="*", SearchDirection:=xlNext, SearchOrder:=xlByColumns).Column
LastRow = _
Cells.Find(What:="*", SearchDirection:=xlPrevious, SearchOrder:=xlByRows).Row
LastCol = _
Cells.Find(What:="*", SearchDirection:=xlPrevious, SearchOrder:=xlByColumns).Column
Set myUsedRange = Range(Cells(FirstRow, FirstCol), Cells(LastRow, LastCol))
myUsedRange.Select
MsgBox _
"The data range on this worksheet is " & _
myUsedRange.Address(0, 0) & ".", vbInformation, "Range address:"
End Sub
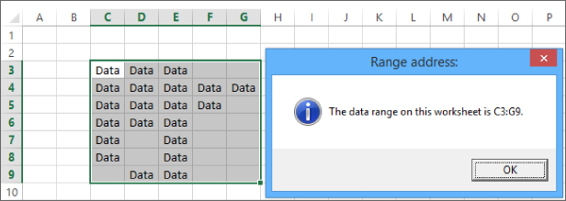
Figure 8.12
Try It
In this lesson, you see how to create a macro that identifies the location of a chart on a worksheet. The purpose of the exercise is to demonstrate how to identify an object's location without selecting or activating any ranges or objects. The value of the exercise is to know with confidence where else on a worksheet (that is, below or to the right of an object) you can insert a new object, edit a cell, or take some action on the worksheet without coming into contact with the existing object of interest.
Lesson Requirements
To get the sample workbook file, you can download Lesson 8 from the book's website at www.wrox.com/go/excelvba24hour.
Hints
Using the Index property of the embedded chart helps avoid needing to know the Chart object's name.
The Cells property is especially useful in this example, when variables are declared to identify row and column locations.
Step-by-Step
1. Open an Excel workbook in which you have a Chart object on a worksheet. If you don't have such a workbook, in a new worksheet, construct a simple table and insert a chart similar to Figure 8.13.
2. Compose a macro to tell you the location of the chart on your worksheet. You will want to identify the top and bottom rows, and the left and right columns that the Chart object covers.
3. From the Developer tab on the Ribbon, click the Visual Basic icon, or press Alt+F11 on your keyboard to go to the Visual Basic Editor.
4. From the VBE menu bar, click Insert![]() Module.
Module.
5. In your new module, type the name of the macro. In this example, the macro is named Sub ChartLocation().
6. Declare variables for the top and bottom rows, and left and right columns that the chart touches:
7. Dim TopRow As Long, BottomRow As Long
Dim LeftColumn As Long, RightColumn As Long
7. Open a With structure for the ChartObject. Because there is only one chart on the worksheet, its Index property is 1 and you can refer to it in code with this statement:
With ActiveSheet.ChartObjects(1)
8. Declare your row and column variables like so:
9. TopRow = .TopLeftCell.Row
10. BottomRow = .BottomRightCell.Row
11. LeftColumn = .TopLeftCell.Column
RightColumn = .BottomRightCell.Column
9. Close the With structure:
End With
10.Utilizing the variables to show an example of changing a cell outside the range occupied by the chart, this line of code enters the word Hello into a cell two rows below and two columns to the right of the bottom-right corner of the chart:
Cells(BottomRow + 2, RightColumn + 2).Value = "Hello"
11.For demonstration purposes, an optional enhancement to this macro is the following message box code that confirms the chart's location when the macro is run, as shown in Figure 8.14:
12. MsgBox "Top row: " & TopRow & vbCrLf & _
13. "Bottom row: " & BottomRow & vbCrLf & _
14. "Left column: " & LeftColumn & vbCrLf & _
"RightColumn: " & RightColumn, , "ChartLocation"
12.End the macro with the End Sub line.
13.Go ahead and test your macro. Press Alt+Q to exit the VBE, and from your worksheet press Alt+F8 to show the Macro dialog box. Select the macro name and click the Run button. The ChartLocation macro looks like this in its entirety:
14. Sub ChartLocation()
15. Dim TopRow As Long, BottomRow As Long
16. Dim LeftColumn As Long, RightColumn As Long
17. With ActiveSheet.ChartObjects(1)
18. TopRow = .TopLeftCell.Row
19. BottomRow = .BottomRightCell.Row
20. LeftColumn = .TopLeftCell.Column
21. RightColumn = .BottomRightCell.Column
22. End With
23. Cells(BottomRow + 2, RightColumn + 2).Value = "Hello"
24. MsgBox "Top row: " & TopRow & vbCrLf & _
25. "Bottom row: " & BottomRow & vbCrLf & _
26. "Left column: " & LeftColumn & vbCrLf & _
27. "RightColumn: " & RightColumn, , "ChartLocation"
End Sub
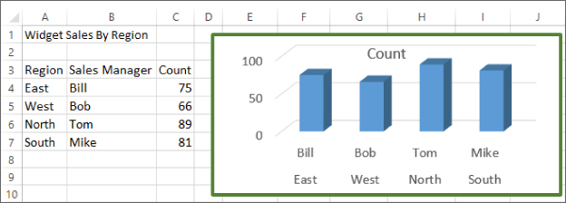
Figure 8.13
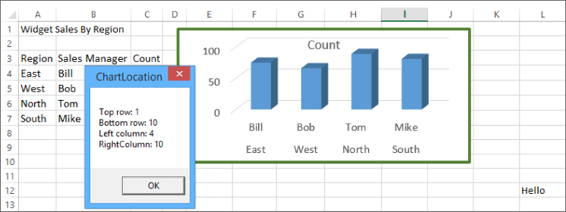
Figure 8.14
REFERENCE Please select the video for Lesson 8 at www.wrox.com/go/excelvba24hour. You will also be able to download the code and resources for this lesson from the website.
All materials on the site are licensed Creative Commons Attribution-Sharealike 3.0 Unported CC BY-SA 3.0 & GNU Free Documentation License (GFDL)
If you are the copyright holder of any material contained on our site and intend to remove it, please contact our site administrator for approval.
© 2016-2026 All site design rights belong to S.Y.A.