Automate the Boring Stuff with Python: Practical Programming for Total Beginnerso (2015)
Part II. Automating Tasks
Chapter 11. Web Scraping
In those rare, terrifying moments when I’m without Wi-Fi, I realize just how much of what I do on the computer is really what I do on the Internet. Out of sheer habit I’ll find myself trying to check email, read friends’ Twitter feeds, or answer the question, “Did Kurtwood Smith have any major roles before he was in the original 1987 Robocop?”[2]
Since so much work on a computer involves going on the Internet, it’d be great if your programs could get online. Web scraping is the term for using a program to download and process content from the Web. For example, Google runs many web scraping programs to index web pages for its search engine. In this chapter, you will learn about several modules that make it easy to scrape web pages in Python.
§ webbrowser. Comes with Python and opens a browser to a specific page.
§ Requests. Downloads files and web pages from the Internet.
§ Beautiful Soup. Parses HTML, the format that web pages are written in.
§ Selenium. Launches and controls a web browser. Selenium is able to fill in forms and simulate mouse clicks in this browser.
Project: mapit.py with the webbrowser Module
The webbrowser module’s open() function can launch a new browser to a specified URL. Enter the following into the interactive shell:
>>> import webbrowser
>>> webbrowser.open('http://inventwithpython.com/')
A web browser tab will open to the URL http://inventwithpython.com/. This is about the only thing the webbrowser module can do. Even so, the open() function does make some interesting things possible. For example, it’s tedious to copy a street address to the clipboard and bring up a map of it on Google Maps. You could take a few steps out of this task by writing a simple script to automatically launch the map in your browser using the contents of your clipboard. This way, you only have to copy the address to a clipboard and run the script, and the map will be loaded for you.
This is what your program does:
§ Gets a street address from the command line arguments or clipboard.
§ Opens the web browser to the Google Maps page for the address.
This means your code will need to do the following:
§ Read the command line arguments from sys.argv.
§ Read the clipboard contents.
§ Call the webbrowser.open() function to open the web browser.
Open a new file editor window and save it as mapIt.py.
Step 1: Figure Out the URL
Based on the instructions in Appendix B, set up mapIt.py so that when you run it from the command line, like so...
C:\> mapit 870 Valencia St, San Francisco, CA 94110
... the script will use the command line arguments instead of the clipboard. If there are no command line arguments, then the program will know to use the contents of the clipboard.
First you need to figure out what URL to use for a given street address. When you load http://maps.google.com/ in the browser and search for an address, the URL in the address bar looks something like this:https://www.google.com/maps/place/870+Valencia+St/@37.7590311,-122.4215096,17z/data=!3m1!4b1!4m2!3m1!1s0x808f7e3dadc07a37:0xc86b0b2bb93b73d8.
The address is in the URL, but there’s a lot of additional text there as well. Websites often add extra data to URLs to help track visitors or customize sites. But if you try just going to https://www.google.com/maps/place/870+Valencia+St+San+Francisco+CA/, you’ll find that it still brings up the correct page. So your program can be set to open a web browser to 'https://www.google.com/maps/place/your_address_string' (where your_address_string is the address you want to map).
Step 2: Handle the Command Line Arguments
Make your code look like this:
#! python3
# mapIt.py - Launches a map in the browser using an address from the
# command line or clipboard.
import webbrowser, sys
if len(sys.argv) > 1:
# Get address from command line.
address = ' '.join(sys.argv[1:])
# TODO: Get address from clipboard.
After the program’s #! shebang line, you need to import the webbrowser module for launching the browser and import the sys module for reading the potential command line arguments. The sys.argv variable stores a list of the program’s filename and command line arguments. If this list has more than just the filename in it, then len(sys.argv) evaluates to an integer greater than 1, meaning that command line arguments have indeed been provided.
Command line arguments are usually separated by spaces, but in this case, you want to interpret all of the arguments as a single string. Since sys.argv is a list of strings, you can pass it to the join() method, which returns a single string value. You don’t want the program name in this string, so instead of sys.argv, you should pass sys.argv[1:] to chop off the first element of the array. The final string that this expression evaluates to is stored in the address variable.
If you run the program by entering this into the command line...
mapit 870 Valencia St, San Francisco, CA 94110
... the sys.argv variable will contain this list value:
['mapIt.py', '870', 'Valencia', 'St, ', 'San', 'Francisco, ', 'CA', '94110']
The address variable will contain the string '870 Valencie St, San Francisco, CA 94110'.
Step 3: Handle the Clipboard Content and Launch the Browser
Make your code look like the following:
#! python3
# mapIt.py - Launches a map in the browser using an address from the
# command line or clipboard.
import webbrowser, sys, pyperclip
if len(sys.argv) > 1:
# Get address from command line.
address = ' '.join(sys.argv[1:])
else:
# Get address from clipboard.
address = pyperclip.paste()
webbrowser.open('https://www.google.com/maps/place/' + address)
If there are no command line arguments, the program will assume the address is stored on the clipboard. You can get the clipboard content with pyperclip.paste() and store it in a variable named address. Finally, to launch a web browser with the Google Maps URL, call webbrowser.open().
While some of the programs you write will perform huge tasks that save you hours, it can be just as satisfying to use a program that conveniently saves you a few seconds each time you perform a common task, such as getting a map of an address. Table 11-1 compares the steps needed to display a map with and without mapIt.py.
Table 11-1. Getting a Map with and Without mapIt.py
|
Manually getting a map |
Using mapIt.py |
|
Highlight the address. |
Highlight the address. |
|
Copy the address. |
Copy the address. |
|
Open the web browser. |
Run mapIt.py. |
|
Go to http://maps.google.com/. |
|
|
Click the address text field. |
|
|
Paste the address. |
|
|
Press ENTER. |
See how mapIt.py makes this task less tedious?
Ideas for Similar Programs
As long as you have a URL, the webbrowser module lets users cut out the step of opening the browser and directing themselves to a website. Other programs could use this functionality to do the following:
§ Open all links on a page in separate browser tabs.
§ Open the browser to the URL for your local weather.
§ Open several social network sites that you regularly check.
Downloading Files from the Web with the requests Module
The requests module lets you easily download files from the Web without having to worry about complicated issues such as network errors, connection problems, and data compression. The requests module doesn’t come with Python, so you’ll have to install it first. From the command line, run pip install requests. (Appendix A has additional details on how to install third-party modules.)
The requests module was written because Python’s urllib2 module is too complicated to use. In fact, take a permanent marker and black out this entire paragraph. Forget I ever mentioned urllib2. If you need to download things from the Web, just use the requests module.
Next, do a simple test to make sure the requests module installed itself correctly. Enter the following into the interactive shell:
>>> import requests
If no error messages show up, then the requests module has been successfully installed.
Downloading a Web Page with the requests.get() Function
The requests.get()function takes a string of a URL to download. By calling type() on requests.get()’s return value, you can see that it returns a Response object, which contains the response that the web server gave for your request. I’ll explain the Response object in more detail later, but for now, enter the following into the interactive shell while your computer is connected to the Internet:
>>> import requests
➊ >>> res = requests.get('http://www.gutenberg.org/cache/epub/1112/pg1112.txt')
>>> type(res)
<class 'requests.models.Response'>
➋ >>> res.status_code == requests.codes.ok
True
>>> len(res.text)
178981
>>> print(res.text[:250])
The Project Gutenberg EBook of Romeo and Juliet, by William Shakespeare
This eBook is for the use of anyone anywhere at no cost and with
almost no restrictions whatsoever. You may copy it, give it away or
re-use it under the terms of the Proje
The URL goes to a text web page for the entire play of Romeo and Juliet, provided by Project Gutenberg ➊. You can tell that the request for this web page succeeded by checking the status_code attribute of the Response object. If it is equal to the value of requests.codes.ok, then everything went fine ➋. (Incidentally, the status code for “OK” in the HTTP protocol is 200. You may already be familiar with the 404 status code for “Not Found.”)
If the request succeeded, the downloaded web page is stored as a string in the Response object’s text variable. This variable holds a large string of the entire play; the call to len(res.text) shows you that it is more than 178,000 characters long. Finally, calling print(res.text[:250]) displays only the first 250 characters.
Checking for Errors
As you’ve seen, the Response object has a status_code attribute that can be checked against requests.codes.ok to see whether the download succeeded. A simpler way to check for success is to call the raise_for_status() method on the Response object. This will raise an exception if there was an error downloading the file and will do nothing if the download succeeded. Enter the following into the interactive shell:
>>> res = requests.get('http://inventwithpython.com/page_that_does_not_exist')
>>> res.raise_for_status()
Traceback (most recent call last):
File "<pyshell#138>", line 1, in <module>
res.raise_for_status()
File "C:\Python34\lib\site-packages\requests\models.py", line 773, in raise_for_status
raise HTTPError(http_error_msg, response=self)
requests.exceptions.HTTPError: 404 Client Error: Not Found
The raise_for_status() method is a good way to ensure that a program halts if a bad download occurs. This is a good thing: You want your program to stop as soon as some unexpected error happens. If a failed download isn’t a deal breaker for your program, you can wrap theraise_for_status() line with try and except statements to handle this error case without crashing.
import requests
res = requests.get('http://inventwithpython.com/page_that_does_not_exist')
try:
res.raise_for_status()
except Exception as exc:
print('There was a problem: %s' % (exc))
This raise_for_status() method call causes the program to output the following:
There was a problem: 404 Client Error: Not Found
Always call raise_for_status() after calling requests.get(). You want to be sure that the download has actually worked before your program continues.
Saving Downloaded Files to the Hard Drive
From here, you can save the web page to a file on your hard drive with the standard open() function and write() method. There are some slight differences, though. First, you must open the file in write binary mode by passing the string 'wb' as the second argument to open(). Even if the page is in plaintext (such as the Romeo and Juliet text you downloaded earlier), you need to write binary data instead of text data in order to maintain the Unicode encoding of the text.
UNICODE ENCODINGS
Unicode encodings are beyond the scope of this book, but you can learn more about them from these web pages:
§ Joel on Software: The Absolute Minimum Every Software Developer Absolutely, Positively Must Know About Unicode and Character Sets (No Excuses!): http://www.joelonsoftware.com/articles/Unicode.html
§ Pragmatic Unicode: http://nedbatchelder.com/text/unipain.html
To write the web page to a file, you can use a for loop with the Response object’s iter_content() method.
>>> import requests
>>> res = requests.get('http://www.gutenberg.org/cache/epub/1112/pg1112.txt')
>>> res.raise_for_status()
>>> playFile = open('RomeoAndJuliet.txt', 'wb')
>>> for chunk in res.iter_content(100000):
playFile.write(chunk)
100000
78981
>>> playFile.close()
The iter_content() method returns “chunks” of the content on each iteration through the loop. Each chunk is of the bytes data type, and you get to specify how many bytes each chunk will contain. One hundred thousand bytes is generally a good size, so pass 100000 as the argument toiter_content().
The file RomeoAndJuliet.txt will now exist in the current working directory. Note that while the filename on the website was pg1112.txt, the file on your hard drive has a different filename. The requests module simply handles downloading the contents of web pages. Once the page is downloaded, it is simply data in your program. Even if you were to lose your Internet connection after downloading the web page, all the page data would still be on your computer.
The write() method returns the number of bytes written to the file. In the previous example, there were 100,000 bytes in the first chunk, and the remaining part of the file needed only 78,981 bytes.
To review, here’s the complete process for downloading and saving a file:
1. Call requests.get() to download the file.
2. Call open() with 'wb' to create a new file in write binary mode.
3. Loop over the Response object’s iter_content() method.
4. Call write() on each iteration to write the content to the file.
5. Call close() to close the file.
That’s all there is to the requests module! The for loop and iter_content() stuff may seem complicated compared to the open()/write()/close() workflow you’ve been using to write text files, but it’s to ensure that the requests module doesn’t eat up too much memory even if you download massive files. You can learn about the requests module’s other features from http://requests.readthedocs.org/.
HTML
Before you pick apart web pages, you’ll learn some HTML basics. You’ll also see how to access your web browser’s powerful developer tools, which will make scraping information from the Web much easier.
Resources for Learning HTML
Hypertext Markup Language (HTML) is the format that web pages are written in. This chapter assumes you have some basic experience with HTML, but if you need a beginner tutorial, I suggest one of the following sites:
§ http://htmldog.com/guides/html/beginner/
§ http://www.codecademy.com/tracks/web/
§ https://developer.mozilla.org/en-US/learn/html/
A Quick Refresher
In case it’s been a while since you’ve looked at any HTML, here’s a quick overview of the basics. An HTML file is a plaintext file with the .html file extension. The text in these files is surrounded by tags, which are words enclosed in angle brackets. The tags tell the browser how to format the web page. A starting tag and closing tag can enclose some text to form an element. The text (or inner HTML) is the content between the starting and closing tags. For example, the following HTML will display Hello world! in the browser, with Hello in bold:
<strong>Hello</strong> world!
This HTML will look like Figure 11-1 in a browser.
Figure 11-1. Hello world! rendered in the browser
The opening <strong> tag says that the enclosed text will appear in bold. The closing </strong> tags tells the browser where the end of the bold text is.
There are many different tags in HTML. Some of these tags have extra properties in the form of attributes within the angle brackets. For example, the <a> tag encloses text that should be a link. The URL that the text links to is determined by the href attribute. Here’s an example:
Al's free <a href="http://inventwithpython.com">Python books</a>.
This HTML will look like Figure 11-2 in a browser.
Figure 11-2. The link rendered in the browser
Some elements have an id attribute that is used to uniquely identify the element in the page. You will often instruct your programs to seek out an element by its id attribute, so figuring out an element’s id attribute using the browser’s developer tools is a common task in writing web scraping programs.
Viewing the Source HTML of a Web Page
You’ll need to look at the HTML source of the web pages that your programs will work with. To do this, right-click (or CTRL-click on OS X) any web page in your web browser, and select View Source or View page source to see the HTML text of the page (see Figure 11-3). This is the text your browser actually receives. The browser knows how to display, or render, the web page from this HTML.
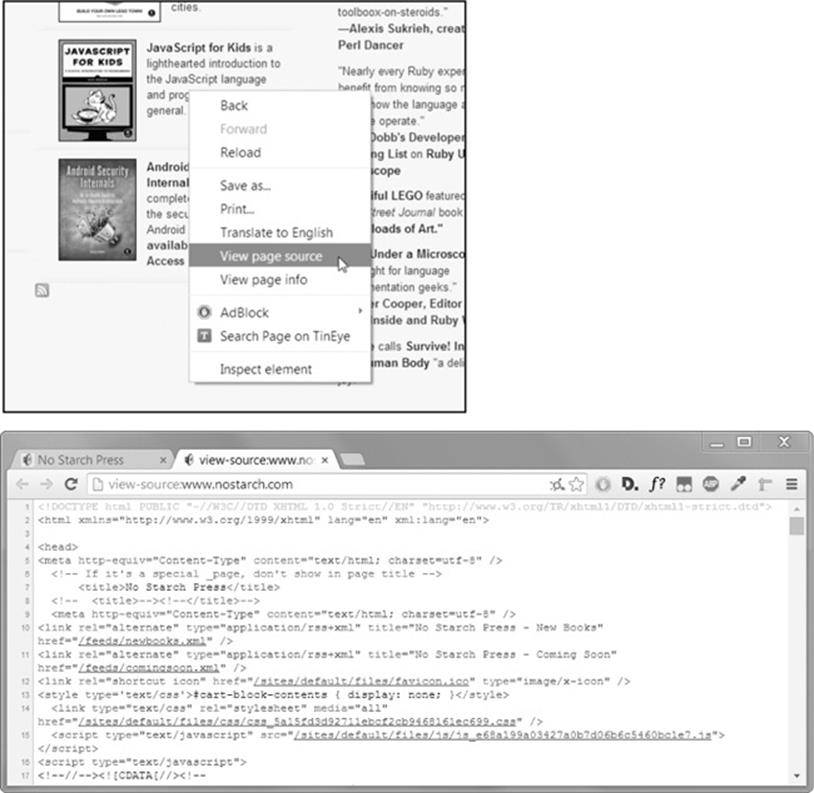
Figure 11-3. Viewing the source of a web page
I highly recommend viewing the source HTML of some of your favorite sites. It’s fine if you don’t fully understand what you are seeing when you look at the source. You won’t need HTML mastery to write simple web scraping programs — after all, you won’t be writing your own websites. You just need enough knowledge to pick out data from an existing site.
Opening Your Browser’s Developer Tools
In addition to viewing a web page’s source, you can look through a page’s HTML using your browser’s developer tools. In Chrome and Internet Explorer for Windows, the developer tools are already installed, and you can press F12 to make them appear (see Figure 11-4). Pressing F12 again will make the developer tools disappear. In Chrome, you can also bring up the developer tools by selecting View▸Developer▸Developer Tools. In OS X, pressing ![]() -OPTION-I will open Chrome’s Developer Tools.
-OPTION-I will open Chrome’s Developer Tools.
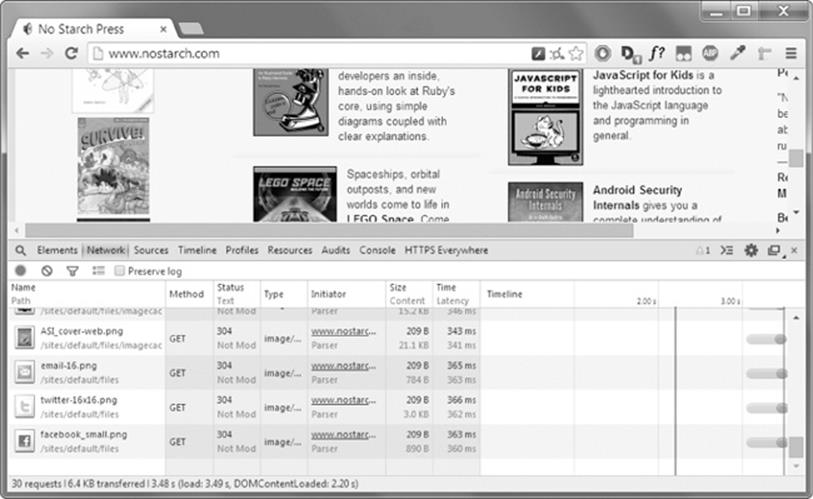
Figure 11-4. The Developer Tools window in the Chrome browser
In Firefox, you can bring up the Web Developer Tools Inspector by pressing CTRL-SHIFT-C on Windows and Linux or by pressing ⌘-OPTION-C on OS X. The layout is almost identical to Chrome’s developer tools.
In Safari, open the Preferences window, and on the Advanced pane check the Show Develop menu in the menu bar option. After it has been enabled, you can bring up the developer tools by pressing ![]() -OPTION-I.
-OPTION-I.
After enabling or installing the developer tools in your browser, you can right-click any part of the web page and select Inspect Element from the context menu to bring up the HTML responsible for that part of the page. This will be helpful when you begin to parse HTML for your web scraping programs.
DON’T USE REGULAR EXPRESSIONS TO PARSE HTML
Locating a specific piece of HTML in a string seems like a perfect case for regular expressions. However, I advise you against it. There are many different ways that HTML can be formatted and still be considered valid HTML, but trying to capture all these possible variations in a regular expression can be tedious and error prone. A module developed specifically for parsing HTML, such as Beautiful Soup, will be less likely to result in bugs.
You can find an extended argument for why you shouldn’t to parse HTML with regular expressions at http://stackoverflow.com/a/1732454/1893164/.
Using the Developer Tools to Find HTML Elements
Once your program has downloaded a web page using the requests module, you will have the page’s HTML content as a single string value. Now you need to figure out which part of the HTML corresponds to the information on the web page you’re interested in.
This is where the browser’s developer tools can help. Say you want to write a program to pull weather forecast data from http://weather.gov/. Before writing any code, do a little research. If you visit the site and search for the 94105 ZIP code, the site will take you to a page showing the forecast for that area.
What if you’re interested in scraping the temperature information for that ZIP code? Right-click where it is on the page (or CONTROL-click on OS X) and select Inspect Element from the context menu that appears. This will bring up the Developer Tools window, which shows you the HTML that produces this particular part of the web page. Figure 11-5 shows the developer tools open to the HTML of the temperature.
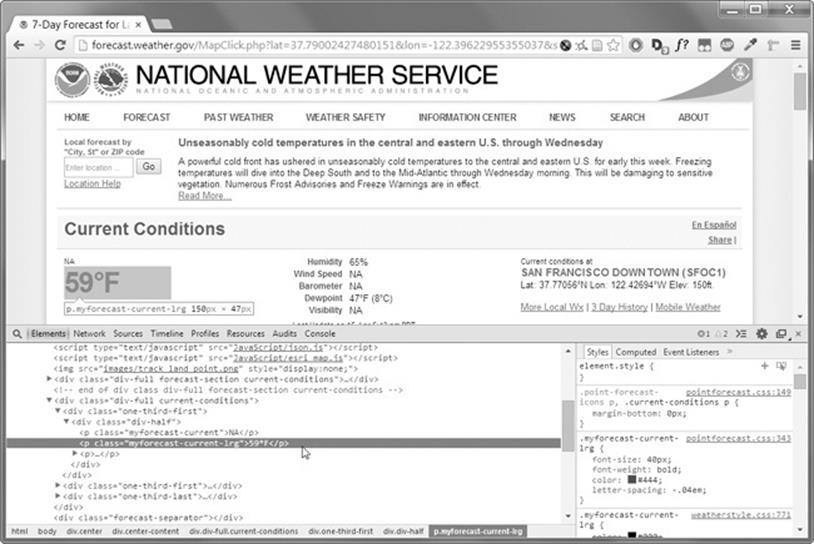
Figure 11-5. Inspecting the element that holds the temperature text with the developer tools
From the developer tools, you can see that the HTML responsible for the temperature part of the web page is <p class="myforecast-current -lrg">57°F</p>. This is exactly what you were looking for! It seems that the temperature information is contained inside a <p> element with themyforecast-current-lrg class. Now that you know what you’re looking for, the BeautifulSoup module will help you find it in the string.
Parsing HTML with the BeautifulSoup Module
Beautiful Soup is a module for extracting information from an HTML page (and is much better for this purpose than regular expressions). The BeautifulSoup module’s name is bs4 (for Beautiful Soup, version 4). To install it, you will need to run pip install beautifulsoup4 from the command line. (Check out Appendix A for instructions on installing third-party modules.) While beautifulsoup4 is the name used for installation, to import Beautiful Soup you run import bs4.
For this chapter, the Beautiful Soup examples will parse (that is, analyze and identify the parts of) an HTML file on the hard drive. Open a new file editor window in IDLE, enter the following, and save it as example.html. Alternatively, download it from http://nostarch.com/automatestuff/.
<!-- This is the example.html example file. -->
<html><head><title>The Website Title</title></head>
<body>
<p>Download my <strong>Python</strong> book from <a href="http://
inventwithpython.com">my website</a>.</p>
<p class="slogan">Learn Python the easy way!</p>
<p>By <span id="author">Al Sweigart</span></p>
</body></html>
As you can see, even a simple HTML file involves many different tags and attributes, and matters quickly get confusing with complex websites. Thankfully, Beautiful Soup makes working with HTML much easier.
Creating a BeautifulSoup Object from HTML
The bs4.BeautifulSoup() function needs to be called with a string containing the HTML it will parse. The bs4.BeautifulSoup() function returns is a BeautifulSoup object. Enter the following into the interactive shell while your computer is connected to the Internet:
>>> import requests, bs4
>>> res = requests.get('http://nostarch.com')
>>> res.raise_for_status()
>>> noStarchSoup = bs4.BeautifulSoup(res.text)
>>> type(noStarchSoup)
<class 'bs4.BeautifulSoup'>
This code uses requests.get() to download the main page from the No Starch Press website and then passes the text attribute of the response to bs4.BeautifulSoup(). The BeautifulSoup object that it returns is stored in a variable named noStarchSoup.
You can also load an HTML file from your hard drive by passing a File object to bs4.BeautifulSoup(). Enter the following into the interactive shell (make sure the example.html file is in the working directory):
>>> exampleFile = open('example.html')
>>> exampleSoup = bs4.BeautifulSoup(exampleFile)
>>> type(exampleSoup)
<class 'bs4.BeautifulSoup'>
Once you have a BeautifulSoup object, you can use its methods to locate specific parts of an HTML document.
Finding an Element with the select() Method
You can retrieve a web page element from a BeautifulSoup object by calling the select()method and passing a string of a CSS selector for the element you are looking for. Selectors are like regular expressions: They specify a pattern to look for, in this case, in HTML pages instead of general text strings.
A full discussion of CSS selector syntax is beyond the scope of this book (there’s a good selector tutorial in the resources at http://nostarch.com/automatestuff/), but here’s a short introduction to selectors. Table 11-2 shows examples of the most common CSS selector patterns.
Table 11-2. Examples of CSS Selectors
|
Selector passed to the select() method |
Will match... |
|
soup.select('div') |
All elements named <div> |
|
soup.select('#author') |
The element with an id attribute of author |
|
soup.select('.notice') |
All elements that use a CSS class attribute named notice |
|
soup.select('div span') |
All elements named <span> that are within an element named <div> |
|
soup.select('div > span') |
All elements named <span> that are directly within an element named <div>, with no other element in between |
|
soup.select('input[name]') |
All elements named <input> that have a name attribute with any value |
|
soup.select('input[type="button"]') |
All elements named <input> that have an attribute named type with value button |
The various selector patterns can be combined to make sophisticated matches. For example, soup.select('p #author') will match any element that has an id attribute of author, as long as it is also inside a <p> element.
The select() method will return a list of Tag objects, which is how Beautiful Soup represents an HTML element. The list will contain one Tag object for every match in the BeautifulSoup object’s HTML. Tag values can be passed to the str() function to show the HTML tags they represent. Tag values also have an attrs attribute that shows all the HTML attributes of the tag as a dictionary. Using the example.html file from earlier, enter the following into the interactive shell:
>>> import bs4
>>> exampleFile = open('example.html')
>>> exampleSoup = bs4.BeautifulSoup(exampleFile.read())
>>> elems = exampleSoup.select('#author')
>>> type(elems)
<class 'list'>
>>> len(elems)
1
>>> type(elems[0])
<class 'bs4.element.Tag'>
>>> elems[0].getText()
'Al Sweigart'
>>> str(elems[0])
'<span id="author">Al Sweigart</span>'
>>> elems[0].attrs
{'id': 'author'}
This code will pull the element with id="author" out of our example HTML. We use select('#author') to return a list of all the elements with id="author". We store this list of Tag objects in the variable elems, and len(elems) tells us there is one Tag object in the list; there was one match. Calling getText() on the element returns the element’s text, or inner HTML. The text of an element is the content between the opening and closing tags: in this case, 'Al Sweigart'.
Passing the element to str() returns a string with the starting and closing tags and the element’s text. Finally, attrs gives us a dictionary with the element’s attribute, 'id', and the value of the id attribute, 'author'.
You can also pull all the <p> elements from the BeautifulSoup object. Enter this into the interactive shell:
>>> pElems = exampleSoup.select('p')
>>> str(pElems[0])
'<p>Download my <strong>Python</strong> book from <a href="http://
inventwithpython.com">my website</a>.</p>'
>>> pElems[0].getText()
'Download my Python book from my website.'
>>> str(pElems[1])
'<p class="slogan">Learn Python the easy way!</p>'
>>> pElems[1].getText()
'Learn Python the easy way!'
>>> str(pElems[2])
'<p>By <span id="author">Al Sweigart</span></p>'
>>> pElems[2].getText()
'By Al Sweigart'
This time, select() gives us a list of three matches, which we store in pElems. Using str() on pElems[0], pElems[1], and pElems[2] shows you each element as a string, and using getText() on each element shows you its text.
Getting Data from an Element’s Attributes
The get() method for Tag objects makes it simple to access attribute values from an element. The method is passed a string of an attribute name and returns that attribute’s value. Using example.html, enter the following into the interactive shell:
>>> import bs4
>>> soup = bs4.BeautifulSoup(open('example.html'))
>>> spanElem = soup.select('span')[0]
>>> str(spanElem)
'<span id="author">Al Sweigart</span>'
>>> spanElem.get('id')
'author'
>>> spanElem.get('some_nonexistent_addr') == None
True
>>> spanElem.attrs
{'id': 'author'}
Here we use select() to find any <span> elements and then store the first matched element in spanElem. Passing the attribute name 'id' to get() returns the attribute’s value, 'author'.
Project: “I’m Feeling Lucky” Google Search
Whenever I search a topic on Google, I don’t look at just one search result at a time. By middle-clicking a search result link (or clicking while holding CTRL), I open the first several links in a bunch of new tabs to read later. I search Google often enough that this workflow — opening my browser, searching for a topic, and middle-clicking several links one by one — is tedious. It would be nice if I could simply type a search term on the command line and have my computer automatically open a browser with all the top search results in new tabs. Let’s write a script to do this.
This is what your program does:
§ Gets search keywords from the command line arguments.
§ Retrieves the search results page.
§ Opens a browser tab for each result.
This means your code will need to do the following:
§ Read the command line arguments from sys.argv.
§ Fetch the search result page with the requests module.
§ Find the links to each search result.
§ Call the webbrowser.open() function to open the web browser.
Open a new file editor window and save it as lucky.py.
Step 1: Get the Command Line Arguments and Request the Search Page
Before coding anything, you first need to know the URL of the search result page. By looking at the browser’s address bar after doing a Google search, you can see that the result page has a URL like https://www.google.com/search?q=SEARCH_TERM_HERE. The requests module can download this page and then you can use Beautiful Soup to find the search result links in the HTML. Finally, you’ll use the webbrowser module to open those links in browser tabs.
Make your code look like the following:
#! python3
# lucky.py - Opens several Google search results.
import requests, sys, webbrowser, bs4
print('Googling...') # display text while downloading the Google page
res = requests.get('http://google.com/search?q=' + ' '.join(sys.argv[1:]))
res.raise_for_status()
# TODO: Retrieve top search result links.
# TODO: Open a browser tab for each result.
The user will specify the search terms using command line arguments when they launch the program. These arguments will be stored as strings in a list in sys.argv.
Step 2: Find All the Results
Now you need to use Beautiful Soup to extract the top search result links from your downloaded HTML. But how do you figure out the right selector for the job? For example, you can’t just search for all <a> tags, because there are lots of links you don’t care about in the HTML. Instead, you must inspect the search result page with the browser’s developer tools to try to find a selector that will pick out only the links you want.
After doing a Google search for Beautiful Soup, you can open the browser’s developer tools and inspect some of the link elements on the page. They look incredibly complicated, something like this: <a href="/url?sa =t&rct=j&q=&esrc=s&source=web&cd=1&cad=rja&uact=8& amp;ved=0CCgQFjAA&url=http%3A%2F%2Fwww.crummy.com%2Fsoftware%2FBeautifulSoup %2F&ei=LHBVU_XDD9KVyAShmYDwCw&usg=AFQjCNHAxwplurFOBqg5cehWQEVKi-TuLQ&a mp;sig2=sdZu6WVlBlVSDrwhtworMA" onmousedown="return rwt(this,'','','','1','AFQ jCNHAxwplurFOBqg5cehWQEVKi-TuLQ','sdZu6WVlBlVSDrwhtworMA','0CCgQFjAA','','',ev ent)" data-href="http://www.crummy.com/software/BeautifulSoup/"><em>Beautiful Soup</em>: We called him Tortoise because he taught us.</a>.
It doesn’t matter that the element looks incredibly complicated. You just need to find the pattern that all the search result links have. But this <a> element doesn’t have anything that easily distinguishes it from the nonsearch result <a> elements on the page.
Make your code look like the following:
#! python3
# lucky.py - Opens several google search results.
import requests, sys, webbrowser, bs4
--snip--
# Retrieve top search result links.
soup = bs4.BeautifulSoup(res.text)
# Open a browser tab for each result.
linkElems = soup.select('.r a')
If you look up a little from the <a> element, though, there is an element like this: <h3 class="r">. Looking through the rest of the HTML source, it looks like the r class is used only for search result links. You don’t have to know what the CSS class r is or what it does. You’re just going to use it as a marker for the <a> element you are looking for. You can create a BeautifulSoup object from the downloaded page’s HTML text and then use the selector '.r a' to find all <a> elements that are within an element that has the r CSS class.
Step 3: Open Web Browsers for Each Result
Finally, we’ll tell the program to open web browser tabs for our results. Add the following to the end of your program:
#! python3
# lucky.py - Opens several google search results.
import requests, sys, webbrowser, bs4
--snip--
# Open a browser tab for each result.
linkElems = soup.select('.r a')
numOpen = min(5, len(linkElems))
for i in range(numOpen):
webbrowser.open('http://google.com' + linkElems[i].get('href'))
By default, you open the first five search results in new tabs using the webbrowser module. However, the user may have searched for something that turned up fewer than five results. The soup.select() call returns a list of all the elements that matched your '.r a' selector, so the number of tabs you want to open is either 5 or the length of this list (whichever is smaller).
The built-in Python function min() returns the smallest of the integer or float arguments it is passed. (There is also a built-in max() function that returns the largest argument it is passed.) You can use min() to find out whether there are fewer than five links in the list and store the number of links to open in a variable named numOpen. Then you can run through a for loop by calling range(numOpen).
On each iteration of the loop, you use webbrowser.open() to open a new tab in the web browser. Note that the href attribute’s value in the returned <a> elements do not have the initial http://google.com part, so you have to concatenate that to the href attribute’s string value.
Now you can instantly open the first five Google results for, say, Python programming tutorials by running lucky python programming tutorials on the command line! (See Appendix B for how to easily run programs on your operating system.)
Ideas for Similar Programs
The benefit of tabbed browsing is that you can easily open links in new tabs to peruse later. A program that automatically opens several links at once can be a nice shortcut to do the following:
§ Open all the product pages after searching a shopping site such as Amazon
§ Open all the links to reviews for a single product
§ Open the result links to photos after performing a search on a photo site such as Flickr or Imgur
Project: Downloading All XKCD Comics
Blogs and other regularly updating websites usually have a front page with the most recent post as well as a Previous button on the page that takes you to the previous post. Then that post will also have a Previous button, and so on, creating a trail from the most recent page to the first post on the site. If you wanted a copy of the site’s content to read when you’re not online, you could manually navigate over every page and save each one. But this is pretty boring work, so let’s write a program to do it instead.
XKCD is a popular geek webcomic with a website that fits this structure (see Figure 11-6). The front page at http://xkcd.com/ has a Prev button that guides the user back through prior comics. Downloading each comic by hand would take forever, but you can write a script to do this in a couple of minutes.
Here’s what your program does:
§ Loads the XKCD home page.
§ Saves the comic image on that page.
§ Follows the Previous Comic link.
§ Repeats until it reaches the first comic.

Figure 11-6. XKCD, “a webcomic of romance, sarcasm, math, and language”
This means your code will need to do the following:
§ Download pages with the requests module.
§ Find the URL of the comic image for a page using Beautiful Soup.
§ Download and save the comic image to the hard drive with iter_content().
§ Find the URL of the Previous Comic link, and repeat.
Open a new file editor window and save it as downloadXkcd.py.
Step 1: Design the Program
If you open the browser’s developer tools and inspect the elements on the page, you’ll find the following:
§ The URL of the comic’s image file is given by the href attribute of an <img> element.
§ The <img> element is inside a <div id="comic"> element.
§ The Prev button has a rel HTML attribute with the value prev.
§ The first comic’s Prev button links to the http://xkcd.com/# URL, indicating that there are no more previous pages.
Make your code look like the following:
#! python3
# downloadXkcd.py - Downloads every single XKCD comic.
import requests, os, bs4
url = 'http://xkcd.com' # starting url
os.makedirs('xkcd', exist_ok=True) # store comics in ./xkcd
while not url.endswith('#'):
# TODO: Download the page.
# TODO: Find the URL of the comic image.
# TODO: Download the image.
# TODO: Save the image to ./xkcd.
# TODO: Get the Prev button's url.
print('Done.')
You’ll have a url variable that starts with the value 'http://xkcd.com' and repeatedly update it (in a for loop) with the URL of the current page’s Prev link. At every step in the loop, you’ll download the comic at url. You’ll know to end the loop when url ends with '#'.
You will download the image files to a folder in the current working directory named xkcd. The call os.makedirs() ensures that this folder exists, and the exist_ok=True keyword argument prevents the function from throwing an exception if this folder already exists. The rest of the code is just comments that outline the rest of your program.
Step 2: Download the Web Page
Let’s implement the code for downloading the page. Make your code look like the following:
#! python3
# downloadXkcd.py - Downloads every single XKCD comic.
import requests, os, bs4
url = 'http://xkcd.com' # starting url
os.makedirs('xkcd', exist_ok=True) # store comics in ./xkcd
while not url.endswith('#'):
# Download the page.
print('Downloading page %s...' % url)
res = requests.get(url)
res.raise_for_status()
soup = bs4.BeautifulSoup(res.text)
# TODO: Find the URL of the comic image.
# TODO: Download the image.
# TODO: Save the image to ./xkcd.
# TODO: Get the Prev button's url.
print('Done.')
First, print url so that the user knows which URL the program is about to download; then use the requests module’s request.get() function to download it. As always, you immediately call the Response object’s raise_for_status() method to throw an exception and end the program if something went wrong with the download. Otherwise, you create a BeautifulSoup object from the text of the downloaded page.
Step 3: Find and Download the Comic Image
Make your code look like the following:
#! python3
# downloadXkcd.py - Downloads every single XKCD comic.
import requests, os, bs4
--snip--
# Find the URL of the comic image.
comicElem = soup.select('#comic img')
if comicElem == []:
print('Could not find comic image.')
else:
comicUrl = comicElem[0].get('src')
# Download the image.
print('Downloading image %s...' % (comicUrl))
res = requests.get(comicUrl)
res.raise_for_status()
# TODO: Save the image to ./xkcd.
# TODO: Get the Prev button's url.
print('Done.')
From inspecting the XKCD home page with your developer tools, you know that the <img> element for the comic image is inside a <div> element with the id attribute set to comic, so the selector '#comic img' will get you the correct <img> element from the BeautifulSoup object.
A few XKCD pages have special content that isn’t a simple image file. That’s fine; you’ll just skip those. If your selector doesn’t find any elements, then soup.select('#comic img') will return a blank list. When that happens, the program can just print an error message and move on without downloading the image.
Otherwise, the selector will return a list containing one <img> element. You can get the src attribute from this <img> element and pass it to requests.get() to download the comic’s image file.
Step 4: Save the Image and Find the Previous Comic
Make your code look like the following:
#! python3
# downloadXkcd.py - Downloads every single XKCD comic.
import requests, os, bs4
--snip--
# Save the image to ./xkcd.
imageFile = open(os.path.join('xkcd', os.path.basename(comicUrl)), 'wb')
for chunk in res.iter_content(100000):
imageFile.write(chunk)
imageFile.close()
# Get the Prev button's url.
prevLink = soup.select('a[rel="prev"]')[0]
url = 'http://xkcd.com' + prevLink.get('href')
print('Done.')
At this point, the image file of the comic is stored in the res variable. You need to write this image data to a file on the hard drive.
You’ll need a filename for the local image file to pass to open(). The comicUrl will have a value like 'http://imgs.xkcd.com/comics/heartbleed_explanation.png' — which you might have noticed looks a lot like a file path. And in fact, you can call os.path.basename() with comicUrl, and it will return just the last part of the URL, 'heartbleed_explanation.png'. You can use this as the filename when saving the image to your hard drive. You join this name with the name of your xkcd folder using os.path.join() so that your program uses backslashes (\) on Windows and forward slashes (/) on OS X and Linux. Now that you finally have the filename, you can call open() to open a new file in 'wb' “write binary” mode.
Remember from earlier in this chapter that to save files you’ve downloaded using Requests, you need to loop over the return value of the iter_content() method. The code in the for loop writes out chunks of the image data (at most 100,000 bytes each) to the file and then you close the file. The image is now saved to your hard drive.
Afterward, the selector 'a[rel="prev"]' identifies the <a> element with the rel attribute set to prev, and you can use this <a> element’s href attribute to get the previous comic’s URL, which gets stored in url. Then the while loop begins the entire download process again for this comic.
The output of this program will look like this:
Downloading page http://xkcd.com...
Downloading image http://imgs.xkcd.com/comics/phone_alarm.png...
Downloading page http://xkcd.com/1358/...
Downloading image http://imgs.xkcd.com/comics/nro.png...
Downloading page http://xkcd.com/1357/...
Downloading image http://imgs.xkcd.com/comics/free_speech.png...
Downloading page http://xkcd.com/1356/...
Downloading image http://imgs.xkcd.com/comics/orbital_mechanics.png...
Downloading page http://xkcd.com/1355/...
Downloading image http://imgs.xkcd.com/comics/airplane_message.png...
Downloading page http://xkcd.com/1354/...
Downloading image http://imgs.xkcd.com/comics/heartbleed_explanation.png...
--snip--
This project is a good example of a program that can automatically follow links in order to scrape large amounts of data from the Web. You can learn about Beautiful Soup’s other features from its documentation at http://www.crummy.com/software/BeautifulSoup/bs4/doc/.
Ideas for Similar Programs
Downloading pages and following links are the basis of many web crawling programs. Similar programs could also do the following:
§ Back up an entire site by following all of its links.
§ Copy all the messages off a web forum.
§ Duplicate the catalog of items for sale on an online store.
The requests and BeautifulSoup modules are great as long as you can figure out the URL you need to pass to requests.get(). However, sometimes this isn’t so easy to find. Or perhaps the website you want your program to navigate requires you to log in first. The selenium module will give your programs the power to perform such sophisticated tasks.
Controlling the Browser with the selenium Module
The selenium module lets Python directly control the browser by programmatically clicking links and filling in login information, almost as though there is a human user interacting with the page. Selenium allows you to interact with web pages in a much more advanced way than Requests and Beautiful Soup; but because it launches a web browser, it is a bit slower and hard to run in the background if, say, you just need to download some files from the Web.
Appendix A has more detailed steps on installing third-party modules.
Starting a Selenium-Controlled Browser
For these examples, you’ll need the Firefox web browser. This will be the browser that you control. If you don’t already have Firefox, you can download it for free from http://getfirefox.com/.
Importing the modules for Selenium is slightly tricky. Instead of import selenium, you need to run from selenium import webdriver. (The exact reason why the selenium module is set up this way is beyond the scope of this book.) After that, you can launch the Firefox browser with Selenium. Enter the following into the interactive shell:
>>> from selenium import webdriver
>>> browser = webdriver.Firefox()
>>> type(browser)
<class 'selenium.webdriver.firefox.webdriver.WebDriver'>
>>> browser.get('http://inventwithpython.com')
You’ll notice when webdriver.Firefox() is called, the Firefox web browser starts up. Calling type() on the value webdriver.Firefox() reveals it’s of the WebDriver data type. And calling browser.get('http://inventwithpython.com') directs the browser to http://inventwithpython.com/. Your browser should look something like Figure 11-7.
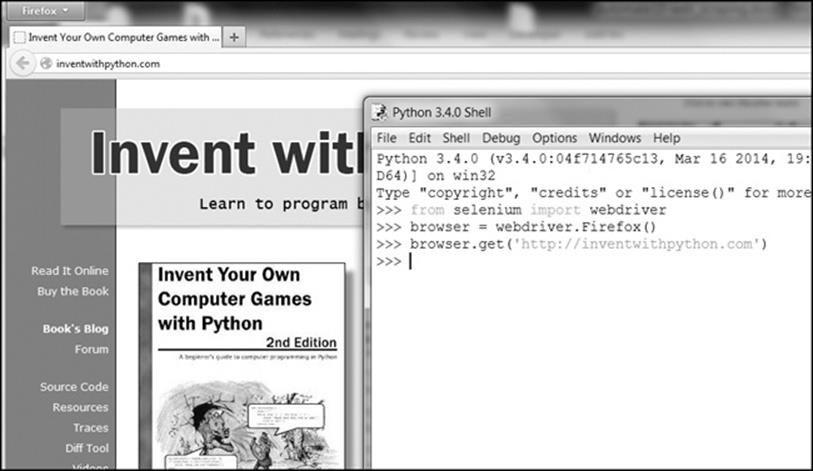
Figure 11-7. After calling webdriver.Firefox() and get() in IDLE, the Firefox browser appears.
Finding Elements on the Page
WebDriver objects have quite a few methods for finding elements on a page. They are divided into the find_element_* and find_elements_* methods. The find_element_* methods return a single WebElement object, representing the first element on the page that matches your query. Thefind_elements_* methods return a list of WebElement_* objects for every matching element on the page.
Table 11-3 shows several examples of find_element_* and find_elements_* methods being called on a WebDriver object that’s stored in the variable browser.
Table 11-3. Selenium’s WebDriver Methods for Finding Elements
|
Method name |
WebElement object/list returned |
|
browser.find_element_by_class_name(name) browser.find_elements_by_class_name(name) |
Elements that use the CSS class name |
|
browser.find_element_by_css_selector(selector) browser.find_elements_by_css_selector(selector) |
Elements that match the CSS selector |
|
browser.find_element_by_id(id) browser.find_elements_by_id(id) |
Elements with a matching id attribute value |
|
browser.find_element_by_link_text(text) browser.find_elements_by_link_text(text) |
<a> elements that completely match the text provided |
|
browser.find_element_by_partial_link_text(text) browser.find_elements_by_partial_link_text(text) |
<a> elements that contain the text provided |
|
browser.find_element_by_name(name) browser.find_elements_by_name(name) |
Elements with a matching name attribute value |
|
browser.find_element_by_tag_name(name) browser.find_elements_by_tag_name(name) |
Elements with a matching tag name (case insensitive; an <a> element is matched by 'a' and 'A') |
Except for the *_by_tag_name() methods, the arguments to all the methods are case sensitive. If no elements exist on the page that match what the method is looking for, the selenium module raises a NoSuchElement exception. If you do not want this exception to crash your program, add tryand except statements to your code.
Once you have the WebElement object, you can find out more about it by reading the attributes or calling the methods in Table 11-4.
Table 11-4. WebElement Attributes and Methods
|
Attribute or method |
Description |
|
tag_name |
The tag name, such as 'a' for an <a> element |
|
get_attribute(name) |
The value for the element’s name attribute |
|
text |
The text within the element, such as 'hello' in <span>hello</span> |
|
clear() |
For text field or text area elements, clears the text typed into it |
|
is_displayed() |
Returns True if the element is visible; otherwise returns False |
|
is_enabled() |
For input elements, returns True if the element is enabled; otherwise returns False |
|
is_selected() |
For checkbox or radio button elements, returns True if the element is selected; otherwise returns False |
|
location |
A dictionary with keys 'x' and 'y' for the position of the element in the page |
For example, open a new file editor and enter the following program:
from selenium import webdriver
browser = webdriver.Firefox()
browser.get('http://inventwithpython.com')
try:
elem = browser.find_element_by_class_name('bookcover')
print('Found <%s> element with that class name!' % (elem.tag_name))
except:
print('Was not able to find an element with that name.')
Here we open Firefox and direct it to a URL. On this page, we try to find elements with the class name 'bookcover', and if such an element is found, we print its tag name using the tag_name attribute. If no such element was found, we print a different message.
This program will output the following:
Found <img> element with that class name!
We found an element with the class name 'bookcover' and the tag name 'img'.
Clicking the Page
WebElement objects returned from the find_element_* and find_elements_* methods have a click() method that simulates a mouse click on that element. This method can be used to follow a link, make a selection on a radio button, click a Submit button, or trigger whatever else might happen when the element is clicked by the mouse. For example, enter the following into the interactive shell:
>>> from selenium import webdriver
>>> browser = webdriver.Firefox()
>>> browser.get('http://inventwithpython.com')
>>> linkElem = browser.find_element_by_link_text('Read It Online')
>>> type(linkElem)
<class 'selenium.webdriver.remote.webelement.WebElement'>
>>> linkElem.click() # follows the "Read It Online" link
This opens Firefox to http://inventwithpython.com/, gets the WebElement object for the <a> element with the text Read It Online, and then simulates clicking that <a> element. It’s just like if you clicked the link yourself; the browser then follows that link.
Filling Out and Submitting Forms
Sending keystrokes to text fields on a web page is a matter of finding the <input> or <textarea> element for that text field and then calling the send_keys() method. For example, enter the following into the interactive shell:
>>> from selenium import webdriver
>>> browser = webdriver.Firefox()
>>> browser.get('http://gmail.com')
>>> emailElem = browser.find_element_by_id('Email')
>>> emailElem.send_keys('not_my_real_email@gmail.com')
>>> passwordElem = browser.find_element_by_id('Passwd')
>>> passwordElem.send_keys('12345')
>>> passwordElem.submit()
As long as Gmail hasn’t changed the id of the Username and Password text fields since this book was published, the previous code will fill in those text fields with the provided text. (You can always use the browser’s inspector to verify the id.) Calling the submit() method on any element will have the same result as clicking the Submit button for the form that element is in. (You could have just as easily called emailElem.submit(), and the code would have done the same thing.)
Sending Special Keys
Selenium has a module for keyboard keys that are impossible to type into a string value, which function much like escape characters. These values are stored in attributes in the selenium.webdriver.common.keys module. Since that is such a long module name, it’s much easier to run from selenium.webdriver.common.keys import Keys at the top of your program; if you do, then you can simply write Keys anywhere you’d normally have to write selenium.webdriver.common.keys. Table 11-5 lists the commonly used Keys variables.
Table 11-5. Commonly Used Variables in the selenium.webdriver.common.keys Module
|
Attributes |
Meanings |
|
Keys.DOWN, Keys.UP, Keys.LEFT, Keys.RIGHT |
The keyboard arrow keys |
|
Keys.ENTER, Keys.RETURN |
The ENTER and RETURN keys |
|
Keys.HOME, Keys.END, Keys.PAGE_DOWN, Keys.PAGE_UP |
The home, end, pagedown, and pageup keys |
|
Keys.ESCAPE, Keys.BACK_SPACE, Keys.DELETE |
The ESC, BACKSPACE, and DELETE keys |
|
Keys.F1, Keys.F2,..., Keys.F12 |
The F1 to F12 keys at the top of the keyboard |
|
Keys.TAB |
The TAB key |
For example, if the cursor is not currently in a text field, pressing the HOME and END keys will scroll the browser to the top and bottom of the page, respectively. Enter the following into the interactive shell, and notice how the send_keys() calls scroll the page:
>>> from selenium import webdriver
>>> from selenium.webdriver.common.keys import Keys
>>> browser = webdriver.Firefox()
>>> browser.get('http://nostarch.com')
>>> htmlElem = browser.find_element_by_tag_name('html')
>>> htmlElem.send_keys(Keys.END) # scrolls to bottom
>>> htmlElem.send_keys(Keys.HOME) # scrolls to top
The <html> tag is the base tag in HTML files: The full content of the HTML file is enclosed within the <html> and </html> tags. Calling browser.find_element_by_tag_name('html') is a good place to send keys to the general web page. This would be useful if, for example, new content is loaded once you’ve scrolled to the bottom of the page.
Clicking Browser Buttons
Selenium can simulate clicks on various browser buttons as well through the following methods:
§ browser.back(). Clicks the Back button.
§ browser.forward(). Clicks the Forward button.
§ browser.refresh(). Clicks the Refresh/Reload button.
§ browser.quit(). Clicks the Close Window button.
More Information on Selenium
Selenium can do much more beyond the functions described here. It can modify your browser’s cookies, take screenshots of web pages, and run custom JavaScript. To learn more about these features, you can visit the Selenium documentation at http://selenium-python.readthedocs.org/.
Summary
Most boring tasks aren’t limited to the files on your computer. Being able to programmatically download web pages will extend your programs to the Internet. The requests module makes downloading straightforward, and with some basic knowledge of HTML concepts and selectors, you can utilize the BeautifulSoup module to parse the pages you download.
But to fully automate any web-based tasks, you need direct control of your web browser through the selenium module. The selenium module will allow you to log in to websites and fill out forms automatically. Since a web browser is the most common way to send and receive information over the Internet, this is a great ability to have in your programmer toolkit.
Practice Questions
|
Q: |
1. Briefly describe the differences between the webbrowser, requests, BeautifulSoup, and selenium modules. |
|
Q: |
2. What type of object is returned by requests.get()? How can you access the downloaded content as a string value? |
|
Q: |
3. What Requests method checks that the download worked? |
|
Q: |
4. How can you get the HTTP status code of a Requests response? |
|
Q: |
5. How do you save a Requests response to a file? |
|
Q: |
6. What is the keyboard shortcut for opening a browser’s developer tools? |
|
Q: |
7. How can you view (in the developer tools) the HTML of a specific element on a web page? |
|
Q: |
8. What is the CSS selector string that would find the element with an id attribute of main? |
|
Q: |
9. What is the CSS selector string that would find the elements with a CSS class of highlight? |
|
Q: |
10. What is the CSS selector string that would find all the <div> elements inside another <div> element? |
|
Q: |
11. What is the CSS selector string that would find the <button> element with a value attribute set to favorite? |
|
Q: |
12. Say you have a Beautiful Soup Tag object stored in the variable spam for the element <div>Hello world!</div>. How could you get a string 'Hello world!' from the Tag object? |
|
Q: |
13. How would you store all the attributes of a Beautiful Soup Tag object in a variable named linkElem? |
|
Q: |
14. Running import selenium doesn’t work. How do you properly import the selenium module? |
|
Q: |
15. What’s the difference between the find_element_* and find_elements_* methods? |
|
Q: |
16. What methods do Selenium’s WebElement objects have for simulating mouse clicks and keyboard keys? |
|
Q: |
17. You could call send_keys(Keys.ENTER) on the Submit button’s WebElement object, but what is an easier way to submit a form with Selenium? |
|
Q: |
18. How can you simulate clicking a browser’s Forward, Back, and Refresh buttons with Selenium? |
Practice Projects
For practice, write programs to do the following tasks.
Command Line Emailer
Write a program that takes an email address and string of text on the command line and then, using Selenium, logs into your email account and sends an email of the string to the provided address. (You might want to set up a separate email account for this program.)
This would be a nice way to add a notification feature to your programs. You could also write a similar program to send messages from a Facebook or Twitter account.
Image Site Downloader
Write a program that goes to a photo-sharing site like Flickr or Imgur, searches for a category of photos, and then downloads all the resulting images. You could write a program that works with any photo site that has a search feature.
2048
2048 is a simple game where you combine tiles by sliding them up, down, left, or right with the arrow keys. You can actually get a fairly high score by repeatedly sliding in an up, right, down, and left pattern over and over again. Write a program that will open the game athttps://gabrielecirulli.github.io/2048/ and keep sending up, right, down, and left keystrokes to automatically play the game.
Link Verification
Write a program that, given the URL of a web page, will attempt to download every linked page on the page. The program should flag any pages that have a 404 “Not Found” status code and print them out as broken links.
[2] The answer is no.
All materials on the site are licensed Creative Commons Attribution-Sharealike 3.0 Unported CC BY-SA 3.0 & GNU Free Documentation License (GFDL)
If you are the copyright holder of any material contained on our site and intend to remove it, please contact our site administrator for approval.
© 2016-2026 All site design rights belong to S.Y.A.