Black Hat Python: Python Programming for Hackers and Pentesters (2014)
Chapter 6. Extending Burp Proxy
If you’ve ever tried hacking a web application, you likely have used Burp Suite to perform spidering, proxy browser traffic, and carry out other attacks. Recent versions of Burp Suite include the ability to add your own tooling, called Extensions, to Burp. Using Python, Ruby, or pure Java, you can add panels in the Burp GUI and build automation techniques into Burp Suite. We’re going to take advantage of this feature and add some handy tooling to Burp for performing attacks and extended reconnaissance. The first extension will enable us to utilize an intercepted HTTP request from Burp Proxy as a seed for creating a mutation fuzzer that can be run in Burp Intruder. The second extension will interface with the Microsoft Bing API to show us all virtual hosts located on the same IP address as our target site, as well as any subdomains detected for the target domain.
I’m going to assume that you have played with Burp before and that you know how to trap requests with the Proxy tool, as well as how to send a trapped request to Burp Intruder. If you need a tutorial on how to do these tasks, please visit PortSwigger Web Security (http://www.portswigger.net/) to get started.
I have to admit that when I first started exploring the Burp Extender API, it took me a few attempts to understand how it worked. I found it a bit confusing, as I’m a pure Python guy and have limited Java development experience. But I found a number of extensions on the Burp website that let me see how other folks had developed extensions, and I used that prior art to help me understand how to begin implementing my own code. I’m going to cover some basics on extending functionality, but I’ll also show you how to use the API documentation as a guide for developing your own extensions.
Setting Up
First, download Burp from http://www.portswigger.net/ and get it ready to go. As sad as it makes me to admit this, you will require a modern Java installation, which all operating systems either have packages or installers for. The next step is to grab the Jython (a Python implementation written in Java) standalone JAR file; we’ll point Burp to this. You can find this JAR file on the No Starch site along with the rest of the book’s code (http://www.nostarch.com/blackhatpython/) or visit the official site, http://www.jython.org/downloads.html, and select the Jython 2.7 Standalone Installer. Don’t let the name fool you; it’s just a JAR file. Save the JAR file to an easy-to-remember location, such as your Desktop.
Next, open up a command-line terminal, and run Burp like so:
#> java -XX:MaxPermSize=1G -jar burpsuite_pro_v1.6.jar
This will get Burp to fire up and you should see its UI full of wonderful tabs, as shown in Figure 6-1.
Now let’s point Burp at our Jython interpreter. Click the Extender tab, and then click the Options tab. In the Python Environment section, select the location of your Jython JAR file, as shown in Figure 6-2.
You can leave the rest of the options alone, and we should be ready to start coding our first extension. Let’s get rocking!
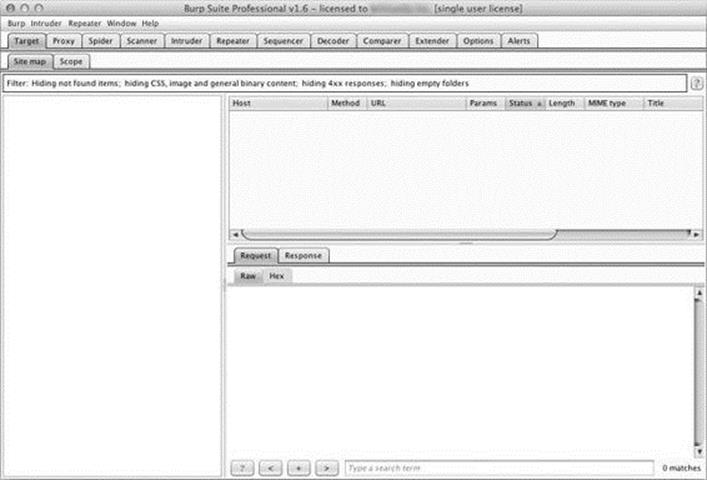
Figure 6-1. Burp Suite GUI loaded properly
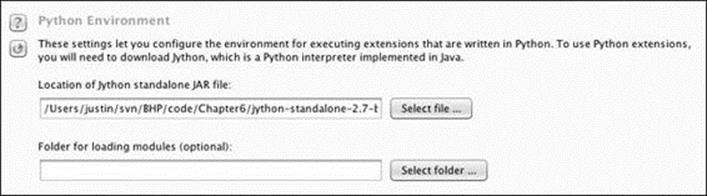
Figure 6-2. Configuring the Jython interpreter location
Burp Fuzzing
At some point in your career, you may find yourself attacking a web application or web service that doesn’t allow you to use traditional web application assessment tools. Whether working with a binary protocol wrapped inside HTTP traffic or complex JSON requests, it is critical that you are able to test for traditional web application bugs. The application might be using too many parameters, or it’s obfuscated in some way that performing a manual test would take far too much time. I have also been guilty of running standard tools that are not designed to deal with strange protocols or even JSON in a lot of cases. This is where it is useful to be able to leverage Burp to establish a solid baseline of HTTP traffic, including authentication cookies, while passing off the body of the request to a custom fuzzer that can then manipulate the payload in any way you choose. We are going to work on our first Burp extension to create the world’s simplest web application fuzzer, which you can then expand into something more intelligent.
Burp has a number of tools that you can use when you’re performing web application tests. Typically, you will trap all requests using the Proxy, and when you see an interesting request go past, you’ll send it to another Burp tool. A common technique I use is to send them to the Repeater tool, which lets me replay web traffic, as well as manually modify any interesting spots. To perform more automated attacks in query parameters, you will send a request to the Intruder tool, which attempts to automatically figure out which areas of the web traffic should be modified, and then allows you to use a variety of attacks to try to elicit error messages or tease out vulnerabilities. A Burp extension can interact in numerous ways with the Burp suite of tools, and in our case we’ll be bolting additional functionality onto the Intruder tool directly.
My first natural instinct is to take a look at the Burp API documentation to determine what Burp classes I need to extend in order to write my custom extension. You can access this documentation by clicking the Extender tab and then the APIs tab. This can look a little daunting because it looks (and is) very Java-y. The first thing we notice is that the developers of Burp have aptly named each class so that it’s easy to figure out where we want to start. In particular, because we’re looking at fuzzing web requests during an Intruder attack, I see theIIntruderPayloadGeneratorFactory and IIntruderPayloadGenerator classes. Let’s take a look at what the documentation says for the IIntruderPayloadGeneratorFactory class:
/**
* Extensions can implement this interface and then call
➊ * IBurpExtenderCallbacks.registerIntruderPayloadGeneratorFactory()
* to register a factory for custom Intruder payloads.
*/
public interface IIntruderPayloadGeneratorFactory
{
/**
* This method is used by Burp to obtain the name of the payload
* generator. This will be displayed as an option within the
* Intruder UI when the user selects to use extension-generated
* payloads.
*
* @return The name of the payload generator.
*/
➋ String getGeneratorName();
/**
* This method is used by Burp when the user starts an Intruder
* attack that uses this payload generator.
* @param attack
* An IIntruderAttack object that can be queried to obtain details
* about the attack in which the payload generator will be used.
* @return A new instance of
* IIntruderPayloadGenerator that will be used to generate
* payloads for the attack.
*/
➌ IIntruderPayloadGenerator createNewInstance(IIntruderAttack attack);
}
The first bit of documentation ➊ tells us to get our extension registered correctly with Burp. We’re going to extend the main Burp class as well as the IIntruderPayloadGeneratorFactory class. Next we see that Burp is expecting two functions to be present in our main class. ThegetGeneratorName function ➋ will be called by Burp to retrieve the name of our extension, and we are expected to return a string. The createNewInstance function ➌ expects us to return an instance of the IIntruderPayloadGenerator, which will be a second class that we have to create.
Now let’s implement the actual Python code to meet these requirements, and then we’ll look at how the IIntruderPayloadGenerator class gets added. Open a new Python file, name it bhp_fuzzer.py, and punch out the following code:
➊ from burp import IBurpExtender
from burp import IIntruderPayloadGeneratorFactory
from burp import IIntruderPayloadGenerator
from java.util import List, ArrayList
import random
➋ class BurpExtender(IBurpExtender, IIntruderPayloadGeneratorFactory):
def registerExtenderCallbacks(self, callbacks):
self._callbacks = callbacks
self._helpers = callbacks.getHelpers()
➌ callbacks.registerIntruderPayloadGeneratorFactory(self)
return
➍ def getGeneratorName(self):
return "BHP Payload Generator"
➎ def createNewInstance(self, attack):
return BHPFuzzer(self, attack)
So this is the simple skeleton of what we need in order to satisfy the first set of requirements for our extension. We have to first import the IBurpExtender class ➊, which is a requirement for every extension we write. We follow this up by importing our necessary classes for creating an Intruder payload generator. Next we define our BurpExtender class ➋, which extends the IBurpExtender and IIntruderPayloadGeneratorFactory classes. We then use the registerIntruderPayloadGeneratorFactory function ➌ to register our class so that the Intruder tool is aware that we can generate payloads. Next we implement the getGeneratorName function ➍ to simply return the name of our pay-load generator. The last step is the createNewInstance function ➎ that receives the attack parameter and returns an instance of the IIntruderPayloadGenerator class, which we calledBHPFuzzer.
Let’s have a peek at the documentation for the IIntruderPayloadGenerator class so we know what to implement.
/**
* This interface is used for custom Intruder payload generators.
* Extensions
* that have registered an
* IIntruderPayloadGeneratorFactory must return a new instance of
* this interface when required as part of a new Intruder attack.
*/
public interface IIntruderPayloadGenerator
{
/**
* This method is used by Burp to determine whether the payload
* generator is able to provide any further payloads.
*
* @return Extensions should return
* false when all the available payloads have been used up,
* otherwise true
*/
➊ boolean hasMorePayloads();
/**
* This method is used by Burp to obtain the value of the next payload.
*
* @param baseValue The base value of the current payload position.
* This value may be null if the concept of a base value is not
* applicable (e.g. in a battering ram attack).
* @return The next payload to use in the attack.
*/
➋ byte[] getNextPayload(byte[] baseValue);
/**
* This method is used by Burp to reset the state of the payload
* generator so that the next call to
* getNextPayload() returns the first payload again. This
* method will be invoked when an attack uses the same payload
* generator for more than one payload position, for example in a
* sniper attack.
*/
➌ void reset();
}
Okay! So we need to implement the base class and it needs to expose three functions. The first function, hasMorePayloads ➊, is simply there to decide whether to continue mutated requests back to Burp Intruder. We’ll just use a counter to deal with this, and once the counter is at the maximum that we set, we’ll return False so that no more fuzzing cases are generated. The getNextPayload function ➋ will receive the original payload from the HTTP request that you trapped. Or, if you have selected multiple payload areas in the HTTP request, you will only receive the bytes that you requested to be fuzzed (more on this later). This function allows us to fuzz the original test case and then return it so that Burp sends the new fuzzed value. The last function, reset ➌, is there so that if we generate a known set of fuzzed requests — say five of them — then for each payload position we have designated in the Intruder tab, we will iterate through the five fuzzed values.
Our fuzzer isn’t so fussy, and will always just keep randomly fuzzing each HTTP request. Now let’s see how this looks when we implement it in Python. Add the following code to the bottom of bhp_fuzzer.py:
➊ class BHPFuzzer(IIntruderPayloadGenerator):
def __init__(self, extender, attack):
self._extender = extender
self._helpers = extender._helpers
self._attack = attack
➋ self.max_payloads = 10
self.num_iterations = 0
return
➌ def hasMorePayloads(self):
if self.num_iterations == self.max_payloads:
return False
else:
return True
➍ def getNextPayload(self,current_payload):
# convert into a string
➎ payload = "".join(chr(x) for x in current_payload)
# call our simple mutator to fuzz the POST
➏ payload = self.mutate_payload(payload)
# increase the number of fuzzing attempts
➐ self.num_iterations += 1
return payload
def reset(self):
self.num_iterations = 0
return
We start by defining our BHPFuzzer class ➊ that extends the class IIntruderPayloadGenerator. We define the required class variables as well as add max_payloads ➋ and num_iterations variables so that we can keep track of when to let Burp know we’re finished fuzzing. You could of course let the extension run forever if you like, but for testing we’ll leave this in place. Next we implement the hasMorePayloads function ➌ that simply checks whether we have reached the maximum number of fuzzing iterations. You could modify this to continually run the extension by always returning True. The getNextPayload function ➍is the one that receives the original HTTP payload and it is here that we will be fuzzing. The current_payload variable arrives as a byte array, so we convert this to a string ➎ and then pass it to our fuzzing function mutate_payload ➏. We then increment the num_iterations variable ➐ and return the mutated payload. Our last function is the reset function that returns without doing anything.
Now let’s drop in the world’s simplest fuzzing function that you can modify to your heart’s content. Because this function is aware of the current payload, if you have a tricky protocol that needs something special, like a CRC checksum at the beginning of the payload or a length field, you can do those calculations inside this function before returning, which makes it extremely flexible. Add the following code to bhp_fuzzer.py, making sure that the mutate_payload function is tabbed into our BHPFuzzer class:
def mutate_payload(self,original_payload):
# pick a simple mutator or even call an external script
picker = random.randint(1,3)
# select a random offset in the payload to mutate
offset = random.randint(0,len(original_payload)-1)
payload = original_payload[:offset]
# random offset insert a SQL injection attempt
if picker == 1:
payload += "'"
# jam an XSS attempt in
if picker == 2:
payload += "<script>alert('BHP!');</script>"
# repeat a chunk of the original payload a random number
if picker == 3:
chunk_length = random.randint(len(payload[offset:]),len(payload)-1)
repeater = random.randint(1,10)
for i in range(repeater):
payload += original_payload[offset:offset+chunk_length]
# add the remaining bits of the payload
payload += original_payload[offset:]
return payload
This simple fuzzer is pretty self-explanatory. We’ll randomly pick from three mutators: a simple SQL injection test with a single-quote, an XSS attempt, and then a mutator that selects a random chunk in the original payload and repeats it a random number of times. We now have a Burp Intruder extension that we can use. Let’s take a look at how we can get it loaded.
Kicking the Tires
First we have to get our extension loaded and make sure there are no errors. Click the Extender tab in Burp and then click the Add button. A screen appears that will allow you to point Burp at the fuzzer. Ensure that you set the same options as shown in Figure 6-3.
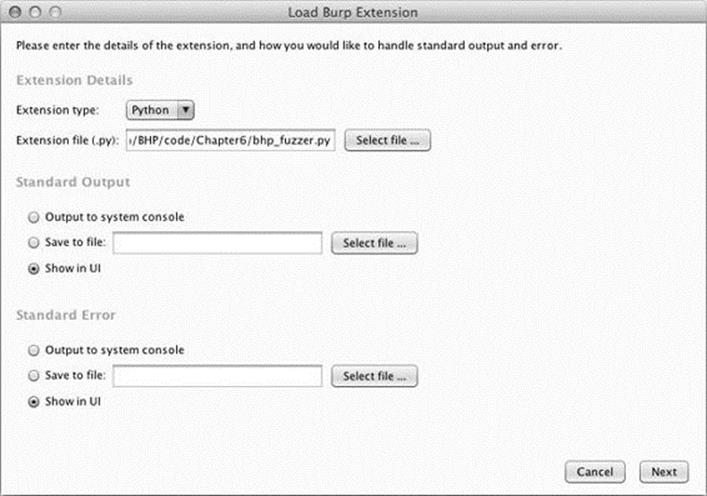
Figure 6-3. Setting Burp to load our extension
Click Next and Burp will begin loading our extension. If all goes well, Burp should indicate that the extension was loaded successfully. If there are errors, click the Errors tab, debug any typos, and then click the Close button. Your Extender screen should now look like Figure 6-4.
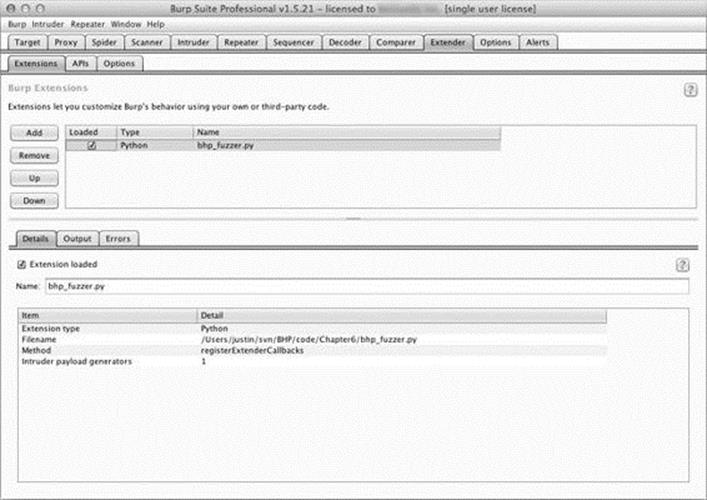
Figure 6-4. Burp Extender showing that our extension is loaded
You can see that our extension is loaded and that Burp has identified that an Intruder payload generator is registered. We are now ready to leverage our extension in a real attack. Make sure your web browser is set to use Burp Proxy as a localhost proxy on port 8080, and let’s attack the same Acunetix web application from Chapter 5. Simply browse to:
http://testphp.vulnweb.com
As an example, I used the little search bar on their site to submit a search for the string “test”. Figure 6-5 shows how I can see this request in the HTTP history tab of the Proxy tab, and I have right-clicked the request to send it to Intruder.
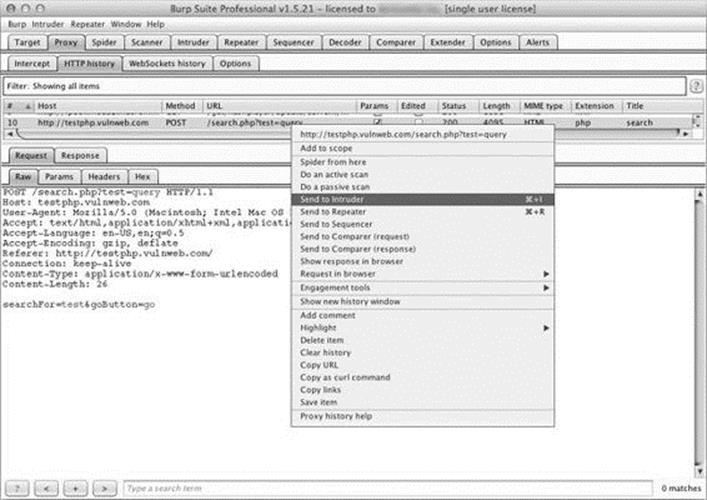
Figure 6-5. Selecting an HTTP request to send to Intruder
Now switch to the Intruder tab and click the Positions tab. A screen appears that shows each query parameter highlighted. This is Burp identifying the spots where we should be fuzzing. You can try moving the payload delimiters around or selecting the entire payload to fuzz if you choose, but in our case let’s leave Burp to decide where we are going to fuzz. For clarity, see Figure 6-6, which shows how payload highlighting works.
Now click the Payloads tab. In this screen, click the Payload type drop-down and select Extension-generated. In the Payload Options section, click the Select generator... button and choose BHP Payload Generator from the drop-down. Your Payload screen should now look like Figure 6-7.
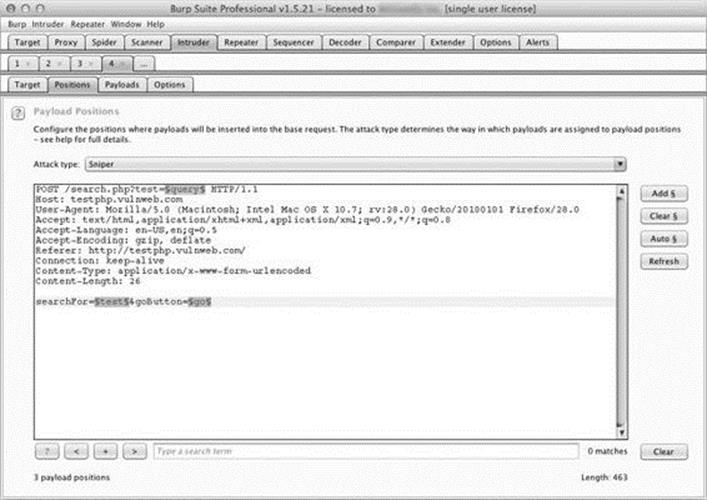
Figure 6-6. Burp Intruder highlighting payload parameters
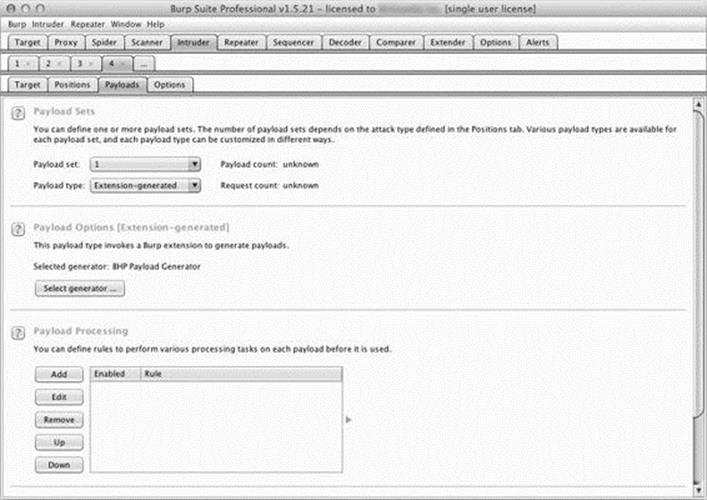
Figure 6-7. Using our fuzzing extension as a payload generator
Now we’re ready to send our requests. At the top of the Burp menu bar, click Intruder and then select Start Attack. This starts sending fuzzed requests, and you will be able to quickly go through the results. When I ran the fuzzer, I received output as shown in Figure 6-8.
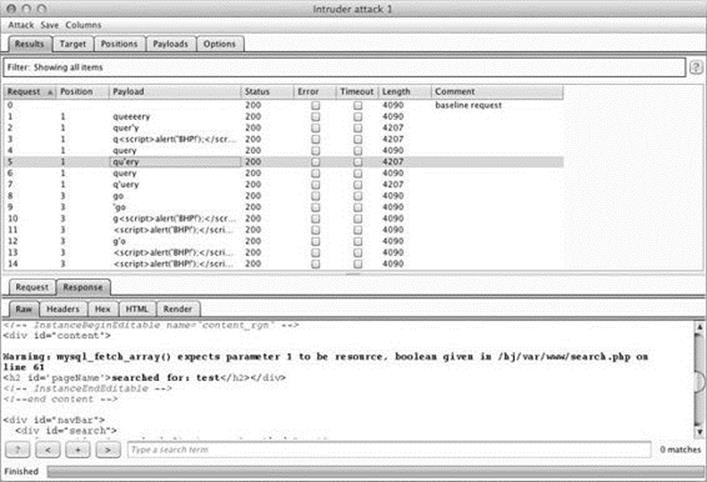
Figure 6-8. Our fuzzer running in an Intruder attack
As you can see from the warning on line 61 of the response, in request 5, we discovered what appears to be a SQL injection vulnerability.
Now of course, our fuzzer is only for demonstration purposes, but you’ll be surprised how effective it can be for getting a web application to output errors, disclose application paths, or behave in ways that lots of other scanners might miss. The important thing is to understand how we managed to get our custom extension in line with Intruder attacks. Now let’s create an extension that will assist us in performing some extended reconnaissance against a web server.
Bing for Burp
When you’re attacking a web server, it’s not uncommon for that single machine to serve several web applications, some of which you might not be aware of. Of course, you want to discover these hostnames exposed on the same web server because they might give you an easier way to get a shell. It’s not rare to find an insecure web application or even development resources located on the same machine as your target. Microsoft’s Bing search engine has search capabilities that allow you to query Bing for all websites it finds on a single IP address (using the “IP” search modifier). Bing will also tell you all of the subdomains of a given domain (using the “domain” modifier).
Now we could, of course, use a scraper to submit these queries to Bing and then scrape the HTML in the results, but that would be bad manners (and also violate most search engines’ terms of use). In order to stay out of trouble, we can use the Bing API[13] to submit these queries programmatically and then parse the results ourselves. We won’t implement any fancy Burp GUI additions (other than a context menu) with this extension; we simply output the results into Burp each time we run a query, and any detected URLs to Burp’s target scope will be added automatically. Because I already walked you through how to read the Burp API documentation and translate it into Python, we’re going to get right to the code.
Crack open bhp_bing.py and hammer out the following code:
from burp import IBurpExtender
from burp import IContextMenuFactory
from javax.swing import JMenuItem
from java.util import List, ArrayList
from java.net import URL
import socket
import urllib
import json
import re
import base64
➊ bing_api_key = "YOURKEY"
➋ class BurpExtender(IBurpExtender, IContextMenuFactory):
def registerExtenderCallbacks(self, callbacks):
self._callbacks = callbacks
self._helpers = callbacks.getHelpers()
self.context = None
# we set up our extension
callbacks.setExtensionName("BHP Bing")
➌ callbacks.registerContextMenuFactory(self)
return
def createMenuItems(self, context_menu):
self.context = context_menu
menu_list = ArrayList()
➍ menu_list.add(JMenuItem("Send to Bing", actionPerformed=self.bing_
menu))
return menu_list
This is the first bit of our Bing extension. Make sure you have your Bing API key pasted in place ➊; you are allowed something like 2,500 free searches per month. We begin by defining our BurpExtender class ➋ that implements the standard IBurpExtender interface and theIContextMenuFactory, which allows us to provide a context menu when a user right-clicks a request in Burp. We register our menu handler ➌ so that we can determine which site the user clicked, which then enables us to construct our Bing queries. The last step is to set up our createMenuItemfunction, which will receive an IContextMenuInvocation object that we will use to determine which HTTP request was selected. The last step is to render our menu item and have the bing_menu function handle the click event ➍. Now let’s add the functionality to perform the Bing query, output the results, and add any discovered virtual hosts to Burp’s target scope.
def bing_menu(self,event):
# grab the details of what the user clicked
➊ http_traffic = self.context.getSelectedMessages()
print "%d requests highlighted" % len(http_traffic)
for traffic in http_traffic:
http_service = traffic.getHttpService()
host = http_service.getHost()
print "User selected host: %s" % host
self.bing_search(host)
return
def bing_search(self,host):
# check if we have an IP or hostname
is_ip = re.match("[0-9]+(?:\.[0-9]+){3}", host)
➋ if is_ip:
ip_address = host
domain = False
else:
ip_address = socket.gethostbyname(host)
domain = True
bing_query_string = "'ip:%s'" % ip_address
➌ self.bing_query(bing_query_string)
if domain:
bing_query_string = "'domain:%s'" % host
➍ self.bing_query(bing_query_string)
Our bing_menu function gets triggered when the user clicks the context menu item we defined. We retrieve all of the HTTP requests that were highlighted ➊ and then retrieve the host portion of the request for each one and send it to our bing_search function for further processing. Thebing_search function first determines if we were passed an IP address or a hostname ➋. We then query Bing for all virtual hosts that have the same IP address ➌ as the host contained within the HTTP request that was right-clicked. If a domain has been passed to our extension, then we also do a secondary search ➍ for any subdomains that Bing may have indexed. Now let’s install the plumbing to use Burp’s HTTP API to send the request to Bing and parse the results. Add the following code, ensuring that you’re tabbed correctly into our BurpExtender class, or you’ll run into errors.
def bing_query(self,bing_query_string):
print "Performing Bing search: %s" % bing_query_string
# encode our query
quoted_query = urllib.quote(bing_query_string)
http_request = "GET https://api.datamarket.azure.com/Bing/Search/Web?$.
format=json&$top=20&Query=%s HTTP/1.1\r\n" % quoted_query
http_request += "Host: api.datamarket.azure.com\r\n"
http_request += "Connection: close\r\n"
➊ http_request += "Authorization: Basic %s\r\n" % base64.b64encode(":%s" % .
bing_api_key)
http_request += "User-Agent: Blackhat Python\r\n\r\n"
➋ json_body = self._callbacks.makeHttpRequest("api.datamarket.azure.com",.
443,True,http_request).tostring()
➌ json_body = json_body.split("\r\n\r\n",1)[1]
try:
➍ r = json.loads(json_body)
if len(r["d"]["results"]):
for site in r["d"]["results"]:
➎ print "*" * 100
print site['Title']
print site['Url']
print site['Description']
print "*" * 100
j_url = URL(site['Url'])
➏ if not self._callbacks.isInScope(j_url):
print "Adding to Burp scope"
self._callbacks.includeInScope(j_url)
except:
print "No results from Bing"
pass
return
Okay! Burp’s HTTP API requires that we build up the entire HTTP request as a string before sending it off, and in particular you can see that we need to base64-encode ➊our Bing API key and use HTTP basic authentication to make the API call. We then send our HTTP request ➋ to the Microsoft servers. When the response returns, we’ll have the entire response including the headers, so we split the headers off ➌ and then pass it to our JSON parser ➍. For each set of results, we output some information about the site that we discovered ➎ and if the discovered site is not in Burp’s target scope ➏, we automatically add it. This is a great blend of using the Jython API and pure Python in a Burp extension to do additional recon work when attacking a particular target. Let’s take it for a spin.
Kicking the Tires
Use the same procedure we used for our fuzzing extension to get the Bing search extension working. When it’s loaded, browse to http://testphp.vulnweb.com/, and then right-click the GET request you just issued. If the extension is loaded properly, you should see the menu option Send to Bing displayed as shown in Figure 6-9.
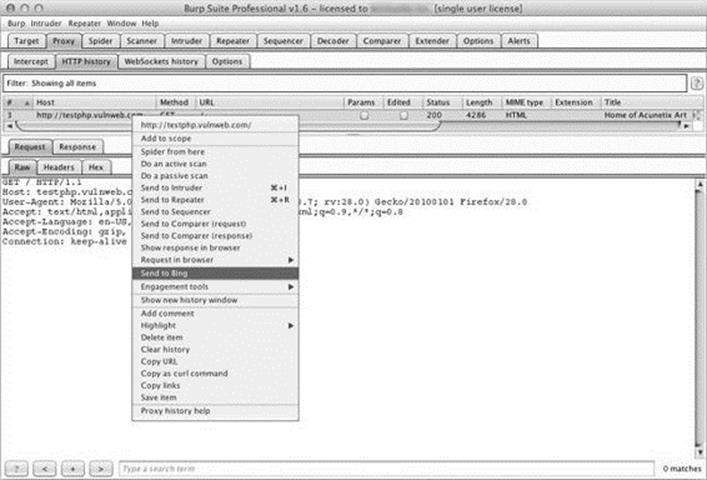
Figure 6-9. New menu option showing our extension
When you click this menu option, depending on the output you chose when you loaded the extension, you should start to see results from Bing as shown in Figure 6-10.
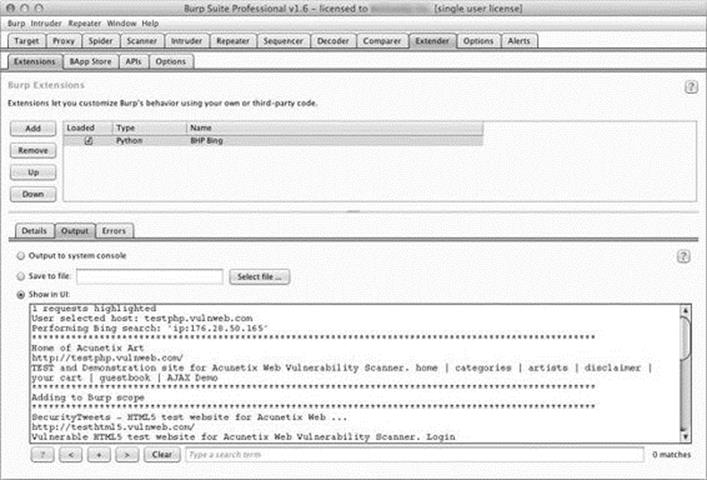
Figure 6-10. Our extension providing output from the Bing API search
And if you click the Target tab in Burp and then select Scope, you will see new items automatically added to our target scope as shown in Figure 6-11. The target scope limits activities such as attacks, spidering, and scans to only those hosts defined.
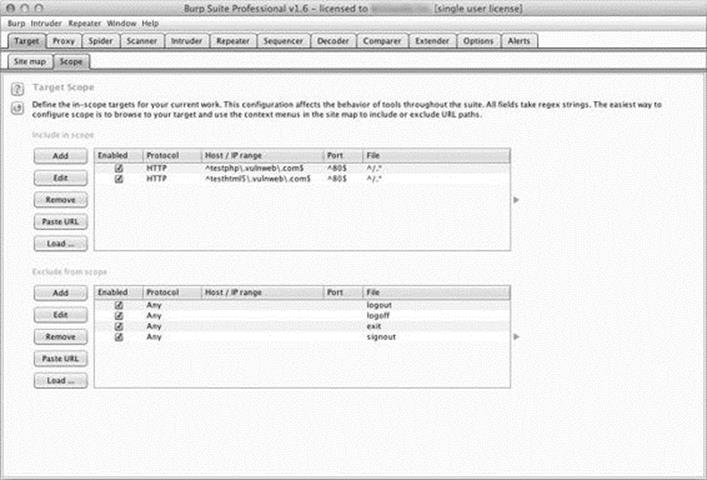
Figure 6-11. Showing how discovered hosts are automatically added to Burp’s target scope
Turning Website Content into Password Gold
Many times, security comes down to one thing: user passwords. It’s sad but true. Making things worse, when it comes to web applications, especially custom ones, it’s all too common to find that account lockouts aren’t implemented. In other instances, strong passwords are not enforced. In these cases, an online password guessing session like the one in the last chapter might be just the ticket to gain access to the site.
The trick to online password guessing is getting the right wordlist. You can’t test 10 million passwords if you’re in a hurry, so you need to be able to create a wordlist targeted to the site in question. Of course, there are scripts in the Kali Linux distribution that crawl a website and generate a wordlist based on site content. Though if you’ve already used Burp Spider to crawl the site, why send more traffic just to generate a wordlist? Plus, those scripts usually have a ton of command-line arguments to remember. If you’re anything like me, you’ve already memorized enough command-line arguments to impress your friends, so let’s make Burp do the heavy lifting.
Open bhp_wordlist.py and knock out this code.
from burp import IBurpExtender
from burp import IContextMenuFactory
from javax.swing import JMenuItem
from java.util import List, ArrayList
from java.net import URL
import re
from datetime import datetime
from HTMLParser import HTMLParser
class TagStripper(HTMLParser):
def __init__(self):
HTMLParser.__init__(self)
self.page_text = []
def handle_data(self, data):
➊ self.page_text.append(data)
def handle_comment(self, data):
➋ self.handle_data(data)
def strip(self, html):
self.feed(html)
➌ return " ".join(self.page_text)
class BurpExtender(IBurpExtender, IContextMenuFactory):
def registerExtenderCallbacks(self, callbacks):
self._callbacks = callbacks
self._helpers = callbacks.getHelpers()
self.context = None
self.hosts = set()
# Start with something we know is common
➍ self.wordlist = set(["password"])
# we set up our extension
callbacks.setExtensionName("BHP Wordlist")
callbacks.registerContextMenuFactory(self)
return
def createMenuItems(self, context_menu):
self.context = context_menu
menu_list = ArrayList()
menu_list.add(JMenuItem("Create Wordlist",
actionPerformed=self.wordlist_menu))
return menu_list
The code in this listing should be pretty familiar by now. We start by importing the required modules. A helper TagStripper class will allow us to strip the HTML tags out of the HTTP responses we process later on. Its handle_data function stores the page text ➊ in a member variable. We also define handle_comment because we want the words stored in developer comments to be added to our password list as well. Under the covers, handle_comment just calls handle_data ➋ (in case we want to change how we process page text down the road).
The strip function feeds HTML code to the base class, HTMLParser, and returns the resulting page text ➌, which will come in handy later. The rest is almost exactly the same as the start of the bhp_bing.py script we just finished. Once again, the goal is to create a context menu item in the Burp UI. The only thing new here is that we store our wordlist in a set, which ensures that we don’t introduce duplicate words as we go. We initialize the set with everyone’s favorite password, “password” ➍, just to make sure it ends up in our final list.
Now let’s add the logic to take the selected HTTP traffic from Burp and turn it into a base wordlist.
def wordlist_menu(self,event):
# grab the details of what the user clicked
http_traffic = self.context.getSelectedMessages()
for traffic in http_traffic:
http_service = traffic.getHttpService()
host = http_service.getHost()
➊ self.hosts.add(host)
http_response = traffic.getResponse()
if http_response:
➋ self.get_words(http_response)
self.display_wordlist()
return
def get_words(self, http_response):
headers, body = http_response.tostring().split('\r\n\r\n', 1)
# skip non-text responses
➌ if headers.lower().find("content-type: text") == -1:
return
tag_stripper = TagStripper()
➍ page_text = tag_stripper.strip(body)
➎ words = re.findall("[a-zA-Z]\w{2,}", page_text)
for word in words:
# filter out long strings
if len(word) <= 12:
➏ self.wordlist.add(word.lower())
return
Our first order of business is to define the wordlist_menu function, which is our menu-click handler. It saves the name of the responding host ➊ for later, and then retrieves the HTTP response and feeds it to our get_words function ➋. From there, get_words splits out the header from the message body, checking to make sure we’re only trying to process text-based responses ➌. Our TagStripper class ➍ strips the HTML code from the rest of the page text. We use a regular expression to find all words starting with an alphabetic character followed by two or more “word” characters ➎. After making the final cut, the successful words are saved in lowercase to the wordlist ➏.
Now let’s round out the script by giving it the ability to mangle and display the captured wordlist.
def mangle(self, word):
year = datetime.now().year
➊ suffixes = ["", "1", "!", year]
mangled = []
for password in (word, word.capitalize()):
for suffix in suffixes:
➋ mangled.append("%s%s" % (password, suffix))
return mangled
def display_wordlist(self):
➌ print "#!comment: BHP Wordlist for site(s) %s" % ", ".join(self.hosts)
for word in sorted(self.wordlist):
for password in self.mangle(word):
print password
return
Very nice! The mangle function takes a base word and turns it into a number of password guesses based on some common password creation “strategies.” In this simple example, we create a list of suffixes to tack on the end of the base word, including the current year ➊. Next we loop through each suffix and add it to the base word ➋ to create a unique password attempt. We do another loop with a capitalized version of the base word for good measure. In the display_wordlist function, we print a “John the Ripper”–style comment ➌ to remind us which sites were used to generate this wordlist. Then we mangle each base word and print the results. Time to take this baby for a spin.
Kicking the Tires
Click the Extender tab in Burp, click the Add button, and use the same procedure we used for our previous extensions to get the Wordlist extension working. When you have it loaded, browse to http://testphp.vulnweb.com/.
Right-click the site in the Site Map pane and select Spider this host, as shown in Figure 6-12.
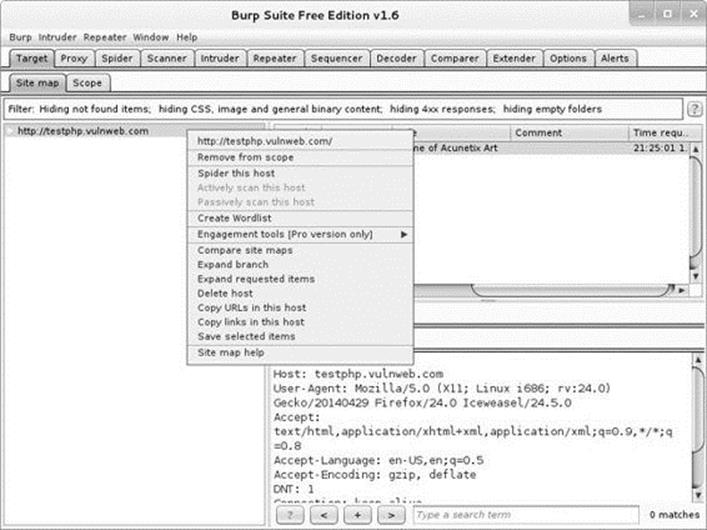
Figure 6-12. Spidering a host with Burp
After Burp has visited all the links on the target site, select all the requests in the top-right pane, right-click them to bring up the context menu, and select Create Wordlist, as shown in Figure 6-13.
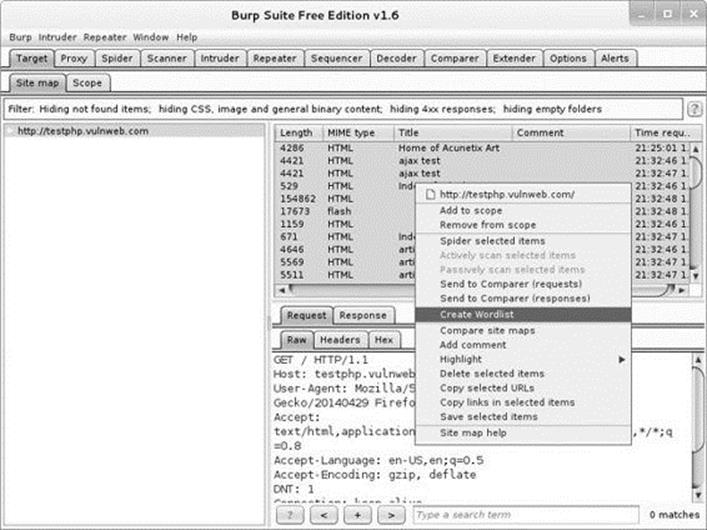
Figure 6-13. Sending the requests to the BHP Wordlist extension
Now check the output tab of the extension. In practice, we’d save its output to a file, but for demonstration purposes we display the wordlist in Burp, as shown in Figure 6-14.
You can now feed this list back into Burp Intruder to perform the actual password-guessing attack.
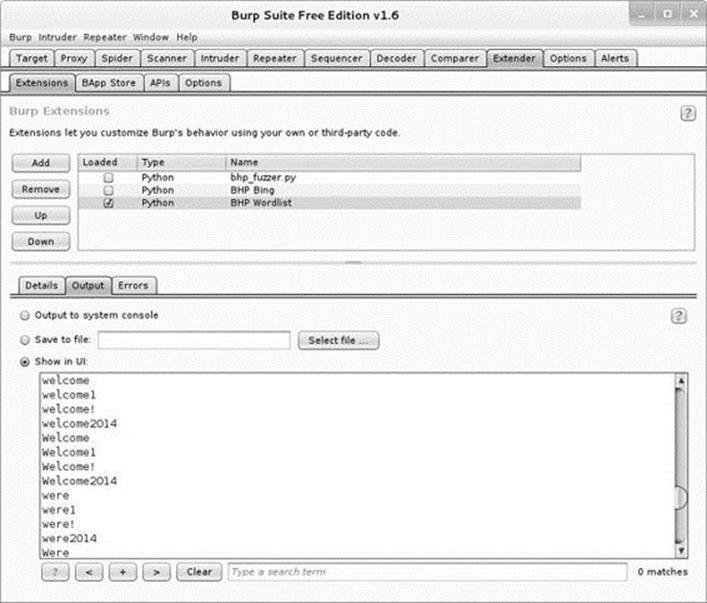
Figure 6-14. A password list based on content from the target website
We have now demonstrated a small subset of the Burp API, including being able to generate our own attack payloads as well as building extensions that interact with the Burp UI. During a penetration test you will often come up against specific problems or automation needs, and the Burp Extender API provides an excellent interface to code your way out of a corner, or at least save you from having to continually copy and paste captured data from Burp to another tool.
In this chapter, we showed you how to build an excellent reconnaissance tool to add to your Burp tool belt. As is, this extension only retrieves the top 20 results from Bing, so as homework you could work on making additional requests to ensure that you retrieve all of the results. This will require doing a bit of reading about the Bing API and writing some code to handle the larger results set. You of course could then tell the Burp spider to crawl each of the new sites you discover and automatically hunt for vulnerabilities!
[13] Visit http://www.bing.com/dev/en-us/dev-center/ to get set up with your own free Bing API key.
All materials on the site are licensed Creative Commons Attribution-Sharealike 3.0 Unported CC BY-SA 3.0 & GNU Free Documentation License (GFDL)
If you are the copyright holder of any material contained on our site and intend to remove it, please contact our site administrator for approval.
© 2016-2026 All site design rights belong to S.Y.A.