Teach Your Kids to Code: A Parent-Friendly Guide to Python Programming (2015)
Chapter 3. Numbers and Variables: Python Does the Math
We’ve used Python to do really fun things, like make colorful pictures in just a few lines of code, but our programs have been limited. We just ran them and watched them make pictures. What if we wanted to interact with our Python programs? In this chapter, we’ll learn how to have Python ask the user’s name and even offer to do the user’s math homework!
Variables: Where We Keep Our Stuff
In Chapter 1 and Chapter 2, we used a few variables (you might remember name from our first program in Chapter 1 or x and sides from Chapter 2). Now let’s look at what variables really are and how they work.
A variable is something you want the computer to remember while your program is running. When Python “remembers” something, it’s storing that information in the computer’s memory. Python can remember values of several types, including number values (like 7, 42, or even 98.6) and strings (letters, symbols, words, sentences, or anything you can type on the keyboard and then some). In Python, as in most modern programming languages, we assign a value to a variable with the equal sign (=). An assignment like x = 7 tells the computer to remember the number 7 and give it back to us anytime we call out x. We also use the equal sign to assign a string of keyboard characters to a variable; we just have to remember to put quotation marks (") around the string, like this:
my_name = "Bryson"
Here, we assign the value "Bryson" to the variable my_name. The quotation marks around "Bryson" tell us that it is a string.
Whenever you assign a value to a variable, you write the name of the variable first, to the left of the equal sign, and then write the value to the right of the equal sign. We name variables something simple that describes their contents (like my_name when I’m storing my name) so we can easily remember them and use them in our programs. There are a few rules to keep in mind as we make up names for variables.

First, we always begin variable names with a letter. Second, the rest of the characters in the variable name must be letters, numbers, or the underscore symbol ( _ ); that means you can’t have a space inside a variable name (for example, my name will give you a syntax error because Python thinks you’ve listed two variables separated by a space). Third, variable names in Python are case sensitive; that means that if we use all lowercase letters in a variable name (like abc), then we can only use the value stored in the variable if we type the variable name exactly the same way, with the same capitalization. For example, to use the value in abc, we have to write abc; we can’t use uppercase letters like ABC. So My_Name is not the same as my_name, and MY_NAME is a different variable name altogether. In this book, we’ll use all lowercase letters in our variable names, separating words with the _ symbol.
Let’s try a program using some variables. Type the following code in a new IDLE window and save it as ThankYou.py.
ThankYou.py
my_name = "Bryson"
my_age = 43
your_name = input("What is your name? ")
your_age = input("How old are you? ")
print("My name is", my_name, ", and I am", my_age, "years old.")
print("Your name is", your_name, ", and you are", your_age, ".")
print("Thank you for buying my book,", your_name, "!")
When we run this program, we’re telling the computer to remember that my_name is "Bryson" and that my_age is 43. We then ask the user (the person running the program) to enter their name and age, and we tell the computer to remember these as the variables your_name and your_age. We’re using Python’s input() function to tell Python that we want the user to enter (or input) something with the keyboard. Input is what we call information that’s entered into a program while it’s running — in this case, the user’s name and age. The part in quotes inside the parentheses, ("What is your name? "), is called the prompt because it prompts the user, or asks them a question requiring their input.
In the last three lines, we tell the computer to print out the value we stored in my_name and the other three variables. We even use your_name twice, and the computer remembers everything correctly, including the parts the user typed as input.
This program remembers my name and age, asks the user for theirs, and prints a nice message to them, as shown in Figure 3-1.
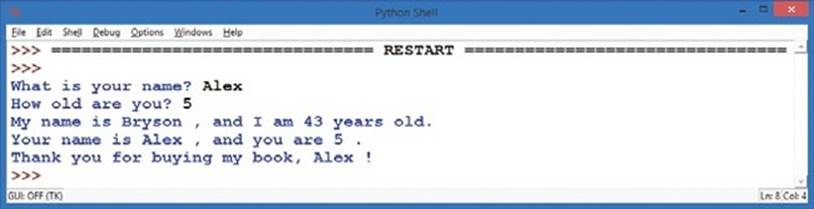
Figure 3-1. A program with four variables and the output it creates
Numbers and Math in Python
The computer is great at remembering values. We can use the same variable hundreds or thousands of times in the same program, and the computer will always give us the right value as long as we’ve programmed it correctly. Computers are also great at performing calculations (addition, subtraction, and so on). Your computer is able to perform over one billion (1,000,000,000, or a thousand million) calculations every second!
That’s much faster than we can compute numbers in our heads; although we’re still better than computers at some tasks, fast math is a contest the computer will win every time. Python gives you access to that mathematical computing power with two main types of numbers, and it also lets you use a whole set of symbols to do math with those numbers, from + to - and beyond.
Python Numbers
The two primary types of numbers in Python are called integers (whole numbers, including negatives, like 7, -9, or 0) and floatingpoint numbers (numbers with decimals, like 1.0, 2.5, 0.999, or 3.14159265). There are two additional number types that we won’t use much in this book. The first is Booleans, which hold true or false values (sort of like the answers on a “true or false” test at school), and the second is complex numbers, which hold even imaginary number values (this might excite you if you know some advanced algebra, but we’re keeping it real here — pun intended).
Integers, or whole numbers, are useful for counting (our variable x in Chapter 2 counted the number of lines as we drew the spiral) and for basic math (2 + 2 = 4). We usually state our age in whole numbers, so when you say you’re 5 or 16 or 42, you’re using an integer. When you count to 10, you’re using integers.
Floating-point, or decimal, numbers are great when we want fractions, like 3.5 miles, 1.25 pizzas, or $25.97. Of course, in Python, we don’t include the units (miles, pizzas, dollars), just the number with the decimal. So if we want to store a variable with the cost of our pizza (cost_of_pizza), we might assign it as follows: cost_of_pizza = 25.97. We’ll just have to remember that the units we’re using there are dollars, euros, or some other currency.

Python Operators
The math symbols like + (plus) and - (minus) are called operators because they operate, or perform calculations, on the numbers in our equation. When we say “4 + 2” aloud or enter it on our calculator, we want to perform addition on the numbers 4 and 2 to get their sum, 6.
Python uses most of the same operators that you would use in a math class, including +, -, and parentheses, (), as shown in Table 3-1. However, some operators are different from what you may have used in school, like the multiplication operator (the asterisk, *, instead of ×) and the division operator (the forward slash, /, instead of ÷). We’ll get to know these operators better in this section.
Table 3-1. Basic Math Operators in Python
|
Math symbol |
Python operator |
Operation |
Example |
Result |
|
+ |
+ |
Addition |
4 + 2 |
6 |
|
– |
- |
Subtraction |
4 - 2 |
2 |
|
× |
* |
Multiplication |
4 * 2 |
8 |
|
÷ |
/ |
Division |
4 / 2 |
2.0 |
|
42 |
** |
Exponent or power |
4 ** 2 |
16 |
|
( ) |
() |
Parentheses (grouping) |
(4 + 2) * 3 |
18 |
Doing Math in the Python Shell
This is a great time to give Python math a try; let’s use the Python shell this time. As you might remember from Chapter 1, the Python shell gives you direct access to Python’s power without writing a whole program. It’s sometimes called the command line because you can type commands line by line and instantly see the result. You can type a math problem (called an expression in programming) like 4 + 2 directly at the command prompt (the >>> symbol with the flashing cursor) in the Python shell, and when you press ENTER, you’ll see the result of the expression, or the answer to the math problem.
Try typing some of the examples listed in Table 3-1 and see what Python says; Figure 3-2 shows some sample output. Feel free to try your own math problems as well.
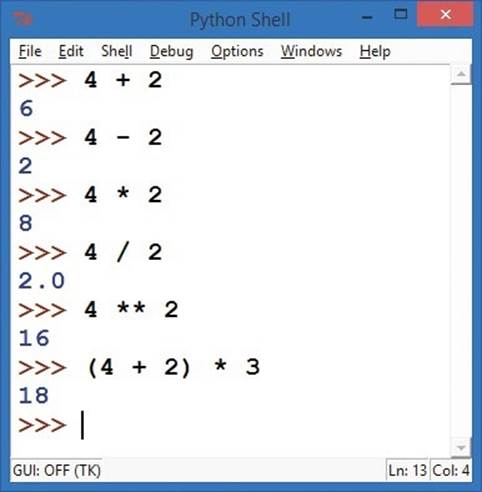
Figure 3-2. Type the example math problems (expressions) from Table 3-1, and Python gives the answers!
Syntax Errors: What Did You Say?
While we’re typing in the Python shell, we have a chance to learn about syntax errors. Whenever Python, or any programming language, can’t understand the command you typed, it may respond with a message like "Syntax Error". This means there was a problem with the way you asked the computer to do something, or your syntax.
Syntax is the set of rules we follow in building sentences or statements in a language. When we program computers, we call a mistake in a statement a syntax error; when we make a mistake in a sentence in English, we might call it bad grammar. The difference is that, unlike English speakers, computers can’t understand bad grammar at all. Python, like most programming languages, is very good at performing calculations as long as we follow syntax rules, but it can’t understand anything we’re saying if we mess up the syntax. Take a look at Figure 3-3 to see some examples of syntax errors, followed by the expressions stated in a way that Python can understand.
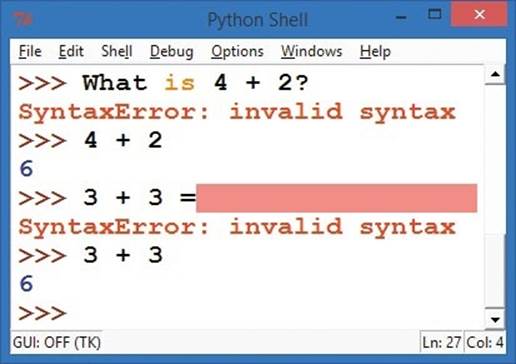
Figure 3-3. Learning to speak Python’s language
When we ask Python “What is 4 + 2?” in regular English, Python responds with "SyntaxError: invalid syntax" to let us know that it can’t understand what we’ve asked it to do. When we give Python the correct expression, 4 + 2, Python will answer correctly every time: 6. In the same way, an extra character, like the equal sign at the end of the statement 3 + 3 =, confuses Python because Python sees the equal sign as an assignment operator to assign a value to a variable. When we type 3 + 3 and press ENTER, Python understands and will always give the right answer: 6.
The fact that we can rely on a computer to answer correctly and quickly every time we give it proper input is one of the most powerful aspects of coding. We can count on computers for fast, accurate calculations, as long as we program them correctly in a language they understand. That’s what you’re learning to do as you learn to code in Python.
Variables in the Python Shell
As we’ve discussed, the Python shell gives us direct access to the programming power of Python without having to write entire stand-alone programs. We can even use variables, like x and my_age, when we’re typing in the Python shell; we just have to assign them values, as you learned to do in this chapter’s opening example.
If you type x = 5 at the command prompt (>>>), Python will store the value 5 in memory as the variable x and will remember it until you tell Python to change the value (for example, by entering x = 9 to give x a new value of 9). See the examples in the Python shell in Figure 3-4.

Figure 3-4. Python remembers our variable’s value for as long as we want.
Notice that in the last assignment statement, we used x on both sides of the equal sign: x = x - 7. In an algebra class, this would be an invalid statement, since x can never equal x - 7. But in a program, the computer evaluates the right side of the equation first, calculating the value of x - 7before it assigns that value to the x on the left side. Variables on the right side of the equal sign get substituted with their values; here, the value of x is 9, so the computer plugs 9 into x - 7 to get 9 - 7, which is 2. Finally, the variable on the left side of the equal sign, x, is assigned the result of the calculation from the right side. The value of x changes only at the end of the assignment process.
Before we move on to a programming example, let’s go over one additional feature of math in Python. In Table 3-1 and in Figure 3-2 and Figure 3-4, we used the division operator — the forward slash (/) — and Python responded with a decimal value. For 4 / 2, Python gave us 2.0, not the 2that we might expect. This is because Python uses what it calls true division, which is meant to be easier to understand and less likely to cause errors.
We see the positive effect of Python’s true division in Figure 3-4 when we ask Python to calculate x / 2, with x equal to 5. Python tells us that 5 divided by 2 is equal to 2.5, which is the result we expect. This division is like dividing five pizzas equally between two teams: each team gets 2.5pizzas (the result of 5 / 2). In some programming languages, the division operator returns only the whole number (that would be 2 in this case). Just remember that Python does “pizza division.”
Programming with Operators: A Pizza Calculator
Speaking of pizza, now let’s imagine you own a pizzeria.
Let’s write a small program to figure out the total cost of a simple pizza order, including sales tax. Say we’re ordering one or more pizzas that all cost the same, and we’re ordering in Atlanta, Georgia, in the United States. There’s a sales tax that’s not included in the menu price but is added at the end of the purchase. The rate is 8 percent, meaning that for every dollar we pay for the pizza, we must also pay eight cents in sales tax. We could model this program in words as follows:
1. Ask the person how many pizzas they want.
2. Ask for the menu cost of each pizza.
3. Calculate the total cost of the pizzas as our subtotal.
4. Calculate the sales tax owed, at 8 percent of the subtotal.
5. Add the sales tax to the subtotal for the final total.
6. Show the user the total amount due, including tax.
We’ve seen how to ask the user for input. To calculate with numbers we’ve entered as input, we need one more function: eval(). The eval() function evaluates, or figures out the value of, the input that we typed. Keyboard input in Python is always received as a string of text characters, so we use eval() to turn that input into a number. So if we type "20" into our program, eval("20") would give us the number value 20, which we can then use in math formulas to calculate new numbers, like the cost of 20 pizzas. The eval() function is pretty powerful when it comes to working with numbers in Python.
Now that we know how to turn user input into numbers that we can calculate with, we can convert the numbered steps of our program plan into actual code.
NOTE
For each programming example, you can try writing your own program first, before you look at the code in the book. Start by writing comments (#) outlining the steps you’ll need to solve the problem. Then fill in the programming steps below each comment, checking the code in the book when you need a hint.
Type this into a new window and save it as AtlantaPizza.py.
AtlantaPizza.py
# AtlantaPizza.py - a simple pizza cost calculator
# Ask the person how many pizzas they want, get the number with eval()
number_of_pizzas = eval(input("How many pizzas do you want? "))
# Ask for the menu cost of each pizza
cost_per_pizza = eval(input("How much does each pizza cost? "))
# Calculate the total cost of the pizzas as our subtotal
subtotal = number_of_pizzas * cost_per_pizza
# Calculate the sales tax owed, at 8% of the subtotal
tax_rate = 0.08 # Store 8% as the decimal value 0.08
sales_tax = subtotal * tax_rate
# Add the sales tax to the subtotal for the final total
total = subtotal + sales_tax
# Show the user the total amount due, including tax
print("The total cost is $",total)
print("This includes $", subtotal, "for the pizza and")
print("$", sales_tax, "in sales tax.")
This program combines what you’ve learned about variables and operators into a single powerful program. Read through it and make sure you understand how each part works. How would you change the program to make it work for a different rate of sales tax?
Notice that we have included the steps of our program as comments, using the # (hash mark). Remember that comments are there for humans to read; the IDLE editor colors comments red to remind us that Python will ignore those parts. This practice of spelling out our programs step by step in words first, then putting those steps into our program as comments, can be very helpful as we build longer and more complex programs. This is our algorithm, the set of steps to be followed in our program. Algorithms are like recipes: if we follow all the steps in the right order, our program turns out great!
When we write our algorithm in words (as # comments) and in code (as programming statements), we’re accomplishing two goals. First, we’re reducing errors in our program by making sure we don’t leave out steps. Second, we’re making our program easier for us and others to read and understand later. You should get in the habit of writing clear comments in your programs from the very beginning, and we’ll do this often throughout the book. If you don’t want to type all of the comments, the program will still run; they’re just there to help you understand what the program is doing.
When you’ve written your program, you can run it and interact with it by going to Run▸Run Module. Figure 3-5 shows some sample output.
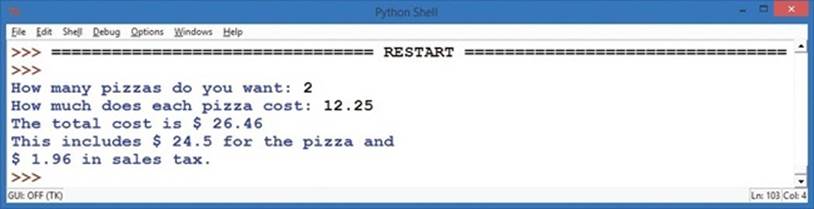
Figure 3-5. A sample run of our AtlantaPizza.py pizza calculator program
Strings: The Real Characters in Python
We’ve seen that Python is terrific at working with numbers, but what about when we want to communicate with people? People are better at understanding words and sentences, rather than just numbers all by themselves. To write programs that people can use, we need another variable type known as strings. Strings are what we call text, or keyboard characters, in a programming language; they are groups (or “strings”) of letters, numbers, and symbols. Your name is a string, as is your favorite color — even this paragraph (or this whole book) is a long string of letters, spaces, numbers, and symbols all mixed together.
One difference between strings and numbers is that we can’t calculate with strings; they’re usually names, words, or other information that can’t go into a calculator. A common way to use strings is in printing. For example, we asked the user for their name in our program at the beginning of the chapter so that we could print it out later.
Let’s do that again with a new program. We’ll ask the user for their name, store their name in a variable called name, and then print their name on the screen 100 times. As in our cool spiral drawing examples in Chapter 1 and Chapter 2, we’re using a loop to repeat the printing of the user’s name 100 times. Type the following code into a new IDLE window and save it as SayMyName.py.
SayMyName.py
# SayMyName.py - prints a screen full of the user's name
# Ask the user for their name
name = input("What is your name? ")
# Print their name 100 times
for x in range(100):
# Print their name followed by a space, not a new line
print(name, end = " ")
There’s something new in the print() statement in this program’s last line: it contains a keyword argument. In this case, the keyword is end, and we’re telling the program to end each print() statement with a space (there’s a space between our quotes: " ") instead of the regular end-of-line character. Print statements in Python usually end with the newline character, which is like pressing ENTER on your keyboard, but with this keyword argument we are telling Python we don’t want every printout of our name to be on a new line.
To see this change a little more clearly, modify the last line of the program to the following, and then run the program:
print(name, end = " rules! ")
If you run this, you’ll see "Your Name rules!" printed 100 times! The keyword argument end = " rules! " lets us change how the print() statement works. The end of every print() statement is now " rules! " instead of a RETURN or ENTER newline character.

In programming languages, an argument isn’t a bad thing; it’s simply how we tell a function, like print(), to do something. We do so by putting extra values inside the parentheses for that function. Those values inside the print() statement’s parentheses are the arguments, and the special keyword argument means that we’re using the keyword end to change the way print() ends each line it prints. When we change the end of the line from the newline character to a simple space character, words are added to the end of the current line without returning, or starting a new line, until the current line fills up completely and wraps around to the next one. Take a look at the result in Figure 3-6.
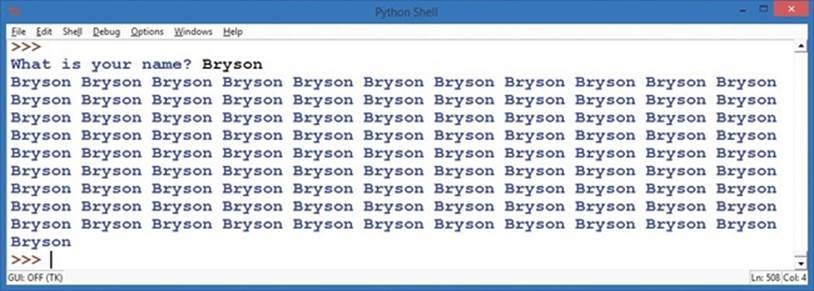
Figure 3-6. Python prints a screen full of my name when I run SayMyName.py.
Improving Our Color Spiral With Strings
Strings are so popular that even turtle graphics in Python have functions for taking strings as input and writing them to the screen. The function to ask a user for a string, or text, in the Turtle library is turtle.textinput(); this opens a pop-up window asking the user for text input and lets us store that as a string value. Figure 3-7 shows the nice graphical window that Turtle pops up for us when we use turtle.textinput("Enter your name", "What is your name?"). There are two arguments in Turtle’s textinput() function. The first argument, "Enter your name", is the window title for the pop-up window. The second argument, "What is your name?", is the prompt that asks the user for the information we want.
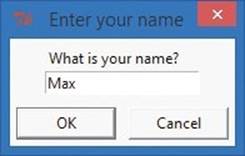
Figure 3-7. A text input window in turtle graphics
The function for writing a string on the turtle screen is write(); it draws text in the turtle’s pen color and at the turtle’s location on the screen. We can use write() and turtle.textinput() to combine the power of strings with colorful turtle graphics. Let’s give it a try! In the following program, we’ll set up turtle graphics just like in our earlier spirals, but instead of drawing lines or circles on the screen, we’ll ask the user for their name and then draw it on the screen in a colorful spiral. Type this into a new window and save it as SpiralMyName.py.
SpiralMyName.py
# SpiralMyName.py - prints a colorful spiral of the user's name
import turtle # Set up turtle graphics
t = turtle.Pen()
turtle.bgcolor("black")
colors = ["red", "yellow", "blue", "green"]
# Ask the user's name using turtle's textinput pop-up window
➊ your_name = turtle.textinput("Enter your name", "What is your name?")
# Draw a spiral of the name on the screen, written 100 times
for x in range(100):
t.pencolor(colors[x%4]) # Rotate through the four colors
➋ t.penup() # Don't draw the regular spiral lines
➌ t.forward(x*4) # Just move the turtle on the screen
➍ t.pendown() # Write the user's name, bigger each time
➎ t.write(your_name, font = ("Arial", int( (x + 4) / 4), "bold") )
t.left(92) # Turn left, just as in our other spirals
Most of the code in SpiralMyName.py looks just like our earlier color spirals, but we ask the user their name in a turtle.textinput pop-up window at ➊ and store the user’s answer in your_name. We’ve also changed the drawing loop by lifting the turtle’s pen off the screen at ➋ so when we move the turtle forward at ➌, it doesn’t leave a trail or draw the normal spiral line. All we want in the spiral is the user’s name, so after the turtle moves at ➌, we tell it to start drawing again with t.pendown() at ➍. Then with the write command at ➎, we tell the turtle to write your_name on the screen every time through the loop. The final result is a lovely spiral; my son Max ran the one shown in Figure 3-8.
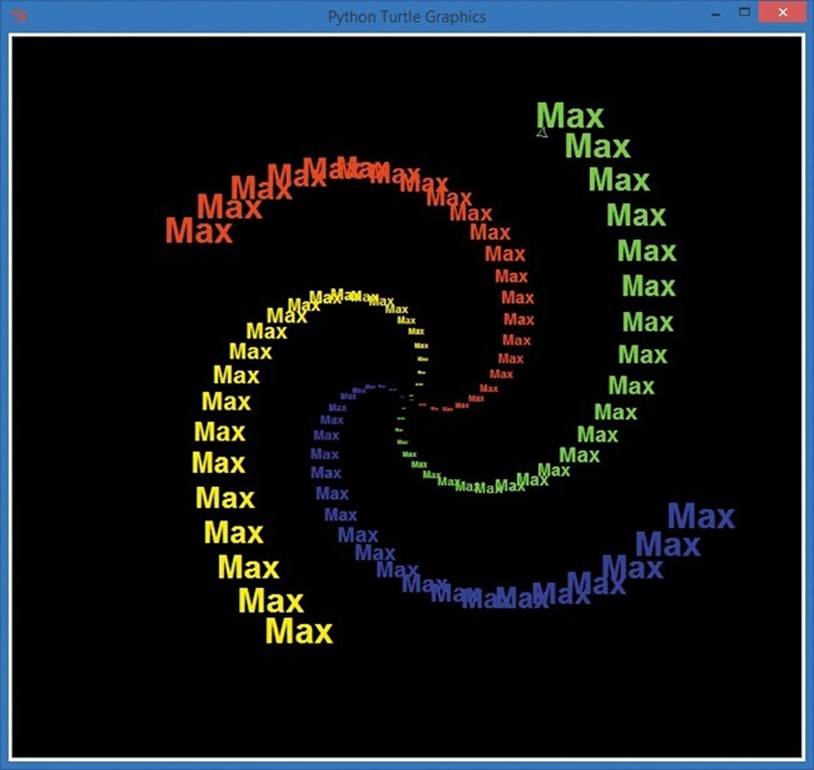
Figure 3-8. A colorful text spiral
Lists: Keeping It All Together
In addition to strings and number values, variables can also contain lists. A list is a group of values, separated by commas, between square brackets, []. We can store any value type in lists, including numbers and strings; we can even have lists of lists.
In our spiral programs, we stored a list of strings — ["red", "yellow", "blue", "green"] — in the colors variable. Then, when our program needed to use a color, we just called the t.pencolor() function and told it to use the list colors to find the name of the color it should use next. Let’s add some more color names to our list of colors and learn one more input function in the Turtle package: numinput().
To red, yellow, blue, and green, let’s add four more named colors: orange, purple, white, and gray. Next, we want to ask the user how many sides their shape should have. Just as the turtle.textinput() function asked the user for a string, turtle.numinput() allows the user to enter a number.
We’ll use this numinput() function to ask the user for the number of sides (between 1 and 8), and we’ll give the user a default choice of 4, meaning that if the user doesn’t enter a number, the program will automatically use 4 as the number of sides. Type the following code into a new window and save it as ColorSpiralInput.py.
ColorSpiralInput.py
import turtle # Set up turtle graphics
t = turtle.Pen()
turtle.bgcolor("black")
# Set up a list of any 8 valid Python
color names colors = ["red", "yellow", "blue", "green", "orange", "purple", "white", "gray"]
# Ask the user for the number of sides, between 1 and 8, with a default of 4
sides = int(turtle.numinput("Number of sides",
"How many sides do you want (1-8)?", 4, 1, 8))
# Draw a colorful spiral with the user-specified number of sides
for x in range(360):
➊ t.pencolor(colors[x % sides]) # Only use the right number of colors
➋ t.forward(x * 3 / sides + x) # Change the size to match number of sides
➌ t.left(360 / sides + 1) # Turn 360 degrees / number of sides, plus 1
➍ t.width(x * sides / 200) # Make the pen larger as it goes outward
This program uses the number of sides the user entered to do some calculations every time it draws a new side. Let’s look at the four numbered lines inside the for loop.
At ➊, the program changes the turtle’s pen color, matching the number of colors to the number of sides (triangles use three colors for the three sides, squares use four colors, and so on). At ➋, we change the lengths of each line based on the number of sides (so that triangles aren’t too much smaller than octagons on our screen).
At ➌, we turn the turtle by the correct number of degrees. To get this number, we divide 360 by the number of sides, which gives us the exterior angle, or the angle we need to turn to draw a regular shape with that number of sides. For example, a circle is 360 degrees with one “side”; a square is made up of four 90-degree angles (also 360 degrees total); you need six 60-degree turns to go around a hexagon (also 360 degrees total); and so on.
Finally, at ➍, we increase the width or thickness of the pen as we get farther from the center of the screen. Figure 3-9 shows the drawings that result from entering eight sides and three sides.
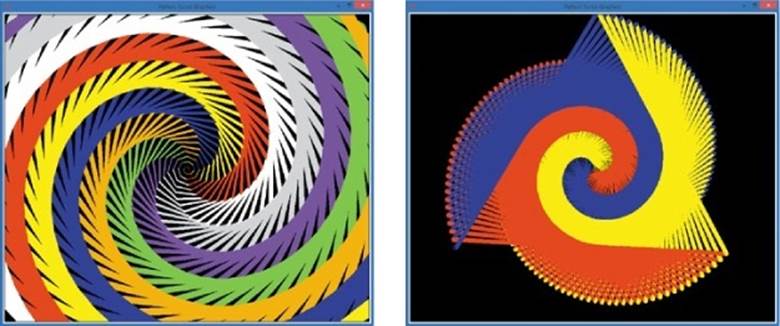
Figure 3-9. The picture from ColorSpiralInput.py with eight sides (left) and three sides (right)
Python Does Your Homework
We’ve seen that Python is a powerful and fun programming language that can handle all sorts of data: numbers, strings, lists, and even complex math expressions. Now you’re going to put Python’s power to work to do something very practical: your math homework!
We’re going to write a short program that combines strings and numbers, using the eval() function to turn math problems into answers. Earlier in the chapter, I said that the eval() function could turn the string "20" into the number 20. As promised, eval() can do even more than that: it can also turn "2 * 10" into the number 20. When the eval() function operates on a string of keyboard characters, it evaluates them just like the Python shell would. So when we enter a math problem as input, running eval() on that input can give us the answer to the problem.
By printing the original problem that the user entered, then outputting eval(problem), we can show the original problem and the answer all on one line. Remember the operators in Table 3-1: if you needed the answer to 5 ÷ 2, you’d type 5 / 2, and for 42, you’d type 4 ** 2. Here’s what our program, MathHomework.py, looks like when we put it together:
MathHomework.py
print("MathHomework.py")
# Ask the user to enter a math problem
problem = input("Enter a math problem, or 'q' to quit: ")
# Keep going until the user enters 'q' to quit
while (problem != "q"):
# Show the problem, and the answer using eval()
print("The answer to ", problem, "is:", eval(problem) )
# Ask for another math problem
problem = input("Enter another math problem, or 'q' to quit: ")
# This while loop will keep going until you enter 'q' to quit
This while statement will keep asking for problems and printing answers until the user presses the Q key to quit the program.
While this short program can’t help us with algebra yet, it can do more than basic math. Remember our discussion about Python’s true division? We called it “pizza division,” because it let us split pizzas evenly among any number of people. Well, Python can still do integer division (whole-number division); we just need to learn two new operators.
When would you want to do integer division? Let’s say your teacher gives you and your three friends 10 cartons of chocolate milk to enjoy, and you want to divide the milk fairly so that each of you gets the same number of cartons. There are four of you (you plus three friends), so 10 ÷ 4 equals 2.5. Unfortunately, you can’t just cut a carton of milk in half. If you had cups, you could split a carton between two friends, but let’s pretend there are no cups around. If you wanted to be fair, you would have to take two cartons each, and give the teacher back the remaining two cartons. That sounds a lot like long division: the two leftover cartons that you return to the teacher are the remainder when you divide 10 by 4. In math, we sometimes note the remainder from long division like this: 10 ÷ 4 = 2 R2. In other words, 10 divided by 4 equals a quotient of 2, with a remainder of 2. This means that 4 goes into 10 evenly 2 times, with 2 remaining.
In Python, integer division is performed with the doubleforward slash operator, //. So 10 // 4 equals 2, and 7 // 4 equals 1 (because 4 goes into 7 only 1 time, with a remainder of 3). The // operator gives us our quotient, but what about the remainder? To get the remainder, we use the modulo operator, which we represent in Python with the % symbol. Don’t confuse % with percent — in Python, you’ll write percentages as decimals (5% becomes 0.05), and the % operator is always the modulus, or remainder resulting from integer division. To get the remainder of long division in Python, type 10 % 4 (gives a remainder of 2) or 7 % 4 (equals a remainder of 3). Figure 3-10 shows the result of several math operations, including integer division and remainders using the // and % operators.
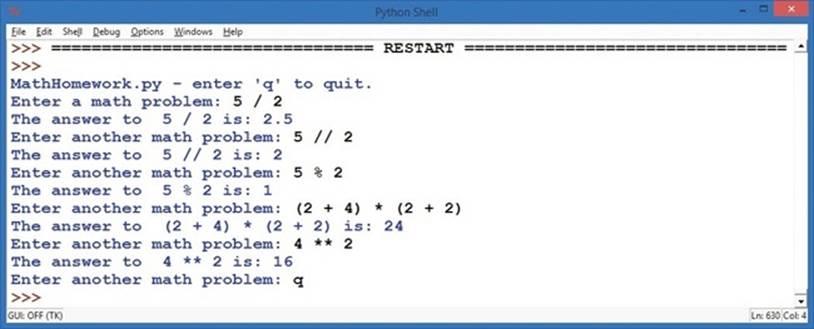
Figure 3-10. Python tackles your math homework.
As we continue through the book, we’ll be using the % operator in programs like our spiral drawings to keep numbers fixed in a certain range.
What You Learned
In this chapter, you’ve seen how to store different types of information, including numbers, lists, and strings, in variables. You learned the rules for naming variables in Python (letters, underscores, numbers; case sensitive; no spaces) and how to assign values to them with the equal sign operator (my_name = "Alex" or my_age = 5).
You also learned about integers (whole numbers) and floatingpoint numbers (decimal values). You learned about the various math operators in Python and how they differ from the symbols you might use in a math textbook. You saw how to use strings of words, letters, characters, and symbols, including how to make Python understand and evaluate certain strings, like when we wanted to use a number that the user entered to perform calculations.

You saw a few examples of syntax errors and learned how to avoid some of them when you program. You learned about the list variable type, which you can use to store lists of all kinds of values, such as colors = ["red", "yellow", "blue", "green"]. You even found out how Python can help you with simple calculations, including long division.
You’ll build on your understanding of variables and data types as you learn how to use variables to create your own loops in Chapter 4, use the computer to make decisions in Chapter 5, and even program the computer to play games in Chapter 6 and beyond. Variables are the first, crucial programming tools that help us break down the most complex problems, from video games to satellites to medical software, into small chunks that we can solve with code. Work on the samples from this chapter, and create your own examples, until you’re familiar enough with variables to dig in to the next chapter.
At this point, you should be able to do the following:
§ Create your own variables to store numbers, strings, and lists.
§ Discuss the differences between number types in Python.
§ Use basic math operators in Python to perform calculations.
§ Explain the difference between strings, numbers, and lists.
§ Write out short programs as steps in English and then write those steps as comments to help you build your code.
§ Ask for user input in a variety of situations and use that input in your programs.
PROGRAMMING CHALLENGES
To practice what you’ve learned in this chapter, try these challenges. (If you get stuck, go to http://www.nostarch.com/teachkids/ for sample answers.)
#1: CIRCULAR SPIRALS
Look back at the ColorCircleSpiral.py program in Chapter 2 (ColorCircleSpiral.py) that drew circles instead of lines on each side of the spiral. Run that example again and see if you can determine which lines of code you’d need to add to and delete from the ColorSpiralInput.py program (ColorSpiralInput.py) to be able to draw circular spirals with any number of sides between one and eight. Once you get it working, save the new program as CircleSpiralInput.py.
#2: CUSTOM NAME SPIRALS
Wouldn’t it be cool to ask the user how many sides their spiral should have, ask for their name, and then draw a spiral that writes their name in the correct number of spiral sides and colors? See if you can figure out which parts of SpiralMyName.py (SpiralMyName.py) to incorporate into ColorSpiralInput.py (ColorSpiralInput.py) to create this new, impressive design. When you get it right (or come up with something even cooler), save the new program as ColorMeSpiralled.py.
All materials on the site are licensed Creative Commons Attribution-Sharealike 3.0 Unported CC BY-SA 3.0 & GNU Free Documentation License (GFDL)
If you are the copyright holder of any material contained on our site and intend to remove it, please contact our site administrator for approval.
© 2016-2026 All site design rights belong to S.Y.A.