Teach Your Kids to Code: A Parent-Friendly Guide to Python Programming (2015)
Chapter 4. Loops Are Fun (You Can Say That Again)
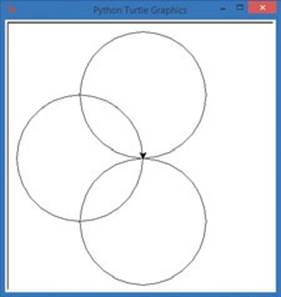
We’ve used loops since our very first program to draw repeating shapes. Now it’s time to learn how to build our own loops from scratch. Whenever we need to do something over and over again in a program, loops allow us to repeat those steps without having to type each one separately.Figure 4-1 shows a visual example — a rosette made up of four circles.
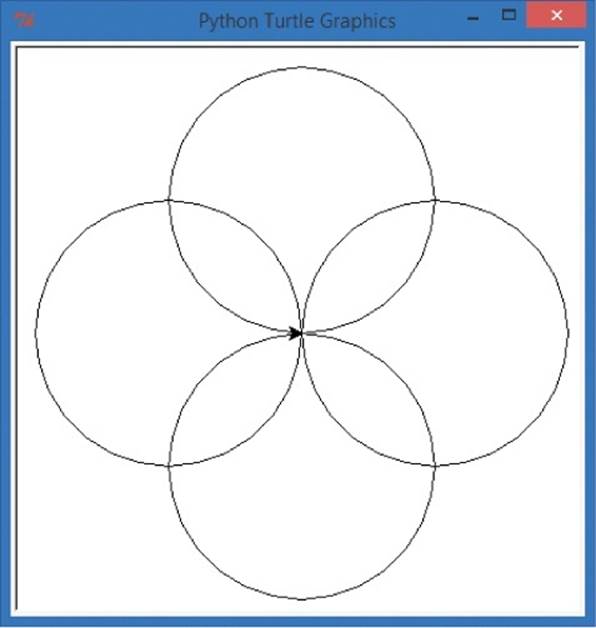
Figure 4-1. A four-circle rosette pattern
Let’s think about how we might write a program to draw four circles overlapping as shown. As you saw in Chapter 2, Turtle’s circle() command draws a circle with the radius we specify inside its parentheses. Those circles look like they’re at the north, south, east, and west of the screen, 90 degrees apart, and we know how to turn left or right 90 degrees. So we could write four pairs of statements to draw a circle, then turn 90 degrees, and then draw another circle, as in the following code. Type this into a new window and save it as Rosette.py.
Rosette.py
import turtle
t = turtle.Pen()
t.circle(100) # This makes our first circle (pointing north)
t.left(90) # Then the turtle turns left 90 degrees
t.circle(100) # This makes our second circle (pointing west)
t.left(90) # Then the turtle turns left 90 degrees
t.circle(100) # This makes our third circle (pointing south)
t.left(90) # Then the turtle turns left 90 degrees
t.circle(100) # This makes our fourth circle (pointing east)
This code works, but doesn’t it feel repetitive? We typed the code to draw a circle four times and the code to turn left three times. We know from our spiral examples that we should be able to write a chunk of code once and reuse that code in a for loop. In this chapter, we’re going to learn how to write those loops ourselves. Let’s try it now!
Building Your Own for Loops
To build our own loop, we first need to identify the repeated steps. The instructions that we’re repeating in the preceding code are t.circle(100) to draw a turtle circle with a radius of 100 pixels and t.left(90) to turn the turtle left 90 degrees before drawing the next circle. Second, we need to figure out how many times to repeat those steps. We want four circles, so let’s start with four.
Now that we know the two repeated instructions and the number of times to draw the circle, it’s time to build our for loop.
A for loop in Python iterates over a list of items, or repeats once for each item in a list — like the numbers 1 through 100, or 0 through 9. We want our loop to run four times — once for each circle — so we need to set up a list of four numbers.
The built-in function range() allows us to easily create lists of numbers. The simplest command to construct a range of n numbers is range(n); this command will let us build a list of n numbers from 0 to n – 1 (from zero to one less than our number n).
For example, range(10) allows us to create a list of the 10 numbers from 0 to 9. Let’s enter a few sample range() commands in the IDLE command prompt window to see how this works. To see our lists printed out, we’ll need to use the list() function around our range. At the >>> prompt, enter this line of code:
>>> list(range(10))
IDLE will give you the output [0, 1, 2, 3, 4, 5, 6, 7, 8, 9]: a list of 10 numbers, starting from 0. To get longer or shorter lists of numbers, you can enter different numbers inside the parentheses of the range() function:
>>> list(range(3))
[0, 1, 2]
>>> list(range(5))
[0, 1, 2, 3, 4]
As you can see, entering list(range(3)) gives you a list of three numbers starting at 0, and entering list(range(5)) gives you a list of five numbers starting at 0.
Using a for Loop to Make a Rosette with Four Circles
For our four-circle rosette shape, we need to repeat drawing a circle four times, and range(4) will help us do that. The syntax, or word order, of our for loop will look like this:
for x in range(4):
We start with the keyword for and then we give a variable, x, that will be our counter or iterator variable. The in keyword tells the for loop to step x through each of the values in the range list, and range(4) gives the loop a list of the numbers from 0 to 3, [0,1,2,3], to step through. Remember that the computer usually starts counting from 0 instead of starting from 1 as we do.
To tell the computer which instructions are supposed to be repeated, we use indentation; we indent each command that we want to repeat in the loop by pressing the TAB key in the new file window. Type this new version of our program and save it as Rosette4.py.
Rosette4.py
import turtle
t = turtle.Pen()
for x in range(4):
t.circle(100)
t.left(90)
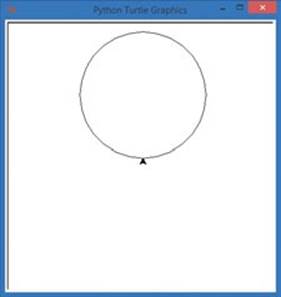
This is a much shorter version of our Rosette.py program, thanks to the for loop, yet it produces the same four circles as the version without the loop. This program loops through lines 3, 4, and 5 a total of four times, generating a rosette of four circles on the top, left, bottom, and right sides of our window. Let’s take a step-by-step look through the loop as it draws our rosette, one circle at a time.
1. The first time through the loop, our counter x has a starting value of 0, the first value in the range list [0, 1, 2, 3]. We draw our first circle at the top of the window with t.circle(100) and then turn the turtle to the left by 90 degrees with t.left(90).
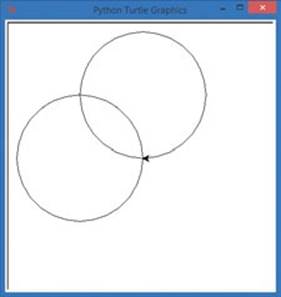
2. Python goes back to the beginning of the loop and sets x to 1, the second value in [0, 1, 2, 3]. Then it draws the second circle on the left side of the window and turns the turtle left by 90 degrees.
3. Python goes back through the loop again, increasing x to 2. It draws the third circle at the bottom of the window and turns the turtle left.
4. On the fourth and final time through the loop, Python increases x to 3, then runs t.circle(100) and t.left(90) to draw our fourth circle on the right side of the window and turn the turtle. The rosette is now complete.
Modifying Our for Loop to Make a Rosette with Six Circles
Now that we’ve built our own for loop together from scratch, could you modify the program on your own to draw something new? What if we wanted to draw a rosette with six circles instead of four? What might we need to change in our program? Take a moment to think about how you might solve this problem.
* * *
Did you come up with some ideas? Let’s walk through the problem together. First, we know that we need six circles this time instead of four, so our range will need to change to range(6) in our for loop. But if we just change that, we’re not going to see any difference in our drawing, because we’ll continue to draw over the same four circles separated by 90 degrees. If we want six circles around the rosette, we’ll need to divide the rosette into six left turns instead of four. There are 360 degrees around the center of our drawing: four 90-degree turns took us 4 × 90 = 360 degrees all the way around. If we divide 360 by 6 instead of 4, we get 360 ÷ 6 = 60 degrees for each turn. So in our t.left() command, we need to turn left 60 degrees each time through the loop, or t.left(60).
Modify your rosette program and save it as Rosette6.py.
Rosette6.py
import turtle
t = turtle.Pen()
➊ for x in range(6):
➋ t.circle(100)
➌ t.left(60)
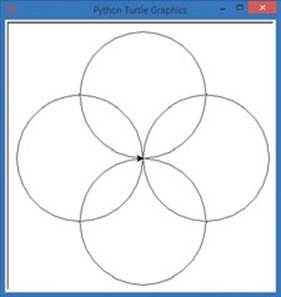
This time, the for loop statement in ➊ will step x through the list of six values from 0 to 5, so we’ll repeat the indented steps ➋ and ➌ six times each. At ➋, we’re still drawing a circle with a radius of 100. At ➌, though, we’re turning only 60 degrees each turn, or one-sixth of 360 degrees, so we get six circles around the center of the screen this time, as shown in Figure 4-2.
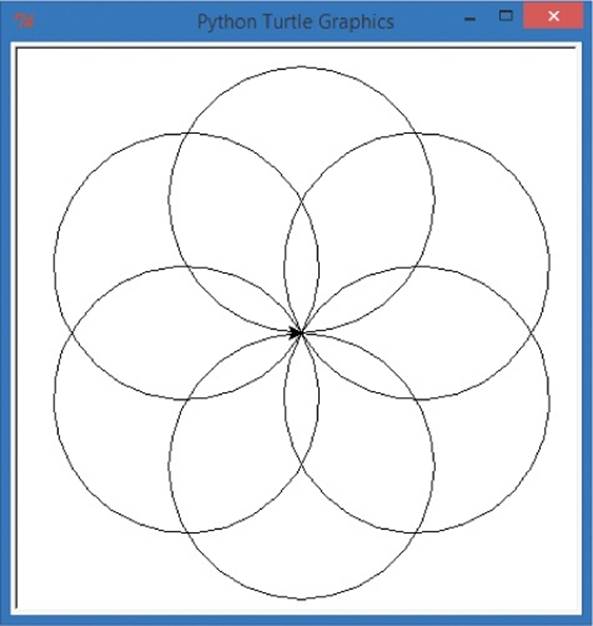
Figure 4-2. A rosette of six circles
The rosette with six circles is even prettier than the one with four circles, and thanks to our for loop, we didn’t have to write any more lines of code to get six circles than we did to get four — we just changed two numbers! Because we varied those two numbers, you may be tempted to replace them with a variable. Let’s give in to that temptation. Let’s give the user the power to draw a rosette with any number of circles.
Improving Our Rosette Program with User Input
In this section, we’ll use the turtle.numinput() function that we saw in Chapter 3 (see ColorSpiralInput.py) to write a program that asks the user to enter a number and then draws a rosette with that number of circles. We’ll set the user’s number as the size of our range() constructor. Then, all we have to do is divide 360 degrees by that number, and we’ll find the number of degrees to turn left each pass through the loop. Type and run the following code as RosetteGoneWild.py:
RosetteGoneWild.py
import turtle
t = turtle.Pen()
# Ask the user for the number of circles in their rosette, default to 6
➊ number_of_circles = int(turtle.numinput("Number of circles",
"How many circles in your rosette?", 6))
➋ for x in range(number_of_circles):
➌ t.circle(100)
➍ t.left(360/number_of_circles)
At ➊, we assign a variable called number_of_circles using a couple of functions together. We’re using Turtle’s numinput() function to ask the user how many circles to draw. The first value, Number of circles, is the pop-up window’s title; the second, How many circles in your rosette?, is the text that will appear in the box; and the last, 6, is a default value in case the user doesn’t enter anything. The int() function outside numinput() turns the user’s number into an integer we can use in our range() function. We store the user’s number as number_of_circles to use as the size of the range() in our drawing loop.
The for statement at ➋ is our loop. It uses the number_of_circles variable to loop x through a list of that many numbers. The command to draw a circle is still the same at ➌ and will draw circles with a radius of 100 pixels. At ➍, we’re dividing a full turn of 360 degrees by the number of circles so we can draw the circles evenly spaced around the center of the screen. For example, if the user enters 30 as the number of circles, 360 ÷ 30 would give us a 12-degree turn between each of the 30 circles around our center point, as shown in Figure 4-3.
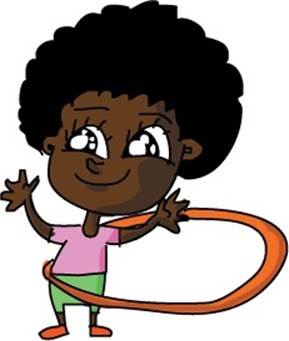
Run the program and try your own numbers. You can even make a rosette of 90 circles, or 200 (but you’ll be waiting a while as Python draws that many circles!). Customize the program to make it your own: change the background color or the rosette color, make the circles bigger or smaller, or make them bigger and smaller! Play with your programs as you create them and as you think of fun things you’d like them to do. Figure 4-4 shows what my five-year-old son, Alex, dreamed up by adding just three extra lines of code to RosetteGoneWild.py. Go tohttp://www.nostarch.com/teachkids/ for the source code.
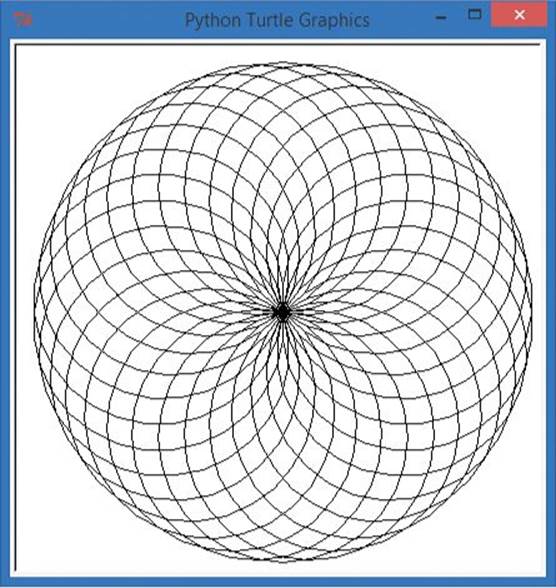
Figure 4-3. A user-defined rosette of 30 circles
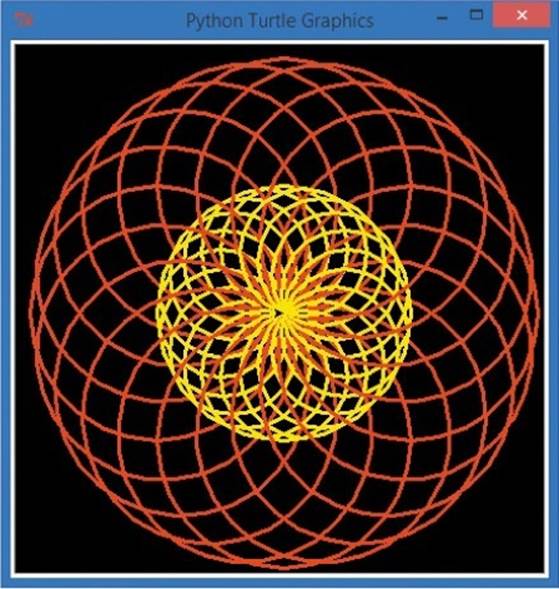
Figure 4-4. A little imagination and a touch of code can turn our rosette program into a lot of colorful fun!
Game Loops and while Loops
The for loop is powerful, but there are limits to its power. For instance, what if we wanted to stop our loop when some event occurred, instead of going all the way through a long list of numbers? Or what if we weren’t sure how many times to run our loop?
For example, consider a game loop — when we write a program, especially a game, where the user gets to choose whether to keep playing or to quit. We, as programmers, can’t know in advance how many times users will choose to play our game or run our program, but we need to give them the ability to play again without having to reload and run the program every time. Can you imagine if you had to restart an Xbox or PlayStation every time you wanted to play a game again, or if you always had to play a game exactly 10 times before moving on to a different one? That might make it less fun.
One way we solve the game loop problem is by using another type of loop, the while loop. Instead of iterating over a predefined list of values, as the for loop does, a while loop can check for a condition or situation and decide whether to loop again or end the loop. The syntax of the whilestatement looks like this:
while condition:
indented statement(s)
The condition is usually a Boolean expression, or true/false test. One everyday example of a while loop is eating and drinking. While you are hungry, you eat. When the answer to the question “Am I hungry?” is no longer yes, that means the condition “I am hungry” is no longer true, and you stop eating. While you are thirsty, you take another drink of water. When you stop feeling thirsty, you quit drinking. Hunger and thirst are conditions, and when those conditions become false, you exit the eating and drinking “loops.” A while loop continues repeating the statements in the loop (the indented statements) as long as the condition is true.
The true/false conditions in while loops often involve comparing values. We might say, “Is the value of x bigger than 10? As long as it is, run this code. When x isn’t bigger than 10 anymore, stop running the code.” In other words, we run the code while the condition x > 10 evaluates to True. The greater-than symbol (>) is a comparison operator, a different kind of operator from arithmetic operators like + (plus) and – (minus). Comparison operators — such as > (greater than), < (less than), == (equal to), or != (not equal to) — let you compare two values to see if one of them is greater or less than the other, or if they are equal or not equal. Is x less than 7? Yes or no? True or False? Based on the result, True or False, you can tell your program to run different pieces of code.
The while loop shares some features with the for loop. First, like the for loop, it repeats a set of statements over and over as needed. Second, with both while loops and for loops, we tell Python which statements to repeat by indenting them to the right with the TAB key.
Let’s try a program with a while loop to see it in action. Type the following code (or download it from http://www.nostarch.com/teachkids/), and run it:
SayOurNames.py
# Ask the user for their name
➊ name = input("What is your name? ")
# Keep printing names until we want to quit
➋ while name != "":
# Print their name 100 times
➌ for x in range(100):
# Print their name followed by a space, not a new line
➍ print(name, end = " ")
➎ print() # After the for loop, skip down to the next line
# Ask for another name, or quit
➏ name = input("Type another name, or just hit [ENTER] to quit: ")
➐ print("Thanks for playing!")
We begin the program by asking the user their name at ➊ and storing their answer in the variable name. We need a name to test as the condition of our while loop, so we have to ask once before the loop starts. Then, at ➋, we start our while loop, which will run as long as the name the user enters is not an empty string (represented by two double quotes with nothing between them: ""). The empty string is what Python sees as the input when the user presses ENTER to quit.
At ➌, we start our for loop, which will print the name 100 times, and at ➍, we tell the print() statement to print a space after the name each time. We’ll keep going back to ➌ and checking to see if x has reached 100, then printing at ➍ until the name fills a few lines of the screen. When ourfor loop has finished printing the name 100 times, we print a blank line without a space ➎, moving the printout down to the next clear line. Then, it’s time to ask for another name ➏.
Because ➏ is the last line indented under the while loop ➋, the new name that the user enters is passed back up to ➋ so the while loop can check whether it’s an empty string. If it’s not empty, our program will start the for loop to print the new name 100 times. If the name is an empty string, that means the user pressed ENTER to end the program, so the while loop at ➋ skips down to ➐, and we thank the user for playing. Figure 4-5 shows the output of the program when my sons ran it.
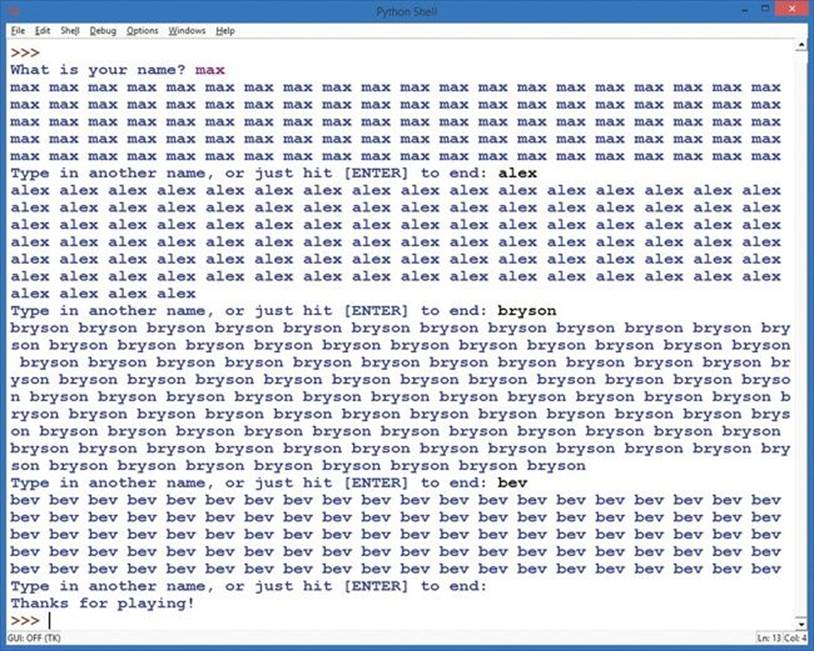
Figure 4-5. My sons ran SayOurNames.py and put in the names of everyone in our family!
The Family Spiral
Now that we can ask for a list of names and print them to the screen, let’s combine the name printer loop with one of our programs from Chapter 3, in SpiralMyName.py, to create a colorful spiral of our family’s or friends’ names.
Our new, combined program will be different from the name repeater in SayOurNames.py in a few ways, but the most important difference is that we can’t just print each name one by one; to draw our spiral, we need to have all the names at once so that we can draw each name in sequence as we wind around our spiral.
In SayOurNames.py, we were able to ask for one name at a time, but for our graphical spiral name program, we’ll need to keep all of the names in a list, just as we do with our colors. Then, as we go around the loop, we can change the names and colors together at each corner of the spiral. To do this, we’ll set up an empty list:
family = [] # Set up an empty list for family names
Whenever we’ve made a list of colors in our programs, we’ve known the color names that we wanted to use, like red, yellow, blue, and so on. In our family list, though, we have to wait until the user enters the names. We use an empty list — a pair of square brackets, [] — to let Python know that we’re going to use a list called family but that we don’t know what will be in the list until the program runs.
Once we have an empty list, we can ask for names in a while loop like we did in SayOurNames.py, and we will append those names to the list. To append means to add items to the end of the list. In this program, the first name the user enters will be added to the empty list, the second name will be appended after the first, and so on. When the user has entered all the names they want in their spiral, they will press ENTER to tell the program that they’ve finished entering names. Then we’ll use a for loop to draw the names on the screen in a colorful spiral shape.
Type and run the following code to see a while loop and a for loop do some beautiful work together:
SpiralFamily.py
import turtle # Set up turtle graphics
t = turtle.Pen()
turtle.bgcolor("black")
colors = ["red", "yellow", "blue", "green", "orange",
"purple", "white", "brown", "gray", "pink" ]
➊ family = [] # Set up an empty list for family names
# Ask for the first name
➋ name = turtle.textinput("My family",
"Enter a name, or just hit [ENTER] to end:")
# Keep asking for names
➌ while name != "":
# Add their name to the family list
➍ family.append(name)
# Ask for another name, or end
name = turtle.textinput("My family",
"Enter a name, or just hit [ENTER] to end:")
# Draw a spiral of the names on the screen
for x in range(100):
➎ t.pencolor(colors[x%len(family)]) # Rotate through the colors
➏ t.penup() # Don't draw the regular spiral lines
➐ t.forward(x*4) # Just move the turtle on the screen
➑ t.pendown() # Draw the next family member's name
➒ t.write(family[x%len(family)], font = ("Arial", int((x+4)/4), "bold") )
➓ t.left(360/len(family) + 2) # Turn left for our spiral
At ➊, we set up an empty list [] called family that will hold the names the user enters. At ➋, we ask for the first name in a turtle.textinput window and start the while loop to gather all the names in the family at ➌. The command to add a value to the end of a list is append(), shown at ➍. This takes the name the user entered and appends it to the list called family. We then ask for another name and keep repeating the while loop ➌ until the user presses ENTER to let us know they’re finished.
Our for loop starts out like previous spirals, but we use a new command at ➎ to set our pen color. The len() command is short for length and tells us the length of the list of names stored in family. For example, if you entered four names for your family, len(family) would return 4. We use the modulo operator, %, with this value to rotate through four colors, one for each name in family. Larger families would rotate through more colors (up to the 10 colors in our list), while smaller families would need fewer colors.
At ➏, we use the penup() command to “lift” the turtle’s pen off the screen so that when we move forward at ➐, the turtle won’t draw anything; we’ll be drawing names at the corners of the spiral, with no lines in between. At ➑, we put the turtle’s pen down again so that our names will be drawn.
At ➒, we’re doing a lot. First, we tell the turtle which name to draw. Notice that family[x%len(family)] uses the modulo operator, %, to rotate through the names the user entered in the family list. The program will start with the first name entered, family[0], and continue with family[1],family[2], and so on until it reaches the final name in the list. The font = portion of this statement tells the computer we want to use the Arial font, in bold style, for our names. It also sets the font size to grow as x grows; our font size of (x+4)/4 means that when the loop finishes with x = 100, the font size will be (100 + 4) / 4 = 26-point font — a nice size. You can make the fonts bigger or smaller by changing this equation.
Finally, at ➓, we turn the turtle left by 360/len(family) degrees plus 2. For a family with four members, we would turn 90 degrees plus 2 for a nice square spiral; a family of six would get 60-degree turns plus 2 for a six-sided spiral, and so on. The extra 2 degrees make the spiral spin to the left a bit for the swirl effect we’ve seen in our other spirals. In Figure 4-6, we ran this program and entered our family’s names, including our two cats, Leo and Rocky, to get a wonderful family spiral picture.
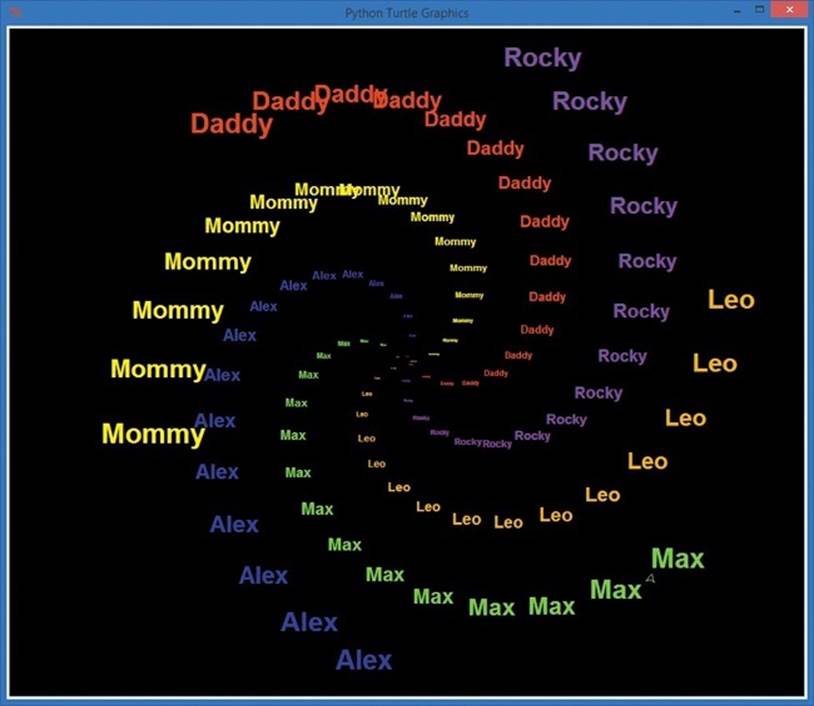
Figure 4-6. The Payne family spiral, including our two cats, Leo and Rocky
Putting It All Together: Spiral Goes Viral
We’ve seen the power of loops: they take pieces of code and repeat them over and over to do repetitive work that we wouldn’t want to do by hand, like typing a name 100 times. Let’s take loops one step further and build our own nested loop, which is a loop inside another loop (like Russian nesting dolls — look inside one doll, and there’s another doll).

To explore nested loops, let’s draw a spiral not of names or lines but of spirals! Instead of drawing a name at every corner of our spiral like we did in Figure 4-6, we could draw a smaller spiral. To accomplish that, we need a big loop to draw a big spiral on the screen and a little loop inside to draw small spirals around the big spiral.
Before we write a program to do that, let’s learn how to nest a loop inside another loop. First, start a loop as usual. Then, inside that loop, press TAB once and start a second loop:
# This is our first loop, called the outer loop
for x in range(10):
# Things indented once will be done 10 times
# Next is our inner loop, or the nested loop
for y in range(10):
# Things indented twice will be done 100 (10*10) times!
The first loop is called the outer loop, because it surrounds our nested loop. The nested loop is called the inner loop, because it sits inside the other loop. Notice that in our nested loop, any lines of code that are indented twice (so they’re inside the second loop) will be repeated 10 times for yand 10 times for x, or 100 times total.
Let’s start writing our program, ViralSpiral.py. We’ll write it step by step — the finished program is shown in ViralSpiral.py.
import
turtle t = turtle.Pen()
➊ t.penup()
turtle.bgcolor("black")
The first few lines of our program look like the other spirals we’ve programmed, except that we won’t be drawing lines for the big spiral. We plan to replace those with smaller spirals, so we have a t.penup() at ➊ to lift the turtle’s pen off the screen right from the beginning. We then set the background color to black.
Keep typing: we’re not done! Next we’ll ask the user for the number of sides they want using turtle.numinput(), with a default of 4 if the user doesn’t choose something different, and we’ll restrict the range of allowable sides to between 2 and 6.
sides = int(turtle.numinput("Number of sides",
"How many sides in your spiral of spirals (2-6)?", 4,2,6))
colors = ["red", "yellow", "blue", "green", "purple", "orange"]
The turtle.numinput() function allows us to specify a title for our input dialog; a prompt question; and default, minimum, and maximum values, in that order: turtle.numinput(title, prompt, default, minimum, maximum). Here, we specify a default value of 4, a minimum of 2, and a maximum of 6. (If the user tries to enter 1 or 7, for example, they’ll get a warning that the minimum allowed value is 2 and the maximum allowed value is 6.) We also set up our colors list with six colors.
Next we’ll write our outer spiral loop. The outer loop will position the turtle at each corner of the big spiral.
➋ for m in range(100):
t.forward(m*4)
➌ position = t.position() # Remember this corner of the spiral
➍ heading = t.heading() # Remember the direction we were heading
Our outer loop takes m from 0 to 99 for 100 total passes ➋. In our outer loop, we move forward just like in our other spiral programs, but when we reach each corner of our big spiral, we stop to remember our position ➌ and heading ➍. The position is the turtle’s (x, y) coordinate location on the screen, and the heading is the direction the turtle is moving in.
Our turtle is taking a bit of a detour at every spot along the large spiral in order to draw the smaller spirals, so it must return to this position and heading after finishing each small spiral in order to maintain the shape of the big spiral. If we didn’t remember the location and direction of the turtle before starting to draw the small spirals, our turtle would wander all over the screen, starting each small spiral relative to where it left off with the last small spiral.
The two commands that will tell us the turtle’s location and direction are t.position() and t.heading(). The turtle’s position is accessed through t.position(), and it consists of both the x (horizontal) and y (vertical) coordinates of the turtle’s location on the screen, just like on a coordinate graph. The direction the turtle is heading is available through the command t.heading() and is measured from 0.0 degrees to 360.0 degrees, with 0.0 degrees pointing up toward the top of the screen. We will store these pieces of information in the variables position and heading before we start each small spiral so that we can pick up where we left off on the big spiral each time.
It’s time for the inner loop. We’re indented even farther here. This inner loop will draw a small spiral at each corner of the bigger spiral.
➎ for n in range(int(m/2)):
t.pendown()
t.pencolor(colors[n%sides])
t.forward(2*n)
t.right(360/sides - 2)
t.penup()
➏ t.setx(position[0]) # Go back to the big spiral's x location
➐ t.sety(position[1]) # Go back to the big spiral's y location
➑ t.setheading(heading) # Point in the big spiral's heading
➒ t.left(360/sides + 2) # Aim at the next point on the big spiral
Our inner loop ➎ begins with n = 0 and stops when n = m/2, or one-half of m, to keep the inner spirals smaller than the outer spiral. The inner spirals look like our previous spirals, except that we put the pen down before drawing each line and lift it after each line is drawn so that our big spiral stays clean.
After we draw our inner spiral from ➎, we pick back up at ➏ by setting the horizontal position of the turtle to the one we stored at ➌. The horizontal axis is commonly called the x-axis, so when we set the horizontal location, we use t.setx(), or set the x-axis position of our turtle’s location on the screen. At ➐, we set the y-axis location, or vertical position, that we stored at ➌. At ➑, we turn the turtle to the heading we stored at ➍ before going on to the next part of the big spiral at ➒.
When our big loop ends after m has gone from 0 to 99, we will have drawn 100 small spirals in a big spiral pattern for a nice kaleidoscope effect, as shown in Figure 4-7.
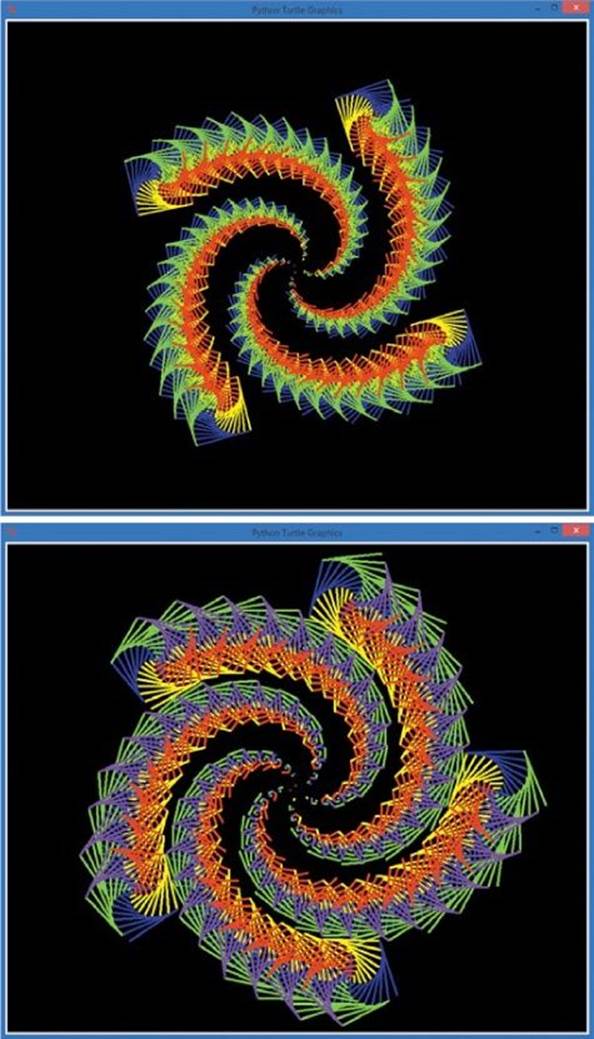
Figure 4-7. A square spiral with square spirals at every corner (top) and a five-sided (pentagonal) spiral of spirals (bottom) from our ViralSpiral.py program
You’ll notice the one drawback to nested loops while you’re waiting for this program to run: the shapes shown in Figure 4-7 take longer to draw than our simple spirals did. That’s because we’re performing so many more steps than we did with our simple spirals. In fact, when we draw the six-sided version of our ViralSpiral.py, the final drawing consists of 2,352 separate lines! All those drawing commands, plus the turning and setting the pen color, add up to a lot of work, even for a fast computer. Nested loops are useful, but remember that the extra steps can slow our programs down, so we use nested loops only when the effect is worth the wait.
Here’s the completed code for ViralSpiral.py.
ViralSpiral.py
import turtle
t = turtle.Pen()
t.penup()
turtle.bgcolor("black")
# Ask the user for the number of sides, default to 4, min 2, max 6
sides = int(turtle.numinput("Number of sides",
"How many sides in your spiral of spirals? (2-6)", 4,2,6))
colors = ["red", "yellow", "blue", "green", "purple", "orange"]
# Our outer spiral loop
for m in range(100):
t.forward(m*4)
position = t.position() # Remember this corner of the spiral
heading = t.heading() # Remember the direction we were heading
print(position, heading)
# Our "inner" spiral loop
# Draws a little spiral at each corner of the big spiral
for n in range(int(m/2)):
t.pendown()
t.pencolor(colors[n%sides])
t.forward(2*n)
t.right(360/sides - 2)
t.penup()
t.setx(position[0]) # Go back to the big spiral's x location
t.sety(position[1]) # Go back to the big spiral's y location
t.setheading(heading) # Point in the big spiral's heading
t.left(360/sides + 2) # Aim at the next point on the big spiral
What You Learned
In this chapter, you learned to build your own loops by identifying repeated steps in a program and moving those repeated steps inside the right kind of loop. With a for loop, you can run your code a set number of times, like looping 10 times with for x in range(10). With a while loop, you can run your code until a condition or event occurs, like the user entering nothing at an input prompt with while name != "".
You learned that the flow of a program is changed by the loops that you create. We used the range() function to generate lists of values that allow us to control the number of times our for loops repeat, and we used the modulo operator, %, to loop through the values in a list to change colors in a list of colors, pick names out of a list of names, and more.
We used an empty list, [], and the append() function to add information from the user into a list that we then used in a program. You learned that the len() function can tell you the length of a list — that is, how many values the list contains.
You learned how to remember the turtle’s current position and the direction it’s heading with the t.position() and t.heading() functions, and you learned how to get the turtle back to this location and heading with t.setx(), t.sety(), and t.setheading().
Finally, you saw how you can use nested loops to repeat one set of instructions inside another set, first to print a list of names on a screen and then to create spirals of spirals in a kaleidoscope pattern. Along the way, we’ve drawn lines, circles, and strings of words or names on the screen.
At this point, you should be able to do the following:
§ Create your own for loops to repeat a set of instructions a certain number of times.
§ Use the range() function to generate lists of values to control your for loops.
§ Create empty lists and add to lists using the append() function.
§ Create your own while loops to repeat while a condition is True or until the condition is False.
§ Explain how each type of loop works and how you code it in Python.
§ Give examples of situations in which you would use each type of loop.
§ Design and modify programs that use nested loops.
PROGRAMMING CHALLENGES
Try these challenges to practice what you’ve learned in this chapter. (If you get stuck, go to http://www.nostarch.com/teachkids/ for sample answers.)
#1: SPIRAL ROSETTES
Think about how you might modify the ViralSpiral.py program to replace the small spirals with rosettes like those in Rosette6.py (Modifying Our for Loop to Make a Rosette with Six Circles) and RosetteGoneWild.py (RosetteGoneWild.py). Hint: first replace the inner loop with an inner loop that will draw a rosette. Then, add the code to change the colors and sizes of the circles in each rosette. As an added touch, change the width of the pen slightly as your circles get bigger. When you finish, save the new program as SpiralRosettes.py. Figure 4-8 shows a drawing produced by one solution to this challenge.
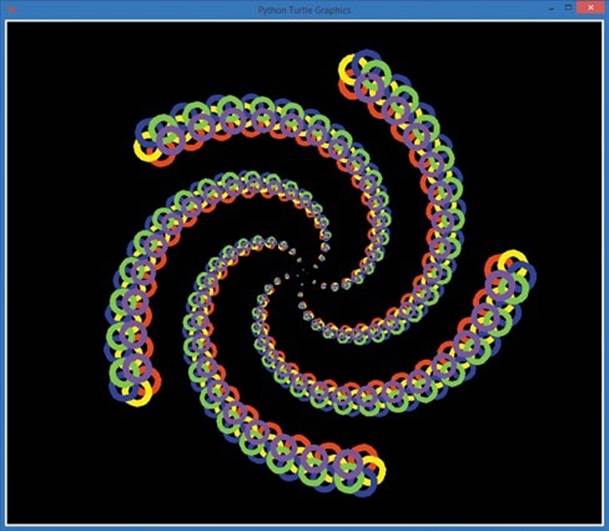
Figure 4-8. A spiral of rosettes from one solution to Programming Challenge #1
#2: A SPIRAL OF FAMILY SPIRALS
Wouldn’t it be cool to draw a spiral of spirals of your family’s names? Take a look at SpiralFamily.py (SpiralFamily.py) and then refer back to the code for ViralSpiral.py. Create an inner loop inside the for loop in SpiralFamily.py that draws the smaller spiral. Then, modify your outer loop to remember the position and heading of the turtle before drawing each small spiral, and set it back before continuing to the next big spiral location. When you get it right, save the new program as ViralFamilySpiral.py.
All materials on the site are licensed Creative Commons Attribution-Sharealike 3.0 Unported CC BY-SA 3.0 & GNU Free Documentation License (GFDL)
If you are the copyright holder of any material contained on our site and intend to remove it, please contact our site administrator for approval.
© 2016-2026 All site design rights belong to S.Y.A.