Python in Practice: Create Better Programs Using Concurrency, Libraries, and Patterns (2014)
Chapter 4. High-Level Concurrency in Python
Interest in concurrent programming has been growing rapidly since the turn of the millennium. This has been accelerated by Java, which has made concurrency much more mainstream; by the near ubiquity of multi-core machines; and by the availability of support for concurrent programming in most modern programming languages.
Writing and maintaining concurrent programs is harder (sometimes much harder) than writing and maintaining nonconcurrent programs. Furthermore, concurrent programs can sometimes have worse performance (sometimes much worse) than equivalent nonconcurrent programs. Nonetheless, if done well, it is possible to write concurrent programs whose performance compared with their nonconcurrent cousins is so much better as to outweigh the additional effort.
Most modern languages (including C++ and Java) support concurrency directly in the language itself and usually have additional higher-level functionality in their standard libraries. Concurrency can be implemented in a number of ways, with the most important difference being whether shared data is accessed directly (e.g., using shared memory) or indirectly (e.g., using inter-process communication—IPC). Threaded concurrency is where separate concurrent threads of execution operate within the same system process. These threads typically access shared data using serialized access to shared memory, with the serialization enforced by the programmer using some kind of locking mechanism. Process-based concurrency (multiprocessing) is where separate processes execute independently. Concurrent processes typically access shared data using IPC, although they could also use shared memory if the language or its library supported it. Another kind of concurrency is based on “concurrent waiting” rather than concurrent execution; this is the approach taken by implementations of asynchronous I/O.
Python has some low-level support for asynchronous I/O (the asyncore and asynchat modules). High-level support is provided as part of the third-party Twisted framework (twistedmatrix.com). Support for high-level asynchronous I/O—including event loops—is scheduled to be added to Python’s standard library with Python 3.4 (www.python.org/dev/peps/pep-3156).
As for the more traditional thread-based and process-based concurrency, Python supports both approaches. Python’s threading support is quite conventional, but the multiprocessing support is much higher level than that provided by most other languages or libraries. Furthermore, Python’s multiprocessing support uses the same abstractions as threading to make it easy to switch between the two approaches, at least when shared memory isn’t used.
Due to the GIL (Global Interpreter Lock), the Python interpreter itself can only execute on one processor core at any one time.* C code can acquire and release the GIL and so doesn’t have the same constraint, and much of Python—and quite a bit of its standard library—is written in C. Even so, this means that doing concurrency using threading may not provide the speedups we would hope for.
*This limitation doesn’t apply to Jython and some other Python interpreters. None of the book’s concurrent examples rely on the presence or absence of the GIL.
In general, for CPU-bound processing, using threading can easily lead to worse performance than not using concurrency at all. One solution to this is to write the code in Cython (§5.2, ![]() 187), which is essentially Python with some extra syntax that gets compiled into pure C. This can result in 100 × speedups—far more than is likely to be achieved using any kind of concurrency, where the performance improvement will be proportional to the number of processor cores. However, if concurrency is the right approach to take, then for CPU-bound processing it is best to avoid the GIL altogether by using the multiprocessing module. If we use multiprocessing, instead of using separate threads of execution in the same process (and therefore contending for the GIL), we have separate processes each using its own independent instance of the Python interpreter, so there is no contention.
187), which is essentially Python with some extra syntax that gets compiled into pure C. This can result in 100 × speedups—far more than is likely to be achieved using any kind of concurrency, where the performance improvement will be proportional to the number of processor cores. However, if concurrency is the right approach to take, then for CPU-bound processing it is best to avoid the GIL altogether by using the multiprocessing module. If we use multiprocessing, instead of using separate threads of execution in the same process (and therefore contending for the GIL), we have separate processes each using its own independent instance of the Python interpreter, so there is no contention.
For I/O-bound processing (e.g., networking), using concurrency can produce dramatic speedups. In these cases, network latency is often such a dominant factor that whether the concurrency is done using threading or multiprocessing may not matter.
We recommend that a nonconcurrent program be written first, wherever possible. This will be simpler and quicker to write than a concurrent program, and easier to test. Once the nonconcurrent program is deemed correct, it may turn out to be fast enough as it is. And if it isn’t fast enough, we can use it to compare with a concurrent version both in terms of results (i.e., correctness) and in terms of performance. As for what kind of concurrency, we recommend multiprocessing for CPU-bound programs, and either multiprocessing or threading for I/O-bound programs. It isn’t only the kind of concurrency that matters, but also the level.
In this book we define three levels of concurrency:
• Low-Level Concurrency: This is concurrency that makes explicit use of atomic operations. This kind of concurrency is for library writers rather than for application developers, since it is very easy to get wrong and can be extremely difficult to debug. Python doesn’t support this kind of concurrency, although implementations of Python concurrency are typically built using low-level operations.
• Mid-Level Concurrency: This is concurrency that does not use any explicit atomic operations but does use explicit locks. This is the level of concurrency that most languages support. Python provides support for concurrent programming at this level with such classes asthreading.Semaphore, threading.Lock, and multiprocessing.Lock. This level of concurrency support is commonly used by application programmers, since it is often all that is available.
• High-Level Concurrency: This is concurrency where there are no explicit atomic operations and no explicit locks. (Locking and atomic operations may well occur under the hood, but we don’t have to concern ourselves with them.) Some modern languages are beginning to support high-level concurrency. Python provides the concurrent.futures module (Python 3.2), and the queue.Queue and multiprocessing queue collection classes, to support high-level concurrency.
Using mid-level approaches to concurrency is easy to do, but it is very error prone. Such approaches are especially vulnerable to subtle, hard-to-track-down problems, as well as to both spectacular crashes and frozen programs, all occurring without any discernable pattern.
The key problem is sharing data. Mutable shared data must be protected by locks to ensure that all accesses to it are serialized (i.e., only one thread or process can access the shared data at a time). Furthermore, when multiple threads or processes are all trying to access the same shared data, then all but one of them will be blocked (that is, idle). This means that while a lock is in force our application could be using only a single thread or process (i.e., as if it were non-concurrent), with all the others waiting. So, we must be careful to lock as infrequently as possible and for as short a time as possible. The simplest solution is to not share any mutable data at all. Then we don’t need explicit locks, and most of the problems of concurrency simply melt away.
Sometimes, of course, multiple concurrent threads or processes need to access the same data, but we can solve this without (explicit) locking. One solution is to use a data structure that supports concurrent access. The queue module provides several thread-safe queues, and for multiprocessing-based concurrency, we can use the multiprocessing.JoinableQueue and multiprocessing.Queue classes. We can use such queues to provide a single source of jobs for all our concurrent threads or processes and as a single destination for results, leaving all the locking to the data structure itself.
If we have data that we want used concurrently for which a concurrency-supporting queue isn’t suitable, then the best way to do this without locking is to pass immutable data (e.g., numbers or strings) or to pass mutable data that is only ever read. If mutable data must be used, the safest approach is to deep copy it. Deep copying avoids the overheads and risks of using locks, at the expense of the processing and memory required for the copying itself. Alternatively, for multiprocessing, we can use data types that support concurrent access—in particularmultiprocessing.Value for a single mutable value or multiprocess-ing.Array for an array of mutable values—providing that they are created by a multiprocessing.Manager, as we will see later in the chapter.
In this chapter’s first two sections, we will explore concurrency using two applications, one CPU-bound and the other I/O-bound. In both cases we will use Python’s high-level concurrency facilities, both the long-established thread-safe queues and the new (Python 3.2)concurrent.futures module. The chapter’s third section provides a case study showing how to do concurrent processing in a GUI (graphical user interface) application, while retaining a responsive GUI that reports progress and supports cancellation.
4.1. CPU-Bound Concurrency
In Chapter 3’s Image case study (§3.12, 124 ![]() ) we showed some code for smooth-scaling an image and commented that the scaling was rather slow. Let’s imagine that we want to smooth scale a whole bunch of images, and want to do so as fast as possible by taking advantage of multiple cores.
) we showed some code for smooth-scaling an image and commented that the scaling was rather slow. Let’s imagine that we want to smooth scale a whole bunch of images, and want to do so as fast as possible by taking advantage of multiple cores.
Scaling images is CPU-bound, so we would expect multiprocessing to deliver the best performance, and this is borne out by the timings in Table 4.1.* (In Chapter 5’s case study, we will combine multiprocessing with Cython to achieve much bigger speedups; §5.3, ![]() 198.)
198.)
*The timings were made on a lightly loaded quad-core AMD64 3 GHz machine processing 56 images ranging in size from 1 MiB to 12 MiB, totaling 316 MiB, and resulting in 67 MiB of output.
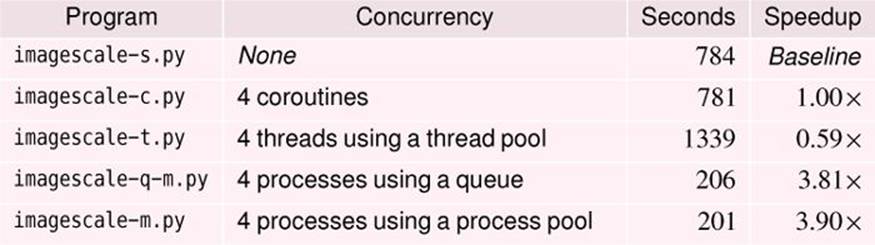
Table 4.1 Image scaling speed comparisons
The results for the imagescale-t.py program using four threads clearly illustrates that using threading for CPU-bound processing produces worse performance than a nonconcurrent program. This is because all the processing was done in Python on the same core, and in addition to the scaling, Python had to keep context switching between four separate threads, which added a massive amount of overhead. Contrast this with the multiprocessing versions, both of which were able to spread their work over all the machine’s cores. The difference between the multiprocessing queue and process pool versions is not signifi-cant, and both delivered the kind of speedup we’d expect (that is, in direct proportion to the number of cores).*
*Starting new processes is far more expensive on Windows than on most other operating systems. Fortunately, Python’s queues and pools use persistent process pools behind the scenes so as to avoid repeatedly incurring these process startup costs.
All the image-scaling programs accept command-line arguments parsed with argparse. For all versions, the arguments include the size to scale the images down to, whether to use smooth scaling (all our timings do), and the source and target image directories. Images that are less than the given size are copied rather than scaled; all those used for timings needed scaling. For concurrent versions, it is also possible to specify the concurrency (i.e., how many threads or processes to use); this is purely for debugging and timing. For CPU-bound programs, we would normally use as many threads or processes as there are cores. For I/O-bound programs, we would use some multiple of the number of cores (2 ×, 3 ×, 4 ×, or more) depending on the network’s bandwidth. For completeness, here is the handle_commandline() function used in the concurrent image scale programs.
def handle_commandline():
parser = argparse.ArgumentParser()
parser.add_argument("-c", "--concurrency", type=int,
default=multiprocessing.cpu_count(),
help="specify the concurrency (for debugging and "
"timing) [default: %(default)d]")
parser.add_argument("-s", "--size", default=400, type=int,
help="make a scaled image that fits the given dimension "
"[default: %(default)d]")
parser.add_argument("-S", "--smooth", action="store_true",
help="use smooth scaling (slow but good for text)")
parser.add_argument("source",
help="the directory containing the original .xpm images")
parser.add_argument("target",
help="the directory for the scaled .xpm images")
args = parser.parse_args()
source = os.path.abspath(args.source)
target = os.path.abspath(args.target)
if source == target:
args.error("source and target must be different")
if not os.path.exists(args.target):
os.makedirs(target)
return args.size, args.smooth, source, target, args.concurrency
Normally, we would not offer a concurrency option to users, but it can be useful for debugging, timing, and testing, so we have included it. The multiprocess-ing.cpu_count() function returns the number of cores the machine has (e.g., 2 for a machine with a dual-core processor, 8 for a machine with dual quad-core processors).
The argparse module takes a declarative approach to creating a command line parser. Once the parser is created, we parse the command-line and retrieve the arguments. We perform some basic sanity checks (e.g., to stop the user from writing scaled images over the originals), and we create the target directory if it doesn’t already exist. The os.makedirs() function is similar to the os.mkdir() function, except the former can create intermediate directories rather than just a single subdirectory.
Just before we dive into the code, note the following important rules that apply to any Python file that uses the multiprocessing module:
• The file must be an importable module. For example, my-mod.py is a legitimate name for a Python program but not for a module (since import my-mod is a syntax error); my_mod.py or MyMod.py are both fine, though.
• The file should have an entry-point function (e.g., main()) and finish with a call to the entry point. For example: if __name__ == "__main__": main().
• On Windows, the Python file and the Python interpreter (python.exe or pythonw.exe) should be on the same drive (e.g., C:).
The following subsections will look at the two multiprocessing versions of the image scale program, imagescale-q-m.py and imagescale-m.py. Both programs report progress (i.e., print the name of each image they scale) and support cancellation (e.g., if the user presses Ctrl+C).
4.1.1. Using Queues and Multiprocessing
The imagescale-q-m.py program creates a queue of jobs to be done (i.e., images to scale) and a queue of results.
Result = collections.namedtuple("Result", "copied scaled name")
Summary = collections.namedtuple("Summary", "todo copied scaled canceled")
The Result named tuple is used to store one result. This is a count of how many images were copied and how many scaled—always 1 and 0 or 0 and 1—and the name of the resultant image. The Summary named tuple is used to store a summary of all the results.
def main():
size, smooth, source, target, concurrency = handle_commandline()
Qtrac.report("starting...")
summary = scale(size, smooth, source, target, concurrency)
summarize(summary, concurrency)
This main() function is the same for all the image scale programs. It begins by reading the command line using the custom handle_commandline() function we discussed earlier (146 ![]() ). This returns the size that the images must be scaled to, a Boolean indicating whether smooth scaling should be used, the source directory to read images from, the target directory to write scaled images to, and (for concurrent versions) the number of threads or processes to use (which defaults to the number of cores).
). This returns the size that the images must be scaled to, a Boolean indicating whether smooth scaling should be used, the source directory to read images from, the target directory to write scaled images to, and (for concurrent versions) the number of threads or processes to use (which defaults to the number of cores).
The program reports to the user that it has started and then executes the scale() function where all the work is done. When the scale() function eventually returns its summary of results, we print the summary using the summarize() function.
def report(message="", error=False):
if len(message) >= 70 and not error:
message = message[:67] + "..."
sys.stdout.write("\r{:70}{}".format(message, "\n" if error else ""))
sys.stdout.flush()
For convenience, this function is in the Qtrac.py module, since it is used by all the console concurrency examples in this chapter. The function overwrites the current line on the console with the given message (truncating it to 70 characters if necessary) and flushes the output so that it is printed immediately. If the message is to indicate an error, a newline is printed so that the error message isn’t overwritten by the next message, and no truncation is done.
def scale(size, smooth, source, target, concurrency):
canceled = False
jobs = multiprocessing.JoinableQueue()
results = multiprocessing.Queue()
create_processes(size, smooth, jobs, results, concurrency)
todo = add_jobs(source, target, jobs)
try:
jobs.join()
except KeyboardInterrupt: # May not work on Windows
Qtrac.report("canceling...")
canceled = True
copied = scaled = 0
while not results.empty(): # Safe because all jobs have finished
result = results.get_nowait()
copied += result.copied
scaled += result.scaled
return Summary(todo, copied, scaled, canceled)
This function is the heart of the multiprocessing queue-based concurrent image scaling program, and its work is illustrated in Figure 4.1. The function begins by creating a joinable queue of jobs to be done. A joinable queue is one that can be waited for (i.e., until it is empty). It then creates a nonjoinable queue of results. Next, it creates the processes to do the work: they will all be ready to work but blocked, since we haven’t put any work on the jobs queue yet. Then, the add_jobs() function is called to populate the jobs queue.
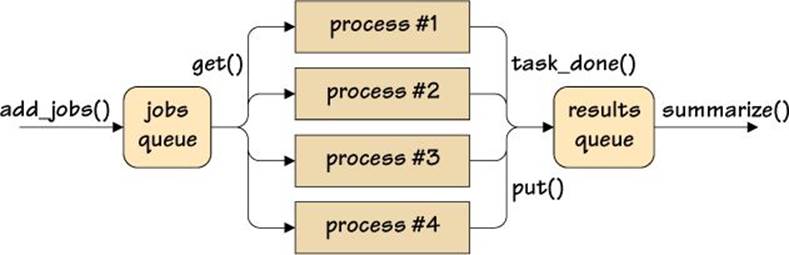
Figure 4.1 Handling concurrent jobs and results with queues
With all the jobs in the jobs queue, we wait for the jobs queue to become empty using the multiprocessing.JoinableQueue.join() method. This is done inside a try ... except block so that if the user cancels (e.g., by pressing Ctrl+C on Unix), we can cleanly handle the cancellation.
When the jobs have all been done (or the program has been canceled), we iterate over the results queue. Normally, using the empty() method on a concurrent queue is unreliable, but here it works fine, since all the worker processes have finished and the queue is no longer being updated. This is why we can also use the nonblocking multiprocessing.Queue.get_nowait() method, rather than the usual blocking multiprocessing.Queue.get() method, to retrieve the results.
Once all the results have been accumulated, we return a Summary named tuple with the details. For a normal run, the todo value will be zero, and canceled will be False, but for a canceled run, todo will probably be nonzero, and canceled will be True.
Although this function is called scale(), it is really a fairly generic “do concurrent work” function that provides jobs to processes and accumulates results. It could easily be adapted to other situations.
def create_processes(size, smooth, jobs, results, concurrency):
for _ in range(concurrency):
process = multiprocessing.Process(target=worker, args=(size,
smooth, jobs, results))
process.daemon = True
process.start()
This function creates multiprocessing processes to do the work. Each process is given the same worker() function (since they all do the same work), and the details of the work they must do. This includes the shared-jobs queue and the shared results queue. Naturally, we don’t have to worry about locking these shared queues since the queues take care of their own synchronization. Once a process is created, we make it a dæmon: when the main process terminates, it cleanly terminates all of its dæmon processes (whereas non-dæmon’s are left running, and on Unix, become zombies).
After creating each process and dæmonizing it, we tell it to start executing the function it was given. It will immediately block, of course, since we haven’t yet added any jobs to the jobs queue. This doesn’t matter, though, since the blocking is taking place in a separate process and doesn’t block the main process. Consequently, all the multiprocessing processes are quickly created, after which this function returns. Then, in the caller, we add jobs to the jobs queue for the blocked processes to work on.
def worker(size, smooth, jobs, results):
while True:
try:
sourceImage, targetImage = jobs.get()
try:
result = scale_one(size, smooth, sourceImage, targetImage)
Qtrac.report("{} {}".format("copied" if result.copied else
"scaled", os.path.basename(result.name)))
results.put(result)
except Image.Error as err:
Qtrac.report(str(err), True)
finally:
jobs.task_done()
It is possible to create a multiprocessing.Process subclass (or a threading.Thread subclass) to do concurrent work. But here we have taken a slightly simpler approach and created a function that is passed in as the multiprocessing.Process’s target argument. (Exactly the same thing can be done with threading.Threads.)
The worker executes an infinite loop, and in each iteration it tries to retrieve a job of work to do from the shared-jobs queue. It is safe to use an infinite loop, because the process is a dæmon and will therefore be terminated when the program has finished. Themultiprocessing.Queue.get() method blocks until it is able to return a job, which in this example is a 2-tuple of the source and target image names.
Once a job is retrieved, we scale (or copy) it using the scale_one() function and report what we did. We also put the result object (of type Result) onto the shared results queue.
It is essential when using a joinable queue that, for every job we get, we execute multiprocessing.JoinableQueue.task_done(). This is how the multiprocess-ing.JoinableQueue.join() method knows when the queue can be joined (i.e., is empty with no more jobs to be done).
def add_jobs(source, target, jobs):
for todo, name in enumerate(os.listdir(source), start=1):
sourceImage = os.path.join(source, name)
targetImage = os.path.join(target, name)
jobs.put((sourceImage, targetImage))
return todo
Once the processes have been created and started, they are all blocked trying to get jobs from the shared-jobs queue.
For every image to be processed, this function creates two strings: sourceImage that has the full path to a source image, and targetImage with the full path to a target image. Each pair of these paths are added as a 2-tuple to the shared-jobs queue. And at the end, the function returns the total number of jobs that need to be done.
As soon as the first job is added to the jobs queue, one of the blocked worker processes will retrieve it and start working on it, just as for the second job that’s added, and the third, until all the worker processes have a job to do. Thereafter, the jobs queue is likely to acquire more jobs while the worker processes are working, with a job being retrieved whenever a worker finishes a job. Eventually, all the jobs will have been retrieved, at which point all the worker processes will be blocked waiting for more work, and they will be terminated when the program finishes.
def scale_one(size, smooth, sourceImage, targetImage):
oldImage = Image.from_file(sourceImage)
if oldImage.width <= size and oldImage.height <= size:
oldImage.save(targetImage)
return Result(1, 0, targetImage)
else:
if smooth:
scale = min(size / oldImage.width, size / oldImage.height)
newImage = oldImage.scale(scale)
else:
stride = int(math.ceil(max(oldImage.width / size,
oldImage.height / size)))
newImage = oldImage.subsample(stride)
newImage.save(targetImage)
return Result(0, 1, targetImage)
This function is where the actual scaling (or copying) takes place. It uses the cyImage module (see §5.3, ![]() 198) or falls back to the Image module (see §3.12, 124
198) or falls back to the Image module (see §3.12, 124 ![]() ) if cyImage isn’t available. If the image is already smaller than the given size, it is simply saved to the target and aResult is returned that says that one image was copied, that none were scaled, and the name of the target image. Otherwise, the image is smooth scaled or subsampled with the resultant image being saved. In this case, the returned Result says that no image was copied, that one was scaled, and again the name of the target image.
) if cyImage isn’t available. If the image is already smaller than the given size, it is simply saved to the target and aResult is returned that says that one image was copied, that none were scaled, and the name of the target image. Otherwise, the image is smooth scaled or subsampled with the resultant image being saved. In this case, the returned Result says that no image was copied, that one was scaled, and again the name of the target image.
def summarize(summary, concurrency):
message = "copied {} scaled {} ".format(summary.copied, summary.scaled)
difference = summary.todo - (summary.copied + summary.scaled)
if difference:
message += "skipped {} ".format(difference)
message += "using {} processes".format(concurrency)
if summary.canceled:
message += " [canceled]"
Qtrac.report(message)
print()
Once all the images have been processed (i.e., once the jobs queue has been joined), the Summary is created (in the scale() function; 148 ![]() ) and passed to this function. A typical run with the summary produced by this function shown on the second line might look like this:
) and passed to this function. A typical run with the summary produced by this function shown on the second line might look like this:
$ ./imagescale-m.py -S /tmp/images /tmp/scaled
copied 0 scaled 56 using 4 processes
For timings on Linux, simply precede the command with time. On Windows, there is no built-in command for this, but there are solutions.* (Doing timings inside programs that use multiprocessing doesn’t seem to work. In our experiments, we found that timings reported the runtime of the main process but excluded that of the worker processes. Note that Python 3.3’s time module has several new functions to support accurate timing.)
*See, for example, stackoverflow.com/questions/673523/how-to-measure-execution-time-of-command-in-windows-command-line.
The three-second timing difference between imagescale-q-m.py and imagescalem.py is insignificant and could easily be reversed on a different run. So, in effect, these two versions are equivalent.
4.1.2. Using Futures and Multiprocessing
Python 3.2 introduced the concurrent.futures module that offers a nice, high-level way to do concurrency with Python using multiple threads and multiple processes. In this subsection, we will review three functions from the imagescalem.py program (all the rest being the same as those in the imagescale-q-m.py program we reviewed in the previous subsection). The imagescale-m.py program uses futures. According to the documentation, a concurrent.futures.Future is an object that “encapsulates the asynchronous execution of a callable” (seedocs.python.org/dev/library/concurrent.futures.html#future-objects). Futures are created by calling the concurrent.futures.Executor.submit() method, and they can report their state (canceled, running, done) and the result or exception they produced.
The concurrent.futures.Executor class cannot be used directly, because it is an abstract base class. Instead, one of its two concrete subclasses must be used. The concurrent.futures.ProcessPoolExecutor() achieves concurrency by using multiple processes. Using a process pool means that any Future used with it may only execute or return pickleable objects, which includes nonnested functions, of course. This restriction does not apply to the concurrent.futures.ThreadPoolExecutor, which provides concurrency using multiple threads.
Conceptually, using a thread or process pool is simpler than using queues, as Figure 4.2 illustrates.
![]()
Figure 4.2 Handling concurrent jobs and results with a pool executor
def scale(size, smooth, source, target, concurrency):
futures = set()
with concurrent.futures.ProcessPoolExecutor(
max_workers=concurrency) as executor:
for sourceImage, targetImage in get_jobs(source, target):
future = executor.submit(scale_one, size, smooth, sourceImage,
targetImage)
futures.add(future)
summary = wait_for(futures)
if summary.canceled:
executor.shutdown()
return summary
This function has the same signature, and does the same work, as the same function in the imagescale-q-m.py program, but it works in a radically different way. We begin by creating an empty set of futures. Then we create a process pool executor. Behind the scenes, this will create a number of worker processes. The exact number is determined by a heuristic, but here we have overridden this to specify the number ourselves, purely for debugging and timing convenience.
Once we have a process pool executor, we iterate over the jobs returned by the get_jobs() function and submit each one to the pool. The concurrent.futures.ProcessPoolExecutor.submit() method accepts a worker function and optional arguments and returns aFuture object. We add each future to our set of futures. The pool starts work as soon as it has at least one future to work on. When all the futures have been created, we call a custom wait_for() function, passing it the set of futures. This function will block until all the futures have been done (or until the user cancels). If the user cancels, we manually shutdown the process pool executor.
def get_jobs(source, target):
for name in os.listdir(source):
yield os.path.join(source, name), os.path.join(target, name)
This function performs the same service as the previous subsection’s add_jobs() function, only instead of adding jobs to a queue, it is a generator function that yields jobs on demand.
def wait_for(futures):
canceled = False
copied = scaled = 0
try:
for future in concurrent.futures.as_completed(futures):
err = future.exception()
if err is None:
result = future.result()
copied += result.copied
scaled += result.scaled
Qtrac.report("{} {}".format("copied" if result.copied else
"scaled", os.path.basename(result.name)))
elif isinstance(err, Image.Error):
Qtrac.report(str(err), True)
else:
raise err # Unanticipated
except KeyboardInterrupt:
Qtrac.report("canceling...")
canceled = True
for future in futures:
future.cancel()
return Summary(len(futures), copied, scaled, canceled)
Once all the futures have been created, we call this function to wait for the futures to complete. The concurrent.futures.as_completed() function blocks until a future has finished (or been canceled) and then returns that future. If the worker callable that the future executed raised an exception, the Future.exception() method will return it; otherwise, it returns None. If no exception occurred, we retrieve the future’s result and report progress to the user. If an exception occurred of a kind we might reasonably expect (i.e., from the Image module), again, we report it to the user. But if we get an unexpected exception, we raise it since it either means we have a logical error in our program or the user canceled with Ctrl+C.
If the user cancels by pressing Ctrl+C, we iterate over all the futures and cancel each one. At the end, we return a summary of the work that was done.
Using concurrent.futures is clearer and more robust than using queues, although either approach is far easier and better than one that involves the use of explicit locks when using multithreading. It is also easy to switch between using multithreading and multiprocessing: we just have to use a concurrent.futures.ThreadPoolExecutor instead of a concurrent.futures.ProcessPoolExecutor. When using multithreading of any kind, if we need to access shared data, we must use immutable types or deep copy (e.g., for read-only access), or use locks (e.g., to serialize read-write accesses), or use a thread-safe type (e.g., a queue.Queue). Similarly, when using multiprocessing, to access shared data we must use immutable types or deep copy, and for read-write access we must use managed multiprocessing.Values ormultiprocessing.Arrays, or use multiprocessing.Queues. Ideally, we should avoid using any shared data at all. Failing that, we should only share read-only data (e.g., by using immutable types or by deep copying) or use concurrency-safe queues, so that no explicit locks are required, and our code is straightforward to understand and maintain.
4.2. I/O-Bound Concurrency
A common requirement is to download a bunch of files or web pages from the Internet. Due to network latency, it is usually possible to do many downloads concurrently and thereby finish much more quickly than would be the case if we downloaded each file one at a time.
In this section, we will review the whatsnew-q.py and whatsnew-t.py programs. These programs download RSS feeds: small XML documents summarizing technology news stories. The feeds come from various web sites, and the program uses them to produce a single HTML page with links to all the stories. Figure 4.3 shows part of a “what’s new”-generated HTML page. Table 4.2 (![]() 156) shows the timings for various versions of the program.* Although the “what’s new” programs’ speedups look proportional to the number of cores, this is a coincidence; the cores were all underutilized, and most of the time was spent waiting for network I/O.
156) shows the timings for various versions of the program.* Although the “what’s new” programs’ speedups look proportional to the number of cores, this is a coincidence; the cores were all underutilized, and most of the time was spent waiting for network I/O.
*The timings were made on a lightly loaded quad-core AMD64 3 GHz machine, downloading from almost 200 web sites on a domestic broadband connection.

Figure 4.3 Some technology news links from an RSS feed
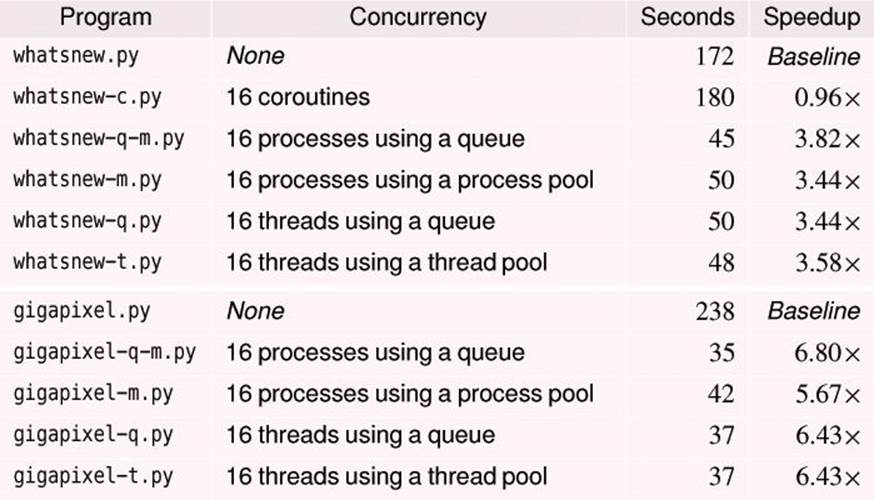
Table 4.2 Download speed comparisons
The table also shows timings for versions of a gigapixel program (not shown in the book). These programs access the www.gigapan.org web site and retrieve nearly 500 JSON-format files, totaling 1.9 MiB, that contain metadata about gigapixel images. The code for the versions of this program mirrors that of the “what’s new” programs, although the gigapixel programs achieve much greater speedups. The better performance is because the gigapixel programs access a single high-bandwidth site, whereas the “what’s new” programs must access lots of different sites with varying bandwidths.
Because network latency varies so much, the speedups could easily change, with concurrent versions achieving improvements from as little as 2 × to as much as 10 ×, or even better, depending on the sites accessed, the amount of data downloaded, and the bandwidth of the network connection. In view of this, the differences between the multiprocessing and multithreading versions are insignificant and could easily be reversed on a different run.
The key thing to remember from Table 4.2 is that we will achieve much faster downloading using a concurrent approach, although the actual speedup will vary from run to run and is sensitive to circumstances.
4.2.1. Using Queues and Threading
We will begin by looking at the whatsnew-q.py program, which uses multiple threads and two thread-safe queues. One queue is a jobs queue, where each job to do is a URL. The other queue is a results queue, where each result is a 2-tuple holding either True and an HTML fragment to go into the HTML page being built up, or False and an error message.
def main():
limit, concurrency = handle_commandline()
Qtrac.report("starting...")
filename = os.path.join(os.path.dirname(__file__), "whatsnew.dat")
jobs = queue.Queue()
results = queue.Queue()
create_threads(limit, jobs, results, concurrency)
todo = add_jobs(filename, jobs)
process(todo, jobs, results, concurrency)
The main() function orchestrates all the work. It begins by processing the command line and getting a limit (the maximum number of news items to read from a given URL) and a concurrency level for debugging and timing. The program then reports to the user that it has started and gets the filename with the full path of the data file that holds the URLs and their one-line titles.
Next, the function creates the two thread-safe queues and the worker threads. Once all the worker threads have been started (and, of course, they are all blocked because there is no work yet), we add all the jobs to the job queue. Finally, in the process() function, we wait for the jobs to be done and then output the results. The program’s overall concurrency structure is illustrated in Figure 4.4 (![]() 158).
158).
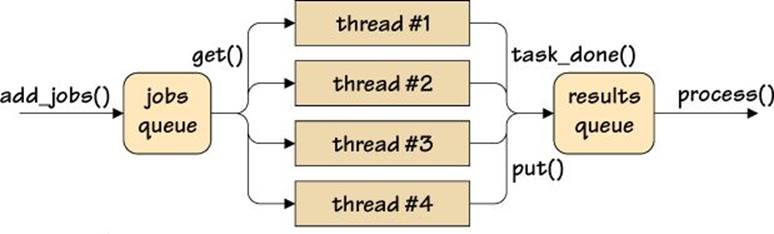
Figure 4.4 Handling concurrent jobs and results with queues
Incidentally, if we had a lot of jobs to add, or if adding each job was time-consuming, we might be better off adding the jobs in a separate thread (or process if using multiprocessing).
def handle_commandline():
parser = argparse.ArgumentParser()
parser.add_argument("-l", "--limit", type=int, default=0,
help="the maximum items per feed [default: unlimited]")
parser.add_argument("-c", "--concurrency", type=int,
default=multiprocessing.cpu_count() * 4,
help="specify the concurrency (for debugging and "
"timing) [default: %(default)d]")
args = parser.parse_args()
return args.limit, args.concurrency
Since the “what’s new” programs are I/O-bound, we give them a default concurrency level that is a multiple of the number of cores—in this case, 4 ×.*
*This multiple was chosen because it worked best in our tests. We recommend experimenting, since setups differ.
def create_threads(limit, jobs, results, concurrency):
for _ in range(concurrency):
thread = threading.Thread(target=worker, args=(limit, jobs,
results))
thread.daemon = True
thread.start()
This function creates as many worker threads as the concurrency variable specifies and gives each one a worker function to execute and the arguments the function must be called with.
Just as with the processes we saw in the previous section, we dæmonize each thread to ensure that it will be terminated when the program finishes. We start each thread, and it is immediately blocked because there are no jobs to do, but it is only the worker threads that are blocked, not the program’s main thread.
def worker(limit, jobs, results):
while True:
try:
feed = jobs.get()
ok, result = Feed.read(feed, limit)
if not ok:
Qtrac.report(result, True)
elif result is not None:
Qtrac.report("read {}".format(result[0][4:-6]))
results.put(result)
finally:
jobs.task_done()
We have made the worker function execute an infinite loop, since it is a dæmon, and therefore it will be terminated by the program when the program has finished.
The function blocks waiting to get a job from the jobs queue. As soon as it gets a job it uses the custom Feed.py module’s Feed.read() function to read the file identified by the URL. All the “what’s new” programs rely on a custom Feed.py module to provide an iterator for the jobs file and a reader for each RSS feed. If the read fails, ok is False and we print the result (which is an error message). Otherwise, providing we got a result (a list of HTML strings), we print the first item (stripping off the HTML tags) and add the result to the results queue.
For queues that we plan to join, it is essential that for every queue.Queue.get() call, we have a corresponding queue.Queue.task_done() call. We have ensured that this will happen by using a try ... finally block.*
*Note that although the queue.Queue class is a thread-safe joinable queue, the multiprocessing equivalent is the multiprocessing.JoinableQueue class, not the multiprocessing.Queue class.
def read(feed, limit, timeout=10):
try:
with urllib.request.urlopen(feed.url, None, timeout) as file:
data = file.read()
body = _parse(data, limit)
if body:
body = ["<h2>{}</h2>\n".format(escape(feed.title))] + body
return True, body
return True, None
except (ValueError, urllib.error.HTTPError, urllib.error.URLError,
etree.ParseError, socket.timeout) as err:
return False, "Error: {}: {}".format(feed.url, err)
The Feed.read() function reads a given URL (feed) and attempts to parse it. If the parse is successful, it returns True and a list of HTML fragments (a title and one or more links); otherwise, it returns False and None or an error message.
def _parse(data, limit):
output = []
feed = feedparser.parse(data) # Atom + RSS
for entry in feed["entries"]:
title = entry.get("title")
link = entry.get("link")
if title:
if link:
output.append('<li><a href="{}">{}</a></li>'.format(
link, escape(title)))
else:
output.append('<li>{}</li>'.format(escape(title)))
if limit and len(output) == limit:
break
if output:
return ["<ul>"] + output + ["</ul>"]
The Feed.py module contains two versions of the private _parse() function. The one shown here uses the third-party feedparser module (pypi.python.org/pypi/feedparser), which can handle both Atom and RSS format news feeds. The other one (not shown) is a fallback if feedparser isn’t available and can handle only RSS format feeds.
The feedparser.parse() function does all the hard work of parsing the news feed. We just need to iterate over the entries it produces and retrieve the title and link for each news story, building up an HTML list to represent them.
def add_jobs(filename, jobs):
for todo, feed in enumerate(Feed.iter(filename), start=1):
jobs.put(feed)
return todo
Each feed is returned by the Feed.iter() function as a (title, url) 2-tuple that is added to the jobs queue. And at the end, the total number of jobs to do is returned.
In this case, we could have safely returned jobs.qsize() rather than kept track of the total to do ourselves. However, if we were to execute add_jobs() in its own thread, using queue.Queue.qsize() would not be reliable, since jobs would be taken off at the same time as they were added.
Feed = collections.namedtuple("Feed", "title url")
def iter(filename):
name = None
with open(filename, "rt", encoding="utf-8") as file:
for line in file:
line = line.rstrip()
if not line or line.startswith("#"):
continue
if name is None:
name = line
else:
yield Feed(name, line)
name = None
This is the Feed.py module’s Feed.iter() function. The whatsnew.dat file is expected to be a UTF-8-encoded plain-text file that contains two lines per feed: a title line (e.g., The Guardian - Technology) and, on the next line, the URL (e.g.,http://feeds.pinboard.in/rss/u:guardiantech/). Blank lines and comment lines (i.e., lines starting with #) are ignored.
def process(todo, jobs, results, concurrency):
canceled = False
try:
jobs.join() # Wait for all the work to be done
except KeyboardInterrupt: # May not work on Windows
Qtrac.report("canceling...")
canceled = True
if canceled:
done = results.qsize()
else:
done, filename = output(results)
Qtrac.report("read {}/{} feeds using {} threads{}".format(done, todo,
concurrency, " [canceled]" if canceled else ""))
print()
if not canceled:
webbrowser.open(filename)
Once all the threads have been created and the jobs added, this function is called. It calls queue.Queue.join(), which blocks until the queue is empty (i.e., when all the jobs are done) or until the user cancels. If the user did not cancel, the output() function is called to write the HTML file with all the lists of links, and then a summary is printed. Finally, the webbrowser module’s open() function is called on the HTML file to open it in the user’s default web browser (see Figure 4.3; 155 ![]() ).
).
def output(results):
done = 0
filename = os.path.join(tempfile.gettempdir(), "whatsnew.html")
with open(filename, "wt", encoding="utf-8") as file:
file.write("<!doctype html>\n")
file.write("<html><head><title>What's New</title></head>\n")
file.write("<body><h1>What's New</h1>\n")
while not results.empty(): # Safe because all jobs have finished
result = results.get_nowait()
done += 1
for item in result:
file.write(item)
file.write("</body></html>\n")
return done, filename
After all the jobs are done, this function is called with the results queue. Each result contains a list of HTML fragments (a title followed by one or more links). This function creates a new whatsnew.html file and populates it with all the news feed titles and their links. At the end, the function returns the number of results (i.e., the count of those jobs that were successfully done) and the name of the HTML file it wrote. This information is used by the process() function to print its summary and to open the HTML file in the user’s web browser.
4.2.2. Using Futures and Threading
If we are using Python 3.2 or later, we can take advantage of the concurrent.futures module to implement this program without the need for queues (or explicit locks). In this subsection, we will review the whatsnew-t.py program, which makes use of this module, although we will omit those functions that are identical to those we saw in the previous subsection (e.g., handle_commandline() and the Feed.py module’s functions).
def main():
limit, concurrency = handle_commandline()
Qtrac.report("starting...")
filename = os.path.join(os.path.dirname(__file__), "whatsnew.dat")
futures = set()
with concurrent.futures.ThreadPoolExecutor(
max_workers=concurrency) as executor:
for feed in Feed.iter(filename):
future = executor.submit(Feed.read, feed, limit)
futures.add(future)
done, filename, canceled = process(futures)
if canceled:
executor.shutdown()
Qtrac.report("read {}/{} feeds using {} threads{}".format(done,
len(futures), concurrency, " [canceled]" if canceled else ""))
print()
if not canceled:
webbrowser.open(filename)
This function creates an initially empty set of futures and then creates a thread pool executor that works just the same as a process pool executor, except that it uses separate threads rather than separate processes. Within the context of the executor, we iterate over the data file, and for each feed, we create a new future (using the concurrent.futures.ThreadPoolExecutor.submit() method) that will execute the Feed.read() function on the given feed URL, returning at most limit links. We then add the future to the set of futures.
Once all the futures have been created, we call a custom process() function that will wait until all the futures have finished (or until the user cancels). Then, a summary of results is printed, and if the user didn’t cancel, the generated HTML page is opened in the user’s web browser.
def process(futures):
canceled = False
done = 0
filename = os.path.join(tempfile.gettempdir(), "whatsnew.html")
with open(filename, "wt", encoding="utf-8") as file:
file.write("<!doctype html>\n")
file.write("<html><head><title>What's New</title></head>\n")
file.write("<body><h1>What's New</h1>\n")
canceled, results = wait_for(futures)
if not canceled:
for result in (result for ok, result in results if ok and
result is not None):
done += 1
for item in result:
file.write(item)
else:
done = sum(1 for ok, result in results if ok and result is not
None)
file.write("</body></html>\n")
return done, filename, canceled
This function writes the start of the HTML file and then calls a custom wait_for() function to wait for all the work to be done. If the user didn’t cancel, the function iterates over the results (which are True, list or False, str or False, None 2-tuples), and for those with lists (which consist of a title followed by one or more links), the items are written to the HTML file.
If the user canceled, we simply calculate how many feeds were successfully read. In either case, we return the number of feeds read, the HTML file’s filename, and whether the user canceled.
def wait_for(futures):
canceled = False
results = []
try:
for future in concurrent.futures.as_completed(futures):
err = future.exception()
if err is None:
ok, result = future.result()
if not ok:
Qtrac.report(result, True)
elif result is not None:
Qtrac.report("read {}".format(result[0][4:-6]))
results.append((ok, result))
else:
raise err # Unanticipated
except KeyboardInterrupt:
Qtrac.report("canceling...")
canceled = True
for future in futures:
future.cancel()
return canceled, results
This function iterates over the futures, blocking until one is finished or canceled. Once a future is received, the function reports an error or a successfully read feed as appropriate, and in either case appends the Boolean and the result (a list of strings or an error string) to a list of results.
If the user cancels (by pressing Ctrl+C), we cancel all of the futures. At the end, we return whether the user canceled and the list of results.
Using concurrent.futures is just as convenient when using multiple threads as when using multiple processes. And in terms of performance, it is clear that when used in the right circumstances—I/O-based rather than CPU-based processing—and with due care, multithreading provides the improved performance that we would expect.
4.3. Case Study: A Concurrent GUI Application
Writing concurrent GUI (graphical user interface) applications can be tricky, especially using Tkinter, Python’s standard GUI toolkit. A short introduction to GUI programming with Tkinter is given in Chapter 7 (![]() 231); readers with no Tkinter experience are recommended to read that chapter first and then return here.
231); readers with no Tkinter experience are recommended to read that chapter first and then return here.
One obvious approach to achieving concurrency in a GUI application is to use multithreading, but in practice this can lead to a slow or even frozen GUI when lots of processing is taking place; after all, GUIs are CPU-bound. An alternative approach is to use multiprocessing, but this can still result in very poor GUI responsiveness.
In this section, we will review the ImageScale application (in the example’s imagescale directory). The application is shown in Figure 4.5. This application takes a sophisticated approach that combines concurrent processing with a responsive GUI that reports progress and supports cancellation.

Figure 4.5 The ImageScale application before, during, and after scaling some images
As Figure 4.6 illustrates, the application combines multithreading and multiprocessing. It has two threads of execution—the main GUI thread and a worker thread—and the worker thread hands off its work to a pool of processes. This architecture produces a GUI that is always responsive, because the GUI gets most of the processor time for the core shared by the two threads, with the worker (which does almost no work itself) getting the rest. And the worker’s processes end up executing on their own cores (on a multi-core machine), so they don’t contend with the GUI at all.
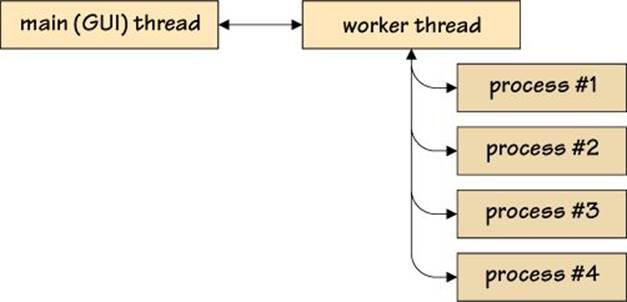
Figure 4.6 The ImageScale application’s concurrency model (arrows indicate communication)
A comparable console program, imagescale-m.py, is around 130 lines of code. (We reviewed this earlier; §4.1, 144 ![]() .) By comparison, the ImageScale GUI application is spread over five files (see Figure 4.7,
.) By comparison, the ImageScale GUI application is spread over five files (see Figure 4.7, ![]() 166), amounting to nearly 500 lines of code. The image scaling code is only around 60 lines; most of the rest is GUI code.
166), amounting to nearly 500 lines of code. The image scaling code is only around 60 lines; most of the rest is GUI code.
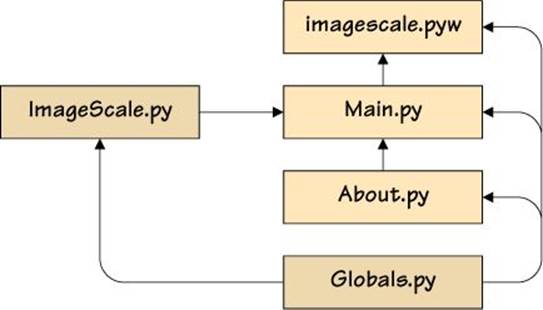
Figure 4.7 The ImageScale application’s files in context (arrows indicate imports)
In this section’s subsections we will review the code that is most relevant to concurrent GUI programming and some of the other code to provide sufficient context for understanding.
4.3.1. Creating the GUI
In this subsection we will review the most important code relating to the creation of the GUI and the GUI’s concurrency support, quoting from the image-scale/imagescale.pyw and imagescale/Main.py files.
import tkinter as tk
import tkinter.ttk as ttk
import tkinter.filedialog as filedialog
import tkinter.messagebox as messagebox
These are the GUI-related imports in the Main.py module. Some Tkinter users import using from tkinter import *, but we prefer these imports both to keep the GUI names in their own namespaces and to make those namespaces convenient—hence tk rather than tkinter.
def main():
application = tk.Tk()
application.withdraw() # hide until ready to show
window = Main.Window(application)
application.protocol("WM_DELETE_WINDOW", window.close)
application.deiconify() # show
application.mainloop()
This is the application’s entry point in imagescale.pyw. The actual function has some additional code that isn’t shown, concerned with user preferences and setting the application’s icon.
The key points to note here are that we must always create a top-level, normally invisible tkinter.Tk object (the ultimate parent). Then we create an instance of a window (in this case a custom tkinter.ttk.Frame subclass), and finally, we start off the Tkinter event loop.
To avoid flicker or the appearance of an incomplete window, we hide the application as soon as it is created (so the user never sees it at this point), and only when the window has been fully created do we show it.
The tkinter.Tk.protocol() call is used to tell Tkinter that if the user clicks the window’s × close button, the custom Main.Window.close() method should be called.* This method is discussed later (§4.3.4, ![]() 177).
177).
*On OS X, the close button is usually a circular red button, with a black dot in the center if the application has unsaved changes.
GUI programs have a similar processing structure to some server programs, in that once started, they simply wait for events to occur, to which they then respond. In a server, the events might be network connections and communications, but in a GUI application, the events are either user-generated (such as key presses and mouse clicks) or system-generated (such as a timer timing out or a message saying that the window has been shown; for example, after another application’s window that was on top of it is moved or closed). The GUI event loop is illustrated in Figure 4.8. We saw examples of event handling in Chapter 3 (§3.1, 74 ![]() .)
.)

Figure 4.8 A classic GUI event loop
PAD = "0.75m"
WORKING, CANCELED, TERMINATING, IDLE = ("WORKING", "CANCELED",
"TERMINATING", "IDLE")
class Canceled(Exception): pass
Here are some of the constants that are imported by ImageScale’s GUI modules using from Globals import *. The PAD is a padding distance of 0.75 mm used for laying out the widgets (and for which the code isn’t shown). The other constants are just enumerations identifying what state the application is in: WORKING, CANCELED, TERMINATING, or IDLE. We will see how the Canceled exception is used later on.
class Window(ttk.Frame):
def __init__(self, master):
super().__init__(master, padding=PAD)
self.create_variables()
self.create_ui()
self.sourceEntry.focus()
When a Window is created, it must call its base class’s __init__() method. Here, we also create the variables that the program will use and the user interface itself. At the end, we give the keyboard focus to the text entry box for the source directory. This means that the user can type in the directory immediately, or they could, of course, click the Source button to invoke a directory chooser dialog, and set it that way.
We won’t show the create_ui() method, nor the create_widgets(), layout_widgets(), and create_bindings() methods that it calls, since they are concerned only with creating the GUI and have nothing to do with concurrent programming. (Of course, we will see examples of creating GUIs in Chapter 7 when we introduce Tkinter programming.)
def create_variables(self):
self.sourceText = tk.StringVar()
self.targetText = tk.StringVar()
self.statusText = tk.StringVar()
self.statusText.set("Choose or enter folders, then click Scale...")
self.dimensionText = tk.StringVar()
self.total = self.copied = self.scaled = 0
self.worker = None
self.state = multiprocessing.Manager().Value("i", IDLE)
We have shown only the most relevant lines of this method. The tkinter.String-Var variables hold strings that are associated with user interface widgets. The total, copied, and scaled variables are used to keep counts. The worker, initially None, is set to be a second thread once the user requests some processing to be done.
If the user cancels (i.e., by clicking the Cancel button), as we will see later, the scale_or_cancel() method is invoked. This method sets the application’s state (which can be WORKING, CANCELED, TERMINATING, or IDLE). Similarly, if the user quits the application (i.e., by clicking the Quit button), the close() method is called. Naturally, if the user cancels the scaling or terminates the application in the middle of scaling, we want to respond as quickly as possible. This means changing the Cancel button’s text to Canceling... and disabling the button, and stopping the worker thread’s processes from doing any more work. Once work has stopped, the Scale button must be reenabled. This means that both threads and all the worker processes must be able to regularly check the application’s state to see if the user has canceled or quit.
One way to make the application’s state accessible would be to use a state variable and a lock. But this would mean that we would have to acquire the lock before every access to the state variable and then release the lock. This isn’t difficult using a context manager, but it is easy to forget to use the lock. Fortunately, the multiprocessing module provides the multiprocessing.Value class, which can hold a single value of a specific type that can be safely accessed because it does its own locking (just like the thread-safe queues do). To create a Value, we must pass it a type identifier—here, we have used "i" to signify an int—and an initial value, in this case the IDLE constant since the application begins in the IDLE state.
One point to notice is that instead of creating a multiprocessing.Value directly, we created a multiprocessing.Manager and got that to create a Value for us. This is essential for the correct working of the Value. (If we had more than one Value or Array, we would create a multiprocessing.Manager instance and use it for each one, but there was no need in this example.)
def create_bindings(self):
if not TkUtil.mac():
self.master.bind("<Alt-a>", lambda *args:
self.targetEntry.focus())
self.master.bind("<Alt-b>", self.about)
self.master.bind("<Alt-c>", self.scale_or_cancel)
...
self.sourceEntry.bind("<KeyRelease>", self.update_ui)
self.targetEntry.bind("<KeyRelease>", self.update_ui)
self.master.bind("<Return>", self.scale_or_cancel)
When we create a tkinter.ttk.Button, we can associate a command (i.e., a function or method) that Tkinter should execute when the button is clicked. This has been done in the create_widgets() method (which isn’t shown). We also want to provide support for keyboard users. So, for example, if the user clicks the Scale button, or—on non-OS X platforms—presses Alt+C or Enter, the scale_or_cancel() method will be invoked.
When the application starts up, the Scale button is initially disabled since there is no source or target folder. But once these folders have been set—either typed in or set via a directory chooser dialog invoked by the Source and Target buttons—the Scale button must be enabled. To achieve this, we have an update_ui() method that enables or disables widgets depending on the situation, and we call this method whenever the user types in the source or target text entry boxes.
The TkUtil module is provided with the book’s examples. It contains various utility functions—such as TkUtil.mac(), which reports whether the operating system is OS X—plus generic support for about boxes and modal dialogs, and some other helpful functionality.*
*Tkinter—or rather, the underlying Tcl/Tk 8.5—does account for some of the cross-platform differences between Linux, OS X, and Windows. However, we are still left to handle many of the differences—especially for OS X—ourselves.
def update_ui(self, *args):
guiState = self.state.value
if guiState == WORKING:
text = "Cancel"
underline = 0 if not TkUtil.mac() else -1
state = "!" + tk.DISABLED
elif guiState in {CANCELED, TERMINATING}:
text = "Canceling..."
underline = -1
state = tk.DISABLED
elif guiState == IDLE:
text = "Scale"
underline = 1 if not TkUtil.mac() else -1
state = ("!" + tk.DISABLED if self.sourceText.get() and
self.targetText.get() else tk.DISABLED)
self.scaleButton.state((state,))
self.scaleButton.config(text=text, underline=underline)
state = tk.DISABLED if guiState != IDLE else "!" + tk.DISABLED
for widget in (self.sourceEntry, self.sourceButton,
self.targetEntry, self.targetButton):
widget.state((state,))
self.master.update() # Make sure the GUI refreshes
This method is called whenever a change occurs that might affect the user interface. It could be invoked directly or in response to an event—a key press or button click that has been bound to it—in which case one or more additional arguments are passed, which we ignore.
We begin by retrieving the GUI’s state (WORKING, CANCELED, TERMINATING, or IDLE). Instead of creating a variable, we could have used self.state.value directly in each if statement, but under the hood this must lock, so we are better off calling it once to minimize the amount of time it is locked. It doesn’t matter if the state changes during the course of this method’s execution, because such a change would result in this method being reinvoked anyway.
If the application is working, then we want the scale button’s text to be Cancel (since we are using this button as a start and a stop button), and to enable it. On most platforms, an underlined letter indicates a keyboard accelerator (e.g., the Cancel button can be invoked by pressing Alt+C), but this functionality isn’t supported on OS X, so on that platform we set underlining off by using an invalid index position.
Once we know the application’s state, we update the scale button’s text and underline, and enable or disable some of the widgets as appropriate. And at the end, we call the update() method to force Tkinter to repaint the window to reflect any changes that we have made.
def scale_or_cancel(self, event=None):
if self.scaleButton.instate((tk.DISABLED,)):
return
if self.scaleButton.cget("text") == "Cancel":
self.state.value = CANCELED
self.update_ui()
else:
self.state.value = WORKING
self.update_ui()
self.scale()
The scale button is used to start scaling, or to cancel scaling since we change its text depending on the application’s state. If the user presses Alt+C (on non-OS X platforms) or Enter, or clicks the Scale or Cancel button (i.e., the scale button), this method is called.
If the button is disabled, we safely do nothing and return. (A disabled button cannot be clicked, of course, but the user could still invoke this method if they used a keyboard accelerator such as Alt+C.)
If the button is enabled and its text is Cancel, we change the application’s state to CANCELED and update the user interface. In particular, the scale button will be disabled and its text changed to Canceling.... As we will see, during processing we regularly check to see if the application’s state has changed, so we will soon detect the cancellation and stop any further processing. When the cancel is complete, the scale button will be enabled and have its text set to Scale. Figure 4.5 (165 ![]() ) shows the application before, during, and after scaling some images. Figure 4.9 (
) shows the application before, during, and after scaling some images. Figure 4.9 (![]() 172) shows the application before, during, and after canceling.
172) shows the application before, during, and after canceling.

Figure 4.9 The ImageScale application before, during, and after canceling
If the button’s text is Scale, we set the state to WORKING, update the user interface (so now the button’s text is Cancel), and start scaling.
def scale(self):
self.total = self.copied = self.scaled = 0
self.configure(cursor="watch")
self.statusText.set("Scaling...")
self.master.update() # Make sure the GUI refreshes
target = self.targetText.get()
if not os.path.exists(target):
os.makedirs(target)
self.worker = threading.Thread(target=ImageScale.scale, args=(
int(self.dimensionText.get()), self.sourceText.get(),
target, self.report_progress, self.state,
self.when_finished))
self.worker.daemon = True
self.worker.start() # returns immediately
We begin by setting all the counts to zero and changing the application’s cursor to be a “busy” indicator. Then we update the status label and refresh the GUI so that the user can see that scaling has begun. Next, we create the target directory if it doesn’t already exist, including any missing intermediate directories.
With everything prepared, we now create a new worker thread. (Any previous worker thread is no longer referenced so is available for garbage collection.) We create the worker thread using the threading.Thread() function, passing it the function we want it to execute in the thread and the arguments to pass to the function. The arguments are the maximum dimension of the scaled images; the source and target directories; a callable (in this case the bound self.report_progress() method) to be called when each job is done; the application’s state Value so that worker processes can regularly check to see if the user has canceled; and a callable (here, the bound self.when_finished() method) to call when processing has finished (or been canceled).
Once the thread has been created, we make it a dæmon to ensure that it is cleanly terminated if the user quits the application, and we start it running.
As we will see, the worker thread itself does almost no work so as to give the GUI thread as much time on the core they share as possible. The ImageScale.scale() function delegates all the worker’s work to multiple processes to execute on other cores (on a multi-core machine) and leave the GUI responsive (although with this architecture the GUI is still responsive, even on a single-core machine, because the GUI thread still gets as much CPU time as the worker thread).
4.3.2. The ImageScale Worker Module
We have separated out the functions called by the worker thread into their own module, imagescale/ImageScale.py, from which this subsection’s code quotes are taken. This is not just a matter of organizational convenience but a necessity, since we want these functions to be usable by the multiprocessing module, and this means that they must be importable and any module data must be pickleable. Modules that contain GUI widgets or widget subclasses may not—and certainly should not—be imported in this way, since doing so can confuse the windowing system.
The module has three functions, the first of which, ImageScale.scale(), is the one executed by the worker thread.
def scale(size, source, target, report_progress, state, when_finished):
futures = set()
with concurrent.futures.ProcessPoolExecutor(
max_workers=multiprocessing.cpu_count()) as executor:
for sourceImage, targetImage in get_jobs(source, target):
future = executor.submit(scale_one, size, sourceImage,
targetImage, state)
future.add_done_callback(report_progress)
futures.add(future)
if state.value in {CANCELED, TERMINATING}:
executor.shutdown()
for future in futures:
future.cancel()
break
concurrent.futures.wait(futures) # Keep working until finished
if state.value != TERMINATING:
when_finished()
This function is executed by the self.worker thread created in the Main.Window. scale() method. It uses a process pool (i.e., multiprocessing rather than multithreading) of processes to do the actual work. This ensures that the worker thread only has to call this function, while all the actual work is delegated to separate processes.
For each source and target image retrieved from the ImageScale.get_jobs() function, a future is created to execute the ImageScale.scale_one() function with the maximum dimension (size), the source and the target images, and the application’s state Value.
In the previous section, we waited for futures to finish using the concurrent.futures.as_completed() function, but here we add a callback function to each future (the Main.Window.report_progress() method) and use concurrent.futures.wait() instead.
After each future is added we check to see if the user has canceled or quit, and if they have we shut down the process pool and cancel all the futures. By default, the concurrent.futures.Executor.shutdown() function returns immediately and will only take effect once all the futures are finished or canceled.
Once all the futures have been created, this function blocks (the worker thread, not the GUI thread) at the concurrent.futures.wait() call. This means that if the user cancels after the futures have been created, we must now check for cancellation when executing each future’s callable (i.e., inside the ImageScale. scale_one() function).
Once the processing has been finished or canceled, and so long as we aren’t quitting, we call the when_finished() callback that was passed in. Once the end of the scale() method is reached, the thread is finished.
def get_jobs(source, target):
for name in os.listdir(source):
yield os.path.join(source, name), os.path.join(target, name)
This little generator function yields 2-tuples of source and target image names with full paths.
Result = collections.namedtuple("Result", "name copied scaled")
def scale_one(size, sourceImage, targetImage, state):
if state.value in {CANCELED, TERMINATING}:
raise Canceled()
oldImage = Image.Image.from_file(sourceImage)
if state.value in {CANCELED, TERMINATING}:
raise Canceled()
if oldImage.width <= size and oldImage.height <= size:
oldImage.save(targetImage)
return Result(targetImage, 1, 0)
else:
scale = min(size / oldImage.width, size / oldImage.height)
newImage = oldImage.scale(scale)
if state.value in {CANCELED, TERMINATING}:
raise Canceled()
newImage.save(targetImage)
return Result(targetImage, 0, 1)
This is the function that does the actual scaling (or copying); it uses the cyImage module (see §5.3, ![]() 198) or falls back to the Image module (see §3.12, 124
198) or falls back to the Image module (see §3.12, 124 ![]() ). For each job, it returns a Result named tuple, or it raises the custom Canceled exception if the user has canceled or quit.
). For each job, it returns a Result named tuple, or it raises the custom Canceled exception if the user has canceled or quit.
If the user cancels or quits in the middle of loading, scaling, or saving, the function won’t stop until the loading, scaling, or saving has finished. This means that when the user cancels or quits, they might have to wait for n images to complete loading, scaling, or saving, where n is the number of processes in the process pool, before the cancellation will take effect. Checking for cancellation or termination before each expensive non-cancelable computation (loading the source image, scaling, saving) is the best we can do to make the application as responsive as possible.
Whenever a result is returned (or a Canceled exception raised), the associated future finishes. And because we associated a callable with each future, that callable is called, which in this case is the Main.Window.report_progress() method.
4.3.3. How the GUI Handles Progress
In this subsection, we will review the GUI methods that report progress to the user. These methods are in imagescale/Main.py.
Since we have multiple processes executing futures, it is possible that two or more might call report_progress() at the same time. In fact, this should never happen, because the callable associated with a future is called in the thread in which the association was created—in this case, the worker thread—and since we have only one such thread, in theory the method cannot be called more than once at the same time. However, this is an implementation detail, and as such, it would be poor practice to rely on it. So, much as we want to do high-level concurrency and avoid mid-level features like locks, in this case we have no real choice. Therefore, we have created a lock to ensure that the report_progress() method’s work is always serialized.
ReportLock = threading.Lock()
The lock is in Main.py, and it is used only in a single method.
def report_progress(self, future):
if self.state.value in {CANCELED, TERMINATING}:
return
with ReportLock: # Serializes calls to Window.report_progress()
self.total += 1 # and accesses to self.total, etc.
if future.exception() is None:
result = future.result()
self.copied += result.copied
self.scaled += result.scaled
name = os.path.basename(result.name)
self.statusText.set("{} {}".format(
"Copied" if result.copied else "Scaled", name))
self.master.update() # Make sure the GUI refreshes
This method is called whenever a future finishes, whether normally or by raising an exception. If the user has canceled, we bail out, since the user interface will be updated by the when_finished() method anyway. And if the user has quit, there is no point in updating the user interface, since it will go away when the application terminates.
Most of the method’s body is serialized by a lock, so if two or more futures finish at the same time, only one will get to execute this part of the method at any one time; the others will be blocked until the lock is released. (We don’t have to worry about the self.state Value, since it is a synchronized type.) Since we are in the context of a lock, we want to do as little work as possible to minimize any blocking.
We begin by incrementing the total count of jobs. If the future raised an exception (e.g., Canceled), we do nothing more. Otherwise, we increment the copied and scaled counts (by 0 and 1 or 1 and 0) and update the GUI’s status label. It is very important that we do the GUI updates in the context of the lock. This is to avoid the risk of the undefined behavior that might occur if two or more GUI updates are made concurrently.
def when_finished(self):
self.state.value = IDLE
self.configure(cursor="arrow")
self.update_ui()
result = "Copied {} Scaled {}".format(self.copied, self.scaled)
difference = self.total - (self.copied + self.scaled)
if difference: # This will kick in if the user canceled
result += " Skipped {}".format(difference)
self.statusText.set(result)
self.master.update() # Make sure the GUI refreshes
This method is called by the worker thread once it has finished, whether by completing the processing or due to cancellation, but not in the case of termination. Since this method is called only when the worker and its processes are finished, there is no need to use the ReportLock. The method sets the application’s state back to IDLE, restores the normal arrow cursor, and sets the status label’s text to show the work done and whether the user canceled.
4.3.4. How the GUI Handles Termination
Terminating a concurrent GUI program isn’t simply a matter of quitting. We must first attempt to stop any worker threads—and especially processes—so that we terminate cleanly and don’t leave any zombie processes that tie up resources (e.g., memory).
We handle termination in the imagescale/Main.py module’s close() method.
def close(self, event=None):
...
if self.worker is not None and self.worker.is_alive():
self.state.value = TERMINATING
self.update_ui()
self.worker.join() # Wait for worker to finish
self.quit()
If the user clicks the Quit button or the window’s × close button (or presses Alt+Q on non-OS X platforms), this method is called. It saves some user settings (not shown) and then checks to see if the worker thread is still working (i.e., if the user has quit while scaling is in progress). If this is the case, the method sets the application’s state to TERMINATING and updates the user interface so that the user can see that the processing is being canceled. The change of state will be detected by the worker thread’s processes (since they regularly check the state Value), and as soon as they detect termination, they stop work. The call to threading.Thread.join() blocks until the worker thread (and its processes) are finished. If we didn’t wait, we might leave some zombie processes behind (i.e., processes that consume memory but are not doing anything useful). At the end, we call tkinter.ttk.Frame.quit() to terminate the application.
The ImageScale application shows that it is possible to combine multithreading and multiprocessing to produce a GUI application that does its work concurrently, while still remaining responsive to the user. Furthermore, the application’s architecture supports progress reporting and cancelation.
Writing concurrent programs using high-level concurrency features such as thread-safe queues and futures—and avoiding mid-level features such as locks—is much easier than using low- and mid-level features. Nonetheless, we must be careful to make sure that our concurrent program actually outperforms a nonconcurrent equivalent. For example, in Python, we should avoid using multithreading for CPU-bound processing.
We must also be sure that we don’t accidentally mutable shared data. So, we must always pass immutable data (e.g., numbers and strings), or pass mutable data that is only ever read (e.g., it was written before the concurrency began), or deep copy mutable data. However, as the ImageScale case study showed, sometimes we really do need to share data. Fortunately, by using a managed multiprocessing.Value (or multiprocessing.Array), we are able to do this without explicit locking. Alternatively, we can create our own thread-safe classes. We will see an example of this in Chapter 6 (§6.2.1.1, ![]() 221).
221).
All materials on the site are licensed Creative Commons Attribution-Sharealike 3.0 Unported CC BY-SA 3.0 & GNU Free Documentation License (GFDL)
If you are the copyright holder of any material contained on our site and intend to remove it, please contact our site administrator for approval.
© 2016-2026 All site design rights belong to S.Y.A.