Python in Practice: Create Better Programs Using Concurrency, Libraries, and Patterns (2014)
Chapter 5. Extending Python
Python is fast enough for the vast majority of programs. And in those cases where it isn’t, we can often achieve sufficient speedups by using concurrency, as we saw in the previous chapter. Sometimes, though, we really do need to do faster processing. There are three key ways we can make our Python programs run faster: we can use PyPy (pypy.org), which has a built-in JIT (Just in Time compiler); we can use C or C++ code for time-critical processing; or we can compile our Python (or Cython) code into C using Cython.*
*New Python compilers are becoming available; for example, Numba (numba.pydata.org) and Nuitka (nuitka.net).
Once PyPy is installed, we can execute our Python programs using the PyPy interpreter rather than the standard CPython interpreter. This will give us a significant speedup for long-running programs, since the cost of the JIT compiling will be outweighed by the reduced runtime, but might produce slower execution for programs with very short runtimes.
To use C or C++, whether our own code or third-party libraries, we must make the code available to our Python program so that it can benefit from the C or C++ code’s fast execution. For those who want to write their own C or C++ code, a sensible approach is to make direct use of the Python C interface (docs.python.org/3/extending). For those who want to make use of existing C or C++ code, there are several possible approaches. One option is to use a wrapper that will take the C or C++ and produce a Python interface for it. Two popular tools for this are SWIG (www.swig.org) and SIP (www.riverbank-computing.co.uk/software/sip). Another option for C++ is to use boost::python (www.boost.org/libs/python/doc/). A newer entry into this field is CFFI (C Foreign Function Interface for Python), which despite its newness is being used by the well-established PyPy (bitbucket.org/cffi/cffi).
![]() Extending Python on OS X and Windows
Extending Python on OS X and Windows
Although the examples in this chapter have been tested only on Linux, they should all work fine on both OS X and Windows. (For many ctypes and Cython programmers, these are their primary development platforms.) However, some platform-specific tweaks may be necessary. This is because whereas most Linux systems use a packaged GCC compiler and system-wide libraries with the appropriate word size for the machine they are running on, the situation for OS X and Windows systems is usually more complicated, or at least a bit different.
On OS X and Windows, it is generally necessary to match the compiler and word size (32- or 64-bit) used to build Python with that used for any external shared libraries (.dylib or .DLL files) or to build Cython code. On OS X, the compiler might be GCC but nowadays is most likely to be Clang; on Windows it could be some form of GCC or a commercial compiler such as those sold by Microsoft. Furthermore, OS X and Windows often have shared libraries in application directories rather than system wide, and header files may need to be obtained separately. So, rather than giving lots of platform- and compiler-specific configuration information (which might quickly become outdated with new compiler and operating system versions), we focus instead on how to use ctypes and Cython, leaving readers on non-Linux systems to determine their own system’s particular requirements when they are ready to use these technologies.
All of the possibilities described so far are worth exploring, but in this chapter we will focus on two other technologies: the ctypes package that comes as part of Python’s standard library (docs.python.org/3/library/ctypes.html) and Cython (cython.org). Both of these can be used to provide Python interfaces for our own or for third-party C and C++ code, and Cython can also be used to compile both Python and Cython code into C to improve its performance—sometimes with dramatic results.
5.1. Accessing C Libraries with ctypes
The standard library’s ctypes package provides access to our own or third-party functionality written in C or C++ (or indeed any compiled language that uses the C calling convention) and that has been compiled into a stand-alone shared library (.so on Linux, .dylib on OS X, or .DLLon Windows).
For this section, and for the following section’s first subsection (§5.2.1, ![]() 188), we will create a module that provides Python access to some C functions in a shared library. The library we will use is libhyphen.so, or, on some systems, libhyphen.uno.so. (See the “Extending Python on OS X and Windows” sidebar.) This library usually comes with OpenOffice.org or LibreOffice and provides a function that, when given a word, produces a copy of the word with hyphens inserted wherever they are valid. Although the function does what sounds like a simple task, the function’s signature is quite complicated (which makes it ideal as a ctypes example). And, in fact, there are three functions that we will need to use: one for loading in a hyphenation dictionary, one for doing the hyphenation, and one for freeing up resources when we have finished.
188), we will create a module that provides Python access to some C functions in a shared library. The library we will use is libhyphen.so, or, on some systems, libhyphen.uno.so. (See the “Extending Python on OS X and Windows” sidebar.) This library usually comes with OpenOffice.org or LibreOffice and provides a function that, when given a word, produces a copy of the word with hyphens inserted wherever they are valid. Although the function does what sounds like a simple task, the function’s signature is quite complicated (which makes it ideal as a ctypes example). And, in fact, there are three functions that we will need to use: one for loading in a hyphenation dictionary, one for doing the hyphenation, and one for freeing up resources when we have finished.
A typical pattern of use for ctypes is to load the library into memory, take references to the functions we want to use, then call the functions as required. The Hyphenate1.py module follows this pattern. First, let’s see how the module is used. Here is an interactive session done at a Python prompt (e.g., in IDLE):
>>> import os
>>> import Hyphenate1 as Hyphenate
>>>
>>> # Locate your hyph*.dic files
>>> path = "/usr/share/hyph_dic"
>>> if not os.path.exists(path): path = os.path.dirname(__file__)
>>> usHyphDic = os.path.join(path, "hyph_en_US.dic")
>>> deHyphDic = os.path.join(path, "hyph_de_DE.dic")
>>>
>>> # Create wrappers so you don't have to keep specifying the dictionary
>>> hyphenate = lambda word: Hyphenate.hyphenate(word, usHyphDic)
>>> hyphenate_de = lambda word: Hyphenate.hyphenate(word, deHyphDic)
>>>
>>> # Use your wrappers
>>> print(hyphenate("extraordinary"))
ex-traor-di-nary
>>> print(hyphenate_de("außergewöhnlich"))
außerge-wöhn-lich
The only function we use outside the module is Hyphenate1.hyphenate(), which uses the library’s hyphenation function. Inside the module there are a couple of private functions that access another couple of functions from the library. Incidentally, the hyphenation dictionaries are in the format used by the open-source TEX typesetting system.
All the code is in the Hyphenate1.py module. The three functions we need from the library are:
HyphenDict *hnj_hyphen_load(const char *filename);
void hnj_hyphen_free(HyphenDict *hdict);
int hnj_hyphen_hyphenate2(HyphenDict *hdict, const char *word,
int word_size, char *hyphens, char *hyphenated_word, char ***rep,
int **pos, int **cut);
These signatures are taken from the hyphen.h header file. A * in C and C++ signifies a pointer. A pointer holds the memory address of a block of memory; that is, of a contiguous block of bytes. The block may be as small as a single byte but could be of any size; for example, 8 bytes for a 64-bit integer. Strings typically take between 1 and 4 bytes per character (depending on the in-memory encoding) plus some fixed overhead.
The first function, hnj_hyphen_load(), takes a filename passed as a pointer to a block of chars (bytes). This file must be a hyphenation dictionary in TEX format. The hnj_hyphen_load() function returns a pointer to a HyphenDict struct—a complex aggregate object (rather like a Python class instance). Fortunately, we don’t need to know anything about the internals of a HyphenDict, since we only ever need to pass around pointers to them.
In C, functions that accept C-strings—that is, pointers to blocks of characters or bytes—normally take one of two approaches: either they require just a pointer, in which case they expect the last byte to be 0x00 ('\0') (that is, for the C-string to be null-terminated), or they take a pointer and a byte count. The hnj_hyphen_load() function takes only a pointer, so the given C-string must be null terminated. As we will see, if the ctypes.create_string_buffer() function is passed a str, it returns an equivalent null-terminated C-string.
For every hyphenation dictionary that we load, we must eventually free it. (If we don’t do this, the hyphenation library will stay in memory needlessly.) The second function, hnj_hyphen_free(), takes a HyphenDict pointer and frees the resources associated with it. The function has no return value. Once freed, such a pointer must never be reused, just as we would never use a variable after it has been deleted with del in Python.
The third function, hnj_hyphen_hyphenate2(), is the one that performs the hyphenation service. The hdict argument is a pointer to a HyphenDict that has been returned by the hnj_hyphen_load() function (and that has not yet been freed with the hnj_hyphen_free()function). The word is the word we want to hyphenate provided as a pointer to a block of UTF-8-encoded bytes. The word_size is the number of bytes in the block. The hyphens is a pointer to a block of bytes that we don’t want to use, but we must still pass a valid pointer for it for the function to work correctly. The hyphenated_word is a pointer to a block of bytes long enough to hold the original UTF-8-encoded word with hyphens inserted. (The library actually inserts = characters as hyphens.) Initially, this block should hold all 0x00 bytes. The rep is a pointer to a pointer to a pointer to a block of bytes; we don’t need this, but we must still pass a valid pointer for it. Similarly, pos and cut are pointers to pointers to ints that we aren’t interested in, but we must still pass valid pointers for them. The function’s return value is a Boolean flag, with 1 signifying failure and 0 signifying success.
Now that we know what we want to wrap, we will review the Hyphenate1.py module’s code (as usual, omitting the imports), starting with finding and loading the hyphenation shared library.
class Error(Exception): pass
_libraryName = ctypes.util.find_library("hyphen")
if _libraryName is None:
_libraryName = ctypes.util.find_library("hyphen.uno")
if _libraryName is None:
raise Error("cannot find hyphenation library")
_LibHyphen = ctypes.CDLL(_libraryName)
We begin by creating an exception class, Hyphenate1.Error, so that users of our module can distinguish between module-specific exceptions and more general ones like ValueError. The ctypes.util.find_library() function looks for a shared library. On Linux it will prefix the given name with lib and add an extension of .so, so the first call will look for libhyphen.so in various standard locations. On OS X, it will look for hyphen.dylib, and on Windows, for hyphen.dll. This library is sometimes called libhyphen.uno.so, so we search for this if it wasn’t found under the original name. And if we can’t find it, we give up by raising an exception.
If the library is found, we load it into memory using the ctypes.CDLL() function and set the private _LibHyphen variable to refer to it. For those wanting to write Windows-only programs that access Windows-specific interfaces, the ctypes.OleDLL() and ctypes.WinDLL()functions can be used to load Windows API libraries.
Once the library is loaded, we can create Python wrappers for the library functions we are interested in. A common pattern for this is to assign a library function to a Python variable, and then specify the types of the arguments (as a list of ctypes types) and the return type (as a singlectypes type) that the function uses.
If we specify the wrong number or types of arguments, or the wrong return type, our program will crash! The CFFI package (bitbucket.org/cffi/cffi) is more robust in this respect and also works much better with the PyPy interpreter (pypy.org) than ctypes.
_load = _LibHyphen.hnj_hyphen_load
_load.argtypes = [ctypes.c_char_p] # const char *filename
_load.restype = ctypes.c_void_p # HyphenDict *
Here, we have created a private module function, _load(), that when called will actually call the underlying hyphenation library’s hnj_hyphen_load() function. Once we have a reference to the library function, we must specify its argument and return types. Here, there is just one argument (of C type const char *), which we can represent directly with ctypes.c_char_p (“C character pointer”). The function returns a pointer to a HyphenDict struct. One way to handle this would be to create a class that inherits ctypes.Structure to represent the type. However, since we only ever have to pass this pointer around and never access what it points to ourselves, we can simply declare that the function returns a ctypes.c_void_p (“C void pointer”), which can point to any type at all.
These three lines (in addition to finding and loading the library in the first place) are all we need to provide a _load() method that will load a hyphenation dictionary.
_unload = _LibHyphen.hnj_hyphen_free
_unload.argtypes = [ctypes.c_void_p] # HyphenDict *hdict
_unload.restype = None
The code here follows the same pattern as before. The hnj_hyphen_free() function takes a single argument, a pointer to a HyphenDict struct, but since we only ever pass such pointers, we can safely specify a void pointer—providing we always actually pass in a HyphenDict struct pointer. This function has no return value; this is signified by setting its restype to None. (If we don’t specify a restype, it is assumed that the function returns an int.)
_int_p = ctypes.POINTER(ctypes.c_int)
_char_p_p = ctypes.POINTER(ctypes.c_char_p)
_hyphenate = _LibHyphen.hnj_hyphen_hyphenate2
_hyphenate.argtypes = [
ctypes.c_void_p, # HyphenDict *hdict
ctypes.c_char_p, # const char *word
ctypes.c_int, # int word_size
ctypes.c_char_p, # char *hyphens [not needed]
ctypes.c_char_p, # char *hyphenated_word
_char_p_p, # char ***rep [not needed]
_int_p, # int **pos [not needed]
_int_p] # int **cut [not needed]
_hyphenate.restype = ctypes.c_int # int
This is the most complicated function we need to wrap. The hdict argument is a pointer to a HyphenDict struct, which we specify as a C void pointer. Then we have the word to be hyphenated, passed as a pointer to a block of bytes for which we use a C character pointer. This is followed by the word_size, a count of the bytes that we specify as an integer (ctypes.c_int). Next, we have the hyphens buffer that we don’t need, then the hyphenated_word, again specified as a C character pointer. There is no built-in ctypes type for a pointer to a pointer to a character (byte), so we have created our own type, _char_p_p, specifying it as a pointer to a C character pointer. We have done a similar thing for the two pointers to pointer to integers.
Strictly speaking, we don’t have to specify a restype, since the function’s return type is an integer, but we prefer to be explicit.
We have created private wrapper functions for the hyphenation library’s functions, since we want to insulate users of our module from the low-level details. To this end, we will provide a single public function, hyphenate(), which will accept a word to be hyphenated, a hyphenation dictionary to use, and the hyphenation character to use. For efficiency, we will only ever load any particular hyphenation dictionary once. And, of course, we will make sure that all hyphenation dictionaries that have been loaded are freed at program termination.
def hyphenate(word, filename, hyphen="-"):
originalWord = word
hdict = _get_hdict(filename)
word = word.encode("utf-8")
word_size = ctypes.c_int(len(word))
word = ctypes.create_string_buffer(word)
hyphens = ctypes.create_string_buffer(len(word) + 5)
hyphenated_word = ctypes.create_string_buffer(len(word) * 2)
rep = _char_p_p(ctypes.c_char_p(None))
pos = _int_p(ctypes.c_int(0))
cut = _int_p(ctypes.c_int(0))
if _hyphenate(hdict, word, word_size, hyphens, hyphenated_word, rep,
pos, cut):
raise Error("hyphenation failed for '{}'".format(originalWord))
return hyphenated_word.value.decode("utf-8").replace("=", hyphen)
The function begins by storing a reference to the word passed in to be hyphenated so that we can use it in an error message, if necessary. Then, we get the hyphenation dictionary: the private _get_hdict() function returns a pointer to the HyphenDict struct that corresponds to the given filename. If the dictionary has already been loaded, the pointer created at that time is returned; otherwise, the dictionary is loaded for the first and only time, its pointer stored for later use, and returned.
The word must be passed to the hyphenation function as a block of UTF-8-encoded bytes, which is easily achieved using the str.encode() method. We also need to pass the number of bytes the word occupies: we compute this and convert the Python int into a C int. We can’t pass a raw Python bytes object to a C function, so we create a string buffer (really a block of C chars) that contains the word’s bytes. The ctypes.create_string_buffer() creates a block of C chars based on a bytes object or of the given size. Although we don’t want to use thehyphens argument, we must still properly prepare it, and the documentation says that it must be a pointer to a block of C chars whose length is five more than the length of the word (in bytes). So, we create a suitable block of chars. The hyphenated word will be put into a block of Cchars that is passed to the function, so we must make a block of sufficient size. The documentation recommends a size twice that of the word’s size.
We don’t want to use the rep, pos, or cut arguments, but we must pass correct values for them or the function won’t work. The rep is a pointer to a pointer to a pointer to a block of C chars, so we have created a pointer to an empty block (a null pointer in C, i.e., a pointer that points to nothing) and then assigned a pointer to a pointer to this pointer to the rep variable. For the pos and cut arguments, we have created pointers to pointers to integers of value 0.
Once all the arguments have been set up, we call the private _hyphenate() function (under the hood, we are really calling the hyphenation library’s hnj_hyphen_hyphenate2() function) and raise an error if the function returns a nonzero (i.e., failure) result. Otherwise, we extract the raw bytes from the hyphenated word using the value property (which returns a null-terminated bytes, i.e., one whose last byte is 0x00). Then we decode the bytes using the UTF-8 encoding into a str and replace the hyphenation library’s = hyphens with the user’s preferred hyphen (which defaults to -). This string is then returned as the hyphenate() function’s result.
Note that for C functions that use char * and sizes rather than null-terminated strings, we can access the bytes using the raw property rather than the value property.
_hdictForFilename = {}
def _get_hdict(filename):
if filename not in _hdictForFilename:
hdict = _load(ctypes.create_string_buffer(
filename.encode("utf-8")))
if hdict is None:
raise Error("failed to load '{}'".format(filename))
_hdictForFilename[filename] = hdict
hdict = _hdictForFilename.get(filename)
if hdict is None:
raise Error("failed to load '{}'".format(filename))
return hdict
This private helper function returns a pointer to a HyphenDict struct, reusing pointers to dictionaries that have already been loaded.
If the filename is not in the _hdictForFilename dict, it is a new hyphenation dictionary and must be loaded. Because the filename is passed as a C const char * (i.e., is immutable), we can create and pass it as a ctypes string buffer directly. If the _load() function returnsNone the loading failed, and we report this by raising an exception. Otherwise, we store the pointer for later use.
At the end, whether or not we loaded the hyphenation dictionary on this occasion, we try to retrieve the corresponding pointer to it, which we then return.
def _cleanup():
for hyphens in _hdictForFilename.values():
_unload(hyphens)
atexit.register(_cleanup)
The _hdictForFilename dict holds pointers to all the hyphenation dictionaries that we have loaded as its values. We must be sure to free all these before our program terminates. We do this by creating a private _cleanup() function that calls our private _unload() function for every hyphenation dictionary pointer (and which itself calls the hyphenation library’s hnj_hyphen_free() function under the hood). We don’t bother to clear the _hdictForFilename dict at the end, since _cleanup() is only ever called on program termination (so the dictwill be deleted anyway). We ensure that _cleanup() is called by registering it as an “at exit” function using the standard library’s atexit module’s register() function.
We have now reviewed all the code needed to provide a hyphenate() function in a module that accesses the hyphen library’s functions. Using ctypes takes some care (e.g., setting argument types and initializing arguments) but opens up the world of C and C++ functionality to our Python programs. One practical use of ctypes is when we want to write some speed-critical code in C or C++ that we also want to be in a shared library, so that it can be used both by Python (via ctypes) and directly in our own C and C++ programs. The other main use is to access C and C++ functionality in third-party shared libraries, although in most cases we should be able to find a standard library or third-party module that already wraps the shared library we are interested in.
The ctypes module offers a lot more sophistication and functionality than we have the space to present here. And although it is harder to use than CFFI or Cython, it may prove to be more convenient, since it comes standard with Python.
5.2. Using Cython
Cython (cython.org) is described on its web site as a programming language “that makes writing C extensions for the Python language as easy as Python itself”. Cython can be used in three different ways. The first way is to use it to wrap C or C++ code, just like ctypes, although arguably using Cython is easier, especially for those familiar with C or C++. The second way is to compile our Python code into fast C. This can be done in essence by changing a module’s extension from .py to .pyx and compiling it. This alone should be sufficient to achieve a 2 × speedup for CPU-bound code. The third way is like the second, only instead of leaving the code as is in the .pyx file, we Cythonize it; that is, we take advantage of the language extensions offered by Cython so that it compiles down to much more efficient C code. This can deliver 100 × or better speedups for CPU-bound processing.
5.2.1. Accessing C Libraries with Cython
In this subsection, we will create the Hyphenate2 module, which provides exactly the same functionality as the Hyphenate1.py module created in the previous section, only this time we will use Cython rather than ctypes. The ctypes version used a single file, Hyphenate1.py, but for Cython we need to create a directory into which we will put four files.
The first file we need is Hyphenate2/setup.py. This tiny infrastructure file contains a single statement that tells Cython where to find the hyphenation library and what to build. The second file is Hyphenate2/ __init__.py. This file is an optional convenience that contains a single statement that exports the public Hyphenate2.hyphenate() function and the Hyphenate2.Error exception. The third file is Hyphenate2/chyphenate.pxd. This very small file is used to tell Cython about the hyphenation library and the functions within it we wish to access. The fourth file is Hyphenate2/Hyphenate.pyx. This is a Cython module that we will use to implement the public hyphenate() function and its private helper functions. We will review each of these files in turn.
distutils.core.setup(name="Hyphenate2",
cmdclass={"build_ext": Cython.Distutils.build_ext},
ext_modules=[distutils.extension.Extension("Hyphenate",
["Hyphenate.pyx"], libraries=["hyphen"])])
Here is the content of the Hyphenate2/setup.py file, excluding the imports. It makes use of Python’s distutils package.* The name is optional. The cmdclass must be given as shown. The first string given to the Extension() is the name we want our compiled module to have (e.g., Hyphenate.so). This is followed by a list of .pyx files that contain the code to compile and, optionally, a list of external C or C++ libraries. For this example, the hyphen library is required, of course.
*It is probably best to install the Python distribute package ≥ 0.6.28 or, better still, the setuptools package ≥ 0.7 (python-packaging-user-guide.readthedocs.org). A modern package tool is needed to install many third-party packages, including some of those used in this book.
To build the extension, execute the following in the directory containing all the files (e.g., Hyphenate2):
$ cd pipeg/Hyphenate2
$ python3 setup.py build_ext --inplace
running build_ext
cythoning Hyphenate.pyx to Hyphenate.c
building 'Hyphenate' extension
creating build
creating build/temp.linux-x86_64-3.3
...
If we have multiple Python interpreters installed, we should give the full path to the particular one we want to use. For Python 3.1, this will produce Hyphenate.so, but for later versions a version-specific shared library will be created; for example, Hyphenate.cpython-33m.so for Python 3.3.
from Hyphenate2.Hyphenate import hyphenate, Error
This is the complete Hyphenate2/__init__.py file. We provide it as a small convenience to the user so that they can write, say, import Hyphenate2 as Hyphenate, and then call Hyphenate.hyphenate(). Otherwise, the import would be, say, import Hyphenate2.Hyphenate as Hyphenate.
cdef extern from "hyphen.h":
ctypedef struct HyphenDict:
pass
HyphenDict *hnj_hyphen_load(char *filename)
void hnj_hyphen_free(HyphenDict *hdict)
int hnj_hyphen_hyphenate2(HyphenDict *hdict, char *word,
int word_size, char *hyphens, char *hyphenated_word,
char ***rep, int **pos, int **cut)
This is the Hyphenate2/chyphenate.pxd file. A .pxd file is required whenever we want to access external shared C or C++ libraries inside Cython code.
The first line declares the name of the C or C++ header file that contains the declarations of the functions and types we want to access. Then the body declares these functions and types. Cython provides a convenient way to refer to a C or C++ struct without having to declare all of its details. This is only allowed if we only ever pass pointers to the struct and never access its fields directly ourselves; this is commonly the case and certainly applies to the hyphenation library. The function declarations are essentially just copied from the C or C++ header file, although we should drop the statement-terminating semicolons from the end of each declaration.
Cython uses this .pxd file to create a bridge of C code between our compiled Cython and the external library to which the .pxd file refers.
Now that we have created the setup.py file, the __init__.py file, and the chyphenate.pxd file, we are ready to create the last file: Hyphenate.pyx. This file contains Cython code; that is, Python with Cython extensions. We will start with the imports and then look at each of the functions in turn.
import atexit
cimport chyphenate
cimport cpython.pycapsule as pycapsule
We need the standard library’s atexit module to ensure that loaded hyphenation dictionaries are freed when the program terminates.
Cython files can import normal Python modules using import and, also, Cython .pxd files (i.e., wrappers for external C libraries) using cimport. So, here, we import chyphenate.pxd as the chyphenate module, and this provides us with the chyphenate.HyphenDict type and the three functions in the hyphenation library.
We want to create a Python dict whose keys are hyphenation dictionary file-names and whose values are pointers to chyphenate.HyphenDicts. However, Python dicts can’t store pointers (they aren’t a Python type). Fortunately, Cython provides us with a solution: pycapsule. This Cython module can encapsulate a pointer in a Python object, and the encapsulating object can, of course, be stored in any Python collection. As we will see, pycapsule also provides a way of extracting the pointer from the Python object.
def hyphenate(str word, str filename, str hyphen="-"):
cdef chyphenate.HyphenDict *hdict = _get_hdict(filename)
cdef bytes bword = word.encode("utf-8")
cdef int word_size = len(bword)
cdef bytes hyphens = b"\x00" * (word_size + 5)
cdef bytes hyphenated_word = b"\x00" * (word_size * 2)
cdef char **rep = NULL
cdef int *pos = NULL
cdef int *cut = NULL
cdef int failed = chyphenate.hnj_hyphen_hyphenate2(hdict, bword,
word_size, hyphens, hyphenated_word, &rep, &pos, &cut)
if failed:
raise Error("hyphenation failed for '{}'".format(word))
end = hyphenated_word.find(b"\x00")
return hyphenated_word[:end].decode("utf-8").replace("=", hyphen)
This function is structurally the same as the ctypes version we created in the previous section (185 ![]() ). The most obvious difference is that we give explicit types to all the arguments and to all the variables. This isn’t required by Cython, but it does allow Cython to perform some optimizations to improve performance.
). The most obvious difference is that we give explicit types to all the arguments and to all the variables. This isn’t required by Cython, but it does allow Cython to perform some optimizations to improve performance.
The hdict is a pointer to a HyphenDict struct, and bword holds the UTF-8-encoded bytes of the word we want to hyphenate. The word_size int is easily created. For the hyphens that we don’t actually use, we must still create a buffer (i.e., a block of C chars) sufficiently large, and we do so very naturally by multiplying a null byte by the required size. We use the same technique to create the hyphenated_word buffer.
We don’t use the rep, pos, or cut arguments, but it is essential that they are passed correctly, or the function won’t work. In all three cases, we create them using C pointer syntax (i.e., cdef char **rep) using one less level of indirection (one less pointer, i.e., one less *) than is actually needed. Then, in the call to the function, we use the C address of operator (&) to pass their address, and this gives us the one extra level of indirection. We can’t just pass a C null pointer (NULL) for these arguments, because all of them are expected to be non-null pointers, even if what they ultimately point to is null. Recall that, in C, NULL is a pointer that points to nothing.
With all the arguments properly initialized, we call the function that is exported by the Cython chyphenate module (in effect, from the chyphenate.pxd file). If the hyphenation fails, we raise a normal Python exception. If the hyphenation succeeds, we return the hyphenated word. To do this, we must slice the hyphenated_word buffer up to the first null byte, then decode the sliced bytes as UTF-8 into a str, and finally, replace the hyphenation library’s = hyphens with the hyphen character the user specified (or the default of -).
_hdictForFilename = {}
cdef chyphenate.HyphenDict *_get_hdict(
str filename) except <chyphenate.HyphenDict*>NULL:
cdef bytes bfilename = filename.encode("utf-8")
cdef chyphenate.HyphenDict *hdict = NULL
if bfilename not in _hdictForFilename:
hdict = chyphenate.hnj_hyphen_load(bfilename)
if hdict == NULL:
raise Error("failed to load '{}'".format(filename))
_hdictForFilename[bfilename] = pycapsule.PyCapsule_New(
<void*>hdict, NULL, NULL)
capsule = _hdictForFilename.get(bfilename)
if not pycapsule.PyCapsule_IsValid(capsule, NULL):
raise Error("failed to load '{}'".format(filename))
return <chyphenate.HyphenDict*>pycapsule.PyCapsule_GetPointer(capsule,
NULL)
This private function is defined using cdef rather than def; this means it is a Cython function, not a Python function. After the cdef we specify the function’s return type, in this case a pointer to a chyphenate.HyphenDict. Then we give the name of the function as usual, followed by its arguments, usually with their types. In this case there is just one string argument, the filename.
Since the return type is a pointer rather than a Python object (i.e., object), it would not normally be possible to report exceptions to the caller. In fact, any exception would simply result in a warning message being printed, but otherwise the exception would be ignored. But we would like this function to be able to raise Python exceptions. We have done this by specifying a return value that indicates when an exception has occurred; in this case, a null pointer to a chyphenate.HyphenDict.
The function begins by declaring a pointer to a chyphenate.HyphenDict whose value is null (i.e., it safely points to nothing). We then see if the hyphenation dictionary’s filename is in the _hdictForFilename dict. If it isn’t, we must load in a new hyphenation dictionary using the hyphen library’s hnj_hyphen_load() function that is available via our chyphenate module. If the load succeeds, a non-null chyphenate.HyphenDict pointer is returned, and we cast this pointer to be a void pointer (which can point to anything) and create a newpycapsule.PyCapsule to store it in. The <type> Cython syntax is used to cast a value of one type to a different C type in Cython. For example, the Cython <int>(x) converts an x value (which must be a number or a C char) to a C int. This is similar to Python’s int(x) syntax, except that in Python the x could be a Python int or float—or a str that held an integer (e.g., "123")—and returns a Python int.
The second argument to pycapsule.PyCapsule_New() is a name to give to the encapsulated pointer (as a C char *), and the third argument is a pointer to a destructor function. We don’t want to set either, so we pass null pointers for both of them. We then store the encapsulated pointer in the dict with the filename as its key.
At the end, whether or not we loaded the hyphenation dictionary in this call, we try to retrieve the capsule that contains a pointer to it. We must check that the capsule contains a valid (i.e., not-null) pointer by passing the capsule and its associated name topycapsule.PyCapsule_IsValid(). We pass null for the name, because we didn’t name any of our capsules. If the capsule is valid, we extract the pointer using the pycapsule.PyCapsule_GetPointer() function—again, passing the capsule and null for its name—and cast the pointer from a void pointer back to being a chyphenate.HyphenDict pointer, which we then return.
def _cleanup():
cdef chyphenate.HyphenDict *hdict = NULL
for capsule in _hdictForFilename.values():
if pycapsule.PyCapsule_IsValid(capsule, NULL):
hdict = (<chyphenate.HyphenDict*>
pycapsule.PyCapsule_GetPointer(capsule, NULL))
if hdict != NULL:
chyphenate.hnj_hyphen_free(hdict)
atexit.register(_cleanup)
When the program terminates, all functions registered with the atexit.register() function are called. In this case, the function calls our module’s private _cleanup() function. This function begins by declaring a pointer to a chyphenate.HyphenDict whose value is null. Then it iterates over all the _hdictForFile-name dict’s values, each of which is a capsule containing a pointer to an unnamed chyphenate.HyphenDict. For each valid capsule that has a not-null pointer, the chyphenate.hnj_hyphen_free() function is called.
The Cython wrapper for the hyphenation shared library is very similar to the ctypes version, except that it needs its own directory and three tiny supporting files. If we are only interested in providing Python access to existing C and C++ libraries, ctypes alone is sufficient, although some programmers may find Cython (or CFFI) easier to use. However, Cython also offers another facility: the ability to write Cython—that is, Python with extentions—which can be compiled into fast-executing C. We’ll look at this in the next subsection.
5.2.2. Writing Cython Modules for Greater Speed
Most of the time, Python code executes as fast as we need it to, or its speed is limited by external factors (e.g., network latency) that no amount of code tweaking can work around. However, for CPU-bound processing, it is possible to get the speed of compiled C code while using Python syntax plus Cython extensions.
Before embarking on any kind of optimization, it is essential to profile the code. Most programs spend most of their execution time in a small portion of their code, so, no matter how much we optimize, if the optimization isn’t in that part of the code, all the effort is in vain. Profiling lets us see exactly where the bottlenecks are and makes it easy to target our optimizations to the code that really needs them. It also makes it possible to measure the effects of our optimizations by comparing the before and after profiles.
We noted in the Image module’s case study (§3.12, 124 ![]() ) that the smooth scaling scale() method (131
) that the smooth scaling scale() method (131 ![]() ) wasn’t very fast. In this subsection, we will try to optimize this method.
) wasn’t very fast. In this subsection, we will try to optimize this method.
Scaling using Image.scale()...
18875915 function calls in 21.587 seconds
ncalls tottime percall cumtime percall filename:lineno(function)
1 0.000 0.000 21.587 21.587 <string>:1(<module>)
1 1.441 1.441 21.587 21.587 __init__.py:305(scale)
786432 7.335 0.000 19.187 0.000 __init__.py:333(_mean)
3145728 6.945 0.000 8.860 0.000 __init__.py:370(argb_for_color)
786432 1.185 0.000 1.185 0.000 __init__.py:399(color_for_argb)
1 0.000 0.000 0.000 0.000 __init__.py:461(<lambda>)
1 0.000 0.000 0.002 0.002 __init__.py:479(create_array)
1 0.000 0.000 0.000 0.000 __init__.py:75(__init__)
This is a profile of the method (excluding built-in functions that we can’t optimize) as produced by the standard library’s cProfile module. (See the example’s benchmark_Scale.py program.) Over 21 seconds to scale a 2 048 × 1 536 (3 145 728 pixels) color photograph certainly isn’t fast, and it is easy to see where the time is going: the _mean() method and the static argb_for_color() and color_for_argb() methods.
We want to get a true speed comparison with Cython, so as a first step we copied the scale() method and its helpers (_mean(), etc.) into the Scale/Slow.py module and turned them into functions. We then profiled the result.
Scaling using Scale.scale_slow()...
9438727 function calls in 14.397 seconds
ncalls tottime percall cumtime percall filename:lineno(function)
1 0.000 0.000 14.396 14.396 <string>:1(<module>)
1 1.358 1.358 14.396 14.396 Slow.py:18(scale)
786432 6.573 0.000 12.109 0.000 Slow.py:46(_mean)
3145728 3.071 0.000 3.071 0.000 Slow.py:69(_argb_for_color)
786432 0.671 0.000 0.671 0.000 Slow.py:77(_color_for_argb)
Without the object-orientation overheads, the scale() function does half the calls (nine million versus eighteen million), yet only achieves a 1.5 × speedup. Nonetheless, now that we have isolated the relevant functions, we are in a position to produce an optimized Cython version to see how it compares.
We put the Cython code in the Scale/Fast.pyx module and used cProfile to profile it scaling the same photograph as the previous two versions.
Scaling using Scale.scale_fast()...
4 function calls in 0.114 seconds
ncalls tottime percall cumtime percall filename:lineno(function)
1 0.000 0.000 0.114 0.114 <string>:1(<module>)
1 0.113 0.113 0.113 0.113 Scale.Fast.scale
The cProfile module can’t analyze the Scale.Fast.scale() method, because it isn’t Python: it has been compiled into C. But no matter, since it produces a 189 × speedup! Of course, scaling a single image might not be representative, but tests on a wide range of images consistently produced speedups that were never less than 130 × faster than the original method.
These impressive speedups were achieved as the result of many kinds of optimization, some of which are specific to the scale() function and its helpers, and some of which are more generally applicable. Here are the most important contributions to the Cython scale() function’s improved performance:
• Copying the original Python file (e.g., Slow.py) to a Cython file (e.g., Fast.pyx) produced a 2 × speedup.
• Changing all the private Python functions into Cython C functions produced an additional 3 × speedup.
• Using the C libc library’s round() function rather than the built-in Python round() function resulted in an additional 4 × speedup.*
*These two functions are not always interchangeable, since they have different behavior. However, they behave the same as used in the scale() and _mean() functions.
• Passing memory views rather than arrays produced an additional 3 × speedup.
Further smaller speed improvements were achieved by using specific types for all variables, passing a struct rather than a Python object, making small functions inline, and doing some conventional optimizations such as precomputing offsets.
Now that we have seen the kind of difference Cython can make, let’s review the faster code; that is, the Fast.pyx module, and in particular, the Cythonized versions of the scale() function and its helper functions _mean(), _argb_for_color() and _color_for_argb().
The original Image.scale() method was discussed earlier (131 ![]() ), although the function shown here is a Cython version of the Slow.py module’s Scale.Slow. scale() function. Exactly the same applies to the _mean() function (132
), although the function shown here is a Cython version of the Slow.py module’s Scale.Slow. scale() function. Exactly the same applies to the _mean() function (132 ![]() ) and the _argb_for_color()function (133
) and the _argb_for_color()function (133 ![]() ). The code in the methods and functions is almost identical. The only differences between them is that the methods access the pixel data via self and call other methods, while the functions pass the pixel data explicitly and call other functions.
). The code in the methods and functions is almost identical. The only differences between them is that the methods access the pixel data via self and call other methods, while the functions pass the pixel data explicitly and call other functions.
We will begin with the Scale/Fast.pyx file’s imports and supporting declarations.
from libc.math cimport round
import numpy
cimport numpy
cimport cython
We begin by importing the C libc library’s round() function to replace the builtin Python round() function. We could, of course, have done cimport libc.math and then used libc.math.round() for the C function and round() for the Python function, if we wanted both. Then we import NumPy plus the numpy.pxd module supplied with Cython, which gives Cython access to NumPy at the C level. For the Cython scale() function we have decided to require NumPy, since this makes sense if we want fast array processing. We also import the Cythoncython.pxd module for some of the decorators it provides.
_DTYPE = numpy.uint32
ctypedef numpy.uint32_t _DTYPE_t
cdef struct Argb:
int alpha
int red
int green
int blue
DEF MAX_COMPONENT = 0xFF
The first two lines here are used to create two types—the Python _DTYPE and the C _DTYPE_t—both of which are aliases for NumPy unsigned 32-bit integers. Then we create a C struct called Argb, which consists of four named integers. (This is the C equivalent of Argb = collections.namedtuple("Argb", "alpha red green blue")). We also create a C constant using a Cython DEF statement.
@cython.boundscheck(False)
def scale(_DTYPE_t[:] pixels, int width, int height, double ratio):
assert 0 < ratio < 1
cdef int rows = <int>round(height * ratio)
cdef int columns = <int>round(width * ratio)
cdef _DTYPE_t[:] newPixels = numpy.zeros(rows * columns, dtype=_DTYPE)
cdef double yStep = height / rows
cdef double xStep = width / columns
cdef int index = 0
cdef int row, column, y0, y1, x0, x1
for row in range(rows):
y0 = <int>round(row * yStep)
y1 = <int>round(y0 + yStep)
for column in range(columns):
x0 = <int>round(column * xStep)
x1 = <int>round(x0 + xStep)
newPixels[index] = _mean(pixels, width, height, x0, y0, x1, y1)
index += 1
return columns, newPixels
The scale() function uses the same algorithm as Image.scale(), only it takes a one-dimensional array of pixels as its first argument, followed by the image’s dimensions and the scaling ratio. We have switched off bounds checking, although doing so didn’t improve performance in this case. The pixels array is passed as a memory view; this is more efficient than passing numpy.ndarrays and incurs no Python-level overhead. Of course, there are other optimizations possible for graphics programming—for example, ensuring that memory is aligned at specific byte boundaries—but our focus here is on Cython in general rather than graphics in particular.
As we mentioned earlier, the <type> syntax is used to cast one type to another in Cython. The creation of the variables is essentially the same as for the Image.scale() method, only here we use C data types (int for integers and double for floating-point numbers). We can still use our normal Python syntax; for example, for ... in loops.
@cython.cdivision(True)
@cython.boundscheck(False)
cdef _DTYPE_t _mean(_DTYPE_t[:] pixels, int width, int height, int x0,
int y0, int x1, int y1):
cdef int alphaTotal = 0
cdef int redTotal = 0
cdef int greenTotal = 0
cdef int blueTotal = 0
cdef int count = 0
cdef int y, x, offset
cdef Argb argb
for y in range(y0, y1):
if y >= height:
break
offset = y * width
for x in range(x0, x1):
if x >= width:
break
argb = _argb_for_color(pixels[offset + x])
alphaTotal += argb.alpha
redTotal += argb.red
greenTotal += argb.green
blueTotal += argb.blue
count += 1
cdef int a = <int>round(alphaTotal / count)
cdef int r = <int>round(redTotal / count)
cdef int g = <int>round(greenTotal / count)
cdef int b = <int>round(blueTotal / count)
return _color_for_argb(a, r, g, b)
The color components for each pixel in the scaled image are the average of the color components of the pixels in the original image that the pixel must represent. The original pixels are efficiently passed as a memory view, followed by the original image’s dimensions and the corners of a rectangular region whose pixels’ color components must be averaged.
Rather than performing the calculation (y × width) + x for every pixel, we compute the first part (as offset) once per row.
Incidentally, by using the @cython.cdivision decorator, we told Cython to use C’s / operator rather than Python’s, to make the function slightly faster.
cdef inline Argb _argb_for_color(_DTYPE_t color):
return Argb((color >> 24) & MAX_COMPONENT,
(color >> 16) & MAX_COMPONENT, (color >> 8) & MAX_COMPONENT,
(color & MAX_COMPONENT))
This function is inlined, which means that instead of the overhead of a function call, its body will be inserted at the place it is called (in the _mean() function) to make it as fast as possible.
cdef inline _DTYPE_t _color_for_argb(int a, int r, int g, int b):
return (((a & MAX_COMPONENT) << 24) | ((r & MAX_COMPONENT) << 16) |
((g & MAX_COMPONENT) << 8) | (b & MAX_COMPONENT))
This function is also inlined to improve performance, since it is called once per scaled pixel.
The Cython inline directive is a request that is normally honored only for small simple functions like those used here. Note, also, that although inlining improved performance in this example, sometimes it can degrade performance. This can happen if the inlined code uses up too much of the processor’s cache. As always, we should profile before and after applying each optimization on the machine or machines we plan to deploy on so that we can make an informed decision about whether to keep the optimization.
Cython has far more features than were needed for this example and has extensive documentation. Cython’s main disadvantage is that it requires a compiler and supporting tool chain on every platform that we wish to build our Cython modules on. But once the tools are in place, Cython can deliver incredible speedups for CPU-bound code.
5.3. Case Study: An Accelerated Image Package
In Chapter 3, we did a case study of the pure Python Image module (§3.12, 124 ![]() ). In this section, we will very briefly review the cyImage module, a Cython module that offers most of the functionality of the Image module but which executes much faster.
). In this section, we will very briefly review the cyImage module, a Cython module that offers most of the functionality of the Image module but which executes much faster.
The two key differences between Image and cyImage are, first, that the former automatically imports whatever image-format-specific modules are available, whereas the latter has a fixed set of format-specific modules, and second, that cyImage requires NumPy, whereas Image will use NumPy if it is available and will fall back to array if it isn’t.
Table 5.1 shows how using the Cython cyImage module compares with using the Python Image module in the image-scale programs. But why does using Cython only deliver an 8 × speedup (per core), rather than the 130 × speedup that the Cython scale() function delivers? Essentially, once we use Cython for scaling, the scaling takes almost no time at all, but the original images still have to be loaded and the scaled images saved. Cython doesn’t deliver much speedup for file handling, because Python’s file handling (since Python 3.1) is already done in fast C. So, we have changed the performance profile from one where scaling was a bottleneck to one where loading and saving are bottlenecks, and ones we can’t do much about.
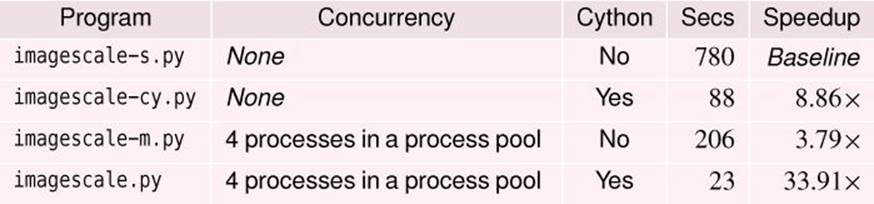
Table 5.1 Cython image scaling speed comparisons
To create the cyImage module, the first step is to create a cyImage directory and copy the Image directory’s modules into it. The second step is to rename those modules that we want to Cythonize: in this case, __init__.py to Image.pyx, Xbm.py to Xbm.pyx, and Xpm.py toXpm.pyx. We also need to create a new __init__.py and a setup.py file.
Experimentation showed that replacing the body of the Image.Image.scale() method with the Scale.Fast.scale() function’s code, and similarly Image.Image. _mean() with Scale.Fast._mean(), resulted in a very disappointing speedup. The problem seems to be that Cython can speed up functions a lot more than methods. In view of this, we copied the Scale.Fast.pyx module into the cyImage directory and renamed it as _Scale.pyx. Then we deleted the Image.Image._mean() method and changed the Image.Image.scale()method so that it passes on all of its work to the _Scale.scale() function. This produced the 130 × speedup we were expecting, although, of course, the overall speedup was much less, as noted earlier.
try:
import cyImage as Image
except ImportError:
import Image
Although cyImage isn’t a complete replacement for Image (it has no PNG support and requires NumPy), for those cases where it is sufficient, we can use this import pattern to use it where possible.
distutils.core.setup(name="cyImage",
include_dirs=[numpy.get_include()],
ext_modules=Cython.Build.cythonize("*.pyx"))
This is the body of the cyImage/setup.py file, excluding the imports. It tells Cython where to find the NumPy header files and to build all the .pyx files it finds in the cyImage directory.
from cyImage.cyImage.Image import (Error, Image, argb_for_color,
rgb_for_color, color_for_argb, color_for_rgb, color_for_name)
In the Image module, we put all the generic functionality into Image/__init__.py, but for cyImage, we have put this functionality into cyImage/Image.pyx and created this one-statement cyImage/__init__.py file. All this file does is import various compiled objects—an exception, a class, and some functions—and make them available directly as, say, cyImage.Image.from_file(), cyImage.color_for_name(), and so on. Because we use an as clause when importing, we end up being able to write Image.Image.from_file(),Image.Image.Image(), etc.
We won’t review the .pyx files, since we have seen in the previous subsection how Python code can be turned into Cython code. However, we will review the imports used by the cyImage/Image.pyx file and the new cyImage.Image.scale() method.
import sys
from libc.math cimport round
from libc.stdlib cimport abs
import numpy
cimport numpy
cimport cython
import cyImage.cyImage.Xbm as Xbm
import cyImage.cyImage.Xpm as Xpm
import cyImage.cyImage._Scale as Scale
from cyImage.Globals import *
We have chosen to use the C round() and abs() functions rather than the Python versions. And rather than doing dynamic imports, as we did for the Image module, here we directly import the image-format-specific modules (i.e., cyImage/Xbm.pyx and cyImage/Xpm.pyx or, really, the shared C libraries that Cython compiles them into).
def scale(self, double ratio):
assert 0 < ratio < 1
cdef int columns
cdef _DTYPE_t[:] pixels
columns, pixels = Scale.scale(self.pixels, self.width, self.height,
ratio)
return self.from_data(columns, pixels)
This is the complete cyImage.Image.scale() method. It is tiny because it passes all the work onto the cyImage._Scale.scale() function (which is a copy of the Scale.Fast.scale() function we saw in the previous subsection; §5.2.2, 193 ![]() .)
.)
Using Cython isn’t as convenient as using pure Python, so to justify the extra work, we should begin by profiling our Python code to see where the bottlenecks are. If the hotspots are for file I/O or due to network latency, Cython is unlikely to help much (and we could consider using concurrency). But if the hotspots are for CPU-bound code, we might achieve worthwhile speedups with Cython, so we should begin by installing Cython and setting up our compiler tool chain.
Having profiled and identified what we want to optimize, it is best to separate out the slow code into its own module and profile the program again to make sure we have correctly isolated the problem code. Next, we should copy and rename the module we want to Cythonize (i.e., from .pyto .pyx) and create a suitable setup.py file (and possibly a convenience __init__.py file). Again, we should profile, this time to see if Cython is able to produce the expected 2 × speedup. Now we can go through repeated cycles of Cythonizing the code and profiling it: declaring types, using memory views, and replacing the bodies of slow methods with calls to Cythonized functions. After each optimization cycle, we can roll back useless changes and keep those that improve performance, until we achieve the level of performance we need or run out of optimizations to try.
Donald Knuth said, “We should forget about small efficiencies, say about 97% of the time: premature optimization is the root of all evil” (“Structured Programming with go to Statements”, ACM Journal Computing Surveys Vol.6, No 4, December 1974, p.268). Furthermore, no amount of optimization will overcome the use of the wrong algorithm. But, if we have used the right algorithms, and profiling has revealed bottlenecks, ctypes and Cython are good examples of tools that can speed up CPU-bound processing.
Accessing functionality in libraries that use the C calling convention via ctypes or Cython allows us to write high-level Python programs that make use of fast, low-level code. Furthermore, we can write our own C or C++ code and access it using ctypes, Cython, or directly with the Python C interface. If we want to improve CPU-bound performance, using concurrency will, at best, give us speedups proportional to the number of cores. But using fast compiled C may produce 100 × speedups compared with pure Python. Cython gives us the best of both Python and C: Python’s convenience and syntax with C’s speed and access to C libraries.
All materials on the site are licensed Creative Commons Attribution-Sharealike 3.0 Unported CC BY-SA 3.0 & GNU Free Documentation License (GFDL)
If you are the copyright holder of any material contained on our site and intend to remove it, please contact our site administrator for approval.
© 2016-2026 All site design rights belong to S.Y.A.